Leadtek Quadro Series User manual

Leadtek Quadro Series General Guide
Version A
December 2003
P/N: W0500858
1
7
Board Layout
Leadtek Quadro Series
General Guide (English)
36
65
Quadro
()
Contents
International Headquarters
18th Fl., 166, Chien-Yi Rd.
Chung Ho, Taipei Hsien
Taiwan (235)
Phone: +886 (0)2 8226 5800
Fax: +886 (0)2 8226 5801
http://www.leadtek.com.tw
E-Mail: [email protected]
United States Headquarters
Europe Headquarters
46732 Lakeview Blvd.
Fremont, CA 94538
U.S.A.
Phone: +1 510 490 8076
Fax: +1 510 490 7759
http://www.leadtek.com
Phone: +
Fax: +
http://www.leadtek.nl
Antennestraat 16 1322 AB
Almere
The Netherlands
31 (0)36 536 5578
31 (0)36 536 2215
Copyright 2003 Leadtek Research Inc.
All rights reserved.
No part of this document may be copied
or reproduced in any form or by any
means without the prior written consent of
Leadtek Research Inc.
Leadtek makes no warranties with respect
to this documentation and disclaims any
implied warranties of merchantability,
quality, or fitness for any particular
purpose. The information in this
document is subject to change without
notice. Leatek reserves the right to make
revisions to this publication without
obligation to notify any person or entity
of any such changes.
Leadtek Research Inc.Leadtek Research Inc.

Quadro FX3000
Workstation stereo sync
connector
DVI-I
connector
Board Layout
Quadro FX3000/FX3000G connectors
The Quadro FX3000/3000G has dual DVI-I connectors. These cards support:
Single VGA output (using a DVI-I to VGA adapter)
Dual VGA output (using two DVI-I to VGA adapters)
VGA+DVI-I output (using a DVI-I to VGA adapter)
Single DVI-I output
Dual DVI-I output
Quadro FX3000G
Workstation stereo
sync connector
DVI-I
connector
RJ-45 frame lock connector
BNC
genlock
connector
Note: 1. Quadro FX3000G will occupy the AGP and
one adjacent PCI slot but use no power nor data from the
PCI slot.
2. For user's guide of Genlock & Frame Lock function, please
refer to the user's manual in Driver CD.
Quadro FX3000 &
1

Board Layout
Quadro FX1000//FX1100/FX2000 connectors
The Quadro FX1000/1100/2000 has dual DVI-I connectors. These cards support:
Single VGA output (using a DVI-I to VGA adapter)
Dual VGA output (using two DVI-I to VGA adapters)
VGA+DVI-I output (using a DVI-I to VGA adapter)
Single DVI-I output
Dual DVI-I output
Quadro FX1000
DVI-I
Connector
Stereo 3D
Connector
DVI-I
Connector
Quadro FX2000
DVI-I
Connector
Stereo 3D
Connector
DVI-I
Connector
Leadtek Quadro Series General Guide 2
Stereo 3D
Connector
DVI-I
Connector
DVI-I
Connector
Quadro FX1100
(Continued on next page)

Quadro FX500 connectors
The Quadro FX500 has both VGA and DVI-I connectors. This card supports:
Single VGA output
Dual VGA output (using a DVI-I to VGA adapter)
Single DVI-I output
VGA+DVI-I output
DVI-I
Connector Quadro FX500
VGA
Connector
Board Layout
Quadro 900/980 XGL
Quadro 900/980 XGL connectors
The Quadro 900/980 XGL has dual DVI-I connectors. These cards support:
Single VGA output ( using a DVI-I to VGA adapter )
Dual VGA output ( using two DVI-I to VGA adapters )
VGA + DVI-I output ( using a DVI-I to VGA adapter)
Dual DVI- I output
Single DVI-I output
DVI-I connector
DVI-I connector
Stereo 3D
connector
3

Quadro 750 XGL
Quadro 700XGL
VGA
connector
DVI-I connector
Stereo 3D
Connector
DVI-I connector
Stereo 3D
connector
Board Layout
Quadro 700/750 XGL connectors
The Quadro 700/750 XGL has both VGA and DVI-I connectors. These cards
support:
Single VGA output
Dual VGA output ( using a DVI-I to VGA adapter)
Single DVI-I output
VGA+DVI-I output
VGA
connector
Quadro 550/580 XGL connectors
The Quadro 550/580 XGL has a single LFH 60-pin connector. Each LFH connector
can support two monitors, using the supplied splitter cable. Your card is shipped
with one DVI-I+DVI-I splitter cable per LFH port and two DVI-I to VGA adapters
per splitter cable.
LFH 60-pin
connector Quadro 550/580 XGL
Leadtek Quadro Series General Guide 4
(Continued on next page)

Board Layout
Quadro 380 XGL connectors
Quadro 380 XGL has both VGA and DVI-I connectors, but only supports a single
display. This card supports :
Single VGA output
Single DVI-I output
Quadro2 MXR connectors
The Quadro2 MXR has 2 VGA connectors. This card supports:
Single VGA output
Dual VGA
VGA connector
VGA connector
Quadro2 MXR
Quadro 380 XGL
DVI-I connector
TV output
connector
VGA
connector
5

Board Layout
Quadro 200/280 NVS and Quadro 400 NVS connectors
The Quadro 200/280 NVS has a single LFH 60-pin connector. The Quadro 400
NVS has two LFH 60 pin connectors. Each LFH connector can support two
monitors, using the supplied splitter cable. Your card is shipped with one DVI-
I+DVI-I splitter cable per LFH port and two DVI-I to VGA adapters per splitter
cable.
Quadro 200/280 NVS
LFH 60-pin
connector
Quadro 400 NVS (PCI)
LFH 60-pin
connector
Quadro NVS 280 PCI connectors
The Quadro NVS 280 PCI has a single DMS 59-pin connector. Each DMS
connector can support two monitors, using the supplied splitter cable. Your card is
shipped with one DVI-I+DVI-I splitter cable and two DVI-I to VGA adapters per
splitter cable.
Quadro NVS 280 PCI
DMS 59-pin
connector
Note:
The actual board appearance may differ from the diagram.
Leadtek Quadro Series General Guide 6

7How to Use this Guide
8
10
12
13
25
28
30
32
33
34
35
Removing the Old VGA Driver
Hardware Installation
Driver Installation
Display Properties
nView Desktop Manager
MAXtreme
POWERdraft
Installing 2 Bundled Software
Display Modes
Installing DirectX
Appendix
13 Settings
15 Advanced Settings
35 FCC Statement
35 Technical Support
Contents
Note: The latest user's guide can be
found in driver CD or can be downloaded
from http://www.leadtek.com.tw
Leadtek Quadro Series General Guide
ENGLISH

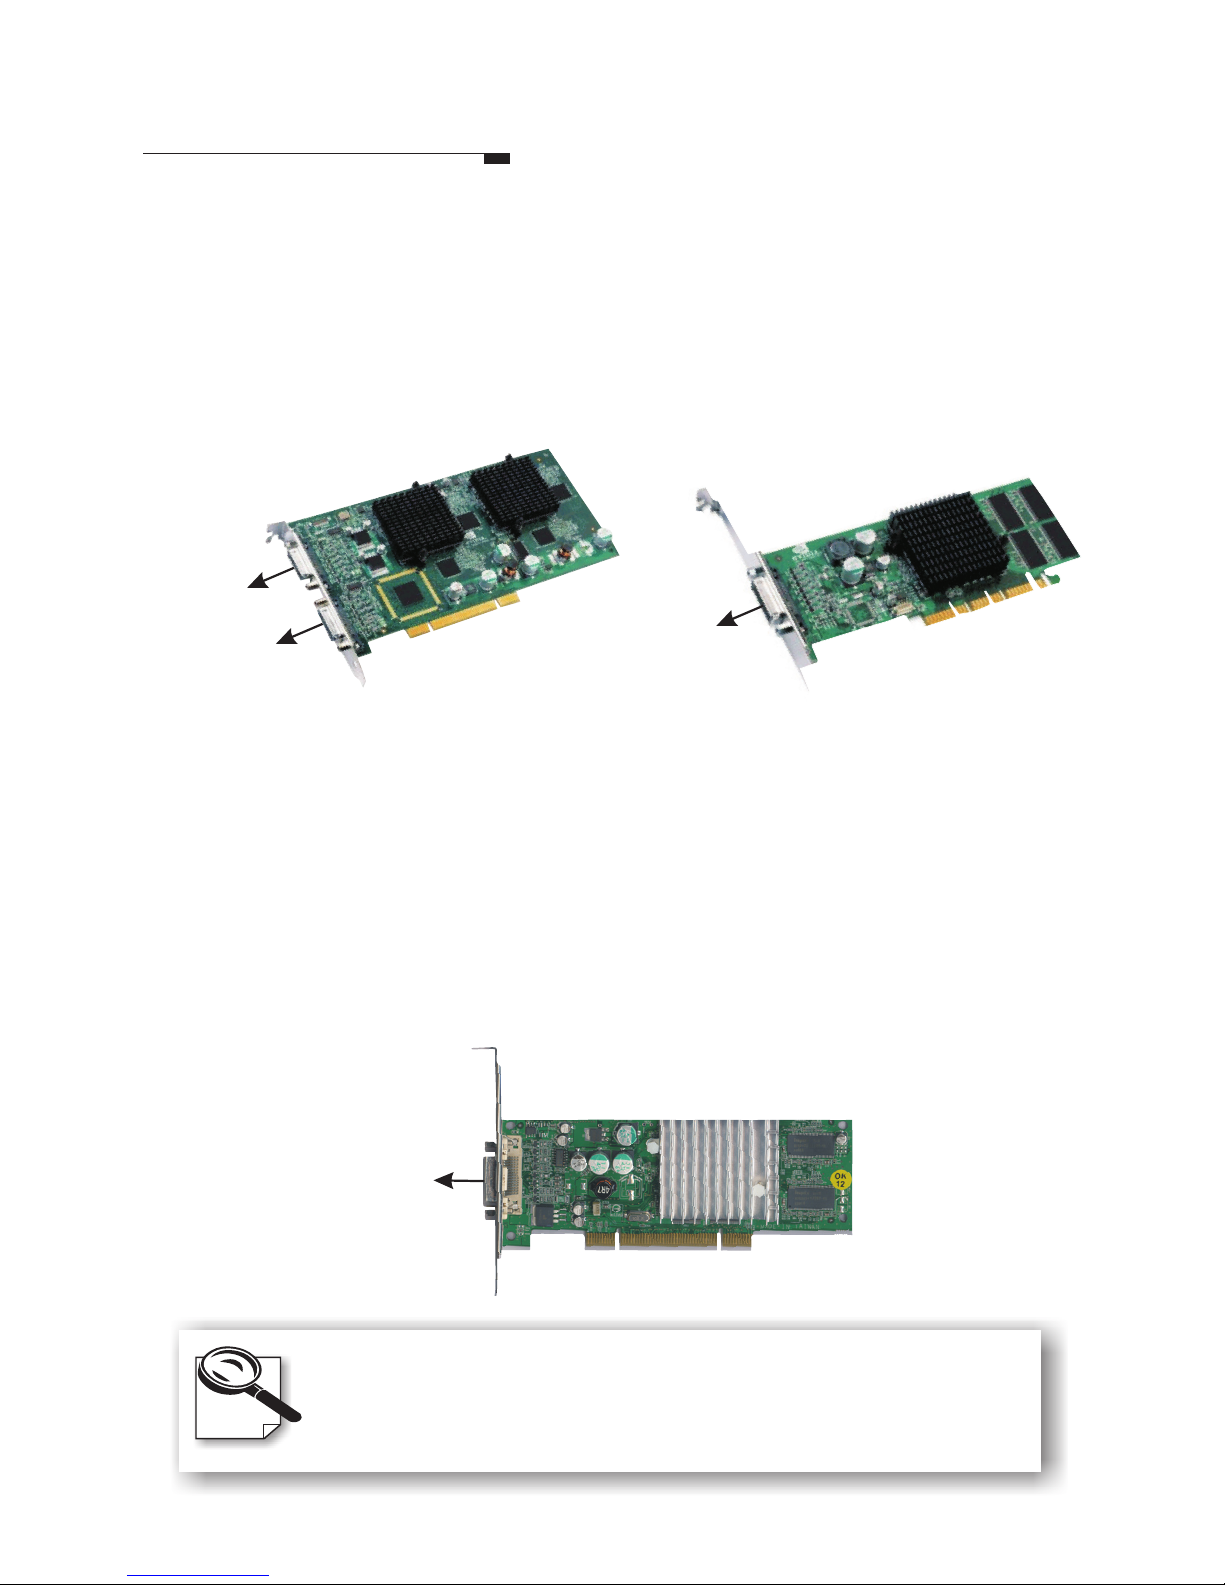
This guide will familiarize you with the general information necessary for the more
advanced configuration and use of your new graphics card.
There are symbols and conventions that appear throughout this manual to help draw
your attention to important information and for your more effective use of this
manual. The figure below is a sample page.
Symbols and Conventions
Symbols
The exclamation mark
gives important
information on
precautions and how
to avoid damage.
The magnifying glass
indicates information
you should take a
closer look before
proceeding further.
Header
There is a header on each page to remind you which
section the current page belongs to. It also helps you find
the information you need without struggling through the
table of contents. This header indicates this page is
under the section.Switching to Standard VGA Driver
The hollow arrow is
intended to impersonate
the cursor on your computer
screen, indicating the area you
should click on with your mouse.
Arrow
The dialog box
appears on the screen as shown. Now
click on the tab.
Display Properties
Settings
Step 4
Step1
Step2
Step 3
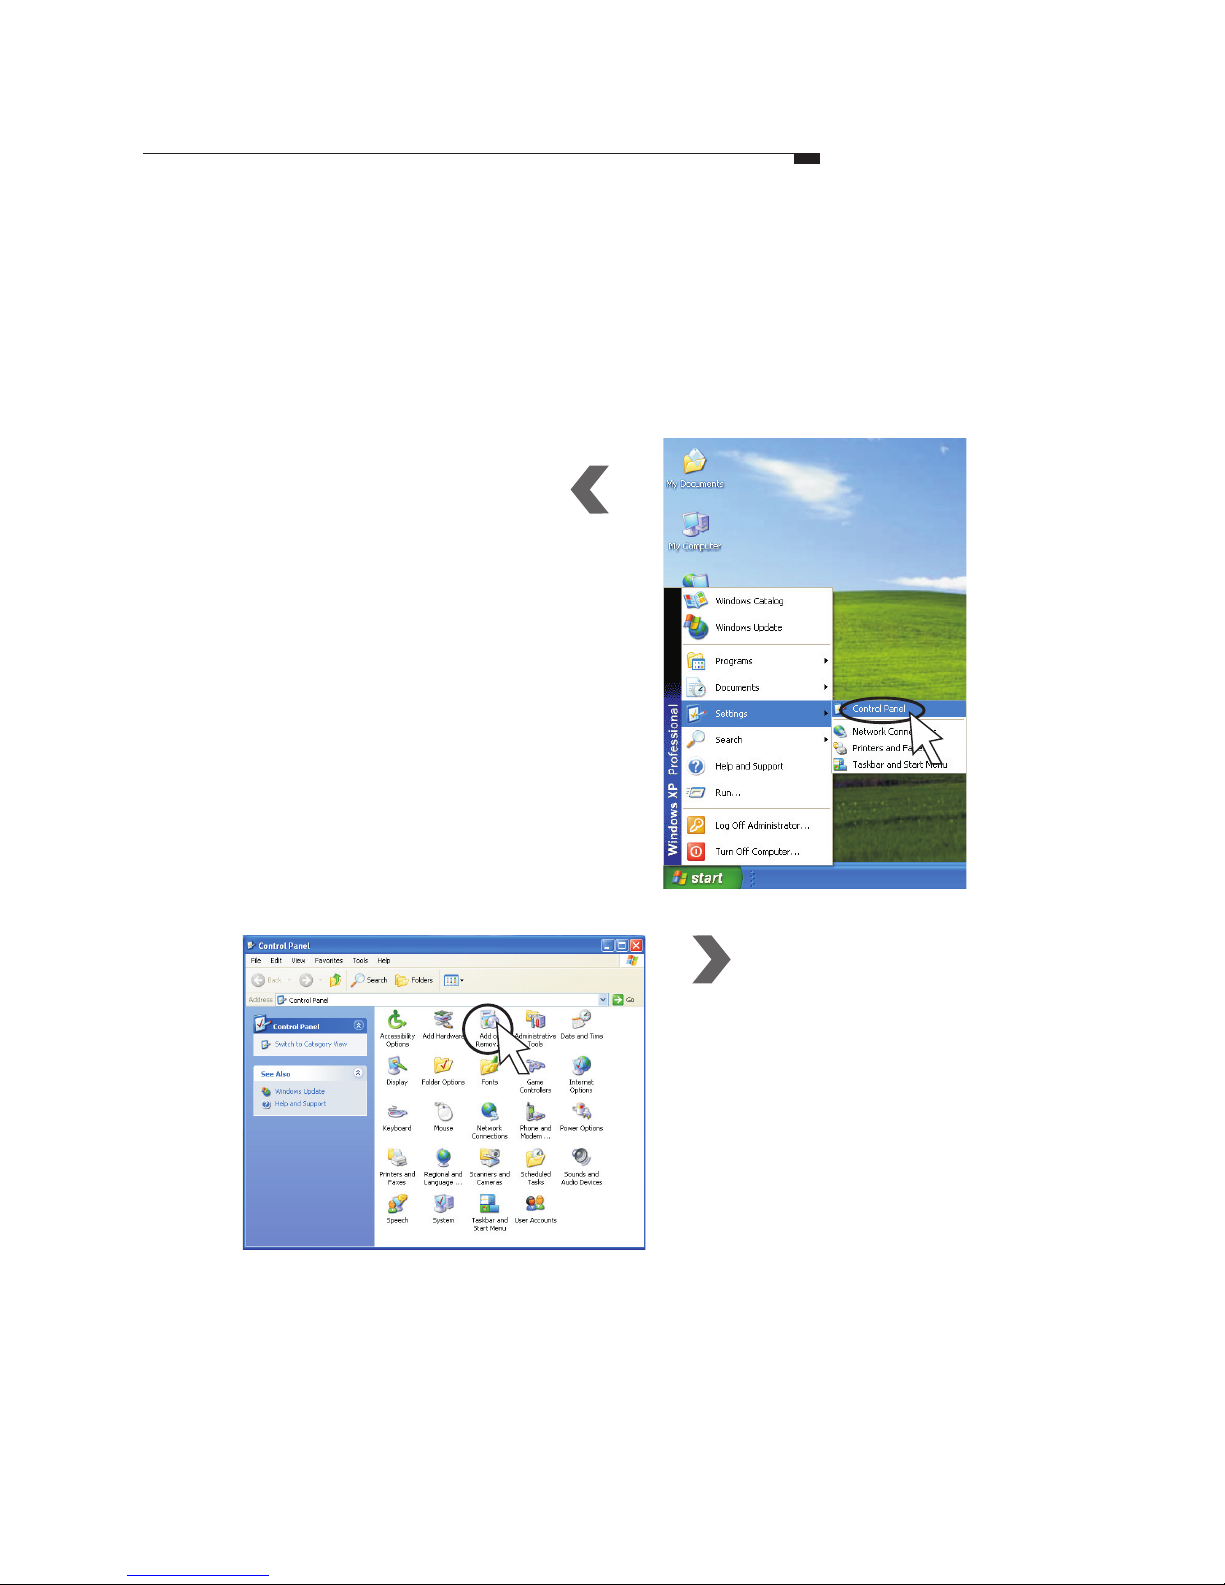
Before installing your new graphics card,
it is recommended that you set your
display to use the standard VGA driver
before removing your legacy VGA card.
Here are the instructions for setting your
display driver as standard VGA driver:
Skip this section if your computer
runs on Windows NT 4.0 or Windows
2000. Only Windows 95/98 users
need to set the Standard VGA driver.
First click the right key of your mouse
on the desktop. A fly-out will appear on
your desktop as shown in the figure on
the right. Then click on , the
highlighted field in the figure.
Properties
Another dialog box appears. Click on the
tab to reveal the sheet of display
property that controls the VGA driver.
Adapter
The sheet turns on
top of the dialog box. Click on
the button.
Settings
Advanced
Windows 95/98 users
may encounter problems
if the VGA driver is not
changed to the Standard
VGA driver prior to the
installation of a new
VGA card.
L
How to Use this Guide
Leadtek Quadro Series General Guide 7

Step1
Click , then select
from
the menu.
Start
Control Panel
Settings
Step2
Removing the Old VGA Driver
It is recommended that you remove or uninstall your existing display driver
before replacing your old video card with the new one. Here are the
instructions for removing your existing display driver:
Double-click the
icon.
Add or Remove
Programs
8

Step3
The window will list the programs
currently installed in your system.
Select the old display driver.
Step4Click the button.
Follow the instructions on the screen
to remove the old VGA driver.
Change/Remove
Removing the Old VGA Driver
1. The screen shots are taken from Windows
XP. The screens for other systems may
vary.
2. If you can not find the current display
driver in the ADD or Remove Programs
window, Please ignore this section.
Leadtek Quadro Series General Guide 9
Users may encounter problems if the old VGA
driver is not removed prior to the replacement
of an old VGA card with a new one.

Hardware Installation
10
Locate the AGP/
PCI bus expansion
slot on your system
mainboard and
remove the cover if
there is one.
If there is an existing
VGA card, remove
the old card by
loosening the
mounting bracket
and pulling the card
off the slot.
OR
Step2
Shut down the
computer; unplug
all the cables and
electrical cords;
and remove the
cover from the
computer chassis.
Step1
Remove the
old card
System mainboard
AGP
slot
1
AGP slot
Step
3
Position the new card
over the AGP slot .
Insert the bus connector
in the slot and gently
press the bus connector
down. (For PCI
interface products,
please insert into PCI
bus slot.)
PCI slot
Inserting your card into
the wrong type of slot
can damage your card,
your computer or both.

Hardware InstallationHardware Installation
NVIDIA
Quadro
4-pin connector
Before Installing the Driver
The product package contains the Software
Pack CD. Please read the Readme.txt file for
the latest information about the software before
proceeding with the driver installation.
If the heat dissipation device provided is a fan, it
is subject to damage if not properly handled. It is
important not to put pressure on the axle or
handle the fan by the axle. A shifted axle may
shorten the fan's lifespan.
A Note for the Fan
Do not handle the
fan by the axle.
Fasten the mounting bracket to the chassis.
Step4
Step7Reconnect all the cables and cords.
To
monitor
Plug the cord into the matched connector of the
graphic card according to what kind of monitor
you have.
Step6
Step5(Only for Quadro FX3000/3000G/2000/1100/1000 and other new
products with the 4-pin connector)
If your computer has an unused power cable you may
connect it to the product directly.
If the card has a 4-pin power connector located at
the edge of the board, as shown in the diagram left,
please use the included power cable, as shown to
the right, to connect the system power supply and
the 4-pin connector on the video card.
Leadtek Quadro Series General Guide 11

Driver Installation
Step1Step5
Step6
Step2
Insert the
software pack
CD into the
CD-ROM drive.
The screen will display on the
screen. Select by clicking
on it.
Autorun
Driver Install
Step3
The InstallShield Wizard is been
preparing.
Step4
A dialog box tells you it is ready to
install the driver. Click .Next
Windows is installing the driver. A
dialog box appears showing you the
progress.
When it is finished, a dialog box asks
you if you want to restart your
computer. Tick and then Finish.Yes
12

Display Properties Settings
Right click on the desktop,
then click on
the popup menu to bring up
the display properties
dialog box. Click the
tab to set the color
mode and resolution of
your preference.
Properties
Settings
Color Quality
You may change the setting to get
color depth you need.
Display Area
Supports VESA standard super high-
resolution graphics modes.
If you have a second display connected to the
Quadro graphic card, the tab is shown
as above. Right click on the desktop, then click
on the popup menu to bring up the
display properties dialog box.
Settings
Properties
Leadtek Quadro Series General Guide 13
(Continued on next page)

Select "Quadro NVS 280 PCI"
tab (or respective model name)
will bring up the submenu as the
right figure that allows you to do
some advanced settings including
nView, OpenGL Settings,
Direct3D Settings, Overlay
Controls, Desktop Utilities and
NVRotate, etc.
Quadro NVS 280 PCI is used as an
example here.
Card Name Tab
èQuadro NVS 280 PCI
(or respective model name)
Open the setting boxOpen the setting box
14
Display Properties Settings
Provides information on the display
adapter, system and driver version.

nView Tab
ènView Display Mode
nView
nView
nView
is a multi-display
technology developed by
NVIDIA. supports a wide
variety of multi-display modes,
offering users maximum
flexibility. It also allows you to
set independent resolution, color
depth, and refresh rate on a per
display basis.
Note:
Not all the nView functions
are available for every model
of the Quadro series. If you
encounter any problem while
using them, look up our
website for the display driver
update.
If you have a second display connected
to the Quadro graphic card, the
tab is shown as below. Open
the setting box and click on
.
Settings
nView
Display Mode
Display Properties Advanced Settings
(Continued on next page)
Leadtek Quadro Series General Guide 15

nView Modes
The option selected here
determines how the video is
displayed on the screen(s) using
the nView technology.
See the next page for further
information.
(Cont'd)
nView Tab
ènView Display Mode
16
Display Properties Advanced Settings

(Cont'd)
Single Display (nView Disabled)
Allows only one screen to display the
output video.
Vertical Span
Horizontal Span
Check to have the Windows desktop
span vertically across two screens.
Check to have the Windows desktop
span horizontally across two screens.
Clone
Check to have the same display on
the two screens.
(Continued on next page)
Refer to next page
nView Tab
ènView Display Mode
Here is an example using
Windows 2K/XP.
Leadtek Quadro Series General Guide 17
Display Properties Advanced Settings

Device Settings Button
Press to open a popup menu that includes
settings for output devices.
nView Tab
èDevice Settings
Primary Display
Click on one of the screens in the
preview window of the nView dialog
box to highlight it with a blue frame.
Tick the
check box to set the selected
screen the primary display (Screen 1).
When clicking the
button, you can see on the popup
menu is checked.
Make this the primary
display
Device Settings
Primary Display
Color Correction
USE the setting options to adjust the
brightness, contrast, and gamma.
(Cont'd)
18
Display Properties Advanced Settings
Other manuals for Quadro Series
1
This manual suits for next models
18
Table of contents
Other Leadtek Video Card manuals