Leap K300 User manual

App install method 2 :
LEAP
LEAP Smart Stopwatch
User Manual

Thank you for your purchase of this LEAP brand - Smart Stopwatch.
Notice before using
However, the battery is inserted at the factory to check the function and performance of the watch.
Its actually life once in your possession may be less than the specified period. When the battery is about
to run out , the upper right corner of the screen will continue to twinkle “ ” pls take the stopwatch to
the dealer or contact with aftermarket service to replacement a new one .( If you use Bluetooth to transmit
data more than 10 times a day ,the battery life will be less than the specified period. )
●Battery description:
This stopwatch power supply is built-in CR2430 (3V) lithium battery (Non-rechargeable battery).
It lasts approximately 2 years.
App install method 1 :
Android phone and iphone all can scan the QR Code as below to download and
install the app.
App install method 2 :
Access App Store/Google Play to search “Leap Timer” then download and install
the App on to your device.
The stopwatch can play the best efficiency under combining use with LEAP
STOPWATCH app. Before use this stopwatch, pls read the manual book thoroughly
and carefully. If you will lost the paper specifications, pls view the electronic manual
in phone app.
Please do not remove the battery in the stopwatch without permission, avoid the performance for
water resistance from being worse under opening shell.
●Waterproof instructions:
This stopwatch comes with 3bar (about 30meters) water resistance, but it is not suitable for diving.
When the stopwatch fell into the water or get wet by rain, pls do not press any button, make sure it is
wiped clear then use it.
Pls keep away exposing the stopwatch to the sun for a long time, in order to avoid the stopwatch
display from dimming under high temperature. After the temperature returned to normal, display can be
back to normal.
●Temperature description:
This stopwatch normal using environment temperature is between -5℃—40℃.
Pls keep away putting the stopwatch in low temperature environment -10℃for a long time, in order
to avoid low temperature from digital display too fast or slow. After the temperature return to normal,
display can be back to normal.
When use the attached lanyard of stopwatch, avoid winding on the neck or catching by other object
so as to avoid damage to the body’s parts.
●Other Note:
Please avoid the severe impact by hard object or strong vibration.

Table of Contents
1.Product Introduction
2.Product illustration and description of main parts
3.Stopwatch- Instructions
Turn on
Turn off
Function conversion
Time/Calendar/Alarm
Data settings
Stopwatch function
Count down function
Pacer function
Stroke frequency function
4.APP—Instructions
APP contact with stopwatch (Update data/Sync Params )
Personal center
Timer record
Stroke record
Pacer record
Share timer / Stroke record
Installation / Run APP
1
2
1
2
2
2
2
2
3
4
5
6
7
7
7
8
9
9
10
11
5.Care instructions 11
………………………………………………………………………
………………………………
…………………………………………………………………
………………………………………………………………………………………
………………………………………………………………………………………
…………………………………………………………………………
………………………………………………………………………
…………………………………………………………………………………
………………………………………………………………………
……………………………………………………………………
……………………………………………………………………………
……………………………………………………………
…………………………………………………………………………
………………………………………………………………………
………………………………
……………………………………………………………………………
…………………………………………………………………………………
…………………………………………………………………………………
…………………………………………………………………………………
…………………………………………………………………
…………………………………………………………………………
Reset initial settings 6
…………………………………………………………………………

1
2.Product and Parts Sketch
1.Features
● Different memory for different stopwatch models, 200 memory (K200), 300 memory (K300),
● The memory can be saved to different groups. All data in different period can be recalled.
● Have the time/calendar/alarm; 1/100 second stopwatch; countdown ; pacer; stroke
● Support iOS 8.0 and Android 4.4 or above.
2
1
3
4
5
6
① START/STOP button to start and pause
② RECALL
③ LAP/SPLIT/RESET
④ MODE button to select the mode
⑤ Cord buckle
⑥ Lanyard
7
⑦ LCD screen
Product dimension: 84*66*21mm
Watch lens dimension: 1.8 inch
Unit net weight: 96g
500 memory (K500).
● Connecting the APP on the phone by Bluetooth, download the data to the phone. The file in
excel format can transfer the data to the PC.
measurement function.
● Turn on/off, power saving function, low battery indicator, mute function.
● Water resistance: 3 bar.
● Battery lifetime: 2 years, CR2430(3V) Li battery.
( Length 36* Width 31mm)
button to see the stopwatch record data
button to set the lap/split and to reset

2
3.Operation
3).Adjust the mode
[Time/Calendar]
4).[ Time/Calendar ] and alarm function
Year
Month-Day
User ID
Current time
Time/Calendar interface
Current time
Alarm interface
Alarm time
1).Turn On
On the turn off status, press and hold the【Mode】key two seconds to turn on the stopwatch.
Show the time/calendar interface.
2).Turn off
On the time/calendar interface, Keep pressing 【Start】+【Recall】+【Reset】keys one after
another three seconds to turn off. (Please make sure stopwatch is no running and reset mode.
Otherwise, the stopwatch couldn’t be turned off.)
Press【Reset】
key to switch Alarm off Alarm on
Press【Start】to
turn on or off
the alarm
5).Set the parameter
On the [Time/Calendar] interface, press【Recall】key two seconds to set the parameter, set the
user ID firstly, the digits start to flash, when flashing, press【Start】key one time to add 1, keep
pressing to keep adding. Press【Reset】key to next digit one by one .( * Note: During the setting,
no operation within 30 second, the interface will return to [Time/Calendar] interface.).
User can set the parameter: user ID,date,12/24 time format, current time, alarm time, turn on/off
power saving, sound on/off for the buttons, the operations are as below.
User ID Year Month Date Hour
12/24Hr
Minute
Second
Hour for alarmMinute for alarm
PS power
saving(On/off)
The sound for
pressing (on/ off)
Setting sequence:User ID→Year→Month→Date→12/24 Hr→Hour→Minute→Second→Hour for
alarm→Minute for alarm→PS power saving mode→Sound on/off setting. The charts are as below.
When turning on, press【Mode】key one time to adjust one by one: [Time/Calendar] →[Stopwatch1]
→[Stopwatch 2]→[Count down ]→[Pacer]→[Stroke measurement]. The charts are as below.
[Stopwatch1] [Stopwatch2] [Count down ] [Pacer] [Stroke measurement]
On the [ Time/Calendar] interface, press【Reset】key one time to [Alarm] interface, press it again
to return [ Time/Calendar] interface.
On the [Alarm] interface, press 【Start】to turn on or turn off the alarm. The charts are as below.
Alarm interface
Alarm interface

3
Identification number can be set. It is useful for keeping the data of individual users separately.
* Power saving function:
If no operation is performed for 3 hours, the power saving function will automatically activated
and the screen will turn off and the word“PS” will appear on it .
* Button pressing sound:
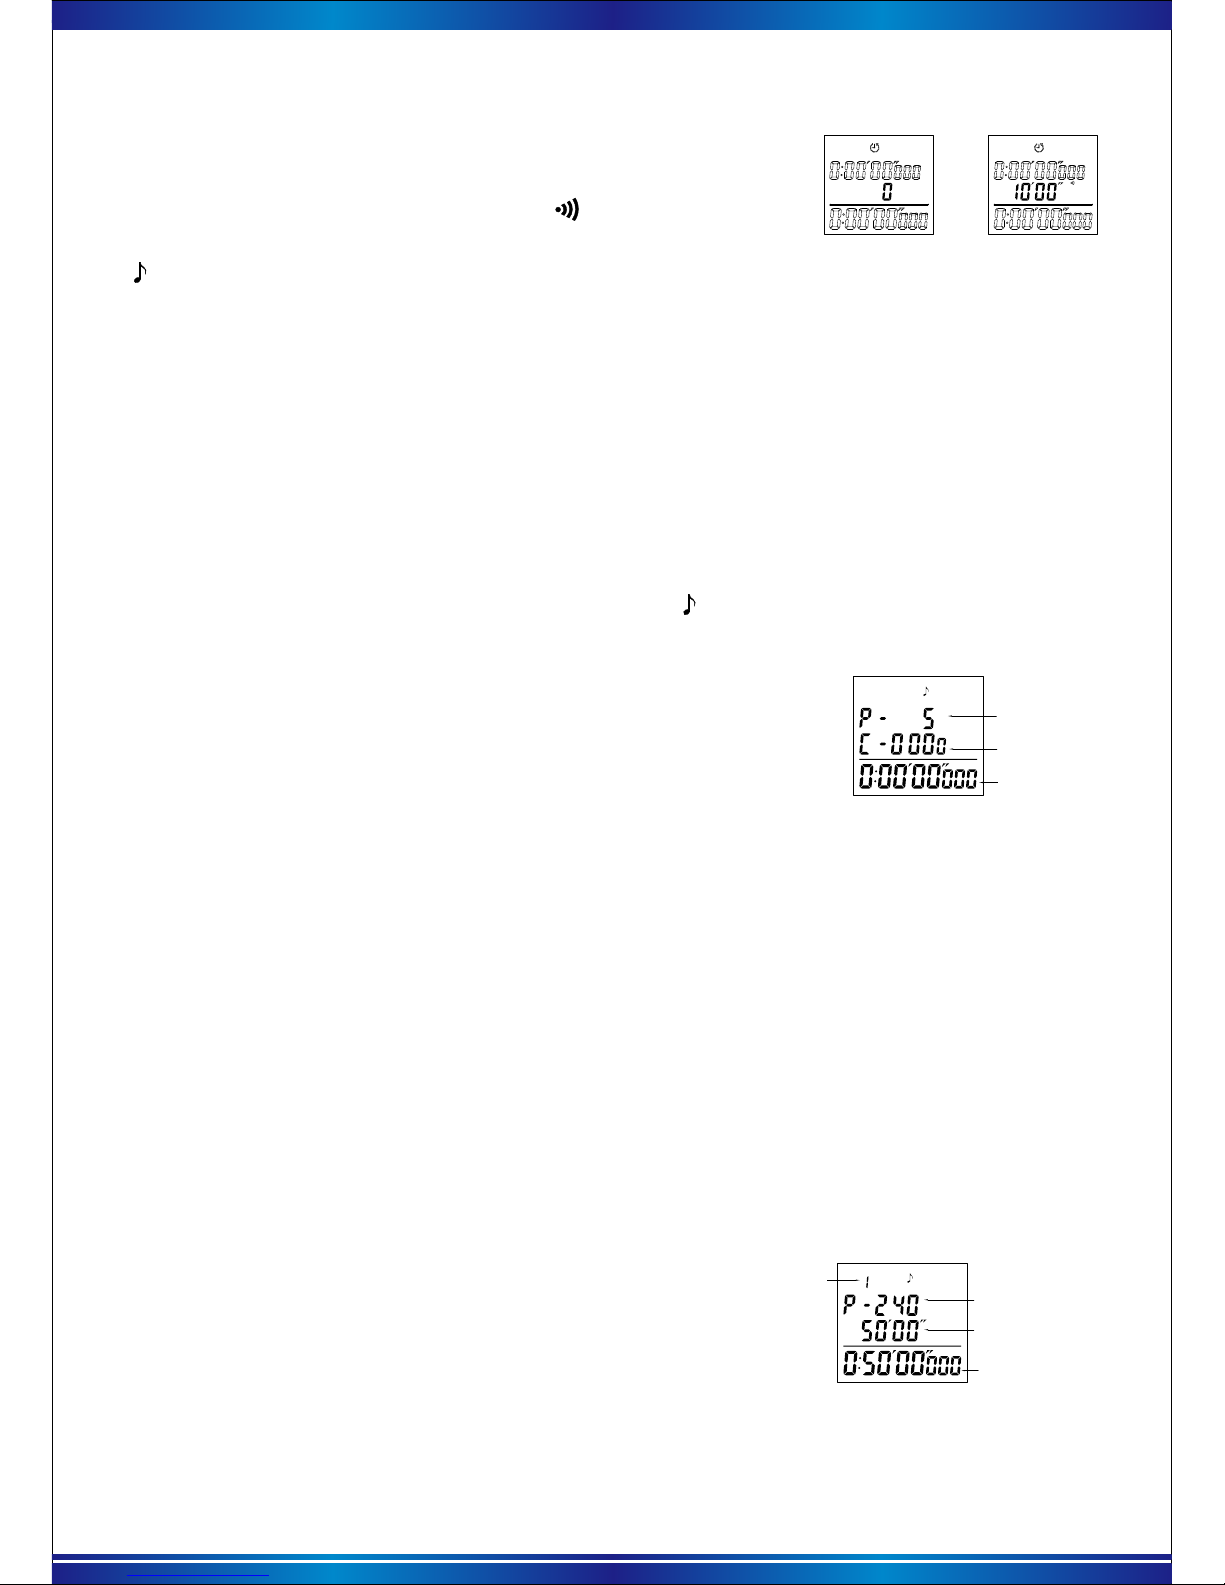
6). Stopwatch function
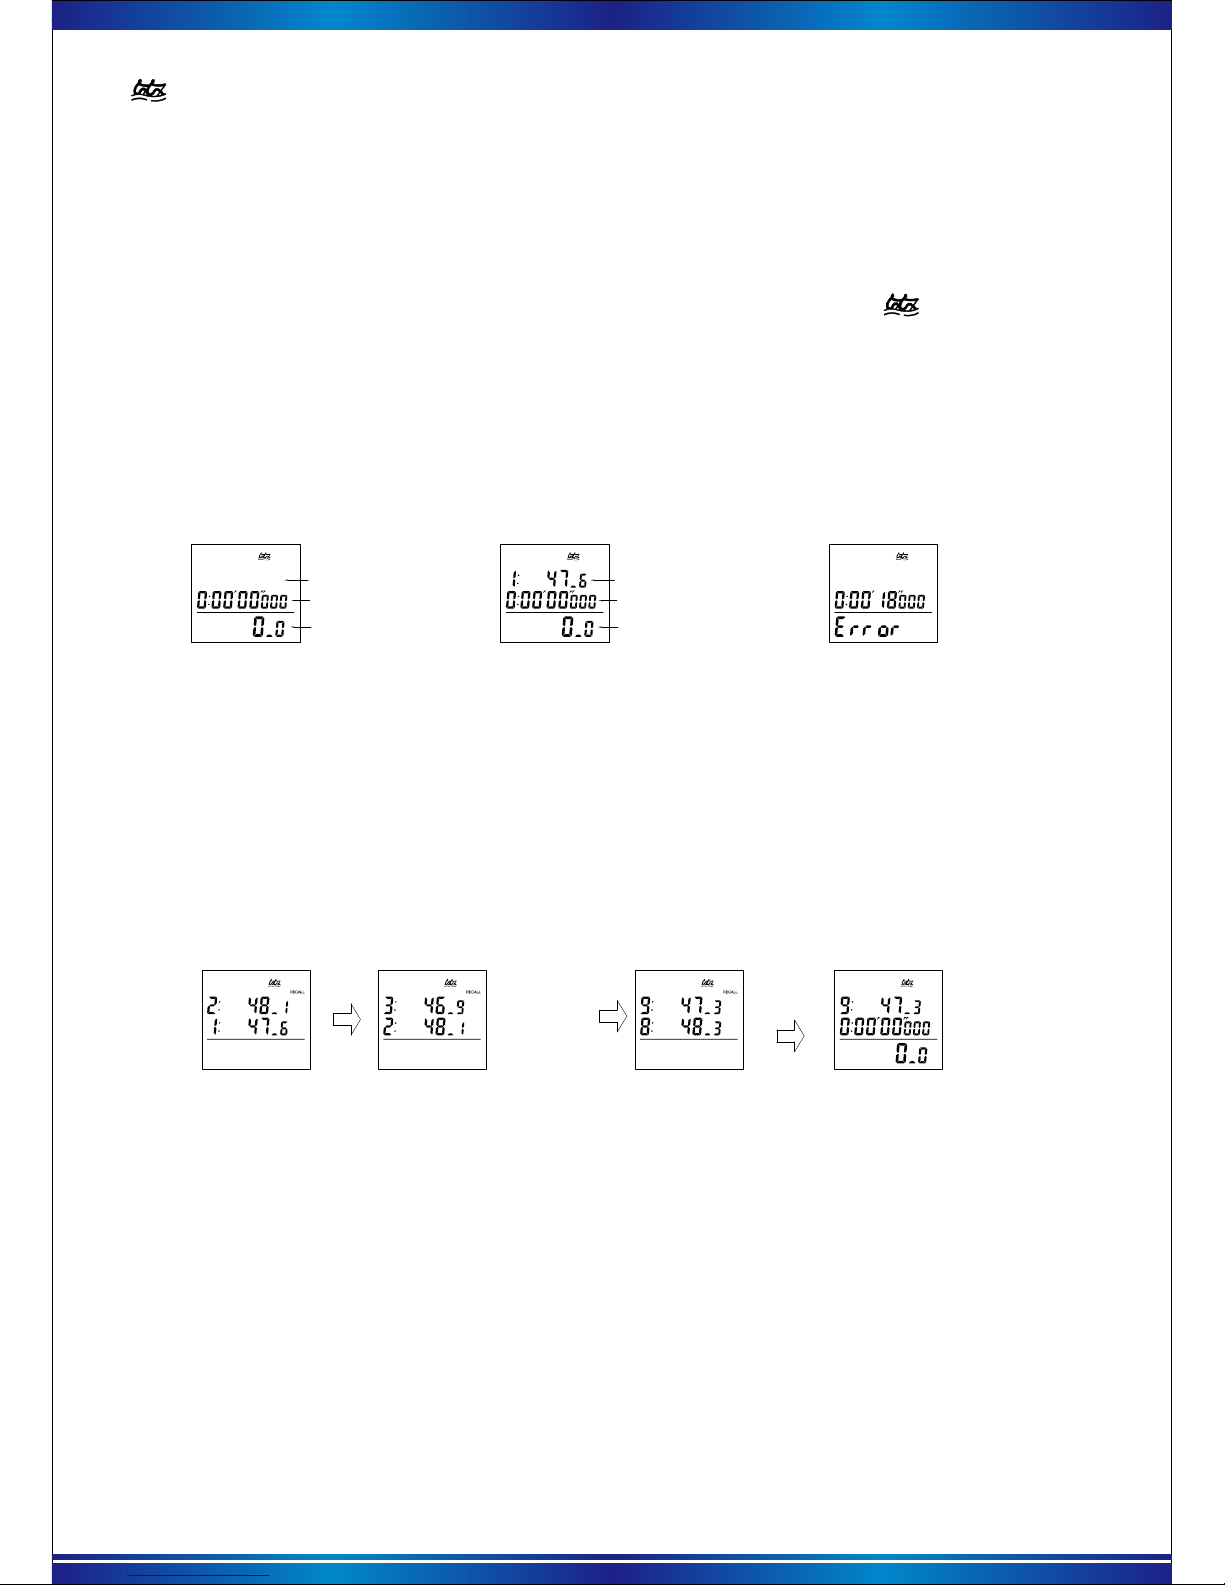
Stopwatch 1 interface
The stopwatch icon will show on the top when use stopwatch function.
When the stopwatch goes running, the display of “stopwatch 1” and “stopwatch 2” show the same
record on the first and second line, only the third line is different.
The third line of “stopwatch 1” show the current accumulate split time,
The third line of “stopwatch 2” show the accumulate lap time.(The third line will show “ ” and “LAP”
symbols) as shown in below charts.
Each record’s SPLIT time
The current accumulate SPLIT time
Each record’s LAP time
a. Stopwatch interface
c. Stopwatch start running
Start
Lap time
Split time
123
0
On the interface of [stopwatch], press the button【START】each time, will start or pause the
stopwatch (each time pause, the time will be store as one record ).
When the stopwatch is running, each time press the 【RESET】key, will store one record.
When the stopwatch is paused, press the【RESET】key, the stopwatch will reset, and store all
of the record before reset as one group.
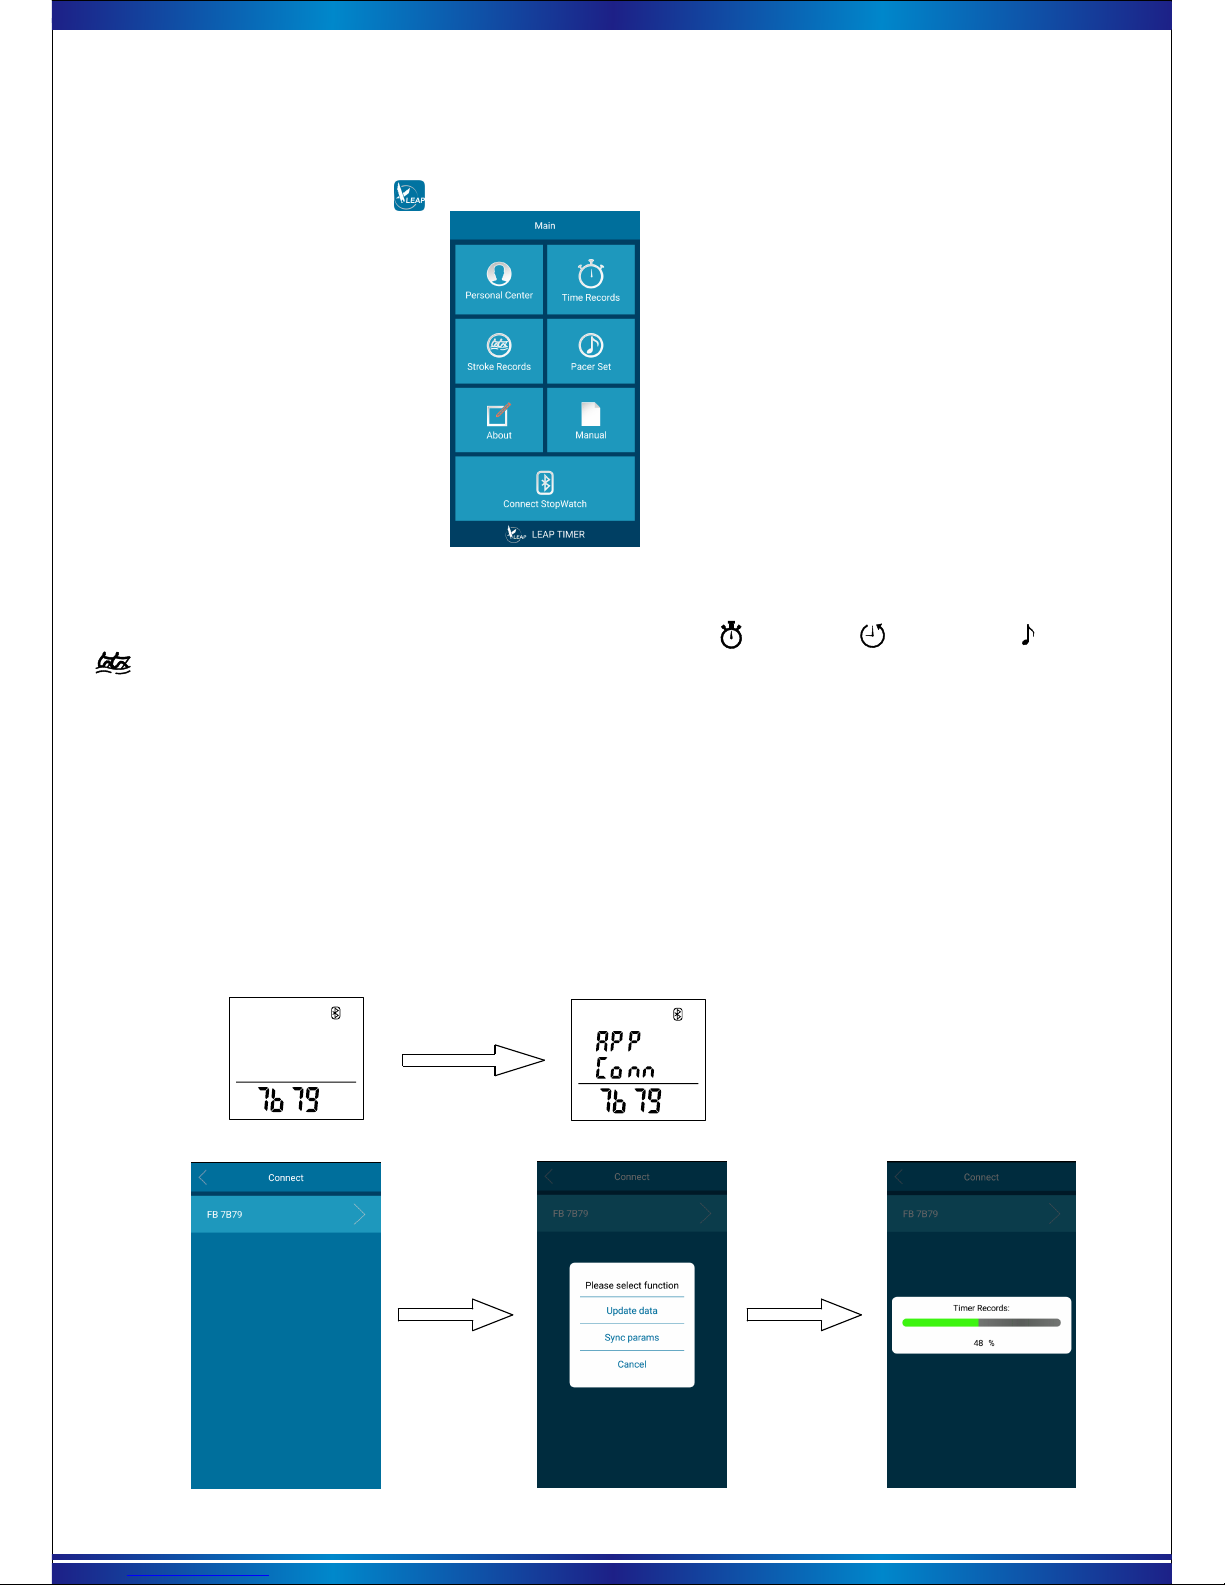
b. Memory saving method
A sequence of measurement data obtained from race start to finish is recorded as a group of data
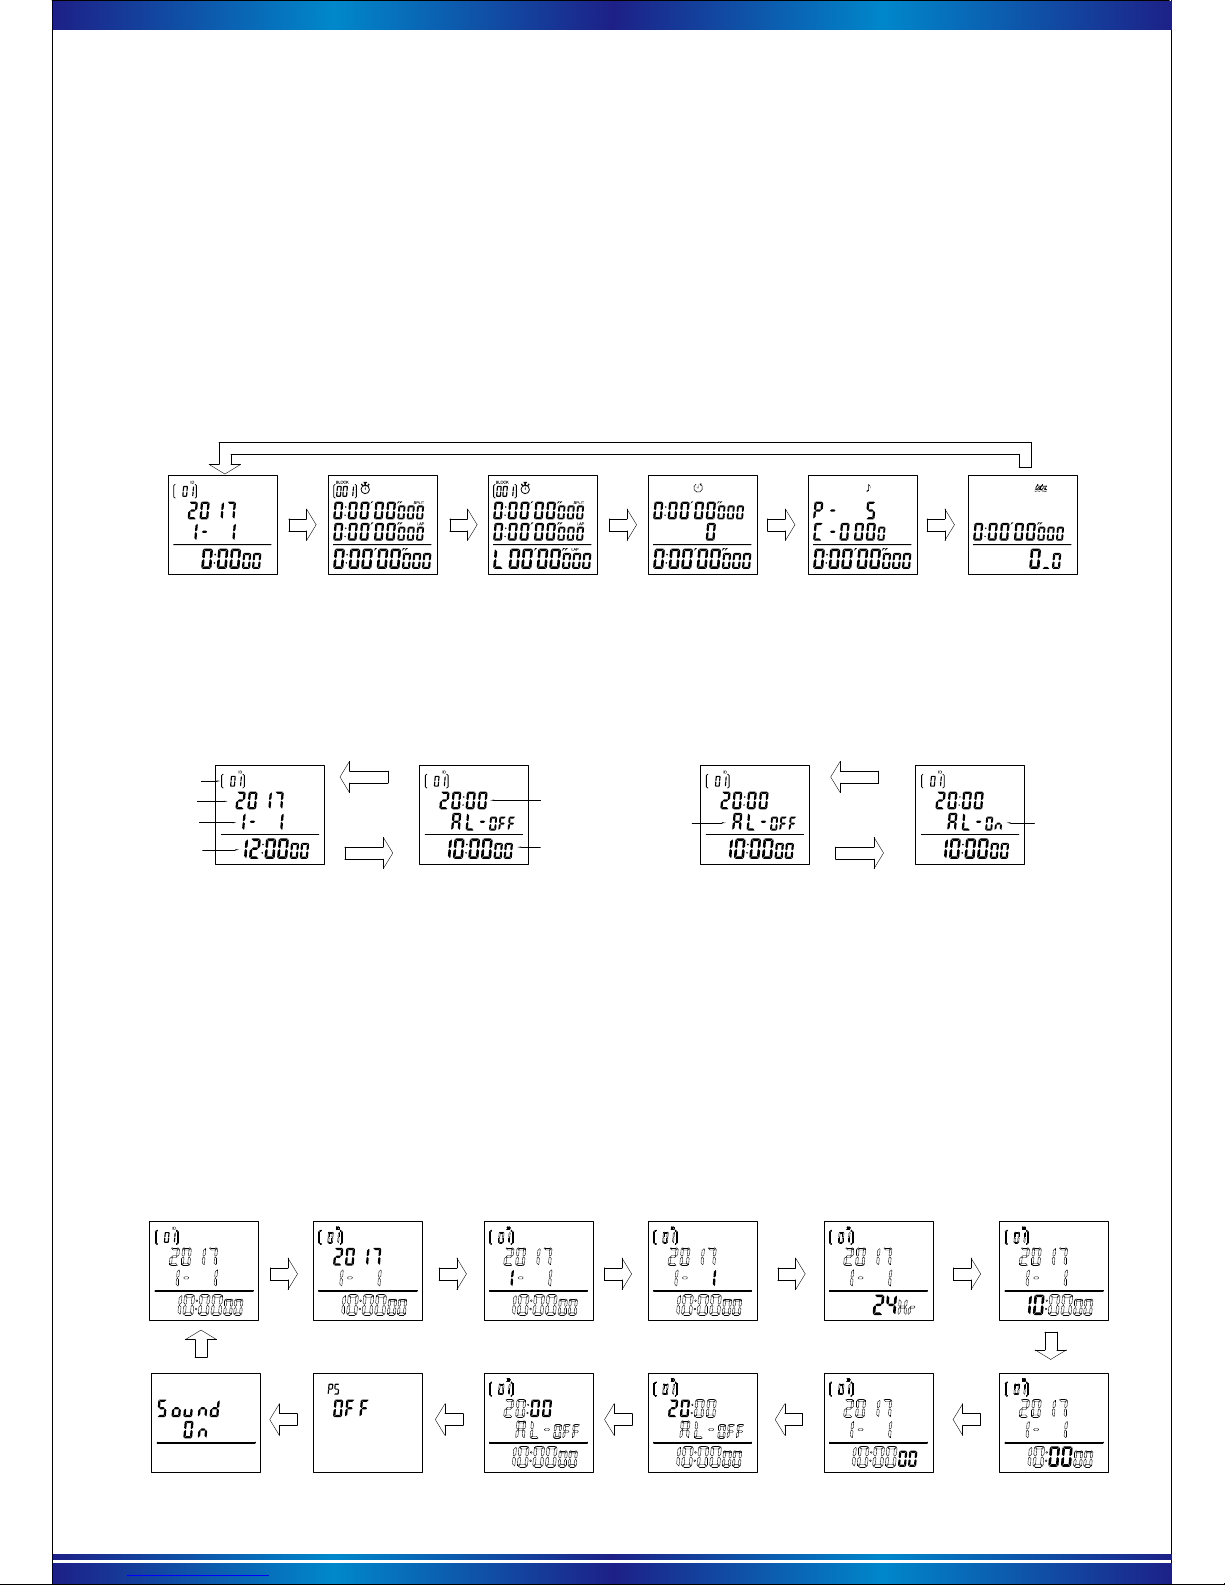
namely “BLOCK”. The stopwatch store the record in different “BLOCK”, each time from start to end,
all the record each time will be saved as one “BLOCK”, Also be marked the information of “Y/M/D”
for this BLOCK, up to 100 blocks of data can be stored in memory without deleting the previous data.
The “block” will display on the top left
corner. The current block numbers
will be shown in the bracket. When
the block is up to 100,
the number “100” will
flash .It can’t store any
data at this time.
When the number of stored
measurements is full, the
memory bar at the right side
will show the letter “ F”(Full)
and can’t store any data,
need store the data to APP
of phone. Then delete the
data from stopwatch
manually.
* How to do when the “Memory” or “BLOCK” is full:
“Memory” means how many records the stopwatch can store, “BLOCK” means how many group stored in the stopwatch
currently, one “BLOCK” can have “several memories ”.When the “memory” or “BLOCK” is out of the limit, the data in the
stopwatch can be move to the APP through Bluetooth, the data in the stopwatch manually release the space.
Example1, the stopwatch have the capacity to store 500 memory, BLOCK 1 is stored 200 memory, BLOCK 2 is stored 300
memory, then the capacity of stopwatch is full, can’t store any more.
Example 2, the stopwatch have the capacity to store 500 memory, if each group store one record, when store 100
BLOCKS, also can’t store record any more, need delete the data manually, if don’t have special case, this way to store the record
is not recommended.
* when the stopwatch is running, the display on top left corner will change from “group number”
to “memory” (The “BLOCK” and “[ ]” will disappear when the “memory” is displayed).
* 12/24 Hours:When using 12 hour time format, “A” is for “AM”, “P” is for “PM”.
* “Y/M/D/Time” can be set manually according to the data setting, or connect the mobile phone and
use APP to update it.
* User ID: (from 01~99)
Turning off the sound of button pressing, will be no “beep” when press the button.
Stopwatch 2 interface
Each record’s SPLIT time
The current accumulate LAP time
Each record’s LAP time “Split time” refers to an elapsed time required to
cover a distance from the start to a given point.
“Lap time” refers to an elapsed time required to
cover a given section of the whole distance.

4
In state of operation/ pause /reset, Press【RECALL】to query memory , the BLOCK group number
and RECALL will be continuous flashing. The screen will show the information “year/month/day/time”
of that data. With each press of the【RECALL】key, the data of BLOCK is recalled successively.
Keeping 【RECALL】pressed, can be quickly loop (BLOCK 001→BLOCK 002→BLOCK 003→
.....and so on ).
d. Recall stopwatch memory
“BLK ”option F-LAP S-LAP A-LAP Stop Time Each Memory
e. How to clear the stored data
Once the following steps are taken, all the stored data are erased from memory. The stored data
cannot be erased one by one or block by block. Before clearing the data, check that the stopwatch is
reset to “00.”Press【RECALL】to show the memory recall display. Keeping 【RESET】pressed for
more than 1.5 seconds, the screen shown at right appears “Clear all data” with warning beeps. After
3 seconds, all the stored data is erased from memory with a long beep. Then the initial measurement
display is shown. If the【RESET】button is released within 3 seconds , the stored data will not be
erased from memory.
7). Countdown function
Target time
Times for countdown
Current countdown
timer
After entering the countdown function, the countdown function
icon will be shown on the top of screen.The first line show the
preset target time, the second line show the number of completed
time, the third line show the current running countdown.
a. Countdown function description
b. Countdown parameter setting
Hour of target time
Countdown interface
After entering the countdown mode without running , press and hold 【RECALL】button for 2
seconds to enter the countdown data setting.
In the countdown parameter setting, beside "target time" to be set, you can also set a "interval
alarm time"."Interval alarm time": time setting range 0-10 minutes, when the set interval is larger
than 0, it shows the interval alarm time is activated. Then during the running countdown, It will be
a beep according to the preset interval of time. When the time is set to 0, “interval alarm” will be
turned off. The specific steps are as follows:
* Note: It will automatically exit the settings and return to the countdown mode, if no any operation within 30
seconds. If the target time is set to 0: 00'00 ", then the current time will start to countdown from 9: 59'59".
When recall the number of BLOCK you need, press【START】to enter the data. And each press
【START】to recall the Fastest (FS), Slowest (SL), Average (AV) time and each memory time of this
BLOCK, long press to recall quickly. After finish the memory recall of one group, press【RECALL】
back to “BLK” group number, repeat the above operation to recall other group’s data. Press【MODE】
key to exist the query , return to the Chrono mode at any time.
When the target time is completed, a beep "Di Di" will sound,
the second line will count once, and the third line will start counting
down again.
When the countdown is up to 9999 times, the countdown stops
and resets, and the data will be reset to zero.
When the number flashes, each press【START】key, the value plus one, long press to increase
quickly. Press the 【RESET】button to switch the next setting and so on. The sequence for setting
as shown below:
Minute of target time Second of target time Minute of interval time Second of interval time

c. Running countdown
In the countdown mode, with each press of the 【START】key, it will run or pause the countdown.
When the countdown is paused, press the【RESET】button, the countdown is reset and the countdown
will be zero.
Countdown times
8). Pacer function
After entering the single section pacer function, the " " pacer function icon is displayed at the
top of the screen as shown on the right.
a. Pacer function description
Pace frequency for
each minute
Times pacer gone
Count-up timer
"Pacer" means that after the start of the time, every minute will be a beep.
For example, if the beat frequency is set to 5, the alarm will be issued five times per minute after
the start of the timer, that is, it is a beep every 12 seconds. The pacer function of this table is divided
into: single section pacer, multi-section pacer.
Single pacer mode: Only one frequency beats (single-segment beat data can be set directly on
the stopwatch) from the start of the timer to the end.
b. Single pacer setting
c. Pacer memory mode setting
Pacer frequency for
each minute
Running time for
current period
Current countdown timer
Current period
Single pacer
Pacer memory mode
* Each press the 【RECALL】key for 2 seconds before the start of counting, switch the "single"
or "memory" mode.
* If the pacer memory is not set in the APP or the data is not synchronized to the stopwatch,
the stopwatch has no pacer memory function and long press【RECALL】key is invalid.
Pacer memory can run up to 10 intervals different time, different frequency of the pacer. The second
period is automatically started after end of the first period, and so on, the pacer stops and returns to the
first period, after end of the time of all periods.
After entering the pacer memory mode, the screen as
shown on the right.
Before the start of the timer, each press the【RECALL】
key to cycle through the pacer frequency and run time for
each segment.
With each press of the【START】key to run or pause the pacer.
When paused, press the【RESET】key to reset the pacer.
To clear the pacer memory records in the stopwatch, you can first change into single mode
of "pacer set" in the phone APP and then synchronizing the data.
5
Before the start of countdown, the 【RESET】key is each
pressed, the second line of the screen will switch "Countdown
number" or "Interval alarm Time", and the " " symbol will be
displayed when "Interval time" is larger than 0. As shown on the right. Interval alarm time
Pacer memory mode: From the start to the end of the time, you can run a few times different
frequencies of the beat. (Memory mode does not support setting data on the stopwatch, you need
to set up on the phone APP and then sync to the stopwatch.)
The first line shows the pacer frequency per minute and blinks
continuously, and you can change the pacer value with each press
of the【RESET】key. Modification range: 5-10-15- (multiplied by 5)
-115-120-150-180-240. Press the 【START】key to start or pause
the pacer function.
The second line counts once for each pacer. When the number
of pacer reaches 9999 times, the time does not reach 9 hours 59
minutes and 59 seconds, the second line will start counting again from
0 until it is running to 9 hours 59 minutes 59 seconds, the pacer stops.
When the pacer is stop, press the【RESET】key to reset and clear the pacer count.
Pacer memory mode must be pre-set in the "pacer Set" of the phone APP, and then synchronize
the memory mode data to the stopwatch. Specific APP operation see "4, LEAP stopwatch APP → 6),
Pacer set" instructions.
After synchronizing the pacer count in APP to the stopwatch, enter the pacer function, still in the
“single pacer” screen, press【RECALL】key for 2 seconds to switch to the " memory mode " interface.

6
9). Stroke frequency measurement function
a. Stroke frequency function description
The stroke/frequency of an activity per minute is automatically calculated by measuring the
time required to make three strokes. Measurable number of strokes per minute is between 10
and 180. Stroke frequency range: 180 times / min> effective frequency> 10 times / min.
Measurement interface
Numbers of stroke
b. Stroke frequency measurement
After entering the stroke function, the top of the screen will display the " " icon press the
【START】key to start the stroke rate measurement, after the athletes complete 3 times training ,
press the【START】key to complete a stroke measurement.
If you want to re-calculate the stroke rate, operate the instruction as above.
Each time you recalculate, the last stroke data is automatically saved. Up to the last 9 times data.
When the completion of a stroke frequency measurement no need to measurement again.
You can press the 【RESET】key to save the current stroke frequency, while the measurement
stops, the screen is cleared.
Current count-up timer
* During the first second after the measurement has been started by press【START】key,
flashing “180.0” is displayed. If the measurement is stopped by pressing 【START】key, during
the period,"Error" will appear. If the measurement is not stopped until "10.0" on display, "Error"
will automatically appear.
The last stroke data
No memory
Measurement interface
Numbers of stroke
Current count-up timer
Error mark
c. Query stroke frequency memory
When the stroke frequency measurement is stopped, with each press of 【RECALL】key, the
data is recalled starting from memory -1. The screen will continue to flash "RECALL" characters),
up to the last 9 times frequency memory, after recall all the memory, return to the stroke frequency
measurement screen as shown below:
And so forth……
Recall interface Recall interface Recall interface Measurement for stroke
Press 【RECALL】firstly then the letter of recall is flashing , Keeping 【RESET】pressed
for more than 1.5 seconds, the screen shown appears “Clear all data” with warning beeps.
After 3 seconds, all the stored data is erased from memory with a long beep. Then the initial
measurement display is shown. If the【RESET】button is released within 3 seconds , the
stored data will not be erased from memory.
d. Clear the stroke frequency memory
Back to
stroke mode
10). System reset mode
At Calendar mode, Keep pressing 【START】+【RECALL】+【RESET】+【MODE】one
after another 3 seconds to reset all record and setting. (saved "stopwatch / stroke "memory
is still retained).

7
4.Leap timer APP operation instruction:
a. First scan the QR code of instruction home page , Download and install “Leap timer” APP on the phone.
b. Finish installed, Connect the Bluetooth Stopwtch with the Apps.Pls make sure the Bluetooth is turned
on before running the app.Tap “ ”(Leap timer) icon, to enter the main menu of Apps as picture 1 as below:
2).Synchronize the timer reords and Calendar
a. Before connecting, please stop and reset the functions of “ stopwatch/ countdown / pacer/
stroke frequency”.
b. keeping press the 【Mode】key for 3 secs to turn on the stopwatch Bluetooth, A 4-digits ID will
show in the LCD screen and inside the cell of connect page. Bluetooth icon and Bluetooth device
number (as picture 2). And then click the APP home page at the bottom of the "connect stopwatch".
Pls find the same Bluetooth device number as the stopwatch is displayed in the list.(as picture3).
Picture 2 Opening Bluetooth interface
Picture 1 Main menu of the Apps
Picture 3 Bluetooth device lists
c. In the device list, click the same list of Bluetooth device as the stopwatch. Then connect stopwatch
and App. Connecting succeed, it will show ‘APP Conn’ on stopwatch (as picture4), Meanwhile the APP
will pop up” update data /sync params /Cancel selection menu (as pictures5).
(*each stopwatch has an individual Bluetooth device number, if there has other Bluetooth device around the phone,
they also can be searched and loaded into device list.)
Picture 4 Connection success
Click “update data”, will send the timer records to the APP and save (as pictures 6).
Click” sync params” will update the Year/month/day/time’ on phone to the stopwatch.
Picture 5 function selection menu Picture 6 Synchronizing data
1).Install the app

d. Long press the 【Mode】key 3 secs to turn on Bluetooth, if the stopwatch/ count down/
pacer/ stroke function is not turned off. or low battery indicator “ “ lights up, The stopwatch will
not be able to turn on the Bluetooth function. The image shows” Alert (warning) and non-close function
icon or low battery symbol will continuous flashing as picture7 as below:
Picture 7 Warning interace
3).Personal center
a. Tap the “ ” (personal center) and tag the icon to add new players. Enter the personal
information setting, Can edit user avatar .user name. User ID as picture 8.
Picture 8 Personal info setting
b.Click “ ”avatar icon, Avatar image will be obtained by “Camera”or “phone”.
Click “user name”can input user name, Click “user ID”can distribute the ID to the user.
*The user ID in the personal
information setting corresponds
to the ID on the stopwatch
User ID
* User ID: When use one stopwatch to test more than 1 person or more than one projects, it can
distinguish respective timing data by setting different ID.
For example: Use one stopwatch test timing data individually for A.B.C users’. Then transmit 3 users
data to phone apps from the stopwatch. can automatically load the three users data into A.B.C user.
Operation as below:
Second step: Use the stopwatch to test the timing for A/B/C user. Before testing A, Set stopwatch ID
to“01”. Then test the timer or stroke of A. After a test finished, set the ID to “02” then test the stopwatch
or stroke rate of B. And so on, When “C” (ID“03”) test completed, Reset the stopwatch to zero.
Third step: Connecting stopwatch and APP, Send the stopwatch data to phone app. APP automatically
according to the test ID and the time data. Respectively load into the corresponding A / B / C users.
After sending data succeed, Can view the “timer records” or “stroke record” on the APP.
Picture 9 User created
8
First step: Add 3 users on the app personal center, (as picture 9 ) they are :User name “A”/ user ID“1”,
User name “B”/User ID“2”, User name “C”/user ID“3”.

9
4).Stopwatch(Timer) record
a. Click apps home page “timer record”, enter stopwatch record list, can view all stopwatch memory
data.(as picture10 ).
* Before checking record, please ensure the data has been synchronized to the app.
Picture 10 Stopwatch record list
b. Then click some catalog you want, after entering, you can view each row lap/split time , average lap
time, fastest lap time (figures shows “orange color”), Lowest lap time(figure shows “black”) as picture11.
Picture 11 Each row Lap/split time Picture12. Speed interface
5).Stroke record
a. Click “stroke record” on APP home page , enter stroke record lists. You can review all stroke
memory data as picture13.
*Before reviewing the record, please ensure the data has been synchronized to the APP.
Picture 13 Stroke records lists
b. Then click the entry you want to check, just can review the stroke data as picture 14.
Picture 14 Stroke data
e. If need delete some stopwatch record, can click the “edit” button at right corner of “timer record list”,
then choose the record you want to delete, Click to delete.
d. When save many stopwatch record on the app, in order to easy to find, can click the button
at the bottom of stopwatch record list scene.
c. Input the distance number on “distance ”column, click the “ ” button on bottom, Switch to
speed interface then calculate automatically each row speed according to distance as picture12.

6).Pacer setting
a. Tap the ( Pacer set) icon and tap the “memory mode” as picture 15.
b. Click at the bottom to add “pacer name”. Click this “pacer name” again to set pacer parameter
by pressing the icon. Set the data for “frequency/working time (mins/secs)” by rolling the dial.
Then press “done” icon to complete as below picture.
Picture 15 Choose memory Picture 16 Add pacer name Picture 17 Click pacer name Picture 18 Setting pacer
parameter
* Each “pacer name” can be set up to 10 kind different frequency and different pacer parameter.
* Repeat above operation, can add more pacer name and pacer parameter.
* Bluetooth stopwatch can only receive memory records of a pacer name each time, If you want
to replace the “memory pacer”, It needs to re-synchronize parameters.
c. Replace “memory pacer”
When there are many “pacer names” on the app, Click “edit”at right of corner to select the setting
you want to synchronize. Press “ Sync” to complete.
Attention:
a.At this time, only the modifications are completed in APP, the memory pacer in stopwatch has
not been replaced. It need click“update data”icon to complete the replacement through reconnecting
the stopwatch APP.
Picture 19 Click edit Picture 20 Click sync after choosing Picture 21 Switch completed
10
b.To clear the “Memory pacer” in the stopwatch, it can be changed back to single pacer by changing
tapping firstly. And then press “update data” icon to complete.

7).Share “stopwatch/stroke”record data
“stopwatch/stroke” record on APP can be generated automatically spreadsheet, then share to other
phone or computer by skype, whatsapp, email and so on. The operation is as below:
Picture22. Choose sending methods.
On the interface of stopwatch record or stroke record, click “ share button” on the bottom, choose
send methods as picture 22. Then operate it according to the tips step. (Sending sheet format is CSV.
Can use excel software to check and edit).
5.Maintenance instruction
* Do not operate the buttons when the Bluetooth stopwatch is wet or in water.
* To clear the set, use a soft dray cloth. Do not use any cleaning agents containing alcohol,
ammonia benzene or abrasives as these may harm.
* Do not disassemble the product to avoid the feature of water resistance making worse.
* The battery is a non-rechargeable one, prohibits charging, so as to avoid expansion of the
battery or leakage.
* Please replace the new battery when the battery is low, the old batteries should be properly
handled in accordance with local environmental requirements.
* To ensure the stopwatch battery life, do not frequently start the stopwatch Bluetooth in a
short time, so as to avoid excessive battery drain.
11
Shenzhen Tianfu Huibo Industrial Co.,Ltd
2/F, 8th Building, Fulongte Industrial, HuaxingRoad, Langhua new district, Shenzhen,China
Tel:0086-755-36811327 00-86-755-26786212
Fax:00-86-755-26753299
Website:http://www.leaptimer.com
Email:hbgm@ hbtimer.com

This manual suits for next models
2
Table of contents
Other Leap Watch manuals