Legacy Power Conversion HERYTAGE 2kVA 1.6kW Operating manual

HERYTAGE
User and Installation Manual
For H02KVA thru H20KVA Model UPS
IMPORTANT SAFETY INSTRUCTIONS, SAVE THESE INSTRUCTIONS
– This Manual contains important instructions for models 2kVA through
20kVA that should be followed during installation and maintenance of the
UPS and Batteries.
The Best Power Protection in the BusinessTM

BILS-10003 rev E 1
Contents
Page
Safety Warnings…………………………………………………………………………………. 3
Symbols…………………………………………………………………………………………… 3
Introduction………………………………………………………………………………………. 4
General Description……………………………………………………………………………… 4
Specifications……………………………………………………………………………………. 5
Section
100 Receiving your Herytage UPS………………………………………………………. 7
101 Unpacking and inspection………………………………………………………………. 7
102 Storage……………………………………………………………………………………. 7
200 Installation Guidelines……………………………………………………………… 8
201 Installation Considerations……………………………………………………………… 8
202 Location………………………………………………………………………………….. 8
203 Remote battery installation…………………………………………………………….. 9
204 Customer supplied batteries with Legacy cabinets…………...……………………… 9
205 Dimensions and clearance requirements…………………………………………….. 9
206 External bypass switch dimensions………………………………………………….. 10
207 External battery cabinet dimensions………………………………………………….. 10
300 Wiring Instructions…………………………………………………………………….. 11
301 Softwired Installations………………………………………………………………..… 11
Table 301-1 Minimum circuit breaker requirements……………………………..……….. 12
302 Hardwired Installations………………………………………………………..………..…….13
302-1 External bypass switch Installations ……………………..………..……………… 13
Figure 302-1A Hard-wired Installation Overview……………………..……………………14
Figure 302-1B Bypass switch Terminal Block……………………..…………………… 14
302-2 Minimum input over-current protection…………………………………..………....15
Table 302-1 Minimum circuit breaker requirements……………………………..……….. 15
302-3 Installation Wiring Connection Diagrams……………………………….……….... 15
Figure 1 Wiring connection diagram/120 Input with External bypass …………………16
Figure 2 Wiring connection diagram/208-240 Input with External bypass ……..…17
Figure 3 Wiring connection diagram/208 Input with MBB External bypass …………18
303 Battery installation and connection……………………………………..………..……….... 19
304 Bypass switch wiring / Phase check……………………………………………..………… 20
305 User interface wiring connections…………………………………………………..……… 22
Table 305-1 DB 9 Serial communications pin outs…………………………..……….... 23
Table 305-2 User interface wiring connection block…………………………..………... 23

BILS-10003 rev E 2
400 System operation…………………………..………………………………..….24
401 Startup ……………………………………..………..……………………..………..……………. 24
401-1 Softwired units (Line cord and receptacles)… ……………..………..…………. 24
401-2 Hardwired units………………………………………………………..………..……. 25
402 Shutdown of the Herytage UPS ………………………..………..………………….…….. 26
402-1 Softwired systems………………………………………………………..………..….26
402-2 Hardwired units…………………………..………..…………………………………. 26
500 System Features……………………………………………………………………….. 27
501 On / Off Switch…………………………………………………..………..…………..…… 27
501-1 Herytage UPS On / Off Switch Positions………………………………..…… 27
502 Bypass switch / AC disconnect operation………………..…………..………………... 27
502-1 AC disconnect switch………………………………………..………………...…27
502-2 Bypass switch……………………………………..………………...…………… 28
503 Display Panel / LED lights……………………………………..………………...………29
503-1 Bar Graph LEDs…………………………………..………………...…………… 29
503-2 Single LEDs…………………………………..………………...…………………29
504 Keypad / LCD display……………………………………………..………………...…... 30
504-1 System Status/System Modes………………..………………...……………… 30
504-2 Passwords…………………………………..………………...………………..… 30
504-3 Keypad Functions and Programming…..……..…………...………………..… 31
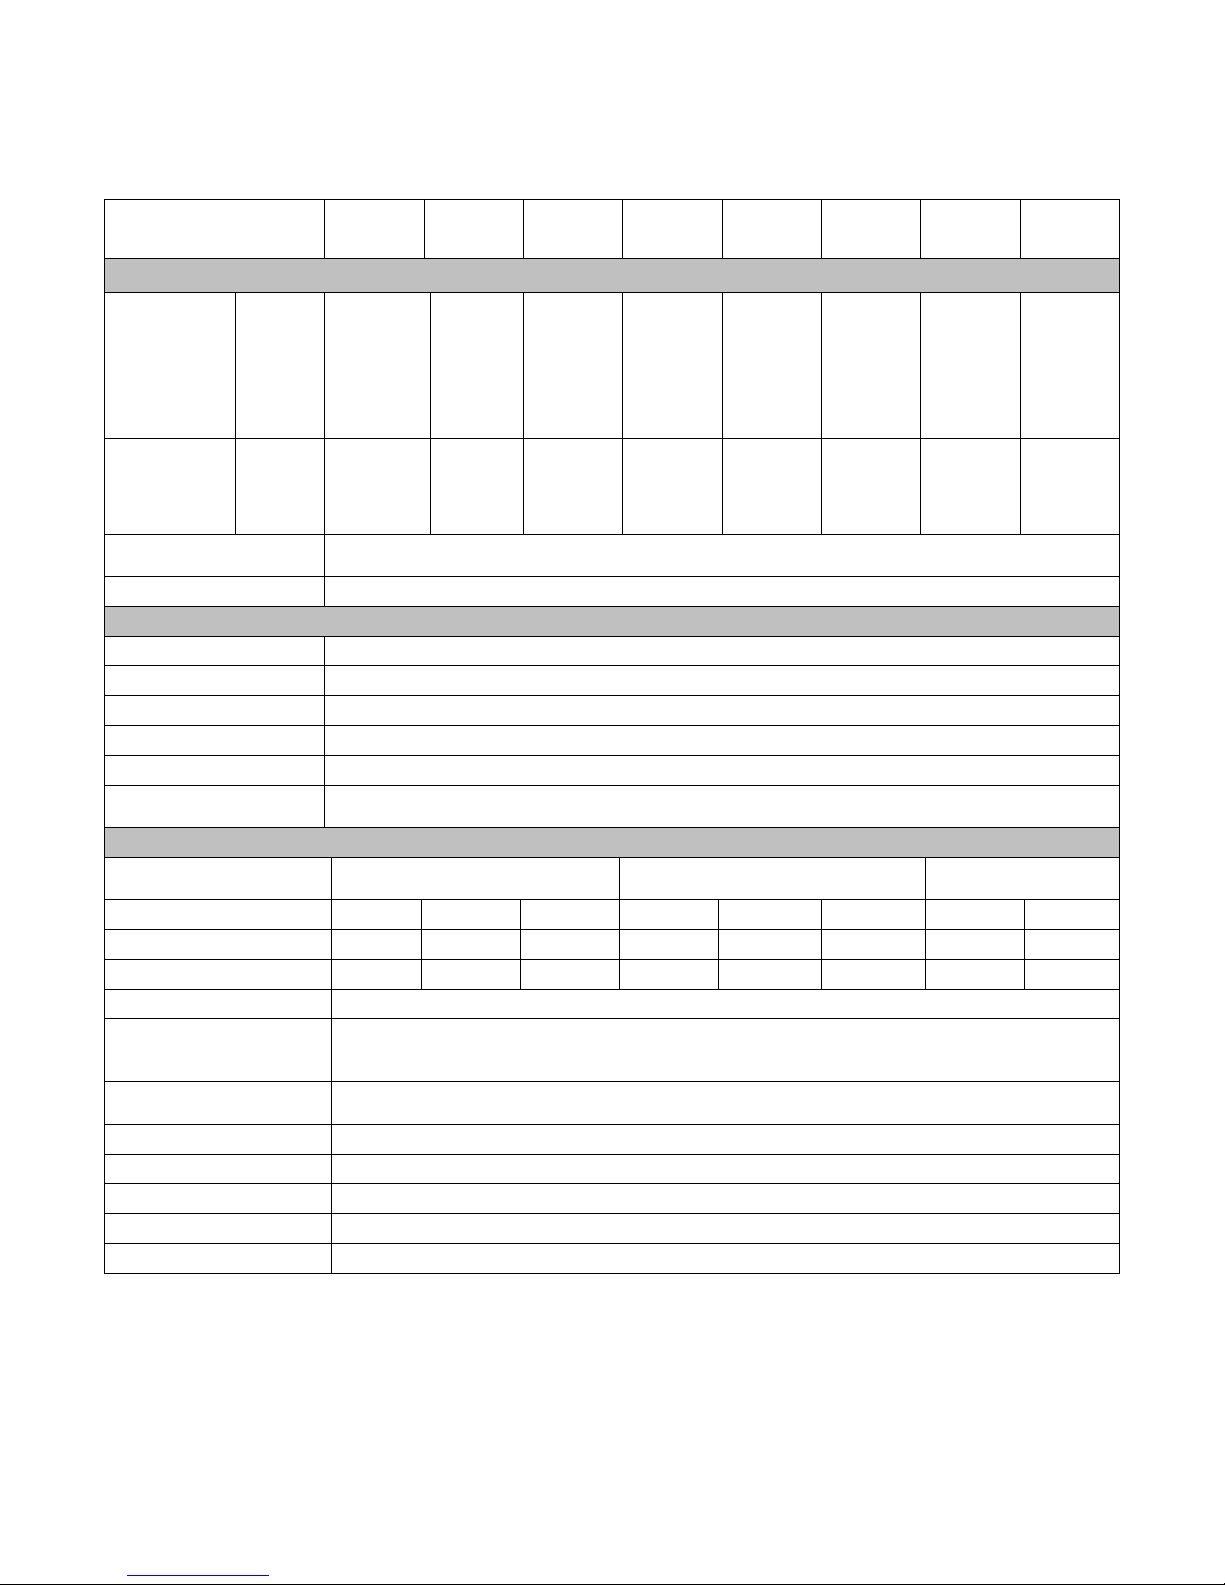
505 Parameter Table…………………………………………………..………………...…… 32
600 RS 232 Serial communications…………………………………………………..….. 37
601 DB9 Serial Terminal / Computer hook up ……………….………………...…….…. 37
602 System Status/System Modes………………..…………….………………...……….. 37
603 Passwords…………………………………..………………...………………..….…….. 38
604 RS232 Commands…………………………………..…………...………………..……. 38
605 Modem Hook Up (optional) …………………………………..………….………..…….39
700 Alarms……………………………………………………………………………………. 40
701 Shutdown and latching alarms……………………………...………………..………… 40
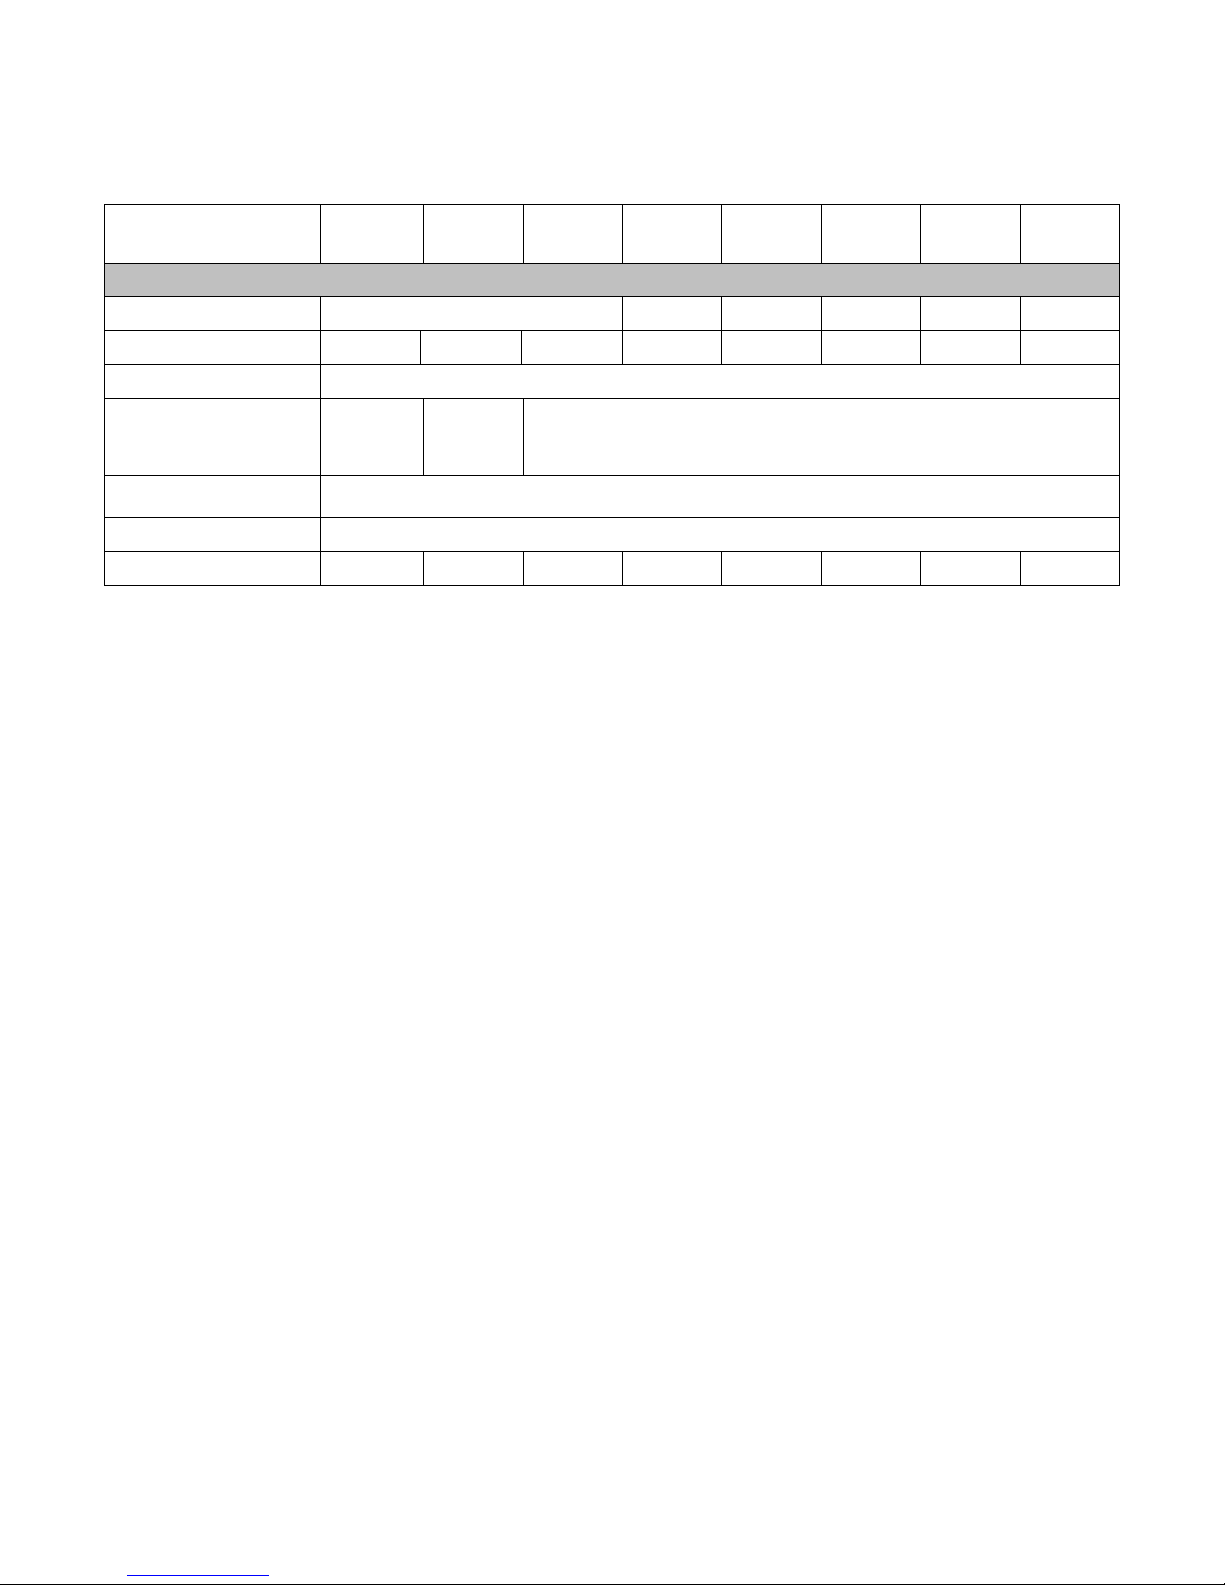
702 Alarm Table ...………………..………………………………....………………..……… 40
703 Alarm Mask...………………..………………………………....………………..……… 42
800 Battery removal / replacement………………………………………………………. 43
801 Battery safety / cautions……………………………………...………………..……….. 43
Warranty………………………………………………...………………..………………………. 44
Warranty registration form………………………………………...………………..……………46

BILS-10003 rev E 3
SAFETY WARNINGS
IMPORTANT SAFETY INSTRUCTIONS – SAVE THESE INSTRUCTIONS
This manual is for Herytage UPS:
Horizontal Chassis 2kVA through 20kVA
DANGER: UPS contain HAZARDOUS VOLTAGES. Because of these voltages,
installation of the system should be performed by a qualified electrician. The
electrician must install according to local and national electrical codes.
There are NO USER SERVICEABLE PARTS inside the UPS, repairs of the
system should be performed by qualified service personnel.
CAUTION: Batteries can present a risk of electrical shock or burn from high short circuit
current. Observe proper precautions.
CAUTION: Proper disposal of batteries is required. Refer to your local codes for disposal
requirements.
CAUTION: A UPS contains its own energy source (batteries). Output voltage may be
present even when the UPS is not connected to an AC supply.
CAUTION: Never dispose of batteries in a fire. Batteries may explode when exposed to
flame.
CAUTION: Never open or mutilate batteries. Released electrolyte is harmful to the skin
and eyes, and may be extremely toxic.
CAUTION: To reduce the risk of fire or electric shock, install this UPS in a temperature and
humidity controlled, indoor environment, free of conductive contaminants.
Ambient temperature must not exceed 40 C (104 F) without de-rating the
maximum load. Do not operate near water or excessive humidity (95% max).
CAUTION: Do not remove or unplug the input cord when the UPS is turned on. This
removes the safety ground from the UPS and the equipment connected to the
UPS.
SYMBOLS: Listed below are the symbols utilized on the product labels or within the
installation / user manual

BILS-10003 rev E 4
INTRODUCTION
Thank you for purchasing this quality product from Legacy Power Conversion, Inc.
Read this manual thoroughly before installing or operating your Herytage UPS system.
Keep this manual for future reference.
This unit will provide highly regulated and controlled power for your sensitive electronics
equipment, protecting it from frequent power glitches that are inherent in commercial power.
IF YOU HAVE ANY QUESTIONS OR PROBLEMS PLEASE LET US HELP… Legacy Power
Conversion, Inc is committed to outstanding customer service. Our customer service center
will be happy to help you with any problems or questions you may have. Service technicians
are available 24 hours a day, 365 days a year. Just call the telephone number below, or
send a fax to the service fax number. Please have your unit’s serial number available.
TELEPHONE NUMBER - 800-859-5711 or 608-565-5878
FAX NUMBER - 608-565-5879
Email – service @ lpc-ups.com
GENERAL DESCRIPTION
The Herytage UPS is an Electronically Controlled Ferroresonant Transformer based UPS
system designed to provide transient free, regulated power to your load equipment. Features
that differentiate the Herytage UPS are:
•Electronically controlled Ferroresonant Transformer
•State of the art user interface
•Keypad with a back lit LCD display, rear access RS232 communications interface port.
•Detailed power quality, control, and unit metering information are all easily accessible.
•Last 248 power quality and alarm events logged by time, date, including start and stop
time.
•Dial in modem option.

BILS-10003 rev E 5
Specifications*
Model 2kVA
1.6kW
3kVA
2.4kW
4kVA
3.2 kW
6kVA
4.8kW
8kVA
6.4kW
10kVA
8kW
16kVA
12.8kW
20kVA
16kW
AC Input
Input ACV &
circuit
breaker
requirements
– standard
hardwire
connection
120VAC
208VAC
240VAC
30A
15A
15A
30A
20A
15A
50A
30A
30A
60A
40A
40A
-
60A
50A
-
70A
60A
-
100A
90A
-
125A
110A
Line Cord
1
(optional) 120VAC
208VAC
240VAC
C2, I2, J, E
O, K, L
O, K, L
J, E
K, L
O, K, L
E
L, M
L, M
-
N, P
N, P
-
-
-
-
-
-
-
-
-
-
-
-
Input Voltage
Window
+15%, -20% of nominal VAC Input @ full load
+15%, -40% of nominal VAC Input @ 50% load
Frequency
60Hz, ± 3Hz. Adjustable window
AC Output
Output ACV
– Hardwire
120 / 208 / 240
Output Receptacles
Optional
Output waveform
Computer grade sine wave output power
Regulation
± 3% voltage regulation
Load Compatible
Guaranteed compatible with all loads for 90 days from date of purchase
Overload
150% surge capability, overload alarm 101% load to 125% load for 10 min. before shutdown.
Greater than 125% the system will shutdown in 5 seconds.
Unit
Dimensions
H x W x D
(in.)
25.2 x 16.2 x 23
3
37.5 x 17.75 x 33.25
39 x 22 x 34
Weight ( lbs.)
208327532903
5653
465
530
570
665
Efficiency
87% 88% 90%
91%
93%
93%
91%
91%
Heat Loss BTU /
W
816/239 1116/327 1213/355
1619/475
1645/482
2055/602
2160/632
3238/95
Noise Attenuation
120db common mode, 60db transverse (normal) mode
Isolation
Output is completely isolated from commercial power with less than 2 pf effective capacitive
coupling primary to secondary. Secondary has neutral to ground bond, qualifying as a
separately derived power source
Surge Protection
6000 volts are suppressed to safe levels per ANSI/IEEE C62.41 – 1997 category A & B
waveforms
Operating Temperature
0°to 40°C (32°to 104°F)
Relative Humidity
0 to 95% without condensation
High altitude operation
Max. altitude 10,000 ft – de-rate 1°C off max operating temp. per 1000 ft. above sea level
Agency
UL 1778, cUL listed
User Interface
Keypad w/ LCD display, RS232 serial communications, dial in modem
* Specifications may change without notice.
1Line Cord Designators: C = 5-20P, I = L5-20P, J = L5-30P, E = 5-50P, O = 6-15P, K = L6-20P, L = L6-30P,
M = L14-30P, N = 6-50P, P = L6-50P
2 20 Amp Line Cord limits battery charger current to 4 Amps.
3Weight and Dimensions are for UPS with standard internal runtime.

BILS-10003 rev E 6
Specifications* (continued)
Model
2kVA
1.6kW
3kVA
2.4kW
4kVA
3.2 kW
6kVA
4.8kW
8kVA
6.4kW
10kVA
8kW
16kVA
12.8kW
20kVA
16kW
DC & Inverter
Nominal DC voltage
48VDC
72VDC
96VDC
120VDC
96VDC
120VDC
DC Current 39 59 78 78 78 78 157 157
Charger Current
8A2
Runtime – (Std Ba
ttery)
100% Load
50% Load
11 min
32 min
18 min
47 min
11 min
32 min
Overload
150% surge capability, overload alarm 101% load to 110% load for 10 min. before shutdown.
Greater than 110% the system will shutdown in 5 seconds.
Efficiency (on inverter)
85%
Sound Level (Inverter)
50dBA 50dBA
52dBA
54dBA
55dBA
55dBA
53dBA
55dBA
* Specifications may change without notice.
2 20 Amp Line Cord limits battery charger current to 4 Amps.

BILS-10003 rev E 7
100 Receiving your Herytage UPS
Caution: The Herytage UPS assemblies are very heavy, insure you are prepared
to unload, unpack, and move these weights.
101 Unpacking and Inspection
Upon receiving shipment of your equipment, it is important to check items received
against the packing slip. Check all pieces for shipping damage by unpacking and
inspecting. If items are missing or damaged, call our customer service department.
They can assist in filing a claim with the shipping carrier.
If installation requirements are not immediate, it is best to repack the system into its
original packing material for storage.
102 Storage
Store Herytage UPS prior to use at temperatures between –20º and +40º Celsius (-4º
to +104º Fahrenheit). Protect the system from moisture and weather.
If storing the Herytage UPS modules containing batteries, it is best to store them at
temperatures less than 77º Fahrenheit. This allows the batteries to have a longer shelf
life. If you plan to store them for more than 4 months it is important to unpack the
system to recharge the batteries. Consult with the factory customer service
department for assistance.

BILS-10003 rev E 8
200 Installation Guidelines
Herytage UPS are intended to be installed in a temperature controlled, indoor area
free of conductive contaminants.
See specifications for more details on the temperature range, environment, and
altitude. In addition consider any national and local codes you may have to follow.
201 Installation considerations
Before installation of your new Herytage UPS, be sure to take into consideration the
site you have selected. UPS systems produce heat and therefore require ventilation
as well as accessibility.
Consider these factors:
- Input Source Voltage - Ventilation
- Available Single Phase KVA - Size of the UPS
- Bypass Switch - Weight of UPS and Batteries
- Excessively Long Power Runs - Room Temperature
- Distance to Critical Load - Audible noise
- Proper Ground Techniques - Clearances
- Generator Applications - Accessibility
- Remote Emergency Power Off - Communications
202 Location
When you plan the location of your UPS, remember to:
•Avoid temperature and humidity extremes
•Provide shelter from the elements (especially moisture)
•Place as near as possible to the computer or other critical loads
•Maintain 8 inches of clearance in back for ventilation, and a minimum of 36 inches
in front for ventilation and maintenance. A larger clearance in front is helpful, but
not required.

BILS-10003 rev E 9
203 Remote battery installations
If the batteries are installed in a remote location (battery room) utilize DC circuit
protection rated at 250A and 20,000A AIC rating. If the batteries must be some
distance from the UPS you may need to install larger battery cables between the
battery cabinets and the UPS. Call your customer service representative if you would
intend to use anything other than standard cable lengths.
204 Customer Supplied batteries with Legacy battery cabinet(s)
Utilize the same number, size and type of battery as offered by Legacy Power
Conversion, Inc.
Enersys NP18-12BFR (Legacy Part Number BAT-0373)
C&D Technologies UPS 12 - 140 (Legacy Part number BBAT-0065)
Enersys NP33-12 (Legacy Part number BBAT-0065)
C&D Technologies UPS 12 - 270 (Legacy Part number BBAT-0103)
C&D Technologies UPS 12 - 310 (Legacy Part number BBAT-0122)
C&D Technologies UPS12-150MR (Legacy Part number BBAT-10031)
C&D Technologies UPS12-300MR (Legacy Part number BBAT-10032)
C&D Technologies UPS12-350MR (Legacy Part number BBAT-10033)
205 Dimensions and clearance requirements
Table 1 Dimensions and Clearances
Model
Height
(In.)
Width
(In.)
Depth
(In.)
Front
Clearance
(In.)
Back
Clearance
(In.)
2kVA1
3kVA1
4 kVA1
25.2 16.2 23 36 8
6
k
VA
8 kVA
10 kVA 37.5 17.75 33.25 36 8
16 kVA
20 kVA 39 22 34 36 8
1Dimensions are for UPS with standard internal runtime.

BILS-10003 rev E 10
206 External Bypass Switch
Dimension (in) A B C D E F G Weight
SW040xxxx 15.0 16.1 17.0 8.0 12.0 7.0 9.4 23
SW080xxxx 16.0 17.1 18.0 12.0 16.0 9.1 11.9 36
SW125xxxx 16.0 17.1 18.0 12.0 16.0 9.1 11.9 38
Allow 36” for service clearance in front of the bypass switch.
207 External Battery Cabinet
2 thru 4K battery cabinet dimensions

BILS-10003 rev E 11
6 thru 20K battery cabinet dimensions
Allow 36” for service clearance in front and on one side of the battery cabinet. Placing cables in flexible
metal conduit will allow for movement of battery cabinet for service.
300 Wiring Instructions
There are two basic installation configurations of the Herytage UPS system. Following
is an overview of each configuration.
- Soft-wired (Line cord & receptacles)
- Hard-wired with external bypass switch
Installation of electrical wiring should be completed by a qualified electrician.
National electrical code and applicable local codes should be followed.
301 Soft-wired installation (Line-cord and receptacle)
Installation requires a proper wall receptacle for the Herytage UPS power cord to plug
into, and installation of external bypass receptacles.
Note: External bypass receptacles provide power to your load equipment in the event
that the Herytage UPS requires maintenance.
Proper breaker sizing for the input line cord receptacle depends on the input voltage /
plug option ordered, see Table 301-1. Review the Herytage UPS input voltage on the

BILS-10003 rev E 12
name plate – if it differs from the power you have available in your building call Legacy
Power Conversion customer service.
Table 301-1 Circuit breaker minimum requirements (Soft-wired installations)
Model Input Voltage Line Cord Option1Minimum
Circuit Breaker
Requirements
2kVA / 1.6kW 120
120
208
240
C, I
J, E
O, K, L
O, K, L
20A
30A, 50A
15A
15A
3kVA / 2.4kW 120
208
240
J, E
K, L
O, K, L
30A
20A
15A
4kVA / 3.2kW 120
208
240
E
L, M
L, M
50A
30A
30A
6kVA / 4.8kW 120
208
240
NA
N, P
N, P
60A
40A
40A
1Line Cord Designators: C = 5-20P, I = L5-20P, J = L5-30P, E = 5-50P, O = 6-15P, K = L6-20P, L = L6-30P,
M = L14-30P, N = 6-50P, P = L6-50P
Figure 301-1 - 2kVA - 6kVA soft-wired installation overview
Herytage UPS
Bypass Receptacles

BILS-10003 rev E 13
302 Hard-wired Installations
General requirements for hardwire Herytage UPS installations
– Input over-current protection and Output over-current protection and AC output
disconnect switch for Herytage UPS must be provided by the installer. It should be
installed and sized according to national and local electrical codes.
– External bypass switches should be installed within sight of Herytage UPS.
– Follow applicable national and local electrical codes when installing the grounding
system. Herytage UPS grounding conductor should be at minimum the same size
(ampacity) as circuit conductors.
– All circuit conductors including the neutral should be the same size (ampacity).
– Use isolated ground receptacles to obtain the best protection against electrical
noise.
– A separate dedicated conduit system should be utilized for the Herytage UPS input
and output wiring.
– Flexible conduit should be used to allow movement of the Herytage UPS to gain
side service clearance.
– Load imbalance should not exceed 40% / 60%; 2-4K units do not have this
restriction. 6K units L1-N 100% max., L2-N 50% max.
302-1 External bypass switch installations
The 2kVA through 20kVA Herytage UPS may be ordered with an external bypass
switch. The external bypass switch is typically mounted on a wall within site of the
Herytage UPS. See Figure 302-1A.
1. The wiring access panel for the external bypass switch is located on the front
bottom half of the external bypass switch module, remove the screws securing
the bottom half of the front cover to obtain access to the terminal blocks. See
Figure 302-1B
2. Input and output wiring to and from the Herytage UPS and to and from the
external bypass switch should be routed through separate conduits. Conduit
connection points are located on the back of the UPS, the same conduit
connection points are on the external bypass switch. Locate the pre-punched
knockouts for starter holes.
3. Review input and output voltages on the unit data plate and insure they are
proper for your installation, select wiring connection diagram figure 1 or 2 for
appropriate connection. If the wrong input or output voltages were ordered –
call Legacy Power Conversion customer service for assistance.

BILS-10003 rev E 14
Figure 302-1A - Hard-wired Installation Overview
Figure 302-1B Bypass Switch Terminal Block
External Bypass Switch
Herytage UPS
Input and Output
Terminal Block located
under side panel

BILS-10003 rev E 15
302-2 Minimum input over-current protection (Hardwired Installations)
Table 302-1 Minimum input circuit breaker and wire size requirements for hardwired installation
Unit Size
Input Voltage
120 208 240
Circuit
Breaker
Wire
Size
Circuit
Breaker
Wire
Size
Circuit
Breaker
Wire
Size
2kVA / 1.6kW 30A 12 15A 14 15A 14
3kVA / 2.4kW 30A 10 20A 12 20A 12
4kVA / 3.2kW 50A 8 30A 10 30A 10
6kVA / 4.8kW 60A 6 40A 8 40A 8
8kVA / 6.4kW --60A 6 50A 8
10kVA / 8kW --70A 4 60A 6
16kVA / 12.8kW --100A 2 90A 3
20kVA / 16kW --125A 1/0 110A 1
Use a minimum of 75°C rated wire. Consider all other applicable national or local electrical codes.
302-3 Installation Wiring Connection Diagrams
Please refer to the wiring connection diagram for application being used.
Figure 1 120 VAC Input with External Bypass Switch
Figure 2 208 or 240 VAC Input with External Bypass Switch
Figure 3 208/120 VAC Utility Voltage and External MBB Bypass Switch

BILS-10003 rev E 16
Building
Service Panel
Protected Load
Distribution
Panel
Wiring Connection Diagram
120 Volt Input / External Bypass Switch
Figure 1
External Bypass Switch
Herytage UPS
N
NN
L1
N
N
N
L1
L1 L1
N
L1
L1
L2
N
L1
L1
LINE AC
INPUT
AC TO UPS
PROTECTED
LOADS
AC TO UPS
INPUT
UPS OUTPUT
UPS INPUT
AC FROM UPS
OUTPUT
See Note 1
See Note 1
Note 1: There are no input or output fuses or breakers within the Herytage UPS.
Install over-
current protection per NEC and Local Codes.
See Section 302-3 Table 1for minimum input over-current protection sizing.
Unit Size
2kVA
3kVA
4kVA
6kVA
UPS Input Voltage
120 VAC
120 VAC
120 VAC
120 VAC
UPS Output Voltage
120 VAC
120 VAC
120 VAC
120 VAC
Bypass Type
BBM or MBB
BBM or MBB
BBM or MBB
BBM or MBB

BILS-10003 rev E 17
Building
Service Panel
Pro
tected Load
Distribution
Panel
Wiring Connection Diagram
208 or 240 Volt Input / External Bypass Switch
Figure 2
External Bypass Switch
Herytage UPS
NN
NN
N
N
L1
L1
L2
L2
L1
L2
L1
L2
L1
L1 L2
L2 L1
L1
L2
L2
L2
LINE AC
INPUT
AC TO UPS
PROTECTED
LOADS
AC TO UPS
INPUT
UPS OUTPUT
UPS INPUT
AC FROM UPS
OUTPUT
208
240
See Note 1
See Note 1
See Note 2
Note 1:
Note 2:
There are no input or output fuses or breakers within the Herytage UPS.
Install over-current prot
ection per NEC and Local Codes.
See Section 302-3 Table 1for minimum input over-current protection sizing.
Connect to terminal L2 / 208 for 208 volt or terminal L@ / 240 for 240 volt.
120 volt loads must be balanced between N to L1 and N to L2 / 240; except on 2 thru 4K product.
Unit Size
ALL
ALL
ALL
ALL
UPS Input Voltage
208 VAC
208 VAC
240 VAC
240VAC
UPS Output Voltage
120/208 VAC
120/240 VAC
120/208 VAC
120/240 VAC
Bypass Type
BBM Only
BBM Only
BBM Only
BBM or MBB
Terminals
N to L1
N to L2 / 240
N to L2 / 208
L1 to L2 / 208
L1 to L2 / 240
Voltage Available
120 VAC
120 VAC
208 VAC
240 VAC
88 VAC( DO NOT USE)

BILS-10003 rev E 18
Building
Service Panel
Protected Load
Distribution
Panel
Wiring Connection Diagram
208 Volt Input - 240/120 Volt Output/ External MBB Bypass Switch
Figure 3
Transformer
208 Pri -
240/120 Sec
Herytage UPS
N
NN
N
N
L1
L1
L2
L2
L1
L2
L1
L2
L1
L1
L2
L2
L1
L1
L2
L2
L2
LINE AC
INPUT
AC TO UPS
PROTECTED
LOADS
AC TO UPS
INPUT
UPS OUTPUT
UPS INPUT
AC FROM UPS
OUTPUT
208 240
See Note 1
See Note 1
See Note 2
Note 1:
Note 2:
There are no input or output fuses or breakers within the Herytage UPS.
Install over-
current protection per NEC and Local Codes.
See Section 302-3 Table 1for minimum input over-current protection sizing.
Connect to terminal L2 / 240 for 240/120 volt.
120 volt loads must be balanced between N to L1 and N to L2 / 240; except on 2 thru 4K product..
Unit Size
ALL
Utility Voltage
208/120 VAC
UPS I
nput Voltage
240 VAC
UPS Output Voltage
120/240 VAC
Bypass Type
BBM or MBB
Terminals
N to L1
N to L2 / 240
N to L2 / 208
L1 to L2 / 208
L1 to L2 / 240
Voltage Available
120 VAC
120 VAC
208 VAC
240 VAC
88 VAC( DO NOT USE)

BILS-10003 rev E 19
303 Battery installation and connection
Herytage UPS systems have internal batteries that are already connected or external
batteries that must be installed and connected before operation of UPS. To install and
connect the batteries in the external cabinet, refer to the Battery Wiring Diagram
supplied with the battery cabinet.
The following precautions should be observed when working on batteries:
- Remove watches rings and other metal objects.
- Use tools with insulated handles.
- Wear rubber gloves and boots.
- Do not lay tools or metal parts on top of batteries.
Determine if the battery is inadvertently grounded. If so remove the source of ground.
Contact with any part of the grounded battery could result in electrical shock.
Note: Refer to enclosed battery connection diagram for battery connection
instructions for UPS utilizing extended runtime batteries (longer than 10
min. at full load).
DANGER: Installation or servicing of batteries should be performed or
supervised by personnel knowledgeable of batteries and required
precautions. Keep unauthorized personnel away from batteries.
CAUTION: Wear protective clothing and eye wear.
CAUTION: Batteries can present a risk of electrical shock or burn from high short
circuit current. Observe proper precautions.
CAUTION: Never open or mutilate batteries. Released electrolyte is harmful to the
skin and eyes, and may be extremely toxic.
CAUTION: Battery tray is heavy and can exceed several hundred pounds, insure
you are prepared to move such weight.
CAUTION: Disconnect charging source prior to connecting or disconnecting battery
terminals.
This manual suits for next models
7
Table of contents