LEINER PERGOLA SUNRAIN Q 1-FIELD User manual

Montageanleitung
Montagehandleiding
Assembly instructions
Leiner GmbH
Augsburger Straße 5
86497 Horgau
Tel +49 (0) 82 94/2 92 – 0
Fax +49 (0) 82 94/2 92 – 39
www.leiner.de
LEINER
PERGOLA SUNRAIN Q 1-FELD / 1-VAKS / 1-FIELD
Leiner GmbH
EN13561
05/2018 Version 2.2 D/NL/EN Art.-Nr.: S19201 Dokumentation: Leiner GmbH
1

Montageanleitung
Montagehandleiding
Assembly instructions
1. Inhaltsverzeichnis
Kapitel / hoofdstuk / chapter Seite / page / page
1. Inhaltsverzeichnis......................................................................................................................
Inhoudsopgave
Contents
2
3. Notwendiges Werkzeug..............................................................................................................
Vereist gereedschap
Tools required
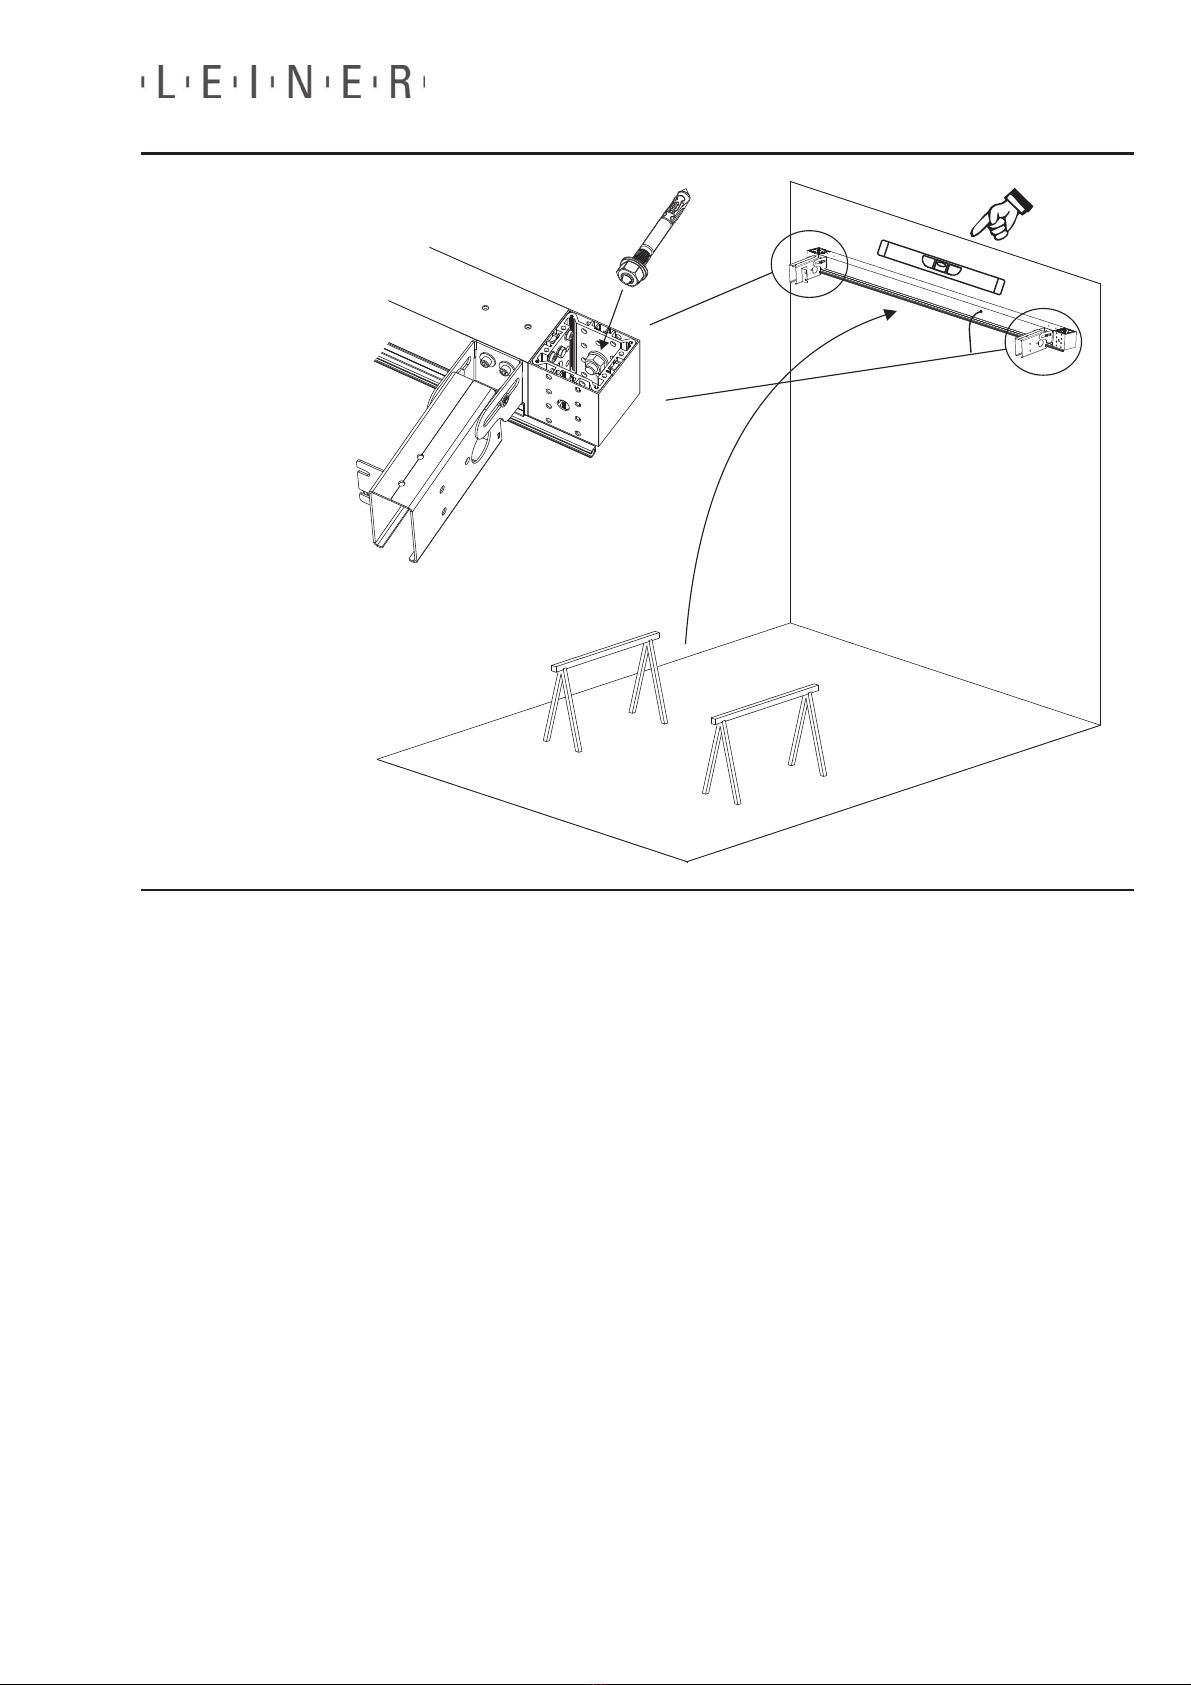
4. Wandmontage Rahmen mit Führungsschienen...............................................................................
Wandmontage frame met geleiders
Mounting the frame with guide rails on the wall
5. Freistehende Montage Rahmen mit Führungsschienen..................................................................
6 ...............................................................................................................
Montage beschermdak
Mounting the hood profile
7.
8
. Einführung ...............................................................................................................................
Introductie
Introduction
Vrijstaande montage frame met geleiders
Mounting the frame with guide rails free standing
. Montage Schutzdach
Montage Aufdoppelungsprofile für stirnseitige Montage CANTO QSZ.............................................
Montage verdubbelingsprofielen voor montage CANTO QSZ aan kopse zijde
Mounting the doubling profiles for face-on assembly of the CANTO QSZ
. Programmierung Terrassenfaltdach Somfy io.............................................................................
Programmering terrasvouwdak Somfy io
Programming the Somfy io folding patio roof
9. Tuchspannung Terrassenfaltdach erhöhen / verringern (nur Somfy io)............................................
Doekspanning terrasvouwdak verhogen / verminderen (alleen Somfy io)
Increasing / reducing the fabric tension of the folding patio roof (Somfy io only)
10. Programmierung Terrassenfaltdach Somfy RTS .......................................................................
Programmering terrasvouwdak Somfy RTS
Programming the Somfy RTS folding patio roof
11. Verstellen der oberen Endlage Terrassenfaltdach (Somfy RTS & io)............................................
Verstellen van de bovenste eindpositie terrasvouwdak (Somfy RTS & io)
Adjusting the upper end position of the folding patio roof (Somfy RTS & io)
12. Programmierung Absenkung Somfy io......................................................................................
Programmering verticale uitval Somfy io
Programming the Somfy io descent
13. Programmierung Absenkung Somfy RTS...................................................................................
Programmering verticale uitval Somfy RTS
Programming the Somfy RTS descent
14. Programmierung LED-Beleuchtung (nur Somfy io)......................................................................
Programmering ledverlichting (alleen Somfy io)
Programming the LED lighting (Somfy io only)
15. Rücksetzen auf Werkseinstellung.............................................................................................
Terugzetten naar fabrieksinstellingen
Restoring the factory settings
2
3
6
7
39
66
70
71
73
74
76
77
82
84
85
2

Montageanleitung
Montagehandleiding
Assembly instructions
Um die Qualitätsprodukte der Firma LEINER ordnungsgemäß montieren zu können müssen die
Anweisungen in der Montageanleitung befolgt werden. Bei Nichtbeachtung der Montageanleitung ist die
Firma LEINER von jeglicher Haftungspflicht entbunden.
Die Markise erfüllt die Anforderungen der CE – Konformität:
Diese Montageanleitung wurde für Fachpersonal geschrieben und setzt die grundlegenden
handwerklichen Kenntnisse sowie die Kenntnisse der örtlichen Unfall-Verhütungs-Vorschriften voraus.
2. Einführung
Leiner GmbH
Augsburger Straße 5
86497 Horgau
EN 13561
Markise für die Verwendung im Außenbereich
Windwiderstandsklasse: Klasse 3
Regenwiderstandsklasse: Klasse 2
Sicherheitshinweis!
Weist auf mögliche Körper- bzw. Sachschäden aufgrund von elektrischen Bauteilen hin
Hinweise zur Bedienung bzw. Montage der Markise.
Sicherheitshinweis!
Weist auf mögliche Körper- bzw. Sachschäden hin
Symbolerklärung:
Sicherheitshinweise:
Vorsicht elektrischer Strom - Lebensgefahr!
Die elektrische Installation darf nur von Elektrofachkräften ausgeführt werden. Die in den
Begleitdokumenten enthaltenen Installationsanweisungen müssen beachtet werden!
D
LED Hinweise zu Montageschritten die zusätzlich bei Anlagen mit LED-Beleuchtung durchgeführt
werden müssen.
Hinweise zu Montageschritten die bei Anlagen mit Somfy io - Funktechnik durchgeführt
werden müssen.
Hinweise zu Montageschritten die bei Anlagen mit Somfy RTS - Funktechnik durchgeführt
werden müssen.
Hinweise zu Montageschritten die bei Anlagen mit PSQ Anbau durchgeführt werden müssen.
3

Montageanleitung
Montagehandleiding
Assembly instructions
De instructies in de montagehandleiding moeten in acht worden genomen om de kwaliteitsproducten
van de firma LEINER correct te kunnen monteren. Als de montagehandleiding wordt genegeerd, komt
de aansprakelijkheid van de firma LEINER te vervallen.
De zonwering is voorzien van het CE-keurmerk:
Deze montagehandleiding is bedoeld voor vakpersoneel en veronderstelt fundamentele vakkennis en
kennis van de lokale OngevallenPreventieVoorschriften.
2. Inleiding
EN 13561
Zonwering voor gebruik buitenshuis
Windweerstandsklasse: klasse 3
Regenweerstandsklasse: klasse 2
Veiligheidsinstructie!
Wijst op mogelijk persoonlijk letsel of materiële schade op grond van elektrische onderdelen.
Aanwijzingen voor de bediening resp. de montage van de zonwering.
Veiligheidsinstructie!
Wijst op mogelijk persoonlijk letsel of materiële schade.
Verklaring van de symbolen:
Veiligheidsinstructies:
Let op! Elektrische stroom –levensgevaar!
De elektrische installatie mag alléén worden uitgevoerd door elektrotechnisch vakpersoneel.
De installatieaanwijzingen in de begeleidende documentatie moeten in acht worden genomen.
NL
Leiner GmbH
Augsburger Straße 5
D - 86497 Horgau
LED Aanwijzingen i.v.m. de extra montagestappen die bij installaties met ledverlichting moeten
worden uitgevoerd.
Aanwijzingen i.v.m. de extra montagestappen die bij installaties met Somfy io-radiotechniek
moeten worden uitgevoerd.
Aanwijzingen i.v.m. de extra montagestappen die bij installaties met Somfy RTS-radiotechniek
moeten worden uitgevoerd.
Aanwijzingen i.v.m. de extra montagestappen die bij installaties met PSQ extensie.
4

Montageanleitung
Montagehandleiding
Assembly instructions
The correct assembly of quality products made by Leiner is subject to strict observance of the
assembly instructions. Failure to follow the instructions for assembly and use shall release Leiner from
liability.
The awning meets the requirements laid down for CE conformity:
These assembly instructions have been written for skilled professionals and assume a technical
knowledge base and a working knowledge of the relevant local accident prevention regulations.
2. Introduction
EN 13561
Awning for outdoor use
Wind resistance class: class 3
Rain resistance class: class 2
Safety alert!
Warning of possible injury or property damage due to electrical components
Information about the use or assembly of the awning
Safety alert!
Warning of possible injury or property damage
Guide to symbols:
Safety information:
Caution! Danger of life!
The electrical installation work may only be carried out by professional electricians,
duly complying with the installation instructions in the documents supplied with the product.
EN
Leiner GmbH
Augsburger Straße 5
D - 86497 Horgau
LED Information about additional mounting steps that have to be carried out in systems with
LED lighting.
Information about mounting steps that have to be carried out in systems with Somfy io
wireless technology.
Information about mounting steps that have to be carried out in systems with Somfy RTS
wireless technology.
Information about mounting steps that have to be carried out in systems with PSQ extension.
5

Montageanleitung
Montagehandleiding
Assembly instructions
3. Notwendiges Werkzeug
Noodzakelijk instrument
Tools required
3x 3mm
4mm
5mm
6mm
Ø 3,9mm
Ø 4,2mm
Ø 9mm
TX25
200°C
13mm
15mm
24mm
10m
Leiner Art.-Nr.:
H121082464
(Metabo Art.-Nr.:
630463000)
3mm
4mm
5mm
6mm
LED
3mm
4mm
5mm
6mm
6

Montageanleitung
Montagehandleiding
Assembly instructions
4. Wandmontage Rahmen mit Führungsschienen
Wandmontage frame met geleiders
Mounting the frame with guide rails on the wall
4.1 Übersicht der Rahmenprofile
Overzicht van de frameprofielen
Overview of the frame profiles
L
R
L1
Q1
M1/1
S1
S3
L2
AS1
AS3
AL1
AL3
Kabelabgang immer nach rechts !
Kabeluitgang altijd naar rechts
Cable outlet always to the right
OU
!!!
7

Montageanleitung
Montagehandleiding
Assembly instructions
4.2
4.3
Ø16
Z
Y: Breite
Breedte
Width
Z: Höhe
Hoogte
Hight
Q1
!
Q1
1x
1x
Q1
1.
2.
Y - 110mm 55
55
Y
110 55 55
8

Montageanleitung
Montagehandleiding
Assembly instructions
4.4 !
Linke Seite spiegelbildlich !
Linkerzijde in spiegelbeeld!
Mirror image on the left-hand side!
Ø16
9

Montageanleitung
Montagehandleiding
Assembly instructions
!4.4.1
4.4.2
4.5
4.6
L1
S1
2x
2x
DIN125 8,4
DIN7984 M8x40
D40422:
D03322:
2x K24835
Bürsten entnehmen
Borstels verwijderen
Remove brushes
4.6.1 4.6.2
Leiner Art.-Nr.:
H121082464
(Metabo Art.-Nr.:
630463000)
10

Montageanleitung
Montagehandleiding
Assembly instructions
4.6.3 4.6.4
ca. 10mm
4.6.5
ca. 1mm
ca. 1mm
4.6.6
4.6.7 4.6.8
~5x ~25Nm
11

Montageanleitung
Montagehandleiding
Assembly instructions
4.6.9 4.6.10
4.7
Q1
4x 8mm
4x DIN934 M8 VZ
Schnorr TypS Ø
L1
Q1
L1
Kabel zu Motor Absenkung (links oder rechts)
Kabel naar motor van verticale uitval (linker- of rechterzijde)
Cable to descent motor (left or right side)
12

Montageanleitung
Montagehandleiding
Assembly instructions
2x
2x
DIN125 8,4
DIN7984 M8x40
S3
L2
4.8
4.9
wie / hoe / like 4.6.1 - 4.6.10
2x K24835
Bürsten entnehmen
Borstels verwijderen
Remove brushes
Q1
L2
Q1
L2
Kabel zu Motor Absenkung (links oder rechts)
Kabel naar motor van verticale uitval (linker- of rechterzijde)
Cable to descent motor (left or right side)
4x 8mm
4x DIN934 M8 VZ
Schnorr TypS Ø
13

32,5
77,5
10
40
70
100
Montageanleitung
Montagehandleiding
Assembly instructions
4.10
x
x
y
x: 4x Bohrungen für Verschraubung
4x Gaten voor schroeven
4x Drillings for screwing
y: 1-4x Bohrung für Kabelverlegung
1-4x Gaten voor kabels
1-4x Drillings for cables
Ø 9mm
14

Montageanleitung
Montagehandleiding
Assembly instructions
AL3
4x D31222: DIN934 M8
4x D41920: Schnorr Ø8mm
4x D40422: DIN125 Ø8,4
4x D04622: DIN912 M8x50
4x DIN125 8,4
4x DIN7984 M8x40
D40422:
D03322:
4.11
15

Montageanleitung
Montagehandleiding
Assembly instructions
4x DIN125 8,4
4x D01722: DIN7984 M8x30
D40422:
M1/1
Kabelabgang immer nach rechts !
Kabeluitgang altijd naar rechts
Cable outlet always to the right
4x D40422: DIN125 8,4
4x D01722: DIN7984 M8x30
=
=
=
=
=
=
=
=
4.12
4.13
L
R
OU
!!!
16

ca.1/2 (±2cm)
ca.1/2 (±2cm)
LR
1x B252000099
200
200
146
146
14
Montageanleitung
Montagehandleiding
Assembly instructions
1x B251000099
4.14
4.15
Ø12
17

Montageanleitung
Montagehandleiding
Assembly instructions
4.16
4.17
1x Z917000022
1x Z918000022
1x DIN913 M4X6A4
2x K50035
1x K49635
1x K49735
8996000099
~10mm
~10mm
==
klemmen
clamp
klemmen
2-4x DIN125 4,3 A2
18

Montageanleitung
Montagehandleiding
Assembly instructions
L
R
1x B251000099
1x B252000099
2x D40422: DIN125 8,4
2x D03322: DIN7984 M8x40
2x D40422: DIN125 8,4
2x D03322: DIN7984 M8x40
4.18
4.19
+8996000099
19

Montageanleitung
Montagehandleiding
Assembly instructions
2x N07330
2x Z734000022
Führungsschienen ganz einschieben
Geleiders helemaal inschuiven
Push guide rails all the way in
1.
2.
2x D03622
4x D56022:
ISO 7380 M8x14 A2
4.20
1.
2.
Stromzufuhr LED rechts spiegelbildlich
Stroomtoevoer led rechts in spiegelbeeld
LED power supply on the right in mirror image
LED
20
Table of contents