Lennox EMEA ARIA 2 User manual

www.lennoxemea.com
INSTALLATION, OPERATING
AND MAINTENANCE
ARIA2-IOM-1910-E
DUCTABLE FANCOIL
ARIA 2
1,3 - 6,6 kW

• 2 •
ARIA 2
3
3
3
3
3
4
4
4
5
5
5
6
6
6
6
7
7
7
7
8
8
8
9-10
11
11
11
11
Installation, Operation and Maintenance Manual / ARIA2-IOM-1910-E
INDEX
INSTALLATION, OPERATION
AND MAINTENANCE
Premise
Warnings
Identification device
Transportation, receipt, handling
Safety requirements
General unit size
Water connections
Nomenclature
General unit size with silencers
Operating limits
Usage limits
Installation warnings
End brackets for anchoring to the ceiling
Grommets
Spigot outside air intake
Additional condensate drain pan
Changing filters
Plenum and suction to change the air flow
Air curtain kit spigot removal
Water connections
Electrical connections
Connections to the terminal block
Wiring diagram
Water coil rotation
Cleaning and maintenance
Troubleshooting
Dismantling device
Ref : ARIA2-IOM-1910-E
All technical and technological information in this manual, including the technical descriptions and the diagrams provided, are the property
of Lennox and may not be used (except in the operation of the product), reproduced, issued to or made available to third parties without prior
written agreement of Lennox.

• 3 •
Installation, Operation and Maintenance Manual / ARIA2-IOM-1910-E
PREMISE
This installation and maintenance manual must always accompany
the air handling units, so that it can be consulted by the installer
or by the user when needed. Installation should be carried out in
compliance with local regulations in each country, according to the
instructions of the manufacturer or qualified personnel specialized
in his profession. Incorrect installation of the unit may cause
damage to people, animals or things for which the manufacturer
cannot be held responsible. The unit’s installation and connection
to the electricity network must be performed by qualified personnel.
Before any intervention is necessary to verify that the device is
disconnected from the power grid. Consult this instruction manual
before installation.
WARNINGS
The use of this device is easy, however it is important to read this
manual thoroughly before using it for the first time. This way you
can:
- Use the equipment safely;
- Obtain best performance;
- Ensure correct behavior;
- Respect the enviroment.
- Do not allow children and unassisted disabled persons to
operate the appliance.
- Do not touch the appliance when barefoot or with wet or damp
parts of the body.
- Do not pull, detach or twist any electrical cables, even when
disconnected from the power network.
- Do not open doors or panels providing access to the interior
of the unit without having first put the system switch to “off.”
- Do not introduce pointed objects through the air intake grills
and air delivery.
- Do not dispose of, abandon or leave within reach of children
packaging materials (maps, staples, plastic bags, etc.) as it
can be dangerous.
- Do not spray or pour water directly on the unit.
- Do not use the appliance in places with suspended dust,
or in potentially explosive atmospheres, in environments
with presence of oil in suspension, high humidity or in the
presence of particularly aggressive atmospheres.
- Do not cover the appliance with objects or drapes that even
partially obstruct the air flow.
The device operates with electric power to the mains voltage (230
V AC, 50Hz). Please keep in mind that mains voltage is potentially
dangerous and that any device connected to it must be used care-
fully. Before working on the appliance, unplug it from the mains
(pull the power plug or isolating the supply line by switching off the
main switch). If the unit is not used for long periods make sure that
the controls are in the O (off). Should the unit off during winter with
temperatures close to zero, empty the system and make sure that
the heat exchanger unit is completely free of water to avoid the risk
of ice formation and subsequent collapse. If the appliance must be
put permanently out of service, disconnect it permanently from the
mains. Any tampering or modification will result in immediate ex-
clusion of warranty. In case of failure, never try to repair the unit by
yourself; seek advice from a qualified technician. Repairs carried
out by inexperienced persons may cause damage or
accidents. Always keep the appliance clean, especially clean the
air filter periodically (at least once a month).
THE MANUFACTURER DECLINES ALL RESPONSIBILITY IF
THE INSTALLATION INSTRUCTIONS PROVIDED IN THIS
MANUAL ARE NOT OBSERVED. INCORRECT INSTALLATION
COULD LEAD TO POOR PERFORMANCE AND / OR FAILURE
OF THIS PRODUCT. IT COULD ALSO BE A SOURCE OF RISK
TO THE USER.
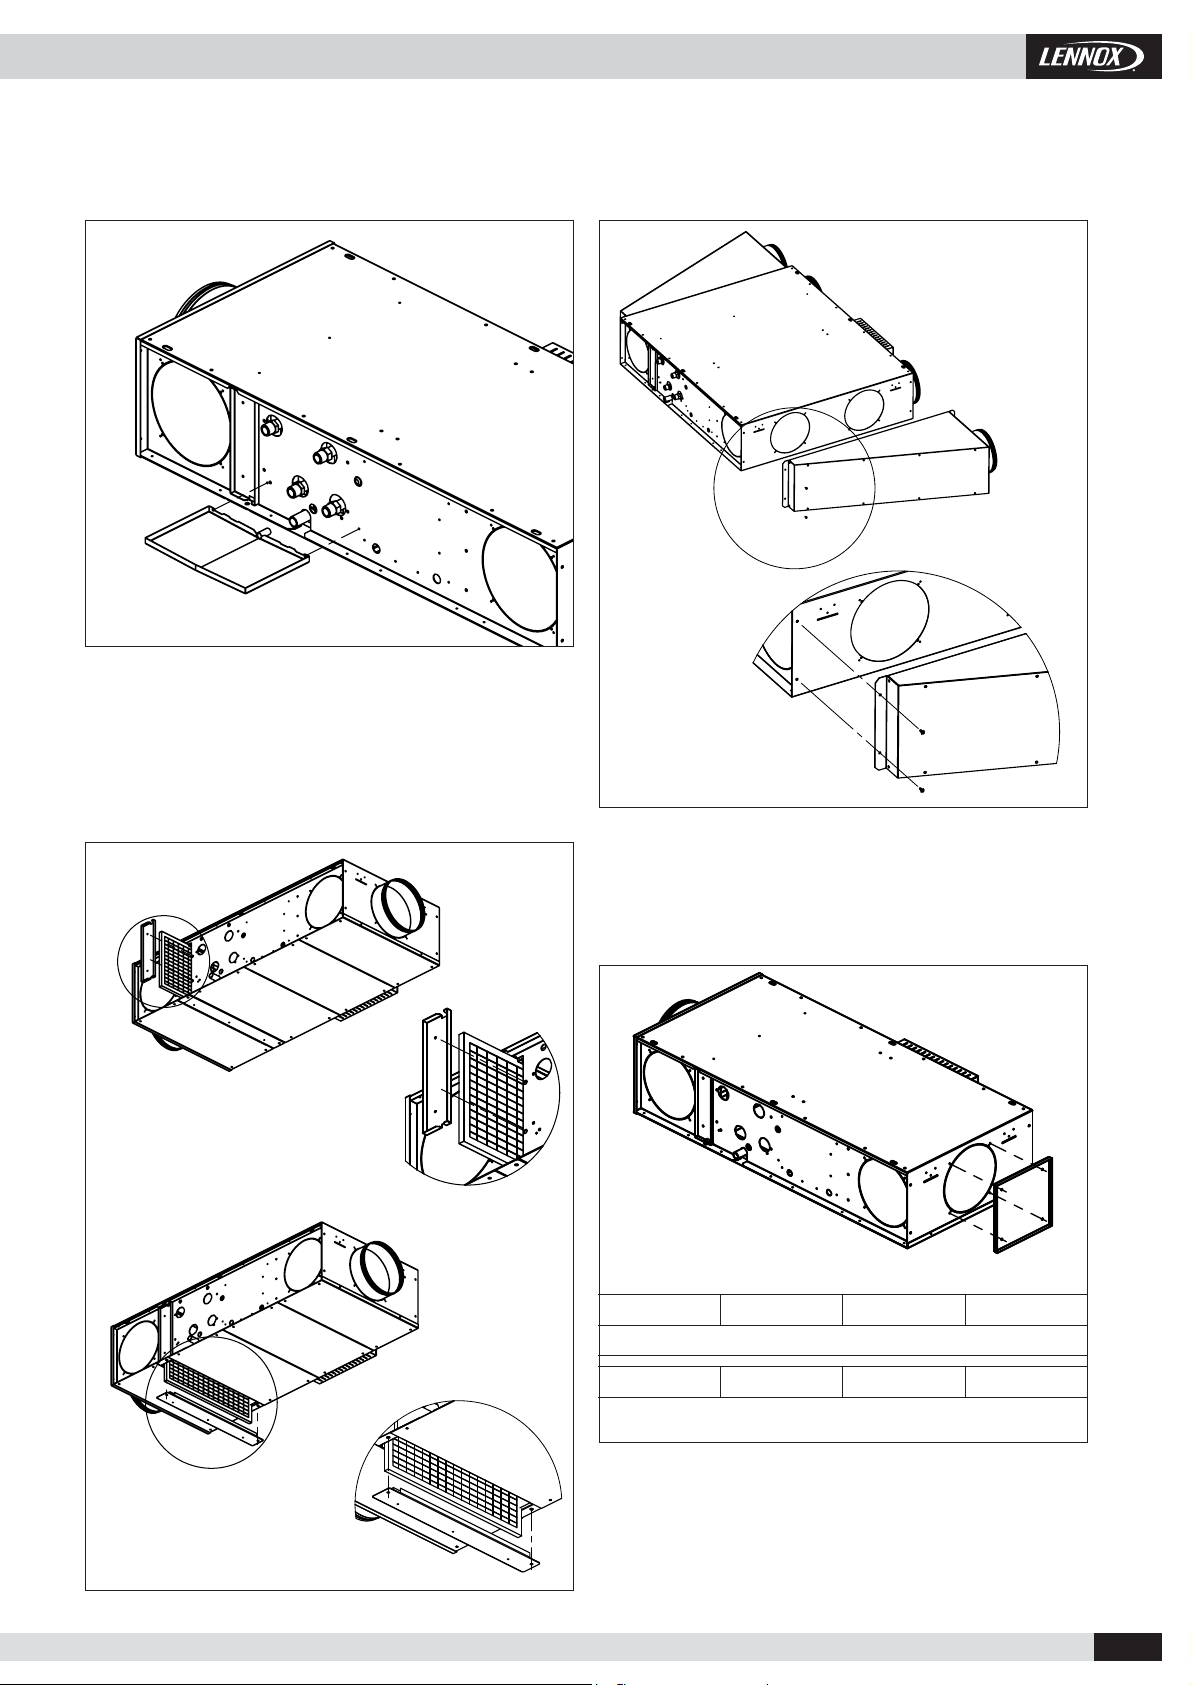
IDENTIFICATION DEVICE
The air handling units are equipped with an identification plate that
reports:
- Address of the Manufacturer; - Power supply voltage in "V";
- Marking "CE"; - Power supply frequency in “Hz”;
- Model;
- Number of phases indicated
with “Ph”;
- Batch number; - Cooling capacity in “W”;
- Date of production; - Sensible cooling capacity in “W”;
- Current consumption in "A"; - Thermal power.
- Power consumption in "W";
TRANSPORT, RECEIPT,
HANDLING
The packaging must remain intact until the time of installation. For
handling, depending on the weight, use appropriate means as
required by Directive 89/391 / EEC, as amended. Upon receipt
of the unit Please make an all-party control, in order to verify that
the transport did not cause damage. Any breakages present must
be communicated to the carrier, adding the saving clause on the
transport document, specifying the type of damage. For prolonged
storage keep the machines protected from dust and away from
sources of heat and vibration.
THE MANUFACTURER ACCEPTS NO RESPONSIBILITY FOR
DAMAGE DUE TO MISHANDLING, OR LACK OF PROTECTION
FROM WEATHER CONDITIONS.

• 4 •
213 216 223 226 413 416 423 426
B482 482 882 882 482 482 882 882
D1/2” 1/2” 1/2” 3/4” 1/2” 1/2” 1/2” 3/4”
R////1/2” 1/2” 1/2” 1/2”
460 460
196
12
69
Ø198
I
283 260508
L
51
251
10078
D
R
70
60
825
398
319
69 1050 69
DN 200
R
20
D
65 22
27
241
B 133
Installation, Operation and Maintenance Manual / ARIA2-IOM-1910-E
GENERAL SIZE UNIT
GENERAL SIZE UNIT NOMENCLATURE
WATER
CONNECTIONS
RIGHT
LEFT
WATER
CONNECTIONS
SAFETY REQUIREMENTS
Do not leave packages loose during transport.
Do not expose to weather conditions.
Do not step on.
If the device must be dismantled, protect your hands with
work gloves.
DO NOT move the machine alone if its weight exceeds 25
kg.
2 PIPES 4 PIPES
ACCESSORIES
ACCESSORY
S213-11-L
S. . . .LOW NOISE UNIT
213. . .SIZE
11 . . . .AIR DIRECTION
L. . . . .WATER CONNECTIONS

• 5 •
400
400 400400
12
69
196
Ø198
910
508
1733
L
I
283
51
251
R
70
1475
78
D
60
69
398
319
69
1700
DN 200
100
20
D
R
65 22
27
241
B 133
P
mm 63 125 250 500 1000 2000 4000 8000
213-216 / 413-416 2 5 8 16 20 20 10 5
223-226 / 423-426 3 6 11 20 25 25 15 8
213 216 223 226 413 416 423 426
B482 482 882 882 482 482 882 882
D1/2” 1/2” 1/2” 3/4” 1/2” 1/2” 1/2” 3/4”
I300 300 300 300 700 700 700 700
L455 455 455 455 855 855 855 855
R////1/2” 1/2” 1/2” 1/2”
Installation, Operation and Maintenance Manual / ARIA2-IOM-1910-E
GENERAL UNIT SIZE WITH SILENCERS
ACCESSORIES
ACCESSORY
2 PIPES
OCTAVE BAND [Hz]
4 PIPES
ACOUSTIC ATTENUATION
OPERATING LIMITS
SUMMER (COOLING)
Minimum temp. Water inlet: + 4°C
Maximum operating pressure: 8 bar
Maximum temp. Ambient air: + 35°C
Maximum air humidity: 80%
WINTER (HEATING)
Maximum temp. water inlet: 70°C
Maximum operating pressure: 8 bar
Minimum temp. ambient air: + 4°C
Maximum air humidity: 80%
Maximum temp. ambient air: + 35°C
USAGE LIMITS
The units have the following operational limitations:
- They can not be installed in environments with abnormal
temperature and humidity conditions;
- They can not be installed outdoors;
- They can not be installed in an explosive or potentially
explosive atmosphere;
- They can not be installed in a corrosive or potentially
corrosive atmosphere.

• 6 •
MIN.1000
Installation, Operation and Maintenance Manual / ARIA2-IOM-1910-E
INSTALLATION WARNINGS
Before installing the device make sure that:
1) The installation site has enough space to contain it and
around it there is enough space for the ordinary and
extraordinary installation and maintenance.
In the case where the unit is installed in the ceiling, it will be
necessary to provide an opening to allow access.
2) There are no obstructions to the air passage on the suction
and discharge.
3) The water connections have position, size and spacing as
required by the device.
4) The system pressure does not exceed 8 bar for the water
versions.
5) The power supply line has characteristics that conform
to the machine and that there is a safety switch, easily
accessible to the user, which can cut power for any
necessary intervention.
6) The safety switch is in the OFF position so that there is no
voltage on the line device supply.
GROMMETS
END BRACKETS FOR
ANCHORING TO THE CEILING SPIGOT OUTSIDE AIR INTAKE
Spigot outside air intake of 100 mm or 125 mm.

• 7 •
213 216 413 416
n° 1 kit
223 226 423 426
n° 2 kit
Installation, Operation and Maintenance Manual / ARIA2-IOM-1910-E
ADDITIONAL CONDENSATE DRAIN PAN
AIR CURTAIN KIT SPIGOT REMOVAL
CHANGING FILTERS
PLENUM AND SUCTION TO CHANGE THE
AIR FLOW
Discharge plenum and suction to change directionality of the air flow.

• 8 •
OUT
OUT
IN
IN
H1H2
Installation, Operation and Maintenance Manual / ARIA2-IOM-1910-E
WATER CONNECTIONS
CONNECTION TO THE MAIN LINE
WARNING! Always use a key and second key for connecting the
coil to the pipes. If the valve is present, adequately isolate the
valve body with insulating material.
Connect the inlet and outlet water pipes respecting what is
indicated on the side of the unit. Properly insulate the water
supply pipes to prevent dripping during cooling operation. On
the outlet tube must be inserted a shut-off valve and in the outlet
pipe a keeper. Also the valve body and holder must be properly
insulated to prevent dripping. Proper insulation should be
installed by the installer. The manufacturer assumes no liability
for the proper performance of the insulation.
NOTE: It is always advisable to install the valve. In the heating
mode, the valve reduces consumption because once it reaches
the temperature, the water circulation is blocked, avoiding thus
waste heat energy. In the cooling function of the valve, blocking
thewater circulation whenthe temperature isreached, it prevents
the indoor heat exchanger continuing to condense water, with
the possibility of undesired dripping on the floor. It also reduces
chiller operation contributing to energy savings.
ELECTRICAL CONNECTIONS
WARNING
Before making the electrical connections, make sure that the
supply line is de-energized, making sure that the main switch is
in the OFF position:
- The electrical connections must be performed by qualified
personnel.
- Ensure that the network is single-phase 230 Vac/1/50 Hz (±
10%).
- The unit exposed to voltages outside the above limits could
cause malfunction and will invalidate the warranty.
- The supply line must be equipped with disconnect switch in
compliance with European standard EN60947-3.
- Make sure the electrical system is capable of providing
not only the working current required but also the current
needed to power other equipment already in use. Any
electrical and mechanical alterations or tampering will
invalidate the warranty.
The cables must be long enough, avoiding traction, which can
create bottlenecks or compressions of metal parts.
The power cables must have a length such that in case of
accidental traction of the conductors tend before the grounding
conductor. Connect the ground wire to the relative terminal
markedwiththesymbol .Checktheconnectionofthegrounding.
Observe the safety regulations in force in the installation country.
CONNECTIONS TO THE TERMINAL BLOCK
Electrical connections must be made on the terminal strip on the
side of the machine. The meaning of each terminal is indicated
on the label present on the terminal block.
WARNING: STRICTLY OBSERVE THE SPECIFIED
CONNECTIONS, FAILURE TO DO SO WILL CAUSEA BLOWN
ENGINE!
CONDENSATE WATER DRAINAGE
The condensate drain pipe must have a downward slope of at
least 3° and must not show upward strokes or bottlenecks to
allow smooth flow of water. It is appropriate that the condensate
drain is siphoned. The condensate drain should be connected to
a rainwater drainage system. Do not use the discharge of white
water or black to avoid possible aspirations of odors in the case
of the evaporation of water contained in the siphon. At the end
of work, check the smooth flow of condensate by pouring water
into the tray. The condensate water drainage system must be
installed in a workmanlike manner and should be subjected to
regular monitoring.
The manufacturer is not liable for any damage caused by
dripping in the absence of valve and periodic maintenance of
the drainage.
Siphon
H1=p/10
H2=((p/10)/2) + 30 p=
in Pa
H1; H2 = mm

• 9 •
Installation, Operation and Maintenance Manual / ARIA2-IOM-1910-E
WIRING DIAGRAM
WIRING DIAGRAM WITH ELECTRICAL HEATER
Fan speed control
0-10 Vdc
2x0,5 sqmm
twisted / shielded
Fan speed control
0-10 VDC - 2x0,5 sqmm twisted / shielded
LEGEND
PE . . . . . . . . Protective conductor (Yellow/Green)
L. . . . . . . . . Phase (Black)
N. . . . . . . . . Neutral (Blue)
A1 . . . . . . . . Electronic control
M1 . . . . . . . . Fan motor
XA1 . . . . . . . Terminal board
LEGEND
PE . . . . . . . . Protective conductor (Yellow/Green)
L. . . . . . . . . Phase (Black)
N. . . . . . . . . Neutral (Blue)
A1 . . . . . . . . Electronic control
M1 . . . . . . . . Fan motor
KA1 . . . . . . . Relay
R1 . . . . . . . . Electric heater
ST1 . . . . . . . Safety thermostat - automatic switch
ST2 . . . . . . . Safety thermostat - manual switch
XA1-2 . . . . . Terminal board
YV1-2. . . . . . Water valve actuator
Permanent power supply
230Vac/50Hz - 3x1 sqmm
Permanent power supply
230Vac/50Hz - 3x2,5 sqmm
Cool valve control (4 pipe system)
ON/OFF - 230Vac/50Hz - 2x1 sqmm
- or -
Heat/cool valve control (2 pipe system)
ON/OFF - 230Vac/50Hz - 2x1 sqmm
Heat valve control (4 pipe
system)
ON/OFF - 230Vac/50Hz - 2x1 mm²
Or Electric heater control
ON/OFF - 230Vac/50H

• 10 •
3x1 mm²
5x1 mm²
Installation, Operation and Maintenance Manual / ARIA2-IOM-1910-E
WIRING DIAGRAM 4 PIPE (2 VALVES) AND THERMOSTAT LXTFZ01M
WIRING DIAGRAM 2 PIPE + ELECTRICAL HEATER AND THERMOSTAT LXTFZ01M
Permanent power supply
230Vac/50Hz - 3x2,5 mm2
2x0,5 mm²
twisted / shielded
LEGEND
PE . . . . . . . . Protective conductor (Yellow/Green)
L. . . . . . . . . Phase (Black)
N. . . . . . . . . Neutral (Blue)
A1 . . . . . . . . Electronic control
M1 . . . . . . . . Fan motor
XA1 . . . . . . . Terminal board
YV1 . . . . . . . Cool water valve actuator
YV2 . . . . . . . Heat water valve actuator
LEGEND
PE . . . . . . . . Protective conductor (Yellow/Green)
L. . . . . . . . . Phase (Black)
N. . . . . . . . . Neutral (Blue)
A1 . . . . . . . . Electronic control
M1 . . . . . . . . Fan motor
KA1 . . . . . . . Relay
R1 . . . . . . . . Electric heater
ST1 . . . . . . . Safety thermostat - automatic switch
ST2 . . . . . . . Safety thermostat - manual switch
XA1-2 . . . . . Terminal board
YV1 . . . . . . . Water valve actuator
2x0,5 mm2
twisted / shielded

• 11 •
Installation, Operation and Maintenance Manual / ARIA2-IOM-1910-E
WATER COIL ROTATION
WARNING
Fans can reach a speed of 1000 r/min. Do not insert any object
nor hands. During operation, the engine warms up. Allow the
engine to cool before touching it. During the heating operation
the heat exchanger and the connecting pipes can reach high
temperatures (80°C). Wait until the cooling of the exchanger
before touching it or protect hands with suitable gloves. The
water heat exchange coils are suitable to operate in operation up
to the maximum pressure of 8 Bar.
For battery rotation, proceed as follows:
1. Unplug the power to the machine, if connected;
2. Make sure that the heat exchange parts have cooled down
completely, if the unit is installed and powered;
3. Drain any water present inside the heat exchanger, if the
unit is powered;
4. Remove the condensate trap bowl;
3. Remove the battery fixing screws;
4. Remove the battery taking care not to cut the fins and not to
damage them;
5. Remove the knockouts from the opposite side of the unit
(using a screwdriver) to allow the passage of battery fittings;
6. Place the battery, turn it upside down without turning it so
that the joints protrude in correspondence of the knockouts
previously removed;
7. Secure the battery with the screws previously removed;
8. It is also recommended to reposition the terminal block
on the opposite side to that of the attacks. If during this
operation, it’s necessary to disconnect the terminal cables,
mark the cable locations to avoid making mistakes in the
process of reconnecting;
9. Replace the condensate drain pan.
CLEANING AND MAINTENANCE
WARNING
Before performing any cleaning or maintenance, disconnect
the device from the power grid!
ORDINARY MAINTENANCE
It is duty of the user to carry out all maintenance operations on
the unit. Only personnel previously trained and qualified may
perform maintenance operations. If the unit must be dismantled,
protect your hands with work gloves.
Monthly checks:
- Make sure the vents are clean. Otherwise, clean them by
suction so as not to damage them.
- Verify all electrical equipment and in particular the tightness
of the electrical connections
Annual checks:
- Check of all electrical equipment and in particular the
tightening of electrical connections.
- Check the tightness of all the bolts, nuts and whatever else
can be loosened by the constant vibration of the unit.
- Check that the motor has no traces of dust, dirt and other
impurities. Periodically verify that it works without abnormal
vibrations or sounds, that the entrance to the fan is not
obstructed, resulting in a possible overheating of the
windings.
CLEANING THE AIR FILTER
The device is equipped with air filter in the fan inlet.
During normal operation the filter withholds impurities present
in the air.
It is necessary to periodically clean the filter to maintain the
filtration characteristics of the fan air.
You should clean the filter at least once a month as follows:
1. Remove the filter.
2. Place the filter on a flat, dry surface, remove accumulated
dust with a vacuum cleaner.
3. Wash the filter with water and detergent (not solvents).
4. Leave the filter to dry in a ventilated place.
5. Replace the filter only after ensuring they are perfectly dry.
NOTE: Clean the filter at the beginning and end of each
season, or consistent with the work done.
TROUBLESHOOTING
There is little or no output air
Possible cause: Possible remedy:
incorrect setting of
speed on the control panel choose the right speed
filter clogged clean filter
Ostruction of airflow
on discharge or suction remove the obstruction
The motor does not run? Check that ...
- the power is on
- switches or thermostats are in the operating position
- there are no foreign objects blocking the rotation of the fan
There are no foreign objects blocking the rotation of the fan
- the filter and battery are clean
- it is not incoming air in the hydraulic circuit from the special venting
valve
- the system is correctly balanced
- the boiler / chiller functions
DISMANTLING DEVICE
This appliance is designed to last for many years. In case of
dismantling, obtain the services of qualified personnel so that the
work is carried out in complete safety.
Always remember that the first operation to be carried out
before dismantling the unit is to unplug it permanently from the
mains. This machine is manufactured using recyclable materials
(copper, aluminum, brass, plastic) assembled by screws and
joints in order to facilitate the unit’s separation.
Contact a firm specializing in differentiated waste disposal; just
so you can be sure of proper recycling and contribute to the
environment.

+ 32 3 633 3045 +351 229 066 050
+33 1 64 76 23 23 +7 495 626 56 53
+49 (0) 211 950 79 600 +34 915 401 810
+ 39 02 495 26 200 +38 044 585 59 10
+ 31 332 471 800 +44 1604 669 100
+48 22 58 48 610
LENNOX DISTRIBUTION
+33 4 72 23 20 20
+ 32 3 633 3045 +48 22 58 48 610
+33 1 64 76 23 23 +351 229 066 050
+49 (0) 211 950 79 600 +34 915 401 810
+ 39 02 495 26 200 +38 044 585 59 10
+ 31 332 471 800 +44 1604 669 100
LENNOX DISTRIBUTION
+33 4 72 23 20 20
www.lennoxemea.com
ARIA2-IOM-1910-E
Due to LENNOX EMEA ongoing commitment to quality, the specifications, ratings and
dimensions are subject to change without notice and without incurring liability.
Improper installation, adjustment, alteration, service or maintenance can cause property
damage or personal injury.
Installation and service must be performed by a qualified installer and servicing agency.
SALES OFFICES :
BELGIUM AND LUXEMBOURG POLAND
FRANCE PORTUGAL
GERMANY SPAIN
ITALY UKRAINE
NETHERLANDS UNITED KINGDOM AND IRELAND
OTHER COUNTRIES :
Table of contents
Popular Air Handler manuals by other brands

MrCool
MrCool Olympus Series user manual

Zehnder Rittling
Zehnder Rittling ComfoClime 24 user manual

System air
System air Topvex SC Operation and maintenance instructions

Amana
Amana AVPTC 24B14A Series manual

Wolf
Wolf KG Installation and maintenance instructions

Hitachi
Hitachi RPIL-0.4FSRE Installation & operation manual

BLAUBERG Ventilatoren
BLAUBERG Ventilatoren Freshbox 100 installation guide

Amana
Amana ARUF 14 Series Installation & operating instructions

National Comfort Products
National Comfort Products CPG41838-U instruction manual

Trox Technik
Trox Technik X-CUBE Transport and installation manual

Gree
Gree FLEXX36HP230V1BH Installation & owner's manual

Vents
Vents Micra 100 E Wi-Fi user manual