LG LH-T3602ME User manual

DVD
RECEIVER
OWNER'S
MANUAL
MODEL:
LH-T3602ME
(Main
Unit:
LH-T3602
Speakers:
LHS-36MEF,
LHS-36MEC
LHS-36MEW,
LHS-36MES)
Before
connecting,
operating
or
repairing
this
product,
please
read
this
instruction
booklet
carefully
and
completely.
LH-T3602ME_NAASLLA_ENG_20Q
R
USB

2
This
lightning
flash
with
arrowhead
symbol
within
an
equilateral
triangle
is
intended
to
alert
the
user
to
the
presence
of
uninsulated
dangerous
voltage
within
the
product's
enclosure
that
may
be
of
sufficient
magnitude
to
constitute
a
risk
of
electric
shock
to
persons.
The
exclamation
point
within
an
equilateral
triangle
is
intended
to
alert
the
user
to
the
presence
of
important operating
and
maintenance
(servicing)
instructions
in
the
literature
accompanying
the
product.
CAUTION:
VISIBLE
AND
INVISIBLE
LASER
RADIATION
WHEN
OPEN
AND
INTERLOCKS
DEFEATED.
CAUTION:
This
product
employs
a
Laser
System.
To
ensure
proper
use
of
this
product,
please
read
this
owner's
manual
carefully
and
retain
it
for
future
reference.
Should
the
unit
require
maintenance,
contact
an
authorized
service
center.
Use
of
controls,
adjustments
or
the
performance
of
procedures
other
than
those
specified
herein
may
result
in
hazardous
radiation
exposure.
To
prevent
direct
exposure
to
laser
beam,
do
not
try
to
open
the
enclosure.
Visible
laser
radiation
when
open.
DO NOT
STARE
INTO
BEAM.
CAUTION:
The
apparatus
should
not
be
exposed
to
water
(dripping
or
splashing)
and
no
objects
filled
with
liquids,
such
as
vases,
should
be
placed
on
the
apparatus.
CAUTION
concerning
the
Power
Cord
Most
appliances
recommend
they
be
placed
upon
a
dedicated
circuit;
That
is,
a
single
outlet
circuit
which
powers
only
that
appliance
and
has
no
additional
outlets
or
branch
circuits.
Check
the
specification
page
of
this
owner's
manual
to
be
certain.
Do
not
overload
wall
outlets.
Overloaded
wall
outlets,
loose
or
damaged
wall
outlets,
extension
cords,
frayed
power
cords,
or
damaged
or
cracked
wire
insulation
are
dangerous.
Any
of
these
conditions
could
result
in
electric
shock
or
fire.
Periodically
examine
the
cord
of
your
appliance,
and
if
its
appearance
indicates
damage
or
deterioration,
unplug
it,
discontinue
use
of
the
appliance,
and
have
the
cord
replaced
with
an
exact
replacement
part
by
an
authorized
servicer.
Protect
the
power
cord
from
physical
or
mechanical
abuse,
such
as
being
twisted,
kinked,
pinched,
closed
in
a
door,
or
walked
upon.
Pay
particular
attention
to
plugs,
wall
outlets,
and
the
point
where
the
cord
exits
the
appliance.
To
disconnect
power
from
the
mains,
pull
out
the
mains
cord
plug.
When
installing
the
product,
ensure
that
the
plug
is
easily
accessible.
CLASS
1
LASER
PRODUCT
KLASSE
1
LASER
PRODUKT
LUOKAN
1
LASER
LAITE
KLASS
1
LASER
APPARAT
CLASSE
1
PRODUIT
LASER
CAUTION
CAUTION:
TO
REDUCE
THE
RISK
OF
ELECTRIC
SHOCK
DO NOT
REMOVE
COVER
(OR
BACK)
NO
USER-SERVICEABLE
PARTS
INSIDE
REFER
SERVICING
TO
QUALIFIED
SERVICE
PERSONNEL.
WARNING:
TO
PREVENT
FIRE
OR
ELECTRIC
SHOCK
HAZARD,
DO
NOT
EXPOSE
THIS
PRODUCT
TO
RAIN
OR
MOISTURE.

3
Introduction
MaintenanceandService.................3
Beforeuse.............................4
FrontPanel/RearPanel...................5
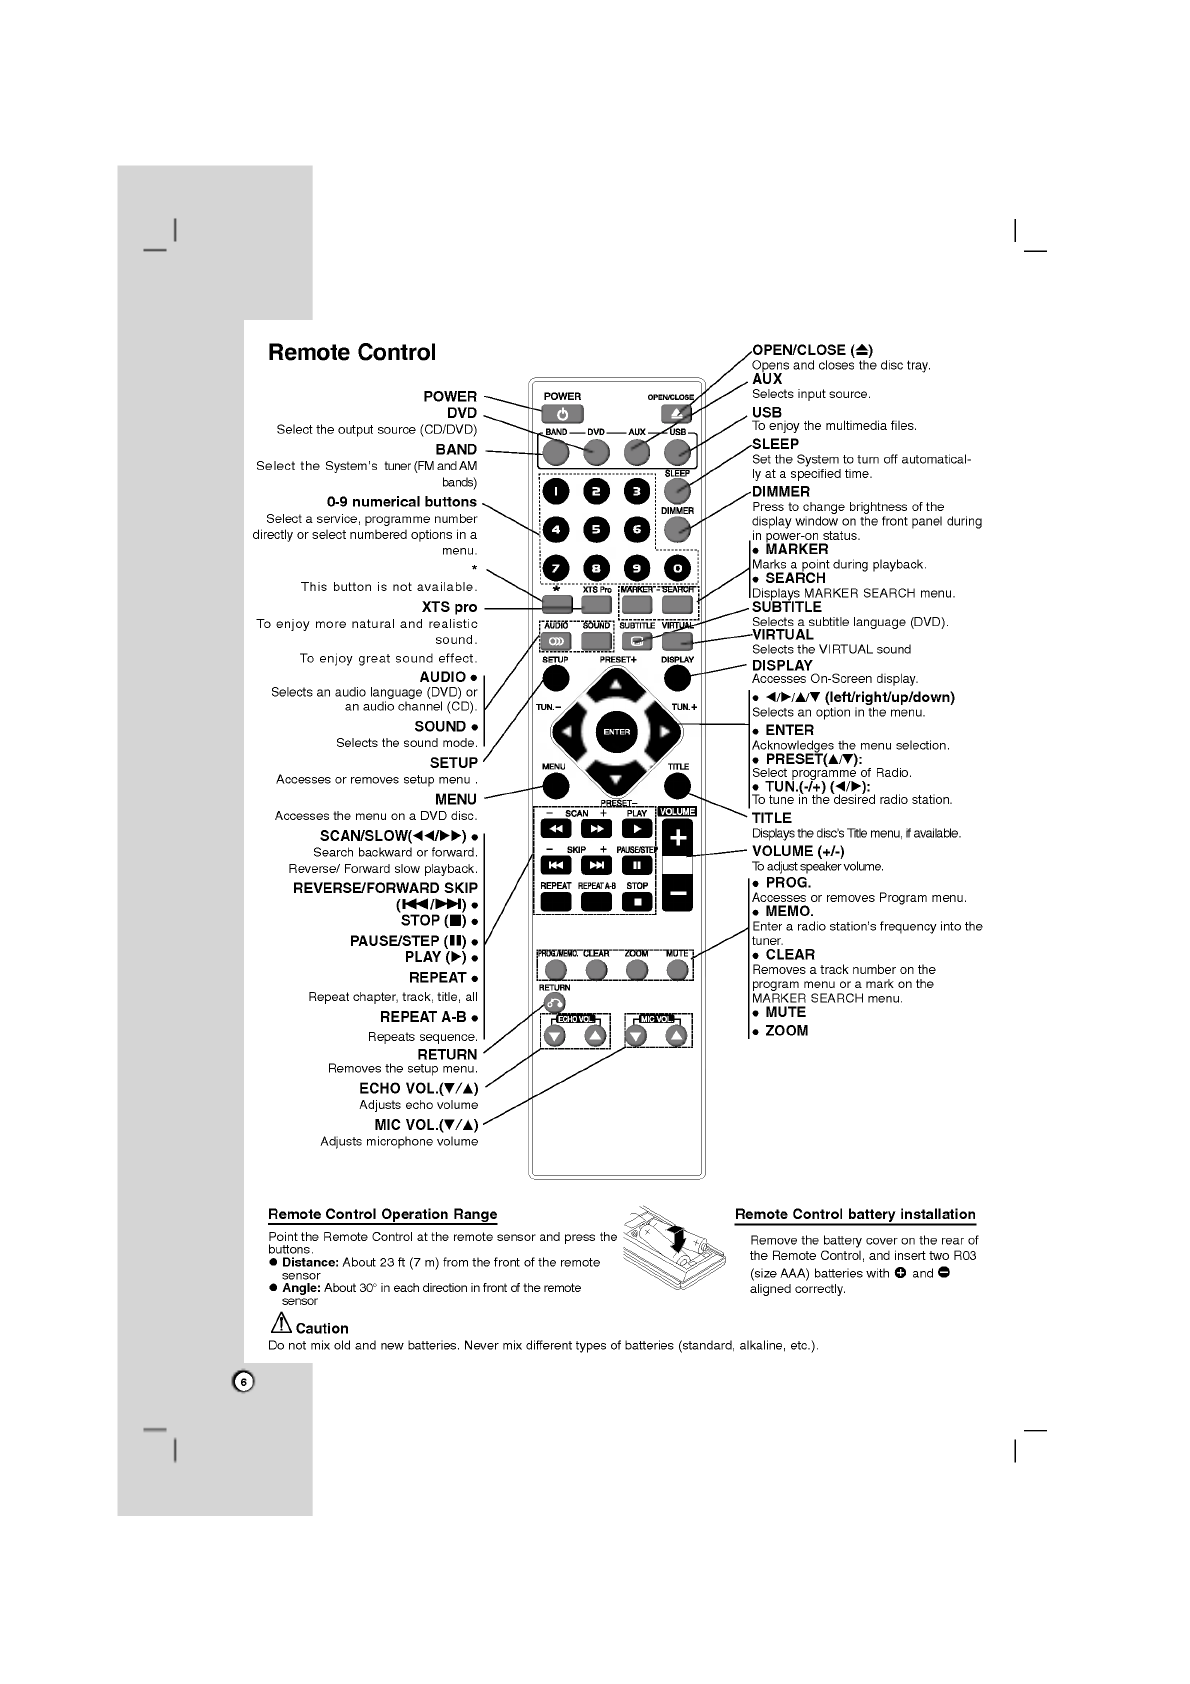
RemoteControl.........................6
Installation
and
Setup
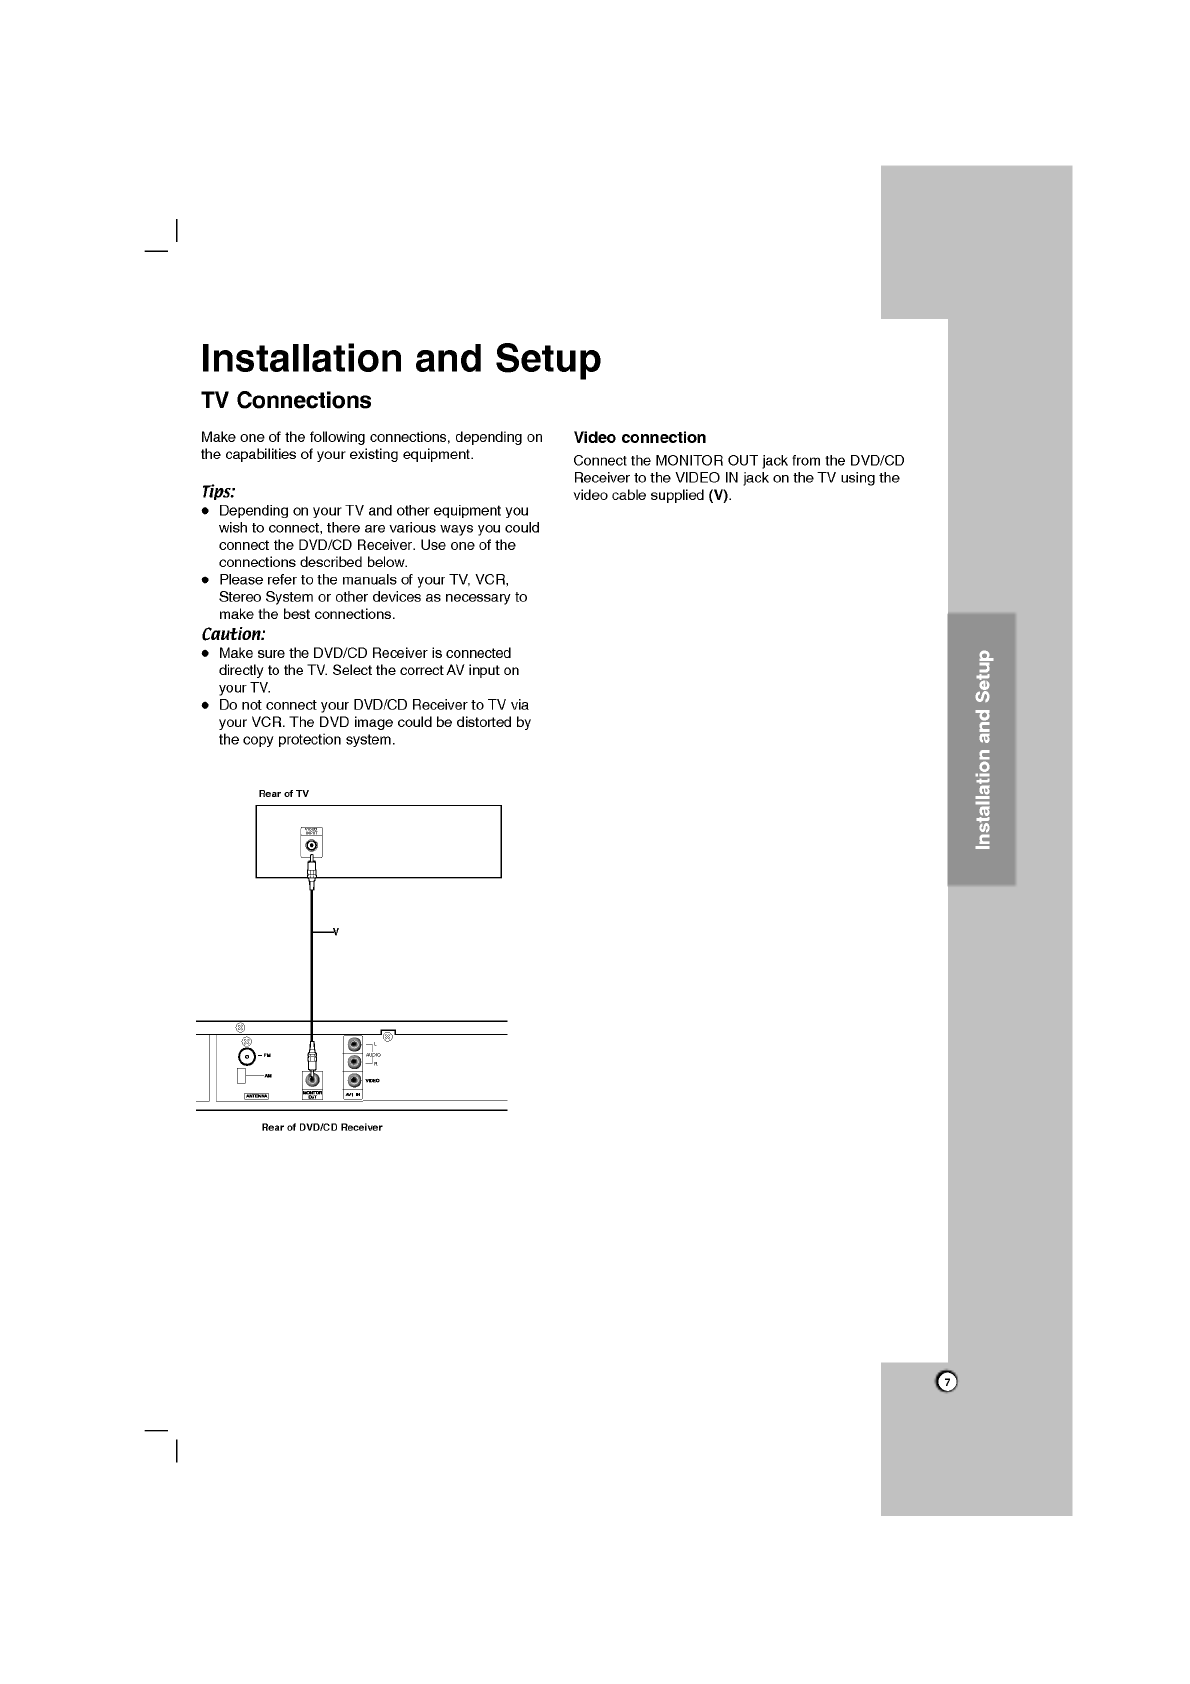
TVConnections.........................7
Optional
Equipment
Connections
. . . . . . . . . .
.8
AntennaConnections....................8
SpeakerSystemConnection...............9
Displaying
Disc
Information
on-screen
. . . . .
.10
InitialSettings.........................10
GeneralOperation......................10
Language...........................10
Display.............................11
Audio..............................12
5.1SpeakerSetup.....................12
Lock(ParentalControl).................13
Others..............................13
Operation
Generalfeatures.......................14
Additionalfeatures.....................15
Playing
an
Audio
CD
or
MP3/WMA
file
. . . . .
.16
ProgrammedPlayback..................16
ViewingaJPEGfile....................17
PlayingaDivXMoviefile.................18
PresettingtheRadioStations
. . . . . . . . . . . .
.19
ListeningtotheRadio...................19
SleepTimerSetting.....................20
Dimmer...............................20
Mute.................................20
UsingHeadphoneJack..................20
XTS/XTSpro...........................20
VIRTUALsound........................20
SoundMode...........................20
REFERENCE
LanguageCodes.......................21
AreaCodes...........................21
Troubleshooting.....................22-23
Specifications
Maintenance
and
Service
Refer
to
the
information
in
this
chapter
before
contacting
a
service
technician.
HANDLING
THE
UNIT
When
shipping
the
unit
Please
save
the
original
shipping
carton
and
packing
materials.
If
you
need
to
ship
the
unit,
for
maximum
protection,
re-pack
the
unit
as
it
was
originally
packed
at
the
factory.
Keeping
the
exterior
surfaces
clean
Do
not
use
volatile
liquids
such
as
insecticide
spray
near
the
unit.
Do
not
leave
rubber
or
plastic
products
in
contact
with
the
unit
for
a
long
period
of
time.
since
they
leave
marks
on
the
surface.
Cleaning
the
unit
To
clean
the
player,
use a
soft,
dry
cloth.
If
the
surfaces
are
extremely
dirty,
use a
soft
cloth
lightly
moistened
with
a
mild
detergent
solution.
Do
not
use
strong
solvents
such
as
alcohol,
benzine,
or
thinner,
as
these
might
damage
the
surface
of
the
unit.
Maintaining
the
Unit
The
DVD/CD
Receiver
is
a
high-tech,
precision
device.
If
the
optical
pick-up
lens
and
disc
drive
parts
are
dirty
or
worn,
the
picture
quality
could
be
diminished.
Depending
on
the
operating
environment,
regular
inspection
and
maintenance
are
recommended
after
every
1,000
hours
of
use.
For
details,
please
contact
your
nearest
authorized
service
center.

4
Before
use
To
ensure
proper
use
of
this
product,
please
read
this
owner's
manual
carefully
and
retain
for
future
reference.
This
manual
provides
information
on
the
operation
and
maintenance
of
your
DVD/CD
Receiver.
Should
the
unit
require
service,
contact
an
authorized
service
location.
About
the
Symbol
Display
" "
may
appear
on
your
TV
display
during
operation
and
indicates
that
the
function
explained
in
this
owner's
manual
is
not
available
on
that
specific
DVD
video
disc.
Symbol
Used
in
this
Manual
Note:
Indicates
special
notes
and
operating
features.
Tip:
Indicates
tips
and
hints
for
making
the
task
easier.
A
section
whose
title
has
one
of
the
following
symbols
is
applicable
only
to
the
disc
represented
by
the
symbol.
DVD
and
finalized
DVD±R/RW
Video
CDs
Audio
CDs
MP3
Discs
WMA
Discs
JPEG
Discs
DivX
Discs
Manufactured
under
license
from
Dolby
Laboratories.
"Dolby",
"Pro
Logic",
and
the
double-D
symbol
are
trademarks
of
Dolby
Laboratories.
Confidential
Unpublished
works.
Copyright
1992-1997
Dolby
Laboratories.
All
rights
reserved.
Manufactured
under
license
from
Digital
Theater
Systems,
Inc.
U.S.
Pat.
No's.
5,451,942;
5,956,674; 5,974,380;
5,978,762;
6,226,616;
6,487,535
and
other
U.S.
and
world-
wide
patents
issued
and
pending.
"DTS"
and
"DTS
Digital
Surround"
are
registered
trademarks
of
Digital
Theater
Systems,
Inc.
Copyright
1996,
2003
Digital
Theater
Systems,
Inc.
All
Rights
Reserved."
Types
of
Playable
Discs
DVD
(8cm/12cmdisc)
Video
CD
(VCD)
(8cm/12cmdisc)
Audio
CD
(8cm/12cmdisc)
In
addition,
this
unit
can
play
a
DVD-RW,
DVD+RW,
SVCD
and
CD-R
or
CD-RW
that
contains
audio
titles,
MP3,
WMA,
JPEG
or
DivX
files.
Notes:
Depending
on
the
conditions
of
the
recording
equipment
or
the
CD-R/RW
(or
DVD-RW,
DVD+RW)
disc
itself,
some
CD-R/RW
(or
DVD-RW,
DVD+RW)
discs
cannot
be
played
on
the
unit.
Do
not
attach
any
seal
or
label
to
either
side
(the
labeled
side
or
the
recorded
side)
of
a
disc.
Do
not
use
irregularly
shaped
CDs
(e.g.,
heart-
shaped
or
octagonal).
It
may
result
in
malfunctions.
Regional
Code
This
unit
has
a
regional
code
printed
on
the
rear
of
the
unit.
This
unit
can
play
only
DVD
discs
labelled
same
as
the
rear
of
the
unit
or
"ALL".
Notes
on
Regional
Codes
Most
DVD
discs
have
a
globe
with
one
or
more
numbers
in
it
clearly
visible
on
the
cover.
This
number
must
match
your
DVD
player's
regional
code
or
the
disc
cannot
play.
If
you
try
to
play
a
DVD
with
a
different
regional
code
from your
player,
the
message
"Check
Regional
Code"
appears
on
the
TV
screen.
Introduction

5
Introduction
OPEN/CLOSE
button
TUNING(-/+)
/SKIP(.bb/BB>)
buttons
Remote
sensor
PHONES
connector
VOLUME
controller
STANDBY/ON
STANDBY
indicator
Lights
red
when
the
receiver
is
in
Standby
mode
(off).
DISPLAY
Window
DISC
Tray
MIC
1/MIC
2
Connect
a
microphone
to
MIC
1
or
MIC
2
or
to
both
sockets.
Do
not
touch
the
inner
pins
of
the
jacks
on
the
rear
panel.
Electrostatic
discharge
may
cause
permanent
damage
to
the
unit.
USB
port
Connect
to
a
USB
port
of
a
memory
device
(USB
memory
etc.)
FUNC./PLAY
Press
and
hold
down
this
button
about
3
seconds,
then
press
repeatedly
to
select
other
function.
MONO/ST./
P./STEP
STOP
AUDIO
L
R
FM
Antenna
connector
AM
Loop
Antenna
connectors
SPEAKER
connectors
Power
Cord
MONITOR
OUT
connector
AV1
AUDIO
Input
(L/R)/VIDEO
IN
Connectors
Front
Panel/Rear
Panel

6
Remote
Control
Remote
Control
Operation
Range
Point
the
Remote
Control
at
the
remote
sensor
and
press
the
buttons.
Distance:
About
23
ft
(7
m)
from
the
front
of
the
remote
sensor
Angle:
About
30°
in
each
direction
in
front
of
the
remote
sensor
Remote
Control
battery
installation
Remove
the
battery
cover
on
the
rear
of
the
Remote
Control,
and
insert
two
R03
(size
AAA)
batteries
with
and
aligned
correctly.
Caution
Do
not
mix
old
and
new
batteries.
Never
mix
different
types
of
batteries
(standard,
alkaline,
etc.).
OPEN/CLOSE
(Z)
Opens
and
closes
the
disc
tray.
AUX
Selects
input
source.
USB
To
enjoy
the
multimedia
files.
SLEEP
Set
the
System
to
turn
off
automatical-
ly
at
a
specified
time.
DIMMER
Press
to
change
brightness
of
the
display
window
on
the
front
panel
during
in
power-on
status.
MARKER
Marks
a
point
during
playback.
SEARCH
Displays
MARKER
SEARCH
menu.
SUBTITLE
Selects
a
subtitle
language
(DVD).
VIRTUAL
Selects the
VIRTUAL
sound
DISPLAY
Accesses On-Screen
display.
b/B/v/V
(left/right/up/down)
Selects
an
option
in
the
menu.
ENTER
Acknowledges
the
menu
selection.
PRESET(v/V):
Select
programme
of
Radio.
TUN.(-/+)
(b/B):
To
tune
in
the
desired
radio
station.
TITLE
Displays
the
disc's
Title
menu,
if
available.
VOLUME
(+/-)
To
adjust
speaker
volume.
PROG.
Accesses
or
removes
Program
menu.
MEMO.
Enter
a
radio
station's
frequency
into
the
tuner.
CLEAR
Removes
a
track
number
on
the
program
menu
or
a
mark
on
the
MARKER
SEARCH
menu.
MUTE
ZOOM
POWER
DVD
Select the
output
source
(CD/DVD)
BAND
Select
the
System's
tuner
(FM
and
AM
bands)
0-9
numerical
buttons
Select
a
service,
programme
number
directly
or
select
numbered
options
in
a
menu.
*
This
button
is
not
available.
XTS
pro
To
enjoy
more
natural
and
realistic
sound.
To
enjoy
great
sound
effect.
AUDIO
Selects
an
audio
language
(DVD)
or
an
audio
channel
(CD).
SOUND
Selects the
sound mode.
SETUP
Accesses
or
removes
setup
menu
.
MENU
Accesses
the
menu
on
a
DVD
disc.
SCAN/SLOW(bb/BB)
Search
backward
or
forward.
Reverse/
Forward
slow
playback.
REVERSE/FORWARD
SKIP
(
.
/
>
)
STOP
(x)
PAUSE/STEP
(
X
)
PLAY
(B)
REPEAT
Repeat
chapter,
track,
title,
all
REPEAT
A-B
Repeats
sequence.
RETURN
Removes
the
setup
menu.
ECHO
VOL.(V/v)
Adjusts
echo
volume
MIC
VOL.(V/v)
Adjusts
microphone
volume

7
Make
one
of
the
following
connections,
depending
on
the
capabilities
of
your
existing
equipment.
Tips:
Depending
on
your
TV
and
other
equipment
you
wish
to
connect,
there
are
various
ways
you
could
connect
the
DVD/CD
Receiver.
Use
one
of
the
connections
described
below.
Please
refer
to
the
manuals
of
your
TV,
VCR,
Stereo
System
or
other
devices
as
necessary
to
make
the
best
connections.
Caution:
Make
sure
the
DVD/CD
Receiver
is
connected
directly
to
the
TV.
Select
the
correct
AV
input
on
your
TV.
Do
not
connect
your
DVD/CD
Receiver
to
TV
via
your
VCR. The
DVD
image
could
be
distorted
by
the
copy
protection
system.
Video connection
Connect
the
MONITOR
OUT
jack
from
the
DVD/CD
Receiver
to
the
VIDEO
IN
jack
on
the
TV
using
the
video
cable
supplied
(V).
TV
Connections
AUDIO
L
R
Rear
of
DVD/CD
Receiver
V
VIDEO
INPUT
Rear
of
TV
Installation
and
Setup

8
Optional
Equipment
Connections
1.
Connect
a
VCR
to
the
AV
IN
connectors.
2.
Connect
the
USB
port
of
USB
Memory
(or
MP3
player,
etc.)
to
the
USB
port
on
the
front
of
the
unit.
To
Remove
the
USB
Device
from
the
unit
1.
Choose
a
different
function
mode
or
press
the
STOP
(x)
twice
in
a
row.
2.
Remove
the
USB
device
from
the
unit.
Notes:
Don't
extract
the
USB
device
while
operating.
Music
files
(MP3/WMA),
image
files
(JPEG)
and
DivX
files
can
be
played.
This
unit
can
not
use
a
USB
HUB.
Recommended
Memory
Cards.
Compact
Flash
Card
(CFC),
Micro
Drive
(MD),
Smart
Media
Card
(SMC),
Memory
Stick
(MS),
Secure
Digital
Card
(SD),
Multi
Media
Card
(MMC),
Memory
Stick
Pro
(MS-Pro)
-
Compatable
with
:
FAT16,
FAT32
-
Only
use
the
memory
cards
recommended.
Devices
which
require
additional
program
installation
when
you
have
connected
the
unit
to
a
computer
are
not
supported.
In
case
of
a
USB
HDD,
make
sure
to
connect
an
auxiliary
power
cord
to
the
USB
HDD
for
proper
operation.
Up
to
four
primary
partitions
of
a
drive
are
supported.
If
there
is
an
extention
partition,
it
will
not
be
supported.
If
the
drive
of
USB
device
is
two
or
more,
a
drive
folder
is
displayed
on
the
screen.
If
you
want
to
move
to
the
initial
menu
after
you
select
a
folder,
press
RETURN.
Digital
cameras
and
mobile
phones
are
not
supported.
Antenna
Connections
Connect
the
supplied
FM/AM
Antenna
for
listening
to
the
radio.
Connect
the
AM
Loop
Antenna
to
the
AM
aerial
connector.
Connect
the
FM
Wire
Antenna
to
the
FM
aerial
connector.
Notes:
To
prevent
noise
pickup,
keep
the
AM
Loop
Antenna
away
from
the
DVD/CD
Receiver
and
other
components.
Be
sure
to
fully
extend
the
FM
wire
Antenna.
After
connecting
the
FM
Wire
Antenna,
keep
it
as
horizontal
as
possible.
AUDIO
L
R
VI
OUT
IN
AUDIO
Rear
of
VCR
To
AV
IN
AUDIO
(L/R)/
VIDEO
Front
of
DVD/CD
Receiver
To
AUDIO
OUT
(L/R)/
VIDEO
OUT
USB
Memory,
MP3
Player
(or
Memory
Card
Reader,
etc.)
AUDIO
L
R
FM
Wire
Antenna
(supplied)
AM
Loop
Antenna
(supplied)

9
Installation and Setup
Speaker
System
Connection
Connect
the
speaker
cords
to
the
speaker
terminals.
To
obtain
the
best
possible
surround
sound,
adjust
the
speaker
parameters
(volume,
distance,
etc.).
Notes:
Be
sure
to
match
the
speaker
cable
to
the
appropriate
terminal
on
the
components:
+
to
+
and
--
to
--.
If
the
cables
are
reversed,
the
sound
will
be
distorted
and
will
lack
base.
If
you
use
front
speakers
with
low
maximum
input
rating,
adjust
the
volume
carefully
to
avoid
excessive
output
on
the
speakers.
Front
speaker
(Right)
Front
speaker
(Left)
Center
speaker
Rear
speaker
(Right
surround)
Subwoofer
Rear
speaker
(Left
surround)
About
Ferrite
Core
(Optional)
Be
sure
to
attach
the
ferrite
core
to
the
speaker
cables
(for
connecting
to
this
unit).
This
ferrite
core
can
reduce
noises.
How
to
attach
the
ferrite
core
1.
Press
the
stopper
[a]
of
the
ferrite
core
to
open.
2.
Wind
the
cable
once on
the
ferrite
core.
3.
Close
the
ferrite
core
unitl
it
clicks.
Note:
Attach
the
ferrite
core
near
the
unit
(Refer
to
the
fig.3
and
comment.).
1
2
3
The
length
here
is
short
as
much
as
possible.
80
mm

10
Displaying
Disc
Information
on-screen
You
can
display
various
information
about
the
disc
loaded
on-screen.
1.
Press
DISPLAY
to
show
various
playback
information.
The
items
displayed
differ
depending
on
the
disc
type
or
playing
status.
2.
You
can
select
an
item
by
pressing
v
/
V
and
change
or
select
the
setting
by
pressing
b
/
B.
Title
(Track)
--
Current
title
(or
track).
number/total
number
of
titles
(or
tracks).
Chapter
--
Current
chapter
number/total
number
of
chapters.
Time
--
Elapsed
playing
time.
Audio
--
Selected
audio
language
or
channel.
Subtitle
--
Selected
subtitle.
Angle
--
Selected
angle/total
number
of
angles.
Sound
--
Selected
sound mode.
Note:
If
no
button
is
pressed
for
a
few
seconds,
the
on-
screen
display
disappears.
Initial
Settings
By
using
the
Setup
menu,
you
can
make
various
adjustments
to
items
such
as
picture
and
sound.
You
can
also
set
a
language
for
the
subtitles
and
the
Setup
menu,
among
other
things.
For
details
on
each
Setup
menu
item,
see
pages
10
to
13.
To
display
and
exit
the
Menu:
Press
SETUP
to
display
the
menu.
A
second
press
of
SETUP
will
take
you
back
to
initial
screen.
To
go
to
the
next
level:
Press
B
on
the
Remote
Control.
To
go
back
to
the
previous
level:
Press
b
on
the
Remote
Control.
GENERAL
OPERATION
1.
Press
SETUP.
The
Setup
menu
appears.
2.
Use
v
/
V
to
select
the
desired
option
then
press
B
to
move
to
the
second
level.
The
screen
shows
the
current
setting
for
the
selected
item,
as
well
as
alternate
setting(s).
3.
Use
v
/
V
to
select
the
second
desired
option
then
press
B
to
move
to
the
third
level.
4.
Use
v
/
V
to
select
the
desired
setting
then press
ENTER
to
confirm
your
selection.
Some
items
require
additional
steps.
5.
Press
SETUP
or
PLAY
to
exit
the
Setup
menu.
LANGUAGE
OSD
Select
a
language
for
the
Setup
menu
and
on-screen
display.
Disc
Audio
/
Subtitle
/
Menu
Select the
language
you
prefer
for
the
audio
track
(disc
audio),
subtitles,
and
the
disc
menu.
Original
--
Refers
to
the
original
language
in
which
the
disc
was
recorded.
Other
--
To
select
another
language,
press
number
buttons
then
ENTER
to
enter
the
corresponding
4-
digit
number
according
to
the
language
code
list
on
page
21.
If
you
enter
the
wrong
language
code,
press
CLEAR.
OSD
Original
English
Off
Original
Disc
Audio
Disc
Subtitle
Disc
Menu
Move
Select
LANGUAGE

11
DISPLAY
TV
Aspect
4:3
--
Select
when
a
standard
4:3
TV
is
connected.
16:9
--
Select
when
a
16:9
wide
TV
is
connected.
Display
Mode
Display
Mode
setting
works
only
when
the
TV
Aspect
mode
is
set
to
"4:3".
Letterbox
--
Displays
a
wide
picture
with
bands
on
the
upper
and
lower
portions
of
the
screen.
Panscan
--
Automatically
displays
the
wide
picture
on
the
entire
screen
and
cuts
off
the
portions
that
do
not
fit.
DISPLAY
TV
Aspect
Display
Mode
Move
Select
Widescreen
16:9
Installation and Setup

12
AUDIO
Each
DVD
disc
has
a
variety
of
audio
output
options.
Set
the
receiver's
AUDIO
options
according
to
the
type
of
audio
system
you
use.
Dynamic
Range
Control
(DRC)
With
the
DVD*
1
format,
you
can
hear
a
program's
soundtrack
in
the
most
accurate
and
realistic
presentation
possible,
thanks
to
digital
audio
technology.
However,
you
may
wish
to
compress
the
dynamic
range
of
the
audio
output
(the
difference
between
the
loudest
sounds
and
the
quietest
ones).
Then,
you
may
listen
to
a
movie
at
a
lower
volume
without
losing
clarity
of
sound. Set
DRC
to
On
for
this
effect.
*1:
Dolby
Digital
only
Vocal
Set
Vocal
to
On
only
when
a
multi-channel
karaoke
DVD
is
playing.
The
karaoke
channels
on
the
disc
will
mix
into
normal
stereo
sound.
5.1
Speaker
Setup
Make
the
following
settings
for
the
built-in
5.1
channel
surround
decoder.
1.
Press
ENTER
and
5.1
Speaker
Setup
menu
appears.
2.
Use
b
/
B
to
select
the
desired
speaker.
3.
Adjust
options
using
v
/
V
/
b
/
B
buttons.
4.
Press
ENTER
to
confirm
your
selection.
Returns
to
the
previous
menu.
Speaker
selection
Select
a
speaker
that
you
want
to
adjust.
(Front
speakers
(Left),
Center
Speaker,
Front
speakers
(Right),
Rear
speakers
(Right),
Rear
speakers
(Left),
or
SubWoofer)
Note:
Certain
speaker
settings
are
prohibited
by
the
Dolby
Digital
licensing
agreement.
Size
Since
the
speaker
settings
are
fixed,
you
cannot
change
the
settings.
Volume
Press
b
/
B
to
adjust
the
output
level
of
the
selected
speaker.
(-5dB
~
5dB)
Distance
If
you
connected
speakers
to
your
DVD/CD
Receiver,
setting
the
Distance
lets
the
speakers
know
how
far
the
sound
has
to
travel
to
reach
your
set
listening
point.
This
allows
the
sound
from
each
speaker
to
reach
the
listener
at
the
same
time.
Press
b
/
B
to
adjust
the
Distance
of
the
selected
speaker.
(You
can't
adjust
front
/
Woofer
speakers)
Test
Press
b
/
B
to test
the
signals
of
each
speaker.
Adjust
the
volume
to
match
the
volume
of
test
signals
memorized
in
the
system.
Front
Left
(L)
→
Center
→
Front
Right
(R)
→
Rear
Right
(R)
→
Rear
Left
(L)
→
SubWoofer
Select
5.1
Speaker
Setup
On
DRC
On
Vocal
Move
Select
AUDIO
AUDIO
Speaker
Volume
Distance
Test
Move
Return
Select
Size
Front
L
Small
0
dB
m
0
Off
Enter

13
LOCK
(Parental
Control)
Rating
Blocks
playback
of
rated
DVDs
based
on
their
content.
Not
all
discs
are
rated.
1.
Select
"Rating"
on
the
LOCK
menu
then
press
B.
2.
To
access
the
LOCK
options,
you
must
input
the
password
you
have
created.
If
you
have
not
yet
entered
password,
you
are
prompted
to
do
so.
Input
a
password
and
press
ENTER.
Enter
it
again
and
press
ENTER
to
verify.
If
you
make
a
mistake
before
pressing
ENTER,
press
CLEAR.
3.
Select
a
rating
from
1
to
8
using
the
v
/
V
buttons.
Rating
1-8:
Rating
one
(1)
has
the
most
restrictions
and
rating
eight
(8)
is
the
least
restrictive.
Unlock:
If
you
select
unlock,
parental
control
is
not
active
and
the
disc
plays
in
full.
4.
Press
ENTER
to
confirm
your
rating
selection,
then
press
SETUP
to
exit
the
menu.
Password
You
can
enter
or
change
password.
1.
Select
Password
on
the
LOCK
menu
then
press B.
2.
Follow
step
2
as
shown
above
(Rating).
To
change
the
password,
press
ENTER
when
the
"Change"
option
is
highlighted.
Input
a
password
and
press
ENTER.
Enter
it
again
and
press
ENTER
to
verify.
3.
Press
SETUP
to
exit
the
menu.
If
you
forget
your
password
If
you
forget
your
password,
you
can
clear
it
using
the
following
steps:
1.
Press
SETUP
to
display
the
Setup
menu.
2.
Input
the
6-digit
number
"210499"
and
press
ENTER.
The
password
is
cleared.
Area
Code
Enter
the
code
of
the
area
whose
standards
were
used
to
rate
the
DVD
video
disc,
based
on
the
list
on
page
21.
1.
Select
"Area
Code"
on
the
LOCK
menu
then
press
B.
2.
Follow
step
2
as
shown
previous
paragraph
(Rating).
3.
Select the
first
character
using
v
/
V
buttons.
4.
Press
B
and
select
the
second
character
using
v
/
V
buttons.
5.
Press
ENTER
to
confirm
your
Area
code
selection.
OTHERS
PBC
Set
Playback
Control
(PBC)
to
On
or
Off.
On:
Video
CDs
with
PBC
are
played
according
to
the
PBC.
Off:
Video
CDs
with
PBC
are
played
the
same
way
as
Audio
CDs.
DivX(R)
Registration
We
provide
you
the
DivX
VOD
(Video
On
Demand)
registration
code
that
allows
you
to
rent
and
purchase
videos
using
the
DivX
VOD
service.
For
more
information,
visit
www.divx.com/vod.
1.
Select
"DivX(R)
Registration"
option
then
press B.
2.
Press
ENTER
while
"Select"
is
selected
and
the
registration
code
will
appear.
Use
the
registration
code
to
purchase
or
rent
the
videos
from
DivX
VOD
service
at
www.divx.com/vod.
Follow
the
instructions
and
download
the
video
onto
a
disc
for
playback
on
this
unit.
3.
Press
ENTER
to
exit.
Note:
All
the
downloaded
videos
from
DivX
VOD
can
only
be
played
back
on
this
unit.
LOCK
Rating
****
Unlock
Password
Area
Code
US
Move
Select
PBC
Move
OTHERS
On
Select
Select
DivX(R)
Registration
Installation and Setup

14
Operation
General
features
Buttons
Operations
Z
(OPEN
/
CLOSE)
Opens
or
closes
the
disc
tray.
X
(PAUSE)
During
playback,
press
X
to
pause
playback.
Press
X
repeatedly
to
play
Frame-by-Frame.
SKIP
(.
/
>)
During
playback,
press
SKIP
(.
or
>)
to
go
to
the
next
chapter/track
or
to
return
to
the
beginning
of
the
current
chapter/track.
Press
SKIP
.
twice
briefly
to
step
back
to
the
previous
chapter/track.
SCAN
(m
/
M)
During
playback,
press
SCAN
(m
or
M)
repeatedly
to
select
the
required
scan
speed.
DVD
:
5
steps
(X2,
X4,
X8,
X16,
X100)
DivX
disc,
Video
CD
:
4
steps
(X2,
X4, X8,
X16)
WMA/MP3,
Audio
CD
:
3
steps
(X2,
X4,
X8)
REPEAT
During
playback,
press
REPEAT
repeatedly
to
select
a
desired
repeat
mode.
DVD
Video
discs:
Chapter/Title/Off
Video
CD,
Audio
CD,
DivX/MP3/WMA
discs:
Track/All/Off
A-B
During
playback,
each
press
of
A-B
button
to
select
point
A
and
point
B
and
repeats
a
sequence
from
point
A
(Starting
point)
to
point
B
(End
point).
Press
REPEAT
A-B
to
exit.
ZOOM
During
playback
or
pause
mode,
press
ZOOM
to
enlarge
the
video
image
(3
steps).
You
can
move
through
the
zoomed
picture
using
bBvV
buttons.
TITLE
If
the
current
DVD
title
has
a
menu,
the
title
menu
appears
on
the
screen.
Otherwise,
the
disc
menu
may
appears.
DVD
MENU
The
disc
menu
appears
on
the
screen.
(SUBTITLE)
During
playback,
press
SUBTITLE
repeatedly
to
select
a
desired
subtitle
language.
(AUDIO
language)
During
playback,
press
AUDIO
repeatedly
to
hear
a
different
audio
language
or
audio
track.
(AUDIO
channel)
Press
AUDIO
repeatedly
during
playback
to
hear
a
different
audio
channel
(STER.,
LEFT
or
RIGHT).
SLOW
Pause
mode,
press
SLOW
(m
or
M)
to
select
the
required
speed.
DVD
:
t
(1/2,
1/4, 1/8,
1/16)
or
T
(1/2,
1/4, 1/8,
1/16)
Video
CD
:
T
(1/2,
1/4, 1/8,
1/16)
Discs

15
Notes
on
general
features:
If
you
press
SKIP
(>)
once
during
Repeat
Chapter
(Track)
playback,
the
repeat
playback
cancels.
Zoom
may
not
work
on
some
DVDs.
The
A-B
repeat
function
is
available
only
in
the
current
title.
Additional
features
Time
Search
To
start
playing
at
any chosen
time
on
the
disc:
1.
Press
DISPLAY
during
playback.
2.
Press
v
/
V
to
select
the
time
clock
icon
and
"--:--:--"
appears.
3.
Input
the
required
start
time
in
hours,
minutes,
and
seconds
from
left
to
right.
If
you
enter
the
wrong
numbers,
press
CLEAR
to
remove
the
numbers
you
entered.
Then
input
the
correct
numbers.
4.
Press
ENTER
to
confirm.
Playback
starts
from
the
selected
time.
Marker
Search
To
enter
a
Marker
You
can
start
playback
from
up
to
nine
memorized
points.
To
enter
a
marker,
press
MARKER
at
the
desired
point
on
the
disc.
The
Marker
icon
appears
on
the
TV
screen
briefly.
Repeat
to
enter
up
to
nine
markers.
To
Recall
or
Clear
a
Marked
Scene
1.
During
disc
playback,
press
SEARCH.
The
marker
search
menu
appears
on
the
screen.
2.
Within
10
seconds,
press
b
/
B
to
select
a
marker
number
that
you
want
to
recall
or
clear.
3.
Press
ENTER
and
playback
starts
from
the
marked
scene.
Or,
Press
CLEAR
and
the
marker
number
is
erased
from
the
list.
4.
You
can
play
any
marker
by
inputting
its
number
on
the
marker
search
menu.
Screen Saver
The
screen
saver
appears
when
you
leave
the
unit
in
Stop
mode
for
about
five
minutes.
Last
Scene
Memory
This
receiver
memorizes
last
scene
from
the
last
disc
that
is
viewed.
The
last
scene
remains
in
memory
even
if
you
remove
the
disc
from
the
receiver
or
switch
off
the
receiver.
If
you
load
a
disc
that
has
the
scene
memorized,
the
scene
is
automatically
recalled.
Note:
This
receiver
does
not
memorize
the
scene
of
a
disc
if
you
switch
off
the
receiver
before
commencing
to
play
the
disc.
System
Select
You
must
select
the
appropriate
system
mode
for
your
TV
system.
If
NO
DISC
appears
in
the
display
window,
press
and
hold
P./STEP
on
the
front
panel
or
remote
control
for
more
than
5seconds
to
be
able to
select
a
system
(PAL,
NTSC
or
AUTO).
When
the
selected
system
does
not
coincide
with
the
system
of
your
TV,
normal
colour
picture
may
not
be
displayed.
AUTO:
Select
when
the
unit
is
connected
with
Multi
system
TV.
NTSC:
Select
when
DVD/CD
Receiver
is
connected
with
NTSC-TV.
PAL:
Select
when
DVD/CD
Receiver
is
connected
with
PAL-TV.

16
Playing
an
Audio
CD
or
MP3/WMA
file
This
unit
can
play
Audio
CDs
or
MP3/WMA
files
recorded
media.
MP3/
WMA/
Audio
CD
Once
you
insert
an
MP3/WMA
files
recorded
media
or
Audio
CD,
a
menu
appears
on
the
TV
screen.
Press
v
/
V
to
select
a
track/file
then
press
PLAY
or
ENTER
and
playback
starts.
You
can
use
variable
playback
functions.
Refer
to
page
14.
Tips:
Press
MENU
to
move
to
the
next
page.
On
a
CD
with
MP3/WMA
and
JPEG
you
can
switch
MP3/WMA
and
JPEG.
Press
TITLE
and
MUSIC
or
PHOTO
word
on
top
of
the
menu
is
highlighted.
Programmed
Playback
The
program
function
enables
you
to
store
your
favorite
tracks
from
any
disc
in
the
receiver
memory.
A
program
can
contain
300
tracks.
1.
Insert
a
disc.
Audio
CD
and
MP3/WMA
Discs:
2.
Select
a
track
on
the
"List",
then
press
PROG.
or
select
"
(Add)"
icon
then
press
ENTER
to
place
the
selected
track
on
the
"Program"
list.
Repeat
to
place
additional
tracks
on
the
list.
Note:
You
can
add
all
tracks
in
the
disc.
Select
"
(
Add
All)"
icon
then
press
ENTER.
3.
Select
the
track
you
want
to
start
playing
on
the
"Program"
list.
Press
MENU
to
move
to
the
next
page.
4.
Press
PLAY
or
ENTER
to
start.
Playback
begins
in
the
order
in
which
you
programmed
the
tracks.
Playback
stops
after
all
of
the
tracks
on
the
"Program"
list
have
played
once.
5.
To
resume
normal
playback
from
programmed
playback,
select
a
track
of
AUDIO
CD
(or
MP3/WMA)
list
and
then
press
PLAY.
Repeat
Programmed
Tracks
1.
Press
REPEAT
when
playing
a
disc.
The
repeat
icon
appears.
2.
Press
REPEAT
to
select
a
desired
repeat
mode.
?
TRACK:
repeats
the
current
track
?
ALL:
repeats
all
the
tracks
on
programmed
list.
?
Off(No
display):
does
not
play
repeatedly.
Erasing
a
Track
from
"Program"
List
1.
Use
vVto
select
the
track
that
you
wish
to
erase
from
the
Program
list.
2.
Press
CLEAR.
Alternatively,
select
"
(Delete)"
icon
then
press
ENTER
to
place
the
selected
track
on
the
Program
list.
Repeat
to
erase
additional
tracks
on
the
list.
Erasing
the
Complete
Program
List
Use
v
/
V
to
select
"
(Del
all)",
then press
ENTER.
Note:
The
programs
are
also
cleared
when
the
disc
is
removed.
Program
List
Track1
Track2
Track3
Track4
Track5
Track6
Track7
Track8
0:00:00
1/12
Audio
CD
Program
List
0:00:00
1/104
MP3
JPEG
Music
Folder
1
Music
Folder
2
Music
Folder
3
Music
Folder
4
Music
Folder
5
Music
Folder
6
Music
Folder
7
Music
Folder
8
MP3
/
WMA
disc
compatibility
with
this
player
is
limited
as
follows:
?
Sampling
frequency:
within
32
-
48
kHz
(MP3),
within
24
-
48kHz
(WMA)
?
Bit
rate:
within
32
-
320kbps
(MP3),
40
-
192kbps
(WMA)
?
The
DVD/CD
Receiver
cannot
read
an
MP3/WMA
file
that
has
a
file
extension
other
than
".mp3"
/
".wma".
?
CD-R
physical
format should
be
ISO
9660
?
If
you
record
MP3
/
WMA
files
using
software
that
cannot
create
a
file
system
(eg.
Direct-CD)
it
is
impossible
to
playback
MP3
/
WMA
files.We
recommend
that
you
use
Easy-CD
Creator,
which
creates
an
ISO
9660
file
system.
?
File
names
should
have
a
maximum
of
8
letters
and
must
incorporate
an
.mp3
or
.wma
extension.
?
They
should
not
contain
special
letters
such
as
/
?
*
:
"
<>letc.
?
The
total
number
of
files
on
the
disc
should
be
less
than
999.
This
DVD/CD
Receiver
requires
discs
and
recordings
to
meet
certain
technical
standards
in
order
to
achieve
optimal
playback
quality.
Pre-recorded
DVDs
are
automatically
set
to
these
standards.
There
are
many
different
types
of
recordable
disc
formats
(including
CD-R
containing
MP3
or
WMA
files)
and
these
require
certain
pre-existing
conditions
(see
above)
to
ensure
compatible
playback.
Customers
should
note
that
permission
is
required
in
order
to
download
MP3
/
WMA
files
and
music
from
the
Internet.
Our
company
has
no
right
to
grant
such
permission.
Permission
should
always
be
sought
from
the
copyright
owner.

17
Viewing
a
JPEG
file
This
unit
can
play
discs
with
JPEG
files.
Before
playing
JPEG
recordings,
read
the
notes
on
JPEG
Recordings
on
right.
1.
Insert
a
disc
and
close
the
tray.
The
JPEG
menu
appears
on
the
TV
screen.
2.
Press
v
/
V
to
select
a
folder,
and
press
ENTER.
A
list
of
files
in
the
folder
appears.
If
you
are
in
a
file
list
and
want
to
return
to
the
previous
Folder
list,
use
the
v
/
V
buttons
on
the
remote
to
highlight
and
press
ENTER.
3.
If
you
want
to
view
a
particular
file,
press
v
/
V
to
highlight
a
file
and
press
ENTER
or
PLAY. While
viewing
a
file,
you
can
press
STOP
to
move
to
the
previous
menu
(JPEG
menu).
Tips:
There
are
four
Slide
Speed
options
:
>
(Slow),
>>
(Normal),
>>>
(Fast)
and
II
(off).
Use
v
/V
/b
/B
to
highlight
the
Speed.
Then,
use
b
/
B
to
select
the
option
you
want
to
use
then
press
ENTER.
If
you
set
Speed
option
to
Off,
Slide
is
not
active.
Slide
Show
Use
vVbBto
highlight
the
(Slide
Show)
then
press
ENTER.
Still
Picture
1.
Press
PAUSE/STEP
during
slide
show.
The
DVD/CD
Receiver
will
now
go
into
PAUSE
mode.
2.
To
return
to
the
slide
show,
press
PLAY
or
press
PAUSE/STEP
again.
Moving
to
another
File
Press
SKIP
(.
or
>)
once
while
viewing
a
picture
to
advance
to
the
next
or
previous
file.
To
rotate
picture
Press
b
/
B
during
showing
a
picture
to
rotate
the
picture
clockwise
or
counter-clockwise.
Zoom
Each
time press
ZOOM
the
setting
change
in
the
following
order.
Zoom
on
y
Zoom
off
Press
v/B/M
to
enlage
the
video
image.
Press
V/b/m
to
reduce
the
video
image.
JPEG
Preview
List
JPEG
Folder
1
JPEG
Folder
2
JPEG
Folder
3
JPEG
Folder
4
JPEG
Folder
5
JPEG
Folder
6
JPEG
Folder
7
JPEG
Folder
8
PHOTO
JPEG
disc
compatibility
with
this
player
is
limited
as
follows:
?
Depending
upon
the
size
and
number
of
JPEG
files,
it
could
take
a
long
time
for
the
DVD/CD
Receiver
to
read
the
disc's
contents.
If
you
don't
see
an
on-screen
display
after
several
minutes,
some
of
the
files
may
be
too
large
---
reduce
the
resolution
of
the
JPEG
files
to
less
than
2M
pixels
as
2760
x
2048
pixels
and
burn
another
disc.
?
The
total
number
of
files
and
folders
on
the
disc
should
be
less
than
999.
?
Some
discs
may
be
incompatible
due
to
a
different
recording
format
or
the
condition
of
disc.
?
Ensure
that
all
the
selected
files
have
the
".jpg"
extensions
when
copying
into
the
CD
layout.
?
If
the
files
have
".jpe"
or
".jpeg"
extensions,
please
rename
them
as
".jpg"
file.
?
File
names
without
".jpg"
extension
will
not
be
able
to
be
read
by
this
DVD/CD
Receiver.
Even
though
the
files
are
shown
as
JPEG
image
files
in
Windows
Explorer.
Operation

18
Playing
a
DivX
Movie
file
Using
this
DVD/CD
Receiver
you
can
play
DivX
disc.
1.
Insert
a
disc
and
close
the
tray.
The
MOVIE
menu
appears
on
the
TV
screen.
2.
Press
v
/
V
to
select
a
folder,
and
press
ENTER.
A
list
of
files
in
the
folder
appears.
If
you
are
in
a
file
list
and
want
to
return
to
the Folder
list,
use
the
v
/
V
buttons
on
the
remote
to
highlight
and
press
ENTER.
3.
If
you
want
to
view
a
particular
file,
press
v
/
V
to
highlight
a
file
and
press
ENTER
or
PLAY.
4.
Press
STOP
to
exit.
Tips:
Press
MENU
to
move
to
the
next
page.
On
a
CD
with
MP3/WMA,
JPEG
and
MOVIE
file,
you
can
switch
MUSIC,
PHOTO
and
MOVIE
menu.
Press
TITLE
and
MUSIC,
PHOTO
and
MOVIE
word
on
top
of
the
menu
is
highlighted.
Notes:
Be
sure
to
select
"SUBTITLE
ON"
mode
by
pressing
the
subtitle
file
every
time
before
playing
a
DivX
file
.
When
the
subtile
has
more
than
two
languages
in
the
file,
original
subtile
is
only
available.
The
DivX
files
in
your
memory
card
can
not
be
played.
The
microphone
does
not
work
during
playing
a
DivX
file.
You
can
not
adjust
sound
mode
and
VIRTUAL
sound
during
the
DivX
file
playing.
Notice
for
displaying
the Divx
subtitle
If
the
subtitle
does
not
display
properly
during
playback,
press
and
hold
S-TITLE
about
3
seconds
then
press
S-
TITLE
to
select
another
language
code
until
the
subtitle
is
displayed
properly
List
Movie
Folder
1
Movie
Folder
2
Movie
Folder
3
Movie
Folder
4
Movie
Folder
5
Movie
Folder
6
Movie
Folder
7
Movie
Folder
8
MOVIE
0:00:00
DivX
disc
compatibility
with
this
player
is
limited
as
follows:
?A
vailable
resolution
size
of
the
DivX
file
is
under
800x600
(W
x
H)
pixel.
?
The
file
name
of
the
DivX
subtitle
is
available
by
45
characters.
?
If
there
is
impossible
code
to
express
in
the
DivX
file,
it
may
be
displayed
as
"
_
"
mark
on
the
display.
?
If
the
number
of
the
screen
frame
is
over
30
per
1
second,
this unit
may
not
operate
normally.
?
If
the
video
and
audio
structure
of
recorded
file
is
not
interleaved,
either
video
or
audio
is
outputted.
Playable
DivX
file
?
".avi
",
".mpg
",
".mpeg
",
".divx"
Playable
Subtitle
format
SubRip(*.srt/*.txt)
SAMI(*.smi)
SubStation
Alpha(*.ssa/*.txt)
MicroDVD(*.sub/*.txt)
SubViewer
2.0(*.sub/*.txt)
VobSub(*.sub)
Playable
Codec
format
?
"DIVX3.xx
",
"DIVX4.xx
",
"DIVX5.xx
",
"XVID
",
"MP43
",
"3IVX
".
Playable
Audio
format
"AC3
",
"DTS
",
"PCM
",
"MP3
",
"WMA
".
?
Sampling
frequency:
within
32
-
48
kHz
(MP3),
within
24
-
48kHz
(WMA)
?Bit
rate:
within
32
-
320kbps
(MP3),
40
-
192kbps
(WMA)

19
Presetting
the
Radio
Stations
You
can
preset
50
stations
for
FM
and
AM
(MW).
Before
tuning,
make
sure
that
you
have
turned
down
the
volume.
1.
Press
BAND
on
the
Remote
Control
until
FM
or
AM
(MW)
appears
in
the
display
window.
2.
And
then
every
time
you
press
BAND,
FM
and
AM
(MW)
changes
alternately.
3.
Press
and
hold
TUN.(-/+)
for
about
two
seconds
until
the
frequency
indication
starts
to
change,
then
release.
Scanning
stops
when
the
DVD/CD
Receiver
tunes
in
a
station.
4.
Press
PROG/MEMO
on
the
Remote
Control.
A
preset
number
will
flash
in
the
display
window.
5.
Press
PRESET
+/-
on
the
Remote
Control
to
select
the
preset
number
you
want.
6.
Press
PROG/MEMO
on
the
Remote
Control
again.
The
station
is
stored.
7.
Repeat
steps
3
to
6
to
store
other
stations.
To
tune
in
a
station
with
a
weak
signal
Press
TUN.(-/+)
repeatedly
in
step
3
to
tune
in
the
station
manually.
To
clear
all
the stored
stations
Press
and
hold
PROG/MEMO
for
about
two
seconds
and
"ERASE
ALL"
is
appeared
in
the
display
window
and
then
press
PROG/MEMO
again,
the
stations
are
cleared.
If
you
have
accidentally
entered
into
the
"ERASE
ALL"
mode
and
you
do
not
wish
to
clear
the
memory,
do
not
press
any
key.
After
a
few
seconds,
the
"ERASE
ALL"
display
will
go
off
by
itself
and
change
to
normal
mode.
Note:
If
all
stations
have
already
been
entered,
the
FULL
message
will
appear
in
the
display
window
for
a
moment
and
then
a
preset
number
will
flash.
To
change
the
preset
number,
follow
the
steps
5-6
as
above.
Listening
to
the
Radio
Preset
radio
stations
in
the
DVD/CD
Receiver's
memory
first
(see
"Presetting
radio
stations"
on
the
left).
1.
Press
BAND
until
FM
or
AM
(MW)
appears
in
the
display
window.
The
last
received
station
is
tuned
in.
2.
Press
PRESET
+/-
repeatedly
on
the
Remote
Control
to
select
the
preset
station
you
want.
Each
time
you
press
the
button,
the
DVD/CD
Receiver
tunes
in
one
preset
station
at
a
time.
3.
Adjust
the
volume
by
rotating
VOLUME
on
the
front
panel
or
by
pressing
VOLUME
+
or
-
on
the
Remote
Control
repeatedly.
To
turn
off
the
radio
Press
POWER
to
turn
the
DVD/CD
Receiver
off
or
select
another
function
mode
(DVD/CD,
AUX,
USB).
To
listen
to
non-preset
radio
stations
Use
manual
or
automatic
tuning
in
step
2.
For
manual
tuning,
press
TUN.(-/+)
repeatedly.
For
automatic
tuning,
press
and
hold
TUN.(-/+)
for
about
two
seconds
on
the
front
panel.
To
select
a
preset
radio
station
directly
You
can use
the
number
buttons
on
the
Remote
Control
to
select
a
preset
radio
station
directly.
For
example,
to
listen
to
preset
station
4,
press
4
on
the
Remote
Control.
To
listen
to
preset
station
19,
press
1
then
9
(within
3
seconds).
For
your
reference
If
an
FM
program
is
noisy
Press
MONO/ST.
on
the
front
panel
so
that
"ST."
disappears
in
the
display
window.
There
will
be
no
stereo
effect,
but
the
reception
will
improve.
Press
the
button
again
to
restore
the
stereo
effect.
To
improve
reception
Reorient
the
supplied
antennas.

20
Sleep
Timer
Setting
You
can
set
the
DVD/CD
Receiver
to turn
off
automatically
at
a
specified
time.
1.
Press
SLEEP
to
set
the
desired
sleep
time.
The
SLEEP
indicator
and
sleep
time
appears
in
the
display
window.
2.
Each
time
you
press
SLEEP
the
setting
changes
in
the
following
order.
SLEEP180→150→120→90→80→70→60→50→40→
30→20→10→OFF
Note:
You
can
check
the
time
remaining
before the
DVD/CD
Receiver
turns
off.
Press
SLEEP.
The
remaining
time
appears
in
the
display
window.
Dimmer
This
function
will
change
the
brightness
of
the
display
window
on
the
front
panel
during
in
power-on
status.
Press
the
DIMMER
repeatedly.
Mute
Press
MUTE
to
mute
your
unit.
You
can
mute
your
unit
in
order,
for
example,
to
answer
the
telephone,
"MUTE"
indicator
flashes
in
the
display
window.
Using
Headphone
Jack
Connect
a
stereo
headphone
plug
(
3.5mm)
into
the
PHONES
connector.
The
speakers
are
automatically
disabled
when
you
plug
in
headphones
(not
supplied).
XTS/XTS
pro
Each
time
you
press
XTS
pro
the
setting
changes
in
the
following
order.
XTS
ON
→
NORMAL
→
XTS-P
ON...
XTS-P
ON
The
unique
sound
quality
of
the
LG
Technology
creates
the
optimum
sound
for
you
to
play
the
perfect
playback
of
the
original
sound
and
to
feel
the
living
sound
source.
XTS
ON
When
playing
the
movie
with
the
weak
bass
sound
relatively
to
the
general
music,
it
enforces
the
sense
of
sound
at
woofer
for
you
to
satisfy
with.
In
the
mode
of
2
CH
BYPASS,
It
creates
the
high
display
effect
by
playing
the
sound
source
via
the
rear
speakers
same
as
the
front
speakers.
Note:
The
XTS
mode
is
temporarily
disabled
when
changing
from
2.1
CH
to
5.1
CH
and
it
is
enabled
when
changing
it
to
2.1
CH.
NORMAL
XTS-P
and
XTS
mode
tune
off
VIRTUAL
sound
press
VIRTUAL
the
setting
VIRTUAL
sound.
3D
STEREO
Realtime
3D
positioned
sound
rendering
technology
with
stereo
sources,
optimized
for
stereo
speakers.
Listeners
may
experience
amazing
virtual
surround
effects
with
their
own
multimedia
players.
Multichannel
sound
The
Multichannel
sound
makes
a
5.1
ch
feel
10.1
ch
sound
therefore
this
mode
provides
a
emotion
which
you
are
involved
with
sound
and
you
can
feel
detailed
sound.
Sound
Mode
You
can
enjoy
surround
sound
simply
by
selecting
one
of
the
pre-programmed
sound
fields
according
to
the
program
you
want
to
listen
to.(2
ch.
sound
only)
BYPASS
→
ON
STAGE
→
STUDIO
→
CLUB
→
HALL
→
THEATER
1
→
CHURCH
→
PL
ll
MOVIE
→
PL
ll
MUSIC
→
PL
ll
MTRX
→
BYPASS...
Note:
Initial
sound
mode
is
BYPASS.
Source
Display
Effect
2.1
ch.
VIRTUAL
3D
STEREO
5.1
ch
VIRTUAL
Multichannel
sound
Table of contents