LG LH-W750TA User manual

Before
connecting
up,
operating
or
repairing
this
product,
please
read
this
instruction
booklet
carefully
and
completely.
LGEAP_LH-W750TA_ENG_102L
R
WIRELESS
DVD
RECEIVER
SYSTEM
OWNER'S
MANUAL
MODEL:
LH-W750TA
LH-W750,
LHS-W75TAF,
LHS-W75TAC,
LHS-W75TAR,
LHS-W75TAL,
LHS-W75TAW,
ACC75T

2
Safety
Precautions
This
lightning
flash
with
arrowhead
symbol
within
an
equilateral
triangle
is
intended
to
alert
the
user
about
the
presence
of
uninsulated
dangerous
voltage
within
the
product's
enclosure
that
may
be
of
sufficient
magnitude
to
constitute
a
risk
of
electric
shock
to
persons.
The
exclamation
mark
within
an
equilateral
triangle
is
intended
to
alert
the
user
about
the
presence
of
important
operating
and
maintenance
(servicing)
instructions
in
the
instructions
accompanying
the
product.
WARNING:
Do
not
install
this
equipment
in
a
confined
space
such
as
a
book
case
or
similar
unit.
CAUTION:
This
DVD/CD
receiver
employs
a
laser
system.
To
ensure
proper
use
of
this
product,
please
read
this
owner's
manual
carefully
and
retain
it
for
future
reference.
Should
the
unit
require
maintenance,
contact
an
authorized
service
loca-
tion
(see
service
procedure).
Performing
controls,
adjustments,
or
carrying
out
procedures
other
than
those
specified
herein
may
result
in
hazardous
radi-
ation
exposure.
To
prevent
direct
exposure
to
laser
beam,
do
not
try
to
open
the
enclosure.
Visible
laser
radiation
when
open.
DO
NOT
STARE
INTO
BEAM.
CAUTION:
The
apparatus
should not
be
exposed
to
water
(dripping
or
splashing)
and
no
objects
filled
with
liquids,
such
as
vases,
should
be
placed
on
the
apparatus.
CAUTION:
This
product
may
not
be used
outdoor,
restricted
to
indoor
use
only.
About
the
symbols
for
instructions
Indicates
hazards
likely
to
cause
harm
to
the
unit
itself
or
other
material
damage.
Indicates
special
operating
features
of
this
unit.
Indicates
tips
and
hints
for
making
the
task
easier.
Manufactured
under
license
from
Dolby
Laboratories.
"Dolby",
"Pro
Logic",
and
the
double-D
symbol
are
trademarks
of
Dolby
Laboratories.
Confidential
Unpublished
works.
Copyright
1992-
1997
Dolby
Laboratories.
All
rights
reserved.
Manufactured
under
license
from
Digital
Theater
Systems,
Inc.
US
Pat.
No.
5,451,942
5,956,674, 5,974,380,
5,978,762
and
other
worldwide
patents
issued
and
pending.
"DTS"
and
"DTS
Digital
Surround"
are
registered
trademarks
of
Digital
Theater
Systems,
Inc.
Copyright
1996,
2000
Digital
Theater
Systems,
Inc.
All
rights
reserved.
OTES
ON
COPYRIGHTS:
It
is
forbidden
by
law
to
copy,
broadcast,
show,
broadcast
via
cable,
play
in
public,
or
rent
copyrighted
material
without
permission.
This
product
features
the
copy
protection
function
developed
by
Macrovision.
Copy
protection
signals
are
recorded
on
some
discs.
When
recording
and
playing
the
pictures
of
these
discs
on a
VCR,
picture
noise
will
appear.
This
product
incorporates
copyright
protection
technology
that
is
protected
by
method
claims
of
certain
U.S.
patents
and
other
intellectual
property
rights
owned
by
Macrovision
Corporation
and
other
rights
owners.
Use
of
this
copyright
protection
tech-
nology
must
be
authorized
by
Macrovision
Corporation,
and
is
intended
for
home
and
other
limited
viewing
uses
only
unless
otherwise
authorized
by
Macrovision
Corporation.
Reverse
engineering
or
disassembly
is
prohibited.
SERIAL
NUMBER:
The
serial
number
is
located
on
the
back
of
this
unit.
This
number
is
unique
to
this
unit
and
not
available
to
others.
You
should
record
requested
information
here
and
retain
this
guide
as
a
permanent
record
of
your
purchase.
Model
No.
___________________________________
Serial
No.
___________________________________
WARNING:
TO PREVENT
FIRE
OR
ELECTRIC
SHOCK
HAZARD,
DO
NOT
EXPOSE
THIS
PRODUCT
TO
RAIN
OR
MOISTURE.
CAUTION
RISK
OF
ELECTRIC
SHOCK
DO
NOT
OPEN
CAUTION:
TO
REDUCE
THE
RISK
OF
ELECTRIC
SHOCK
DO
NOT
REMOVE
COVER
(OR
BACK)
NO
USER-SERVICEABLE
PARTS
INSIDE
REFER
SERVICING
TO
QUALIFIED
SERVICE
PERSONNEL.
CAUTION:
The
appliance
is
not
intended
for
use
by
young
children
or
infirm
persons
without
supervision.
CAUTION:
Young
Children
should
be
supervised
to
ensure
that
they
do
not
play
with
appliance.
CAUTION:
If
the
appliance
is
supplied
from
a
cord
extension
set
or
an
electrical
portable
outlet
device,
the
cord
extension
set
on
electrical
portable
outlet
device
must
be
positioned
so
that
it
is
not
subject
to
splashing
or
ingress
of
moisture.

3
Introduction
Table
of
Contents
Introduction
SafetyPrecautions.........................2
TableofContents..........................3
BeforeUse..............................4-5
PlayableDiscs...........................4
Precautions.............................5
NotesonDiscs..........................5
AboutSymbols..........................5
FrontPanelandRearPanel..................6
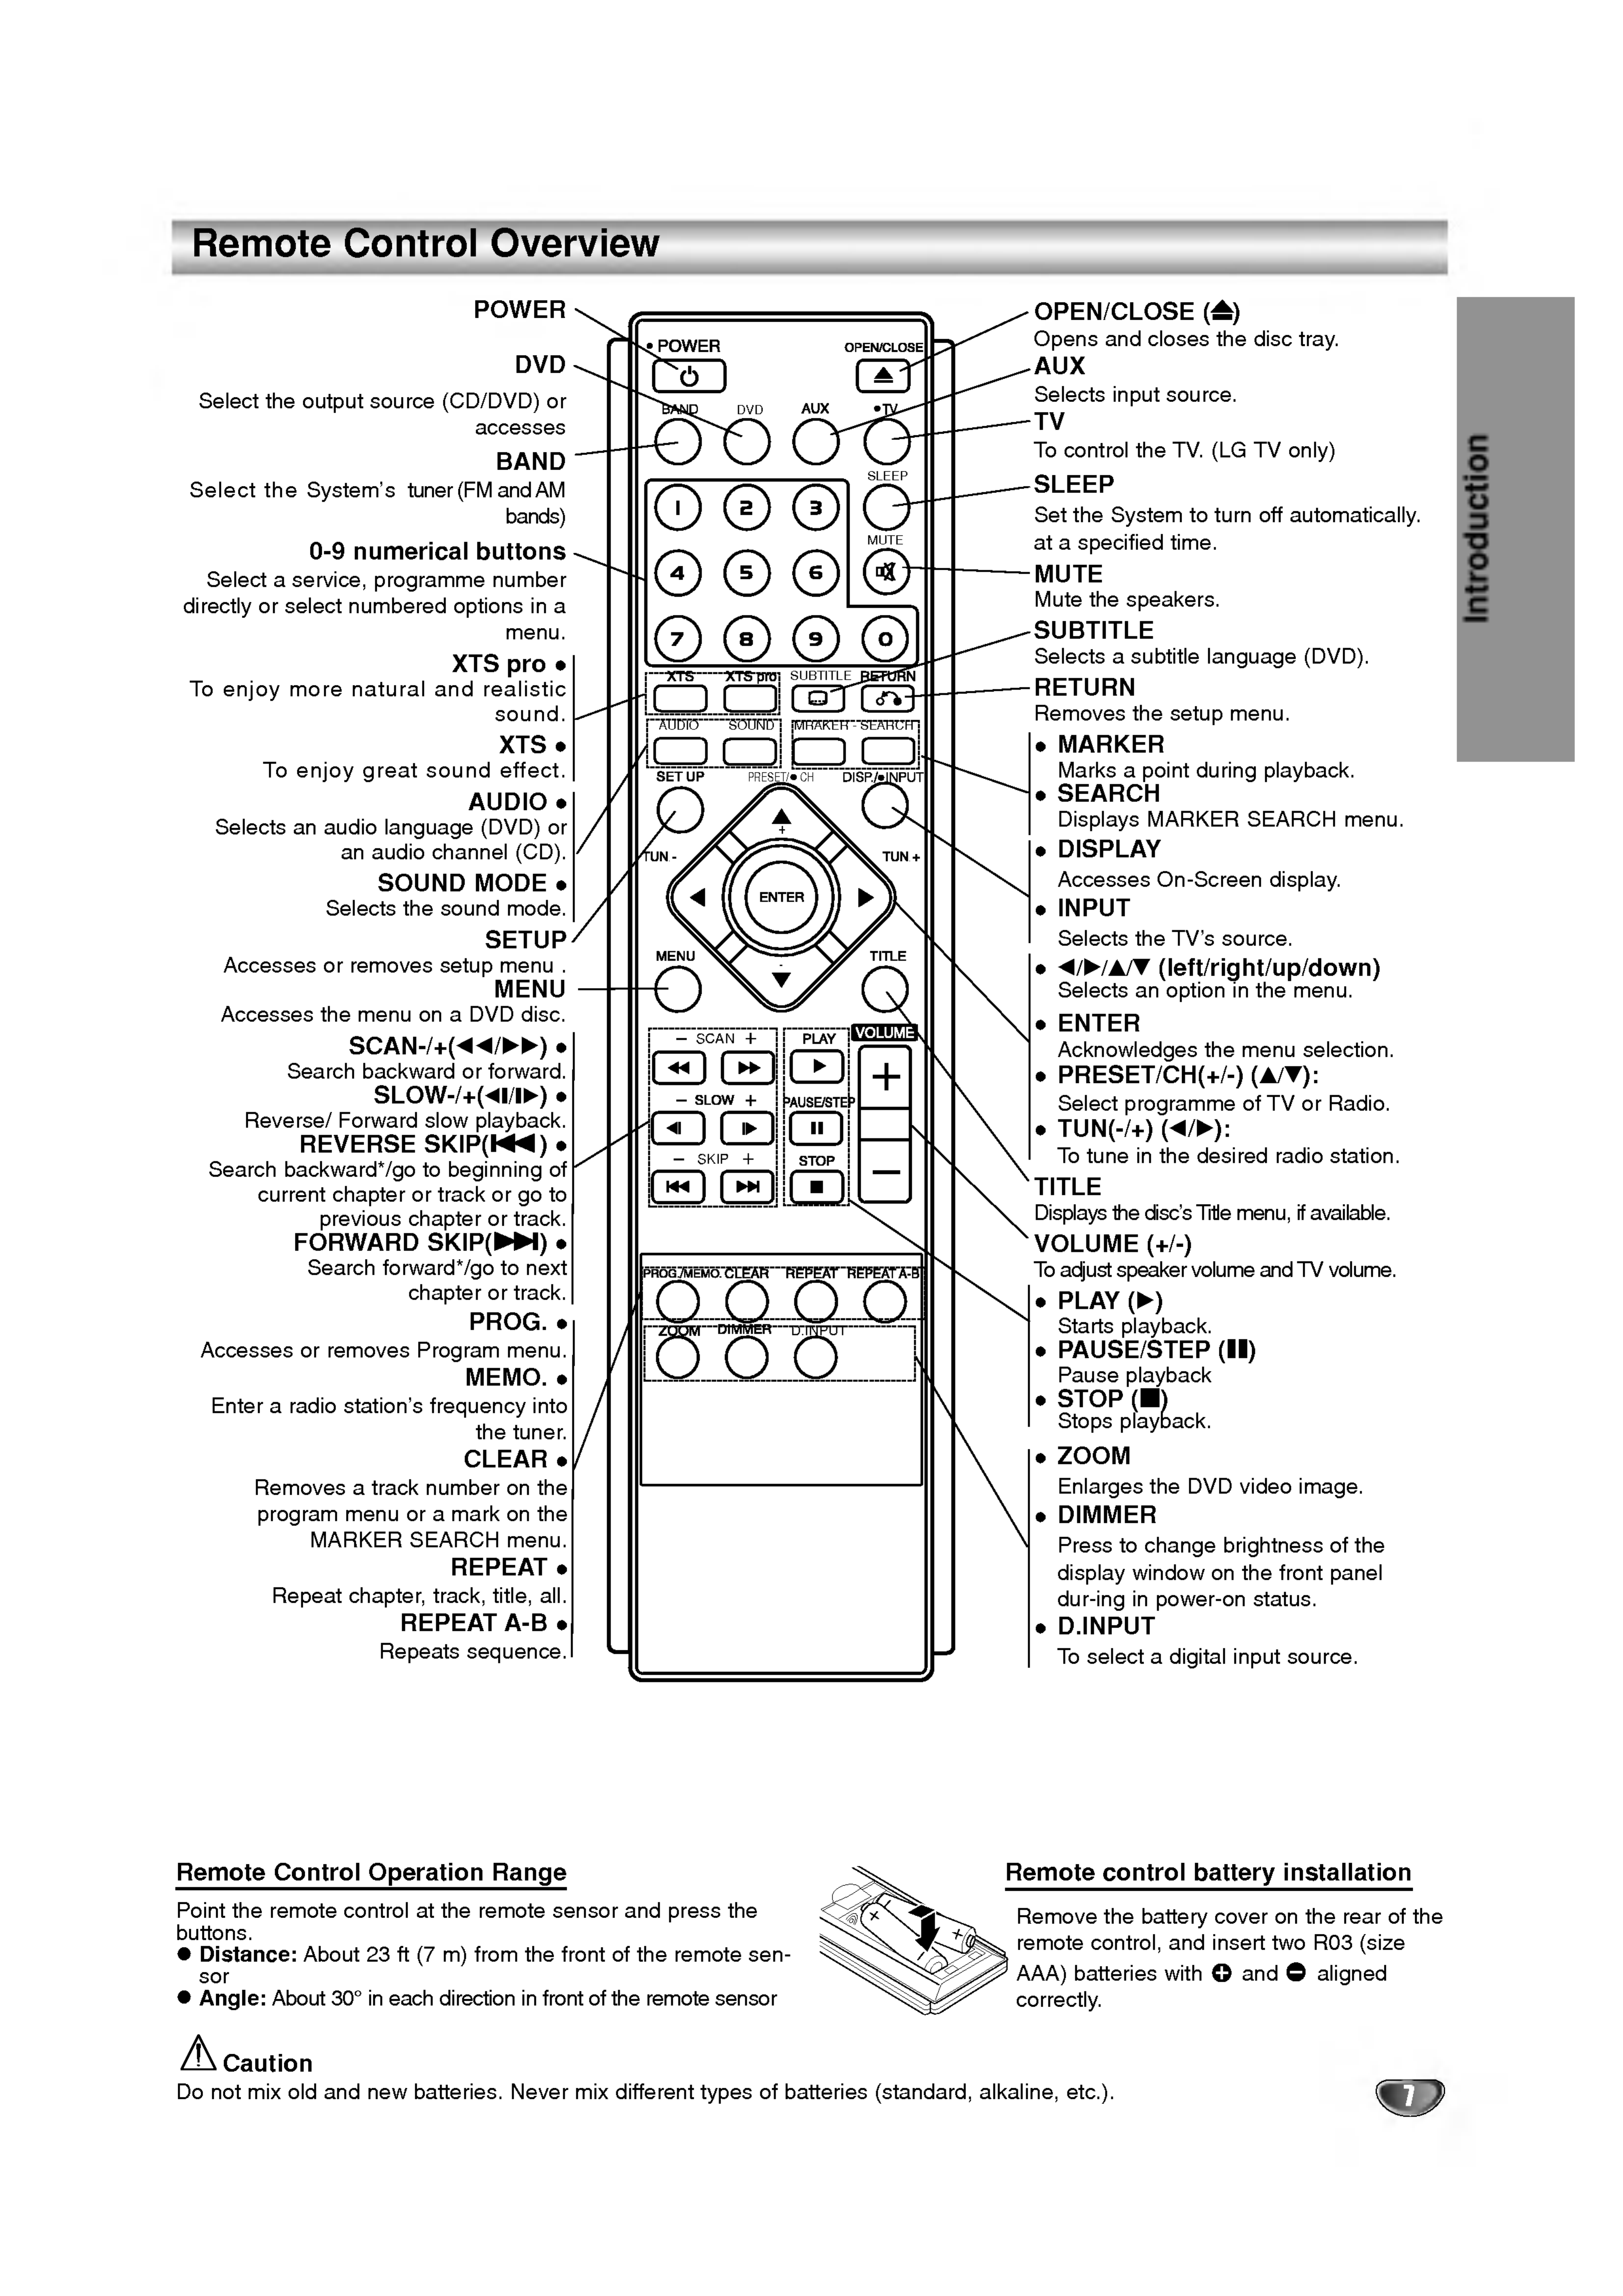
RemoteControlOverview....................7
Preparation
Connections............................8-13
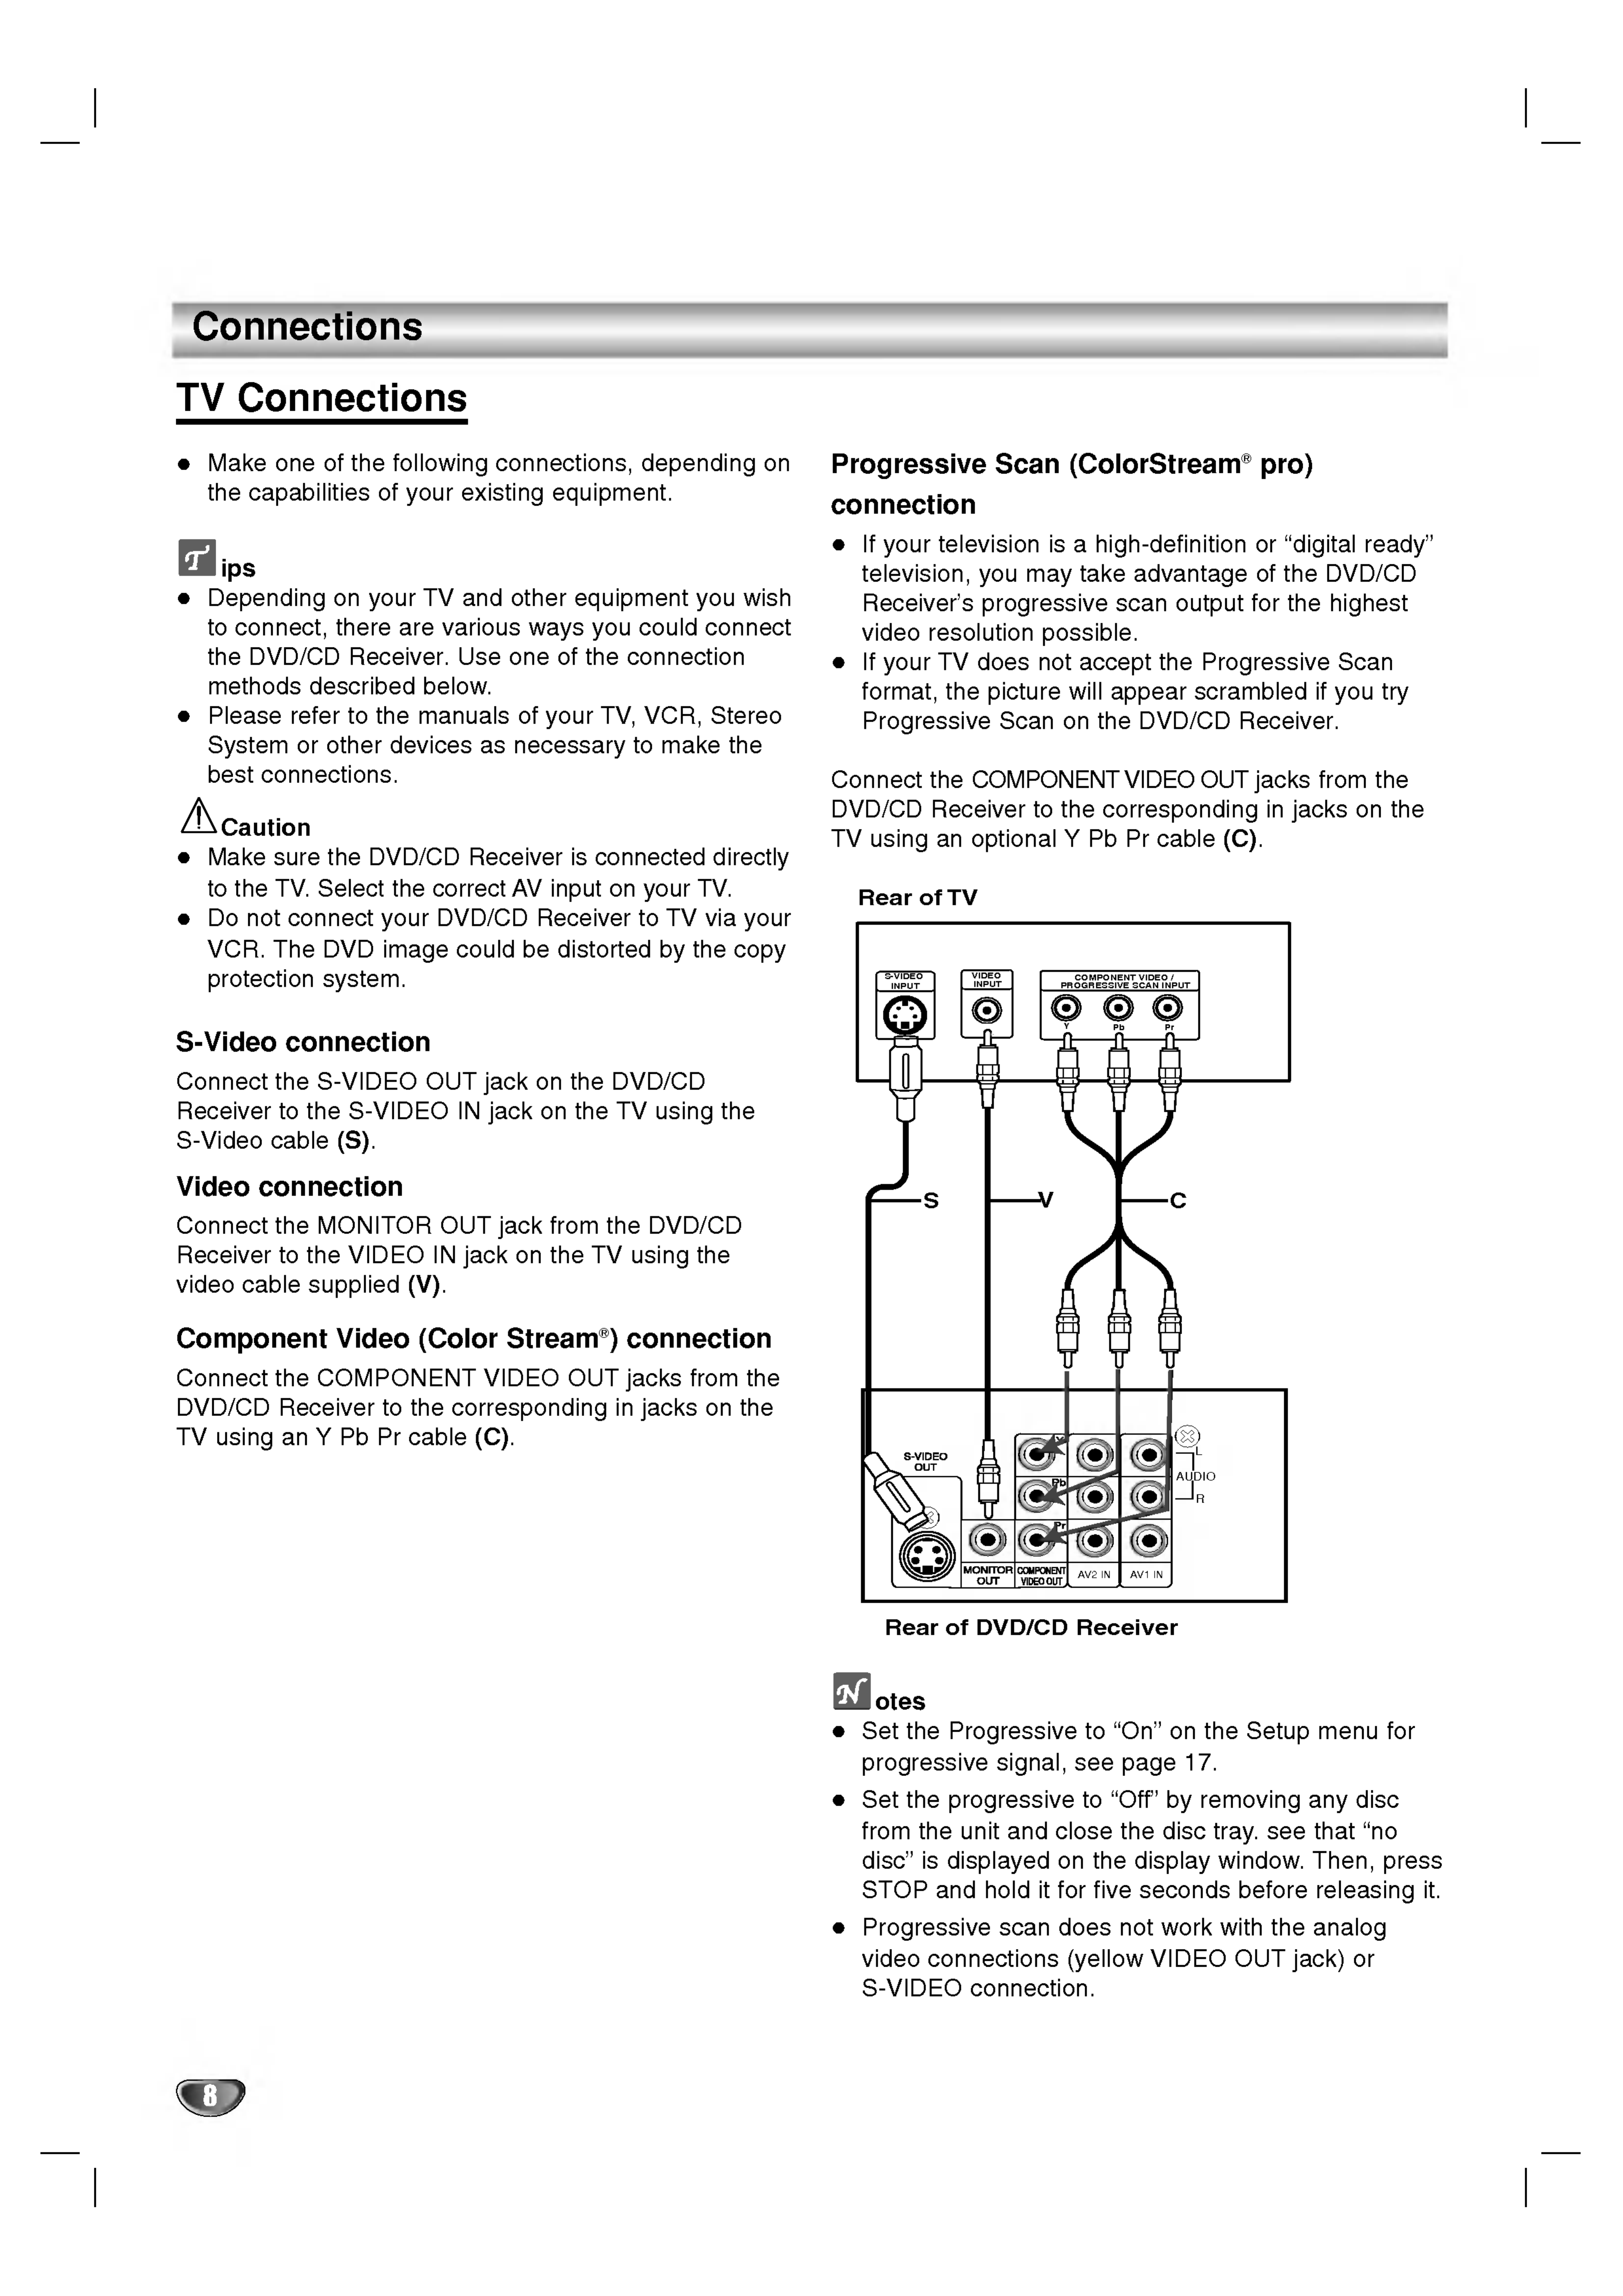
TVConnections.........................8
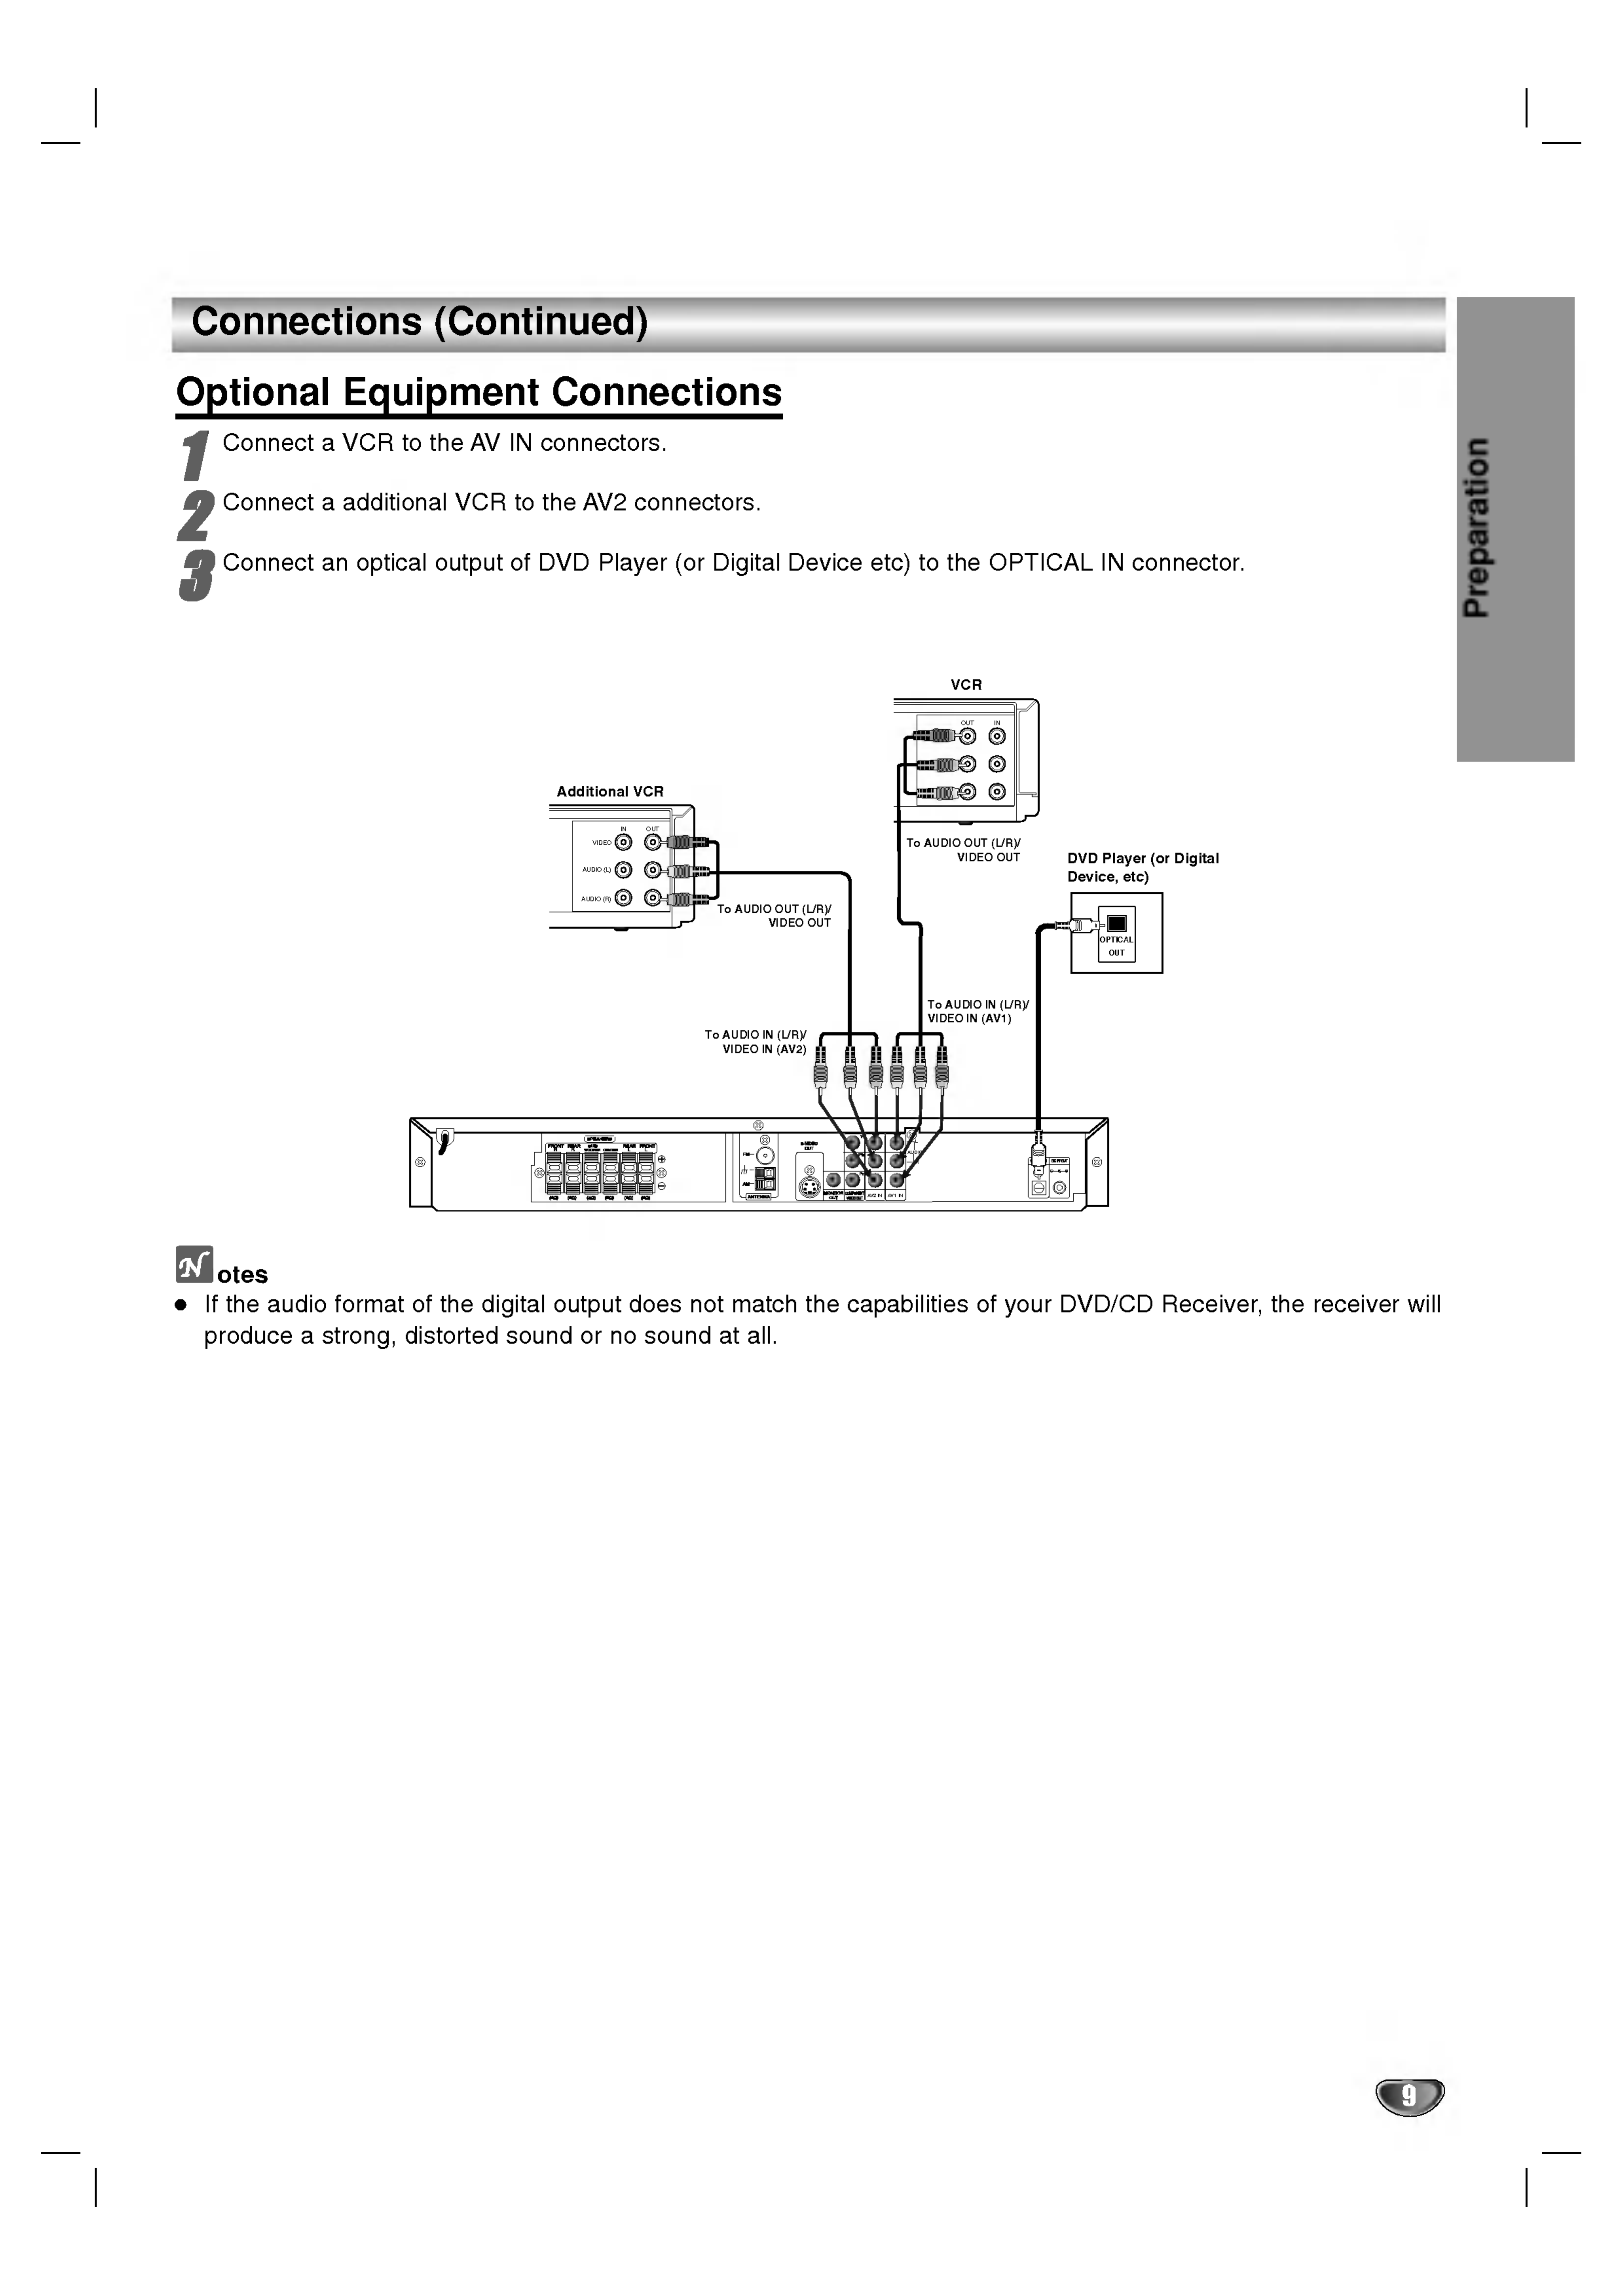
OptionalEquipmentConnections
...........
.9
AerialConnections.......................10
SpeakerSystemConnection.
...........
.11-12
Transmitter..........................11
Changinga
channelofTransmitter.
......
.11
SettingaIDofTransmitter.
............
.11
Assembling
and
Connecting
to
the
Speakers
11
SpeakerConnections..................12
SpeakerPositioning......................13
BeforeOperation.......................14-19
Mini
Glossary
for
Audio
Stream
&
Surround
Mode.................................14
SoundMode...........................14
On-ScreenDisplay.....................15
InitialSettings........................16-19
GeneralOperation....................16
Language..........................16
Display..........................16-17
Audio..............................17
Lock(ParentalControl)................18
Others.............................19
Operation
DVDorVideoCDOperation...............19-22
PlayingaDVDandVideoCD...............19
GeneralFeatures.....................20-22
MovingtoanotherTITLE/GROUP.
......
.20
Moving
to
another
CHAPTER/TRACK
.....
20
SlowMotion.........................20
Still
Picture
and
Frame-by-Frame
Playback
.
20
Search.............................20
Repeat............................20
RepeatA-B.........................21
TimeSearch........................21
MarkerSearch.......................21
Zoom..............................21
SpecialDVDFeatures....................22
TitleMenu..........................22
DiscMenu..........................22
ChangingtheAudioLanguage.
.........
.22
ChangingtheAudioChannel.
..........
.22
Subtitles...........................22
DVDAudioDiscs........................22
AudioCDandMP3/WMADisc...............23
Playing
an
Audio
CD
and
MP3/WMA
Disc
.....23
Pause.............................23
MovingtoanotherTrack...............23
RepeatTrack/All/Off...................23
Search.............................23
JPEGDiscOperation......................24
ViewingaJPEGdisc.....................24
SlideShow.........................24
StillPicture.........................24
Movingtoanotherfile.................24
Torotatepicture......................24
ProgrammedPlayback.....................25
RepeatProgrammedTracks................25
ErasingaTrackfromProgrammeList
.......
.25
Erasing
the
Complete
Programme
List
.......
25
DivXDiscOperation.......................26
SpeakerSetup............................27
AdditionalInformation.....................28
LastConditionMemory...................28
ScreenSaver...........................28
SystemSelect..........................28
ControllingtheTV.......................28
OperationwithRadio......................29
Presettingtheradiostations................29
Listeningtotheradio.....................29
OtherFunctions...........................30
SleepTimerSetting......................30
Dimmer...............................30
Mute.................................30
UsingtheHeadphoneJack................30
SelectingtheInputSource.................30
XTS(ExcellentTrueSound)................30
XTSpro...............................30
Reference
LanguageCodeList.......................31
CountryCodeList.........................31
Troubleshooting........................32-33
Specifications............................34

4
Before
Use
Playable
Discs
DVD
(8cm/12cmdisc)
DVD
audio
discs
(8cm/12cmdisc)
Video
CD
(VCD)
(8cm/12cmdisc)
Audio
CD
(8cm/12cmdisc)
In
addition,
this
unit
can
play
a
DVD-RW,
DVD+RW,
SVCD
and
CD-R
or
CD-RW
that
contains
audio
titles,
MP3,
WMA,
JPEG
or
DivX
files.
otes
Depending
on
the
conditions
of
the
recording
equip-
ment
or
the
CD-R/RW
(or
DVD-RW,
DVD+RW)
disc
itself,
some
CD-R/RW
(or
DVD-RW,
DVD+RW)
discs
cannot
be
played
on
the
unit.
Do
not
attach
any
seal
or
label
to
either
side
(the
labeled
side
or
the
recorded
side)
of
a
disc.
Do
not
use
irregularly
shaped
CDs
(e.g.,
heart-shaped
or
octagonal).
It
may
result
in
malfunctions.
otes
on
DVDs
and
Video
CDs
Some
playback
operations
of
DVDs
and
Video
CDs
may
be
intentionally
fixed
by
software
manufacturers.
As
this
unit
plays
DVDs
and
Video
CDs
according
to
disc
content
designed
by
the
software
manufacturer,
some
playback
features
of
the
unit
may
not
be
available
or
other
functions
may
be
added.
Make
sure
to
also
refer
to
the
instructions
supplied
with
the
DVDs
and
Video
CDs.
Some DVDs
made
for
busi-
ness
purposes
may
not
be
able
to
be
played
on
the
unit.
Regional
code
of
the
DVD/CD
receiver
and
DVDs
This
DVD/CD
Receiver
is
designed
and
manufactured
for
playback
of
region
"4"
encoded
DVD
software.
The
region
code
on
the
labels
of
some
DVDs
indicates
which
type
of
player
can
play
those
discs.
This
unit
can
only
play
DVDs
labeled
"4"
or
"ALL".
If
you
try
to
play
any
other
discs,
the
message
"Check
Regional
Code"
will
appear
on
the
TV
screen.
Some
DVDs
that
have
no
region
code
label
may
still
be
subject
to
area
restrictions
and
therefore
not
playable.
ote
on
DTS-encoded
CDs
When
playing
DTS-encoded
CDs,
excessive
audio
level
may
be
heard
from
the
analog
stereo
output.
To
avoid
possible
damage
to
the
audio
system,
turn
down
the
volume
before
playing
back such
discs,
adjust
the
volume
gradually,
and
keep
the
volume
level
low.
To
enjoy
DTS
Digital
SurroundTM
playback,
an
external
5.1
channel
DTS
Digital
SurroundTM
decoder
system
must
be
connected
to
the
digital
output
of
the
unit.
Disc-related
terms
Title
(DVD
only)
The
main
film
content
or
accompanying
feature
content
or
additional
feature
content,
or
music
album.
Each
title
is
assigned
a
title
reference
number
enabling
you
to
locate
it
easily.
Chapter
(DVD
only)
Sections
of
a
picture
or
a
musical
piece
that
are
smaller
than
titles.
A
title
is
composed
of
one
or
several
chap-
ters.
Each
chapter
is
assigned
a
chapter
number,
enabling
you
to
locate
the
chapter
you
want.
Depending
on
the
disc,
chapters
may
not
be
recorded.
Group
(DVD
audio
discs
only)
The
main
audio
content
or
accompanying
feature
con-
tent
or
additional
feature
content,
or
music
album.
Each
group
is
assigned
a
group
reference
number
enabling
you
to
locate
it
easily.
Scene
(VCD)
On
a
Video
CD
with
PBC
(Playback
control)
functions,
moving
pictures
and
still
pictures
are
divided
into
sec-
tions
called
"Scenes".
Each
scene
is
displayed
in
the
menu
screen
and
assigned
a
scene
number,
enabling
you
to
locate
the
scene
you
want.
A
scene
is
composed
of
one
or
several
tracks.
Types
of
Video
CDs
There
are
two
types
of
Video
CDs:
Video
CDs
equipped
with
PBC
(Version
2.0)
PBC
(Playback
control)
functions
allow
you
to
interact
with
the
system
via
menus,
search
functions,
or
other
typical
computer-like
operations.
Moreover,
still
pictures
of
high
resolution
can
be
played
if
they
are
included
in
the
disc.
Video
CDs
not
equipped
with
PBC
(Version
1.1)
Operated
in
the
same
way
as
audio
CDs,
these
discs
allow
playback
of
video
pictures
as
well
as
sound,
but
they
are
not
equipped
with
PBC.
4

Introduction
5
Before
Use
(Continued)
Precautions
Handling
the
unit
When
shipping
the
unit
The
original
shipping
carton
and
packing
materials
may
come
in
handy.
For
maximum
protection,
re-pack
the
unit
as
it
was
originally
packed
at
the
factory.
When
setting
up
the
unit
The
picture
and
sound
of
a
nearby
TV,
VCR,
or
radio
may
be
disturbed
during
playback.
In
this
case,
position
the
unit
away
from
the
TV,
VCR,
or
radio,
or
turn
off
the
unit
after
removing
the
disc.
To
keep
the
exterior
surfaces
clean
Do
not
use
volatile
liquids,
such
as
insecticide
spray,
near
the
unit.
Do
not
leave
rubber
or
plastic
products
in
contact
with
the
unit
for
a
long
period
of
time.
They
will
leave
marks
on
the
surface.
Cleaning
the
unit
To
clean
the
cabinet
Use
a
soft,
dry
cloth.
If
the
surfaces
are
extremely
dirty,
use
a
soft
cloth
lightly
moistened
with
a
mild
detergent
solution.
Do
not
use
strong
solvents
such
as
alcohol,
benzene,
or
thinner,
as
these
might
damage
the
surface
of
the
unit.
To
obtain
a
clear
picture
The
DVD/CD
Receiver
is
a
high-tech,
precision
device.
If
the
optical
pick-up
lens
and
disc
drive
parts
are
dirty
or
worn,
the
picture
quality
will
be
poor.
Regular
inspection
and
maintenance
are
recommended
after
every
1,000
hours
of
use.
(This
depends
on
the
operating
environment.)
For
details,
please
contact
your
nearest
dealer.
Notes
on
Discs
Disc
Handling
Do
not
touch
the
playback
side
of
the
disc.
Hold
the
disc
by
the
edges
so
that
fingerprints
will
not
get
on
the
surface.
Do
not
stick
paper
or
tape
on
the
disc.
Storing
discs
After
playing,
store
the
disc
in
its
case.
Do
not
expose
the
disc
to
direct
sunlight
or
sources
of
heat,
or
leave
it
in
a
parked
car
exposed
to
direct
sun-
light,
as
there
may
be
a
considerable
temperature
increase
inside
the
car.
Cleaning
discs
Fingerprints
and
dust
on
the
disc
can
distort
the
picture
or
reduce
sound
quality.
Before
playing,
clean
the
disc
with
a
clean
cloth.
Wipe
the
disc
from
the
centre
out-
wards.
Do
not
use
strong
solvents
such
as
alcohol,
benzene,
thinner,
commercially
available
cleaners,
or
anti-static
spray
intended
for
vinyl
records.
About
Symbols
About
the
symbol
display
""
may
appear
on
the
TV
screen
during
operation.
This
icon
means
the
function
explained
in
this
owner's
manual
is
not
available
on
that
specific
DVD-Video
disc.
About
the
disc
symbols
for
instructions
A
section
whose
title
has
one
of
the
following
symbol
is
applicable
only
to
the
disc
represented
by
the
symbol.
DVD
and
finalized
DVD±R/RW.
DVD
Audio
discs.
Video
CDs
with
the
PBC
(playback
control)
function.
Video
CDs
without
the
PBC
(playback
control)
function.
Audio
CDs.
MP3
disc.
WMA
disc.
JPEG
disc.
DivX
disc.
DivX
JPEG
WMA
MP3
CD
VCD1.1
VCD2.0
DVD-A
DVD-V

6
Front
Panel
and
Rear
Panel
Do
not
touch
the
inner
pins
of
the
jacks
on
the
rear
panel.
Electrostatic
discharge
may
cause
permanent
damage
to
the
unit.
AUDIO
L
R
AV2
IN
AV1
IN
S-VIDEO
OUT
connector
FM
Antenna
connector
AM
Loop
Antenna
connectors
SPEAKER
connectors
Power
Cord
MONITOR
OUT
connector
OPTICAL
IN
connector
COMPONENT
VIDEO
OUT
terminals
Connect
to
a
TV
with
Y
Pb
Pr
inputs.
AV1
AUDIO
Input
(L/R)/VIDEO
IN
Connectors
AV2
AUDIO
Input
(L/R)/VIDEO
IN
Connectors
TRANSMITTER
(DC
7V
OUT)
Connector
OPEN/CLOSE
button
TUNING(-/+)/SKIP(-/+)
buttons
Remote
sensor
PHONES
connector
VOLUME
controller
STANDBY/ON
DISPLAY
Window
STANDBY
indicator
Lights
red
when
the
receiver
is
in
Standby
mode
(off).
DISC
Tray
FUNCTION/PLAY
Press
and
hold
down
this
button
about
3
seconds,
then
press
repeatedly
to
select
other
function.
MONO/STEREO/
PAUSE/STEP
STOP

7
Introduction
Remote
Control
Operation
Range
Point
the
remote
control
at
the
remote
sensor
and
press
the
buttons.
Distance:
About
23
ft
(7
m)
from
the
front
of
the
remote
sen-
sor
Angle:
About
30°
in
each
direction
in
front
of
the
remote
sensor
Remote
control
battery
installation
Remove
the
battery
cover
on
the
rear
of
the
remote
control,
and
insert
two
R03
(size
AAA)
batteries
with
and
aligned
correctly.
Caution
Do
not
mix
old
and
new
batteries.
Never
mix
different
types
of
batteries
(standard,
alkaline,
etc.).
OPEN/CLOSE
(Z)
Opens
and
closes
the
disc
tray.
AUX
Selects
input
source.
TV
To
control
the TV.
(LG
TV
only)
SLEEP
Set
the
System
to
turn
off
automatically.
at
a
specified
time.
MUTE
Mute
the
speakers.
SUBTITLE
Selects
a
subtitle
language
(DVD).
RETURN
Removes
the
setup
menu.
MARKER
Marks
a
point
during playback.
SEARCH
Displays
MARKER
SEARCH
menu.
DISPLAY
Accesses
On-Screen
display.
INPUT
Selects the
TV's
source.
b/B/v/V
(left/right/up/down)
Selects
an
option
in
the
menu.
ENTER
Acknowledges
the
menu
selection.
PRESET/CH(+/-)
(v/V):
Select
programme
of
TV
or
Radio.
TUN(-/+)
(b/B):
To
tune
in
the
desired
radio
station.
TITLE
Displays
the
disc's
Title
menu,
if
available.
VOLUME
(+/-)
To
adjust
speaker
volume
and
TV
volume.
PLAY
(B)
Starts
playback.
PAUSE/STEP
(X)
Pause
playback
STOP
(x)
Stops
playback.
ZOOM
Enlarges
the
DVD
video
image.
DIMMER
Press
to
change
brightness
of
the
display
window
on
the
front
panel
dur-ing
in
power-on
status.
D.INPUT
To
select
a
digital
input
source.
Remote
Control
Overview
SLEEP
DVD
MUTE
SUBTITLE
SCAN
SKIP
D.INPUT
MRAKER
-
SEARCH
SOUND
PRESET/
CH
AUDIO
..
+
-
POWER
DVD
Select
the
output
source
(CD/DVD)
or
accesses
BAND
Select
the
System's
tuner
(FM
and
AM
bands)
0-9
numerical
buttons
Select
a
service,
programme
number
directly
or
select
numbered
options
in
a
menu.
XTS
pro
To
enjoy
more
natural
and
realistic
sound.
XTS
To
enjoy
great
sound
effect.
AUDIO
Selects
an
audio
language
(DVD)
or
an
audio
channel
(CD).
SOUND
MODE
Selects the
sound
mode.
SETUP
Accesses
or
removes
setup
menu
.
MENU
Accesses
the
menu
on
a
DVD
disc.
SCAN-/+(bb/BB)
Search
backward
or
forward.
SLOW-/+(t/T)
Reverse/
Forward
slow
playback.
REVERSE
SKIP(.)
Search
backward*/go
to
beginning
of
current
chapter
or
track
or
go
to
previous
chapter
or
track.
FORWARD
SKIP(>)
Search
forward*/go
to
next
chapter
or
track.
PROG.
Accesses
or
removes
Program
menu.
MEMO.
Enter
a
radio
station's
frequency
into
the
tuner.
CLEAR
Removes
a
track
number
on
the
program
menu
or
a
mark
on
the
MARKER
SEARCH
menu.
REPEAT
Repeat
chapter,
track,
title,
all.
REPEAT
A-B
Repeats
sequence.

8
Connections
Make
one
of
the
following
connections,
depending
on
the
capabilities
of
your
existing
equipment.
ips
Depending
on
your
TV
and
other
equipment
you
wish
to
connect,
there
are
various
ways
you
could
connect
the
DVD/CD
Receiver.
Use
one
of
the
connection
methods
described
below.
Please
refer
to
the
manuals
of
your
TV,
VCR,
Stereo
System
or
other
devices
as
necessary
to
make
the
best
connections.
Caution
Make
sure
the
DVD/CD
Receiver
is
connected
directly
to
the
TV.
Select
the
correct
AV
input
on
your
TV.
Do
not
connect
your
DVD/CD
Receiver
to
TV
via
your
VCR.
The
DVD
image
could
be
distorted
by
the
copy
protection
system.
S-Video
connection
Connect
the
S-VIDEO
OUT
jack
on
the
DVD/CD
Receiver
to
the
S-VIDEO
IN
jack
on
the
TV
using
the
S-Video
cable
(S).
Video
connection
Connect
the
MONITOR
OUT
jack
from
the
DVD/CD
Receiver
to
the
VIDEO
IN
jack
on
the
TV
using
the
video cable
supplied
(V).
Component
Video
(Color
Stream)
connection
Connect
the
COMPONENT
VIDEO
OUT
jacks
from
the
DVD/CD
Receiver
to
the
corresponding
in
jacks
on
the
TV
using
an
Y
Pb
Pr
cable
(C).
Progressive
Scan
(ColorStream
pro)
connection
If
your
television
is
a
high-definition
or
"digital
ready"
television,
you
may
take
advantage
of
the
DVD/CD
Receiver's
progressive
scan
output
for
the
highest
video
resolution
possible.
If
your
TV
does
not
accept
the
Progressive
Scan
format,
the
picture
will
appear
scrambled
if
you
try
Progressive
Scan
on
the
DVD/CD
Receiver.
Connect
the
COMPONENT
VIDEO
OUT
jacks
from
the
DVD/CD
Receiver
to
the
corresponding
in
jacks
on
the
TV
using
an
optional
Y
Pb
Pr
cable
(C).
otes
Set
the
Progressive
to
"On"
on
the
Setup
menu
for
progressive
signal,
see
page
17.
Set
the
progressive
to
"Off"
by
removing
any
disc
from
the
unit
and
close
the
disc
tray.
see
that
"no
disc"
is
displayed
on
the
display
window.
Then,
press
STOP
and
hold
it
for five
seconds
before
releasing
it.
Progressive
scan
does
not
work
with
the
analog
video
connections
(yellow
VIDEO
OUT
jack)
or
S-VIDEO
connection.
TV
Connections
AUDIO
L
R
Rear
of
DVD/CD
Receiver
S
VC
YPb
Pr
COMPONENT
VIDEO
/
PROGRESSIVE
SCAN
INPUT
L
VIDEO
INPUT
S-VIDEO
INPUT
Rear
of
TV
AV1
IN
AV2
IN

Preparation
9
otes
If
the
audio
format
of
the
digital
output
does
not
match
the
capabilities
of
your
DVD/CD
Receiver,
the
receiver
will
produce
a
strong,
distorted
sound
or
no
sound
at
all.
Connections
(Continued)
Optional
Equipment
Connections
1
Connect
a
VCR
to
the
AV
IN
connectors.
2
Connect
a
additional
VCR
to
the
AV2
connectors.
3
Connect
an
optical
output
of
DVD
Player
(or
Digital
Device
etc)
to
the
OPTICAL
IN
connector.
AUDIO
L
R
DVD
Player
(or
Digital
Device,
etc)
OPTICAL
OUT
IN
OUT
VIDEO
OUT
IN
AUDIO
(L)
AUDIO
(R)
VCR
Additional
VCR
To
AUDIO
IN
(L/R)/
VIDEO
IN
(AV2)
To
AUDIO
IN
(L/R)/
VIDEO
IN
(AV1)
To
AUDIO
OUT
(L/R)/
VIDEO
OUT
To
AUDIO
OUT
(L/R)/
VIDEO
OUT
AV1
IN
AV2IN

10
Connections
(Continued)
AUDIO
L
R
FM
Wire
aerial
(supplied)
AM
Loop
aerial
(supplied)
AV1
IN
AV2
IN
Aerial
Connections
Connect
the
supplied
FM/AM
aerial
for
listening
to
the
radio.
Connect
the
AM
Loop
aerial
to
the
AM
aerial
connector.
Connect
the
FM
Wire
aerial
to
the
FM
aerial
connector.
otes
To
prevent
noise
pickup,
keep
the
AM
Loop
aerial
away
from
the
DVD/CD
Receiver
and
other
components.
Be
sure
to
fully
extend
the
FM
wire
aerial.
After
connecting
the
FM
Wire
aerial,
keep
it
as
horizontal
as
possible.

Connections
(Continued)
Preparation
11
Speaker
System
Connection
ote
If
there
is
a
strong
electromagnetic
wave
product
nearby,
an
interference
may
be
occurred.
(Ex
:
Micro
wave
oven)
Transmitter
Changing
a
channel
of
Transmitter
If
there
is
a
similar
wireless
product
nearby,
interference
may
occur.
In
this
case,
change
to
other
channel
using
ID/CHANNEL
(ID./CH.)
button
of
transmitter.
Press
the
ID/CHANNEL
(ID./CH.)
button
for
less
than
about
3
seconds.
ote
The
wireless
speakers
may
not
received
the
changed
channel
of
transmitter.
In
this
case
set
the
ID
as
below.
Setting
a
ID
of
Transmitter
When
you
connect
the
wireless
speaker
for
the
first
time,
the
blue
and
red
LED
indicator
of
wireless
speaker
blinks
in
turn
and
then
the
ID
will
be
set
automatically.
If
an
interference
is
occurred
or
you
use
a
new
wireless
speaker,
set
the
ID.
1.
Press
the
ID/CHANNEL
(ID./CH.)
button
for
more
than
about
3
seconds.
The
blue
LED
indicator
blinks.
2.
Turn
the
transmitter
and
wireless
speaker
off
and
then
turn
it
on.
Assembling
and
Connecting
to
the
Speakers
The
front
and
rear
speakers
are
detached
from
the
speaker
stands.
Connect
the
speaker
cords
and
assem-
ble
the
front
and
rear
speakers
from
speaker
stands
as
illustrated.
Connect
the
speaker
cords
to
the
appropriate
termi-
nals
on
the
bottom
of
each
front
and
rear
speaker.
After
connecting
the
speaker
cords
to
the
appropriate
terminals
on
the
bottom
of
each
front
and
rear
speak-
er
and
attach
the
front
and
rear
speakers
to
the
speaker
stands.
ote
You
cannot
detach
the
speaker
from
the
stand
after
assem-
bling
the
front
and
rear
speakers.
LED
indicator
Displays
the
operated
status.
SIGNAL
ID./CH.
DC
IN
SOUND
SIGNAL
connector
ID/CHANNEL
(ID./CH.)
button
DC
IN
connector

Connections
(Continued)
12
AUDIO
L
R
AV1
IN
AV2
IN
Transmitter
DC
power
cable
Sound
signal
SIGNAL
ID./CH.
DC
IN
Wireless
Speaker
(Right)
Center
speaker
Front
speaker
(Left)
Front
speaker
(Right)
Subwoofer
Wireless
Speaker
(Left)
cable
Speaker
System
Connection
Speaker
Connections
Connect
the
speakers
to
the
front
(right,
left)
or
center
speaker
connectors.
Connect
the
subwoofer
to
the
woofer
connector.
Connect
the
power
cord
of
the
wireless
speaker
to
the
outlet.
Connect
the
DC
IN
connector
of
transmitter
and
the
transmitter
connector
of
rear
panel
with
the
DC
power
cable.
Connect
the
SOUND
SIGNAL
connector
of
transmitter
and
the
rear
(right,
left)
speaker
connector
of
rear
panel
with
the
SOUND
SIGNAL
cable.
Set
the
distance
between
the
transmitter
and
wireless
speaker
(right,
left)
within
10m.
Notes:
Optimum
performance
can
be
implemented
only
when
the
transmitter
and
the
wireless
speaker
within
distance
of
2m
through
10m
is
used
since
communication
failure
may
occur
if
closely
approaching
distance
between
them.
Be
sure
to
match
the
speaker
cable
to
the
appropriate
terminal
on
the
components:
+
to
+
and
--
to
--.
If
the
cables
are
reversed,
the
sound
will
be
distorted
and
will
lack
base.
Do
not
remove
the
front
cover
of
supplied
speaker.
It
takes
a
few
seconds
(and
may
take
longer)
for
the
transmitter
and
wireless
speaker
(left,
right)
to
communicate
with
each
other.
When
the
main
set
is
turned
off,
the
transmitter
is
also
turned
off
automatically
and
the
wireless
speaker
is
in
standby
mode
(red
LED
indicator).
If
the
wireless
speaker
is
turned
off,
the
wireless
speaker
will
not
function.

Preparation
13
Connections
(Continued)
Centre
Speaker
Front
Speaker
(Left)
Speaker
Positioning
Example
Rear
Speaker
(Left)
Rear
Speaker
(Right)
Front
Speaker
(Right)
Subwoofer
Speaker
Positioning
In
the
case
of
normal
position
use
the
6
speakers
(2
front
speakers,
centre
speaker,
2
rear
speakers
and
sub-
woofer).
If
you
want
to
play
the
excellent
bass
sound,
DTS
digital
surround
or
Dolby
Digital
surround,
you
should
connect
a
subwoofer.
?
Front
speakers
According
to
your
listening
position
set
up
the
speakers
for
equal
distance.
And
by
hearing
position
set
up
the
interval
between
speakers
to
45
degree.
?
Centre
speaker
The
centre
speakers
and
front
speakers
are
ideally
the
same
height.
But
normally
place
it
above
or
below
the
television.
?
Rear
speakers
Place
left
and
right
behind
the
listening
area.
These
speakers
recreate
sound
motion
and
atmosphere
required
for
surround
sound
playback.
For
best
results,
do
not
install
the
rear
speakers
too
far
behind
the
listening
position
and
install
them
at
or
above
the
level
of
the
listener
's
ears.
It
is
also
effective
to
direct
the
rear
speakers
towards
a
wall
or
ceiling
to
further
disperse
the
sound.
In
the
case
of
a
smaller
room
size,
if
the
audience
is
near
to
the
rear
wall
set
the
rear
speakers
opposite
each
other,
and
set
the
rear
speakers
above
60
-
90
cm
than
the
listener
's
ears.
?
Subwoofer
This
can
be
placed
in
any
front
position.

Mini
Glossary
for
Audio Stream
&
Surround
mode
Allows
you
to
enjoy
5.1(or
6)
discrete
channels
of
high
quality
digital
audio
from
DTS
program
sources
such
as
discs,
DVD
and
compact
discs,
etc.bearing
the
trade-
mark.
DTS
Digital
Surround
delivers
up
to
6
channels
of
transparent
audio(which
means
identical
to
the
original
masters)
and
results
in
exceptional
clarity
throughout
a
true
360
degree
sound
field.
The
term
DTS
is
a
trade-
mark
of
DTS
Technology,
LLC.
Manufactured
under
license
from
DTS
Technology,
LLC.
The
Dolby
Digital
surround
format
lets
you
enjoy
up
to
5.1
channels
of
digital
surround
sound
from
a
Dolby
Digital
program
source.
If
you
play
DVDs
with
"
"
mark,
you
can
enjoy
even
better
sound
quality,
greater
spatial
accuracy,
and
improved
dynamic
range.
(II)
Dolby
Pro
Logic
II
creates
five
full-bandwidth
output
channels
from two-channel
sources.
This
is
done
using
an
advanced,
high-purity
matrix
surround
decoder
that
extracts
the
spatial
properties
of
the
original
recording
without
adding
any
new
sounds
or
tonal
colorations.
MOVIE
mode:
The
Movie
mode
is
for
use
with
stereo
television
shows
and
all
programs
encoded
in
Dolby
Surround.
The
result
is
enhanced
soundfield
directionality
that
approaches
the
quality
of
discrete
5.1-channel
sound.
MUSIC
mode:
The
Music
mode
is
for
use
with
any
stereo
music
recordings.
MATRIX
mode:
The
Matrix
mode
is
the
same
as
the
Music
mode
except
that
the
directional
enhancement
logic
is
turned
off.
It
may
be
used
to
enhance
mono
signals
by
making
them
seem
"larger."
The
Matrix
mode
may
also
find
use
in
auto
systems,
where
the
fluctuations
from
poor
FM
stereo
reception
can
otherwise
cause
disturbing
surround
signals
from
a
logic
decoder.
The
ultimate
"cure"
for
poor
FM
stereo
reception
may
be
simply
to
force
the
audio
to
mono.
BYPASS
Software
with
multichannel
surround
audio
signals
is
played
according
to
the
way
it
was
recorded.
Sound
Mode
You
can
enjoy
surround
sound
simply
by
selecting
one
of
the
pre-programmed
sound
fields
according
to
the
program
you
want
to
listen
to.
When
DVD
is
inserted
You
can
change
the
Digital
Audio
Output
mode
by
pressing
the
AUDIO
button
on
the
remote
control
during
playback.
Although
the
DVD
contents
differ
from
disc
to
disc,
the
following
explains
the
basic
operation
when
this
feature
is
used.
a)
After
you
select
2
channel
(For
example
or
)
by
pressing
AUDIO
button,
press
SOUND
button
repeatedly.
b)
After
you
select
5.1
channel
(For
example
or
)
by
pressing
AUDIO
button,
press
SOUND
button.
-"
"
indicator
will
be
displayed
on
the
TV
screen.
-
"BYPASS"
indicator
will
be
only
displayed
on
the
display
window.
When
Video
CD
is
inserted
Each
time
you
press
SOUND
button,
the
sound
mode
of
Video
CD
is
changed
on
the
display
window
in
the
following
order.
BYPASS
→
STUDIO
→
CLUB
→
HALL
→
THEATER
1
→
CHURCH
→
PL
ll
MOVIE
→
PL
ll
MUSIC
→
PL
ll
MTRX
→
BYPASS...
ote
After
you
select
the
"Bypass"
of
sound
mode
by
pressing
SOUND
button,
press
AUDIO
button.
The
Left,
Right
and
Stereo
of
audio
channel
will
be
displayed
on
the
TV
screen.
When
CD
is
inserted
Each
time
you
press
SOUND
button,
the
sound
mode
of
Audio
CD
is
changed
on
the
display
window
in
the
following
order.
BYPASS
→
STUDIO
→
CLUB
→
HALL
→
THEATER
1
→
CHURCH
→
PL
ll
MOVIE
→
PL
ll
MUSIC
→
PL
ll
MTRX
→
BYPASS...
For
your
reference
?
You
can
identify
the
encoding
format
of
program
software
by
looking
at
its
packaging.
-
Dolby
Digital
discs
are
labeled
with
the
logo.
-
Dolby
Surround
encoded
programs
are
labeled
with
the
logo.
-
DTS
Digital
Surround
discs
are
marked
with
DTS.
ote
When
you
play
sound
tracks
with
96kHz
sampling
frequen-
cy,
the
output
signals
will
be
converted
to
48kHz
(sampling
frequency).
When
you
use
a
microphone,
you
can't
enjoy
5.1
channel
output.
Only
2
channel
sound
will
out
by
the
influence
of
the
microphone
system.
4
ENG
DTS
5.1
CH
1
ENG
D
5.1
CH
Matrix
Music
Movie
Bypass
3
ENG
D
2CH
2
ENG
D
2CH
CD
VCD1.1
VCD2.0
DVD
14
Before
Operation

Preparation
15
Before
Operation
(Continued)
On-Screen
Display
You
can
display
the
general
playback
status
on
the
TV
screen.
Some
items
can
be
changed
using
the
menu.
To
use
the
on-screen
display:
1
Press
DISPLAY
during
playback.
2Pressv/Vtoselectanitem.
The
selected
item
is
highlighted.
3
Press
b
/
B
to
change
the
setting.
You
can
also
use
the
number
buttons
if
appropriate
(e.g.
inputting
the
title
number).
For
some
functions,
press
ENTER
to
execute
the
setting.
PLAYBACK
STATUS/RESTRICTIONS
Repeat
title
Repeat
sequence
Resume
play
from
this
point
Action
prohibited
or
not
available
otes
Some
discs
may
not
provide
all
of
the
features
shown
below.
If
no
button
is
pressed
for
10
seconds,
the
on-
screen
display
disappears.
A-B
Title
Example:
On-Screen
Display
during
playing
VCD
Items
Title
Number
Chapter
Number
Time
search
Audio
language
and
Digital
Audio
Output
mode
Subtitle
language
Angle
Sound
Selection
Method
b
/
B,Numbers
ENTER
b
/
B,Numbers
ENTER
Numbers,
ENTER
b/Bor
AUDIO
b/Bor
SUBTITLE
b/B
b/B
1/3
1/12
0:20:09
ABC
1
ENG
1/3
Bypass
Example:
On-Screen
Display
during
playing
DVD
Video
Items
Track
Number
(or
PBC
mode)
Time
search
Audio
Channel
Sound
Selection
Method
b
/
B,Numbers
ENTER
Numbers
ENTER
b/Bor
AUDIO
b/B
1/3
0:20:09
Bypass
Items
Group
Number
Track
Number
Time
search
Audio
language
and
Digital
Audio
Output
mode
Subtitle
language
Page
(or
Angle)
Selection
Method
b
/
B,
Numbers
ENTER
b
/
B,
Numbers
ENTER
Display
only
b/Bor
AUDIO
Display
only
b/B
0:20:09
OFF
ABC
Example:
On-Screen
Display
during
playing
DVD
Audio
1/3
or

16
Before
Operation
(Continued)
Initial
Settings
By
using
the
Setup
menu,
you
can
make
various
adjust-
ments
to
items
such
as
picture
and
sound.
You
can
also
set
a
language
for
the
subtitles
and
the
Setup
menu,
among
other
things.
For
details
on
each
Setup
menu
item,
see
pages
16
to
19.
To
display
and
exit
the
Menu:
Press
SET
UP
to
display
the
menu.
A
second
press
of
SET
UP
will
take
you
back
to
initial
screen.
To
go
to
the
next
level:
Press
B
on
the
remote
control.
To
go
back
to
the
previous
level:
Press
b
on
the
remote
control.
General
Operation
1
Press
SET
UP.
The
setup
menu
appears.
2
Use
v
/
V
to
select
the
desired
option
then
press
B
to
move
to
the
second
level.
The
screen
will
be
shown
the
current
setting
for
the
selected
item,
as
well
as
alternate
setting(s).
3
Use
v
/
V
to
select
the
second
desired
option
then
press
B
to
move
to
the
third
level.
4
Use
v
/
V
to
select
the
desired
setting
then
press
ENTER
to
confirm
your
selection.
Some
items
require
additional
steps.
5
Press
SET
UP
or
PLAY
to
exit
the
setup
menu.
LANGUAGE
OSD
Select
a
language
for
the
Setup
menu
and
on-screen
display.
Disc
Audio
/
Subtitle
/
Menu
Select
the
language
you
prefer
for
the
audio
track
(disc
audio),
subtitles,
and
the
disc
menu.
Original:
Refers
to
the
original
language
in
which
the
disc
was
recorded.
Other:
To
select
another
language,
press
number
buttons
to
enter
the
corresponding
4-digit
number
according
to
the
language
code
list
on
page
31.
If
you
enter
the
wrong
language
code,
press
CLEAR
on
the
remote
control.
DISPLAY
TV
Aspect
4:3:
Select
when
a
standard
4:3
TV
is
connected.
16:9:
Select
when
a
16:9
wide
TV
is
connected.
Display
Mode
Display
Mode
setting
works
only
when
the
TV
Aspect
mode
is
set
to
"4:3".
Letterbox:
Displays
a
wide
picture
with
bands
on
the
upper
and
lower
portions
of
the
screen.
Panscan:
Automatically
displays
the
wide
picture
on
the
entire
screen
and
cuts
off
the
portions
that
do
not
fit.
DVD-A
DVD-V
DVD-A
DVD-V
DVD-A
DVD-V
OSD
Original
English
Off
Original
Disc
Audio
Disc
Subtitle
Disc
Menu
Move
Select
LANGUAGE
DISPLAY
TV
Aspect
Widescreen
16:9
Display
Mode
Move
Select
Progressive
Scan
Off

Preparation
17
Before
Operation
(Continued)
Progressive
Scan
Progressive
Scan
Video
provides
the
highest
quality
pictures
with
less
flickering.
If
you
are
using
the
COMPONENT
VIDEO
OUT
jacks,
but
are
connecting
the
receiver
to
a
standard
(analog)
television,
set
Progressive
Scan
to
Off.
If
you
are
using
the
Component
Video
jacks
for
connection
to
a
TV
or
monitor
that
is
compatible
with
a
progressive
scan
signal,
set
Progressive
Scan
to
On.
1
Select
"Progressive
Scan"
on
the
DISPLAY
menu
then
press
B.
2
Select
"On"
using
the
v
/
V
buttons.
3
Press
ENTER
to
confirm
your
selection.
The
confirm
menu
will
appear.
4
When
the
confirm
menu
appears
on
your
screen
Cancel
is
highlighted
as
default.
Use
the
b
/
B
buttons
to
highlight
Enter.
5
Pressing
ENTER
will
set
the
DVD/CD
Receiver
to
Progressive
scan
mode.
ote
Progressive
Scan
will
not
be
displayed
in
the
setup
menu
when
the
VIDEO
OUT
SELECTOR
switch
is
set
at
SCART
position.
Caution
Once
the
setting
for
progressive
scan
output
is
entered,
an
image
will
only
be
visible
on
a
progressive
scan
compatible
TV
or
monitor.
If
you
set
Progressive
Scan
to
On
in
error,
you
must
reset
the
unit.
1)
Remove
any
disc
from
the
unit
and
close
the
disc
tray.
See
that
"NO
DISC"
is
displayed
on
the
display
window
2)
Press
and
hold
STOP
(x)
for
five
seconds
then
release
it.
The
video
output
will
be
restored
to
the
standard
setting,
and
a
picture
will
once
again
be
visible
on
a
conventional
analog
TV
or
monitor.
AUDIO
Each
DVD
disc
has
a
variety
of
audio
output
options.
Set
the
DVD/CD
Receiver's
AUDIO
options
according
to
the
type
of
audio
system
you
use.
5.1
Speaker
Setup
Select
speaker
settings,
including
volume
balance
and
distance,
or
test
the
speaker
settings.
Speaker
settings
are
only
active
on
the
Analog
Multi-
Channel
Output.
(See
"Speaker
Setting"
page
27)
Dynamic
Range
Control
(DRC)
With
the
DVD
format,
you
can
hear
a
program's
sound-
track
in
the
most
accurate
and
realistic
presentation
possible,
thanks
to
digital
audio
technology.
However,
you
may
wish
to
compress
the
dynamic
range
of
the
audio
output
(the
difference
between
the
loudest
sounds
and
the
quietest
ones).
Then,
you
may
listen
to
a
movie
at
a
lower
volume
without
losing
dialog
intelligibility.
Set
DRC
to
On
for this
effect.
otes
The
DRC
function
works
only
during
playback
of
Dolby
Digital
recorded
discs.
The
level
of
Dynamic
Range
Compression
may
differ
depending
on
the
DVD
disc.
Vocal
Set
Vocal
to
On
only
when
a
multi-channel
Karaoke
DVD
is
playing.
The
karaoke
channels
on
the
disc
will
mix
into
a
normal
stereo
sound.
DVD-V
DivX
DVD-A
DVD-V
DVD-A
DVD-V
DISPLAY
TV
Aspect
Display
Mode
Move
Select
Progressive
Scan
On
Off
Select
On
5.1
Speaker
Setup
DRC
On
Vocal
Move
Select
AUDIO

18
Before
Operation
(Continued)
LOCK
(Parental
Control)
Rating
Some
movies
contain
scenes
that
may
not
be
suitable
for
children
to
view.
Many
of
these
discs
contain
parental
control
information
that
applies
to
the
complete
disc
or
to
certain
scenes
on
the
disc.
Movies
and
scenes
are
rated
from
1
to
8,
depending
on
the
country.
Some
discs
offer
more
suitable
scenes
as
an
alternative.
The
parental
control
feature
allows
you
to
block
access
to
scenes
below
the
rating
you
input,
thereby
preventing
your
children
from
being
able
to
view
material
you
believe
is
unsuitable.
1
Select
"Rating"
on
the
LOCK
menu
then,
press
B.
2
To
access
the
Rating,
Password
and
Country
Code
features,
you
must
input
the
4-digit
security
code
you
created.
If
you
have
not
yet
entered
a
security
code
you
are
prompted
to
do
so.
Input
a
4-digit
code
and
press
ENTER.
Enter
it
again
and
press
ENTER
to
verify.
If
you
make
a
mistake
before
pressing
ENTER,
press
CLEAR.
3Selectaratingfrom1to8usingthev/V
buttons.
Rating
1-8:
Rating
one
(1)
has
the
most
restrictions
and
rating
eight
(8)
is
the
least
restrictive.
Unlock
If
you
select
unlock,
parental
control
is
not
active
and
the
disc
plays
in
full.
ote
If
you
set
a
rating
for
the
DVD/CD
Receiver,
all
disc
scenes
with
the
same
rating
or
lower
are
played.
Higher
rated
scenes
are
not
played
unless
an
alternate
scene
is
available
on
the
disc.
The
alternative
must
have
the
same
rating
or
a
lower
one.
If
no
suitable
alternative
is
found,
playback
stops.
You
must
enter
the
4-digit
pass-
word
or
change
the
rating
level
in
order
to
play
the
disc.
4
Press
ENTER
to
confirm
your
rating
selection,
then
press
SET
UP
to
exit
the
menu.
Password
(Security
Code)
You
can
enter
or
change
password.
1
Select
Password
on
the
LOCK
menu
then
press
B.
2
Follow
step
2
as
shown
left
(Rating).
"Change"
or
"New"
is
highlighted.
3
Enter
the
new
4-digit
code,
then
press
ENTER.
Input
it
again
to
verify.
4
Press
SET
UP
to
exit
the
menu.
If
you
forget
your
Security
Code
If
you
forget
your
security
code
you
can
clear
it
using
the
following
steps:
1
Input
the
6-digit
number
"210499"
on
the
setup
menu
and
the
security
code
is
cleared.
2
Enter
a
new
code
as
described
above.
ote
When
"
"
appears
on
the
TV
screen,
press
STOP
(x)
and
then
press
SET
UP
to
move
to
the
setup
menu.
Country
Code
Enter
the
code
of
the
country/area
whose
standards
were
used
to
rate
the
DVD-Video
disc,
based
on
the
list
in
the
reference
chapter.
1
Select
"Country
Code"
on
the
LOCK
menu,
then
press
B.
2
Follow
step
2
as
shown
left
(Rating).
3
Select
the
first
character
using
v
/
V
buttons.
4
Shift
the
cursor
using
B
button
and
select
the
second
character
using
v
/
V
buttons.
5
Press
ENTER
to
confirm
your
country
code
selection.
DVD-V
INPUT
PASSWD
DVD-V
LOCK
Rating
****
Unlock
Password
Country
Code
Move
Select

Operation
19
Before
Operation
(Continued)
OTHERS
PBC
Set
Playback
Control
(PBC)
to
On
or
Off.
On:
Video
CDs
with
PBC
are
played
according
to
the
PBC.
Off:
Video
CDs
with
PBC
are
played
the
same
way
as
Audio
CDs.
DivX(R)
Registration
You
can
show
the
DivX
DRM
(Digital
Right
Management)
Registration
code
for
your
unit
only.
The
Registration
code
is
used
for
VOD
(Video-On-
Demand)
service
agent.
You
can
purchase
or
rental
an
encrypt
movie
file.
otes
If
you
rent
the
DivX
VOD
file,
it
has
several
options
of
viewing
limits
as
show
below.
?
Display
the
number
which
you
can
watch
the
file.
?
The
rental
has
been
expired.
?
Display
the
authorization
error.
Playing
a
DVD
and
Video
CD
Playback
Setup
Turn
on
the
TV
and
select
the
video
input
source
con-
nected
to
the
DVD/CD
Receiver.
Audio
system:
Turn
on
the
audio
system
and
select
the
input
source
connected
to
the
DVD/CD
Receiver.
1
Press
OPEN/CLOSE
(Z)
to
open
the
disc
tray.
2
Load
your
chosen
disc
in
the
tray,
with the
label
facing
up.
When
a
double-sided
DVD
is
inserted,
make
sure
the
side
you
want
to
play
is
facing
down.
3
Press
OPEN/CLOSE
(Z)
to
close
the
tray.
READING
appears
on
the
TV
screen,
and
playback
starts
automatically.
If
playback
does
not
start,
press
PLAY.
In
some
cases,
the
disc
menu
might
appear
instead.
If
a
menu
screen
is
displayed
The
menu
screen
may
be
displayed
first
after
loading
a
DVD
or
Video
CD
which
contains
a
menu.
Use
the
b/B/v/V
buttons
to
select
the
title/chapter
you
want
to
view,
then
press
ENTER
to
start.
Press
TITLE
or
DVD
MENU
to
return
to
the
menu
screen.
Use
the
b/B/v/V
buttons
to
select
an
option
you
want,
then
press
ENTER
to
view
the
option.
Use
the
number
buttons
to
select
the
track
you
want
to
view.
Press
RETURN
to
return
to
the
menu
screen.
Menu
setting
and
the
exact
operating
procedures
for
using
the
menu
may
differ
depending
on
the
disc.
Follow
the
instructions
on
the
each
menu
screen.
You
also
may
set
PBC
to
Off
under
setup.
otes
If
Parental
Control
is
set
and
the
disc
is
not
within
the
Rating
settings
(not
authorized),
the
4-digit
code
must
be
entered
and/or
the
disc
must
be
authorized
(see
"Parental
Control",
on
page
18).
DVDs
may
have
a
region
code.
Your
receiver
will
not
play
discs
that
have
a
region
code
different
from
your
receiver.
The
region
code
for
this
player
is
4
(four).
VCD2.0
DVD-A
DVD-V
VCD1.1
VCD2.0
DVD
DivX
VCD
PBC
Move
OTHERS
On
Select
Select
DivX(R)
Registration
Your
registration
code
is
:
XXXXXXXX
Please
use
this
code
to
register
this
player
with
the
DivX(R)
Video
On
Demand
service.
This
will
allow
you
to
rent
and
purchase
videos
using
the
DivX(R)
Video
On
Demand
format.
To
learn
more
go
to
www.divx.com/vod
This
rental
video
has
7
views
left.
A
view
?
ends
when
you
stop
playback,
play
a
different
video,
or
turn
off
your
player.
Do
you
want
to
use
one
of
your
7
views
now
Yes No
This
rental
is
expired.
This
video
player
is
not
authorized
to
play
this
video.
DVD
or
Video
CD
Operation

20
DVD
or
Video
CD
Operation
(Continued)
General
Features
ote
Unless
stated
otherwise,
all
operations
described
use
the
remote
control.
Some
features
may
also
be
available
on
the
Setup
menu.
Moving
to
another
TITLE/GROUP
When
a
disc
has
more
than
one
title/group,
you
can
move
to
another
title/group
as
follows:
Press
DISP.,
then
press
the
appropriate
numbered
button
(0-9)
to
select
a
title
number.
Moving
to
another
CHAPTER/TRACK
When
a
title
on a
disc
has
more
than
one
chapter
or
a
disc
has
more
than
one
track,
you
can
move
to
another
chapter/track
as
follows:
Press
.
or
>
briefly
during
playback
to
select
the
next
chapter/track
or
to
return
to
the
beginning
of
the
current
chapter/track.
Press
.
twice
briefly
to
step
back
to
the
previous
chapter/track.
To
go
directly
to
any
chapter
during
DVD
playback,
press
DISP.
Then,
press
3/4
to
select
the
chapter/track
icon.
Then,
enter
the
chapter/track
number
using
the
numbered
buttons
(0-9).
ote
For
two-digit
numbers,
press
the
numbered
buttons
(0-9)
in
rapid
succession.
Slow
Motion
1
Press
SLOW
-/+
during
pause.
The
receiver
will
enter
SLOW
mode.
2
Use
the
SLOW
-/+
to
select
the
required
speed:
t
1/16,
t
1/8,
t
1/4
or
t
1/2
(backward),
or
T
1/16,
T
1/8,
T
1/4
or
T
1/2
(forward).
3
To
exit
slow
motion
mode,
press
PLAY.
ote
Slow
motion
playback
in
reverse
is
not
applicable
for
Video
CD.
Still
Picture
and
Frame-by-frame
playback
1
Press
PAUSE/STEP
during
playback.
The
DVD/CD
Receiver
will
now
go
into
PAUSE
mode.
2
You
can
advance
the
picture
frame-by-frame
by
press-
ing
PAUSE/STEP
repeatedly
on
the
remote
control.
Search
1
Press
m
or
M
during
playback.
The
DVD/CD
Receiver
will
now
go
into
SEARCH
mode.
2Press
m
or
M
repeatedly
to
select
the
required
speed:
mX2, mX4, mX8,
mX16,
mX100
(backward)
or
MX2,
MX4,
MX8,
MX16,
MX100
(forward).
With
a
Video
CD,
the
Search
speed
changes:
mX2,
mX4,
mX8,
mX16
(backward)
or
MX2,
MX4,
MX8,
MX16
(forward).
3
To
exit
SEARCH
mode,
press
PLAY.
Repeat
DVD-Video
discs
-
Repeat
Chapter/Title/Off
1
To
repeat
the
currently
playing
chapter,
press
REPEAT.
The
Repeat
Chapter
icon
appears
on
the
TV
screen.
2
To
repeat
the
title
currently
playing,
press
REPEAT
a
second
time.
The
Repeat
Title
icon
appears
on
the
TV
screen.
3
To
exit
Repeat
mode,
press
REPEAT
a
third
time.
The
Repeat
Off
icon
appears
on
the
TV
screen.
Video
CDs
-
Repeat
Track/All/Off
1
To
repeat
the
track
currently
playing,
press
REPEAT.
The
Repeat
Track
icon
appears
on
the
TV
screen.
2
To
repeat
the
disc
currently
playing,
press
REPEAT
a
second
time.
The
Repeat
All
icon
appears
on
the
TV
screen.
3
To
exit
Repeat
mode,
press
REPEAT
a
third
time.
The
Repeat
Off
icon
appears
on
the
TV
screen.
ote
On
a
Video
CD
with
PBC,
you
must
set
PBC
to
Off
on
the
setup
menu
to
use
the
Repeat
function.
See
page
19.
DivX
VCD1.1
VCD2.0
DVD-A
DVD-V
VCD1.1
VCD2.0
DVD-A
DVD-V
DivX
VCD1.1
VCD2.0
DVD-A
DVD-V
VCD1.1
VCD2.0
DVD-A
DVD-V
DivX
VCD1.1
VCD2.0
DVD-A
DVD-V
DVD-A
DVD-V
Other manuals for LH-W750TA
2
This manual suits for next models
7
Table of contents