LG LMP1171SS User manual

LMP1171SS
P/No. : MFL40407607www.lg.com
OWNER’S MANUAL
MICROWAVE OVEN
PLEASE READ THIS OWNER’S MANUAL THOROUGHLY
BEFORE OPERATING.

TABLE OF CONTENTS
SAFETY ................................................................................
Precautions to Avoid Possible Exposure
to Excessive Microwave Energy ........................................... 3
Grounding Instructions.......................................................... 3
Important Safety Instructions ............................................ 4, 5
UNDERSTANDING YOUR MICROWAVE OVEN.................. 6–10
Specifications ........................................................................ 6
Installation ............................................................................. 6
Parts and Accessories .......................................................... 7
Control Panel Features ......................................................... 7
Cookware Guide ................................................................... 8
Tips for Microwave Cooking.................................................. 9
Cleaning ...............................................................................
USING YOUR
MICROWAVE
OVEN ..................................
Clock/Kitchen Timer/Child Lock/Ez on.................................. 11
More/Less /Time Cooking/
Multistage Cooking .............................................................
Microwave Power Levels .................................................... .
Quick Touch ..........................................................
Reheat..................................................................................
Auto Defrost/Auto Defrost Table .........................................
Cooking Tips ..................................................................
USING THE PIZZA OVEN .............................................. 18, 19
Cooking with Auto Pizza ..................................................... 18
Cooking with the Bake Feature........................................... 19
TROUBLESHOOTING.................................................... 20–22
Questions and Answers ................................................ 20, 21
Before Calling for Service ................................................... 22
WARRANTY................................................ Inside back cover
........... ...
Precautions ...........................................................................
3–5
11–18
10
10
12
13
14
15
16
17, 18

SAFETY
•Do not attempt to operate this oven with
the door open, since open-door operation can
result in harmful exposure to microwave
energy. It is important not to defeat or tamper
with the safety interlocks.
•Do not place any object between the oven
front face and the door, or allow soil or
cleaner residue to accumulate on sealing
surfaces.
•Do not operate the oven if it is damaged.
It is particularly important that the oven door
close properly and that there is no damage to
the:
- door (bent),
- hinges and latches (broken or loosened),
- door seals and sealing surfaces.
•The oven should not be adjusted or
repaired by anyone except properly qualified
service personnel.
PRECAUTIONS TO AVOID POSSIBLE EXPOSURE
TO EXCESSIVE MICROWAVE ENERGY
GROUNDING INSTRUCTIONS
This appliance must be grounded. In the event
of an electrical short circuit, grounding reduces
the risk of electric shock by providing an escape
wire for the electric current. This appliance is
equipped with a cord having a grounding wire
and a grounding plug. The plug must be
plugged into an outlet that is properly installed
and grounded.
WARNING
Improper grounding can result in a risk of elec-
tric shock. Consult a qualified electrician if the
grounding instructions are not completely under-
stood, or if doubt exists as to whether the appli-
ance is properly grounded, and either:
1. If it is necessary to use an extension cord,
use only a 3-wire extension cord that has a
3-blade grounding plug, and a 3-slot recepta-
cle that will accept the plug on the appliance.
The marked rating of the extension cord shall
be equal to or greater than the electrical
rating of the appliance, or. . . .
2. Do not use an extension cord. If the power
supply cord is too short, have a qualified
electrician or serviceman install an outlet near
the appliance.
NOTES:
1. A short power-supply cord is provided to
reduce the risks resulting from becoming
entangled in or tripping over a longer cord.
2. Longer cord sets or extension cords are
available and may be used if care is exer-
cised in their use.
3. If a long cord or extension cord is used, (1)
the marked electrical rating of the cord set or
extension cord should be at least as great as
the electrical rating of the appliance, (2) the
extension cord must be a grounding-type
3-wire cord, and (3) the longer cord should be
arranged so that it will not drape over the
countertop or tabletop where it can be pulled
on by children or tripped over accidentally.
Ensure proper ground
exists before use
3

SAFETY
IMPORTANT SAFETY INSTRUCTIONS
The safety instructions below will tell you how to use your oven to avoid harm to yourself or damage to your
oven.
WARNING -To reduce the risk of burns, electric shock, fire, injury to persons, or exposure to
excessive microwave energy:
1. Read all instructions before using the appliance.
2. Read and follow the specific PRECAUTIONS TO AVOID POSSIBLE EXPOSURE TO EXCESSIVE
MICROWAVE ENERGY found on page 3 of this manual.
3. This appliance must be grounded. Connect only to properly grounded outlet.
See GROUNDING INSTRUCTIONS found on page 3 of this manual .
4. Install or locate this appliance only in accordance with the provided installation instructions.
5. Some products, such as whole eggs and sealed containers – for example, closed glass jars are able to
explode and should not be heated in this oven.
6. Use this appliance only for its intended use as described in the manual. Do not use corrosive chemicals
or vapors in this appliance. This type of oven is specifically designed to heat, cook, or dry food. It is not
designed for industrial or laboratory use.
7. As with any appliance, close supervision is necessary when used by children.
8. Do not operate this appliance if it has a damaged cord or plug, if it is not working properly, or if it has been
damaged or dropped.
9. This appliance should be serviced only by qualified service personnel. Contact the nearest authorized service
facility for examination, repair, or adjustment.
10. Do not cover or block any openings on the appliance.
11. Do not store this appliance outdoors. Do not use this product near water – for example, near a kitchen sink,
in a wet basement, near a swimming pool, or similar location.
12. Do not immerse cord or plug in water.
13. Keep cord away from heated surfaces.
14. Do not let cord hang over the edge of a table or counter.
15. When cleaning surfaces of door and oven that come together on closing the door, use only mild, nonabrasive
soaps or detergents applied with a sponge or soft cloth.
16. To reduce the risk of fire in the oven cavity:
a. Do not overcook food. Carefully attend appliance when paper, plastic, or other combustible materials are
placed inside the oven to facilitate cooking.
b. Remove wire twist-ties from paper or plastic bags before placing bag in oven.
c. If materials inside the oven ignite, KEEP OVEN DOOR CLOSED, turn oven off, and disconnect the power
cord or shut off power at the fuse or circuit breaker panel.
d. Do not use the cavity for storage purposes. Do not leave paper products, cooking utensils, or food in
the cavity when not in use.
17. Liquids such as water, coffee, or tea are able to be overheated beyond the boiling point without appearing to
be boiling. Visible bubbling or boiling when the container is removed from the microwave oven is not always
present. THIS COULD RESULT IN VERY HOT LIQUIDS SUDDENLY BOILING OVER WHEN THE CON-
TAINER IS DISTURBED OR A SPOON OR OTHER UTENSIL IS INSERTED INTO THE LIQUID. To reduce
the risk of injury to persons; 1) Do not overheat the liquid. 2) Stir the liquid both before and halfway through
heating it. 3) Do not use straight-sided containers with narrow necks. 4) After heating, allow the container to
stand in the microwave oven for a short time before removing the container. 5) Use extreme care when
inserting a spoon or other utensil into the container.
18. Avoid heating small-necked containers such as syrup bottles.
19. Avoid using corrosive and vapors, such as sulfide and chloride.
20. Liquids heated in certain shaped containers (especially cylindrical-shaped containers) may become overheat-
ed. The liquid may splash out with a loud noise during or after heating or when adding ingredients (instant
coffee, etc.), resulting in harm to the oven and possible injury. In all containers, for best results, stir the liquid
several times before heating. Always stir liquid several times between reheatings.
SAVE THESE INSTRUCTIONS
4

SAFETY – PIZZA OVEN
IMPORTANT SAFETY INSTRUCTIONS
WARNING – When using electrical appliances, especially around children, basic safety precautions should also
be followed, including the following:
1. Read all the instructions before using your pizza oven.
2. Do not touch hot surfaces. Use handles or knobs.
3. To protect against electrical hazards, do not immerse cord,
plug, or the appliance in water or other liquid.
4. Close supervision is necessary when any appliance is used
by or near children.
5. Unplug from outlet before cleaning. Allow to cool before
putting on or taking off parts or cleaning.
6. Do not operate any appliance with a damaged cord or plug,
or after the appliance malfunctions or has been dropped
or damaged in any manner. Return appliance to nearest
authorized service center for examination, repair, or
adjustment.
7. The use of accessory attachments not recommended by the
manufacturer may cause hazards.
8. Keep the cord away from heated surfaces. Do not let the
cord hang over the edge of table or counter, as it could be
pulled off.
9. Do not use outdoors.
10. Do not use on or near a hot gas or electric burner or in a
heated oven.
11. Do not use appliance for other than its intended use.
12. Oversized foods, metal foil packages, or utensils must not
be inserted into this appliance, as they may create a fire or
electrical hazard.
13. A fire may occur if this oven is covered or touching
flammable material, including curtains, draperies, walls,
etc. when in operation.
14. Do not attempt to dislodge food when this appliance is
plugged in.
15. Do not clean with metal scouring pads. Pieces can break
off the pad and touch electrical parts, creating a risk of
electrical shock.
16. Do not use paper products when operated in
pizza oven mode.
17. Do not store any materials other than the manufacturer’s
recommended accessories in this oven when not in use.
18. Do not cover racks, tray, or any other part of the oven with
aluminum foil. This will cause overheating of the oven.
19. Extreme caution must be used when moving an appliance
containing hot oil or other liquids.
20. Always attach plug to appliance first, then plug cord into the
wall outlet. To disconnect, turn controls to OFF then remove
plug from wall outlet.
21. Use extreme caution when removing tray or disposing of
hot grease.
22. Extreme caution should be exercised when using containers
constructed of other than metal or glass.
23. Do not place any of the following materials in the oven:
paper, cardboard, or plastic.
SAVE THESE INSTRUCTIONS!
5

UNDERSTANDING YOUR MICROWAVE OVEN
SPECIFICATIONS
*IEC 60705 RATING STANDARD
Specifications subject to change without prior notice.
Power Supply
Rated Power Microwave
Consumption Pizza grill
Power Output Microwave
Pizza grill
Frequency
Rated Current Microwave
Pizza
Overall Dimensions (W x H x D)
Oven Cavity Dimensions (W x H x D)
Capacity of Oven Cavity
120 VAC, 60 Hz
1,450 W
1,400 W
1,000 W*
1,400 W
2,450 MHz
12.5 A
12.5 A
1915/16" x 151/2" x 171/4" (51 x 39 x 44 cm)
141/16" x 87/8" x 131/4" (37 x 23 x 34 cm)
1.1 Cu. Ft.
grill
INSTALLATION
Carefully remove your microwave oven from the shipping
carton. Be sure to remove all packing materials from
the oven cavity and pizza cavity before use.
A. Circuits
B. Placement of the Oven
C. Turntable Installation
Place the turntable roller rest in the circle on the oven floor
and then place the glass turntable on the turntable roller rest.
NOTES:
Blocking the air inlet and/or outlet openings can damage
the oven.
D. Pizza Oven Pan
Place the pizza oven pan in the pizza drawer.
NOTE:
in place.
INSTALLATION CLEARANCES
4" (10 cm)
4" (10 cm)
4"
(10 cm)
For safety purposes this oven must be plugged into a
15 or 20 Amp circuit. No other electrical appliances or
lighting circuits should be on this line. If in doubt, con-
sult a licensed electrician.
Your microwave oven can be placed easily in your
kitchen, family room, or anywhere else in your home.
Place the oven on a flat surface such as a kitchen
countertop or a specially designed microwave oven
cart. Do not place oven above a gas or electric range.
Free air flow around the oven is important. Allow at
least 4 inches of space at the top, sides, and back of
the oven for proper ventilation.
E. Voltage Warning
The voltage used at the wall receptacle must be the
same as specified on the oven name plate located on
the back or on the side of the control panel of the oven.
Use of a higher voltage is dangerous and may result in
a fire or other type of accident causing oven damage.
Low voltage will cause slow cooking. In case your
microwave oven does not perform normally in spite of
proper voltage, remove and reinsert the plug.
F. Do not block the air vents
All air vents should be kept clear during cooking. If air
vents are covered during oven operation the oven may
overheat. In this case, a sensitive thermal safety device
automatically turns the oven off. The oven will be
inoperable until it has cooled sufficiently.
G. Radio interference
1.Microwave oven operation may interfere with TV or
radio reception.
2.
When there is interference, it may be reduced or
eliminated by taking the following measures:
a. Clean the door and the sealing surfaces of the
oven.
b. Reorient the receiving antenna of radio or
television.
c. Relocate the microwave oven in relation to the TV
or radio.
d. Move the microwave oven away from the
receiver.
e. Plug the microwave oven into a different outlet
so that microwave oven and receiver are on
different branch circuits
.
6

ENGLISH
1 Pizza Oven Pan
Your oven comes with the following accessories:
1 Owner's Manual and Cooking Guide
1Glass Turntable
1Rotating Ring
UNDERSTANDING YOUR MICROWAVE OVEN
PARTS AND ACCESSORIES
DISPLAY. The Display includes a clock and indicators to tell you time of day,
cooking time settings, and cooking functions selected.
2. QUICK
TOUCH. Touch this pad to cookwithout entering a cook power
or time.
3.
4. NUMBER PADS.Touch number pads to enter cooking times, cook powers,
quantities, or weights .
5. COOK TIME.Touch this pad to set a cooking time.
6.
AUTO DEFROST. Touch this pad to thaw ground meat, poultry,
or steaks/chops by entering a weight.
.1
STOP/&/($5. Touch this pad to stop the oven or clear entries.
7. CLOCK. Touch this pad to enter the time of day.
8. KITCHEN TIMER. Touch this pad to use your microwave oven as
a kitchen timer.
9. POWER. Touch this pad to set a cooking power.
10. CHILD LOCK. Touch and hold the 0 pad for 4seconds to activate this feature.
Touch and hold the 0 pad for 4seconds again to deactivate this feature.
11. MORE. Each time you touch this pad, you add10 seconds to the cooking time.
12. LESS. Each time you touch this pad, you subtract 10 seconds from the cooking time.
13. START / 467$57. Touch this pad to start all entries. If no other
settings have been made, touch this pad to cook at 100% power for 30
seconds. Press again to add time in 30 second increments, up to 9 minutes
and 59 seconds. Cooking will start immediately.
14. AUTO PIZZA. Touch this pad to automatically bake fresh or frozen pizza.
15. BAKE. Touch this pad to select a temperature to bake selected food items.
See-Through Door
Safety Interlock System Pizza Oven Pan
Oven
Control
Panel
Easy-Clean
Oven Cavity
Pizza Oven Drawer
CONTROL PANEL FEATURES
Turntable
Rotating ring
1
2
3
4
5
6
7
8
9
10
11 12
13
14
15
7

USE
Ovenproof Glass
•Glass treated for use in high-intensity heat
includes utility dishes, bread dishes, pie plates,
cake plates, liquid measuring cups, casseroles,
and bowls without metallic trim.
China
•Bowls, cups, serving plates, and platters without
metallic trim can be used in your oven.
Plastic
•When using plastic wrap as a cover, make sure
that the dish is deep enough so the plastic wrap
does not touch the food. As the food heats, it may
melt the plastic wrap wherever the wrap touches
the food.
•Place plastic wrap loosely over the top of the dish
and secure it by pressing the wrap to the sides of
the dish.
•Vent by turning back one corner of the plasticwrap.
This will allow excess steam to escape.
•Use plastic dishes, cups, semi-rigid freezer
containers, and plastic bags only for short time
cooking. Use these with care because the
plastic may soften from the heat of the food.
Paper
•Microwave-safe paper towels, waxed paper, paper
napkins, and paper plates with no metallic trim or
design can be used in your oven.
•Refer to the manufacturer’s label for use of any
paper product in the microwave oven.
DO NOT USE
Metal Utensil
•Metal shields food from microwave energy and
produces uneven cooking. Avoid metal skewers,
thermometers, or foil trays.
•Metal utensils can cause arcing, which is a
discharge of electric current. Arcing can damage
your microwave oven.
Metal Decoration
•Do not use metal-trimmed or metal-banded
dinnerware, casserole dishes, etc.
Centura™ Tableware
•The Corning Company recommends that you
do not use Centura tableware and some
Corelle™ closed-handle cups for microwave
cooking.
Aluminum Foil
•Avoid large sheets of aluminum foil because
they hinder cooking and may cause arcing.
•Use small pieces of foil to shield poultry legs
and wings.
•Keep all aluminum foil at least 1 inch from the
walls and door of the oven.
Wood
•Wooden bowls, boards, and baskets will dry out
and may split or crack when you use them in the
microwave oven.
Tightly Closed Containers
•Tightly closed cookware can explode. Be sure
to leave an opening for steam to escape from
covered cookware.
Brown Paper
•Avoid using brown paper bags. They absorb
heat and could burn.
Metal Twist Ties
•Always remove metal twist ties as they can
become hot and cause a fire.
UNDERSTANDING YOUR MICROWAVE OVEN
COOKWARE GUIDE
Most heat-resistant, non-metallic cookware is safe for use in your microwave oven. However, to test cookware
before using, follow these steps:
1. Place the empty cookware in the microwave oven.
2. Measure 1 cup of water in a glass measuring cup and place it in the oven beside the cookware.
3. Microwave on 100% power for 1 minute. If the dish is warm, it should not be used for microwave cooking.
UNDERSTANDING YOUR MICROWAVE OVEN
8

ENGLISH
BROWNING
Meat and poultry with high fat content that are cooked
for 10 or 15 minutes or longer will brown lightly. Foods
cooked a shorter time can be brushed with a browning
agent, such as Worcestershire sauce, soy sauce, or
barbecue sauce.
COVERING
A cover traps heat and steam and causes the food to cook
more quickly. Use a lid or microwave-safe plastic wrap
with one corner folded back to vent the excess steam.
Lids on glass casseroles can become hot during cooking.
Handle carefully. Waxed paper will prevent the food from
splattering in the oven and help retain heat. When warming
bread items, use waxed paper, napkins, or paper towels.
To absorb extra moisture, wrap sandwiches and fatty foods
in paper towels.
SPACING
Arrange individual foods, such as baked potatoes,
cupcakes, and hors d’oeuvres’ in a circle and at least
1 inch apart. This will help the food cook more evenly.
STIRRING
Stirring blends flavors and redistributes the heat in foods.
Always stir from the outside toward the center of the dish.
Food at the outside of the dish heats first.
TURNING
Large foods, such as roasts and whole poultry, should be
turned so that the top and bottom cook evenly. Also turn
over chicken pieces and chops.
ARRANGEMENT
Do not stack food. Arrange in a single layer in the dish
for more even cooking. Because dense foods cook more
slowly, place thicker portions of meat, poultry, fish, and
vegetables toward the outside of the dish.
TESTING FOR DONENESS
Because foods cook quickly in a microwave oven, you
need to test frequently for doneness.
STANDING TIME IN OVEN
Depending on density, food often needs to stand from 2
to 15 minutes either in or outside the oven after cooking
power shuts off. Outside of oven, you usually need to
cover food during standing time to retain heat. Remove
most foods when they are slightly undercooked and they
will finish cooking during standing time. The internal
temperature of food will rise about 10°F during
standing time.
SHIELDING
To prevent some portions of foods in rectangular or square
dishes from overcooking, you may need to shield them with
small strips of aluminum foil to block the microwaves. You
can also cover poultry legs and wing tips with foil to keep
them from overcooking. Always keep foil at least 1 inch
from oven walls to prevent arcing.
PIERCING
Pierce the shell, skin, or membrane of foods before cooking
to prevent them from bursting. Foods that require piercing
include yolks and whites of eggs, hot dogs, clams, oysters,
and whole vegetables, such as potatoes and squash.
UNDERSTANDING YOUR MICROWAVE OVEN
TIPS FOR MICROWAVE COOKING
9

CLEANING
PRECAUTIONS
•Place the front surface of the door three inches or
more from the countertop edge to avoid accidental
tipping of the microwave oven during normal use.
•To program the oven, make sure you touch the center
of each pad firmly since the areas between the pads
will not activate the oven. A tone will sound each time
a pad is touched correctly. Don’t touch several pads
at once.
•Do not strike the control panel with silverware, uten-
sils, etc. Breakage may occur.
•Always use caution when taking the cooking utensils
out of the oven. Some dishes absorb heat from the
cooked food and may be hot. See Cookware Guide
earlier in this section for more information.
•Do not rinse cooking utensils by placing them in
water immediately after cooking. This may cause
breakage. Also, always allow the turntable to cool
before removing it from the oven.
•Never operate the oven when it is empty. Food or
water should always be in the oven during operation
to absorb the microwave energy.
•Do not use the oven to dry newspapers or clothes.
They may catch fire.
•Use thermometers that have been approved for
microwave oven cooking.
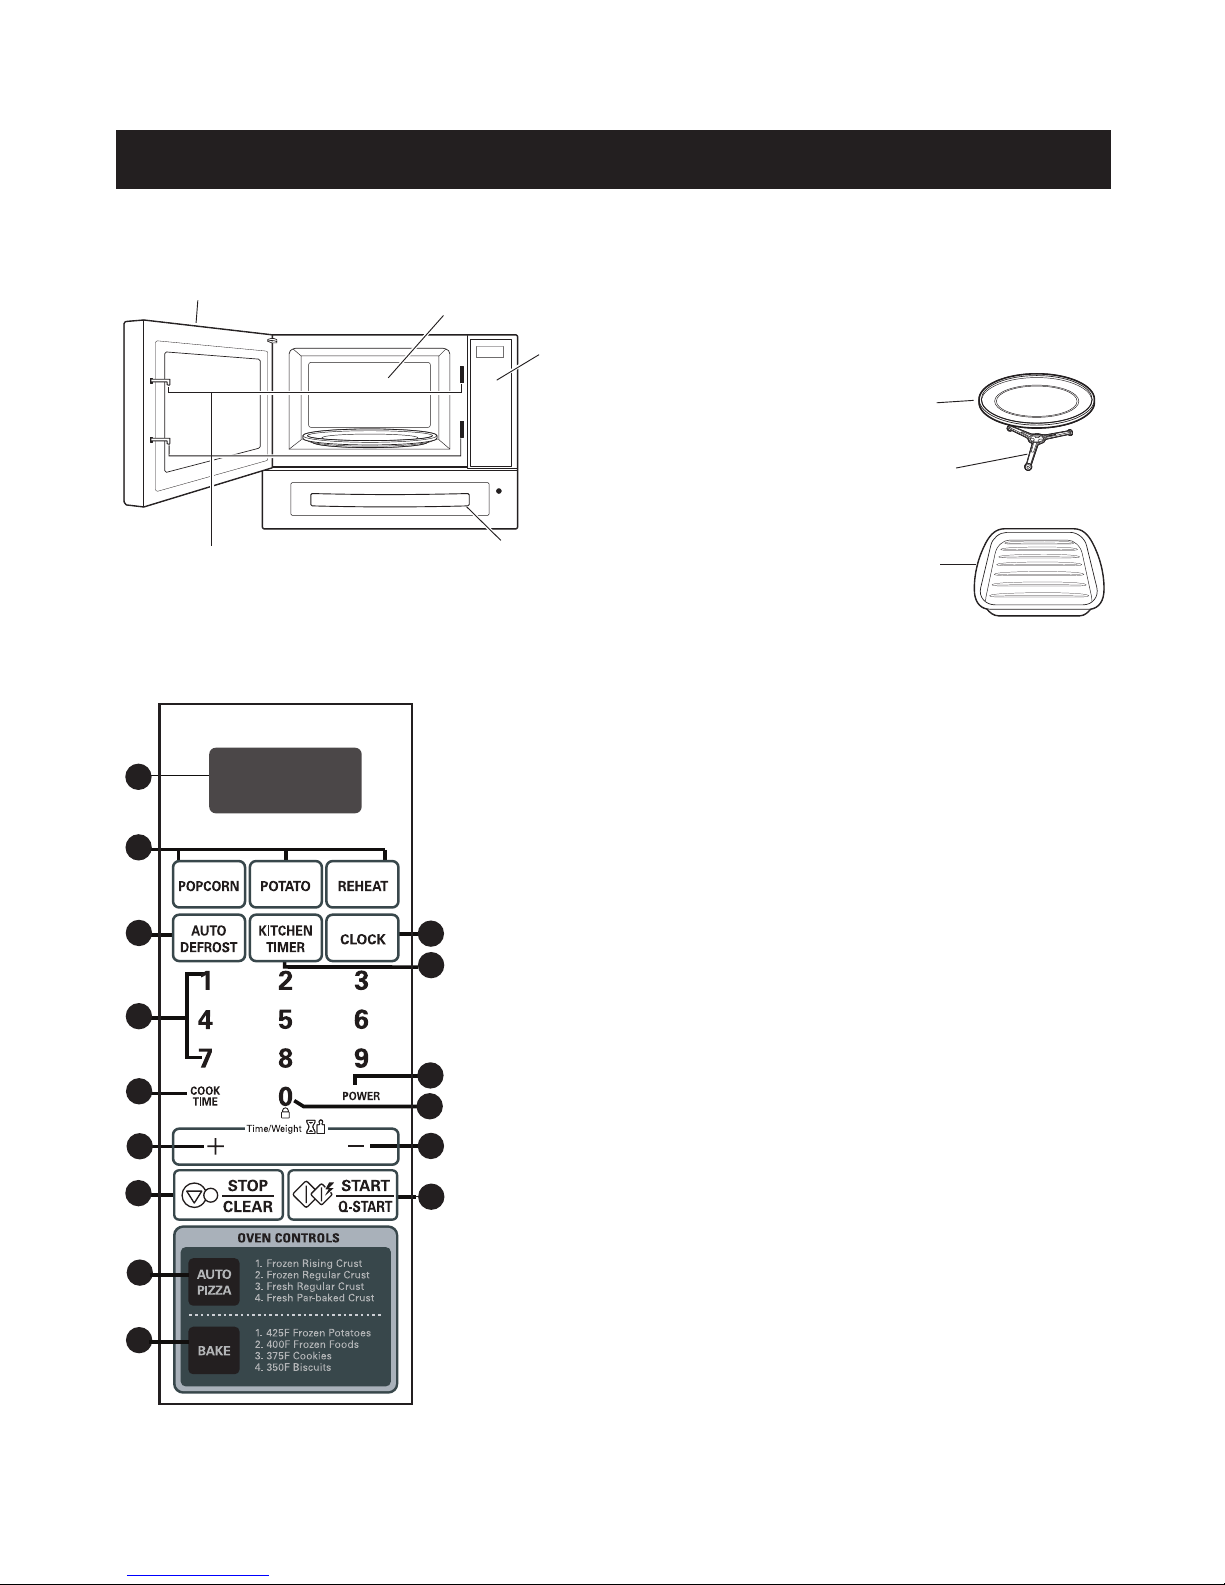
•The turntable must always be in place when you
operate the oven.
•Do not use your microwave oven to cook eggs in the
shell. Pressure can build up inside the shell, causing
it to burst.
•There are several precautions to follow when
microwaving popcorn:
— Do not pop popcorn, except in a microwave-safe
container or commercial packages designed for
microwave ovens.
— Never try to pop popcorn in a paper bag that is not
microwave-approved.
— Overcooking may result in smoke and fire.
— Do not repop unpopped kernels.
— Do not reuse popcorn bags.
— Listen while corn pops. Stop oven when popping
slows to 2-3 seconds between pops.
— Do not leave microwave unattended while popping
corn.
— Follow directions on bag.
NOTE: Before cleaning the oven, unplug the power
cord. If this is impossible, open the oven door to pre-
vent an accidental oven start.
INTERIOR
Wipe the oven inside and outside with a soft cloth and
a mild detergent solution. Then rinse and wipe dry.
This should be done weekly or more often, if needed.
Never use cleaning powders or rough pads.
Excessive oil splatters on the inside top will be difficult
to remove if left for many days. Wipe splatters with a
wet paper towel, especially after cooking chicken or
bacon.
REMOVABLE PARTS
The turntable and rotating ring are removable. They
should be hand-washed in warm (not hot) water with a
mild detergent and a soft cloth. Once they are clean,
rinse well and dry with a soft cloth. Never use cleaning
powders, steel wool, or rough pads.
•The turntable may be cleaned at the sink. Be careful
not to chip or scratch the edges as this may cause
the turntable to break during use.
•The rotating ring should be cleaned regularly.
DOOR
For best performance and safety, the inner door panel
and the oven front frame should be free of food or
grease buildup. Wipe often with a mild detergent; then
rinse and wipe dry. Never use cleaning powders or
rough pads.
After cleaning the control panel, touch STOP/CLEAR
to clear any entries that might have been entered acci-
dentally while cleaning the panel. Also make sure that
the turntable and rotating ring are in the right position.
PIZZA OVEN PAN
The pizza grill pan features a non-stick surface and is
dishwasher safe. It should be washed regularly in a
dishwasher or warm, soapy water.
UNDERSTANDING YOUR MICROWAVE OVEN
10

USING YOUR MICROWAVE OVEN
CLOCK
0
Example: To set the clock for 10:30.
Touch: Display Shows:
2.
3.
1.
4.
NOTE: This is a 12-hour clock.
Use this safety feature to lock the control panel
when you are cleaning it, or to prevent children
from using the oven when you do not want them
to.
To set Child Lock.
Touch: Display Shows:
CHILD LOCK
1. Time of day
2.
To cancel CHILD LOCK.
Touch: Display Shows:
Time of day
1.
When your oven is plugged in for the first time or
when power resumes after a power interruption,
the numbers in the display reset to "0".,
12:00
10:30
10:30
KITCHEN TIMER
Example: To count 3 minutes.
Touch: Display Shows:
2.
3.
1.
You can use your microwave oven as a timer.Use
theTimer for timing up to 99 minutes, 99 seconds.
3:00
3:00
l
Example: To cook for 1 minute.
Touch: Display Shows:
EZ ON
1. Time of day
2. Twice.
NOTE: If you touch ADD 30 seconds, it will add 30
seconds each time the pad is pressed, up to
9 minutes and 59 seconds.
:0
(approximately 4 seconds)
Touch and hold until L appears in the display.
the display.(approximately 4 seconds)
Touch and hold until L disappears from
A time-saving pad, this simplified control lets you
quickly set and start microwave cooking at 100%
power without the need to set the time and press
START.
Time counting down and
power level 10.
11

This feature lets you program a specific cook time and
power level. For best results, there are 10 power level
settings in addition to HIGH (100%) power. Refer to
the “Microwave Power Levels Table” on page 13for
more information.
NOTE: If you do not select a power level, the oven
will automatically cook at 100% power.
Example: To cook for 5 minutes, 30 seconds
at 80% power.
Touch: Display Shows:
TIME COOKING
Time counting down
1.
3.
2.
4.
5.
USING YOUR MICROWAVE OVEN
This convenient feature lets you add or reduce
cooking time in 10 second increments while a cooking
cycle is in process without having to restart the
cooking cycle.
Example: When cooking is in process with 2 minutes
remaining, you want to add 20 seconds.
Touch: Display Shows:
MORE/LESS
1.
2:00
2:20
Touch two
times. Time counting down
For best results, some recipes call for different
cooking power levels during different stages of a
cook cycle. You can program your oven to switch
from one power level to another for up to 3 stages.
Example: To set a 2-stage cook cycle.
Touch: Display Shows:
MULTISTAGE COOKING
to set a
3-minute cook
time for the
first stage.
to set an 80%
cook power
for the first
stage.
1.
3.
2.
4.
5.
6.
7.
8.
9.
10. When the first stage is over, you will hear two
short tones as the oven begins the second
cook stage.
5:30
pl 10
pl 8
5:30
3:00
pl 10
pl 8
to set a
7-minute cook
time for the
second stage.
7:00
pl 10
pl 5
NOTE: Use the LESS pad to decrease the cooking
time in 10 second increments.
3:00
:0
:0
:0
12
to set a 50%
cook power
for the second
stage.

MICROWAVE POWER LEVELS
Your microwave oven has 10 cook power levels to let
you cook or heat a wide variety of foods. Refer to the
table below for suggestions:
Microwave Power Level Table
sBoiling water.
sMaking candy.
sCooking poultry pieces, fish, and vegetables.
sCooking tender cuts of meat.
sWhole poultry.
sReheating rice, pasta, and vegetables.
sReheating prepared foods quickly.
sReheating sandwiches.
sCooking egg, milk, and cheese dishes.
sCooking cakes, breads.
sMelting chocolate.
sCooking veal.
sCooking whole fish.
sCooking puddings and custard.
sCooking ham, whole poultry, and lamb.
sCooking rib roast, sirloin tip.
sThawing meat, poultry, and seafood.
sCooking less tender cuts of meat.
sCooking pork chops, roast.
sTaking chill out of fruit.
sSoftening butter.
sKeeping casseroles and main dishes warm.
sSoftening butter & cream cheese.
sStanding time.
10
(High)
9
8
7
6
5
4
3
2
1
0
Use
Power
Level
USING YOUR MICROWAVE OVEN
13

USING YOUR MICROWAVE OVEN
Use this function to cook food without entering a cook
time or power . Refer to the Quick Touch Cooking
Table below for more information.
Example: To cook a 3.5 oz. bag of microwave
popcorn.
Touch: Display Shows:
QUICK TOUCH
Time counting down
1.
3.
2.
3.5
At the end of cooking
time, 2 short tones
and 1 long tone will
sound.
Example: To cook 1 potato.
Touch: Display Shows:
Time counting down
1.
3.
2.
1
At the end of cooking
time, 2 short tones
and 1 long tone will
sound.
CATEGORY TOUCH SERVING SIZE DIRECTIONS
0OPCORN TIME OZ s&OLLOWPACKAGEINSTRUCTIONS
TIMES OZ s$ONOTTRYTOPOPUNPOPPEDKERNELS
s(EATONLYPACKAGEATATIME
0OTATO TIME EAOZ sOZPERPOTATO
TIMES EAOZ
TIMES EAOZ
TIMES EAOZ s!FTERCOOKINGLETSTANDFORMINUTES
s0LACEINCENTEROFTHETURNTABLEONPAPERTOWEL
s0IERCEPOTATOSEVERALTIMESWITHFORK
14

USING YOUR MICROWAVE OVEN
Reheat provides four preset categories for
reheating.
Example: To reheat 2 food plate servings.
Touch: Display Shows:
REHEAT
1.
Example: To reheat 2 food plate servings.
Touch: Display Shows:
Time counting down
2.
4.
3.
At the end of cooking
time, 2 short tones
and 1 long tone will
sound.
PRESS
REHEAT CATEGORY SERVING AMOUNT DIRECTIONS
4IME &OOD0LATE SERVINGOZ s0LACEONLOWPLATE
SERVINGSOZ s#OVERWITHVENTEDPLASTICWRAP
s,ETSTANDMINUTESAFTERCOOKING
4)ME 3OUP3AUCE CUP s0LACEINSHALLOWMICROWAVEABLECASSEROLE
CUPS s#OVERWITHVENTEDPLASTICWRAP
CUPS s!FTERCOOKINGSTIRANDLETSTANDMINUTES
4 cups
4IMES #ASSEROLE CUP s0LACEINSHALLOWMICROWAVEABLECASSEROLE
CUPS s#OVERWITHVENTEDPLASTICWRAP
CUPS s!FTERCOOKINGSTIRANDLETSTANDMINUTES
4 cups
4IMES 2OLL-UFlN PIECEOZ s0LACEONPAPERTOWEL
PIECESOZ s$ONOTCOVER
3 pieces (6 oz.)
4 pieces (8 oz.)
Number of
Category cups/items
Food plate 1-2 servings
Soup/Sauce 1–4 cups
Casserole 1–4 cups
Roll/Muffin 1–4 pieces
Refer to the cooking
guide to select the
food quantity.
Category Touch Pad Display
Shows
Food plate 1 Time
Soup/Sauce 2 Times
Casserole 3 Times
Roll/Muffin 4 Times
REHEAT (continued)
2
Refer to the cooking
guide to select the
food type.
15

USING YOUR MICROWAVE OVEN
For best results:
s2EMOVElSHSHELLlSHMEATANDPOULTRYFROMITS
original closed paper or plastic package (wrapper).
Otherwise, the wrapper will hold steam and juice close
to the foods, which can cause the outer surface of
the foods to cook.
s&ORMTHEMEATINTOTHESHAPEOFADOUGHNUTBEFORE
freezing. When defrosting, scrape off thawed meat
when the beep sounds and continue defrosting.
s0LACEFOODSINASHALLOWGLASSBAKINGDISHORONA
microwave roasting rack to catch drippings.
s&OODSSHOULDSTILLBESOMEWHATICYINTHECENTERWHEN
removed from the oven.
Three defrost sequences are preset in the oven. The
defrost feature provides you with the best defrosting
method for frozen foods. The cooking guide will show
you which defrost sequence is recommended for the
food you are defrosting.
For added convenience, the Auto Defrost includes a
built-in beep mechanism that reminds you to check,
turn over, separate, or rearrange to get best defrost
results. Three different defrosting levels are provided.
1. MEAT
2. POULTRY
3. FISH
* Available weight is 0.1–6.0 lbs.
AUTO DEFROST
NOTE:
When you touch the START pad, the display
changes to defrost time countdown. The oven will beep
during the DEFROST cycle. At this time, open the door
and turn, separate, or rearrange the food.
Remove any portions that have thawed. Return frozen
portions to the oven and touch START to
resume the defrost cycle. The oven will not stop
during the BEEP unless the door is opened.
Example: To defrost 1.2 lbs. of ground beef.
Touch: Display Shows:
Time counting down
1.
3.
2.
1
1.2
At the end of cooking
time, 2 short tones
and 1 long tone will
sound.
4.
and
to enter the weight.
AUTO DEFROST TABLE
Category
BEEF
Ground beef, round steak, cubes for stew,
tenderloin steak, pot roast, rib roast, rump
roast, chuck roast, hamburger patty
LAMB
Chops (1-in. [2.5-cm] thick), rolled roast
PORK
Chops (1/2-in. [1-cm] thick), hot dogs,
spareribs,
country-style ribs,
rolled roast, sausage
VEAL
Cutlets (1 lb. [0.5 kg],
1/2-in.
[1-cm] thick).
POULTRY
Whole (under 4 lbs. [1.8 kg]), pieces,
breasts (boneless)
CORNISH HENS
Whole
TURKEY
Breast (under 6 lbs. [2.7 kg])
FISH
Filets, whole steaks
SHELLFISH
Crab meat, lobster tails, shrimp, scallops
Food
MEAT
def 1
POULTRY
def 2
FISH
def 3
EQUIVALENT WEIGHT TABLE
Ounces
.10
.20
.25 – One-quarter pound
.30
.40
.50 – One-half pound
.60
.70
.75 – Three-quarters pound
.80
.90
1.00
Decimal Weight
1.6
3.2
4.0
4.8
6.4
8.0
9.6
11.2
12.0
12.8
14.4
16.0
16

USING YOUR MICROWAVE OVEN
Meat
1. No special techniques are required. Meat should
be prepared as with conventional cooking. Season
if desired. Always thoroughly defrost meat before
cooking.
2. Place the meat on a microwave roasting rack or
microwave-proof plate and place on the turntable.
3. Cook according to the Meat Cooking Table (below).
Use the longer time for large cuts of meats and the
shorter time for small cuts of meats. For thicker
chops, use the longer time.
4. Turn the meat once halfway through the cooking
time.
5. Let stand for 5-10 minutes wrapped in foil after
cooking. The standing time is very important as it
completes the cooking process.
6. Make sure meat, especially pork, is thoroughly
cooked before eating.
WARNING: Do not use aluminum foil during cooking cycle.
COOKING TIPS
NOTES:
s 4HETIMESLISTEDABOVEAREONLYAGUIDE!LLOWFOR
differences in individual tastes and preferences.
The times may also vary due to the shape, cut, and
composition of the food.
s )FWHOLEPOULTRYISSTUFFEDTHEWEIGHTOFTHESTUFFEDBIRD
should be used when calculating the cooking time.
NOTE: The times listed above are only a guide.
Allow for differences in individual tastes and preferences.
The times may also vary due to the shape, cut,
and composition of the food.
Poultry
1. No special techniques are required. Poultry should
be prepared as with conventional cooking. Season
if desired.
2. Poultry should be thoroughly defrosted. Remove
giblets and any metal clamps.
3. Prick the skin and brush lightly with vegetable oil
unless the poultry is self-basting.
4. All poultry should be placed on a microwave roasting
rack or a microwave-proof plate and placed on the
turntable.
5. Cook according to the instructions in the Poultry
Cooking Table below. Turn over halfway through the
cooking time. Because of its shape, poultry has a
tendency to cook unevenly, especially in very bony
parts.Turning food over helps to cook these areas
evenly.
6. Remove from oven, wrap in foil, and let stand for
5–10 minutes before carving.The standing time
is very important, since it completes the cooking
process.
7. Make sure poultry is thoroughly cooked before eating.
Whole poultry is completely cooked when the juices
run clear from the inside thigh when it is pierced with
a sharp knife. Poultry pieces should be pierced with
a sharp knife through the thickest part to ensure that
the juices are clear and the flesh is firm.
Meat
Microwave
Power
Cooking Time
Per Pound
BEEF
Standing/Rolled Rib
– Medium
– Well-Done
Ground Beef (to brown
for casserole)
Hamburgers, fresh or
defrosted (4 oz. each)
– 2 patties
– 4 patties
PORK
Loin, Leg
Bacon
– 4 slices
– 6 slices
8
8
HIGH (100%)
HIGH (100%)
HIGH (100%)
8 to 10 minutes
8 to 10 minutes
51⁄2to 81⁄2minutes
2 to 4 minutes
3 to 5 minutes
8
HIGH (100%)
HIGH (100%)
12 to 16 minutes
2 to 3 minutes
3 to 4 minutes
Poultry
Microwave
Power
Cooking Time
Per Pound
CHICKEN
Whole
Breast (boned)
Portions
TURKEY
Whole
8
8
8
10 to 14 minutes
9 to 13 minutes
10 to 16 minutes
810 to 14 minutes
17

ENGLISH
Fish
1. Arrange fresh or frozen fish in a large shallow non-metallic
dish or casserole.
2. Cover with pierced microwave plastic wrap or casserole lid.
3. Place the dish on the turntable.
4. Cook according to the instructions in the Fish Cooking
Table below. Flakes of butter can be added to
the fish, if desired.
COOKING TIPS (continued)
FISH
Microwave
Power
Cooking Time
Per Pound
Fish Filets HIGH 4 to 7 minutes
USING YOUR MICROWAVE OVEN
5. Let stand as directed in the Cooking Table before serving.
6. After standing time, check to see that the fish is thoroughly
cooked. The fish should be opaque and flake easily.
Butter
Add 1 to 2 tbsp (15 to 30 ml)
lemon juice
Standing
Time
2 to 3 minutes
Whole Mackerel,
cleaned and prepared
HIGH 4 to 7 minutes —3 to 4 minutes
Whole Trout,
cleaned and prepared
HIGH 5 to 8 minutes — 3 to 4 minutes
Salmon Steaks HIGH 6 to 7 minutes Add 1 to 2 tbsp (15 to 30 ml)
lemon juice
3 to 4 minutes
Four pizza bake functions are preset in the oven. The
AUTO PIZZA feature automatically selects the best
cooking method and time for various pizza types. The
cooking guide shows which AUTO PIZZA function is
recommended for the the pizza you are cooking.
Example: To cook a frozen regular crust pizza.
Touch: Display Shows:
COOKING WITH AUTO PIZZA
Red indicator light
will come on and
time counting down.
1.
3.
2.
At the end of cooking
time, 2 short tones
and 1 long tone will
sound.
Twice.
Press AUTO
PIZZA
Pizza Type Cooking
Time
1 time
2 times
3 times
4 times
Frozen rising
crust pizza
Frozen regular
crust pizza
Fresh regular
crust pizza
Fresh par-baked
crust pizza
21 minutes
15 minutes
15 minutes
25 minutes
USING THE PIZZA OVEN
Touch this pad to add 10 seconds of
cooking time each time it is pressed.
Touch this pad to subtract 10 seconds
of cooking time each time it is pressed.
NOTE: ALWAYS use the pizza tray when cooking in the pizza
oven. Take care when removing food; the tray will be hot!
15:00
2
18

USING THE PIZZA OVEN
Four BAKE temperatures are preset in the oven. The
BAKE temperature feature provides you with easy
programming to bake selected food items.
CAUTION: DO NOT USE THIS OVEN FOR
BROILING FOODS. This oven is not intended for
broiling.
Oven temperatures may vary. Adjust oven
temperatures and baking times as necessary.
Example: To bake at 400° F for 12 minutes.
Touch: Display Shows:
COOKING WITH
THE BAKE FEATURE
Red indicator light
will come on and
time counting down.
1.
3.
4.
2.
400
At the end of cooking
time, 2 short tones
and 1 long tone will
sound.
Twice.
NOTE: ALWAYS use the pizza tray when cooking
in the pizza oven. Take care when removing
food; the tray will be hot!
Press BAKE
BAKE
temperature Recommended
food
1 time
2 times
3 times
4 times
425° F (218° C)
400° F (204° C)
375° F (190° C)
350° F (176° C)
Frozen potatoes
Frozen foods
Cookies
Biscuits
12:00
To enter
cook time.
f
19

TROUBLESHOOTING
Questions and Answers
Operation
Question Answer
Why is the oven light not on during
cooking? There may be several reasons why the oven light is not on.Have you:
• Set a cooking time?
• Touched START?
Why does steam come out of the air
exhaust vent?
Will the microwave oven be damaged
if it operates empty?
Does microwave energy pass through
the viewing screen in the door?
Why does a tone sound when a pad
on the control panel is touched?
Can the microwave oven be damaged
if food is cooked for too long?
When the oven is plugged into the wall
outlet for the first time, it doesn't work
properly. What is wrong?
Steam is normally produced during cooking. The microwave oven has been
designed to vent this steam.
Yes. Never operate the oven empty or without the glass turntable.
No. The metal screen bounces the energy back to the oven cavity. The holes
(or ports) allow only light to pass through. They do not let microwave energy
pass through.
The tone tells you that the setting has been entered.
Like any other cooking appliance, it is possible to overcook food to the point
that the food creates smoke and even possibly fire and damage to the inside
of the oven. It is always best to be near the oven while you are cooking.
The microcomputer controlling your oven may temporarily become scrambled
and fail to function as programmed when you plug it in for the first time or
when power resumes after a power interruption. Unplug the oven from the
120-volt household outlet and then plug it back in to reset the microcomputer
and then reset the microcomputer.
Why is there light reflection around the
outer case?
This light is from the oven light which is located between the oven cavity and
the outer wall of the oven.
What are the various sounds heard
when the microwave oven is operating?
The clicking sound is caused by a mechanical switch turning the microwave
oven’s magnetron ON and OFF.
The heavy hum is from the change in power the magnetron draws as it is turned
ON and OFF by a mechanical switch. The change in blower speed is from the
change in line voltage caused by the magnetron being turned ON and OFF.
Why is the clock display blank or off? Make sure the microwave oven is plugged into a working outlet. Check for a
blown house fuse or tripped circuit breaker.
Why is there a fan running after the
pizza oven is stopped?
The fan will continue operating to cool the internal components of the pizza
oven.
20
Table of contents
Other LG Microwave Oven manuals
Popular Microwave Oven manuals by other brands

Gaggenau
Gaggenau BMP 250 User manual and installation instructiions

DAEWOO ELECTRONICS
DAEWOO ELECTRONICS KOG-37F7 Service manual

Currys Essentials
Currys Essentials C17MW10 instruction manual

Kenmore
Kenmore 721.63682 Service manual

Caterlite
Caterlite CD399 instruction manual

Furrion
Furrion FMCM15-BL instruction manual