LG 29FU8 Series User manual

OWNER'S MANUAL
Colour Television
information to your dealer when you require service.
See the label attached on the back cover and quote this
Record model number and serial number of the set.
Retain it for future reference.
Please read this manual carefully before operating your set.
P/NO : 3828VA0464A(VERSION 08)
Chassis MC-049A/B/C:

Contents
2
Important Precautions 3
Safety/Installation
Location and function of controls 5
Remote control handset
Front panel
Basic operation 8
On and off / Programme selection
Volume adjustment / Quick view
Mute function / Auto Demonstration
On screen language selection (option)
On screen menus 9
Menu selection
Setting upTV stations 10
Auto programme tuning / Auto programme scan/
Manual programme tuning / FineTuning / Assigning a station name /
Booster (Option) Programme edit / Deleting a programme /
Copying programme/Moving a programme/ Skipping a programme number /
Favourite programme/Calling the programme/
Selecting a programme in the programme table/
Paging through programme table
Picture adjustment 15
Picture adjustment / Eye (option) / Picture format
Turbo picture selection (option)
Sound adjustment 17
Sound adjustment / Woofer volume (option) / FMTransmitter (option)
Turbo sound selection (option) / Stereo / Dual reception (option)
NICAM reception (option) / Sound output selection
Timing setting 19
Time setting / On/off time / off time / On time
On programme number / Auto sleep
Other functions 20
On screen language selection (option) / TV and AV modes /
Auto AV switching (option) / Child lock / Blue back / Tilt (option) /
Degaussing (option) / Sleep timer (option) / LG game (option) / LG Reach (option) /
Jumble numbers (option) / Brainvita (option) / Jumble character (option) /
Space fighter (option) / Remote control for above game (option) /
Game Pack (option) / Remote control for game (option)
PIP operation (option) 24
On and off / Input mode selection for sub picture
Swapping between main and sub pictures
Programme selection for sub pictures (option)
Sub picture size / Sub picture freeze
Sub picture position change / 9 or 4 sub picture
Connection of external equipment 25
Aerial socket / Audio / Video in/out sockets (option)
Euro scart socket (option)
S-Video / Audio in sockets S-AV (option)
Component in sockets (option)
Headphone socket (option)
Troubleshooting check list 27

3
Important Precautions
This unit has been engineered and manufactured to assure your personal safety, however
improperusemayresultinpotentialelectricalshockorfirehazards.Inordertoallowtheproper
operation of all safeguards incorporated in thisTV set, observe the following basic rules for its
installation,useandservicing.Keepitinanaccessibleplaceforfuturereference.
On Safety
Do not Open theTV set
There are no user serviceable components inside.
There are Dangerous High Voltages inside, even when the power is OFF.
Contact your dealer if theTV is not operating properly.
To Avoid Personal Injury :
Do not place the TV set on a sloping shelf unless properly secured.
Use only fixed wooden stand.The TV shall be positioned 5cm behind the front
edge of an open fronted with 1cm free space along the sides top and 5cm
depth behind the TV.
Do not try to roll a stand with small casters across thresholds or deep pile
carpets.
To Prevent Fire or Hazards:
Always turn the TV set OFF if you leave the room for more than a short period
of time.Never leave the TV set ON when leaving the house.
Keep children from dropping or pushing objects into the TV cabinet
openings.Some internal parts carry hazardous voltages.
Do not add accessories that have not been designed for thisTV set.
During a lighting storm or when the TV set is to be left unattended for an
extended period of time, unplug it from the wall outlet and extreme socket.
Do not bring magnetic devices such as magnets or motors near the picture tube.
Operate the TV set only from a power source indicated in the specifications of this manual or
listed on the TV set. If you are not sure what type of power supply you have in your home,
consult with your dealer.
Overloaded AC outlets and extension cords are dangerous.So are frayed power cords and
broken plugs.They may result in a shock or fire hazard.Call your service technician for
replacement.
The power supply cord is used as the main disconnect device.Ensure that the socket-outlet
is easily accessible after installation.
Hands must be dry when holding the power plug to avoid an electric shock.
Do not damage the power cord by disassembling, bending, pulling or heating up,it can cause
fire or electric shock.
Make sure to completely insert the power plug. Insecure connections can cause fire.

Important Precautions
Power
This set operates on an AC mains supply, the voltage is as indicated on the label on the back
cover.Never apply DC power to the set. In the event of thunderstorms or powercuts, please
Service
pullouttheaerialandmainsplugs.
Aerial
Location
Connecttheaerialcabletothesocketmarked 75 onthebackcover.Forthebestreception
anoutdoor aerialshould beused.
Theventilationshouldnotbeimpededbycoveringtheventilationopeningswithitemssuchas
NonakedflamesourcesuchaslightedcandlesshouldbeplacedontheTV.
Never placetheTVset inabuilt-inenclosureunlessproperventilationisprovided.
NeverplacetheTVsetnearoroveraradiatororheatsource.
Positionyoursetsothatnobrightlightorsunlightfallsdirectlyontothescreen.
newspaper,tablecloths,curtains,etc.
On Installation
Do not allow anything to rest upon or roll over the power cord, and do not place theTV set
where the power cord is subject to damage.
Do not attempt to service the TV set yourself, as opening or removing covers may expose
you to dangerous voltage or other hazards. Refer all servicing to qualified service personnel.
Do not use this TV near water such as near bathtub, washbowl, kitchen sink, laundary tub,
in a wet basement, or near a swimming pool.
TV set are provided with ventilation openings in the cabinet to allow the release of heat
generated during operation. If these openings are blocked, built-up heat can cause failures
which may result in a fire hazard.There fore,
OnCleaning
OnRepacking
UnplugtheTVsetbeforecleaningthefaceoftheTVscreen.
Donotthrowawaythecartonandpackingmaterials.Theymakeanidealcontainerinwhichto
Useaslightlydamp(notwet)cloth.DonotuseanaerosoldirectlyontheTVscreenbecause
transporttheunit.Whenshippingtheunittoanotherlocation,repackitinitsoriginalmaterial.
overspraymaycauseelectricshock.
Caution: Please do not use stabilizer with TV set as this set has inbuilt voltage
stabilizer.Use of Inferiorqualitystabilizermaydamage theset.
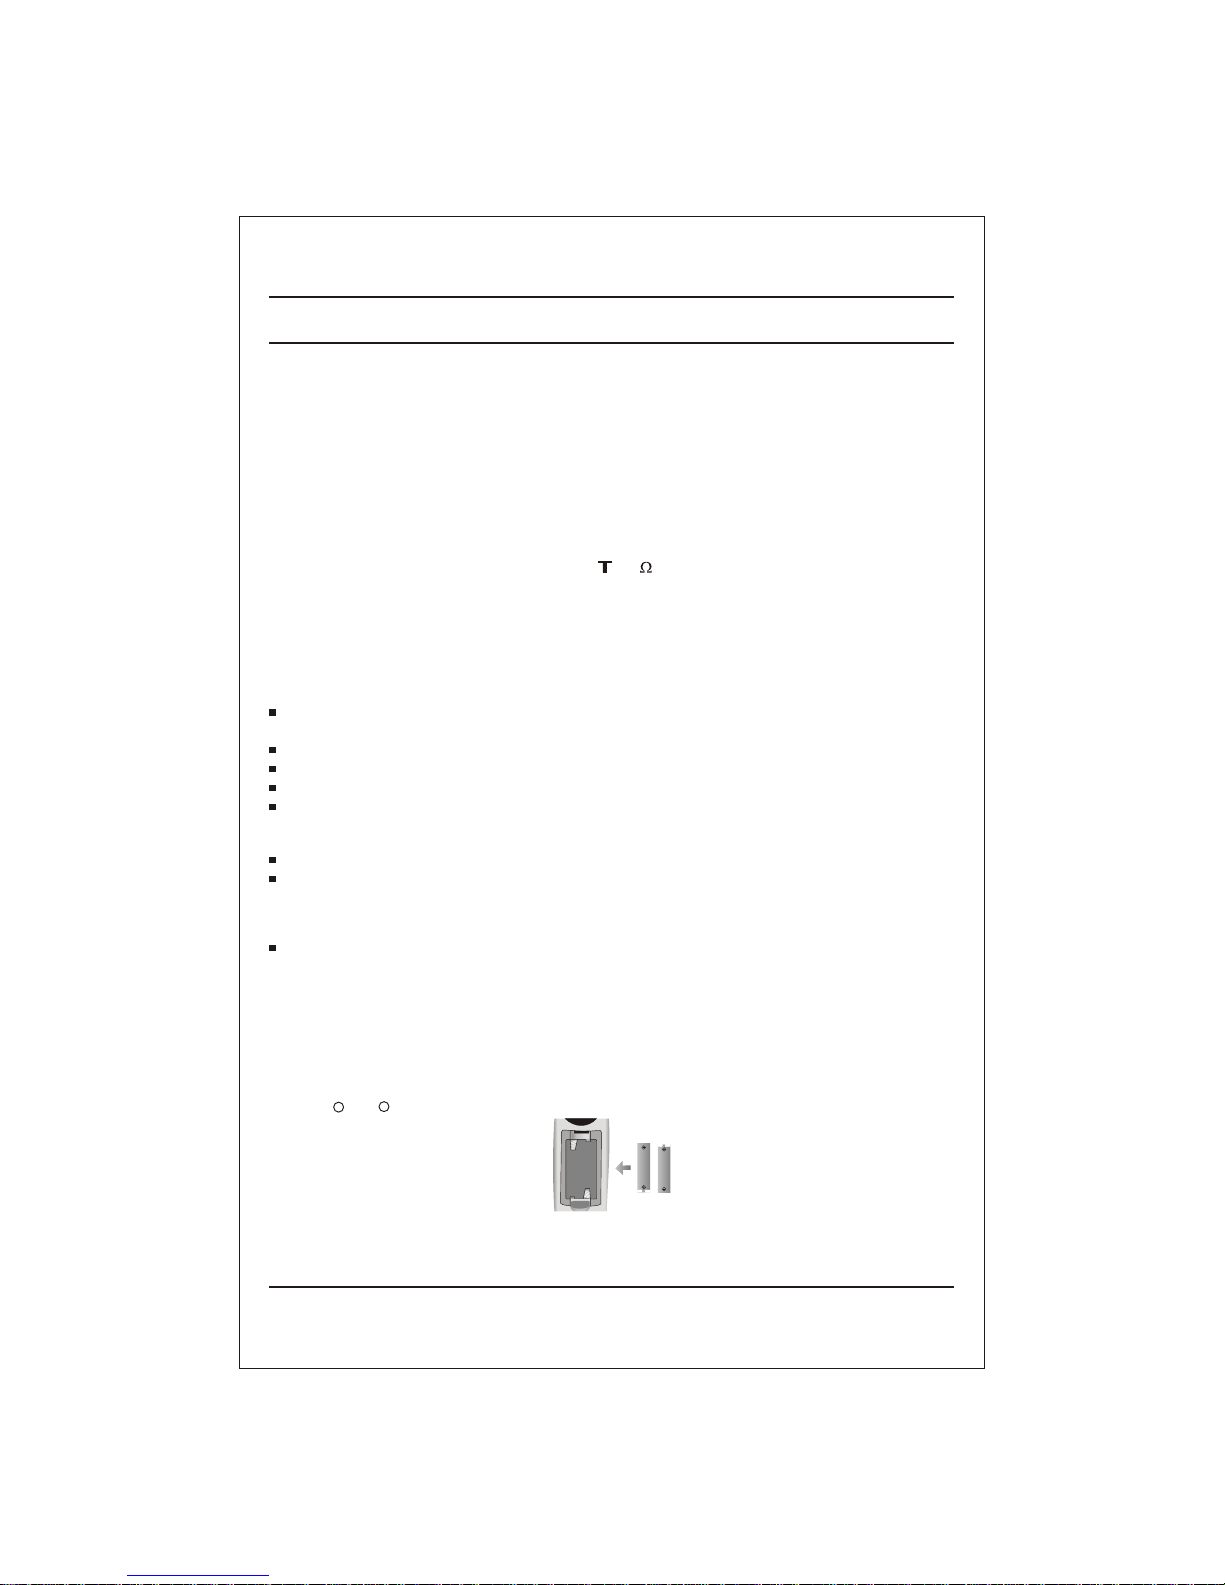
Batteryinstallation
TheremotecontrolhandsetispoweredbytwoAA/AAAtypebatteries.Toloadthebatteries,turntheremote
control handset over and open the battery compartment. Install two batteries as indicated by the polarity
symbols(+ and -)markedinsidethecompartment.
Note: To avoid damage from possible battery leakage, remove the batteries if you do not plan to use the
remotecontrolhandsetforanexternalperiodoftime.
4

Allthe functionscanbe controlledwiththe remotecontrolhandset.
Somefunctionscanalsobeadjustedwiththebuttonsonthefront
paneloftheset.
Remote control handset
Before you use the remote control handset, please install the
batteries. See on the page No4.
1. POWER
switches the set On from standby or Off to standby.
2. NUMBER BUTTONS
switches the set On from standby or directly select a number.
3. ARC (Aspect Ratio Control)
Changes the picture format.
4. TURBO PICTURE / SOUND BUTTON
selects Turbo picture / sound.
5. / (Programme Up/Down)
selects a programme or a menu item.
switches the set On from standby.
scans programmes automatically.
/ (Volume Up/Down)
adjusts the volume.
adjusts menu settings.
6. VCR BUTTONS (option)
control a LG video cassette recorder.
7. SSM (Sound Status Memory)
recalls your preferred sound setting.
8. I/II (option)
selects the language during dual language broadcast (option).
selects the sound output.
9. PSM (Picture Status Memory)
recalls your preferred picture setting.
10. MUTE
switches the sound On or Off.
11.TV/AV
selects TV or AV mode.
switches the set On from standby.
12. MENU
selects a menu.
EYE/
Location and function of controls
5
POWER MUTE
TV/AVARC
SOUND
PICTURE MENU
OK
T U R B O
REW PLAY FF
P/STILL STOP REC
I/II SSM LIST
PSM SLEEP
Q.VIEW
1 2 3
4 5 6
7 8
0
9
10
11
12
13
14
15
16
17
18
SIZE
POSITION
9/4 PIP
PR- PR+ SWAP INPUT
STILL
1
2
3
4
6
7
8
9
PR
VOL VOL
5PR
19
(Without TELETEXT / With PIP)
FAVOURITE

VOL
VOL VOL
SOUND
Q-VIEW
FAVOURITE
ARC/*
PICTURE
TURBO
l/ll
LIST
PSM
78
SSM
0
56
9
4
1
POWER
23
VOL
PR
PR
MUTE
OK
SLEEP MENU
TV/AV EYE/*
1
2
3
10
11
12
5
13
Location and function of controls
6
13. OK
acceptsyourselectionordisplaythecurrentmode.
14. LIST
displaysprogrammetable.
15. EYE/ (option)
switchtheeyefunctionOn orOff.
16. SLEEP
setsthesleeptimer.
17. Q.VIEW
returnstothepreviouslyviewprogramme.
18. PIPBUTTON(option)
for single tuner PIP models, the sub picture in RF mode will be
sameasmainpicture.
PIP
switchesthesubpicture.
PR+/-
selectaprogrammeforthesubpicture.
SWAP
alternatesbetweenmainandsubpicture.
SIZE
adjustthesubpicturesize.
STILL
freezemotionofthesubpicture.
POSITION
relocatesthesubpictureinclockwisedirection.
9/4PIP
switchesOnorOffthe9or4subpicture.
INPUT
presstheinputbuttontoselectthemodeofsubpicture.
19. FAVOURITE
pressing each time this button will select a stored favourite
programme.
COLOURED BUTTONS
Thesebuttonareusedforteletext(onlyTELETEXTmodels)or
programmeedit.
Remarks:
1. Some keys in remote can be non-functional, these keys are use in
othermodels.
2. Keysmarked*arenonfunctional.
(Without TELETEXT/ PIP)Without
15
19
9
16
7
4
8
14
17

21FD5 SERIES
10
52
PR
6
VOL
Location and function of controls
1. MAIN POWER
switches the set On or Off.
2. POWER/STANDBYINDICATOR
illuminates brightly when the set is in
standbymode.
dimswhenthesetisswitchedOn.
3. MENU
selects a menu.
4. OK
accepts your selection or displays the
current mode.
5 (Programme Up/Down)
selects a programme or a menu item.
switches the set on from standby.
(Volume Down/Up)
adjusts the volume.
adjusts menu settings.
6. REMOTE CONTROL SENSOR
Note : Only use the supplied remote
control handset. (When you use other,
they'll be not able to function).
7. HEADPHONE SOCKET (option)
Connect the headphone plug to this
socket.
8. AUDIO/VIDEO IN SOCKETS (AV2/AV3)
(Option)
Connect the audio/video out sockets of
External equipment to these sockets.
9. S-VIDEO/AUDIO IN SOCKETS (S-AV)
(option)
Connect the video out socket of an S
VIDEO VCR to the S-VIDEO socket.
Connect the audio out sockets of the
S-VIDEO VCR to the audio sockets as
in AV3.
10. EYE (option)
adjusts picture according to the Surroun-
ding conditions.
Note : Do not place any heavy objects on
the TV set.
FRONT PANEL / SIDE PANEL
Shown below is a simplified representation of front or side panel, here shown may be somewhat different from your set.
ON/OFF MENU OK VOL PR
1 2 3 46 5
21/29FC8 series
10
S VIDEO L/MONOVIDEO AUDIO R
8
7AV3
9
MENU
OK
ON/OFF
1
3
4
S VIDEO L/MONOVIDEO AUDIO R
AV3
8
9
7
LVIDEO AUDIO R
AV2
8
7
3
MENU
OK
ON/OFF
1
4
21FE4 series
5 2 10
PR
6
VOL
7
8
7
8
3
5
4
7
S VIDEO L/MONOVIDEO AUDIO R
8
7AV3
9
610
21
3
4
5
29FD7 series/29FU8
S VIDEO L/MONOVIDEO AUDIO R
8
7AV3
9ON/OFF MENU OK VOL PR
1 2 3 4 56 10
MENU
OK
ON/OFF
1
3
4
29FD5 series
5 2 106
PR
VOL
S VIDEO L/MONOVIDEO AUDIO R
AV3
8
9
7
12610
21FD7 series
2610
21FU8 series 3
4
5
1

Basic operation
OnandOff
1. PressthemainpowerbuttontoswitchthesetOn.
2. If the set is in standby mode press the POWER,,TV/AV or
NUMBER buttons on the remote control handset to switch it On
fully.
3. PressthePOWERbuttonontheremotecontrolhandset.
Thesetrevertstostandbymode.
4. PressthemainpowerbuttonagaintoswitchthesetOff.
Programmeselection
You can select a programme number with the or NUMBER
buttons.
Volumeadjustment
Pressthe buttontoadjust thevolume.
Quickview
Press the Q.VIEW button to view the last programme you were
watching.
PresstheMUTE button.ThesoundisswitchedOff.Youcancancelit
bypressingtheMUTE, , SSM,TURBOSOUND.
AutoDemonstration
Toreview allthe menusprogrammedintheset, pressthe OKbutton
of the front panel control for about 10 seconds. To stop auto
demonstration, press any button of the front panel control or
POWERbuttonoftheremotecontrol.
Onscreenlanguageselection(option)
Themenucan bedisplayedon thescreenindesired language.First
selectyourlanguage.
1. Press the MENU button and then button to select the
Specialmenu.
2. Press the button twice and then the button to select
Language.
3. PresstheOKbutton.
Alltheonscreendisplayswillappearintheselectedlanguage
4. Repeatedly press the MENU or button to return to normal TV
viewing.
8
Mute function
VOL
VOL
SOUND
Q-VIEW
FAVOURITE
ARC/*
PICTURE
TURBO
l/ll
LIST
PSM
78
SSM
0
56
9
4
1
POWER
23
VOL
PR
PR
MUTE
OK
TV/AV
SLEEP MENU
EYE/*

9
On screen menus
The dialogue between you and your set takes place on screen with
an operator menu.The buttons required for the operatingsteps are
alsodisplayed.
Menuselection
1. Press the MENU button and then button to display each
menu.
2. Pressthe buttonandthen buttontoselectamenuitem.
Theselectedmenuitemchangesfromwhitetoblue.
3. Press the button to change the setting of a menu item or OK
buttontodisplaythesubmenu.
Note:
a. Intheteletextmodemenusarenotdisplayed.
b. Insomemodels,theNormal/Turbosearchwillnotdisplay,
onlytheStartwilldisplayintheAutoProgrammemenu.
c. In some models, Tilt,Game,FM transmitter, Booster,DBS,
WoofervolumeorColourdegauss willnotdisplay.
d. Insomemodels,theLanguage will notdisplay.
e) Insomemodels,FMTransmitterwillbedisplayedasX-wave.
VOL
VOL
SOUND
Q-VIEW
FAVOURITE
ARC/*
TV/AV
PICTURE
TURBO
l/ll
LIST
SLEEP
PSM
7
MENU
8
SSM
0
56
9
4
1
POWER
23
VOL
EYE/*
PR
PR
MUTE
OK Picture
Sound
Time
Special
Programme
O.5 1.5 10 KHz
5.0O.1
OR

Up to 200 TV stations can be stored in this set by programme
numbers (0 to199). Once you have preset the stations, you will be
able to use the or NUMBER buttons to scan the stations you
programmed. Stations can be tuned using automatic or manual
modes.
Note:Insomemodelsup to100TV stationscanbe stored.
All stations that can be received are stored by this method. It is
recommended that you use auto programme during installation of
thisset.
1. Press the MENU button and then button to select the
Programmemenu.
2. Press the button and then button to select Auto pro-
gramme.
3. Pressthe buttontodisplaytheAutoProgramme menu.
4. Press the button to select System.Select aTV system
withthe button;
BG
: (Asia/NewZealand/M.East/Africa/Australia)
I: (HongKong/SouthAfrica)
DK : (EastEurope/China/Africa/CIS)
M: (USA/Korea/Philippines)(option)
5. Pressthe buttontoselectStoragefrom.
6. Select the beginning programme number with the button
or NUMBER buttons.Any number under 10 is entered with a
numeric‘0’(or‘00’)infrontofiti.e.‘05’or(‘005’)for5.
7. Pressthe buttontoselectionNormalorTurbosearch.
Option : Insomemodels,OnlycanselectStart.
Note:
a. Turbo search is further faster than Normal search and in
some models, these searches will automatically store all
receivablestations.
b. lf the programmed station has poor quality sound, select the
systemagainintheManualProgramme menu.
8. Pressthe buttontobeginautoprogramming.
Allreceivablestationsarestored.
TostopautoprogrammingpresstheMENUbutton.
When auto programming is completed, the Programme edit
menu appears on the screen. See the 'Programme edit'
sectiontoeditthestoredprogramme.
9. RepeatedlypresstheMENUtoreturntonormalTV viewing.
10
Setting upTV stations
Turbo Search
Auto programme tuning
Normal Search
To Start
To Start
Programme
VOL
VOL
SOUND
Q-VIEW
FAVOURITE
ARC/*
TV/AV
PICTURE
TURBO
l/ll
LIST
SLEEP
PSM
7
MENU
8
SSM
0
56
9
4
1
POWER
23
VOL
EYE/*
PR
PR
MUTE
OK

Autoprogrammescan
Toautomaticallyscanthepicturesofstoredprogrammes,press the
or buttonforabout3seconds.Thepictureofstored Programmes
appearsonthescreenonebyone.
To stop auto programme scanning, press any button except VCR
buttons.
Manualprogrammetuning
Manualprogrammeletsyoumanuallytuneandarrangethestations
inwhateverorderyoudesire. Alsoyoucanassignstationnamewith
fivecharacterstoeachprogrammenumber.
1. Press the MENU button and then button to select the
Programmemenu.
2. Press the button and then button to select Manual
programme.
3. Pressthe buttontodisplay theManualProgramme menu.
4. Ifthis stationis theone required, pressthe buttonto select
Storage.Selectthe desiredprogrammenumber (0to 199)with
the button or NUMBER buttons. Any number under 10 is
entered with a numeric ‘0’ (or‘00’) in front of it, i.e.‘05’(or‘005’)
for5.
5. Pressthe buttonto selectSystem.SelectaTVsystemwith
the button;
BG : (Asia/NewZealand/M.East/Africa/Australia)
I : (HongKong/SouthAfrica)
DK : (EastEurope/China/Africa/CIS)
M : (USA/Korea/Philippines)(option)
6. Pressthe buttontoselect Channel.Pressthe button
toselectV/UHForCableasrequired.
If possible select the channel number (1 to 69) directly with the
number buttons. Any number under 10 is entered with a
numeric ‘0’(or‘00’)infrontofit,i.e.‘05’(or‘005’)for5.
7. Press the button to select search. Press button to
commencesearching.Ifastationisfound,thesearchwillstop.
8. PresstheOKbuttontostoreit.ThedisplayStoredwill appear.
9. Tostoreanotherstationrepeatsteps4to8.
0. Repeatedlypress theMENU or buttonto returntonormalTV
viewing.
11
Setting upTV stations
1
Auto programme scan
AUTO PROGRAMME
Programme
VOL
VOL
SOUND
Q-VIEW
FAVOURITE
ARC/*
TV/AV
PICTURE
TURBO
l/ll
LIST
SLEEP
PSM
7
MENU
8
SSM
0
56
9
4
1
POWER
23
VOL
EYE/*
PR
PR
MUTE
OK
MANUAL PROGRAMME

Programme
Finetuning
Normally finetuningis onlynecessary ifreceptionis poor.
1. Repeatthe Manualprogrammetuning steps1to 3.
2. Pressthe buttontoselectFine.
3. Press the button step by step to fine tune for the best
pictureandsound.
4. PresstheOKbutton.
5. Repeatedly press the MENU or button to return to normal TV
viewing.
The finely tuned programme will be indicated by yellow number
duringprogrammeselection.
Assigningaprogrammename
1. Repeatthe Manualpragrammetuningsteps1to 3.
2. Pressthe buttontoselectName.
3. Pressthe button. Youcanuseablank thenumeric0to9
andthealphabetAtoZ.
Withthe buttonyoucanselectintheoppositedirection.
4. Select the next position by pressing the button and then take
yourchoiceofthesecondcharacter,andsoon.
5. PresstheOKbutton.
6. RepeatedlypresstheMENUtoreturntonormalTVviewing.
Booster(option)
When the interference between programmes appear, select
BoostertoOff.ForweaksignalreceptionselectBoosterto On.
1. Repeatthe'Manualprogrammetuning' steps1to 3.
2. Pressthe buttontoselectBooster.
3. Pressthe buttontoselectOnorOff.
4. Repeatedlypress theMENU or buttonto return tonormalTV
viewing.
12
Setting upTV stations
MANUAL PROGRAMME
VOL
VOL
SOUND
Q-VIEW
FAVOURITE
ARC/*
PICTURE
TURBO
l/ll
LIST
PSM
78
SSM
0
56
9
4
1
POWER
23
VOL
PR
PR
MUTE
OK
SLEEP MENU
TV/AV EYE/*

Programmeedit
This function enables you to delete or skip the stored programmes.
Also you can move some stations to other programme numbers or
insertablankstationdataintotheselectedprogrammenumber.
1. Press the MENU button and then button to select the
Programmemenu.
2. Pressthe buttonandthen buttonto select programme
edit.
3. Pressthe buttontodisplaytheProgrammeeditmenu.
Deletingaprogramme
1. Selectaprogrammeto bedeletedwith the or button.
2. PresstheREDbuttontwice.
The selected programme is deleted, all the following
programmesareshifteduponeposition.
Copyingaprogramme
1. Selecta programme tobecopied withthe or button.
2. PresstheGREENbutton.
Allthefollowingprogrammesareshifteddownoneposition.
Movingaprogramme
1. Selectaprogrammeto bemovedwith the or button.
2. PresstheYELLOWbutton.
3. Move the programme to the desired programme number with
the or button.
4. PresstheYELLOWbuttonagaintoreleasethisfunction.
Skippingaprogrammenumber
1. Selectaprogrammenumbertobeskippedwiththe or
button.
2. PresstheBLUEbutton.Theskipped programme turnsto blue.
3. Press the BLUE button again to release the skipped
programme.
Whena programmenumberis skippedit meansthat youwill be
unable to select it using the button during normal TV
viewing. If you want to select the skipped programme, directly
enter the programme number with the NUMBER buttons or
select it in theprogramme editor tablemenu.Skipped prog.No.
appearsBLUE.
RepeatedlypresstheMENUtoreturntonormalTVviewing.
13
Setting upTV stations
G
PROGRAMME EDIT
PROGRAMME EDIT
Programme
VOL
VOL
SOUND
Q-VIEW
FAVOURITE
ARC/*
PICTURE
TURBO
l/ll
LIST
SLEEP
PSM
7
MENU
8
SSM
0
56
9
4
1
POWER
23
VOL
PR
PR
MUTE
OK
TV/AV EYE/*

Calling the programme table
You can check the programmes stored in the memory by displaying
the programme table.
Displaying Programme table
Press the LIST button to display the Programme table menu.
The programme table appears on the screen.One programme table
contains ten programmes as below.
4. Pressthe buttontoselect------.
5. Select a desired programme with the button or NUMBER
buttons. Any number under 10 is entered with a numeric '00' in
frontofiti.e '005' for5.
6. To storeanotherprogrammerepeat steps5to 6.
Youcanstoreupto8programmes.
7. Repeatedly press the MENU or button to return to normalTV
viewing.
Repeatedly press the FAVOURITE KEY button to select stored
favouriteprogrammes.
Favouriteprogramme
Thisfunctionletsyouselectyourfavouriteprogrammesdirectly.
1. Press the MENU button and then button to select the
Programmemenu
2. Press the button and then button to select Favourite
Programme.
3. PresstheOKbuttontodisplaytheFavouriteProgrammemenu.
Selectingaprogramme intheprogrammetable
Selecta prorgammewiththe or button.
Thenpressthe OKbutton.
Theset switchestothe chosenprogrammenumber.
14
Setting upTV stations
Pagingthroughprogramme table
There are 10 (or 20) programme table pages which contain 100 (or
200)programmes.
pressingthe or buttonrepeatedlyturnsthe pages.
Repeatedly press the MENU to return to normalTV viewing.
Programme
G
Programme
G
Note:
a. You may find some programme numbers highlighted in blue
colour. They have been set up to be skipped by auto
programmingorin theprogrammeeditmode.
b. Some programmes with the channel number shown in the
programme table indicated thereisno stationnameassigned.
VOL
VOL
SOUND
Q-VIEW
FAVOURITE
ARC/*
PICTURE
TURBO
l/ll
LIST
PSM
78
SSM
0
56
9
4
1
POWER
23
VOL
PR
PR
MUTE
OK
0-9
Programme
TV/AV
SLEEP MENU
EYE/*

15
Pictureadjustment
You can adjust picture PSM contrast, brightness, colour intensity,
sharpnessandtint(NTSCinputonly)tothelevelsyouprefer.
1. Press the MENU button and then button to select the
Picturemenu.
2. Pressthe buttonandthen buttontoselectthedesired
Pictureitem.
Select PSM press button to select Dynamic, Standard,
Mild,Game orUser.
3. Press the button to make appropriate adjustments and
pressOK, thenitwillbestoredforthepictureUser.
UsershouldbeselectedinPSM.
4. Repeatedly press the MENU or button to return to normalTV
viewing.
To recall your preferred setting press the PSM button until the
desired picture (Dynamic, Standard, Mild, Game or User)
appears. The picture Dynamic, Standard, Mild and Game are
programmedforgoodpicturereproductionatthefactoryandcannot
be changed.
Eye is an optional function.Only a set with eye option can perform
thisfunction.
In some models, the set will automatically adjust the picture
according to the surrounding conditions. This will enable you to
enjoythemostsuitablepictureaccordingtothesurroundings.
PresstheEYE/ buttontoswitchthe eyefunctionOnorOff.
When the eye function is On the most suitable picture is
automaticallyadjusted accordingtothe surrounding conditions.
Atthistimethedisplay ingreendoesnotappearcontinuously
but the display in yellow appears each time the picture
conditionchanges.
Note : If you press the PSM orTURBO PICTURE button with the
eyefunction,theeyefunctionisautomatically switchedOff.
8
Off
Picture adjustment
Eye (option)
VOL
VOL
SOUND
Q-VIEW
FAVOURITE
ARC/*
TV/AV
PICTURE
TURBO
l/ll
LIST
SLEEP
PSM
7
MENU
8
SSM
0
56
9
4
1
POWER
23
VOL
EYE/*
PR
PR
MUTE
OK

Pictureformat
YoucanwatchTVinvariouspictureformats;Standard,Wide,Zoom.
Repeatedly press the ARC button to select your desired picture
format.
Standard(4:3)
Thispicture formatis 4:3 ofgeneralTV.
Wide
You can enjoy the cinema (the picture format of 16:9) or generalTV
programmethroughthe16:9mode.
The screen 16:9 is viewed just like that but the screen 4:3. is
magnifiedtotheupper/lowersothatthescreen16:9isfull.
Zoom(14:9)
You can enjoy the cinema in a vast screen through the Zoom mode.
The screen 4:3 is magnified to the upper/lower sides so that the
screen16:9isfull.Thebottomandtopofthepicturemaybelost.
Note:
a. When you switch the set to Off, the Wide or Zoom picture
formatisresettotheStandard(4:3).
b. In the 1/2 size sub picture and vertical four sub pictures of PlP
modethepictureformatisnotavailable.
c. ThismenuwillappearonlyinEnglish.
Turbopictureselection (option)
When this function is On, picture quality will be enhanced.
RepeatedlypresstheTURBOPICTUREbuttontoswitchOnorOff.
(TurboPictureoff) (TurboPictureon)
Note : If you press the PSM or EYE/ button with the Turbo picture
function,theTurbopicturefunctionisautomaticallyswitchedOff.
16
Picture adjustment
VOL
VOL
SOUND
Q-VIEW
FAVOURITE
ARC/*
TV/AV
PICTURE
TURBO
l/ll
LIST
SLEEP
PSM
7
MENU
8
SSM
0
56
9
4
1
POWER
23
VOL
EYE/*
PR
PR
MUTE
OK
0FF ON

Sound
17
Sound adjustment
Sound
VOL
VOL
SOUND
Q-VIEW
FAVOURITE
ARC/*
TV/AV
PICTURE
TURBO
l/ll
LIST
SLEEP
PSM
7
MENU
8
SSM
0
56
9
4
1
POWER
23
VOL
EYE/*
PR
PR
MUTE
OK
O.5 1.5 10 KHz
5.0O.1
Sound adjustment
You can select your preferred sound setting: Flat, Music, Movie or
Speech and you can also adjust the sound frequency of equalizers
andbalance.
If you switch DBS (option) to On, the set creates a dynamic bass
sound.
In the FM transmitter (option), you can select a pre-selected
frequency (106.7 to 107.9 Mhz) at which the TV audio shall be
transmitted. This way you can enjoy sound of TV on your music
system and customize it as per your choice. Please note this
transmission is effective only till distance of 7 mtr. (provided no
obstruction isthere inbetweenTVand thereceiver).If thereception
isnotclear,youmayswitchreceptioninyourreceiverfromSTEREO
toMONOforbettersoundquality.
If you switch AVL to On, the set automatically keeps on an equal
volumelevelevenifyouchangeprogrammes.
You can vary the woofer volume (option) to get woofer effect in
soundwithrichbass.
1. Press the MENU button and then button to select the
Sound menu
2. Press the button and then button to select the desired
sound item; SSM,AVL,Balance, DBS, Woofer Volume or
FM Transmitter.
3. Press the , button to make desired adjustment
Press the button in SSM to set the SSM User.
Press to select Flat,Music,Movie,Speech or User.
a. Select User by pressing the /OK button.
b. Select a sound band by pressing the button.
c. Make appropriate sound level with the button.
d. Press the OK button to store it for the sound User.
It will auto store.
5. Repeatedly press the MENU or button to return to normalTV
viewing.
6. MatchtheTV’sfrequency&theFMreceiver’s.
To recall your preferred setting press the SSM button until the
desired sound (Flat,Music,Movie,Speech or User) appears.
The sound Flat,Music, Movie,and Speech are programmed for
goodsoundreproductionatthefactoryandcannotbechanged.
Notes:
a)If youpress theSSM buttonafter making appropriateadjustment
in Sound menu, the display User automatically appears even
through you have already set a factory preset setting, Flat,
Music,Movieor Speech.
b)Insomemodels,FMTransmitterwillbedisplayedasX-wave.
4. SelectFMTransmitter,using keys
a. Press /OKbuttontogoinsideFMtransmittermenu.
b. Select the frequency at which you want to transmitTV audio
(106.7to107.9Mhz)using keys.
c. SelectOFFtoswitchOFFthetransmissionusing keys.
Sound
106.7 MHz
106.9 MHz
107.1 MHz
107.3 MHz
107.5 MHz
107.7 MHz
107.9 MHz
OFF

Stereo/Dualreception(option)
Stereo/dualisanoptionalfunction.
When a programme is selected, the sound information for the
station appears after the programme number and station name
disappear.Broadcast OnScreenDisplay
Mono MONO
Stereo STEREO
Dual DUALI
Monosoundselection
In stereo reception, if the stereo signal is weak, you can switch to
mono by pressing the I/II button twice.In mono reception the depth
of sound is improved.To switch back to stereo, press the I/II button
twiceagain.
Languageselectionforduallanguagebroadcast
Ifa programmereceivedin twolanguages(dual language),youcan
switch to DUAL I,DUAL II or DUAL I+II by pressing the I/II button
repeatedly.
DUAL Isends theprimary broadcastlanguageto theloudspeakers.
DUAL II sends the secondary broadcast language to the
loudspeakers.
DUAL I+IIsendsaseparatelanguagetoeachloudspeaker.
NICAM reception(option)
If your set is equipped with the receiver for NICAM reception the
high quality NICAM (Near Instantaneous Companding Audio
Multiplex)digitalsoundcanbereceived.
Sound output can be selected according to the type of received
broadcastasfollowsbypressingtheI/IIbuttonrepeatedly.
1. When NICAM mono is received, you can select NICAM MONO
orFMMONO.
2. When NICAM stereo is received, you can select NICAM
STEREO or FM MONO.If the stereo signal is weak, switch to FM
MONO.
3. When NICAM dual is received you can select NICAM DUAL I,
NICAM DUAL II or NICAM DUAL I+II or MONO. When FM
MONOisselectedthedisplayMONOappearsonthescreen.
Soundoutputselection
In AV mode, you can select output sound for the left and right
L+R : Audio signal from audio L input is sent to left loudspeaker
and audio signal from audio R input is sent to right
loudspeaker.
L+L: Audio signal from audio L input is sent to left and right
loudspeakers,
R+R: Audio signal from audio R input is sent to left and right
loudspeakers.
18
Sound adjustment
Repeatedly press the I/II button to select the sound output.
VOL
VOL
SOUND
Q-VIEW
FAVOURITE
ARC/*
TV/AV
PICTURE
TURBO
l/ll
LIST
SLEEP
PSM
7
MENU
8
SSM
0
56
9
4
1
POWER
23
VOL
EYE/*
PR
PR
MUTE
OK
ONOFF
When this function is On, it will give surround effect as well as
loudnesswill beincreased.
RepeatedlypresstheTURBOSOUNDbuttontoswitchOnorOff.
Turbo sound selection (option)

TimeSetting
Time
The time uses 24-hour system and must be set to the correct time
beforeoperatingtheset.
1. Press the MENU button and then button to select the
Timemenu.
2. Pressthe buttonandthen buttontoselectTime.
3. Selectandadjusthourandminutebypressingthe , buttons.
4. Repeatedly press the MENU or button to return to normal TV
viewing.
Byusingthisfunction in On modethesetautomaticallyswitcheson or
off at a preset time. You must set the time correctly before using
On/Offtimefunction.
1. Press the MENU button and then , button to select the
Timemenu.
2. Pressthe buttonandthen buttontoselectOffTime.
3. PressOK
4. Pressthe buttontoselectOffTimeOnorOff.
5. Pressthe button.
6. Selectandadjusthourandminutebypressingthe , button.
7. RepeatedlypresstheMENUor buttontoreturntonormalviewing.
1. Press the MENU button and then button to select theTime
menu.
2. Pressthe buttonandthen buttontoselectOnTime.
3. PressOK
4. Pressthe buttontoselectOnTimeOnorOff
5. Pressthe button.
6. Selectandadjusthourandminutebypressingthe , button.
By using this function the set automatically switches on at a preset
Programmeonapresetvolumelevel.
1. Repeatsteps1to3forOnTime.
2. Pressthe button toselectOn Programme /OnVolume.
3. Select and adjust Program number by pressing buttons or
numberbuttons.SelectandadjustVolumebypressingthe
buttons.
4. RepeatedlypresstheMENUor buttontoreturntonormalviewing.
If you select Auto Sleep On the set will automatically switch itself to
standby mode approximately ten minutes after a TV station stops
Broadcasting.
1. Press the MENU button and then button.to select the Time
menu.
2. Pressthe button andthen buttontoselect AutoSleep.
3. Pressthe buttontoselectOn.
4. Repeatedly press the MENU or button to return to normal TV
viewing.
Note:
a. Thisfunctionworksonlyinstandbymode.
b. TocancelthesetOn/Offtime,settheOn/Offtimerto--:--.
c ToviewtheremainingOn/Off timeselecttheTimemenu
d. When you switch the main power Off, the Time is reset and the
On/Off timeisOff.
e. Timeraccuracyis 15sec.
Timing setting
Time
19
Time Setting
On/OffTime
OffTime
OnTime
On Programme number / OnVolume
Auto sleep
--:--
VOL
VOL
SOUND
Q-VIEW
FAVOURITE
ARC/*
TV/AV
PICTURE
TURBO
l/ll
LIST
SLEEP
PSM
7
MENU
8
SSM
0
56
9
4
1
POWER
23
VOL
EYE/*
PR
PR
MUTE
OK
±

20
Other functions
Special
1. Press the MENU button and then button to select the
Specialmenu.
2. Press the buttonandthen the buttonto selectLanguage.
3. PresstheOKbutton.
Alltheonscreendisplayswillappearintheselectedlanguage
4. Repeatedly press the MENU or button to return to normal
TVviewing.
TVandAVmodes
Inputs can be set for TV or AV mode. AV mode is used when a video
cassetterecorder(VCR),orotherequipmentisconnectedtotheset.
Note :When aVCRis connected viathe aerial socketthe set isused in
TVmode.Seethe‘Connectionofexternalequipment’section.
1. Press the MENU button and then button to select the Special
menu.
2. Pressthe buttonandthen buttontoselectInput.
3. Press the button to select TV, AV1, AV2 (option),AV3 (option)
orS-Video(option),Component (option).
TheAVmodesare:
AV 1 :VCR connected to the Euro scart socket or phone jack of the
set.
AV2:VCRconnectedtothephonejackoftheset.
AV3:VCRconnectedtotheAV3(option)socketsoftheset.
S-Video : S-VIDEO VCR connected to the S-VIDEO (option)
set(option).
socketsofthe
COMPONENT : COMPONENT connected to the COMPONENT
INPUTsocketontheset(option).
ToreturntoTVmode,pressthe orNUMBER buttons.
Alternatively you can select theTV or AV mode by pressing the TV/AV
button.
AutoAV switching(option)
If your VCR outputs switching voltage when it is switched to playback
with the VCR connected to the Euro scart socket, the set is
automatically switched to AV 1 mode when on AV signal is input.But if
you want to keep on watching TV mode, press the or Number
buttons.
PresstheTV/AVbuttontoreturntoAVmodes.
Childlock
The TV can be set so that the remote control handset is needed to
controlit.Thisfeaturecanbeusedtopreventunauthorizedviewing.
1. Press the Menu button and then button to select the Special
menu.
2. Pressthe buttonandthen buttontoselectChildlock.
3. Pressthe buttonontheremotecontrolhandsettoselectOn.
4. RepeatedlypresstheMENUor buttontoreturntonormalTVviewing.
Withthelockon,thedisplayChildlockOnappearsonthescreenifany
buttononthe frontpanel ispressedwhile viewing theTV.
Note : The display Child lock On will not appear on the screen if any
buttononthefrontpanelispressedwhiledisplayingthemenus.
TV and AV modes (option)
Onscreenlanguageselection(option)
Themenucan bedisplayedon thescreenindesired language.First
selectyourlanguage.
VOL
VOL
SOUND
Q-VIEW
FAVOURITE
ARC
TV/AV
PICTURE
TURBO
l/ll
LIST
SLEEP
PSM
7
MENU
8
SSM
0
56
9
4
1
POWER
23
VOL
EYE/*
PR
PR
MUTE
OK
This manual suits for next models
9
Table of contents
Other LG TV manuals