LG 42LV3700 User manual

x
LED LCD
PLASMA TV LCD
Please read this manual carefully before operating the
set and retain it for future reference.
LED LCDTV MODELS
42LV3700 42LV5500 32LW5700 47LW6500
47LV3700 47LV5500 42LW5700 55LW6500
55LV3700 55LV5500 47LW5700 65LW6500
42LV5400 42LW5600 55LW5700 47LW7700
47LV5400 47LW5600 72LZ9700 55LW7700
55LV5400 55LW5600 47LW9500
55LW9500
P/NO: SAC34134220 (1101-REVOO) 60LW9500
LCD TV
MODELS
42LK530
47LK530
55LK530
42LK550
47LK550
PLASMA TV
MODELS
50PZ750
60PZ750
50PZ950
60PZ950
50PZ950U
60PZ950U
www.lg.com

80 CUSTOMIZING SETTINGS
CUSTOMIZING TV SETTINGS
The SETUP Menu
1Press Home to access the Home menu.
2Press the Navigation buttons to select the SETUP menu and press ENTER.
3 Press the Navigation buttons to scroll to one of the following menus and press ENTER.
4Press the Navigation buttons to scroll to the setting or option you want and press ENTER.
5 When you are finished, press EXIT.
Menu H DeSCription
CHANNEL Sets up andedit channels,
PICTURE Adjusts the image size,quality, or effect,
AUDIO Adjusts the sound quality, effect, or volume level
TiME Sets the time, date, or Timer feature.
LOCK Locksor unlocks channets andprograms.
OPTION Customizes the general settings.
NETWORK Sets up the network setting.
SUPPORT Checks the customer information.

CUSTOMSZING SETTSNGS 81
Customizing Settings
CHANNEL Settings
1
2
3
Press Home to access the Home menu.
Press the Navigation buttons to scroll to SETUP and press ENTER.
Press the Navigation buttons to scroll to CHANNEL and press
ENTER.
4Press the Navigation buttons to scroll to the setting or option you
want and press ENTER.
- To return to the previous level, press BACK.
5 When you are finished, press EXIT.
The available channel settings are described in the following.
Setting
Auto Tuning (Seep.44).
Manual Tuning _t manually(See p.44).
Channel Edit Adds or deletes channels (Seep.44).

82 CUSTOMIZING SETTINGS
PICTURE Settings
1
2
3
Press Home to access the Home menu.
Press the Navigation buttons to scroll to SETUP and press ENTER.
Press the Navigation buttons to scroll to PICTURE and press
ENTER.
4Press the Navigation buttons to scroll to the setting or option you
want and press ENTER.
- To return to the previous level, press BACK.
5 When you are finished, press EXIT.
Aspect Ratio
Set 3D Video
(For 3D TV)
Picture Wizard
The available picture settings are described in the following.
setting Description
Changes the image size to view images at its optimal size (See p.47).
Sets the 3D imaging option (See p.78).
Energy Saving
Adjusts the image quality and calibrates the screen.
The customized options will be saved as Expert1 in the Picture Mode.
NOTE q
• If you use Picture Wizard, the Energy Saving feature will turn off automatically. /
• To reset changes made by Picture Wizard, operate Picture Reset when Picture Mode is on J
Expert1.
Reduces the power consumption by adjusting the screen brightness.
NOTE q
When selecting Auto or Maximum, Backlight will not work ( _ ).
Option
lute (_:_)The backlight is adjusted automatically corresponding to the surroundings
when selecting Auto using the Intelligent sensor feature.
!nteiiigent Sensor The most suitable picture is automatically adjusted corresponding to the
(_} surroundings.
Off Select if this feature is not necessary.
Minimum/ Selects the brightness level.
Medium/Maximum
Screen off The screen turns off in 3 seconds,
Pressing any button of the remote control will turn on the screen again,

CUSTOMIZINGSETTINGS83
Setting-- Description
Picture Mode Selects one of the preset image or customizes options in each mode for the best TV screen
)erformance. You are also able to customize advanced options of each mode.
The available preset picture modes vary depending on the TV.
Mode (Depending on model)
intelligent Sensor Sets the TV to adjust the image settings, such as contrast, brightness,
sharoness color, or tint, automatically corresponding to the surrounding
environments.
Vivid
Standard
APS
3inema
THX Cinema.
THX Bright Room
Spor_
Game
Photo
Expert 1. 2 or
ISFccc Exper[ 1.2
Adjusts tne video image for the retail environment by enhancing the contrast,
brigntness color, and sharpness.
Adjusts tne image for the normal environment.
Maximizes video images reducing power consumption without hurting picture
aualit .
Optimizes video image for a cinematic look to enjoy movies as if you are in a
movie theater.
Provides a cinema experience while watching a movie at home. The user
N9e able enjoy the best level of screen quality without any separate
aajustments.
THX Cinema express the optimal screen quality when the room is dark.
THX Bright Room express the optimal screen quality when the room is
oright.
-@ NOTE
o Tuv : THX (Thomlinson Holman's Experiment)is an audio and video
certification standard established by George Lucas and Thomtinson. A
THX certified display guarantees screen quality that exceeds the display
s_anaarcJ specification it/both hardware and software.
Optimizes the video image for high and dynamic actions by emphasizing
Drimar\ colors such as white, grass, or sky blue.
Ootimizes the video image for a fast gaming screen for PCs or games.
Ootimizes the still image like a photo file in HDMI, USB mode (ie, when
connecting the external device like a DSLR)
Adjusts _ne detailed video image settings for video experts as well as general
viewers.
-@ NOTE
• SFccc (ISFccc: Imaging Science Foundation Certified Calibration
Control) (Except LW5700, LV5400, LK550 series): This TV contains
the detailed calibrations necessary for professional certification by
tne Imaging Science Foundation. The resulting ISF "day" and "night"
modes wilt then be accessible by the user to experience the best their
LG HDTV has to offer.
Sophisticated and detailed calibrations can be made through the ISFccc
tootle,
Detailed calibration requires a licensed technician. Please contact your
oca dealer to inquire about an ISF certified technician.
_@ NOTE
• ( _r_ ) If you select Intelligent Sensor, the Energy saving feature will switch to Auto
automatically.
• If you select THX Cinema or THX Bright Room, the Aspect ratio feature will switch to Just
scan automatically.

84 CUSTOMIZING SETTINGS
Setting
TruMotion
SCREEN
(RGB-PC)
LED Local
Dimming
(Depending on
model)
.......... DeSCription
Advance video technology that provides clearer, smoother images, even during fast action scenes
creating a more stabte structure for a crisper picture.
TruMotion works with all inputs except PC mode.
if you enable "TruMotion", noise may appear on the screen, if this occurs, set "TruMotion" to "Off".
if you select "Picture Mode-Game ", set "TruMotion" to "Off".
Mode
High Provides smoother picture movement.
Low Provides smooth picture movement. Use this setting for standard use.
Off Turn off TruMotion operation.
user De-Judder: Adjusts noise of the screen.
De-Blur: Adjusts after-image of the screen.
Customizes the PC display options.
Resolution Selects a proper resolution when your PC uses 1024 X 768, 1280 X 768, or
1360 X 768 resolution.
Auto Configure Sets the TV to optimize the options automatically for the TV display.
Position Locates the image at the proper position.
Size Adjusts the image size.
Phase Eliminates horizontal streaking.
Reset Restores the options to the default setting.
After analysing the signal of the input video by areas of the screen, it adjusts the backlight to
improve the contrast ratio.
Mode
Oif--- Turn off LED Local Dimming operation.
Low Brightens the picture and deepens black levels using the soft Iocat dimming.
Medium Deepens black levels using the strong local dimming.
,High Clears the picture and deepens black levels using the strong Iocat dimming.
Setting
Backlight ( _ )
Contrast
Brightness
Sharpness
Color
Tint
Adjusts the brightness of the screen by controlling the LCD backlight. If you decrease the
brightness level, the screen becomes darker and the power consumption will be reduced
without any video signal loss.
• If you use the "Energy saving - Off, Minimum, Medium", Backtight will be available.
Increases or decreases the gradient of the video signal You may use Contrast when the
bright part of the picture is saturated.
Adjusts the base level of the signal in the picture.
Adjusts the levet of sharpness in the edges between the light and dark areas of the picture.
The lower the level, the softer the image.
Adjusts intensity of att cotors.
Adjusts the balance between red and green levels.

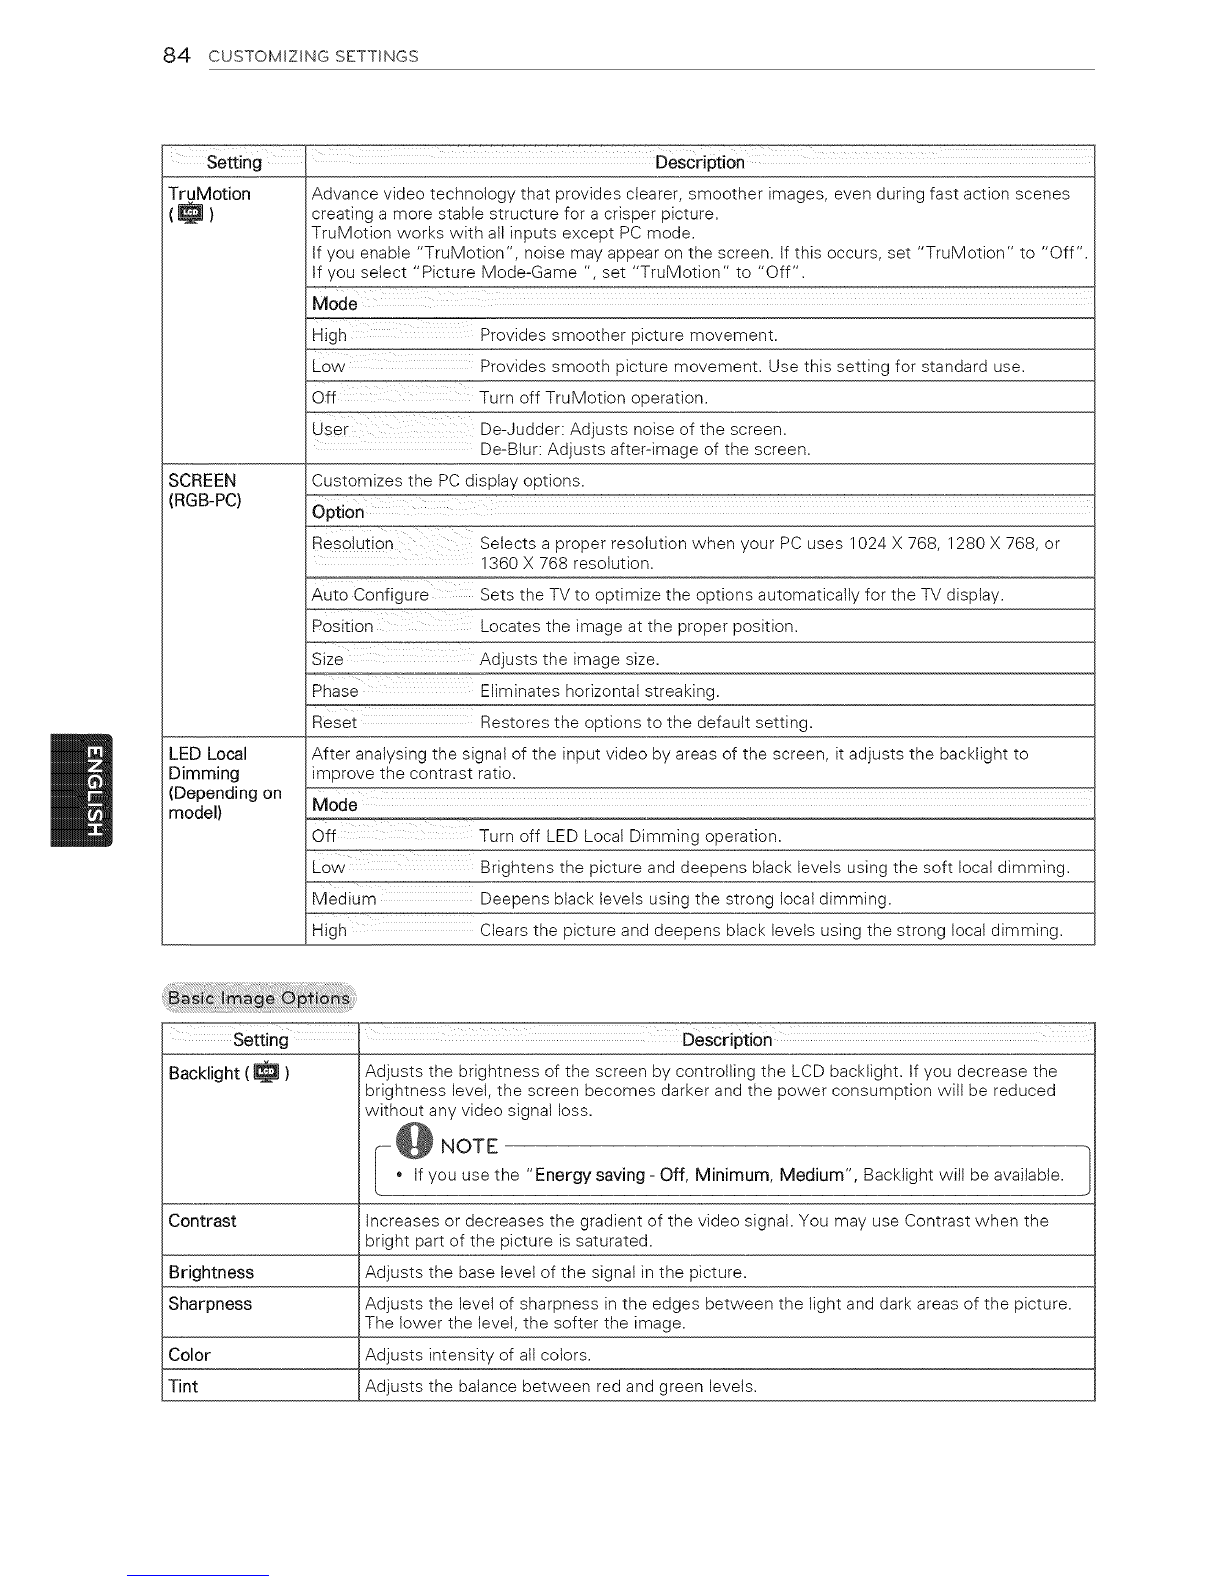
CUSTOMIZING SETTINGS 85
Setting Description
Color Temp, Set to warm to enhance hotter colors such as red, or set to cool to enhance cooler colors
such as blue.
Advanced Control or Customizes the advanced options.
Expert Control
Picture Reset Restores the options of each mode to the factory default.
Dynamic Contrast Adjusts the contrast to keep it at the best levet according to the brightness of the screen.
The picture is improved by making bright parts brighter and dark parts darker.
Dynamic Color Adjusts screen colors so that they look livetier, richer and clearer. This feature enhances hue,
saturation and luminance so that red, blue and green white look more vivid.
Skin Color it detects the skin area of video and adjusts it to express a natural skin color.
Noise Reduction Reduces screen noise without compromising video quality.
MPEG Noise Reduction Removes noise caused by compressing video.
Super Resolution Provides a crystal-clear picture by improving the details in an area that has a blurry or unclear
)icture.
Gamma You can adjust brightness of dark area and middle gray level area of the picture.
>>Low: Make the dark and middle gray levet areas brighter.
>>Medium: Express the original picture level.
>>High: Make the dark and middle gray level area darker.
Black Level Sets btack level of the screen to proper level This function is available in the following
modes: TV(NTSC-M/J, PAL-M, PAL-N), AV (NTSC-M/J, PAL-M, PAL-N), HDMi or Component.
>>Auto: Realizing the black level of the screen and set it to High or Low automatically.
>>Low: The reflection of the screen gets darker.
>>High: The reflection of the screen gets brighter.
Clear White Make the white area of screen brighter and more white.
Eye Care Adjusts the brightness of the screen to prevent the screen from being too bright. Dims
extremely bright pictures.
This feature is enabled in "Picture Mode-Standard, Game".
Makes video clips recorded in film look more natural by eliminating judder effect.
DVD and Blu-ray movies are filmed at 24 frames per second (fps). With LG Real Cinema,
every frame is consistently processed 5 times in 1/24 of a second producing 120 fps with
TruMotion or 2 times in 1/24 of a second producing 48 fps without TruMotion, thus totally
eliminating the judder effect.
This function can also work when TruMotion is off.
I Advanced Control, Expert Control
>>Maximizes the utilization of color to increase color quality.
>>Standard: Displays standard set of colors.
>>Wide: increases number of colors used.
Photo mode
>>Wide: increases number of colors used.
>>sRGB: Mode to display sRGB standard color gamut"
Real Cinema or Film
Mode
Color Gamut
Advanced Control
>>Maximizes the utilization of color to increase color quality.
>>Standard: Displays standard set of colors.
>>Wide: increase number of colors used.
Expert Control
Displays color domain of the signal.
>>Standard: Displays standard set of colors.
>>Wide: increase number of colors used.
7>EBU: Mode to display EBU standard color area.
7>SMPTE: Mode to display SMPTE standard color area.
7>BT709: Mode to display BT709 standard color area.

86 CUSTOMIZINGSETTINGS
EdgeEnhancer
xvYCC
ColorFilter
ExpertPattern
ColorTemperature
ColorManagement
System
Showscleareranddistinctiveyetnaturaledgesofthevideo.
ThisfunctionworkswelloverSharpnessUI60value.
Thisisproducesrichercolors.
Thisfeaturerepresentsrichcolorsasmuchasaconventionalvideosignal.
Thisfunctionisenabledin"Picturemode-Cinema,Expert"whenxvYCCsignalisinputted
throughHDMI.
Thisisthefunctiontofilterthespecificcolorsofthevideo.
YoucanusetheRGBfiltertosetcolorsaturationandhueaccurately.
Thisisthepatternusedforexpertadjustment
Thisfunctionisenabledin"PictureMode-Expert"whenyouwatchDTV.
Adjuststheoverallcolorofthescreenbychangingthewhitebaseline.
la.Method"2 Points
• Pattern: Inner, Outer
• Red/Green/Blue Contrast, Red/Green/Blue Brightness: The adjustment range is -50
to +50.
b. Method : 20 Point IRE
• IRE (institute of Radio Engineers) is the unit to display the size of the video signal
and can be set among 0, 5, 10, 15 - 100 Plasma TV. You can adjust Red, Green or
Blue according to each setting.
• Red/Green/Blue: The adjustment range is -50 - +50.
c. Apply to all inputs
blalGamma Select 1.9, 2.2, 2.4
Method 2 Points
• Pattern: Inner, Outer
• Red!Green/Blue Contrast, Red/Green/Blue Brightness
c. Method : 10 Point IRE
Pattern: Inner, Outer
• IRE (institute of Radio Engineers) is the unit to display the size of the video
signal and can be set among 10, 20, 30 - 100. You can adjust Red, Green or Blue
according to each setting.
• Luminance: This function displays calculated luminance value for 2.2 gamma. You
can input luminance value you want at 100 IRE, than the target luminance value
for 2.2 gamma is displayed at every 10 steps from 10 IRE to 90 IRE.
• Red/Green/Blue: The adjustment range is -50 - +50.
d. Apply to all inputs
As the tool used by the experts to make adjustments by using the test patterns, this does
not affect other colors but can be used to selectively adjust the 6 color areas (Red/Green/
Btue/Cya n/M agenta/Yellow).
Color difference may not be distinctive even when you make the adjustments for the general
video.
Adjusts Red!Green/Blue/Yetlow/Cyan/Magenta.
>>Red/Green/Blue/Yetlow/Cyan/Magenta Color: The adjustment range is -30 - +30.
>>Red!Green/Blue/Yellow/Cyan/Magenta Tint: The adjustment range is -30 - +30.
>>This feature is disable in RGB-PC and HDMI-PC mode.

CUSTOMIZING SETTINGS 87
AUDIO Settings
1Press Home to access the Home menu.
2Press the Navigation buttons to scroll to SETUP and press ENTER.
3 Press the Navigation buttons to scroll to AUDIO and press ENTER.
4Press the Navigation buttons to scroll to the setting or option you
want and press ENTER.
- To return to the previous level, press BACK.
5 When you are finished, press EXIT.
The available audio settings are described in the following.
setting DesCription
Auto Volume Activates the Auto Volume feature to keep the volume ievet consistent whenever you change
channels, The volume level may not be consistent due to different signal conditions of broadcasting
stations,
Clear Voice II Sets whether to enhance human voice clarity, You can adjust the level of clarity when you set this
feature on,
Balance Adjust balance between the left and right speakers according to your room environment,
Sound Mode Selects one of the preset sound modes or customizes options in each mode,
Mode
Standard Select when you want standard-quality sound.
Music Select when you listen to music.
Cinema Select when you watch movies.
Sport Select when you watch sports events.
Game Select when you play games.
_s OTE
ound quality or volume is not at the levet you want, it is recommended to use a separate
me theater system or amplifier to cope with different user environments.
he Clear Voice ti feature is on, Infinite 3D Surround will not be activated.
Infinite 3D Patents LG proprietary sound processing technology that strives immersive 5.1
Surround surround sound with just two front speakers.
Treble Controls the dominant sounds in the output. When you turn up the treble, it will
increase the output to the higher frequency range.
Bass Controls the softer sounds in the output. When you turn up the bass, it will
increase the output to the lower frequency range.
sound Reset Resets the sound mode to the default setting.

88 CUSTOMIZING SETTINGS
Sound
Optimizer
TVSpeaker
ARC Mode
(Audio Return
Channel)
Description
Optimizes the sound depending on the environment in which the TV is installed.
Option
Normat Normal sound mode.
Wall Mount Type Optimized sound mode for a wail-mounted TV.
stand type optimized sound mode for a stand-type TV.
Turns on the internal speaker of the TV when using an external Hi-Fi system. You can use the TV
speaker as an audio output device even if there is no video input.
When using an external audio device with the ARC (Audio Return Channel) feature, SPDIF can be
output using only a High Speed HDMI cable without an additional optical cable.
NOTE
• Some HDMI cables may not support this mode (A High Speed HDMt cable is recommended).
ATheARC mode only works on the HDMt 1 input on the TV.
_ Activates the StMPLINK feature to use this feature.
Option
On tf the device with the ARC feature is turned on, the device speaker is
automatically used when StMPLINK is enabled.
Even if the device with the ARC feature is turned on and StMPLINK is enabled,
the device speaker is not automatically used.
AV Sync. If the video and sound are not synced, you can adjust it manually.
7>(-)setting "Make audio output faster than the default.
7>(+) setting "Make audio output slower than the default.
Option
AV Sync. Adjusts the sync of the TV speaker and SPDIF.
TV Speaker Adjusts the sync of the sound from the TV's internal speaker.
SPDIF (Sony Adjusts the sync of the sound from an external speaker connected to the digital
Phi!ips Digital audio output port.
InterFace)

CUSTOMIZING SETTINGS 89
TIME Settings
1Press Home to access the Home menu.
2Press the Navigation buttons to scroll to SETUP and press ENTER.
[3 Press the Navigation buttons to scroll to TIME and press ENTER.
4Press the Navigation buttons to scroll to the setting or option you
want and press ENTER.
- To return to the previous level, press BACK.
5 When you are finished, press EXIT.
The available time settings are described in the following.
_etting Description
Clock Sets the time, date, time zone, and daylight-saving time feature.
The time will be set automatically according to a digital channel signal which includes time
information provided by the broadcasting station. If not, set the time and date manually.
Off Time/On Time Sets the time to turn on or off the TV automatically. To use this function, you should set the current
time and date in advance.
--@ NOTE 1
If you do not press any button within 2 hours after the TV turns on by the On Time feature, /
the TV enters the Standby mode automatically. J
If you set both Off time and On time features to the same time, the Off time feature
overrides the On time feature.
Sleep Timer Sets the length of time until the TV to turns off. When you turn the TV off and turn it on again, the
Sleep timer feature wilt be set to off.

90 CUSTOMIZING SETTINGS
LOCK Settings
1Press Home to access the Home menu.
2Press the Navigation buttons to scroll to SETUP and press ENTER.
3 Press the Navigation buttons to scroll to LOCKand press ENTER.
4Press the Navigation buttons to scroll to the setting or option you
want and press ENTER.
- To return to the previous level, press BACK.
5 When you are finished, press EXIT.
The available lock settings are described in the following.
setting
Set Password Changes the 4-digit password, The default PIN is "0 0 0 0",
If you forget your password, press "0-3-2-5" on the remote control,
Lock System Activates or deactivates the lock system,
Block Channel Blocks the channels that contain inappropriate contents for children. The channels can be selected
but the screen is blank and the audio is muted.
To watch a locked channel, enter the password.
Movie Rating Blocks the movies that are only broadcasted on the TV and contain inappropriate contents, based on
the Motion Picture Association of America (MPAA) rating.
Rating
G General audiences All ages admitted
PG Parental guidance suggested - Some material may not be suitable for children
PGq 3 Patents strongly cautioned - Some material may be inappropriate for children
under 13
R Restricted - Under 17 requires accompanying parent or adult guardian
NCq 7 No one 17 and under admitted.
X Adults only
iV Rating- Blocks the children's TV programs that parents do not want their children to watch. To block other
Children TV programs, you should set the TV Rating-General feature.
(Depending on
model) Rating
Age TV-Y (All children, including children from ages 2-6)
TV-Y7 (Directed to older children, suitable for children age 6 and above)
Fantasy Violence TY-Y7 (Directed to older children - Fantasy violence, suitable for children age 6
and above, containing more intense or combative fantasy violence)

CUSTOMIZING SETTINGS 91
Setting
TV Rating-
General
(Depending on
model)
iV Rating-
English
(Depending on
model)
DeSCription ......
Blocks the TV programs that you want based on the ratings by using the Parental Control Function
(V-Chip).
_e NOTE "/
e V-Chip electronically reads TV program ratings and allows parents to block program that |
unsuitable for children.
Rating
Age TV-G (General audience, suitable for all ages)
TV-PG (Parental guidance suggested, containing material that are unsuitable for
younger children)
TV-14 (Parents strongly cautioned, containing material that are unsuitable for
age 14and under)
TV-MA (Mature audience only, unsuitable for children age under 17)
Dialog TV-PG or TV-14
(suggestiye
dialogue)
Language (coarse TV-PG, TV-14, or TV-MA
language)
Sex (sexual TV-PG, TV-14, or TV-MA
situation)
Violence TV-PG, TV-14, or TV-MA
Selecting Canadian English rating system.
-- Exempt
C Children
C8+ Children eight years and older
G General programming, suitable for all audiences
PG Parental Guidance
14+ Viewers 14 years and older
18+ Adult programming
Blocking Off Permits all programs
iV Rating- Selecting Canadian French rating system.
French
(Depending on
model) E Exempt
General
8ans+ General-Not convenient for little children
3ans+ Not convenient for children of 13 years and younger
i 6ans+ Not convenient for children of 16 years and younger
i8ans+ This programs is only for adults
Blocking Off Permits all programs
Downloadable
Rating This function operates only when TV has received Region5 Rating data.
The name of the rating option may differ.
_Tp NOTE
isfeature is availableonly for digitat channels.
Input Block Block the input sources.

92 CUSTOMIZING SETTINGS
OPTION Settings
1Press Home to access the Home menu.
2Press the Navigation buttons to scroll to SETUP and press ENTER.
3 Press the Navigation buttons to scroll to OPTION and press ENTER
4Press the Navigation buttons to scroll to the setting or option you
want and press ENTER.
- To return to the previous level, press BACK.
5 When you are finished, press EXIT.
The available general settings are described in the following.
Setting Description
Language Selects a desired language.
Option
Menu Language Selects a language for the display text.
Audio Language Selects an audio language for your program. This feature operates only in the
DTV or CADTV mode.
Caption Sets whether to display captions and customize your option in each mode.
Mode
CC !-4 (Closed Displays the audio portion of a TV program as text on the TV screen. CC1 is the
Captioning) most common mode in use.
TeXt i}4 - Field 1 data channels: two Captions (CC1, CC2) and two Text (71,72).
Field 2 data channels: two Captions (CC3, CC4) and two Text (T3, T4).
Service 1:6 This is only available for the digital broadcasting system.
T
Option (For Digital Broadcasting)
Size Selects the word size.
Font Selects a typeface for the text.
Text Color Selects a color for the text.
TeXt opacity Adjusts the opacity for the text color.
ag C0ioi Selects a background color.
ag opacity Adjusts the opacity for the background color.
Edge Type Selects an edge type.
Edge Color Selects a color for the edges.
Power Indicator Sets to turn on or off the indicator light on the TV.
(Depending on ................
model) Option
Standby Light Set to turn on or off the indicator light in Standby mode.
power Light Set to turn on or off the indicator light when you turn on the power.

CUSTOMIZING SETTINGS 93
Setting Description
ISM Method Prevents image sticking or removes a ghost image.
A frozen still picture displayed on the screen for prolonged periods can result in a ghost image.
Mode
Norms Sets it :_image sticking s never a problem.
Orbiter Avoids a gnost mage on the screen.
The mage wi move ever'. 2 minutes to help prevent ghost images. However, it
ts DesI not to allow ar. fixed image to remain on the screen.
Color Wash
Pointer
(Depending on
model)
Smart Share
Setting
White Wash
Removes a ghost image on the screen.
The co_or DIOCKNith tne screen moved a little and the white pattern are
alternate1 disDla\ ea. It is difficult to see the after image on all colors.
Once it has been correctea it witl not be visible in any color.
Removes a ghost image on tne screen.
use soaringly. Watch the TV normal y for a while before using this feature to see
if the gnos_ image disappears on its own.
-@ NOTE /
An excessive gnos_ea image may be impossible to clear entirely with |
White Wash, To re_urn _o norma viewing, press the any button, J
Sets the pointer option of the magic motion remote control.
option
Speed Changes the pointer speed.
Shape Selects the pointer shape.
Size Changes the pointer size.
Alignment Align the remote control's direction with the pointer on your TV screen by
shaking the remote controt left and right. Then, the pointer automatically moves
to the center of the screen.
Sets the DivX and DLNA option.
Option
DivX VOD Registers your TV to ptay DivX protected videos (See p.71 ).
Registration
DivX Deregisters your TV (See p.71).
Deregistration
DMR Activates or deactivates the DMR (Digital Media Render) connection.

94 CUSTOMIZING SETTINGS
setting
Initial Setting
Set ID
Mode Setting
IR Blaster
(Depending on
model)
Description
Resets the TV to factory default and erases all stored channels.
Customizes the TV settings to suit your preference. The initial setup screen will appear when you
turn on the TV for the first time.
NOTE
•WhpenrSetecting__oo- "Lock System-On'in the LOCK menu, the message to enter the password
_ if you forget your password, press "0-3-2-5" on the remote control.
Setting
Language Selects a desired language.
Mode Settino Selects Home Use for the home environment.
Selects Store Demo for the retail environment.
Selects Demo Mode to set to show special features of the TV. You can cancel
tne aemo mode by pressing any buttons except the Volume and Mute buttons.
NOTE
When selecting Store Demo, Demo Mode will be activated,
Power indicator Turns the power indicator light on or off.
LED LCD TV_
Time Zone Sets the time zone and daylight saving.
Auto Tuning Scans and saves available channels automatically.
Adds an iD to the connected devices.
Default selection is "Home Use". We recommend setting the TV to "Home Use" mode for the best
picture in your home environment.
Home Use Selects it for the home environment.
Store Demo Selects it for the retail environment.
Demo Mode Sets to show special features of the TV. You can cancel the demo mode by
pressing any buttons except the Volume and Mute buttons.
Adjusts when connecting Wireless media box (sold seperate).
For luther information, refer to the optional "Wireless media box" manual for operating insturctlons.

CUSTOMIZING SETTINGS 95
NETWORK Settings
1
2
3
Press Home to access the Home menu.
Press the Navigation buttons to scroll to SETUP and press ENTER.
Press the Navigation buttons to scroll to NETWORK and press
ENTER.
4Press the Navigation buttons to scroll to the setting or option you
want and press ENTER.
- To return to the previous level, press BACK.
5 When you are finished, press EXIT.
The available network settings are described in the following.
Setting Description
Network Setting Configure the network settings (See p.50).
Network Status Display the network status (See p.55).
Smart TV Set the region for which weather forecast is provided and manage the IDs added to the TV.
Setting
Country Setting Set the country for premium services. Different premium services are
provided depending on the country you set.
weather Effect Sets the region for the weather to be displayed on the background of the
premiumservice
Select your region.
Premium Version Display the version of the premium service.
ID Management Manage the Iogin history of the IDs added to the TV.
Reset Delete all IDs added and applications installed on the TV. Please be aware
that alt your paid applications may be deleted.
Display the Legal notice (See p.57).
View the supplied Netfilx Electronic Serial Number (ESN)
Legal Notice
ESN (Depending
on model)

96 CUSTOMIZING SETTINGS
SUPPORT Settings
1
2
3
Press Home to access the Home menu.
Press the Navigation buttons to scroll to SETUP and press ENTER.
Press the Navigation buttons to scroll to SUPPORT and press
ENTER.
4Press the Navigation buttons to scroll to the setting or option you
want and press ENTER.
- To return to the previous level, press BACK.
5 When you are finished, press EXIT.
The available support settings are described in the following.
Setting
Software
Update
Picture Test
Sound Test
Description
Update the TV with the latest firmware.
Executes picture or built-in melody sound tests.
>>If this test has an error, select Yes. You will see product or service information.
>>If this test has no errors, check the connection status of external devices and refer to the
manual of externat devices.
Product/Service Shows the product or service information.
Info. Customer Service Center can differ by country.

MAKING CONNECTIONS 97
MAKING CONNECTIONS
Connect various external devices to the TV and switch input modes to select an external device. For more
information on external device's connection, refer to the manual provided with each device.
Available external devices are: HD receivers, DVD players, VCRs, audio systems, USB storage devices, PC,
gaming devices, and other external devices.
.-@ NOTE
If you record a TV program on a DVD recorder or VCR, make sure to connect the TV signal input cable
to the TV through a DVD recorder or VCR. For more information on recording, refer to the manual
provided with the connected device.
The external device connection may differ from the model.
Connect external devices to the TV regardless of the order of the TV port.

98 MAKING CONNECTIONS
Connection Overview
Connect various external devices to the ports on the TV back panel.
1Find an external device you want to connect to your TV as shown on the following illustration.
2Check the connection type of the external device.
3 Go to the appropriate illustration and check the connection details.
HD Receiver
Speaker USB
PC
i_iiiiiii
HDMI - See p.99, p.104
DVI - See p.lO0, p.105
Component - See p.101
Composite - See p.102
RGB - See p.106
Memory storage - See p.109
Memory card reader - See p.109
Digital - See p.107
Gaming Device
--@ NOTE
.If you connect a gaming device to the TV, use the cable supplied with the gaming device.
*Refer to the external equipment's manual for operating instructions.
Other manuals for 42LV3700
12
This manual suits for next models
37
Table of contents
Other LG TV manuals