LGP 30.1000 User manual

USER’S MANUAL
ATV SNOW BLOWER
13 HP
MODEL 30.1000
ATTENTION!
READ AND FOLLOW ALL SAFETY AND OPERATING INSTRUCTIONS!

2
CONTENTS
1. INTRODUCTION ________________________________________________ 3
2. SAFETY INSTRUCTIONS _________________________________________ 4-6
Compulsory tasks and prohibitions
Safety stickers
3. COMPLETING ASSEMBLY________________________________________ 7-11
Specifications
Installation manual
4. OPERATION ___________________________________________________ 12-14
Preparation
Operation
Transportation position and operating position
Height adjustment
Using the control panel
Operating the snow blower
5. MAINTENANCE ________________________________________________ 15-17
Maintenance schedule
Engine maintenance
Checking the securing bolts
Checking tyre pressure
Blade maintenance
Greasing
Protective bolts
Belt replacement
Electric fuse
6. STORAGE ______________________________________________________ 18
Unassembling the equipment
Storage
7. SPARE PART LIST _______________________________________________ 19-25

3
INTRODUCTION
You have purchased a snow blower, which is an ideal tool that is meant primarily for removing lighter deposits
of snow. This equipment may also be used in more complicated circumstances (which involve thicker snow, ice,
etc), but in these conditions you will have to consider using a lower operating speed (read more in the user’s
manual).
With the snow blower attached to an ATV, a longer working machine is created which is hard to move around,
which also means that removing snow in small or confined areas is made more difficult.
This manual contains instructions for fully completing the snow blower, with all required attachments, along
with ensuring its safe operation and maintenance.
NOTE: Photos and drawings in this manual may not necessarily depict the actual models of snow blower or
their accessories. They are merely given as a frame of reference and are based on the latest available information
at the time of publication.
This symbol is used throughout the manual and on warning signs in order to warn
users of the possibility of serious injury. Before using the vehicle and snow blower,
carefully read the safety instructions and make sure that you have understood
them. Follow all instructions and ensure that everyone who uses the equipment
follows them!
Add the serial number and purchase date for your snow blower to the fields below. The distributor needs this
information in order to be able to service your equipment quickly and efficiently when ordering spare parts. If parts
need to be replaced, use only original spare parts.
In case repairs are required under the terms of the guarantee, submit this registration brochure together with the initial
sales invoice to the distributor to order servicing under the terms of the guarantee.
Keep this manual for future reference.
Based on the specifications for your model, please check that you have received all of the parts for your
particular set.
SERIAL NUMBER: ___________________________
MODEL NUMBER: ___________________________
DATE OF PURCHASE: ___________________________

4
SAFETY INSTRUCTIONS
Most accidents occur due to negligence or carelessness. Avoid unnecessary accidents and follow the safety
instructions given below.
DEFINITION
In this manual the terms “left” and “right” designate directions when sitting on the driver’s seat in a forward-
facing position.
TRAINING
1. Read the safety instructions and terms and conditions of use carefully.
Learn how to stop the equipment and deactivate the controls fast.
2. Never allow children to use the vehicle or snow blower. Never allow
adults to use the vehicle or snow blower unless they have received
appropriate instruction.
3. The vehicle or snow blower should not be used when intoxicated or
under the influence of drugs which may affect perception or reactions.
4. Make sure that there are no persons, especially infants, or animals in the
equipment’s operating area.
PROHIBITIONS
Never use the snow blower unless all of the protective parts are correctly installed.
Never modify the engine adjustment without approval by the manufacturer.
Never touch any moving or rotating parts during the operation of the snow blower.
Never attempt to carry out any adjustments while the engine is running (unless directly recommended
by the manufacturer).
Never stop the engine right after prolonged use (see Clause 4.6).
Never use the snow blower without wearing the proper protective clothing, earmuffs, protective
goggles, or anti-slip footwear.
Never give anybody a ride on the snow blower.
Never leave an operating snow blower unattended.
Never fill the equipment when the engine is running or hot.
Never fill the fuel tank indoors.
Never allow the engine to run in an enclosed room as gases emitted from the exhaust contain carbon
monoxide, which is lethal when inhaled.
Never use the snow blower on very steep slopes.
Never use the snow blower unless all of the safety elements have been installed and are being used
correctly.
Never use the snow blower before you have carefully read the entire user’s manual.
Never wear loose clothing that can become entangled in the machine’s moving parts.
Never attempt to remove obstacles with the engine running. Before cleaning the snow blower, make
sure that the engine has been switched off and that the rotor has stopped moving.
Never use the snow blower in the dark, unless you are using artificial lighting.
Never use the snow blower when excessive vibration is being experienced. Instead, stop the snow
blower immediately and find out the reason behind the fault.
Never climb the snow blower.
Never modify the accessories or any parts without written approval by the manufacturer.

5
COMPULSORY TASKS
Follow the user’s manual where it concerns the engine.
Make sure that every bystander is removed to a safe distance when operating the snow blower.
Regularly maintain the snow blower and check it before every use.
Clean the operating area of possibly hazardous objects.
Allow the vehicle and accessories to acclimatise to the ambient temperature before use.
Slow down the speed when working on a slope or on an uneven surface.
Bear in mind that the snow blower’s parts may be hot after the machine has been in use.
Follow every instruction given by the ATV’s manufacturer.
Be careful when filling the snow blower, especially if engine components are hot.
Handle fuel with caution, bearing in mind that it is highly flammable.
Only use the fuel container prescribed by the manufacturer.
If fuel is splashed onto your clothing, ensure that clothing is changed.
Always use protective equipment that is designed for every type of product (goggles, earmuffs,
protective clothing, anti-slip footwear, etc) (see chapter concerning use).
The safe road-steadiness of the vehicle shall always be ensured by using the correct accessories for the
task in hand (chains, counterbalances, etc).
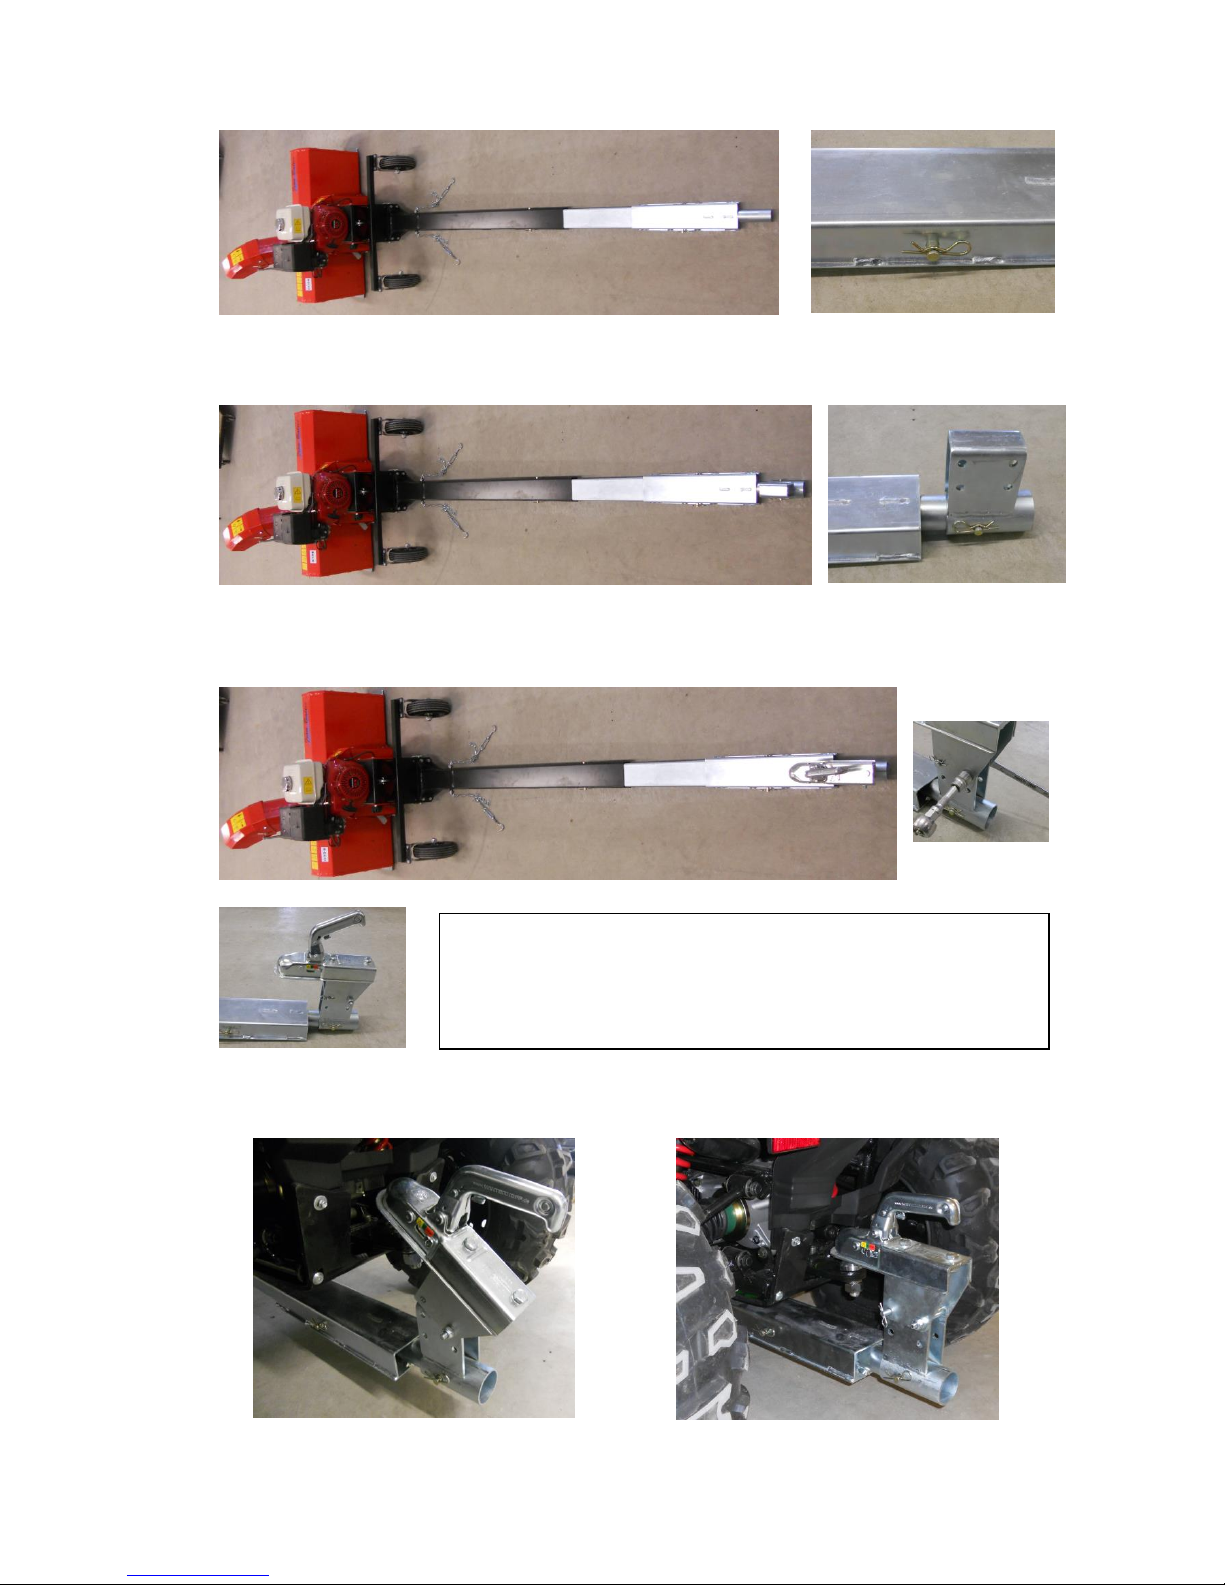
Always make sure that every component is correctly installed (ensuring that the drive system is firmly
in place and fastened at both ends, and that belts are correctly installed).
Always wear thick leather gloves when handling the winch rope.
Make sure that all the safety stickers are in good condition. Replace damaged stickers as required.
Keep your hands and feet away from the rotating blades.
Before transporting the snow blower, make sure that it is in the transportation position.
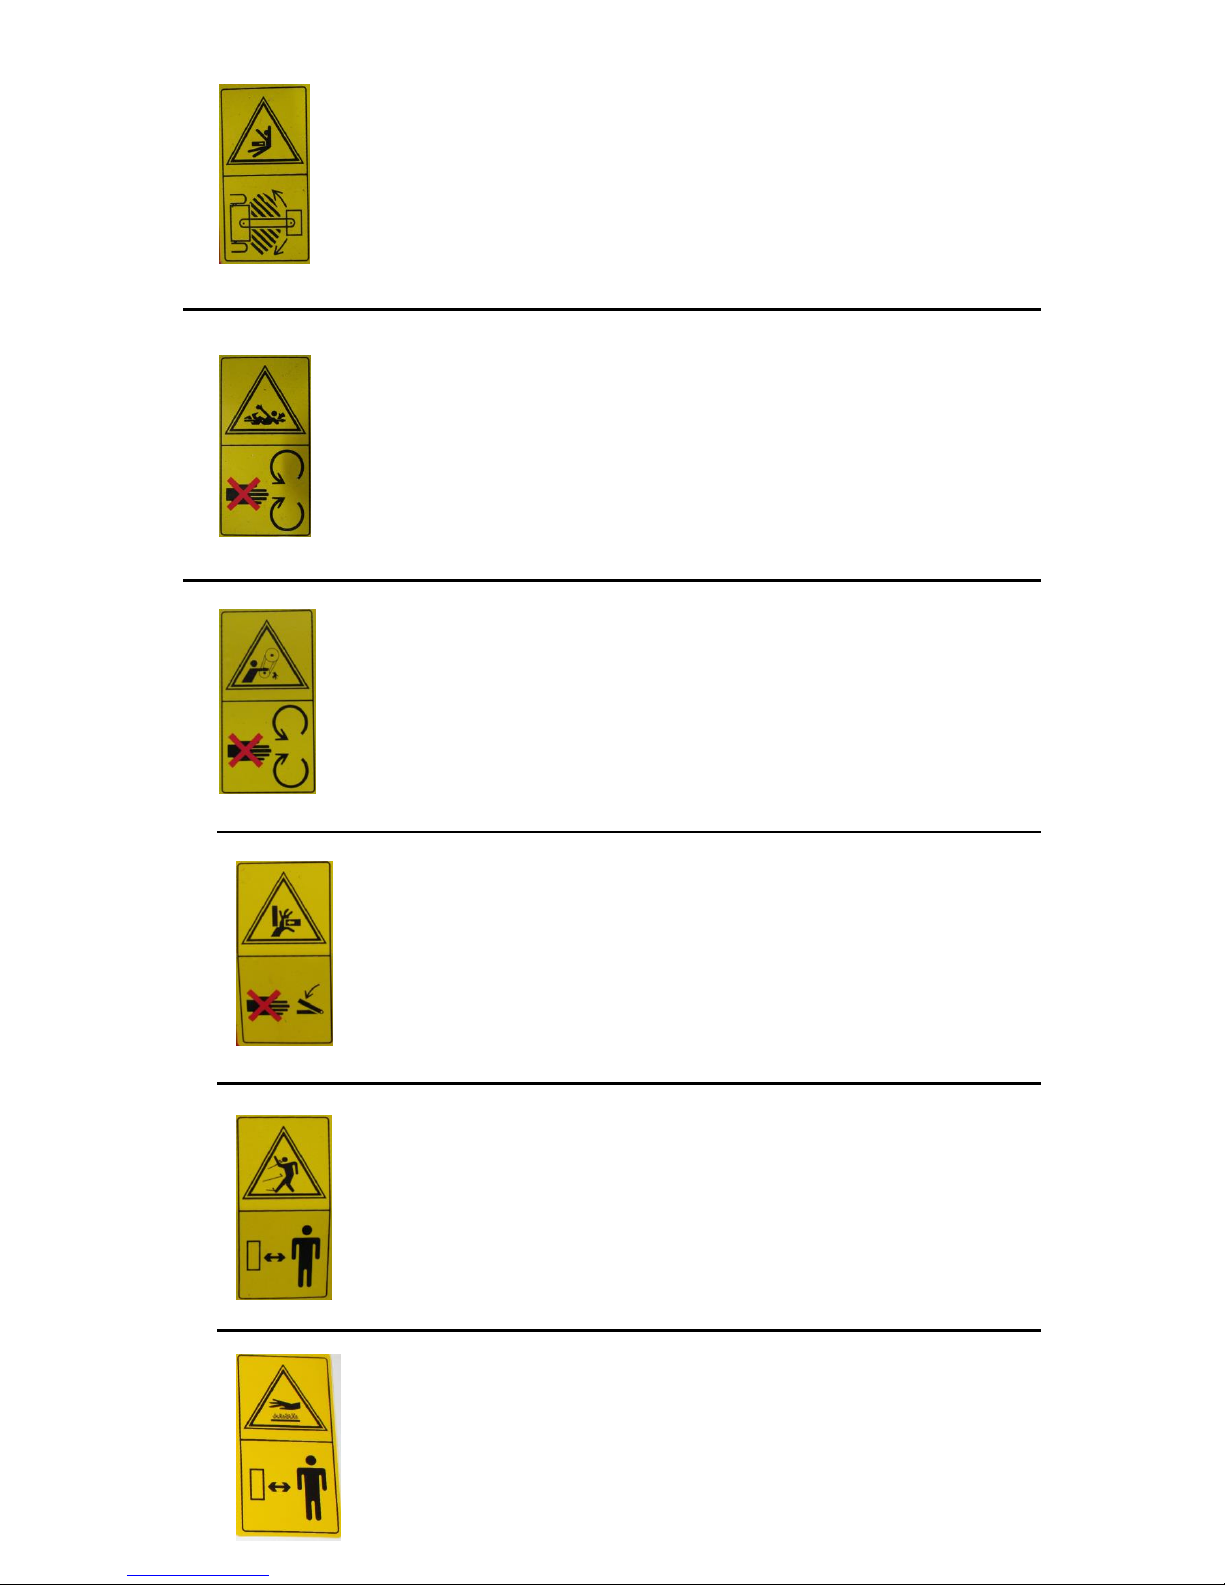
Safety stickers
Safety stickers must be placed on your ATV mower. If any of these stickers is missing from your vehicle or have
been damaged, contact the mower’s distributor so that any missing stickers can be replaced before the equipment
is used.
Meanings for safety stickers
Read the instructions given in the user’s manual in relation to the wearing of
protective clothing, protective gloves, goggles, earmuffs, protective footwear, or
a mask.
Before installation or use, read the user’s manual and make sure that you have understood
everything correctly.
Never attempt to perform any adjustment, repair, cleaning or maintenance work while the
engine is running. When work has been completed, stop the engine, lower the snow blower,
set the gears to neutral, activate the parking brake, and remove the ignition key.

6
Danger area! Risk of collision! In order to ensure safety, consider the dimensions, operating
area and moving speed of the tool.
Keep your hands, feet and clothing away from rotating parts while the engine is running!
Always make sure that there are no people or obstacles in the operating area!
Never attempt to remove obstacles with the engine running! Before cleaning the snow blower,
make sure that the engine has stopped and that the rotor has stopped rotating.
Keep your hands, feet and clothing away from rotating parts while the engine is running.
Never attempt to install or remove the driving belt without reading the user’s manual.
Keep your hands away from rotating parts while the engine is running.
Never attempt to remove obstacles with the engine running! Before cleaning the snow
blower, make sure that the engine has stopped and that the rotor has stopped rotating.
Danger area! Always make sure that there are no persons, objects or obstacles in the
operating area; stop work immediately when danger is present!
Caution, dangerously hot! Keep away from hot parts!

7
COMPLETING ASSEMBLY
Attention! An ATV towing hook and winch is required for the installation of the snow blower!
SPECIFICATIONS
Tools required for completeness:
Open-ended spanners sized 13mm and 17mm
Socket wrenches sized 8mm, 13mm and 17mm
Based on the specification, check whether you have received all the parts for the set.
Installation time 30 –60min
Pos.
Code
Designation
Quantity
1
30.2.00.00
Snow blower
1
2
30.1.01.00
Support wheels
1
3
30.1.02.00
External pipe
1
4
30.1.00.01
Internal pipe
1
5
30.1.03.00
Rear pipe
1
6
30.1.04.00
Adapter
1
7
30.1.08.00
Driving head assembly
1
8
30.4.00.00
Control panel set
1
9
30.3.00.00
Pin 20, L = 325mm
1
10
30.1.06.00
Pin 12, L = 159mm
2
11
30.1.07.00
Pin 12, L = 109mm
1
12
30.1.05.00
Pin 10, L = 95mm
1
13
DIN 11024
Pin splint 3
5
14
DIN 933
Bolt M10 x 25
4
15
DIN 931
Bolt M10 x 75
1
16
DIN 3570
Pipe clip M8 x 28mm
2
17
DIN 9021
Washer 8
4
18
DIN 125
Washer 10
10
19
DIN 315
Butterfly nut M8
4
20
DIN 985
Nut M10 Nyloc
5

8
INSTALLATION MANUAL
1. Attach the support wheels (pos. 2) to the fixing frame (pos. 3). Use bolts M10 x 25, plus 10 washers
and M10 Nyloc nuts. Tighten the bolts.
Attention! Depending on the height of the ATV and the location of the towing hook, choose securing holes that
match the height of the bolts. Take into account the fact that the fixing frame should run parallel to the bottom of
the ATV.
2. Attach the snow blower (pos. 1) to the securing frame. When securing, use the pin (pos. 9) and splint
(pos. 13).
3. Attach the internal pipe (pos. 4) to the securing frame. When securing, use the pin (pos. 10) and splint
(pos. 13).
Attention! Depending on the length of the ATV, choose a length that is suitable for the pipe. Take into account
the fact that the securing frame on the snow blower is attached to the towing hook.

9
Attention! Depending on the location of the towing hook, choose securing
holes that match the height of the bolts. Take into account the fact that the
securing frame should run parallel to the bottom of the ATV.
4. Install the rear pipe (pos. 5) and secure it with the pin (pos. 10) and splint (pos. 13).
5. Install the interim adapter (pos. 6) and secure with the pin (pos. 11) and splint (pos. 13).
6. Install the driving head (pos. 7). Use the pin (pos. 12), splint (pos. 13), the M10 x 75 bolt, the 10
washers, and the M10 Nyloc nut.
7. Attach the snow blower to the towing hook. Lift the securing frame and secure its position with the pin.

10
8. Secure the snow blower to the ATV with chains. Find out a suitable length for the chain, place the
towing hook behind the front suspension handle, and tighten firmly.
9. Attach the winch rope to lift the snow blower. Remove the roller, secure the hook behind the eyelet and
position the roller in such a way that the winch rope will be able to start moving on it.
Attention!
Avoid the wheels colliding!
Make sure that the minimum distance between
the support wheels on the snow blower and the
front wheels on the ATV is set at 150mm
Attention!
The snow blower should be centred in relation to
the ATV!

11
10. Secure the control panel to the securing frame. Use 28mm U-clips, 8 washers, and M8 butterfly nuts.
11. Connect the cables. Connect the red wire to the “+” terminal and the black wire to the “-” terminal on
the battery.
Attention!
Make sure that the control panel does not
interfere with the ATV’s steering.
Find a location for the control panel which
allows free and easy access to the joystick
and stop button.
Attention!
Make sure that the cables do not get under the wheels or any other moving parts and that they do not pose a
risk of danger in any other way.

12
OPERATION
PREPARATION
1. Examine the planned operating area carefully and remove doormats, foreign objects, etc.
2. Never use the accessory unless you are wearing proper winter overalls. Avoid loose clothing that might
become entangled with moving parts. Wear appropriate footwear that helps to avoid slipping.
3. Handle fuel with caution as this is highly flammable.
a. Use an appropriate fuel container.
b. Never fill the equipment when the engine is running or is hot.
c. Fill the fuel tank outdoors and ensure that you are extremely careful. Never fill the fuel tank
indoors.
d. Never fill plastic-lined containers while they are in the vehicle or on a carrier or trailer. Always
place the container on the ground away from the vehicle before filling.
e. If possible, remove any equipment which has a petrol engine from the carrier or trailer and fill
it up while it is on the ground. If this is not possible, then fill such equipment from a mobile
container, and not from the nozzle of a petrol pump.
f. Always press the nozzle against the edge of the fuel tank or container until filling is complete.
Never use nozzle-opening equipment.
g. Replace the fuel cap firmly and clean off any fuel that may have been spilled.
h. Change your clothing if any fuel has been spilled on it.
4. Never attempt to carry out any adjustments when the engine is running (unless directly recommended
by the manufacturer).
5. Allow the vehicle and snow blower to acclimatise to the ambient temperature before use.
6. Never use the snow blower unless the covers, plates or any other required safety equipment has been
installed.
7. Always use the protective equipment that has been designed for each type of product (goggles,
earmuffs, mask, and so on).
8. The safe road-steadiness of the vehicle should always be ensured by using the appropriate accessories
(chains, counterbalances, etc).
9. Always make sure that every component is correctly installed (including that the driving system is
firmly in place and fastened at both ends, and that belts have been correctly installed).
10. Always wear thick leather gloves when handling the winch rope.
11. Never modify the accessories or any other parts without the written approval of the manufacturer.
OPERATION
1. Never place your hands or feet near, under, or in the rotating parts.
2. When working on gravel roads, walkways or carriageways, or when crossing them, be extremely
careful. Consider possible traffic hazards. Never give a ride to passengers.
3. Following a collision with a foreign object, stop the engine, disconnect the wires and make sure that
an accidental start is impossible. Examine the snow blower thoroughly to locate any possible damage
and repair that damage before any restart.
4. If the equipment starts vibrating in an excessive manner, stop the engine and immediately locate the
cause. As a rule, the presence of vibration is a general indicator that there is a problem.
5. When leaving the vehicle, apply every safety measure possible. Stop the snow blower’s engine and
lower it to the operating position, set the gears to the neutral position, set the parking brake, stop the
ATV’s engine, and remove the ignition key.
Attention!
Ensure that the user’s manual for the vehicle
(ATV) is thoroughly read before using the
snow blower!
Attention!
Ensure that the user’s manual for the engine
is thoroughly read before using the snow
blower!

13
6. Never start the engine indoors, except when moving the equipment in or out of a building. Never
allow the engine to work in a warehouse that does not have ventilation, as petrol contains carbon
monoxide, which is odourless, colourless, and which may cause death.
7. Never use the snow blower when moving along or up a slope; only do so when moving down a slope.
Be extremely careful when using the equipment on slopes. Never attempt to clean a steep slope.
8. Keep bystanders away from the operating area. Never point the ejection pipe at bystanders, as this
may eject gravel or litter that might injure people or cause material damage.
9. Never use the equipment at high speeds on a slippery surface. Be careful when backing up.
10. Never give a ride to passengers.
11. Switch the snow blower’s engine off while the blower is being moved or is inoperative.
12. Never use the snow blower unless visibility and lighting levels are sufficient.
13. Keep the snow blower away from heaters or open flames.
14. Never handle the winch rope or hook when they are tense.
TRANSPORTATION POSITION AND OPERATING POSITION
Use the ATV’s winch to change the snow blower’s operating position. By pulling on the rope, you will be able
to lift the snow blower into the transportation position, and by releasing the rope, you will lower the snow
blower into the operating position.
Transport position Operating position
HEIGHT ADJUSTMENT
In order to adjust the operating height of the snow blower, release the bolts that secure the skis, find a suitable
position, and tighten the bolts firmly.
Attention! When adjusting the height, make sure that the snow blower is parallel to the ground!
Attention!
Be careful when handling
the winch! Never attempt to
use it to lift the snow blower
into its final position, as this
may cause the winch to
break!

14
CONTROL PANEL
Joystick - use to adjust the position of the ejection pipe.
The “STOP” switch - use this to stop the snow blower’s engine. The LED on the switch indicates the presence of
power in the system.
OPERATION
1. Place the snow blower into the operating position.
2. Make sure that the operation of the fan or any other moving parts is not hindered.
3. Start the snow blower’s engine and set it to maximum power.
4. Adjust the ejection pipe to ensure that it is in a suitable position.
5. Commence operation. Choose an operating speed that is suitable for the conditions. Take into account
the fact that the snow blower’s engine operates at 75%-100% of full power. When moving the snow
blower too fast, the engine will be unable to eject the snow, the shaft’s rotational speed will be slowed,
and this will cause the belt or clutch to wear.
6. When moving from one location to another, lift the snow blower into the transportation position. Make
sure that you have enough room to be able to move around and that you do not endanger anyone.
7. Stop the engine by using the “STOP” button when the work has been completed.
Attention!
Never attempt to turn the
ejection pipe when it
becomes stuck or when it is
already in its final position,
as this will cause the fuse to
burnout!
Attention!
Use the “STOP” switch to
stop the engine when there is
the presence of any danger!
Attention!
Never drive faster than 10km/h when in the transportation
position.
Never work on a slope that has an inclination of over 10%.
Never drive faster than 3km/h when in the operating
position.
Attention!
Never use the snow blower as a plough to
push snow aside. When the speed of the
vehicle is too high, it may overload and
jam the snow blower.

15
MAINTENANCE
MAINTENANCE SCHEDULE
Maintenance schedule
Maintenance action:
Once a hour
Once a day
Once a week
Seasonally
Engine (see the engine manufacturer’s user manual)
●
●
●
●
Cleaning rotor and impeller
●
●
●
●
Cleaning ejection pipe
●
●
●
●
Visual examination of connections for parts
●
●
●
Greasing ejection pipe and wheel connections
●
●
Checking tyre pressure
●
●
Checking drive belts
●
●
Checking rotor bearings
●
●
Checking wheel bearings
●
●
Checking the condition of all connecting parts
●
●
Checking safety stickers
●
●
Checking safety parts
●
●
Checking oil level for speed changer
●
Checking wear on metal parts
●
Checking wear/operating condition of clutch
●
ENGINE MAINTENANCE
Maintain the engine as per the instructions given in the engine’s user manual.
CHECKING THE SECURING BOLTS
Regularly check the tightness of the securing bolts in order to avoid costly repairs. Make sure that the snow
blower is in a safe operating condition.
TYRE PRESSURE
Check tyre pressure and adjust it to the level of 50psi. Tyre pressure should be equal on both wheels.
BLADE MAINTENANCE
Check blade wear from time to time. The cutting edge can be turned over. Unscrew the bolts and turn the blade
over.
Attention!
If the snow blower is in the transportation
position, firmly support it so that
maintenance work can be carried out.
Attention!
Before carrying out any maintenance work, or any assembly
or disassembly of the snow blower:
- switch off the snow blower,
- lower the snow blower to the ground,
- set the parking brake,
- stop the vehicle’s engine and remove the ignition key,
- make sure that every moving part has stopped,
- never clean the chute with your hand; always use the
appropriate tools.

16
GREASING
WHEELS:
Grease the wheel axes and rotating axes every sixteen operating hours.
Apply oil to every rotating point.
EJECTION PIPE:
Grease the connections on the ejection pipe every sixteen operating hours.
SPEED CHANGER:
Check oil once per year. Add AGMA 4 EP or SAE 90 oil as required.
There should be 275ml of oil in the gearbox or it should be filled up to the rim of the bolt hole when mounted on
the snow blower.
PROTECTIVE BOLTS
Regularly check the condition of the protective bolts, and replace the bolts with new ones as required. Use M6 x
50 (DIN 931) bolts, M8 x 50 (DIN 931) bolts, M6 Nyloc (DIN 985) nuts, and M8 Nyloc (DIN 985) nuts.
Attention!
The protective bolts are designed as a
preventive measure, but one that will not
ensure full protection. The user should be
careful. Check the operating area around the
snow blower and remove any foreign objects.

17
BELT REPLACEMENT
Regularly check the condition of the belt, and replace it as required. Use a B1430 V-belt.
1. Loosen the bolts and remove the cover.
2. Remove the securing bolt.
3. Lift the handle. Replace the belt.
4. Push the handle into the lower position.
5. Insert the securing bolt.
6. Replace the hood and tighten it with the bolts.
ELECTRIC FUSE
The electric fuse is designed to protect the electrical system. Only use the correct fuse for the power output
available. Using more powerful fuses may cause the electrical system to burnout!
Attention!
The electric fuse is designed to protect the
electrical system. Only use the correct fuse
for the power output available. Using more
powerful fuses may cause the electrical
system to burnout!

18
STORAGE
UNASSEMBLING THE EQUIPMENT
1. Place the vehicle on an even surface, set the parking brake, stop the engine, and remove the ignition key
in order to avoid an accidental start.
2. Lower the accessory to the ground.
3. Disconnect electrical wires.
4. Unhook the winch hook and remove the winch rope.
5. Unhook the tension adjusters at the front of the vehicle and the hooking equipment at the rear of the
vehicle.
6. Remove the vehicle.
STORAGE
1. Clean the snow blower and base frame thoroughly.
2. Paint all parts where the paint is worn.
3. Mark all parts that are to be replaced in the next season.
4. Follow the instructions given in the chapter concerning greasing.
5. Follow the instructions given in the engine’s user manual.
6. Store the snow blower and base frame in a dry place.

19
KINNITUSRAAM / SUBFRAME
Kood / Code 30.1.00.00
Pos.
Nimetus / Description
Kood
Code
Kogus
Amount
1
Sisemine pikitala / Internal beam
30.1.00.01
1
2
Kinnitusraami koost / Assembly for subframe
30.1.01.00
1
3
Pikitala koost / Assembly for beam
30.1.02.00
1
4
Tagumise karbiku koost / Assembly for rear box frame
30.1.03.00
1
5
Veopea koost / Drive head
30.1.04.00
1
6
Haakepea tapp d10 / Joggle for tach head
30.1.05.00
1
7
Kinnitusraami tapp / Spindle for subframe d12
30.1.06.00
2
8
Kinnitusraami toru tapp / Spindle for subframe d12
30.1.07.00
1
9
Veopea kinnitusplaadi koost / Assembly for drive head plate
30.1.08.00
1
10
Kett / Chain 6 mm
2
11
Nylock mutter / Nylock nut M10
DIN 985
15
12
Nylock mutter / Nylock nut M8
DIN 985
4
13
Nõelsplint / Cotter pin 3mm
DIN 11024
4
14
Polt / Bolt M10x75
DIN 931
1
15
Polt / Bolt M10x20
DIN 933
2
16
Polt / Bolt M10x25
DIN 933
12
17
Polt / Bolt M8x25
DIN 933
2
18
Polt / Bolt M8x30
DIN 933
2
19
Seib 10 / Washer 10
DIN 125
30
20
Seib 8 / Washer 8
DIN 9021
4
21
Pöördratas / Pivoting wheel 250 mm
2
22
Tõmmits / Puller 10 mm
2
23
Veopea / Drive head
1

20
PUHUR / BLOWER
Kood / Code 30.2.00.00
Pos.
Nimetus / Description
Kood
Code
Kogus
Amount
1
Rihmülekande kate küljele / Side cover for belt drive
30.2.00.04
2
2
Taldmikud / Skid shoes
30.2.00.06
2
3
Tera / Scraper
30.2.00.07
1
4
Toru liugelaager / Sleeve bearing for chute
30.2.00.09
1
5
Vintsi trossiratas / Rope sheave for winch
30.2.00.10
1
6
Pööramisajami koost / Assembly for turning gear
30.2.04.00
1
7
Rihma katte koost / Assembly for belt cover
30.2.05.00
1
8
Peaajami koost / Assembly for main gear
30.2a.00.00
1
9
Väljavisketoru / Outlet pipe
30.2b.00.00
1
10
Nylock mutter / Nylock nut M6
DIN 985
10
11
Nylock mutter / Nylock nut M8
DIN 985
10
12
Nõelsplint / Cotter pin 3mm
DIN 11024
1
13
Polt / Bolt M6x16
DIN 603
2
14
Polt / Bolt M8x20
DIN 603
10
15
Polt / Bolt M6x12
DIN 933
3
16
Polt / Bolt M6x16
DIN 933
8
17
Seib 6 / Washer 6
DIN 125
2
18
Seib 6 / Washer 6
DIN 9021
19
19
Seib 8 / Washer 8
DIN 9021
10
20
Tapp / Spindle 10x30
ISO 2341
1
Table of contents