LIBERTY AV SOLUTIONS DigitaLinx DL-USB-PTZ10-W User manual
11675 Ridgeline Drive
Colorado Springs, CO
V 1.0
Phone: 719-260-0061
Toll-Free: 800-530-8998
Fax: 719-260-0075
Full HD PTZ Camera Quick Guide
DL-USB-PTZ10-W

DL-USB-PTZ10-W Quick Guide
2
Liberty’s DigitaLinx USB PTZ10 Cameras are available in two dierent color options: black or white. Both
camera options share the same features and are designed to capture video for conferencing and other
applications such as streaming, webinars, distance learning, lecture capture, and personal chatting. Easy
plug-and-play; no driver is required when using software platforms such as Zoom, Teams, YouTube,
Facetime, and other messaging applications.
• Supports all Zoom Room features and has been tested to conform with the latest Zoom Certication
Program for the highest performance and ultra-reliability.
• Vivid and high resolution video with a strong sense of depth and fantastic color rendition.
• Full HD Resolution: 1/2.9 inch high quality CMOS sensor. Resolution is up to 1920x1080 with frame
rate up to 30 fps.
• Optical Zoom Lens: 10X optical zoom lens.
• Leading Auto Focus Technology: Fast, accurate, and stable auto focusing technology.
• Low Noise and High SNR: Super high SNR image is achieved with low noise CMOS. Advanced 2D/3D
noise reduction technology further reduces the noise while ensuring high image clarity.
• Control Interface: RS485, RS232 (cascade connection)
• Multiple Control Protocol: Support VISCA, PELCO-D, PELCO-P protocols; support automatic
identication protocols.
• Quiet Pan / Tilt Movement: With high accuracy step driving motor, camera can pan / tilt extremely
quiet and smooth.
• Multiple presets: Up to 255 presets (10 presets via remote control).
• Multiple Application: Online-education, lecture capture, webcasting, video conferencing,
telemedicine, unied communication, emergency command and control systems, etc.
• Choose from multiple mounting options – provided wall mount, optional ceiling mount, or use
a tripod with the included tripod thread insert.
• 5-year product warranty, including advanced replacement.
Product Overview
Package Contents
(x1) 1m
USB Cable
(x1) Quick
Start Guide
(x1) Power
Supply
(x1)
Camera
(x1) Wall
Mount
(x1) Remote
Control
(x1) Control
Cable
DL-USB-PTZ10-W Quick Guide
3
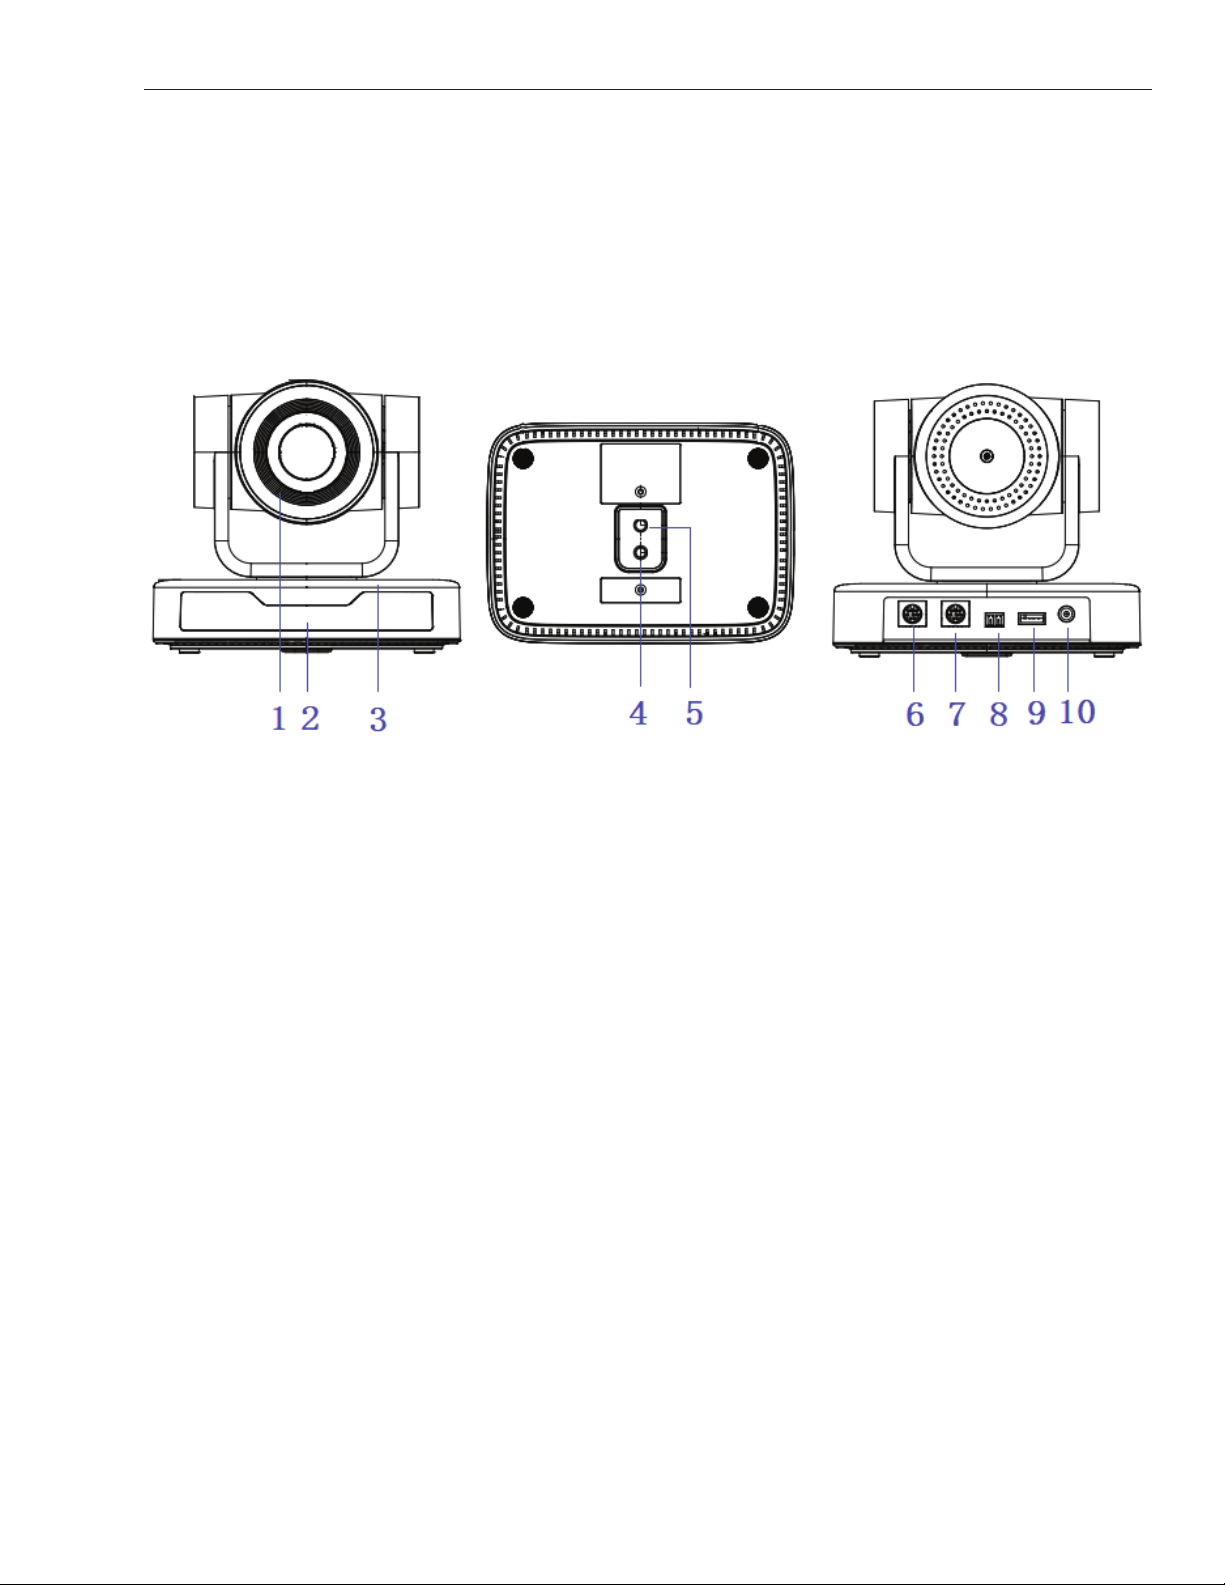
1. Camera Lens
2. Remote Control Receiving Indicator
3. Camera Base
4. Tripod Screw Hole
5. Screw Hole for Tripod
6. RS232 Control Interface (Input)
7. RS232 Control Interface (Output)
8. RS485 Input (left +, right-)
9. USB 2.0 Interface
10. DC12V Input Power Supply Socket
Product Breakdown
Front View Bottom View Rear View

DL-USB-PTZ10-W Quick Guide
4
Mounting Options
Wall mounting the camera using the provided wall mount or third party mount.
Included Items:
STEP 1 STEP 3
STEP 4 FINISHED
STEP 2

DL-USB-PTZ10-W Quick Guide
5
STEP 1
STEP 3
STEP 2
STEP 4 FINISH
*Optional Ceiling Mount
Included Items:
DL-USB-PTZ10-W Quick Guide
6
Power-on
Connect the extenral power supply to the camera.
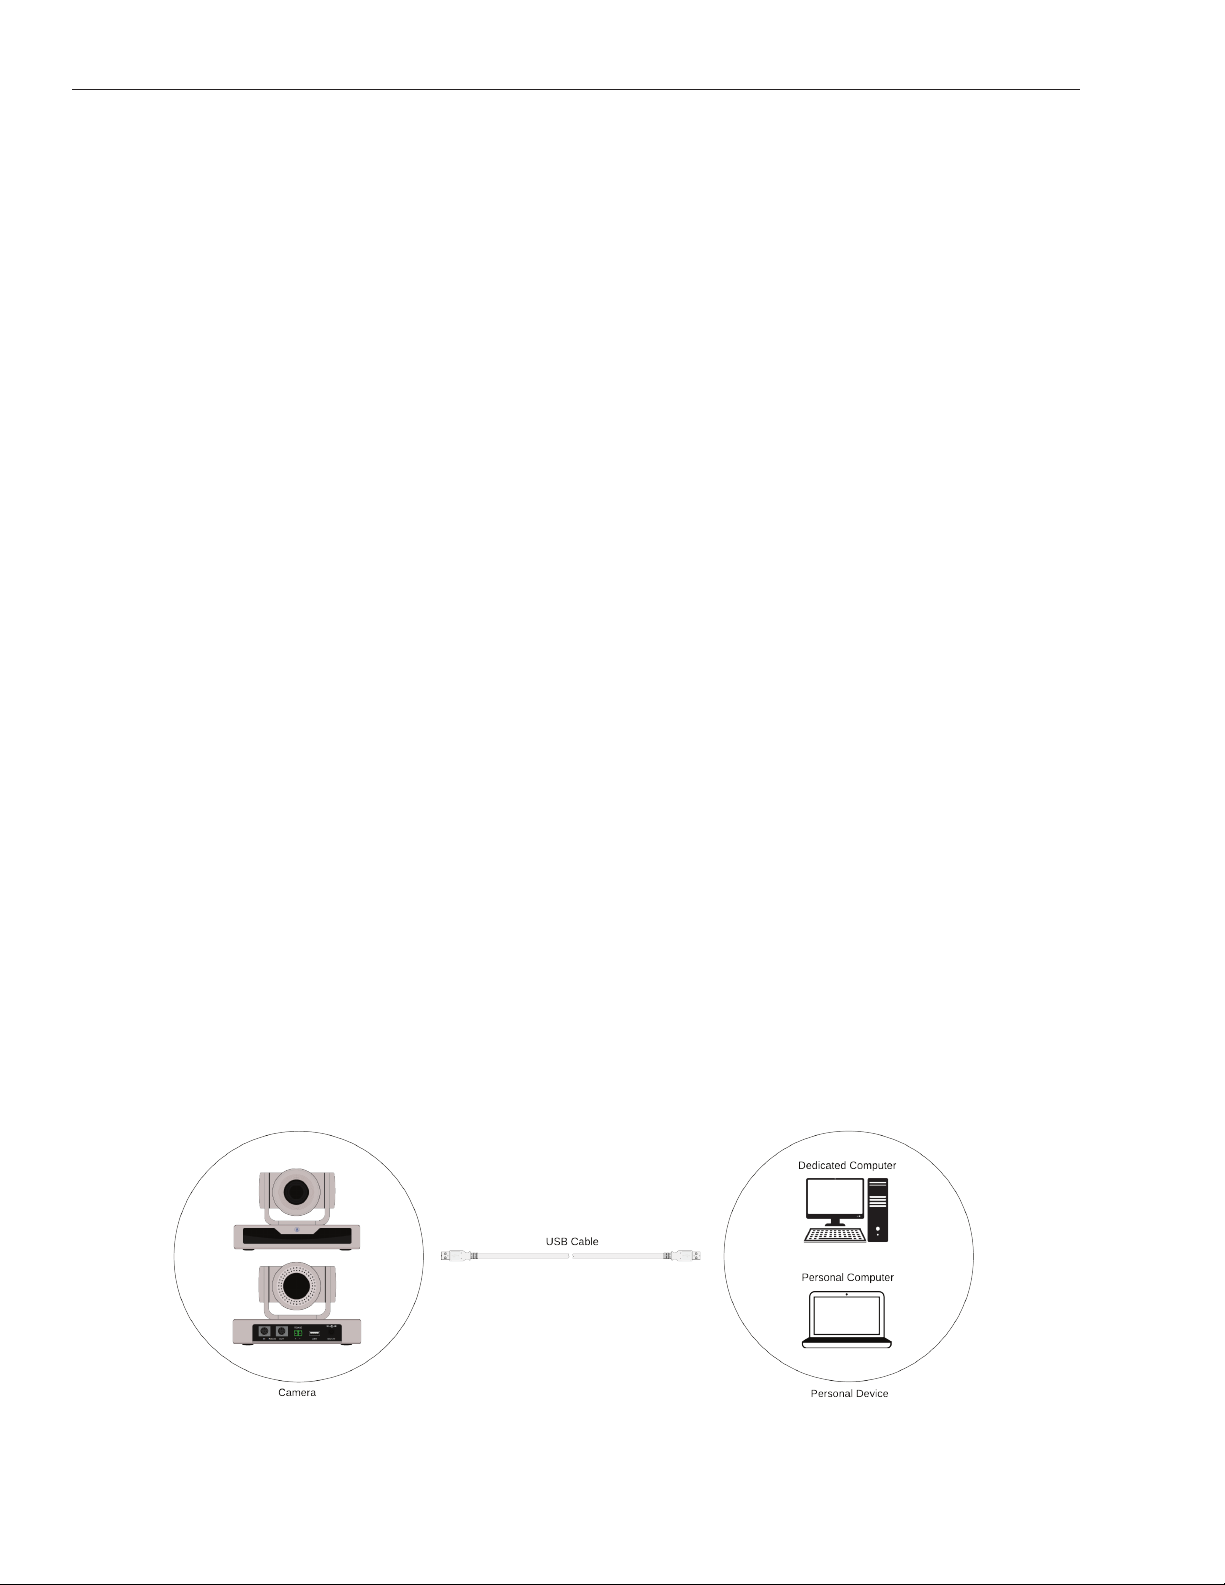
USB 2.0 cable
The provided USB 2.0 cable can provide power in addition to sending video. If the USB signal needs
to be extended, this feature may be lost and the external power supply may be needed in supplying
sucient power to the camera.
Initial Conguration
• The remote control receiving indicator will start to ash after the camera has been powered on.
• The camera will pan-tilt and then move to the HOME position (both the horizontal and vertical positions
are in the middle). When the remote control's receiving indicator stops ashing, the self-checking is
completed.
• After powering on and self-checking, the camera will automatically return to the dened preset 0.
• The default address for the IR remote control is 1#. If the menu has been restored to factory de-
faults, the remote control default address will restore to 1#.
Requirements - A computer with a USB connections
Install the video conferencing desktop client such as Zoom, Teams, Google meet onto the computer.
Note: Verify your preferred video calling application requirements.
Placement - Reference the mounting options and choose what best ts your needs.
Connectivity - Locate the Digitalinx PTZ Camera and provided USB cable. Plug the cable into the USB
port of the computer and camera. If the length of the USB cable is not long enough, use a TYPE A USB
2.0 extension cable, signal extender or USB hub.
Navigation - Go to settings>privacy>camera (or similar) on your PC and turn on “let apps use my camera.”
Close all other applications that may use the PTZ Camera.
Setting Up Your PTZ Camera

DL-USB-PTZ10-W Quick Guide
7
Maintenance and Troubleshooting
Camera Maintenance
• Power o the camera and disconnect the power adapter and socket, if it’s not used for a
long period of time.
• Use a soft cloth or tissue to clean the camera cover.
• When cleaning the camera lens, use a soft, dry cloth and wipe it gently with a mild detergent,
if needed. Do not use strong or corrosive detergents to avoid scratching the lens and aecting the
video quality.
• Do not rotate the camera head violently; otherwise, it may cause mechanical failure.
• This product should be placed on a stable desktop or other horizontal surface. Do not install the
product obliquely; otherwise, it may not display a level image.
• Ensure there are no obstacles within rotation range of the holder.
• Do not power on before completing the installation.
Troubleshooting
No video output
a. Check whether the camera power supply is connected and receiving power.
c. Check whether the bottom of the DIP switch is switched to normal operating mode.
d. Check whether the video output cable has been disconnected.
e. Check whether the camera is selected within the software.
Remote control is not working
a. Check if the batteries are installed properly and are new.
b. Check to see if the remote control address is set to 1. If the machine is set back to the factory
defaults, the remote control addresses need to be set back to 1, too.
c. Make sure the menu setting has been closed out.
Serial port is not working
a. Check whether the camera serial device protocol, baud rate, address is consistent.
b. Check whether the control cable is connected properly.
DL-USB-PTZ10-W Quick Guide
8
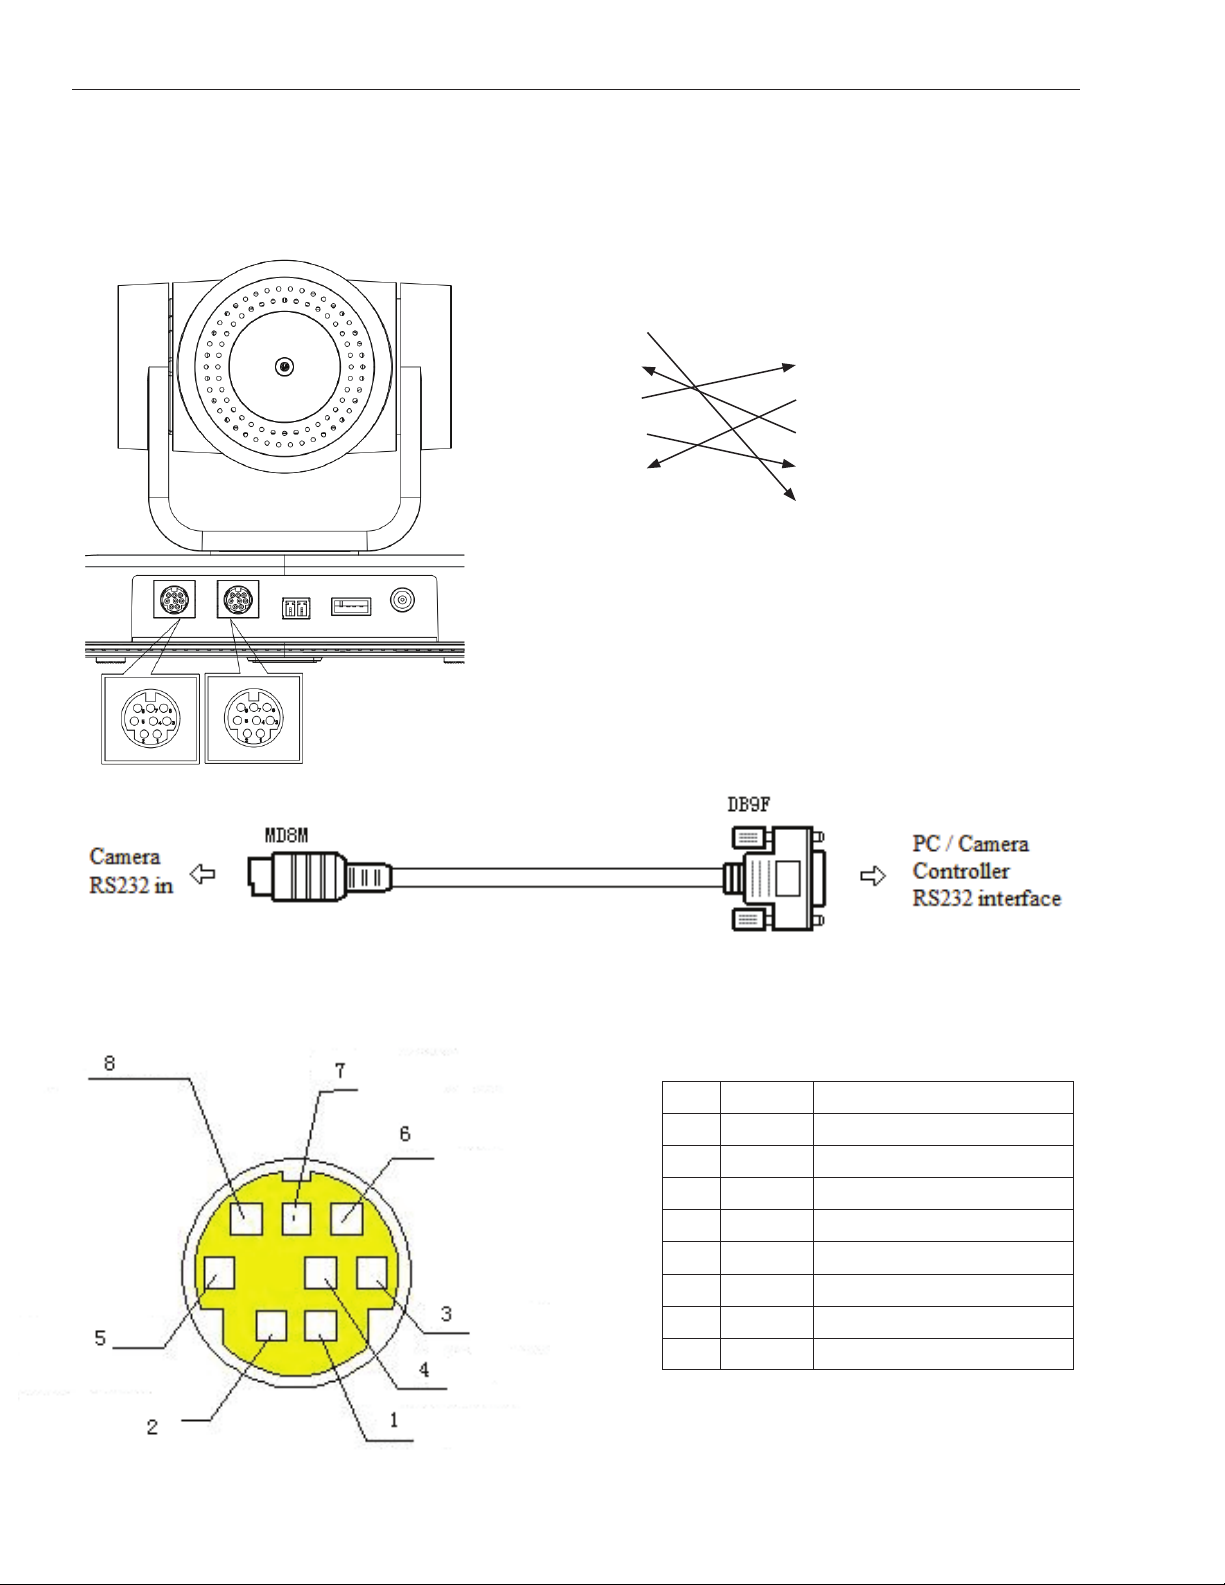
RS-232 Interface
RS-232 Mini-DIN 8-pin
Camera
1. DTR
2. DSR
3. TXD
4. GND
5. RXD
6. GND
7. IR OUT
8. NC
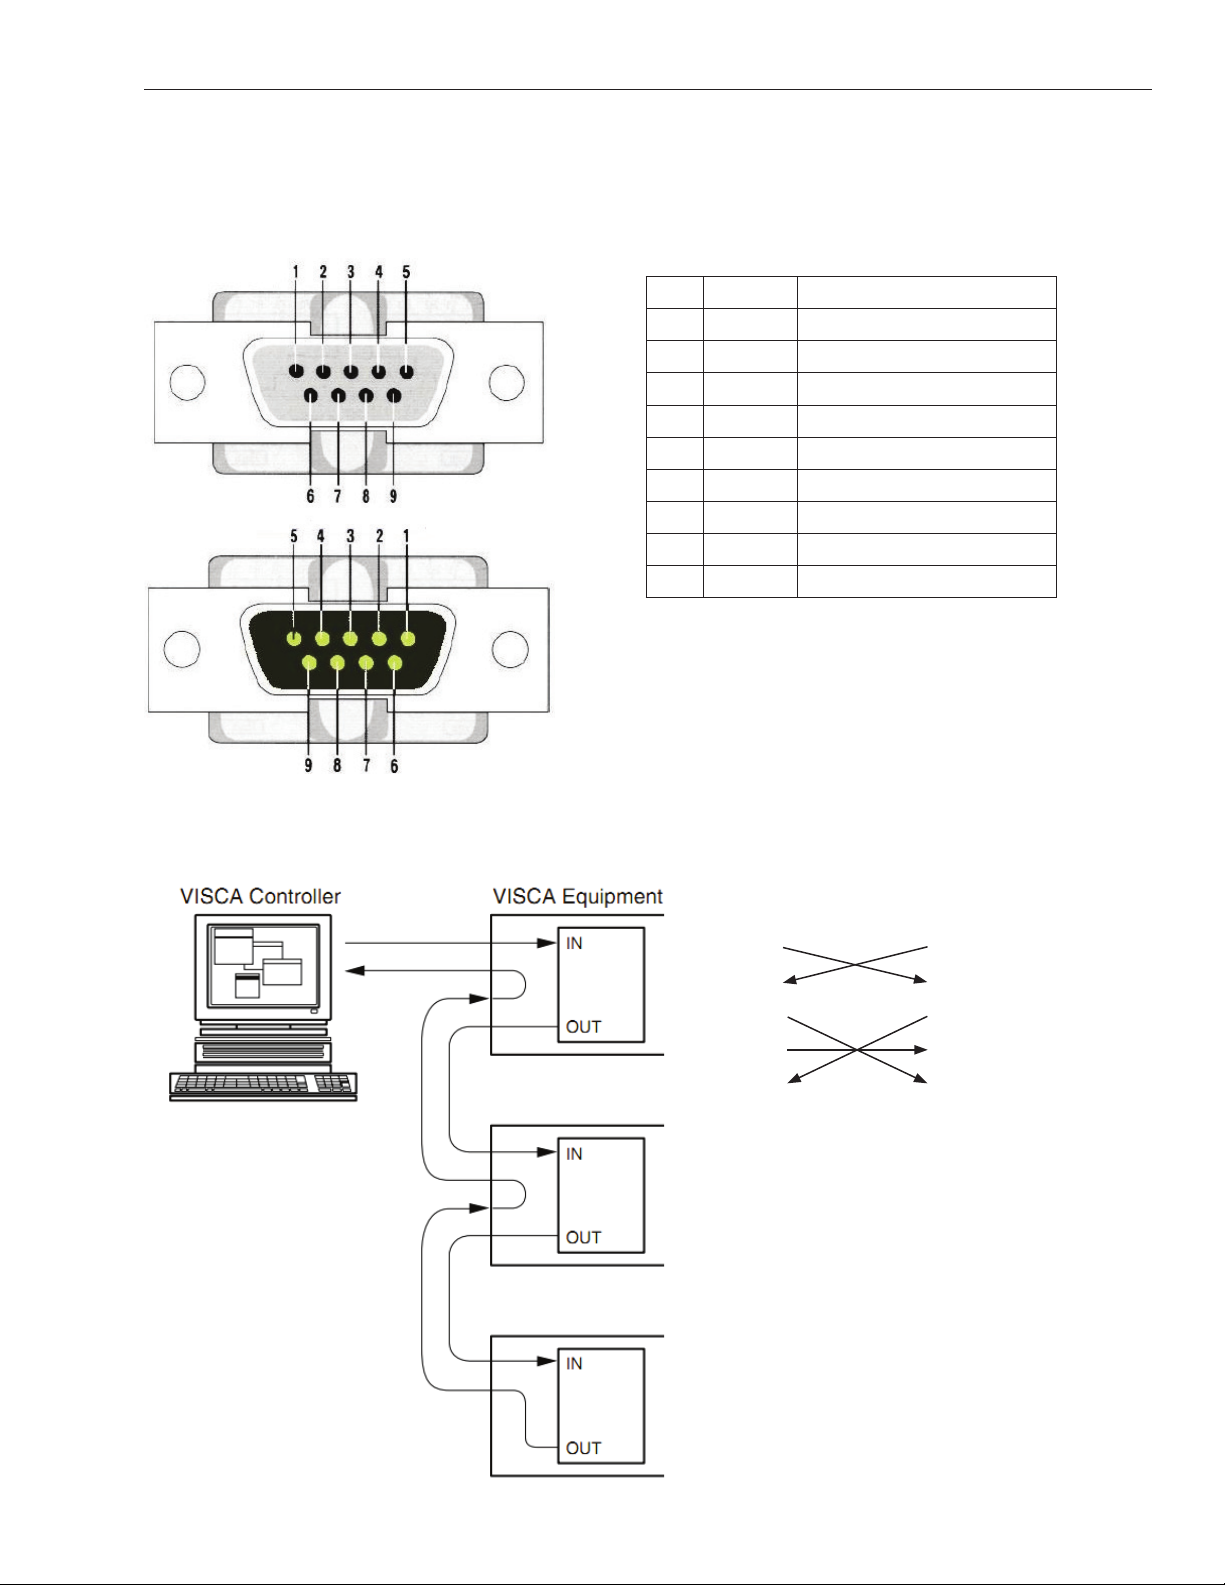
WindowsDB-9
1. DCD
2. RXD
3. TXD
4. DTR
5. GND
6. DSR
7. RTS
8. CTS
9. RI
Connection to PC or Camera Controller
No. Port Denition
1 DTR Data Terminal Ready
2 DTR Data Set Ready
3TXD Transmit Data
4GND Signal Ground
5RXD Receive Data
6 GND Signal Ground
7 IR OUT IR Commander Signal
8 NC No Connection
Control Interface Pin-Outs
DL-USB-PTZ10-W Quick Guide
9
Connection to PC or Camera Controller
No. Port Denition
1 DTR Data Terminal Ready
2 DTR Data Set Ready
3TXD Transmit Data
4GND Signal Ground
5RXD Receive Data
6 GND Signal Ground
7 IR OUT IR Commander Signal
8 NC No Connection
RS232(DB9) Port
VISCA
No. Port Denition
1 DCD Data Carrier Detect
2RXD Receive Data
3TXD Transmit Data
4DTR Data Terminal Ready
5 GND System Ground
6 DSR Data Set Ready
7 RTS Request to Send
8 CTS Clear to Send
9 RI Ring Indicator
Camera 1
1. DTR
2. DSR
3. TXD
4. GND
5. RXD
6. GND
7. IR OUT
8. NC
Camera 2
1. DTR
2. DSR
3. TXD
4. GND
5. RXD
6. GND
7. OPEN
8. OPEN
Cascading Cameras
Control Interface Pin-Outs
DL-USB-PTZ10-W Quick Guide
10
In this quick start guide, “press the key” means a click rather than a long-press, and
a special note will be given if a long-press for more than one second is required.
When a key-combination is required, do it in sequence. For example, “[*] + [#] +
[F1]” means press “[*]” rst and then press “[#]” and last press “[F1]”.
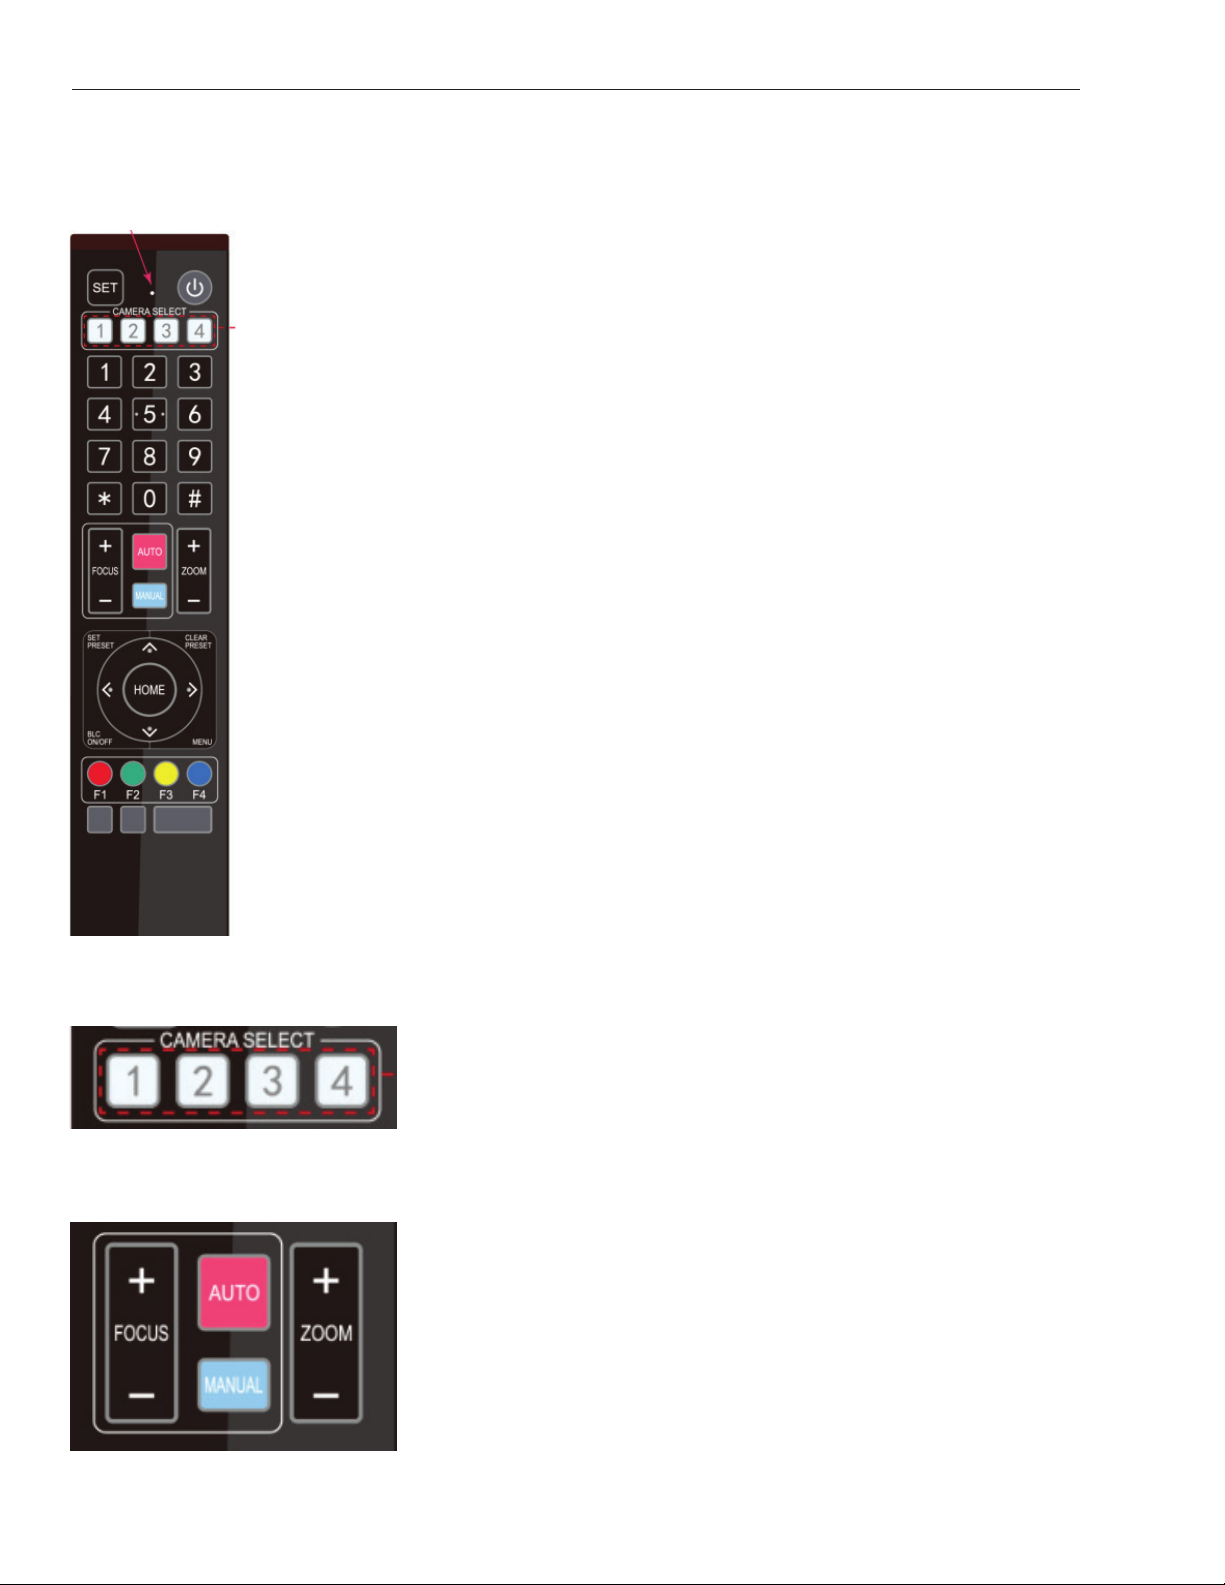
Standby Key
The camera enters standby mode if there is a long-press of 3 seconds on
standby key. Do a long-press for 3 seconds again on the standby key. The camera
will self check again and return to HOME position. (If the preset 0 position is set,
the camera will return to the preset 0 position.)
Camera Selection
Select the camera address you want to control.
Auto: auto focus mode
Manual: manual focus mode
Focus + (near): Press [FOCUS +] key
(Valid only in manual focus mode)
Focus - (far): Press [FOCUS -] key (Valid only in manual focus mode)
Press and hold the keys. The action of focus will keep continue and
stop as soon as the key is released.
Focus
Using the Remote Control
Table of contents
Other LIBERTY AV SOLUTIONS Security Camera manuals


