LIBERTY AV SOLUTIONS DL-USB-PTZ20-W User manual

www.libav.com 800.530.8998
QUICK GUIDE
FULL HD PTZ CAMERA
DL-USB-PTZ20-W
V 1.0

2QUICK GUIDE / DL-USB-PTZ20-W
Liberty’s USB PTZ20 Camera is a fully featured, broadcast quality PTZ camera, featuring advanced
ISP processing algorithms, oering vivid and high resolution video with a strong sense of depth and
fantastic color rendition, and supporting simultaneous video outputs. It's designed to capture video for
conferencing and other applications such as streaming, webinars, distance learning, lecture capture,
and personal chatting. Easy plug-and-play; no driver is required when using software platforms such as
Zoom, Teams, YouTube, Facetime, and other messaging applications. Full HD 1920x1080 video quality
@ 60 fps.
• Supports all Zoom Room features and has been tested to conform with the latest Zoom Certication
Program for the highest performance and ultra-reliability.
• Mounting: built in gravity sensor, supporting autoip.
• Vivid and high resolution video with a strong sense of depth and fantastic color rendition.
• Full HD Resolution: 1/2.8 inch high quality CMOS sensor. Resolution up to 1920x1080 with frame rate
up to 60 fps.
• Optical Zoom Lens: 20X optical zoom lens.
• Leading Auto Focus Technology: Fast, accurate, and stable auto focusing technology.
• Low Noise and High SNR: Super high SNR image is achieved with low noise CMOS. Advanced 2D/3D
noise reduction technology further reduces the noise while ensuring high image clarity.
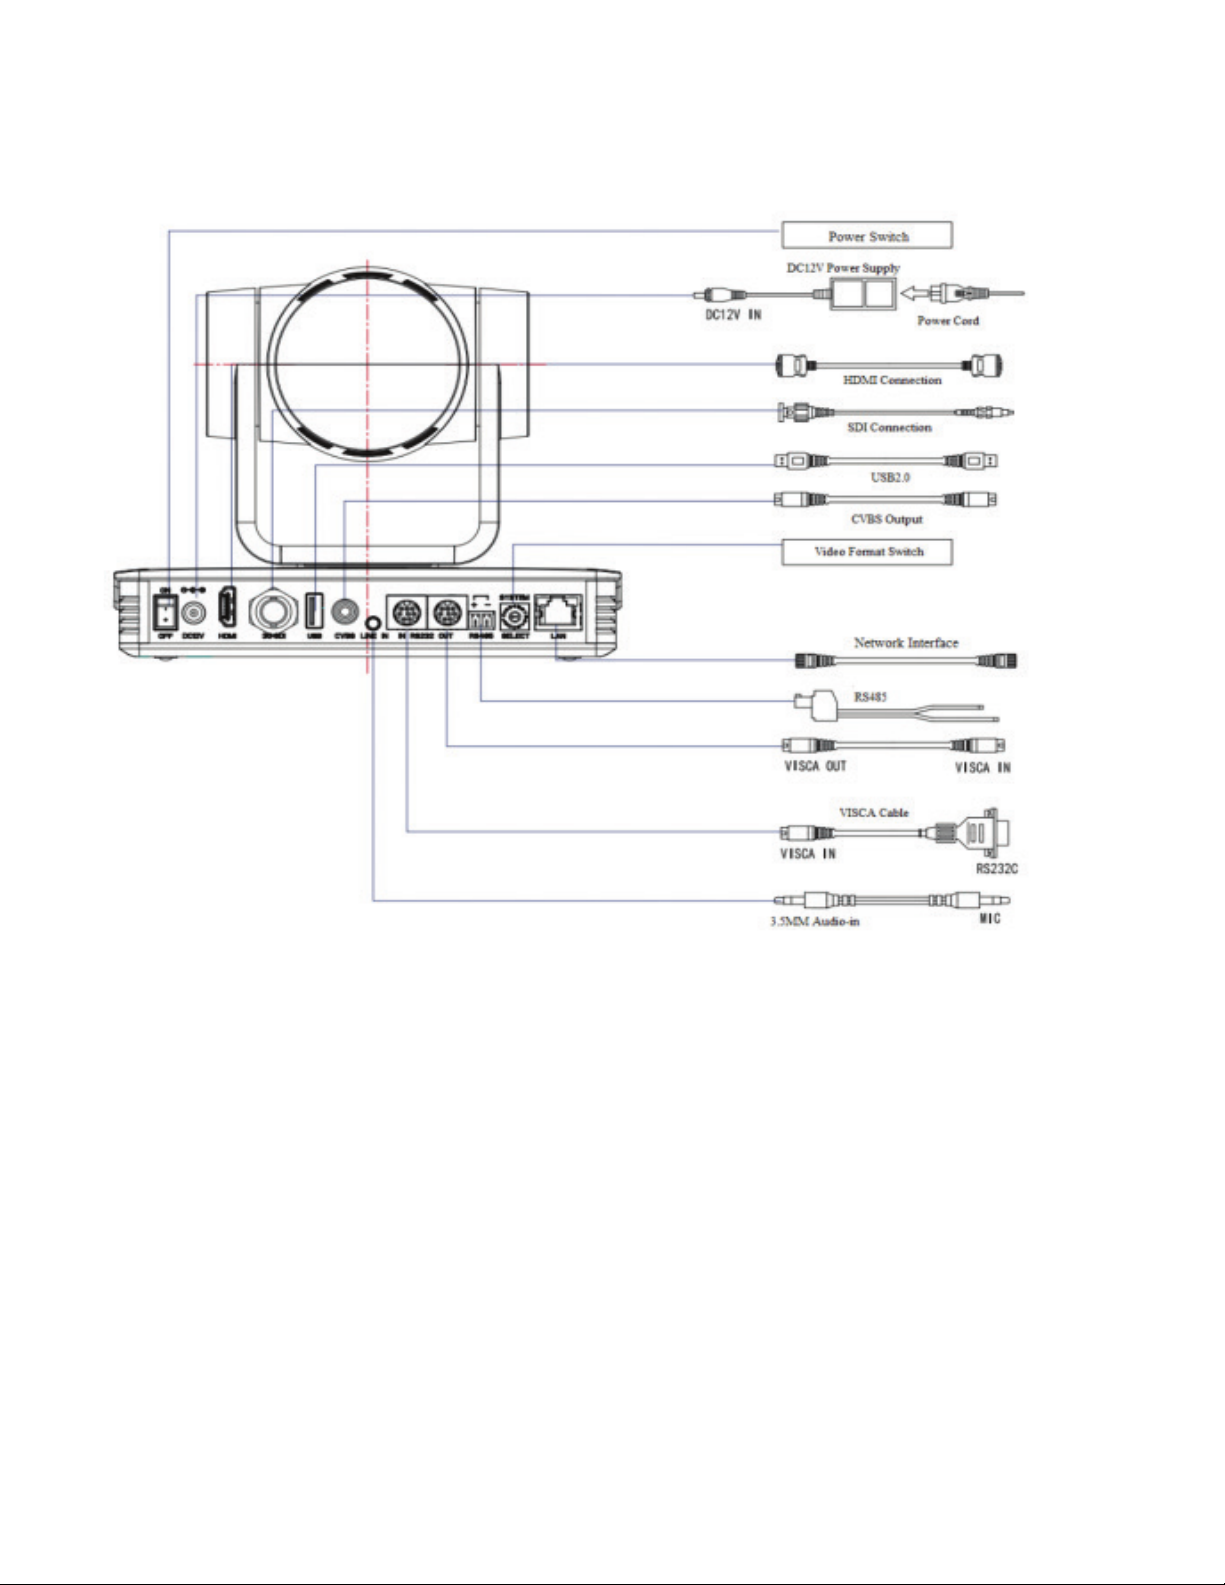
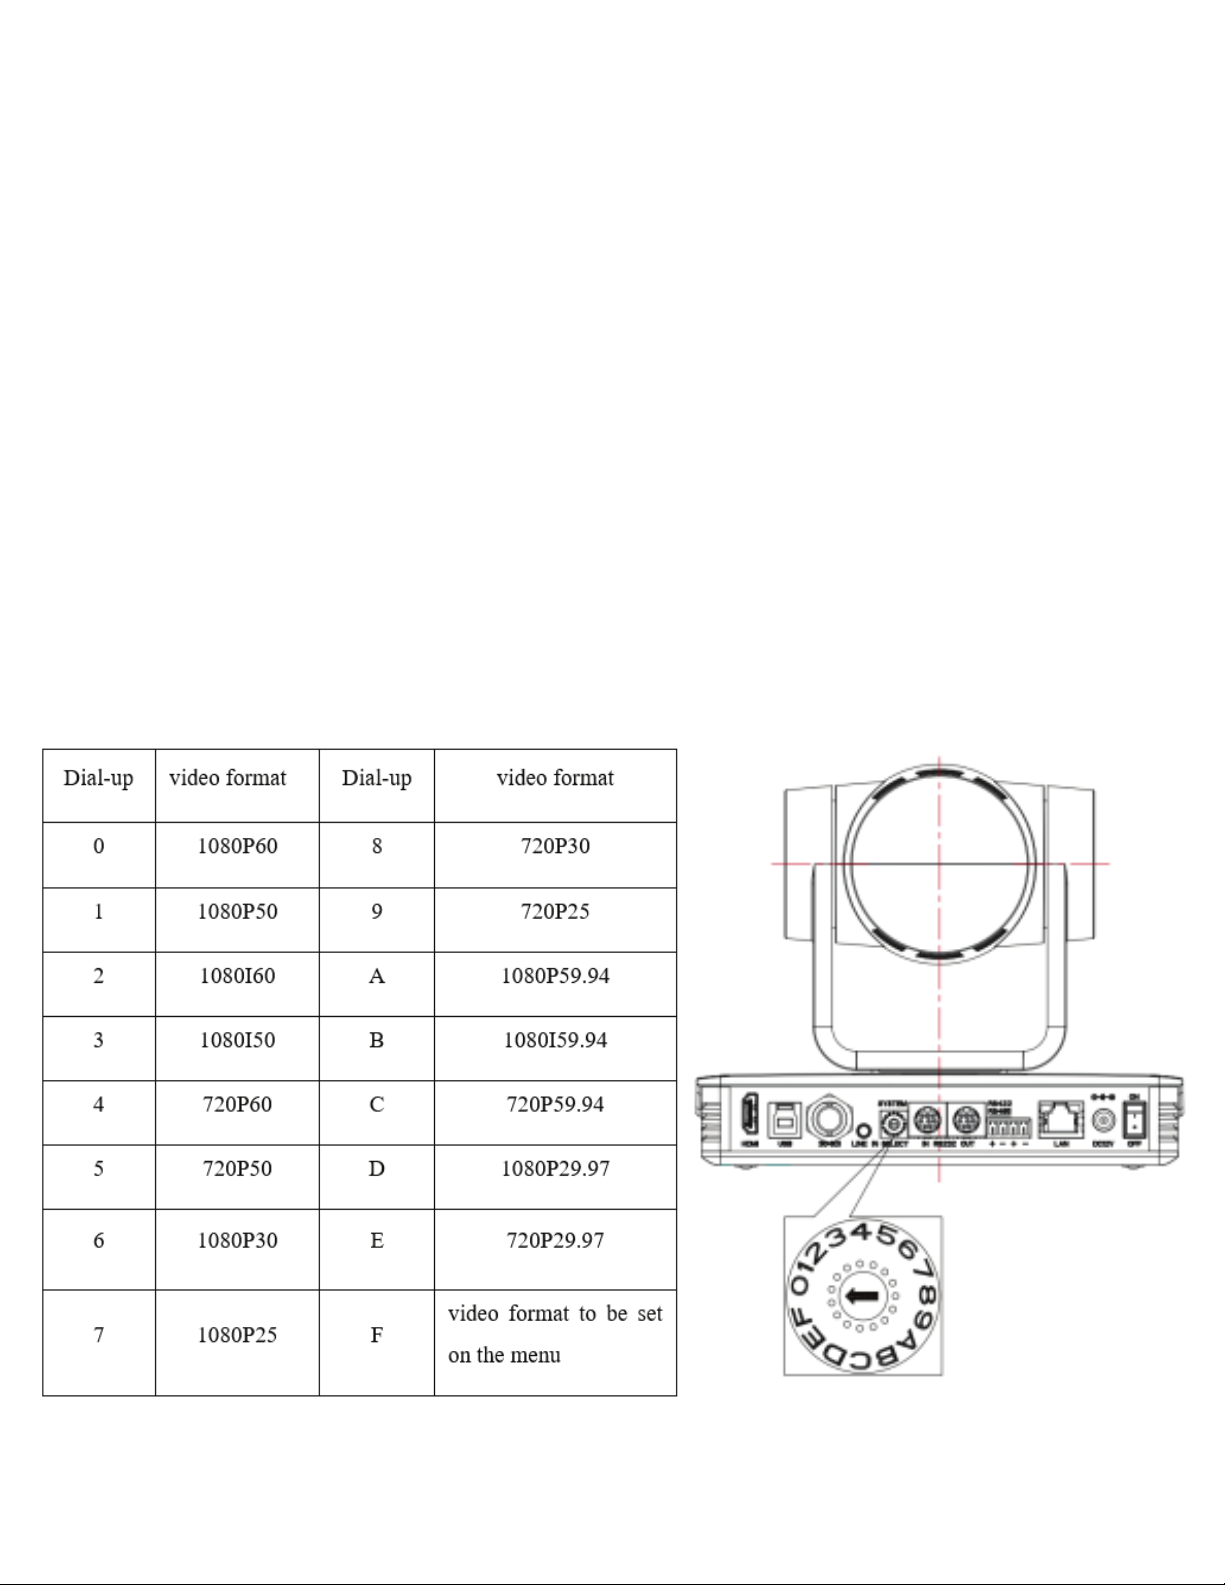
• Multiple video outputs: HDMI, 3G-SDI, CVBS, LAN. Simultaneously output audio and video signal via
HDMI, SDI and LAN. SDI output can be sent up to 100M with 1080P@60fps.
• Multiple AV compression standards: Support H.264/H.265 video compression, up to 1920×1080
resolution 60 fps; support AAC, MP3 and G.711A audio compression, 8000,16000,32000,44100,48000
sampling frequency.
• Control Interface: RS485, RS232 (cascade connection)
• Multiple Control Protocol: Support VISCA, PELCO-D, PELCO-P protocols; support automatic
identication protocols.
• Multiple Network Protocol: support ONVIF, GB/T28181, RTSP, RTMP protocols; Support RTMP push
mode easy to be connected to streaming server (Wowza,FMS); Support RTP multicast mode; Support
network full command VISCA control protocol.
• Quiet Pan / Tilt Movement: With high accuracy step driving motor, camera can pan / tilt extremely
quiet and smooth.
• Multiple presets: Up to 255 presets (10 presets via remote control).
• Multiple Application: Online-education, lecture capture, webcasting, video conferencing,
telemedicine, unied communication, emergency command and control systems, etc.
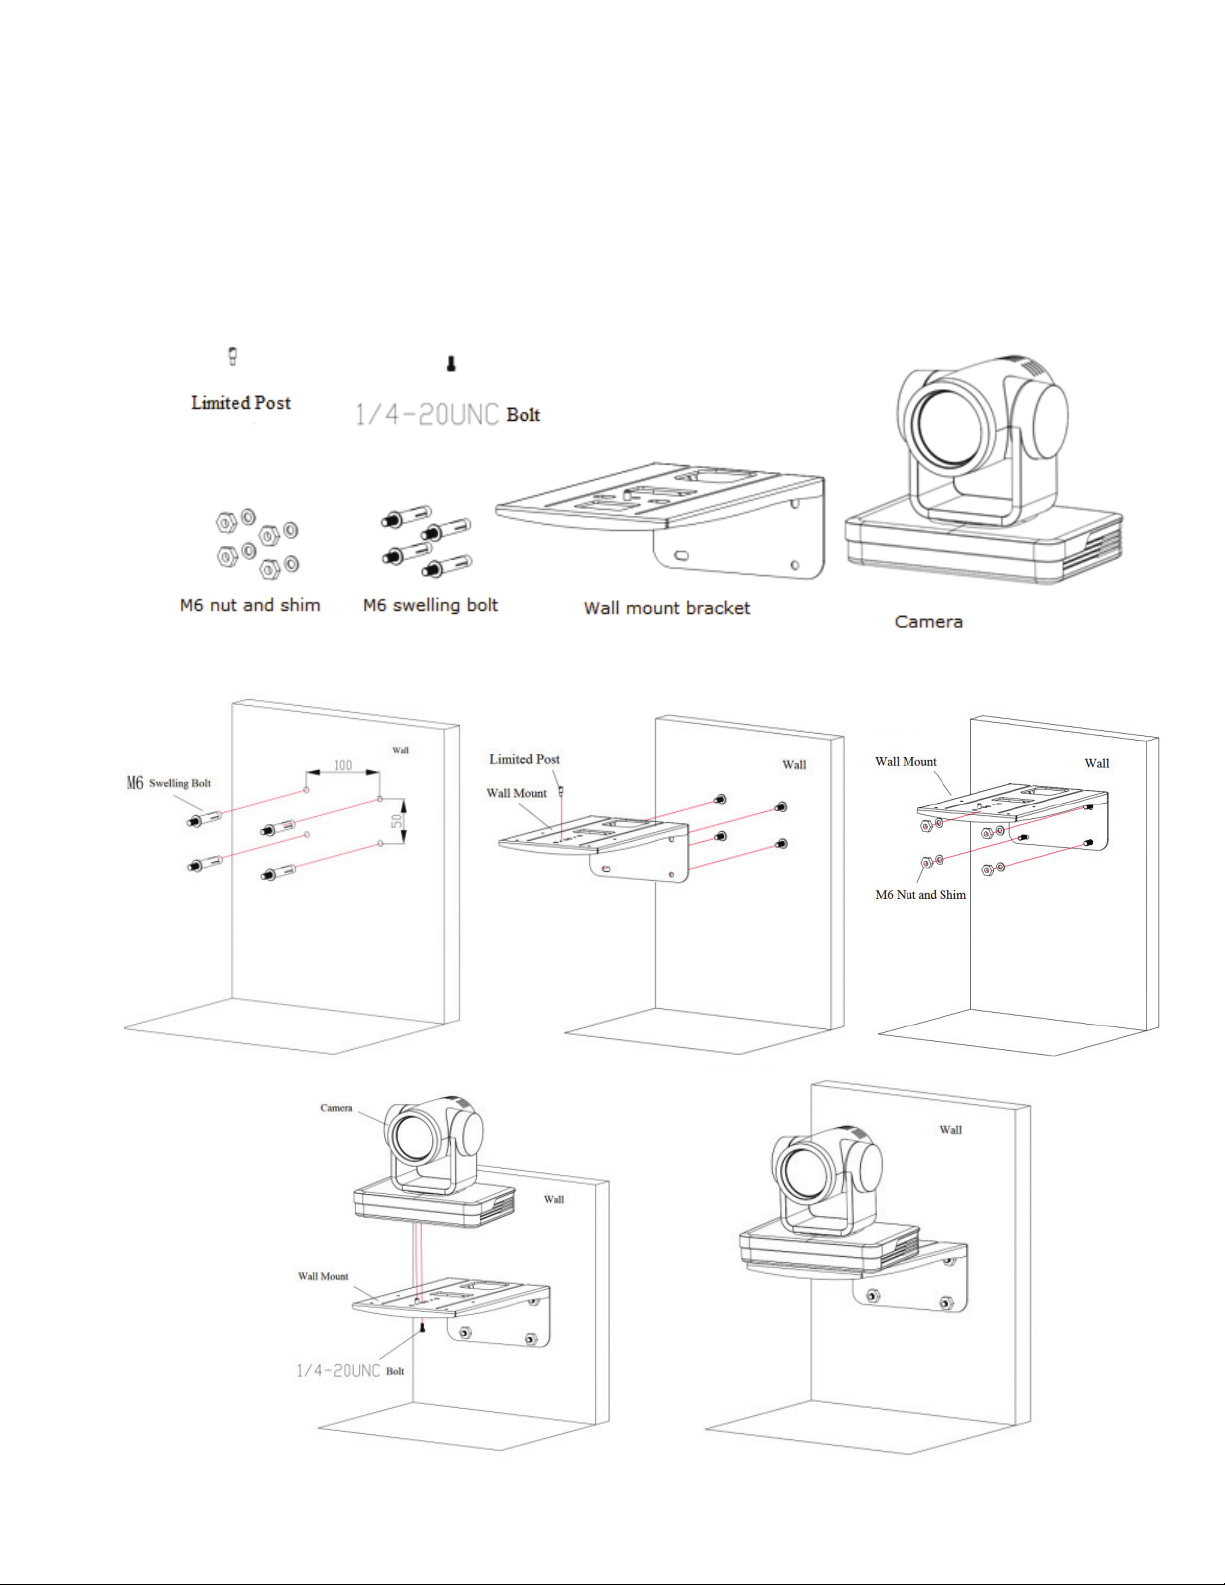
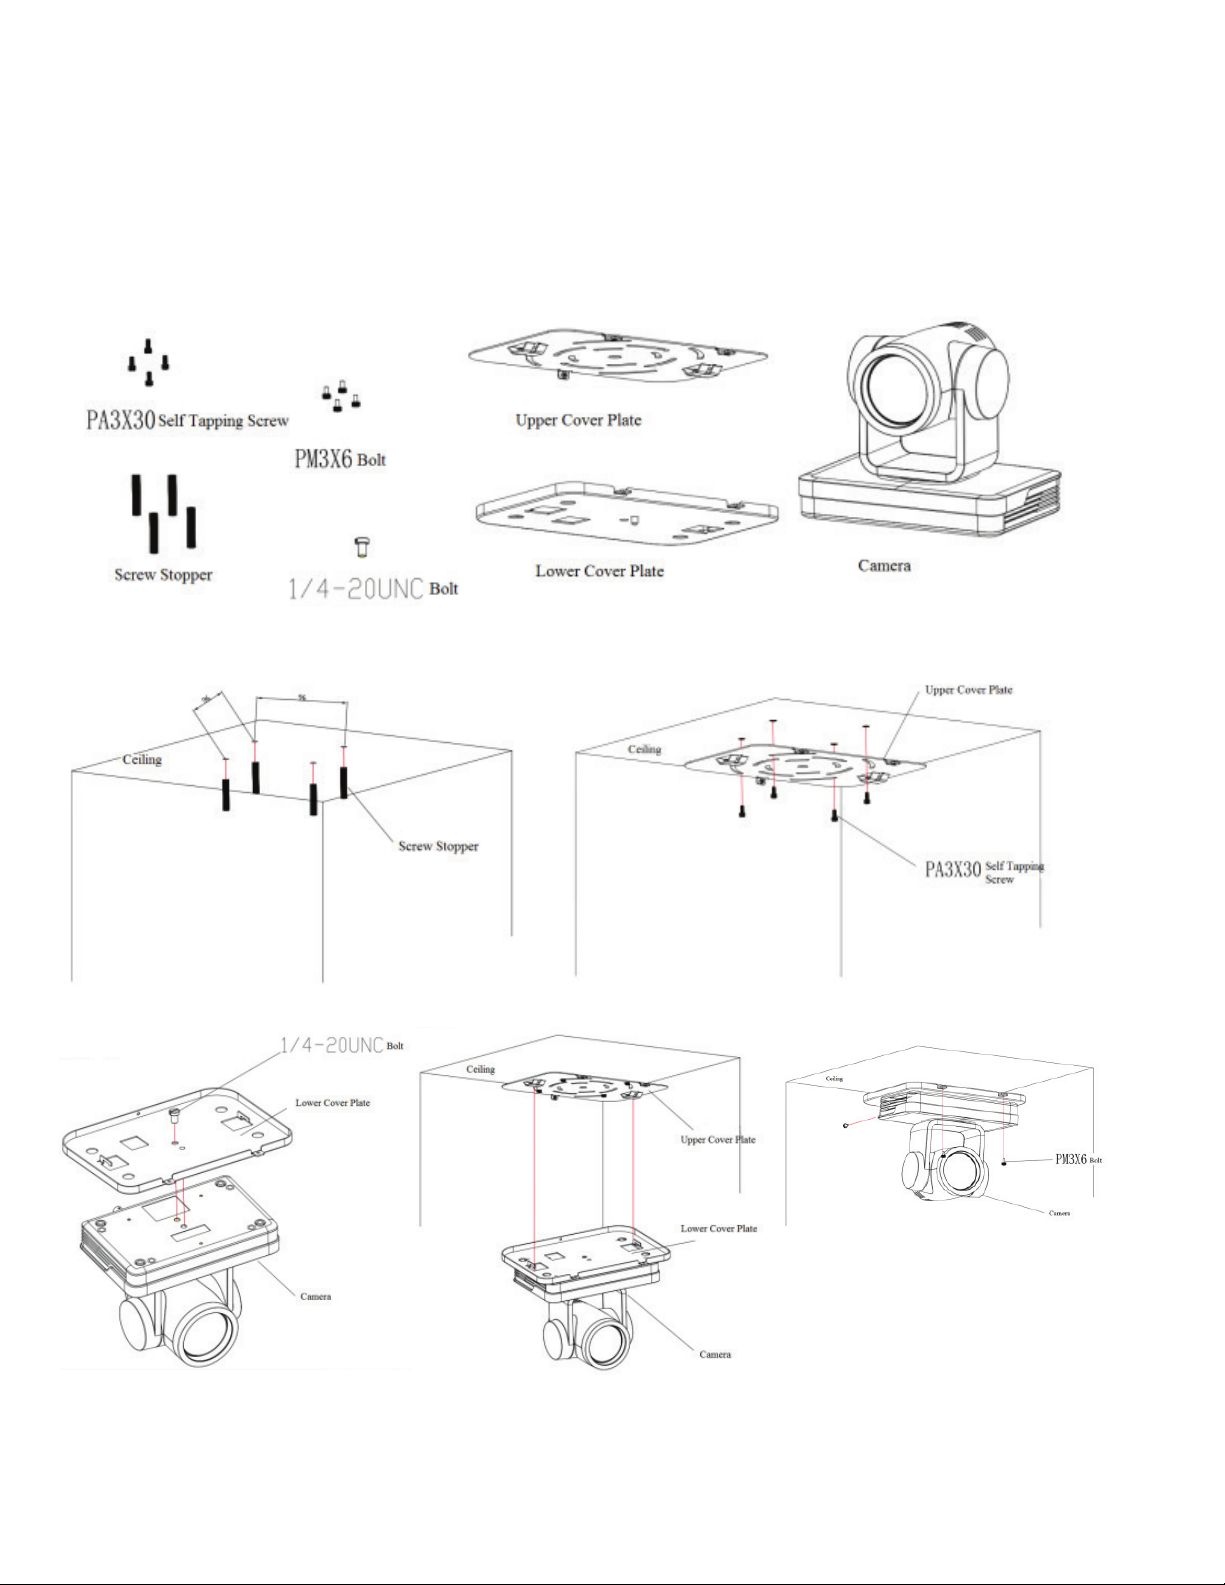
• Choose from multiple mounting options – provided wall mount, optional ceiling mount, or use
a tripod with the included tripod thread insert.
• 5-year product warranty, including advanced replacement.
PACKAGE CONTENTS
PRODUCT BREAKDOWN
PRODUCT OVERVIEW

3
QUICK GUIDE / DL-USB-PTZ20-W
PACKAGE CONTENTS
(x1) 1m
USB Cable
(x1) Quick
Start Guide
(x1) Power
Supply
(x1)
Camera
(x1) Wall
Mount
(x1) Remote
Control
(x1) Control
Cable
FRONT
1. Camera Lens
2. Camera Base
3. Remote Control
Receiving Indicator
4. Infrared Receiver
5. Tripod Screw Hole
6. Screw Hole for Tripod
7. HDM Output
8. USB3.0 Output
9. SDI Output
10. Audio Input Interface
(Line-in)
11. Rotary DIP Switch
12. RS232 Control Interface (input)
13. RS232 Control Interface (output)
14. RS422 Interface
(Compatible with RS485)
15. Network Interface (LAN)
16. DC12V Input Power Supply Socket
17. Power Switch
PRODUCT BREAKDOWN
BOTTOM REAR

4QUICK GUIDE / DL-USB-PTZ20-W
MOUNTING OPTIONSWIRING DIAGRAM

5
QUICK GUIDE / DL-USB-PTZ20-W
MOUNTING OPTIONS
Wall mounting the camera using the provided wall mount or third party mount.
Included Items:
STEP 1 STEP 3
STEP 2
STEP 4 FINISHED

6QUICK GUIDE / DL-USB-PTZ20-W
STEP 1
STEP 3
STEP 2
FINISH
*Optional Ceiling Mount
Included Items:
STEP 4
MOUNTING OPTIONS

7
QUICK GUIDE / DL-USB-PTZ20-W
Power-on
Connect the external power supply to the camera.
USB 3.0 cable
The provided USB 3.0 cable can provides USB video to your computer. If the signal needs to be
extended, it is recommended to use a 3.0 extender. Using 2.0 will downgrade the camera to USB 2.0
specications.
Initial Conguration
• The remote control receiving indicator will start to ash after the camera has been powered on.
• It will pan-tilt and then move to the HOME position (both the horizontal and vertical positions are in the
middle). When the remote control's receiving indicator stops ashing, the self-checking is completed.
• After powering on and self-checking, the camera will automatically return to the dened preset 0.
• The default address for the IR remote control is 1#. If the menu has been restored to factory de-
faults, the remote control default address will restore to 1#.
Requirements - A computer with a USB connections.
Install the video conferencing desktop client (such as Zoom, Teams, Google Meet) onto the computer.
Note: Verify your preferred video calling application requirements.
Placement - Reference the mounting options and choose what best ts your needs.
Connectivity - Locate the Digitalinx PTZ Camera and provided USB cable. Plug the cable into the USB
port of the computer and camera. If the length of the USB cable is not long enough, use a TYPE A USB
3.0 extension cable, 3.0 signal extender, or USB hub.
Navigation - Go to settings>privacy>camera (or similar) on your PC and turn on "let apps use my camera."
Close all other applications that may use the PTZ Camera.
SETTING UP YOUR PTZ CAMERA

8QUICK GUIDE / DL-USB-PTZ20-W
MAINTENANCE AND TROUBLESHOOTING
Camera Maintenance
• Please power o the camera and disconnect the power adapter and socket, if it’s not used for a
long run.
• Use a soft cloth or tissue to clean the camera cover.
• Wipe it with a soft, dry cloth when cleaning the camera lens. Wipe it gently with a mild detergent,
if needed. Do not use strong or corrosive detergents to avoid scratching the lens and aecting the
video quality.
Troubleshooting
No video output
a. Check whether the camera power supply is connected, the voltage is normal, and the power
indicator
is lit.
b. Determine whether the machine could do a self-check after restarted.
c. Check whether the bottom of the DIP switch is in normal operating mode.
d. Check whether the video output cable or video display has been disconnected.
No image sometimes
a. Check whether the video output cable or video display is normal.
Video dithering when zoom-in or zoom-out
a. Check whether the camera installation position is solid.
b. Determine whether there is shaking machine or objects around the camera.
Remote control doesn't work
a. Remote control address is set to to 1. (If the machine is set back to the factory defaults, the remote
control addresses need to be back to 1 too.)
b. Check whether the battery is installed on the remote controller or low.
c. Check the camera working mode is the normal operating mode (see Table 2.2 and Table 2.3).
d. Check to ensure the menu is closed; camera control through remote controller is only available after
exiting the menu. If the video output is from LAN, the menu will not be displayed. The menu will
automatically exit after 30 seconds, and then it can be controlled by the remote.
Serial port doesn't work
a. Check whether the camera serial device protocol, baud rate, and address are consistent.
b. Check whether the control cable is connected properly.
c. Check whether the camera working mode is the normal operating mode.

9
QUICK GUIDE / DL-USB-PTZ20-W
MAINTENANCE AND TROUBLESHOOTING
Web pages cannot log in
a. Check if the camera outputs video normally by connecting directly to the screen.
b. Check whether the network cable is connected properly. (Ethernet port yellow light will ash to
indicate a normal network cable connection.)
c. Check whether your computer is added to the segment and the segment is consistent with the IP
address of the camera.
d. Click "Start," Select "Run," and then type “cmd” in the computer. Click "OK" then turn on a DOS
command window to enter ping 192.168.5.163. Press the Enter key when you see the message:
Description network connection is normal
MAINTENANCE AND TROUBLESHOOTING
DIP SWITCH SETTINGS

10 QUICK GUIDE / DL-USB-PTZ20-W
RS-232 Interface
RS-232 Mini-DIN 8-pin
Camera
1. DTR
2. DSR
3. TXD
4. GND
5. RXD
6. GND
7. IR OUT
8. NC
WindowsDB-9
1. DCD
2. RXD
3. TXD
4. DTR
5. GND
6. DSR
7. RTS
8. CTS
9. RI
Connection to PC or Camera Controller
No. Port Denition
1 DTR Data Terminal Ready
2 DTR Data Set Ready
3 TXD Transmit Data
4 GND Signal Ground
5 RXD Receive Data
6 GND Signal Ground
7 IR OUT IR Commander Signal
8 NC No Connection
CONTROL INTERFACE PIN-OUTS CONTROL INTERFACE PIN-OUTS

11
QUICK GUIDE / DL-USB-PTZ20-W
Connection to PC or Camera Controller
No. Port Denition
1 DTR Data Terminal Ready
2 DTR Data Set Ready
3 TXD Transmit Data
4 GND Signal Ground
5 RXD Receive Data
6 GND Signal Ground
7 IR OUT IR Commander Signal
8 NC No Connection
RS232(DB9) Port
VISCA
No. Port Denition
1 DCD Data Carrier Detect
2 RXD Receive Data
3 TXD Transmit Data
4 DTR Data Terminal Ready
5 GND System Ground
6 DSR Data Set Ready
7 RTS Request to Send
8 CTS Clear to Send
9 RI Ring Indicator
Camera 1
1. DTR
2. DSR
3. TXD
4. GND
5. RXD
6. GND
7. IR OUT
8. NC
Camera 2
1. DTR
2. DSR
3. TXD
4. GND
5. RXD
6. GND
7. OPEN
8. OPEN
Cascading Cameras
CONTROL INTERFACE PIN-OUTS

12 QUICK GUIDE / DL-USB-PTZ20-W
Standby Key
The camera enters standby mode if there's a long-press for 3 second on the
standby key.
Long - press for 3 seconds again on the standby key. The camera will self-
check again and return to HOME position. (If preset 0 position is set, the
camera will return to preset 0 position).
In this manual, “press the key” means a click rather than a long-press,
and a special note will be given if a long-press for more than one second
is required.
When a key-combination is required, do it in sequence. For example,
“[*]+[#]+[F1]” means press “[*]” rst and then press “[#]” and last press “[F1].”
Match Code for Wireless Remote Control
One to One Code Matching: Press the "set" and "*" keys combined for
3 seconds until the LED indicator starts ashing. Camera will receive the
signal and power on. The LED indicator will go o if the code matches
successfully. The camera can be controlled by this wireless remote control
only after one to one code pairing. Otherwise, please clear the code
matching of this remote control, or use other remote control to pair with
the camera again.
If one to one code matching fails, the red LED light ashes for 20 seconds
and then goes o. The camera will stop code match and turn on sleep
mode. Press any key to wake up the camera and re-match code.
Note: After code matching successfully, please select the camera address to
control it.
Clear Code: Press the "set" and "*" keys combined for 3 seconds until
the LED indicator starts ashing. Camera will power o and on. The LED
indicator will go o if the code clears successfully.
Sleep Mode and Wake Up: Press any key to wake up the camera from
sleep mode.
Camera Selection
Select the camera address you want to control.
USING THE REMOTE CONTROL

13
QUICK GUIDE / DL-USB-PTZ20-W
Auto: auto focus mode
Manual: manual focus mode
Focus + (near): Press [FOCUS +] key
(Valid only in manual focus mode)
Focus - (far): Press [FOCUS -] key
(Valid only in manual focus mode)
Press and hold the keys. The action of focus will continue and
will stop as soon as the key is released.
Focus Control
Zoom Control
Press [Zoom +] key to zoom in.
Press [Zoom -] key to zoom out.
Press and hold the keys. The action of focus will continue and
will stop as soon as the key is released.
Set and Clear Presets
Set Preset: Press [SET PRESET] button, and then press the
number key from 0-9 to set preset positions.
Note: Ten presets via remote control.
Call Preset: Press a number key from 0-9 to call a
preset position.
Clear Preset: Press [CLEAR PRESET] button, and then press a
number key from 0-9 to clear preset positions.
Note: Press the [#] key 3x continually to clear
all presets.

14 QUICK GUIDE / DL-USB-PTZ20-W
Camera Remote Control Address Setting
[*] + [#] + [F1]:Camera Address No.1
[*] + [#] + [F2]:Camera Address No. 2
[*] + [#] + [F3]:Camera Address No. 3
[*] + [#] + [F4]:Camera Address No. 4
Menu Settings
[MENU]: Open / close the OSD menu
[HOME]: Camera lens goes back to the middle position;
Conrm button; Enter next menu
[ ] [ ]: Choose item
[ ] [ ]: Modify values
[BLC ON/OFF]: Turn on or o the back light compensation
Pan/Tilt Control
Up: Press Down: Press
Left: Press Right: Press
Back to middle position: Press “[HOME]”
Press and hold the up/down/left/right key, the pan/tilt
movements will keep running, from slow to fast, until it runs to
the endpoint. Stop as soon as the key is released.

15
QUICK GUIDE / DL-USB-PTZ20-W
Key Combination
1) [#]+[#]+[#]: Clear all presets
2) [*]+[#]+[6]: Restore factory defaults
3) [*]+[#]+[3]: Menu set to Chinese
4) [*]+[#]+[4]: Menu set to English
5) [*]+[#]+[9]: Flip switch
6) [*]+[#]+Auto: Enter aging mode
7) [#]+[*]+Auto: Exit aging mode
8) [*]+[#]+Manual: Restore the default user name, password, and IP address
9) [#]+[#]+[0]: Switch the video format to 1080P60
10) [#]+[#]+[1]: Switch the video format to 1080P50
11) [#]+[#]+[2]: Switch the video format to 1080I60
12) [#]+[#]+[3]:Switch the video format to 1080I50
13) [#]+[#]+[4]: Switch the video format to 720P60
14) [#]+[#]+[5]:Switch the video format to 720P50
15) [#]+[#]+[6]: Switch the video format to 1080P30
16) [#]+[#]+[7]: Switch the video format to 1080P25
17) [#]+[#]+[8]: Switch the video format to 720P30
18) [#]+[#]+[9]:Switch the video format to 720P25
Note: If the address of the former remote control is not address 1 (instead it's
2, 3, or 4), the corresponding camera address will restore to address 1 when
all parameters are restored to factory default. User should change the remote
control address to address 1.

16 QUICK GUIDE / DL-USB-PTZ20-W
Menu Introduction
Note: The modication is valid only if you exit the menu before you save and power o.
1. Menu Control
[MENU]: Enter / exit the OSD menu or return to the previous menu
[HOME]: Enter next menu
[ ] [ ]: Choose item
[ ] [ ]: Modify values
2. English Menu

17
QUICK GUIDE / DL-USB-PTZ20-W

18 QUICK GUIDE / DL-USB-PTZ20-W
SERIAL PORT COMMUNICATION AND CONTROL
The camera could be controlled through RS232/RS485 interface; RS232C serial parameter are
as follows:
Baud rate: 2400/4800/9600/115200 bits / sec; Start bit: 1; data bits: 8; Stop bit: 1; Parity: None.
VISCA Protocol Return Command
z = camera address + 8
Ack/Completion Message
Command packet Note
ACK z0 41 FF Returned when the command is accepted.
Completion z0 51 FF Returned when the command has been executed.
Error Messages
Command packet Note
Syntax Error z0 60 02 FF Returned when the command format is dierent or
when a command with illegal command parameters
is accepted.
Command Not
Executable
z0 61 41 FF Returned when a command cannot be executed
due to current conditions. For example, when
commands controlling the focus manually are
received during auto focus.
VISCA Protocol Control Command
Command Function Command packet Note
AddressSet Broadcast 88 30 0p FF p: Address setting
IF_Clear Broadcast 88 01 00 01 FF I/F Clear
CommandCancel 8x 21 FF
CAM_Power On 8x 01 04 00 02 FF Power ON/OFF
O 8x 01 04 00 03 FF
CAM_Zoom Stop 8x 01 04 07 00 FF
Tele(Standard) 8x 01 04 07 02 FF
Wide(Standard) 8x 01 04 07 03 FF
Tele(Variable) 8x 01 04 07 2p FF p = 0(low) - F(high)
Wide(Variable) 8x 01 04 07 3p FF
Direct 8x 01 04 47 0p 0q 0r
0s FF
pqrs: Zoom Position

19
QUICK GUIDE / DL-USB-PTZ20-W
Command Function Command packet Note
CAM _Focus Stop 8x 01 04 08 00 FF
Far(Standard) 8x 01 04 08 02 FF
Near(Standard) 8x 01 04 08 03 FF
Far(Variable) 8x 01 04 08 2p FF p = 0(low) - F(high)
Near (Variable) 8x 01 04 08 3p FF
Direct 8x 01 04 48 0p 0q 0r
0s FF
pqrs: Focus Position
Auto Focus 8x 01 04 38 02 FF
Manual Focus 8x 01 04 38 03 FF
One Push mode 8x 01 04 38 04 FF
CAM _Zoom Focus Direct 8x 01 04 47 0p 0q 0r 0s
0t 0u 0v 0w FF
pqrs: Zoom Position
tuvw: Focus Position
CAM_AFSensitivity High 8x 01 04 58 01 FF Focus Sensitivity Setting
Normal 8x 01 04 58 02 FF
Low 8x 01 04 58 03 FF
CAM_AFZone Top 8x 01 04 AA 00 FF Focus Region Setting
Center 8x 01 04 AA 01 FF
Bottom 8x 01 04 AA 02 FF
ALL 8x1 01 04 AA 03 FF
CAM_WB One Push
mode
8x 01 04 35 03 FF
One Push
Trigger
8x 01 04 10 05 FF One Push WB Trigger(Enabled
during One Push WB mode)
CAM_WB Mode 8x 01 04 35 pq FF pq = 00--33 WBMode
CAM_
AWBSensitivity
Low 8x 01 04 A9 00 FF WB Sensitivity Setting
Normal 8x 01 04 A9 01 FF
High 8x 01 04 A9 02 FF
CAM _RGain Reset 8x 01 04 03 00 FF Manual Control of R Gain
Up 8x 01 04 03 02 FF
Down 8x 01 04 03 03 FF
Direct 8x 01 04 43 00 00 0p
0q FF
pq: R Gain
CAM_ Bgain Reset 8x 01 04 04 00 FF Manual Control of B Gain
Up 8x 01 04 04 02 FF
Down 8x 01 04 04 03 FF
Direct 8x 01 04 44 00 00 0p
0q FF
pq: B Gain

20 QUICK GUIDE / DL-USB-PTZ20-W
Command Function Command packet Note
CAM_AE Full Auto 8x 01 04 39 00 FF Automatic Exposure mode
Manual 8x 01 04 39 03 FF Manual Control mode
Shutter priority 8x 01 04 39 0A FF Shutter Priority Automatic
Exposure mode
Iris priority 8x 01 04 39 0B FF Iris Priority Automatic
Exposure mode
Bright 8x 01 04 39 0D FF Bright mode
CAM_Shutter Reset 8x 01 04 0A 00 FF Shutter Setting
Up 8x 01 04 0A 02 FF
Down 8x 01 04 0A 03 FF
Direct 8x 01 04 4A 00 00 0p
0q FF
pq: Shutter Position
CAM_Iris Reset 8x 01 04 0B 00 FF Iris Setting
Up 8x 01 04 0B 02 FF
Down 8x 01 04 0B 03 FF
Direct 8x 01 04 4B 00 00 0p
0q FF
pq: Iris Position
CAM_Gain Limit Reset 8x 01 04 0C 00 FF Gain Limit Setting
Up 8x 01 04 0C 02 FF
Down 8x 01 04 0C 03 FF
Gain Limit 8x 01 04 2C 0p FF
CAM_Bright Reset 8x 01 04 0D 00 FF Bright Setting
Up 8x 01 04 0D 02 FF
Down 8x 01 04 0D 03 FF
Direct 8x 01 04 4D 00 00 0p
0q FF
pq: Bright Positon
CAM_ExpComp On 8x 01 04 3E 02 FF Exposure Compensation ON/OFF
O 8x 01 04 3E 03 FF
Reset 8x 01 04 0E 00 FF Exposure Compensation Amount
Setting
Up 8x 01 04 0E 02 FF
Down 8x 01 04 0E 03 FF
Direct 8x 01 04 4E 00 00 0p
0q FF
pq: ExpComp Position
CAM_Back Light On 8x 01 04 33 02 FF Back Light
Compensation
O 8x 01 04 33 03 FF
CAM_WDRStrength Reset 8x 01 04 21 00 FF WDR Level Setting
Up 8x 01 04 21 02 FF
Down 8x 01 04 21 03 FF
Direct 8x 01 04 51 00 00 00
0p FF
p: WDR Level Positon
Table of contents
Other LIBERTY AV SOLUTIONS Security Camera manuals