Life & Home PC1924 User manual

PC1924
Owner’s Manual
0
SAVE THESE INSTRUCTIONS
FOR FUTURE
REFERENCE. IF YOU ARE
ASSEMBLING THIS UNIT
FOR SOMEONE ELSE, GIVE
THIS MANUAL TO HIM
OR
HER TO SAVE
FOR FUTURE REFERENCE.
FOR CUSTOMER SERVICE OR
TECHNICAL HELP
,
PLEASE VISIT
WWW.BBQTEK.COM
SEND EMAIL TO
SERVICE@BBQTEK.COM OR
CALL 1-877-885-8227,
6
A.M. – 4:30 P.M.
(PST)
,MONDAY-FRIDAY.
Square Charcoal Grill
WARNING
Improper installation,
adjustment, alteration, service
or maintenance can cause
injury or property damage.
Read the installation, operation
and maintenance instructions
thoroughly before installing or
servicing this equipment.
DANGER
Failure to follow these
instructions could result in fire
or explosion that could cause
property damage, personal
in
j
ur
y
or death.
WARNING
FOR YOUR SAFETY :
For Outdoor Use Only
(outside any enclosure).
Printed in China
DANGER
Do not use charcal briquettes
for indoor cooking or heationg.
TOXIC carbon nonoxidefumes
can accumulate and cause
asphyxiation.
DO NOT USE on boats or
recreational vehicles. Live hot
charcoal could create a fire
hazard.

PC1924
Owner's Manual
1
Table of Contents
For Your Safety.......................................................................................................................1
Illustrated Parts List ...............................................................................................................2
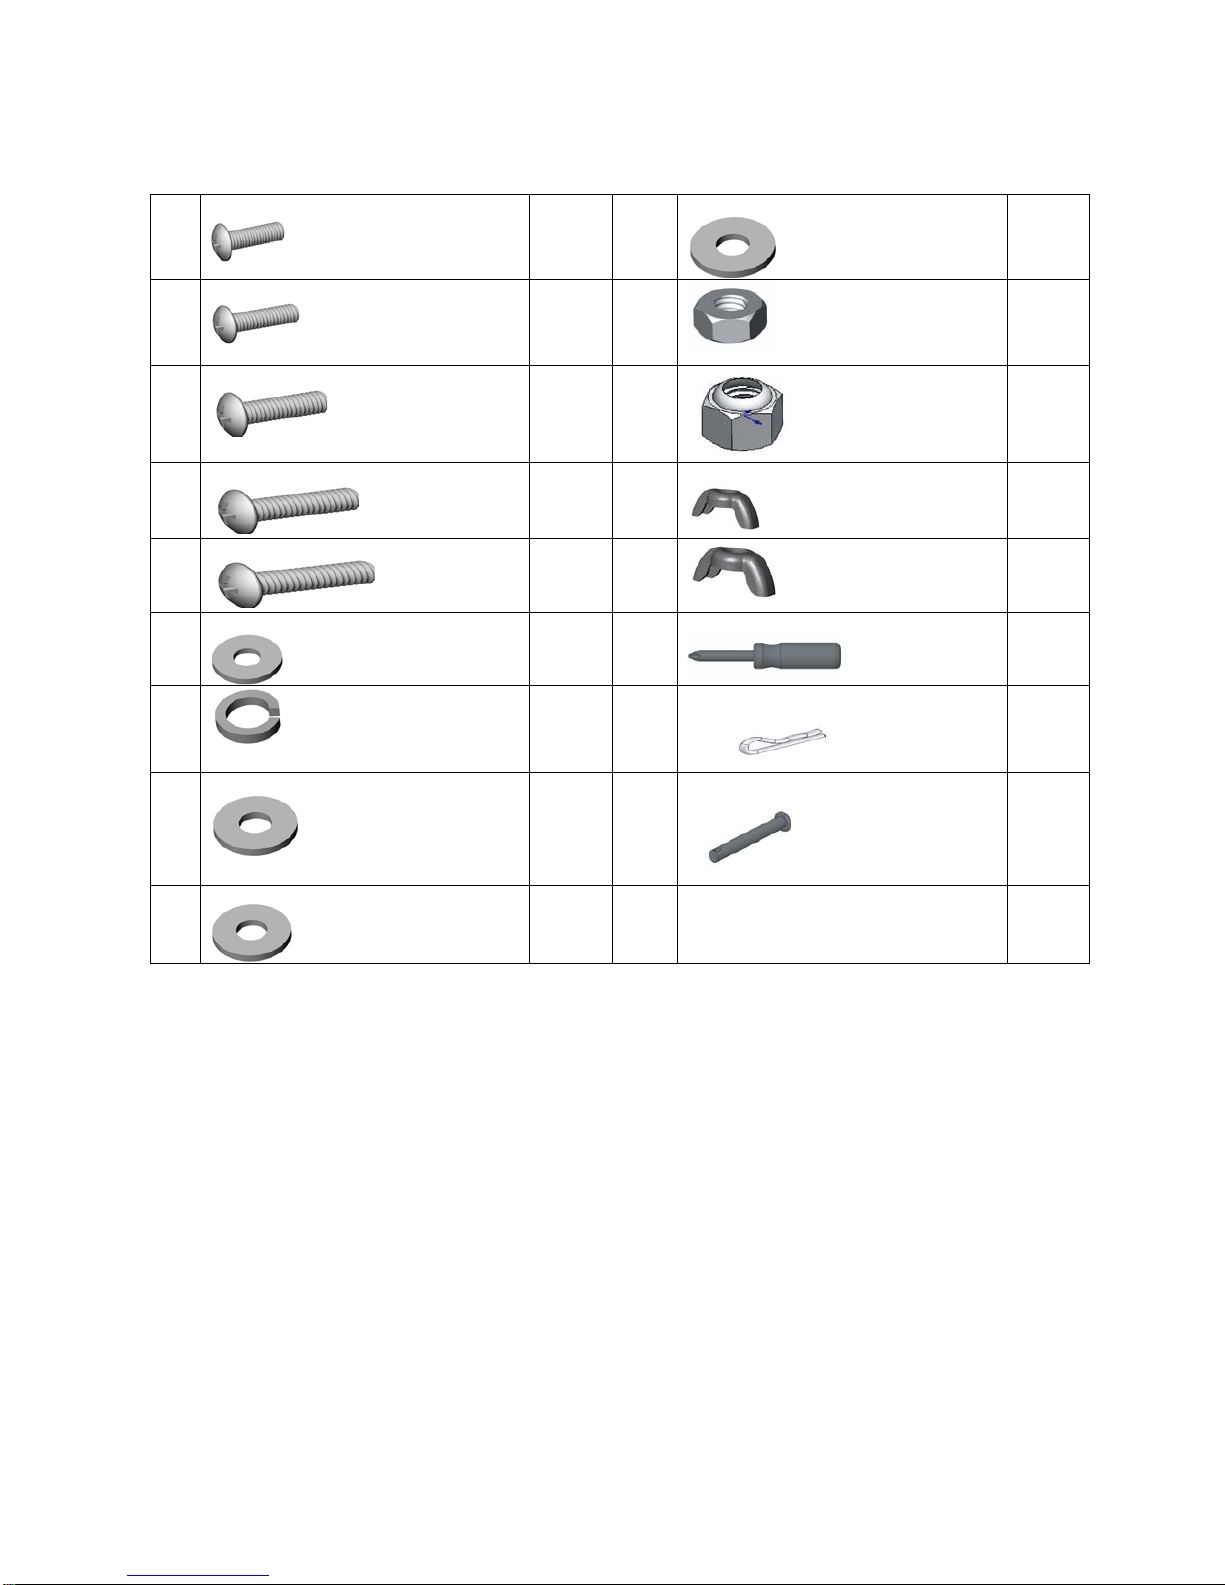
Hardware List...........................................................................................................................3
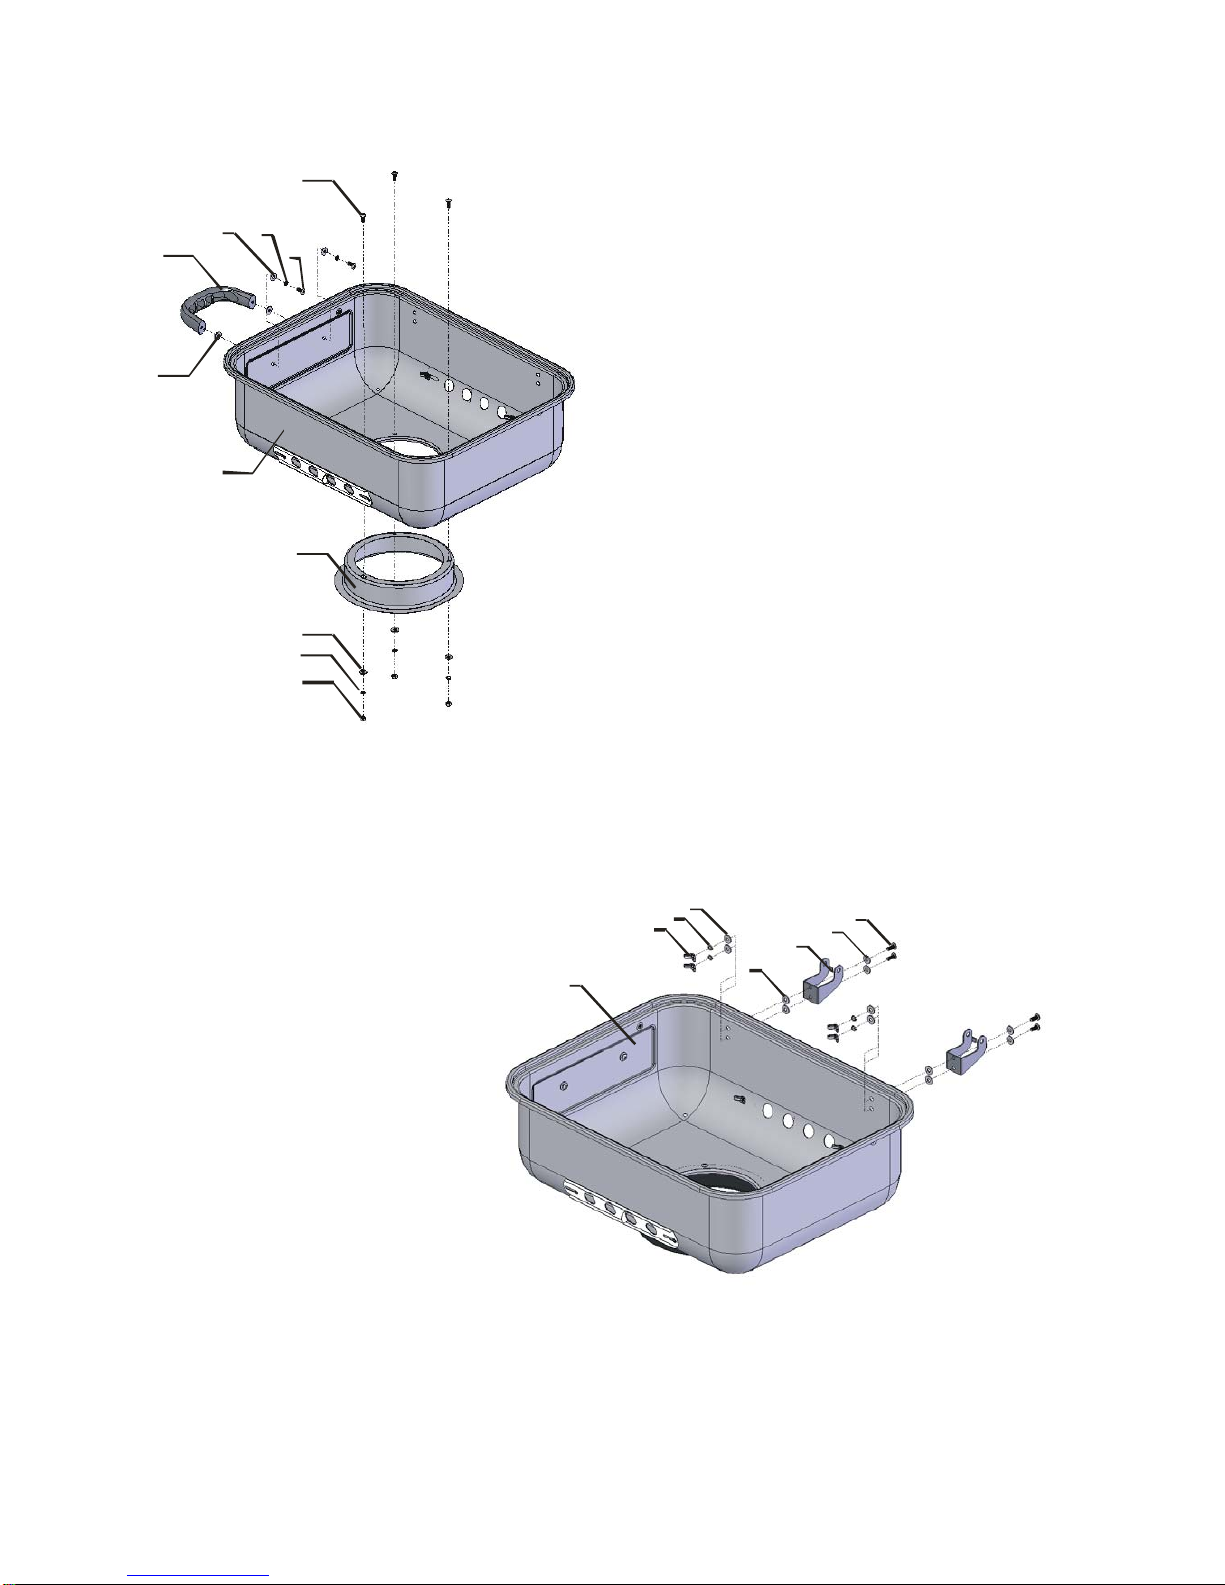
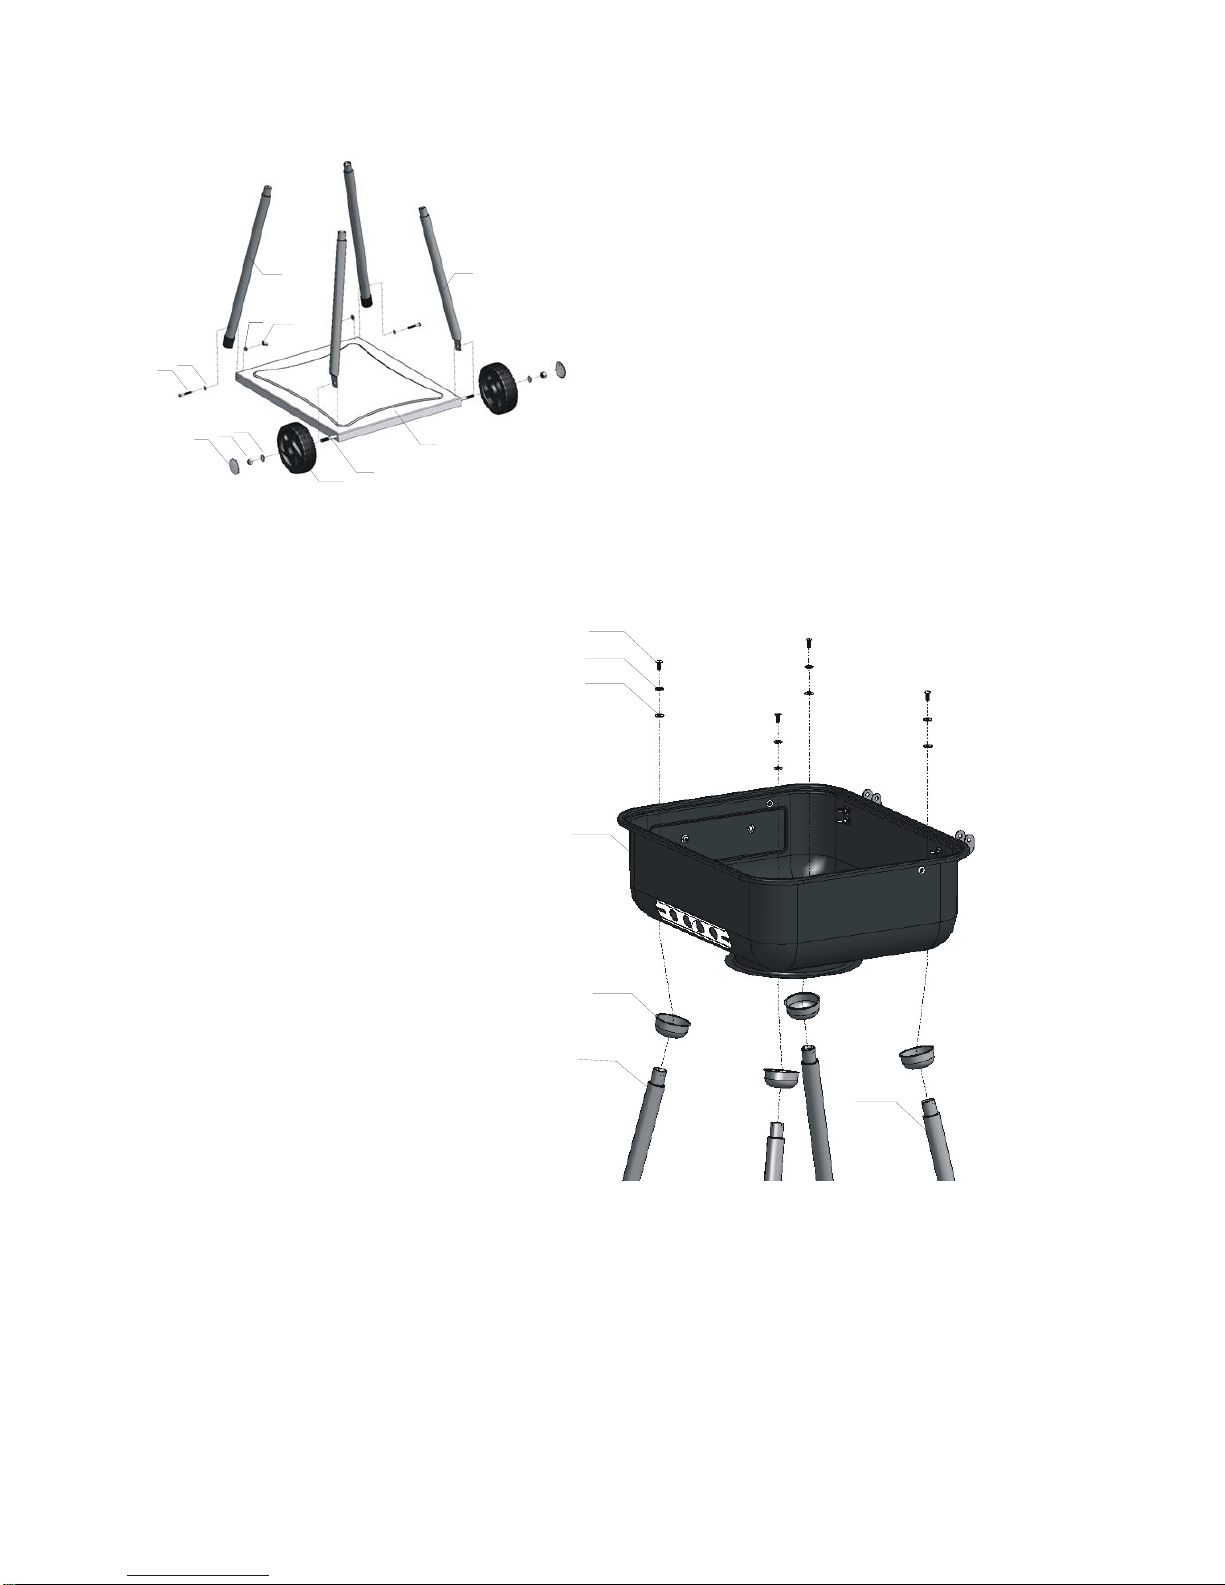
Assembly Instructions............................................................................................................4
Lighting Your Grill...................................................................................................................9
Award- Winning Barbecue Recipes....................................9
Warranty Program...............................................................11
Dear Valued
Customer,
Congratulations
on your
new
barbecue grill
purchase! You’ve made the right choice. In
this manual, you
will
find assembly
instructions, suggestions for
grilling and
helpful hints, as
well as guidelines for
the safe operation, proper care
and
use of
your grill. Our expert staff strives to provide
you
with an easy to assemble product. Should
you have any
questions or any
problems with this product, please visit
WWW.BBQTEK.COM,send email to
or call
1-877-885-
8227, 6:00
A.M. – 4:30 P.M. PST, MONDAY-FRIDAY.
WARNING
1. This grill is for outside use only, and should not be used in a building, garage or any other enclosed area.
2. This grill is for use with charcoal only.
3. The use of alcohol, prescription or non-prescription drugs may impair the user's ability to properly assemble or safely operate
the appliance.
4. Do not use gasoline, kerosene or alcohol for lighting. This grill is not intended to be installed in or on recreation vehicles
and/or boats.
5. Always open grill lid carefully and slowly as heat and steam trapped within the grill could cause severe burns.
6. Always place your grill on a hard and level surface far away from combustible materials. An asphalt or blacktop surface may
not be acceptable.
7. Do not attempt to move the grill while it is lit.
8. Do not leave a lit grill unattended. Keep children and pets away from the grill at all times.
9. Do not use grill in high winds.
10. Do not use the grill until it is COMPLETELY assembled and all parts are securely fastened and tightened.
11. Keep all combustible items and surfaces at least 12 inches (30 cm) away from the grill at all times.
12. DO NOT use this grill or any charcoal product under any enclosure near any unprotected combustible constructions.
13.DO NOT store or use gasoline or other flammable vapors and liquids within 25 feet (8m) of this or any other appliance.
CAUTION
1. Do not touch metal parts of grill until it has completely cooled (at least 30 minutes) to avoid burns, unless you are wearing
protective gear (pot holders, gloves, BBQ mittens, etc.).
2. Do not use in an explosive atmosphere. Keep grill area clear and free from combustible materials, gasoline and other
flammable vapors and liquids.
3. Do not alter grill in any manner.
4. Do not repair or replace any part of the grill unless specifically recommended in this manual. All other service should be
referred to a qualified technician.
For Your Safety
QUESTIONS, PROBLEMS, MISSING PARTS WITH THIS PRODUCT? DO NOT RETURN TO YOUR RETAILER.
PLEASE VISIT US ATWWW.BBQTEK.COM OR EMAIL US AT
SERVICE@BBQTEK.COM
YOU CAN ALSO CALL OUR CUSTOMER SERVICE DEPARTMENT 6:00 A.M. TO 4:30 P.M.
PACIFIC STANDARD TIME, MONDAY THROUGH FRIDAY,AT
1-877-885-8227

PC1924
Owner’s Manual
2
Illustrated Parts List
1. Lid……..............1pc
2. Bowl.......................…1pc
3. Cooking grid.…......1pc
4. Charcoal grid…..........1pc
5. Warming grid…….....1pc
6. Bowl Damper...........2pcs
7. Up Hinger......….......2 pcs
8.Down Hinger.............2pcs
9. Long Leg..................2 pcs
10. Wheel Leg................2pcs
11. Leg Support.....……4pcs
12.Bottom Panel............1pc
13.Lid Handle.............1pc
14.Bowl Handle.............1pc
15.Asher Holder Handle..1pc
16.Asher Holder Support.1pc
17.Asher Holder...........1pc
18. Wheel Cap.............2pcs 19.Lid Damper................1set
20.Wheel......................2pcs
21.Wheel Axle..... ..............1pc

PC1924
Owner’s Manual
3
Hardware List
A
5pcs
J
18 pcs
B
11 pcs
K 3 pcs
C
2pcs L
2 pcs
D
4 pcs
M
5 pcs
E
2 pcs
N
15 pcs
F
5 pcs
O
1 pc
G 17 pcs P
2 pcs
H
33 pcs Q
2 pcs
I
2 pcs
Parts & Hardware shown above are not to scale.
Bolt
M6 x 20mm
Bolt
M6 x12mm
Bolt
M5 x10mm
Bolt
M6 x 35mm
Bolt
M6 x 50mm
Small Washer
Large Lock Washer
Large Washer
Wheel Washer
Heat Insulator Washer
M6
Nut
Wheel Nut
Small Wing Nut
Large Wing Nut
Screwdriver
Hair Pin
Pin

PC1924
Owner’s Manual
4
Assembly Instructions
For Best Results
● Remove all contents from packaging, and make sure all parts are present before attempting to assemble.
● Tighten all bolt connections by hand first. Once the grill is fully assembled, go back and tighten with
screwdriver.
● Estimated Assembly Time : Approximately 30 to 45 minutes.
A
19
1
13
J
H
7
J
H
N
F
M
B
G
N
G
H
2
M
F
6
A
Step 2
Align
the
hole
at one pieceof bowl damper (6)
with the hole at the bowl.
Screw a M5x10mm bolt(A) intto each pre-drilled
hole.
Then seal with asmall washer (F)and a small
wing nut(M).
Repeat the same procedure for the another
piece of bowl damper.
Step 1
Insert the pre-assembled bolts at the lid
handle(13) along with a heat insulator
washer(J)into each hole at the lid(1).
Then seal with a large washer(H),a large lock
washer (G)and a large wing Nut(N).
Align the holes at the up hinger (7) with the
holes at the lid ,screwing a M6X12MM bolt(B)
and a large washer(H)into the hole at the up
hinger, then attach a heat insulator washer(J)
into each hole at the lid.
Then seal with a large washer(H), a large lock
washer (G)and a large wing Nut(N).
Align the holes at the two lid damper(19) with
the holes at the lid ,screwing a M5X10MM
bolt(A) into each predrilled hole , then seal with
a small washer(F)and a small wing Nut(M).

PC1924
Owner’s Manual
5
B
H
G
K
16
C
G
H
14
2
J
B
H
8
J
H
G
N
2
Step 3
Align the hole at the bowl
handle(14),attaching with a heat insulator
washer(J)with the hole at the bowl .
Screw a M6X20mm bolt(C), a Then seal with
a large lock washer (G) and a large
washer(H) into each hole.
Align the holes at the asher holder
support(16) with the holes at the
bowl,screwing a M6X12mm bolt(B)into each
pre-drilled hole.
Then seal with a large waher(H) ,a large lock
washer(G) and a nut(K)
Step 4
Align the holes at the down hinger (8) with
the holes at the bowl ,screwing a
M6X12mm bolt(B) and a large
washer(H)into the hole at the down hinger,
attaching a heat insulator wahser(J) into
each hole at the lid.
Then seal with a large washer(H), a large
lock washer (G)and a large wing Nut(N).

PC1924
Owner’s Manual
6
18 LI
20 21
12
10
9
N
H
EH
D
J
2
11
9
10
H
Step 5
Insert the wheel axle(21) into the hole in
the wheel (20),the hole in the wheel leg(10)
and the hole in the bottom panel(12) .
Screw each wheel nut(L) on the end of the
wheel axle ,then cover each wheel cap (18)
toward each wheel.
Align the hole at the long leg(9)with the
hole at the bottom panel .
Screw a M6x50mm bolt(E), a large
washer(H)into each pre-drilled hole ,then
seal with a large washer(H) and a large
wing nut(N)
Step 6
Insert each leg support (11) into the
four legs.
Align each hole at the bowl with the
hole at the leg support and the hole at
each leg.
Screw a M6x35mm bolt(D) along with a
heat insulator washer(J)and a large
washer(H) into each pre-drilled hole.

PC1924
Owner’s Manual
7
1
5
2
P
Q7
8
N
G
H
J
15
17
Step 7
Align the holes at the down hinger with the
holes at the up hinger .
Insert a pin(Q)into the hinger hole.
Insert a hair pin(P) into the hole at the pin
to fasten hingers.
Insert the hook of the warming grid into the
holes at the lid and at the bowl .
Step 8
Insert the pre-assembled bolts at the asher
holder handle(15)along with a heat
insulator washer(J) into each predrilled
hole at the asher holder(17).
Then seal with a large washer(H),a large
lock washer(G) and a large wing nut(K)

PC1924
Owner’s Manual
8
3
4
2
17
16
Fully-Assembled view
Step 9
Place the charcoal grid(4)inside the bowl.
Place the cooking grid(3)upon the charcoal
grid inside the bowl.
Slide the surface edge of the asher
holder(17) along the edge of the asher
support to hook them together

PC1924
Owner’s Manual
9
Lighting your grill
1. Make sure the lid and vents are open.
2. Remove the cooking grid. Pile adequate amounts of charcoal in the center of the charcoal grid and shape into a
pyramid.
3. If you are using regular charcoal and intend to use lighter fluid, apply fluid according to the instruction on the container.
Allow lighter fluid to soak into the charcoal for approximately 1 minute before lighting.
4. If you are using an electric fire starter, do not add lighter fluid or lighter charcoal in accordance with the manufacturer’s
fire starter instructions.
5. If you are using instant-light charcoal, do not use alternate lighting methods.
6. Allow the charcoal to burn approximately 15-20 minutes or until all the charcoal is lightly coated with gray ash.
Cooking Styles
1. Direct Grilling : When the coals are covered with ash, use a long-handled cooking utensil and protective cooking mitts
to spread the charcoal evently over the charcoal grid. Place the cooking grid back onto the grill and arrange the food
onto the cooking grid. Food can be cooked with the lid open or close.
.
2. Indirect Grilling : When the charcoal is covered with ash, use a long-handled cooking utensil and protective cooking
mitts to arrange
the charcoal in a donut shape. Leave an open space in the center. Place a small drip pan (not included) in the center of
the charcoal to catch the drippings.
3. Smoking : Soak any fragrant wood chips in water overnight so they will not burn when placed on the charcoal. After
spreading the charcoal, according to direct cooking method above, place wood chips on top of the charcoal. Cook with
lid closed and the cooking grid, if adjustable, set to its highest setting.
Helpful Hints
1. Store charcoal in a dry place. If storing outside, seal the charcoal in a waterproof container.
2. During cooking, if the lid is not hinged, lift it to one side instead of staright up. Lifting the lid straight up could create a
vaccum within the grill that could suck ash into the food.
3. When cleaning the grill, DO NOT use abrasive cleaners. It could damage parts of the grill. Clean the grids and pans
with mild detergent. Rinse thoroughly with water. Remove and dispose of ash properly.

PC1924
Owner’s Manual
10
Award-Winning Barbecue Recipes
Never Fail Barbecue Sauce
Ingredients:
¼ cup Finely Chopped Onion
2 tablespoons Butter or Margarine
¼ cup Brown Sugar, Firmly Packed
1 tablespoon Worcestershire Sauce
¼ teaspoon Hot Pepper Sauce
1 Clove Garlic, Finely Chopped
1 cup Catsup
¼ cup Lemon Juice
1 teaspoon Prepared Mustard
Prepare:
Cook onion and garlic in margarine until tender. Add
remaining ingredients and bring to a boil. Simmer
uncovered 15 to 20 minutes. Refrigerate leftovers
after using.
Mamma’s Marinated Chicken
Ingredients:
¼ cup Dijon Mustard
2 tablespoons Fresh Lemon Juice
1 ½ teaspoons Worcestershire Sauce
½ teaspoon Dried Tarragon
¼ teaspoon Freshly Ground Black Pepper
4 Boneless, Skinless
Chicken Breast Halves
Prepare:
Combine ingredients, mixing well. Marinade chicken
for several hours. Grill uncovered, over medium heat,
for 10 to 15 minutes or until juices run clear. Chicken
is done when juices run clear.
Barbecued Honey Steak
Ingredients:
5 pounds Beef Sirloin Steak
2 tablespoons Red Pepper -- Crushed
1 teaspoon Black Pepper
2 Garlic Cloves -- Crushed
1 large Onion
1 cup Honey
Prepare:
Combine all ingredients and marinate steak for 7-8
hours. Remove meat from marinade and grill over
very high heat to desired doneness. Heat leftover
marinade to a boil and pour over grilled steak to
serve.
Hardcore Grilled Trout
Ingredients:
1/4 cup Lemon or Lime Juice
2 tablespoons Melted Butter
2 tablespoons Vegetable Oil
2 tablespoons Chopped Parsley
1 tablespoon Hot Sauce
1/2 teaspoon Ground Ginger
1/2 teaspoon Salt
4 brook trout ---about 1 pound each
Prepare:
Combine lemon juice, margarine, oil, parsley, hot
sauce, ginger and salt. Mixing well. Pierce skin of fish
in several places. Roll fish in juice mixture to coat
inside and out. Cover. Refrigerate 30 minutes to 1
hour, turning occasionally. Remove fish from
marinade. Place fish on grill; brush fish with marinade
while grilling. Cook over high heat for 5 minutes. Turn
and brush with marinade. Cook 5 minutes longer.
Fish is done when it flakes easily with fork.
Grilled Veggies
Ingredients:
¾ cup Olive Oil
¼ cup Red Wine Vinegar
1 teaspoon Fresh Rosemary
1 teaspoon Fresh Thyme Leaves
1 teaspoon Fresh Basil, Chopped
1 teaspoon Fresh Oregano, Chopped
1 tablespoon Minced Garlic
½ teaspoon Salt
½ teaspoon Ground Black Pepper
2 pounds assorted vegetables, chopped or whole,
according to taste.
Prepare
Combine all ingredients in a small bowl. Marinade
vegetables with sauce. Cover and refrigerate for 2
hrs. Grill vegetables over medium heat until tender,
brushing them with marinade while they cook.
Cooking times will vary according to the vegetables
chosen.

PC1924
Owner’s Manual
11
Warranty
Program
Proof
of
purchase
is
required
to
access
this
warranty
program,
which
is
in
effect
from
the
date
of
purchase. Inability
to
provide
proof
of
purchase
or
after
the
warranty
has
expired,
customers
will
be
subject
to
parts,
shipping and
handling
fees.
Full 30-Day Warranty
Any missing parts can be replaced at no charge within 30 days from the date of purchase, with a valid proof of purchase.
Limited
Warranty
□
1
Year
Warranty
on
all
parts
in
regards
to
damage
affecting
the
operation
of
the
gas
grill.
Warranty
Provisions:
This
warranty
is
non-transferable
and
does
not
cover
failures
due
to
misuse
or
improper
installation
or
maintenance.
This
warranty
is
for
replacement
of
defective
parts
only.
We
are
not
responsible
for
incidental
or
consequential
damages
or
labor
costs.
This
warranty
does
not
cover
chips
and
scratches
of
porcelain
or
painted
surfaces,
nor
does
it
cover
corrosion
or
discoloration
due
to
misuse,
lack
of
maintenance,
hostile
environment,
accidents, alterations,
abuse
or
neglect.
This
warranty
does
not
cover
damage
caused
by
heat,
abrasive
and
chemical
cleaners,
resulting
in chipped
porcelain
enamel
parts
or
any
damage
to
other
components
used
in
the
installation
or
operation of
the
gas
grill.
Inability
to
provide
a
proof
of
purchase
or
after
the
warranty
has
expired,
customers
will
be
subject
to parts,
shipping
and
handling
fees.
Some
provinces
do
not
allow
the
limitation
or
exclusion
of
incidental
or
consequential
damages,
so
the
above
limitations
or
exclusions
may
not
apply
to
you.
This
warranty
gives
you
specific
legal
rights,
and
you may
also
have
other
rights
that
vary
from
province
to
province.
If
you
have
any
questions
related
to
the
product
or
warranty,
please
visit
our
website
at
www.bbqtek.com
or
email
us
to
or
call
our
customer
service
center
at
1-877-885-8227,
6:00
A.M.
to
4:30
P.M.
(PST),
Monday
through
Friday.
Manufactured by :
Lucas Innovation Inc.
Xieken District, QingXi Town,
Dong Guan, Guang Dong, China.
Printed in
China
Table of contents
Other Life & Home Grill manuals