Life Changer icOn 5 User manual

AVC PREAMPLIFIER
OWNER’S MANUAL

Congratulations on your purchase of our brand new icOn 5
autoformer based hybrid (passive or active) audio control
unit / preamplier! We are pleased that you choose a Life-
Changer Audio UK product, as by doing so you have
acquired a preamplier with an outstanding sonic
performance which will provide enjoyment for many years to
come.
icOn 5 has been designed by us to provide the highest
sound quality possible and provide an enjoyable user
experience free from the hassles normally associated with
manually controllable preampliers. It includes intuitive
software for controlling inputs, outputs, volume, balance
and “tilt” via Apple IR Remote from the convenience of the
arm-chair, front-panel optical encoder and the large 7
segment LED display. The unique user recongurable RCA
socket provides exibility for the future system changes.
This manual provides a technical reference for hardware,
setup, interconnectivity, warranty, and safety.
Again, thank you for choosing the icOn 5 preamplier.
Pal Nagy
designer
Dear Music Lover,

QUICK START
UNPACKING
• Carefully unpack your icOn 5
• Keep the packing for future transportation
• Please treat the acrylic window surface on the faceplate with care
• Position the icOn 5 on a stable base.
CABLING
This icOn 5 Extra has 8 pair RCA sockets. The function of the RCA 6 is
exible & user recongurable. Please double check the proper connection
of the input and output cables according to the actual I/O conguration.
• Switch off all appliances of your system
• Connect the icOn 5 with your amplier
• Connect the icOn 5 with your source components
• While changing cables your power amplier should be switched
off.
• Default values for all functions are programmed
• Default I/O conguration: io1 (6 input, 2 output)
• Default input: RCA2, default output: RCA8
• Volume: -40 dB
• Balance: 0 dB, Tilt is off, input buffer is ON
• The RCA5 can work as an AV bypass input. When AV bypass is
activated (displayed as AP 1), from this input the signal goes to the
output(s) without any attenuation (0 dB). Please double check the
cabling in this case!
• No additional programming is required for the start-up.
SWITCH-ON
• Switch-on the icOn 5 on the back plate’s power switch
• Select a moderate volume level or leave at the initial -40dB
• Switch-on your source components and last your power amplier
• Double check the cabling before switch-on. Do not plug the input cables to
the output sockets and vice versa!
2

DESCRIPTION
icOn 5 is much more than some additional “mods” of the popular icOn
4PRO passive preamplier family. It is not (only, or at all) a passive
preamp anymore. It has the pure passive listening mode too, but we call
it a “hybrid AVC line control unit”. It has an input buffer (which is defeat-
able), because it’s built with a new autoformer which needs really low
driving impedance. It has much lower inductance, larger air gap and
higher linearity and in exchange it offers livelier, “faster”, even more
natural sound. The step numbers are different too, 136 steps altogether
in a 83 dB range. 0.5 dB steps from +3 dB to -48 dB and 1 dB steps from
-48dB to -80 dB.
There is a remote controlled Quad-reminiscent “tilt” too. This is a great
opportunity for audiophiles who want a real ne tuning.The 5 is a great
improvement in every eld, my best “science” based solution for the very
best sound possible.
The new features of the icOn 5:
- precision, smooth volume adjustment in 136 steps instead of 68 (4PRO),
higher attenuation range from +3db to -80 dB
- 0.5 dB steps from +3dB to -48 dB, 1 dB steps below -48 dB
- one high voltage input (RCA1) for max. 20V RMS with extra 12 dB
attenuation (max. volume: -9 dB)
- new, lower inductance autoformers with livelier, even more natural sound
- input buffer for better source compatibility because the autoformers need
low driving impedance (defeat-able for passive preamp mode)
- Tilt control in 8 x 0.5 dB steps, defeat-able
- 8 pair RCA socket with future proof user recongurable I/O & AV bypass
function
- bigger, 3 digit white 7 segment display

The icOn 5 is sonically transparent without addition or subtraction of
anything. The changes in level are seamless, with the channel balance
adjusted in 0.5 dB steps / channel should this be necessary. .
Unlike the resistive passive preamps, icOn 5 overcomes any impedance
mismatching between source and power amplier, which is a key factor in
preserving the sound quality.
Level switching is carried out using state of the art analogue switches
which eliminates the possibility of contact errors from conventional open
rotary switches used on many other passive preamps.
The channel balance is exemplary at max. 0.1 dB - virtually undetectable
by the human ear. The balance function provides 2x9 0.5 dB steps.
icOn 5 can be connected to equipment without any sensitivity issues to
cable lengths and capacitance, thus improving its interconnect exibility.
It has a sleep mode and mute functions, which preserves any settings
made prior to this being activated, and negating the needs to reset the
levels every time.
Hidden
touch sensor

All functions such as volume, balance, tilt, mute, source and output
selection are controlled remotely with an Apple Remote which enables the
listener to make adjustments from the seating position, and not where the
equipment is located. Except the balance & tilt every function is reachable
through the knob and touch sensor of the faceplate with the combination
of short and long touches or turning.
The manual volume control on the faceplate is realised with an industrial
grade optical encoder giving instructions to the built in microprocessor.
The way of working of the optical encoders provide a smooth, very precise
control with adjustable sensitivity, but may differ from what you are used
to. The volume control must be adjusted carefully, as it has the ability
to get loud quickly. Do not spin the volume control knob.
The 7 segment white colour LED display provides important information
on the status of icOn 5, so it’s easy to see what is happening and view any
changes.
The unique feature of the icOn 5 model is the user recongurable
RCA socket pair (RCA6). You can choose from the following I/O
congurations at the IR remote pairing process:
Cong.1 (displayed as io1): RCA1-6 inputs, RCA7-8 outputs
Cong.2 (displayed as io2: RCA1-5 inputs, RCA6,7,8 outputs
Cong.3 (displayed as io3): RCA1-5 inputs, RCA6 line output, RCA7-8
outputs

4
USING THE APPLE REMOTE
1
53
3
2
6 4
1 Volume Up / Output select
2 Volume Down / buffer ON/OFF
3 Input selection / Balance & Tilt
adjustment
4 Mute / Unmute or Wake Up
from sleep
5 Status, goes to Sleep when
pushed in Muted state
6 Enter and Exit to Balance / Tilt
adjustment, Night mode when
pushed in Mute (pushing again in
Muted state switches back to
normal display mode)

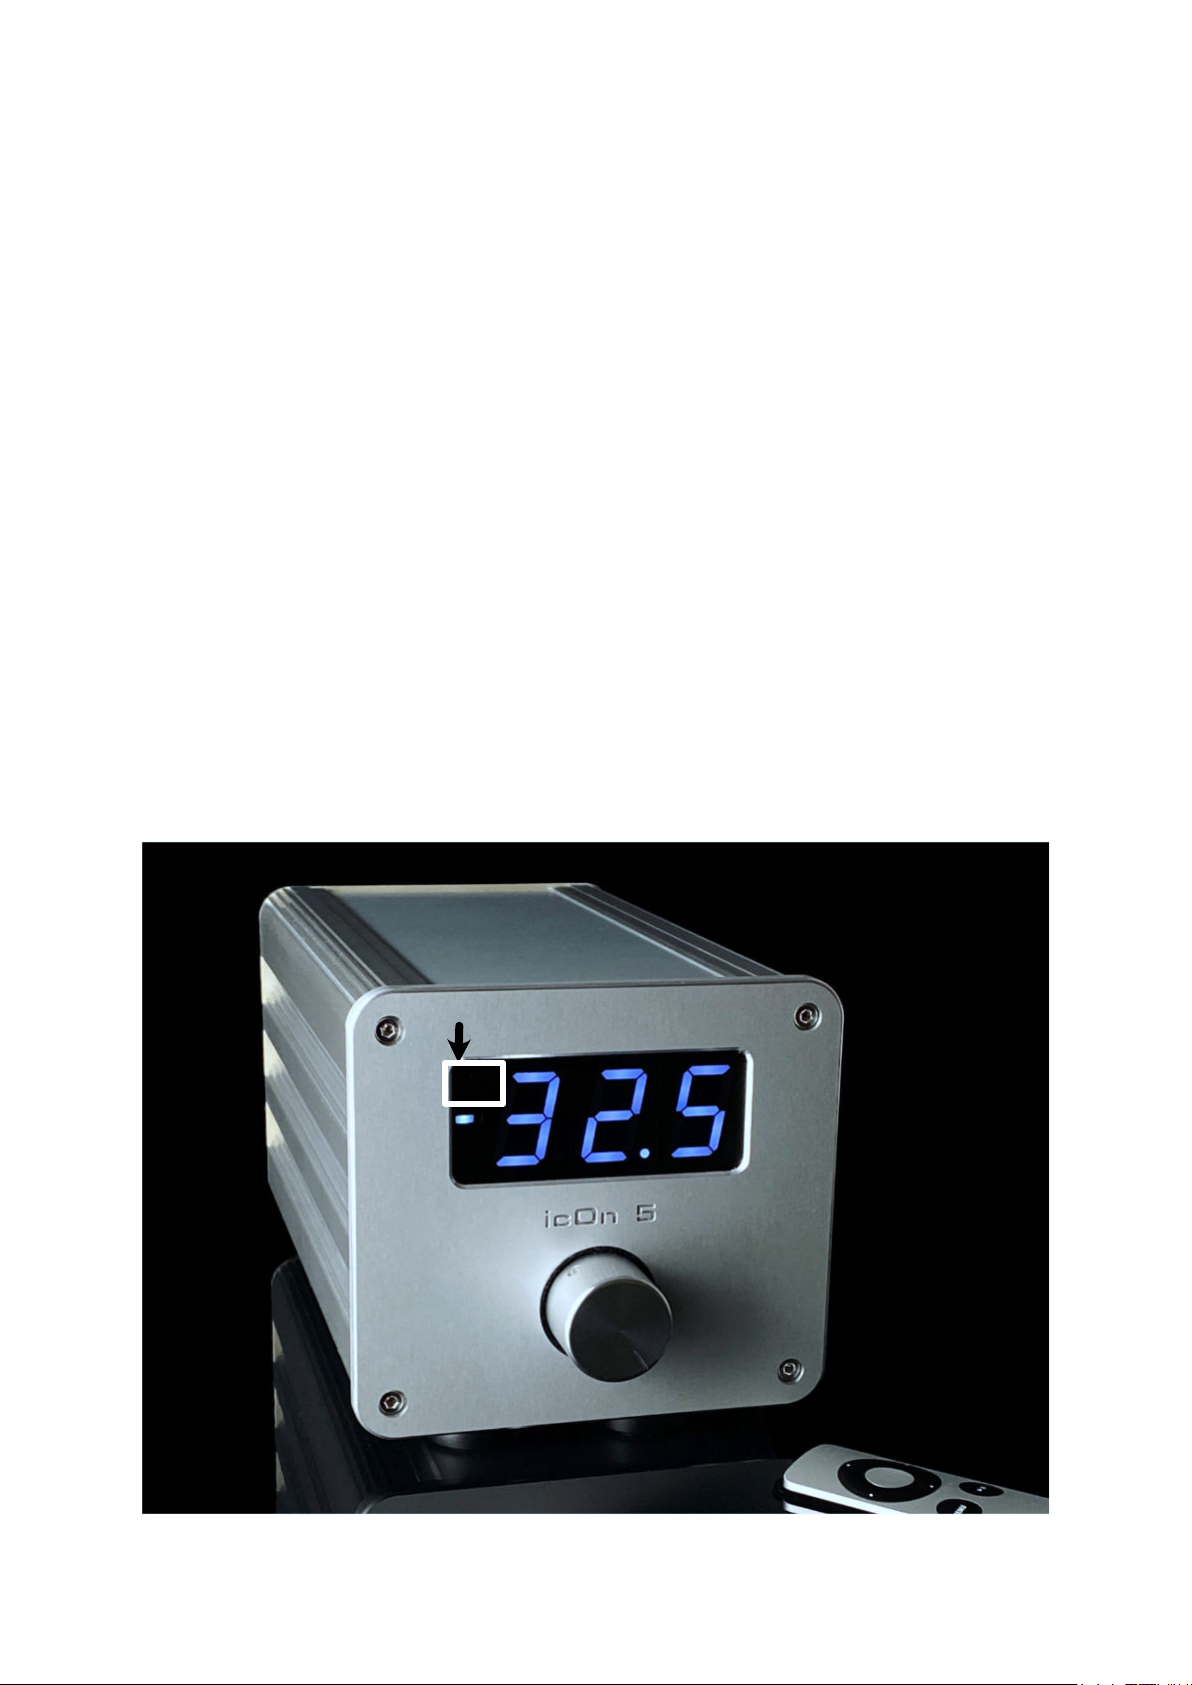
Volume: turn the Volume up with the button on top (1) and turn down with
the button on bottom (2).
Changing the Inputs: Inputs can be changed with the left and right
buttons (3) if Balance or Tilt adjustment is not active. If Balance or Tilt
adjustments are active to go back to normal listening mode push the Menu
button again once or twice.
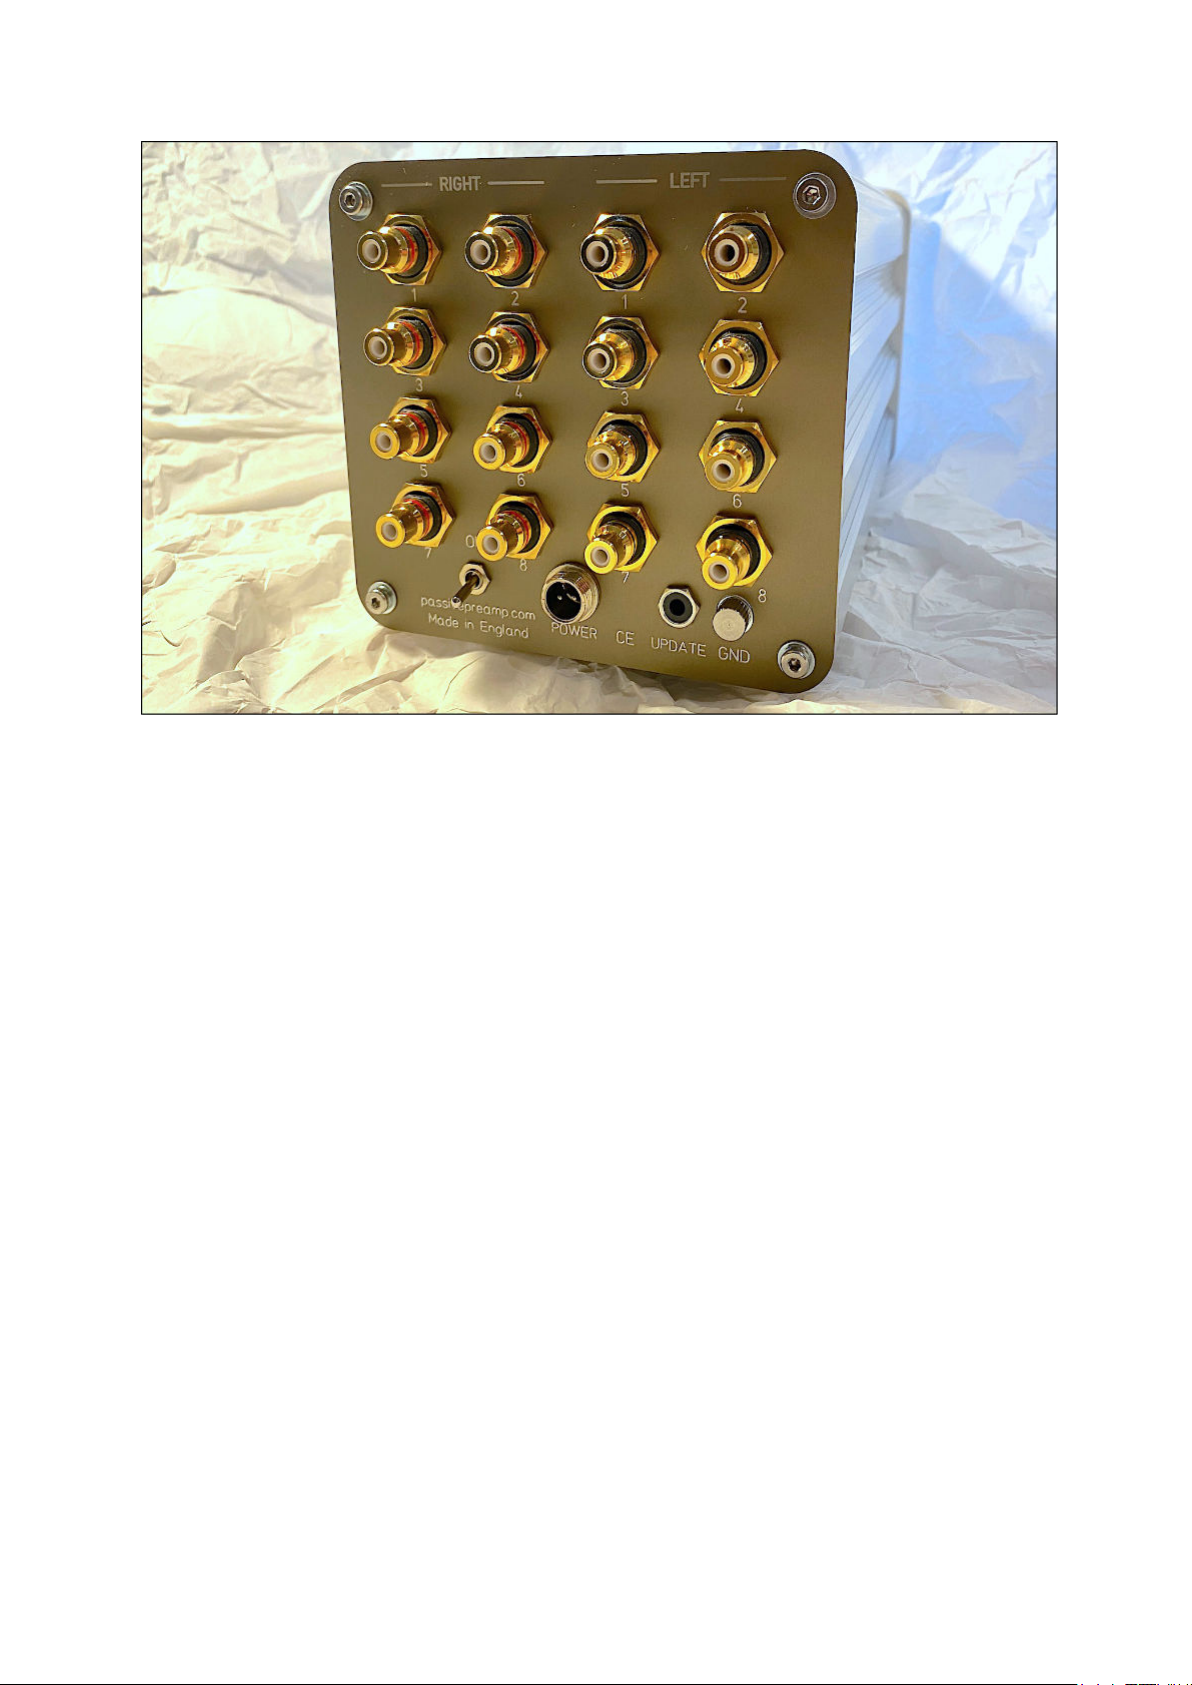
Changing the Outputs: Press the PLAY/PAUSE (4) button on the remote
to mute the music. In the muted state pressing the volume up button the
active output is changing and the number of the actual active output is
displayed on the right of the display. On the left you can see the active
input number. The output numbers show the engraved numbers above the
RCA sockets. The output 9 indicates when all outputs are active. You can
go back to music listening with the chosen output(s) with pressing again
PLAY/PAUSE (4) button.
Adjusting the Tilt: Start with pushing the Menu button (6) once. On the
display a “t”, the number of 0.5 dB tilt steps and a dash will appear,
showing the state of the tilt. When the number is 0 and the dash appears
in the middle the tilt function is defeated and it’s circuit is out from the
signal path. The dash in the top position will indicate slight treble increase
and bass decrease. Adjust the Tilt (in range +/- 4 steps) with the left and
right (3) buttons. When you push the left button the level of the bass is
increasing and the treble decreasing, for the right button the opposite. To
go back to the normal listening mode you should press the Menu button
twice. One push leads to the Balance adjustment mode.
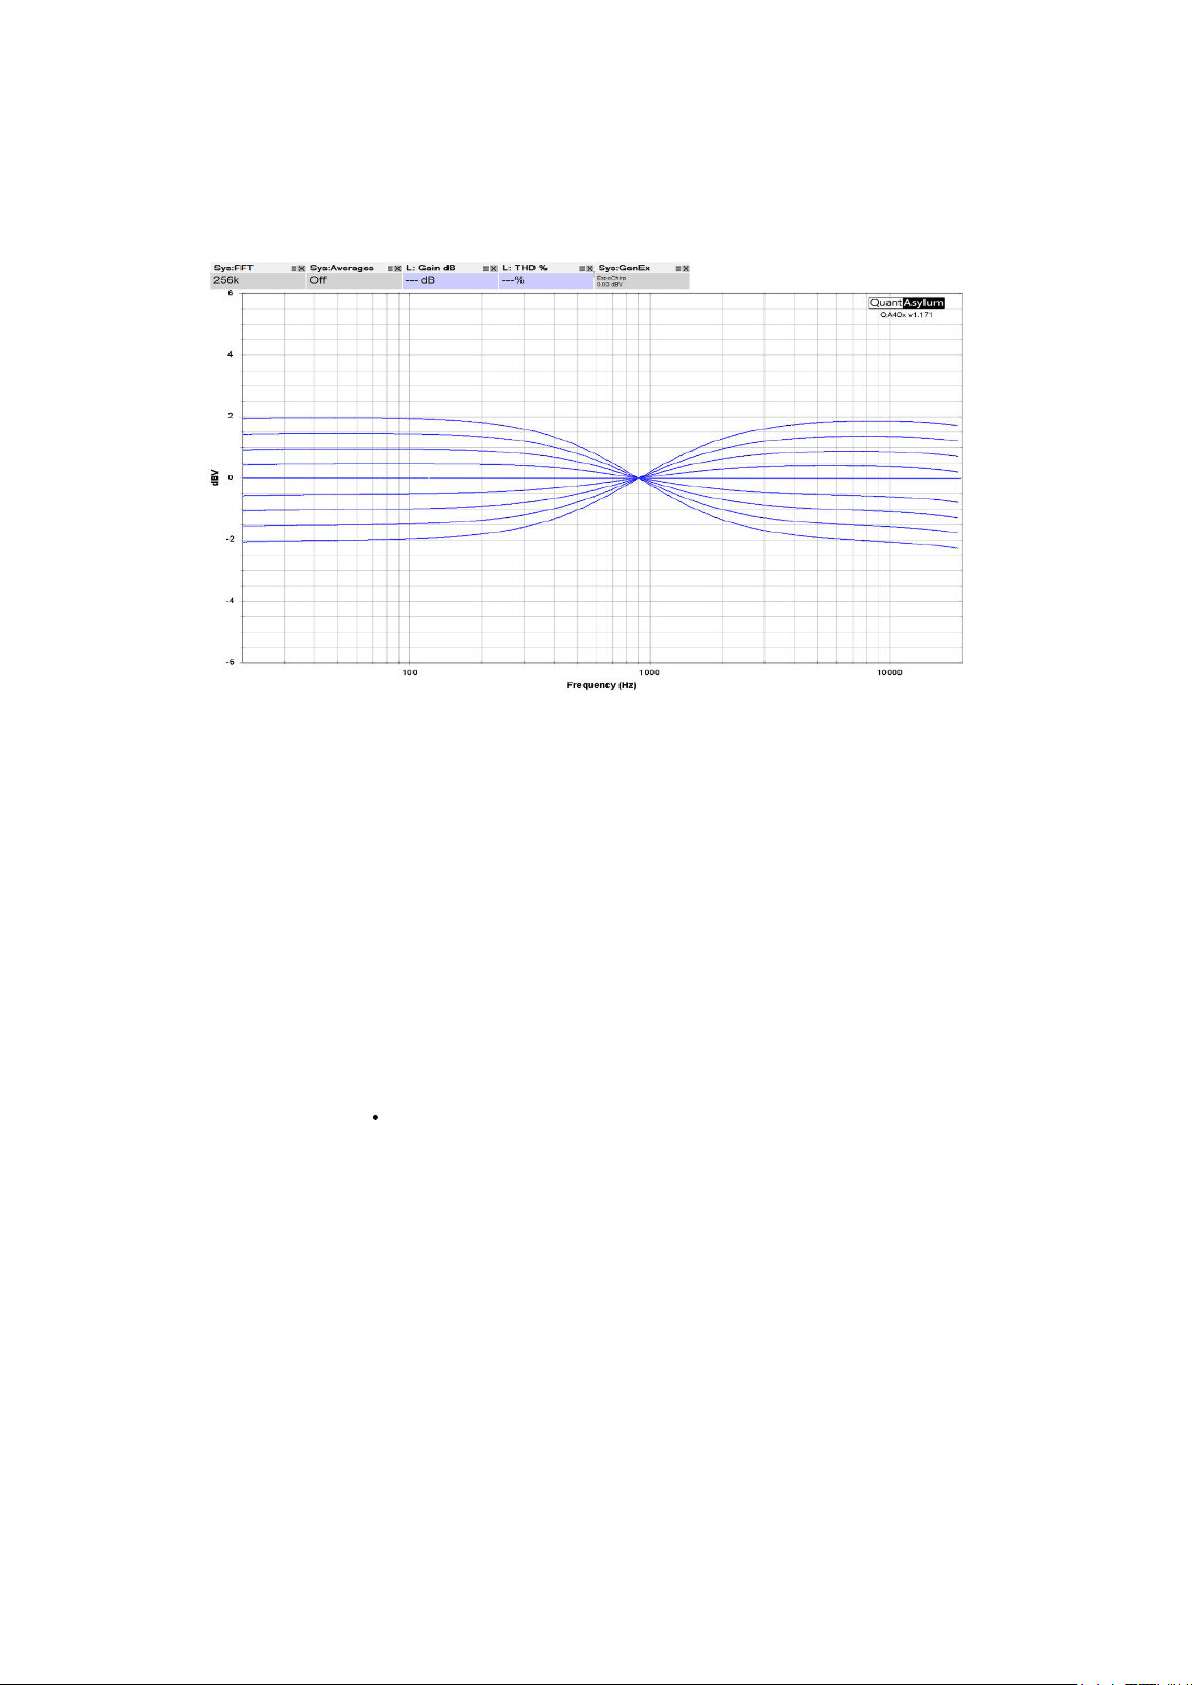
“The tilt control operates exactly as its name implies and produces a very
gradual change in balance across the musical spectrum without changing
the overall subjective level. When set for 1 with lower dash there will be a
gradual fall of only 1 dB from bass to treble with the maximum rate of
change in the centre (900Hz) of no more than ¼ dB per octave. This
absence of any sudden change means that there won’t be ‘colouration’
added to the sound. The sound will remain entirely natural but with a slight
added ‘warmth’. Such a setting will be used if the recording and/or
listening room are slightly too analytical or over-bright. Conversely if both
recording environment and listening room have reverberation falling with
frequency rather than sounding lush, the 2 - 3 or even 4 would be used to
restore detail …”

6
The icOn 5 thus resurrects what many believe one of the most useful /
purist ‘tone control’ ever made. For those who don’t need / want it, it
remains entirely out of the signal path.
Changing the Balance: Select the Balance function with pushing the
Menu button (6) twice. On the display a “b”, the number of 0.5 dB balance
steps and a dash will appear, showing the state of the balance. When both
sides have equal volume the number is 0 and the dash will appear in the
middle. The dash in the top position will indicate higher volume on the right
side. Adjust the Balance (in range +/- 9 steps) with the left and right (3)
buttons. When you push the left button the level of the left channel is
increasing and the right channel’s volume decreasing (and vice versa). To
go back to the normal listening mode you should press the Menu button
again, where you can change the Inputs with the right and left (3) buttons.
The balance adjustment is disabled near the extreme ends to preserve the
integrity of the channels.
Central Button: The button 5 (in the centre of the black circle) has two
different functions. Pushing the central button the number of activated
input (at the left) and output (on the right), the tilt value, the state of
buffered (buF) or passive (PAS) mode are displayed for 2 seconds to
check the status of icOn anytime without any change. If icOn 5 is muted
then this button will take icOn into sleep mode. In sleep mode the display
is dark with a dim point in the middle. Every preamp function is disabled,
the outputs are inactive. Double touch the sensor on the faceplate or push
the PLAY/PAUSE button on the remote to wake up icOn from sleep.

MUTE: Press the PLAY/(4) button on the remote to mute or unmute the
music. Pressing the 1,2 or 3 buttons in Mute initiates an Unmute too. The
Mute/Unmute changes are not abrupt but quick, pleasant up or down
sweeps. In Mute state -99 is shown on the display.
LED Display Night Mode: First activate Mute and after that you can
activate/deactivate the Night Mode pushing the Menu button (6). Go back
to the normal Listening Mode with the PLAY/PAUSE button. In Night Mode
the volume numbers are not displayed, only a dimmed dash but it goes
back to full display for a short time when you initiate any change.
USING THE KNOB AND THE HIDDEN TOUCH
SENSOR
Turn the knob right: Volume Up
Turn the knob left: Volume Down
Touch sensor: invisible, it’s behind the upper left corner of the
display window. In order to reach certain functions you will need to
combine short (•) and long (–) touches.
Here you can nd the combinations:
• next input (after last input comes input 1 again)
– mute / un-mute
• – night mode activation/deactivation. After activation a dim dash will be
displayed in night mode. Deactivate the night mode with one short and
one long touch again on the sensor
• • sleep mode / wake up from sleep state
Personalisation possibilities:
• • • You choose between two display brightness. They alternate with every
3 clicks the brighter and dimmer state

• • – switch between ‘L’ - low sensitivity and ‘H’ - high sensitivity of the
optical encoder. In high sensitivity mode adjust volume carefully and do
not spin the volume control knob.
Important note:
If you have activated the optional AV pass-through function for the RCA5
input, on the output the input signal will appear without attenuation (full
volume, 0 dB)and you will see 0 (dB) on the display. In AV pass-through
state every function (volume adjustment, mute, balance) is disabled , only
input change is possible to nish the AV pass-through mode and listening
normally from the other inputs.
Please be careful with the AV pass function, because using it in a wrong
way you can destroy your loudspeakers. If you don’t understand fully how
does it work - do not enable this function.
FACEPLATE
Handle the faceplate with care, it’s easy to scratch it with sharp objects.
Clean it only with soft cloth and window cleaner if it’s necessary.
7 SEGMENT LED DISPLAY
The display shows the volume in dB (or optionally in numbers from 0 to
135). Max. volume is +3.0 dB (135), minimum level is - 80 dB (1), when
muted -99 dB (0). The night mode without showing the volume numbers
(only a dim dash) is reachable through the sensor on the faceplate and
from the remote.
REAR PLATE
Power switch: You can leave icOn 5 switched ON, using the sleep mode
for deactivation from the Apple remote or the sensor.
Power connector: use only the supplied wall wart power supply or
the optional icOn power supply!!! If you would like to use a third
party power supply please consult with us rst.
8

The UPDATE 4 pins jack socket together with a special hardware device
allows operating software and conguration updates to be loaded into the
unit. These connectors and update processes are not available for end
users. Do not connect any cable or device into this connector! About a
required update or conguration changes contact your dealer or the
manufacturer. The grounds (cold) of RCA inputs and outputs pins are
connected parallel all the time and are connected to the chassis. There is
no galvanic isolation between the inputs and outputs due to the nature of
autoformers.
PAIRING AN APPLE REMOTE
icOn 5 works with its supplied (and paired) Apple remote to prevent any
disturbance by other Apple remotes used together with an Apple TV, etc.
If you want to use another Apple remote with icOn 5 you have to “pair”
them. icOn 5 will learn the unique ID code of the new Apple remote and
will work only with it afterwards. Steps of pairing:
1. Switch on icOn 5 with the power switch on the back and keep touching
the sensor immediately till ‘ir’ will appear on the display.
2. Push the CENTRAL button in the next 5 seconds on the remote. After
few more seconds a ‘YA’ shows that the remote is pared successfully
with icOn 5.The next numbers are the serial number of your icOn 5.
3. If ‘no’ shows, the pairing was unsuccessful. Please try it again.
Using other buttons than the CENTRAL button you can change the
basic congurations of your icOn 5. This is how:
4. If you want to customise the volume display mode:
- for step number display: push CH Up button
- for dB display: push CH down button
5. If you want to change the I/O conguration:
- to increase the I/O conguration number push the Volume Up button (to
change the io1 to io2 or from io2 to io3)
- to decrease the I/O conguration number push the Volume Down button
(to change the io3 to io2 or from io2 to io1)

6. You can activate the AV bypass function for the RCA5 input with the
Mute button and deactivate it with the Menu button. Be very careful with
the AV bypass function, it can easily destroy your loudspeaker if you
mistakenly use the source with it’s full output level at RCA5!!!
SAFETY INSTRUCTIONS
• Please read and follow all instructions
• Do not use this apparatus near water.
• Exclusively use only the original power adaptor. Unplug this apparatus
when moving it & during lightning storms or when unused for long
periods of time. Only use attachments/accessories specied by the
manufacturer.
• Clean only with dry cloth. We suggest using a non abrasive micro bre
towel. Please do not use any solvents or liquids.
• We service icOn 5 with return to base. Service is needed when the
power adaptor is damaged, liquid has been spilled, the equipment has
been exposed to rain or moisture, does not operate normally, or has
been dropped. Please DO NOT send back your preamp without it’s
power supply and remote controller!
GUARANTEE
icOn 5 comes with a 2 years return to base warranty.
PACKAGING
Please save all packaging. Your icOn 5 preamplier is a precision
electronic instrument and should be returned in its case and properly
cartoned any time shipment is made. Should you need to ship your icOn
5 it should be packed carefully.
SCOPE OF DELIVERY
1. icOn 5 preamplier
2. Apple Remote controller
3. Power adaptor 6V, 0.8A
4. User’s Manual
10

Number of volume
positions
136
Attenuation range From +3 to -80dB
Attenuation step sizes From +3db to -48 dB: 0.5 dB; below -48
dB: 1 dB
Attenuator 1 pair bespoke autoformers made by
Dave Slagle, Intact Audio, USA
Maximum input signal 6V RMS
Max. input signal on the
RCA1
20V RMS
Tilt control 900 Hz centre freq., +/-4 x 0.5 dB lift/cut
at 20 Hz and 20 kHz
Frequency response (tilt
OFF)
Within +/- 0.1 dB in the 20 Hz - 20 kHz
frequency range
Distortion less than 0.001% at average volume
levels, see the FFT spectrum
Channel balance better than +/- 0.1 dB.
Input impedance Min.: 30 kOhm, but above 1 MOhm at
average volume levels
Inputs 5 or 6 pair RCA sockets, user selectable
Outputs 2 or 3 pair RCA sockets and 1 line out,
user selectable
Dimensions Width: 135 mm (5.3 in), Height: 130mm
(5.1 in), Depth 270 mm (10.6in).
Weight 2.4 kg, 5.3 lb
Power supply 6V DC, min 0.5A
Power consumption 6V, max. 200 mA
IR remote controller Apple remote
SPECIFICATION

DISTORTION MEASUREMENT

LIFE-CHANGER AUDIO UK
Life-Changer Ltd.
18 Old Lane,
Manchester M11 1BE,
United Kingdom
www.passivepreamp.com
+44 7462 538 212
Table of contents
Other Life Changer Amplifier manuals