manuals.online logo
Brands
  1. Home
  2. •
  3. Brands
  4. •
  5. Lilliput
  6. •
  7. Fish Finder
  8. •
  9. Lilliput LCD Fish/Depth Finder User manual

Lilliput LCD Fish/Depth Finder User manual

Popular Fish Finder manuals by other brands

JRC JFV-700HP instruction manual

JRC

JRC JFV-700HP instruction manual

Norcross D10DX.01T Installation and operation manual

Norcross

Norcross D10DX.01T Installation and operation manual

Hawkeye Mfg FishTrax FT1PXC Operation manual

Hawkeye Mfg

Hawkeye Mfg FishTrax FT1PXC Operation manual

JRC FF50 instruction manual

JRC

JRC FF50 instruction manual

Furuno FCV-628 Operator's manual

Furuno

Furuno FCV-628 Operator's manual

Humminbird Tour Series Operation manual

Humminbird

Humminbird Tour Series Operation manual

Humminbird 595C Operation manual

Humminbird

Humminbird 595C Operation manual

Raytheon V720 instruction manual

Raytheon

Raytheon V720 instruction manual

Navman FISH 4200 Installation and operation manual

Navman

Navman FISH 4200 Installation and operation manual

Humminbird 747c Operation manual

Humminbird

Humminbird 747c Operation manual

Humminbird Piranha 1 install guide

Humminbird

Humminbird Piranha 1 install guide

Humminbird 515 Operation manual

Humminbird

Humminbird 515 Operation manual

Samyung ENC N700 user manual

Samyung ENC

Samyung ENC N700 user manual

Humminbird 585C Operation manual

Humminbird

Humminbird 585C Operation manual

Humminbird 300TX Operation manual

Humminbird

Humminbird 300TX Operation manual

Lowrance Elite-5 DSI Operation manual

Lowrance

Lowrance Elite-5 DSI Operation manual

Lowrance Elite FS manual

Lowrance

Lowrance Elite FS manual

Furuno FCV-627 Operator's manual

Furuno

Furuno FCV-627 Operator's manual

manuals.online logo
manuals.online logoBrands
  • About & Mission
  • Contact us
  • Privacy Policy
  • Terms and Conditions

Copyright 2025 Manuals.Online. All Rights Reserved.

LCD Fish/Depth Finder
User Manual
ZHANGZHOU LILLIPUT ELECTRONIC TECHNOLOGY CO., LTD
ADDRESS: Zong Si Road, Lan Tian Economic Deve opment Zone,
Zhangzhou, Fu Jian, 363005, China
TEL:0596-2109323、2109661 FAX:0596-2109611
http://www. i iput.com.cn & http://www.gdsun.com
Emai : sa es@ i iput.com.cn
1
Dear Customer:
::
:
Thank you for choosing Li iput’s LCD fish finder. This product adopts
high-performance embedded computer hardware. It is designed for operations under
re ative y harsh marine environments and featuring water prove, damp prove,
corruption protection, wide vo tage range protection etc. The de icate y optimized
design meets the requirements of a users in its app ications to various conditions and
occasions. Li iput aims to server our customer with its exce ent qua ity and exquisite
manufacturing techno ogy.
We encourage you to read this insta ation and operations carefu y in order to get fu
benefit from a the features and app ication of this product.
Notice:
::
:
 Do not power on the equipment when the transducer is expose to the air. It might
cause the damage to the transducer.
 Insta the transducer according to the instruction. Do not bend, twist, pu or press
the cab e of the transducer.
 The extension cab e needs to put inside the sea termina box. The cab e of the
transducer is not a owed to touch the surface of the boat.
 Once the equipment’s power has been put into the “on” position do not switch the
computer’s power to the “off” position unti the computer is fu y booted.
 P ease make sure that the power vo tage setting has been adjusted to the standard
vo tage va ue of the ocation where the product is being used.
 Before using this product, p ease first make sure that a externa wires and power
adapters have been correct y connected. If you suspect any defects, p ease contact
your sa es agent or factory personne immediate y.
 Dust, humidity and dramatic temperature changes wi affect the usage ife of this
computer. P ease keep the machine away from these hazards.
 In c eaning the units do not use chemica detergents. Remove dust with a soft
c oth to ensure brightness.
Warnings:
::
:
High Vo tage Circuit! Disassemb y and repair of device shou d on y be
performed by authorized service persona .
Power off the device from the p ane immediate y if there is water eaking into
the equipment. Continuous using the equipment might causes short circuit.
P ease contact our service under those circumstances.
Do not attempt to modify or repair the origina equipment. It may cause the
damage of the precious e ectronic components inside the device.
Power off the device from the p ane immediate y if there is fire or smoke
around. Continuous using the equipment might causes short circuit. P ease
contact our service under those circumstances
2
Contents
1. Introduction...............................................................................................3
2. pecification...............................................................................................3
2-1. Functions..........................................................................................3
2-2. Parameter..........................................................................................4
3. Installation..................................................................................................4
3-1. Insta ation Summary........................................................................4
3-2. Who e Device Insta ation…….........................................................5
3-3. Main Device Insta ation...................................................................6
3-4. Transducer Insta ation..................................................................... 6
3-5. Device Cab e Interfaces………........................................................8
4.
..
.Display Windows......................................................................................9
4-1. Tit e Screen.......................................................................................9
4-2. Sonar View…………………………….....................…………..... 9
4-3. Sonar Zoom View…………………….....................………….......11
4-4. Dua Sonar View……………………….....................………….....12
4-5. Big Digita View…….………………….....................…………... 13
4-6. Circu ar View…………………………….....................…….…… 14
4-7. System Status…………………………….....................….……… 15
5. Key Button Functions............................................................................... 15
6. The Menu ystem...................................................................................... 17
6-1. Main MENU………………………………......................………. 17
6-2. Detai ed MENU…………………………..….....................…...... 18
6-3. Brightness adjustment……………………..….....................…...... 21
7. RARAMETER........................................................................................... 21
8. TANDARD ACCE ORIE ……………………..……..…………...... 22
3
1. Introduction
Your fishing system user interface is easy to use. A combination of menu, keys,
different views, and situation-specific, customizab e menus a ows you to contro the
co or on disp ay. Refer to the fo owing i ustration, and see functions, views and
menu systems for detai information.
1.4-WAY Cursor Contro
2.MENU
3.VIEW
4.EXIT
5.POWER
6.Screen
2. pecification
2-1. Functions:
 4.3” TFT LCD (reso ution 480x320);
 Composed of mu ti-co or mu ti- eve waveform is more de icate;
 Manua adjustment range, the screen disp ays the waveform wi not break;
 Automatic underwater range and automatic identification without manua intervention;
 pause screen brush map, move the cursor measurement of arbitrary target ocation;
 Any manua y set the disp ay range up and down range;
 User to adjust the screen sp it ratio;
 Data recording and p ayback
;
 High sensitivity gain and the gain in sha ow water, c ear bottom echo detection;
 Mu tip e a arm modes: depth, vo tage, fish, temperature;
 Inte igent a gorithm for more accurate identification of fish f esh, and a visua disp ay;
 Setting disp ay: contour, windows, rea -time window, co or, background co or, ight;
 A variety of protective measures: overvo tage, over current protection, reverse po arity
protection;
 The who e machine adopts modu ar design, stabi ity, re iabi ity, defau t settings are not ost;
 Si icone f exib e and re iab e touch of a button, the new soft keyboard functiona ity a ows
simp e operation of comp ex functions.
2-2. Parameters:
1. Disp ay, 4.3” co or LCD, (reso ution 480X320)
2. Sonar co ors: standard (4 co ors, 32 eve s), gray, reverse, inverse, green etc
3. Disp ay Mode: Standard, bottom zoom, dua disp ays, arge numbers, graphics, version
information, simu ation
4
4. Auto Mode: Auto range, auto sensitivity
5. Disp ay waveforms: Anyway to set, disp ay the waveform wi not be interrupted
6. Interference suppression: automatic suppression of interference signa s with frequency
unwanted signa Interference suppression
7. Cursor operation: for any point on the screen depth measurement
8. Depth migration: ±5m
9. A arm mode: fish a arm, depth a arm, battery a arm, temperature a arm
10. Reso ution: 0.022 m
11. Screen sp it: vertica
12. Frequency: 83/200KHZ dua
13. Depth range: 0 to 100 meters
14. Chart speed: 1 to 10
15. Background co ors: white, b ue, b ack
16. Output power: 300W
17. Power supp y
:
DC 8.5V
~
24V
18. Working Environment
:
0 to 50
℃
,
re ative humidity be ow 95%
19. Storage Temperature
:
20-70
℃
20. Degree of protection
:
IP64
21. Weight: 960g
3. Installation
3-1. Installation ummary
 Avoid direct sunray,avoid impact shock.
 The humidity and temperature condition of the insta p ace shou d meet the
specifications.
 The equipment shou d insta in a we venti ated p ace, and keep away from the air pipe
and air vent.
 Insta the equipment in a sufficient room is recommended, therefore prepare enough
room for the cab es and make it easy to carry out inspection and service.
 Keep the equipment away from e ectromagnetic radiation device, such as motor and
generators.
5
3-2. Whole Device Installation
6
3-3 Main Device Installation
3-4.
..
.Transducer Installation:
Transducer is a precious front signa sensor. It must transport and insta with care, no heavy
pressure, fa off or working in the air. Painting and parasite shou d keep away from the
surface of the transducer.
The mounting ocation is very important and wi affect the measure accuracy of the
transducer direct y. It is recommended to insta it on the bi ge where the surface is smooth
and f at. Keep the transducer far away from prope er or pipe ines which generate turbu ent
water. Keep the surface of the transducer horizonta , use guide p ate to guarantee gent e water
f ows if the bi ge is not f at. Do not expose the transducer into the air under any
circumstances.
Mark and dri mounting ho es:
7
1)
Ensure that ship at the horizonta position, and the hu does not ti t.
2)
Ho ding the transducer bracket temp ate for the boat to mark the two mounting ho es.
Center of two ho es shou d be para e to the surface. Ensure that the bottom of the
temp ate and the distance between the ower edge of the beam is about 0 ~ 5 mm.
8
3-5. Device Cable Interfaces
9
4. Display Window
4-1. Title creen
Turn on your device F403S by pressing the POWER key. The
tit e screen is disp ay unti the F403S begins operation. The
device wi begin Norma or Simu ator operation, depending
on your choice.
Press MENU to begin Simu ator operation. The simu ator data
is avai ab e under this mode; however the recording function
is unavai ab e under simu ator mode. Otherwise it wi enter
norma operating mode. In norma mode there, enter the ast
visit of the view interface.
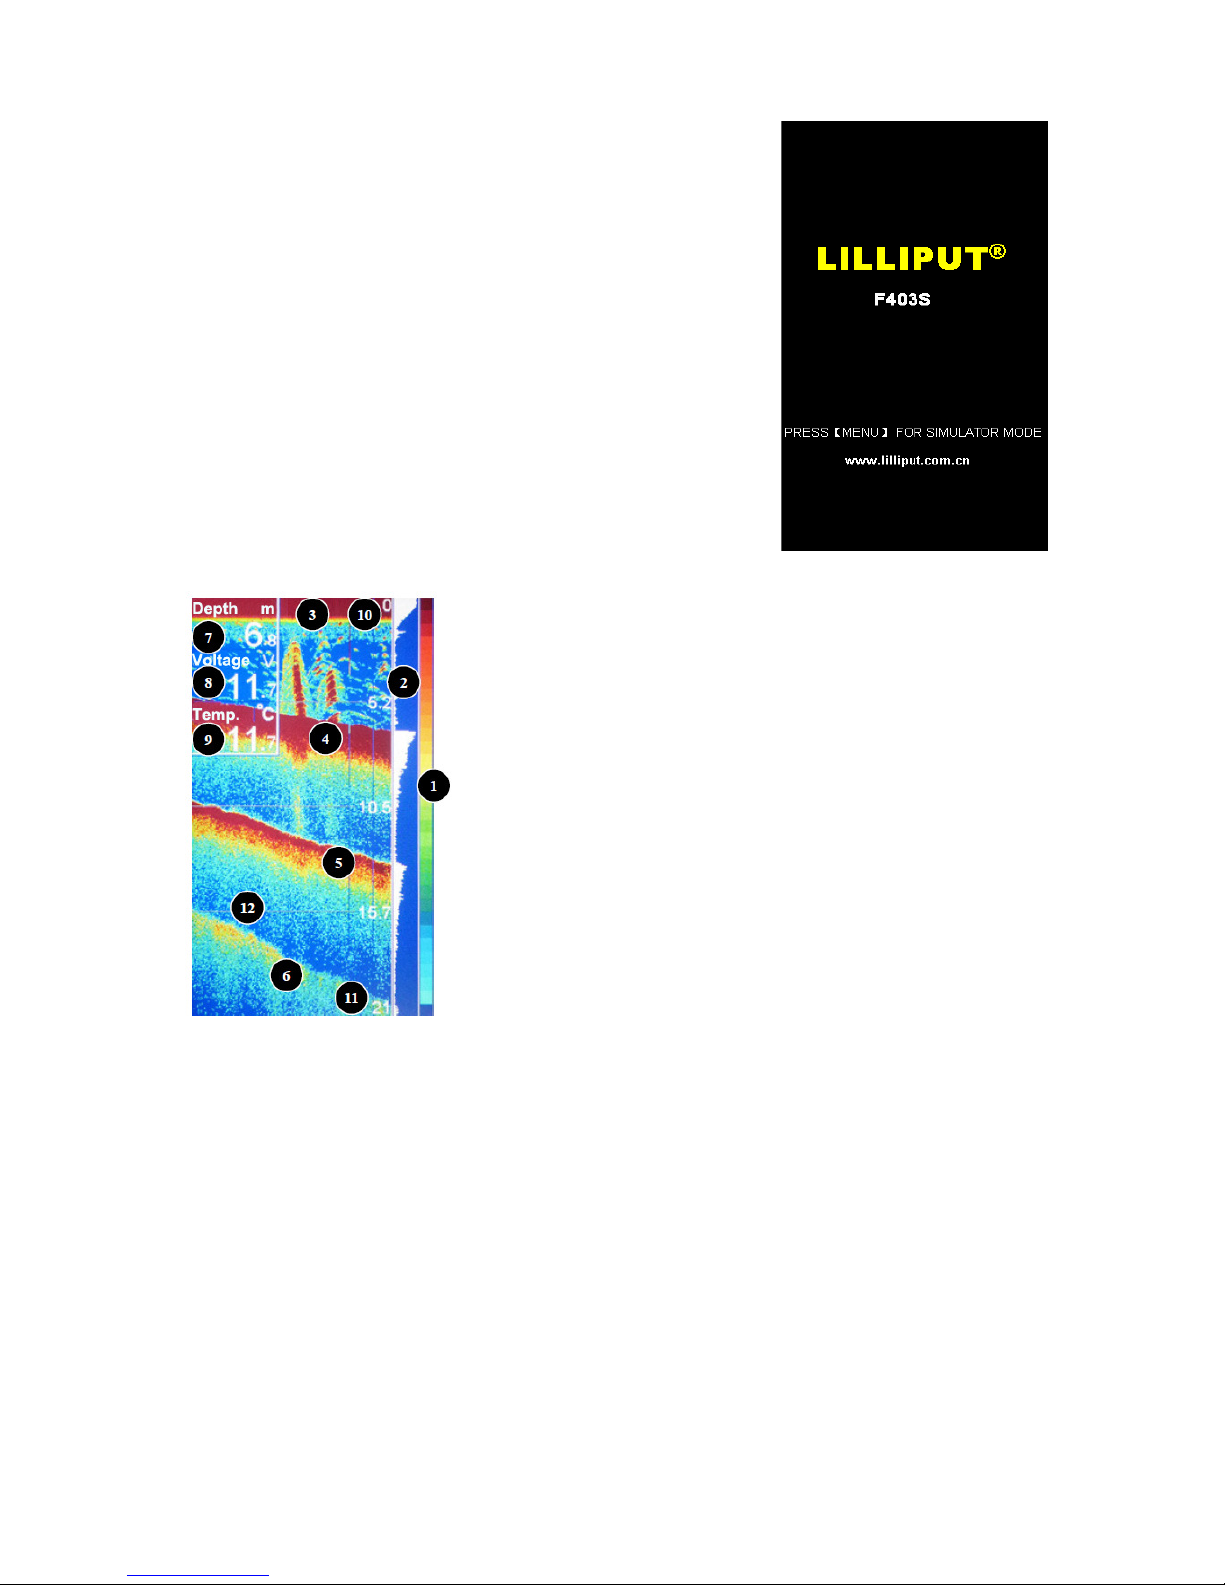
4-2. onar View
1. Sonar Co or Bar: Co or spectrum indicating ow to high sonar
intensity returns, where red indicates high intensity and white
indicates ow intensity, defau t va ue: standard.
2. Rea Time Sonar Window: Disp ay the rea time samp e data,
the disp ay mode can be changed, defau t va ue: waveforms.
3.
Water Surface Noise: The noise waveforms from Sonar returns.
4.
Sonar Return: First sonar return, it indicates depth of the water
at present.
5.
Second Sonar Return: When the sonar signa bounces between
the bottom and the surface of the water and back again. Use the
appearance of the second return to determine bottom hardness.
Hard bottoms wi show a strong second return, whi e soft
bottoms wi show a very weak one or none at a .
6.
Third Sonar Return: When the sonar signa bounces between
the bottom and the surface of the water and back again.
7.
Window 1: Water depth, can set depth a arm, defau t va ue: off.
8.
Window 2: Input Vo tage, can set ow battery a arm, defau t va ue: off.
9.
Window 3: The temperature disp ay, the current ocation of underwater transducer
temperature, the current water temperature a arm can be set; set off according to user needs
or disp ay, defau t va ue: off.
10.
On the range: the range of disp ay settings, you can manua y set, defau t va ue: 0
11.
The fo owing range: Disp ay settings under the scope, you can manua y set, defau t va ue:
auto.
12.
Depth contours: with three ines to the screen is divided into severa equa portions, you can
a so turn off the menu, defau t va ue: off
13.
Background co or: b ue, white, b ack. Different background co ors, font co ors disp ayed
are not the same, defau t va ue: b ue.