LINNUT Siiri User manual

LINNUT “ Siiri ”
design Oiva Toikka,2019
Apparecchio di illuminazione da tavolo
ricaricabile a luce diusa. Base in ABS. Corpo
in PC colorato. Tecnologia led, Interruttore
touch con funzione dimmer. Ricarica tramite
cavo micro USB-C e carica batteria.
Ambiente Per interni
Peso 0,7 kg
Fonte luminosa modulo led integrato 1x2,4W - 3000K - 370 lm - CRI>80
Potenza max 5 W
Batteria Sì. Autonomia no a 6 h full peak, la durata della batteria aumenta
riducendo l'intensità luminosa. Per ricaricare la batteria utilizzare
esclusivamente il carica batteria fornito da Magis (5V-2000mA,
100-240V, 50-60Hz 0,3A). Tempo di ricarica completa circa 4,5 h.
Certicazioni 40 (EN)(IT) 40
LINNUT “ Siiri ”
design Oiva Toikka,2019
16,528
19
16,528
19
Rechargeable table lamp with diused light.
ABS base. Coloured PC body. LED
technology, touch switch with dimmer
function. Charges using micro USB-C cable
and battery charger.
Environment For Indoor use
Weight 0,7 kg
Lamp integrated LED module 1x2.4W - 3000K - 370 lm - CRI> 80
Power max 5 W
Battery Yes. Autonomy up to 6 hrs fully charged, battery life increases with
reduced light intensity. To recharge the battery only use the battery
charger supplied by Magis (5V-2000mA, 100-240V, 50-60Hz 0,3A).
Charging time approx. 4,5 hrs.
Certications

ISTRUZIONI DI INSTALLAZIONE ED IMPIEGO
ATTENZIONE!
La sicurezza dell’apparecchio é garantita solo rispettando queste istruzioni sia in fase di
installazione che di impiego; é pertanto necessario conservarle.
AVVERTENZE:
- All’atto dell’installazione ed ogni volta che si interviene sull’apparecchio, assicurarsi che
sia stata tolta la tensione di alimentazione.
- L’apparecchio non può essere in alcun modo modicato o manomesso, ogni modica ne
può compromettere la sicurezza rendendo lo stesso pericoloso. MAGIS declina ogni
responsabilità per i prodotti modicati.
- Se il cavo essibile si danneggia, deve essere sostituito da MAGIS o da personale
qualicato al ne di evitare pericoli.
- L’apparecchio è esente dal rischio di emissione fotobiologica.
- Il simbolo indica che prodotto deve essere smaltito in modo dierenziato dai riuti
urbani.
- La sorgente luminosa non può essere sostituita dal cliente. Per informazioni
contattare MAGIS.
ISTRUZIONI PER LA PULIZIA DELL’APPARECCHIO
- Per la pulizia dell’apparecchio utilizzare esclusivamente un panno morbido eventualmente
inumidito con acqua e sapone.
- Attenzione: non utilizzare alcool o solventi.
INSTRUCTION FOR CORRECT INSTALLATION AND USE
WARNING!
The safety of this tting can only be guaranteed if these instructions are observed, during
both installation and use. Please retain these instructions safety.
REMARKS:
- When installing and whenever acting on the appliance, ensure that the power supply has
been switched o.
- The appliance may in no way be modied or tampered with, any modication may
compromise safety causing the appliance to become dangerous. MAGIS declines all
responsibility for products that are modied.
- Should the external trailing cable get damaged,it must be replaced by MAGIS or by
qualied personnel in order to avoid any danger.
- The device carries no risk of photobiological emissions.
- The symbol shown on the device indicates that the product must be thrown out in a
dierent manner than with the urban trashes.
- The light source cannot be replaced by the customer. Contact MAGIS for information.
CLEANING INSTRUCTIONS
- Use only a soft cloth to clean the appliance, dampened with water and soap or mild
cleanser if needed for resistant dirt.
- Warning: do not use alcohol or other solvents.
(EN)(IT)
Environment For Indoor use
Weight 0,7 kg
Lamp integrated LED module 1x2.4W - 3000K - 370 lm - CRI> 80
Power max 5 W
Battery Yes. Autonomy up to 6 hrs fully charged, battery life increases with
reduced light intensity. To recharge the battery only use the battery
charger supplied by Magis (5V-2000mA, 100-240V, 50-60Hz 0,3A).
Charging time approx. 4,5 hrs.
Certications
G
F
1s
25-100% 100%
(IT)
(EN)
01
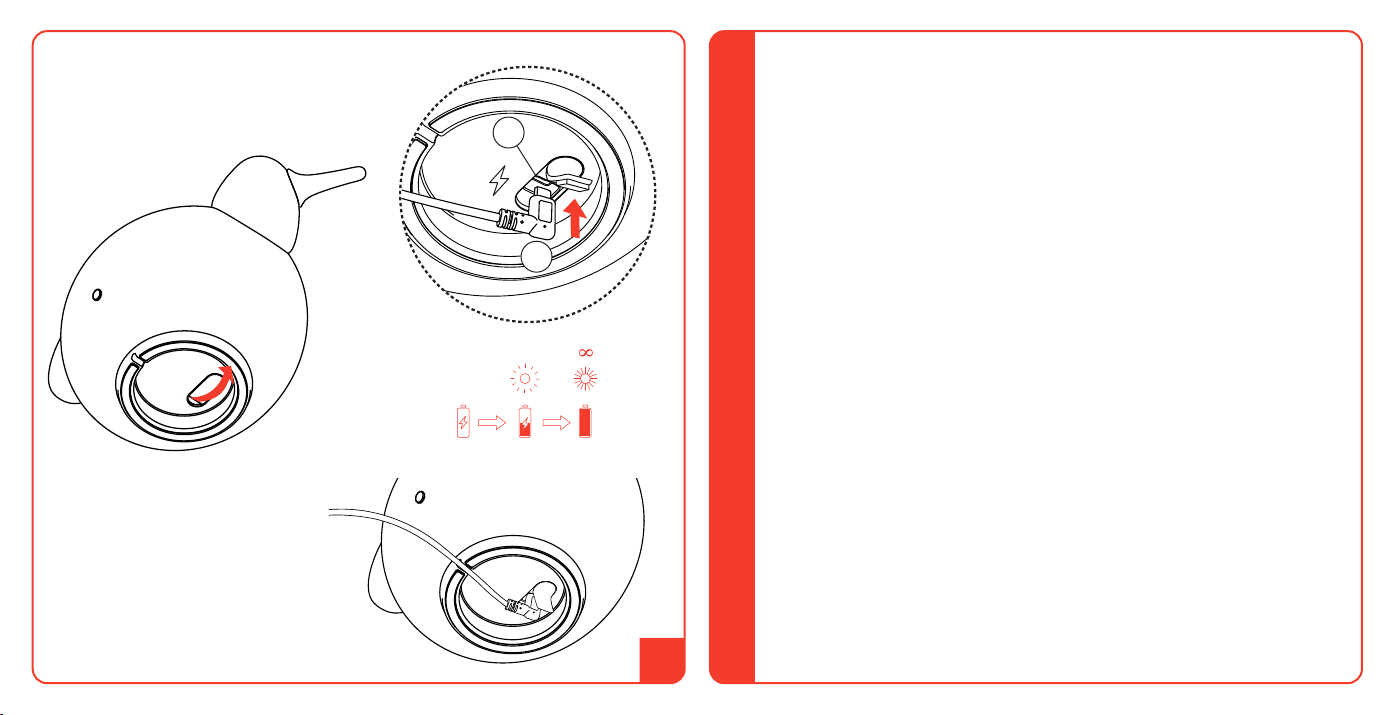
01 RICARICA BATTERIA. Inserire la presa micro-USB type-C (F) nel connettore (G)
dell’apparecchio. Collegare il cavo USB al carica batteria. Eettuare una carica completa.
La scheda di gestione è dotata di funzione di autoapprendimento: ogni volta che si collega
o scollega il cavo USB Type-C, la scheda esegue il ciclo di autoapprendimento della durata
di circa 3” accendendo la lampada al 100% e spegnendola gradualmente. Èmolto
importante che durante questa fase la lampada non venga mai toccata: in caso di
tocco accidentale si dovrà scollegare e ricollegare il cavo per ripetere il ciclo.
Lo stato di ricarica è segnalato dalla frequenza di pulsazione del led visibile attraverso il
connettore (G): luce blu costante = carica completa; luce blu ad intermittenza (3s) =
batterie in fase di ricarica. Emissione luminosa < 5% = carica batteria < 25%, in questa
condizione non vengono accettati comandi di dimmerazione ma solo ON/OFF.
01 BATTERY RECHARGE. Insert the micro-USB type-C plug (F) into the device’s
connector (G). Connect the USB cable to the charger. Perform a full charge. The
management card is equipped with a self-learning function: every time you connect or
disconnect the USB Type-C cable, the card performs the self-learning cycle lasting about
3" by turning the lamp on and o gradually. It is very important that the lamp is never
touched during this phase: in case of accidental touch, the cable must be
disconnected and reconnected to repeat the cycle.
The charging status is signaled by the pulsation frequency of the LED visible through the
connector (G): constant blue light = full charge; intermittent blue light (3s) = batteries
being charged. Light emission < 5% = battery charge < 25%, in this condition dimming
commands are not accepted except for ON/OFF.
02
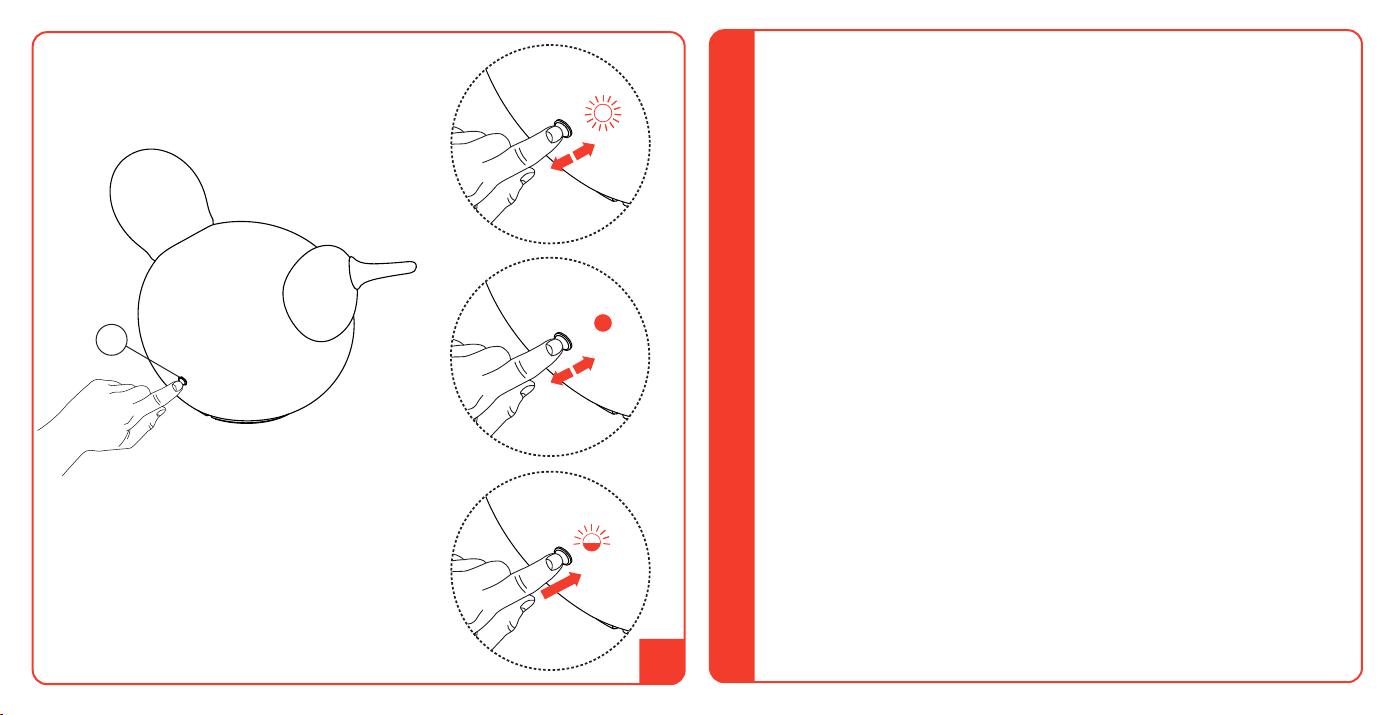
02 DIMMER A PULSANTE. La regolazione dell’intensità luminosa avviene attraverso il
tocco manuale dell’interruttore touch (H). La logica di funzionamento è la seguente:
a- 1 tocco: accensione soft rapida
b- 1 tocco spegnimento soft lento
c- mantenimento della pressione sul interruttore touch: regolazione soft dell’intensità
luminosa (5-100%)
02 TOUCH-BUTTON DIMMER. The light intensity is adjusted by the manual touch of the
touch switch (H). The operating logic is as the following:
a- 1 touch: fast soft start
b- 1 touch: slow soft o
c- pressure maintenance on the touch switch: soft light intensity adjustment (5-100%)
5%
100%
a
b
c
5-100%
(IT)
(EN)
H
Popular Home Lighting manuals by other brands


Safavieh Lighting
Safavieh Lighting TBL4441A quick start guide

SAFAVIEH COUTURE
SAFAVIEH COUTURE Harvey quick start guide

Orion
Orion LA 4-1312 schwarz Mounting and safety instructions

Phantom
Phantom PHOTOBIO TX user manual

Safavieh
Safavieh TBL4116A Care and maintenance

hudson valley
hudson valley L1403 installation instructions


