LiteOn eHBU212 User manual

ENGLISH
S
AFETY
I
NSTRUCTIONS
Please read all instructions carefully and keep this User’s Manual for your reference.
Carefully note all Cautions and Warnings.
1. Always install electrical equipment close to an electrical outlet and ensure that the outlet
is easily accessible.
2. Place power cords where people will not step or trip on them. Do not place objects over
power cords.
3. Install equipment on a stable surface. If equipment is not installed on a stable surface, it
may drop and cause injury.
4. Do not place computer equipment in direct sunlight, on heating units, or near electrical
appliances that draw large amounts of current.
5. Computer equipment enclosures often have openings for air convection. To protect
equipment from overheating, do not cover air convection openings.
6. Ensure that the power source voltage is appropriate whenever connecting equipment
to
a
power outlet.
7. If your computer equipment is not in use for several days, disconnect it from the power
outlet to avoid damage by transient power surges.
8. Protect electrical equipment from humidity.
9. Always disconnect computer equipment from the electrical outlet before cleaning. Do
not use liquid or sprayed detergent for cleaning – use a moist cloth.
10. Never pour any liquid into computer equipment openings; internal contact with liquid
could cause fire or electrical shock.
11. Keep the area around your computer equipment clean from dust, smoke, and other
contaminants.
12. Never open this drive’s enclosure. For safety reasons, the drive should be opened only
by qualified service personnel.
13. Do not drop or jolt the drive.
14. When operating this drive, be sure to use the following of the external power|
supply for safety.
(a) Asian Power Devices Inc. Type WA-24E12U-AAA.
(b) Asian Power Devices Inc. Type WA-24E12GK-ABA.
15. CLASS 3B VISIBLE AND INVISIBLE LASER RADIATION WHEN OPEN.
AVOID EXPOSURE TO THE BEAM.
1

ENGLISH
FCC C
OMPLIANCE
S
TATEMENT
Note: This equipment has been tested and found to comply with the limits for
a
Class
B digital device, pursuant to Part 15 of the FCC Rules. These limits
are
designed to provide reasonable protection against harmful interference in
a
residential
installation. This equipment generates, uses, and can radiate
radio
frequency energy and, if not installed and used in accordance with the
instructions,
may cause harmful interference to radio communications. However, there is
no
guarantee that interference will not occur in a particular installation. If
this
equipment
does cause harmful interference to radio or television reception,
which
can
be determined by turning the equipment off and on, the user is encouraged to
try
to correct the interference by one of the following
measures:
- Reorient or relocate the receiving
antenna.
- Increase the separation between the equipment and
receiver.
- Connect the equipment into an outlet on a circuit different from that to
which
the receiver is
connected.
- Consult the dealer or an experienced radio/TV technician for
help.
FCC Caution: To assure continued compliance, (example – use only
shielded
interface cables when connecting to computer or peripheral devices). Any
changes
or modifications not expressly approved by the party responsible for
compliance
could void the user’s authority to operate this
equipment.
This device complies with Part 15 of the FCC Rules. Operation is subject to
the
following two conditions: (1) this device may not cause harmful interference, and
(2)
this device must accept any interference received, including interference that
may
cause undesired
operation.
2

ENGLISH
P
RECAUTIONS
CAUTION: Do not attempt to
op
e
n
the drive for service. Removing
th
e
cover may cause exposure to
ha
r
mfu
l
laser beams and electrical voltage.
To
obtain service, return the
d
e
f
ec
t
i
v
e
drive to the vendor where the
d
ri
v
e
was
pu
rc
has
e
d.
•
Use the original package for transporting the drive or sending it back for service. The
original packaging was designed and tested to protect your drive under rough conditions.
•
Keep your discs clean. Using a soft, dust-free cloth to clean the disc surface before
recording will improve data integrity.
•
The copyright laws of each country govern the reproduction of copyrighted works. The
person using this drive may be liable if it is used to make unauthorized copies of
copyrighted works.
•
It will increase the success rate for copying the data from HDD, instead of copying the
data by "copy on the fly mode". Therefore we recommend the user reserving sufficient
buffer space for creating an image file (At least 650MB for CD; 5GB for DVD; and if
your drive supports Double Layer DVD+R or Dual Layer DVD-R writing, then at least
9GB space is needed. At least 30GB for BD-R SL / BD-RE SL. At least 60GB for BD-R
DL / BD-RE DL).
3
•
In accordance with BDA (Blu-ray Disc Association) provision, starting July 1, 2011,
players and software must support Bus Encryption specifications. When using a BD
movie disc, it is recommended to install the original software to ensure compatibility
during playback.

ENGLISH
T
ABLE OF
C
ONTENTS
INTRODUCTION
W
h
a
t
Y
o
u
C
a
n
D
o
w
i
t
h
t
h
e
B
D
W
r
i
t
e
r
…
…
…
…
…
…
…
…
…
…
…
5
F
o
r
m
a
t
C
o
m
p
a
t
i
b
i
l
i
t
y
…
…
…
…
…
…
…
…
…
…
…
…
…
…
…
…
…
…
…
6
R
ec
or
di
n
g
M
od
es
S
u
ppor
t
ed…
…
…
…
……
…
…
……
…
…
…
…
……
…
6
System Configuration
S
y
s
t
e
m
R
e
q
u
i
r
e
m
e
n
t
s
…
…
…
…
…
…
…
…
…
…
…
…
…
…
…
…
…
…
…
7
Features and Controls
F r
o
n
t
V i
e
w
…
…
…
…
…
…
…
…
…
…
…
…
…
…
…
…
…
…
…
…
…
…
… 9
R e a r V i
e
w … … … … …
…
… … … … … … … … … … … … … … … … 1 0
INSTALLATION
Installing the BD Drive
………………………………………………….…..…. ..11
OPERATION
Installing Device Driver and Software
……………………………12
T
o
U
s
e
t
h
e
B
D
W
r
i
t
e
r
…
…
…
…
…
…
…
…
…
…
…
…
…
…
…
…
…
…
…
1
2
T
o
I
ns
t
al
l
S
o
f
t
w
ar
e…
…
…
…
…
…
…
…
…
…
…
…
…
…
…
…
…
…
…
…
…
1
2
Loading and Unloading the Tray
…………………………………13
Recording & Playing
Recording CDs, DVDs &
BDs……
………………………………………14
Playi
ng
D
VDs &
BDs…
……………………
……… ……… ………
………14
P
l
a
y
i
n
g
R
e
g
i
o
n
a
l
l
y
E
n
c
o
d
e
d
D
V
D
s
…
…
…
…
…
…
…
…
…
…
…
…
1
4
A
b
o
u
t
S
o
f
t
w
a
r
e &
M
a
n
u
a
l
s
…
…
…
…
…
…
…
…
…
…
…
…
…
…
…
…
…
1
4
LightScribe User Guide
……………………………………………..…15
LightScribe Create Labels and Burn
……………..………………16
LightScribe Common Questions and Answers
………………17
Recommended Recordable & ReWritable Media
……………
18
TROUBLESHOOTING
R
e
a
d
P
r
o
b
l
e
m
s
…
…
…
…
…
…
…
…
.
.
.
…
…
…
…
…
…
…
…
…
…
…
…
…
1
9
W
r
i
t
e
P
r
o
b
l
e
m
s
…
…
…
…
…
…
…
…
…
…
…
…
.
…
…
…
…
…
…
…
…
…
…
20
4

E
N
GLI
S
H
5
I
NTRODUCTION
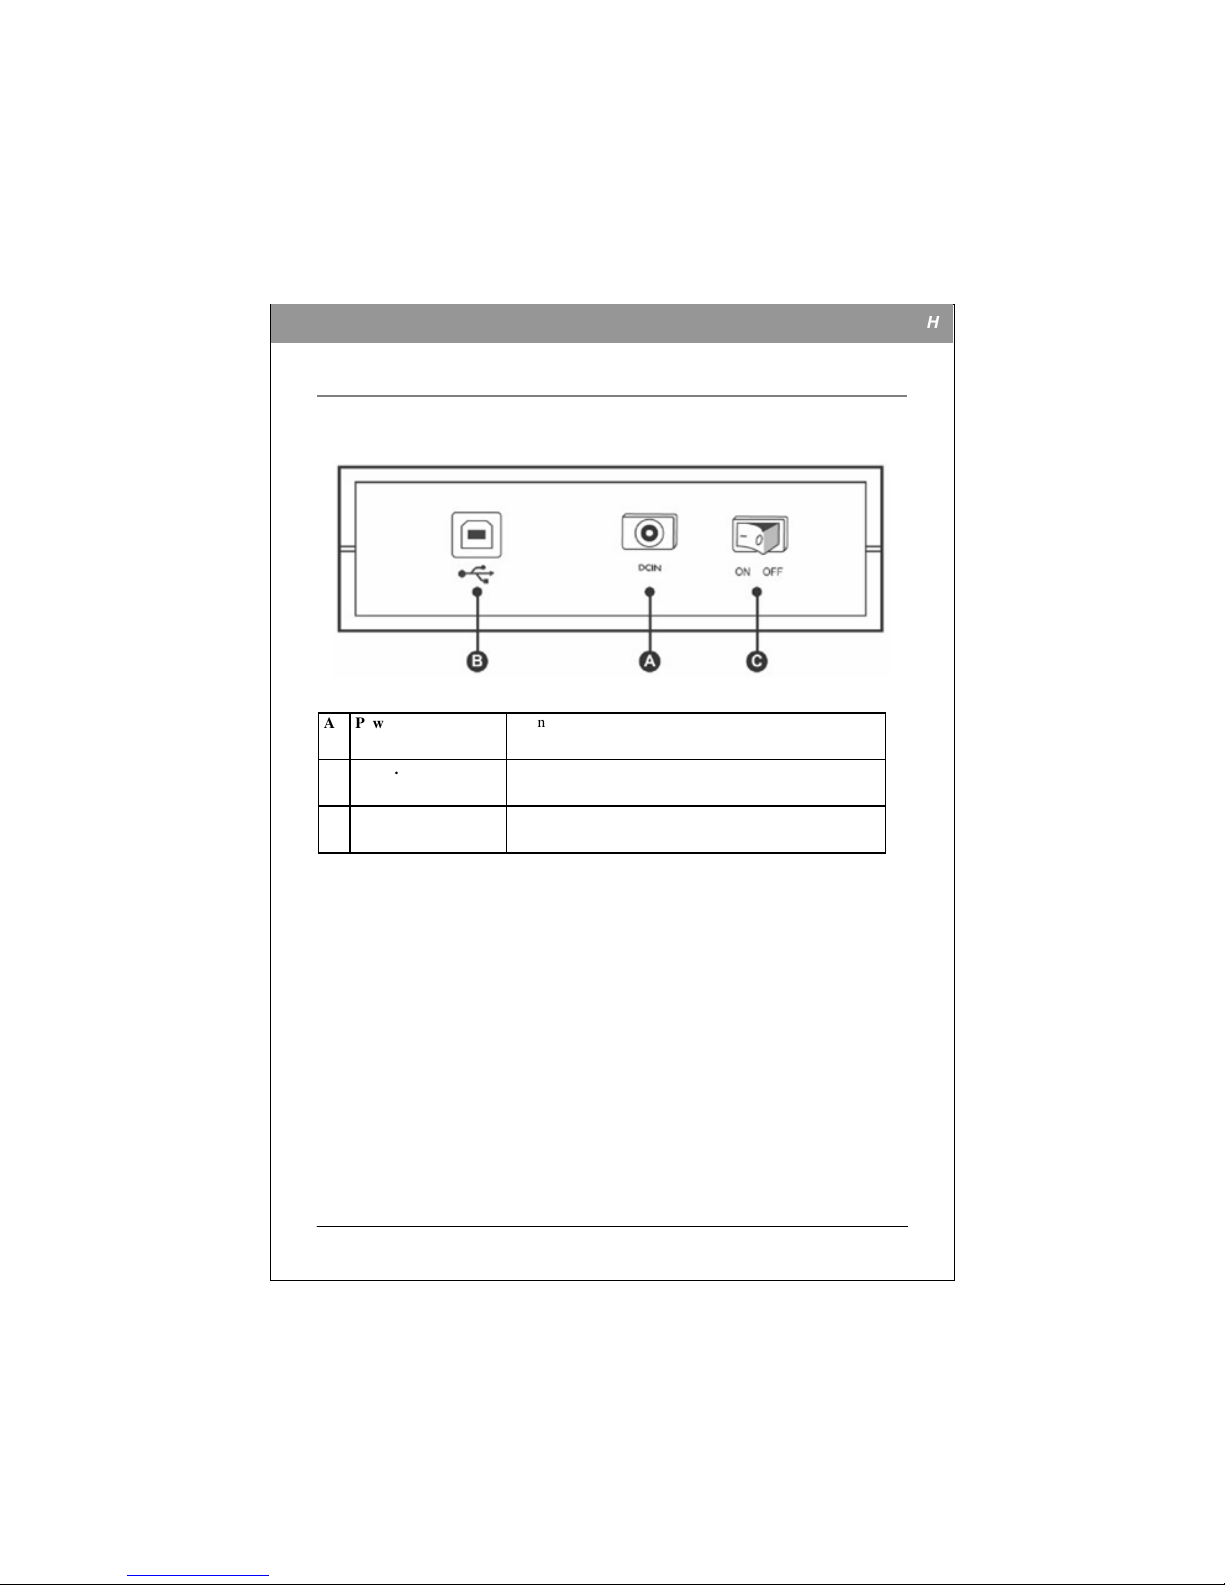
This BD ( Blu-ray Disc ) writer provides professional-quality BD, DVD and CD performance
for writing, rewriting and reading. It supports Running OPC (ROPC) and is compatible with
Windows Plug & Play. In addition, the drive is equipped with buffer underrun technology to
eliminate buffer underrun errors, so you can safely use your computer for other things while
you’re writing to BD, DVD or CD, and using a web connection, you can update this drive’s
flash memory to the latest firmware revisions without opening the drive.
NOTE: The drive’s maximum write, rewrite and read speeds are noted on the original package.
What You Can Do with the BD Writer
•
Record data onto recordable or rewritable BDs, DVDs or CDs.
•
Save photos and other images on recordable or rewritable BDs, DVDs or CDs.
•
Record digital video or slide shows onto BD-R, BD-RE, DVD+R, DVD+RW, DVD-R,
and DVD-RW discs.
•
Archive images and video to BDs, DVDs or CDs.
•
Play BD-R (BD Recordable), BD-RE (BD Rewritable), DVD+R, DVD+RW, DVD-R,
and DVD-RW discs.
•
Play music CDs.
•
Play VCD, DVD and BD movies.
•
Access interactive reference materials stored on DVDs & BDs.
•
Master new software programs on BDs, DVDs or CDs.
BD
functions:
•
Write to BD-R SL (25GB) media
•
Write to BD-RE SL (25GB) media
•
Read BD-ROM, BD-R SL, BD-R DL, BD-RE SL and BD-RE DL media
DVD
functions:
•
Write to DVD+R and DVD-R (recordable DVD) media
•
Write to DVD+RW and DVD-RW (re-writable DVD) media
•
Read DVD-ROM, DVD+R, DVD-R, DVD+RW, DVD-RW, DVD+R9 and DVD-R9
discs.
•
Write to double-layer DVD+R (recordable DVD+R9) and dual-layer DVD-R
(recordable DVD-R9)
media*
•
Read or write to DVD-RAM media*
*Only specific drives support DVD-RAM, double-layer and/or dual-layer recording. Refer
to your drive’s original package.
CD
functions:
•
Write to CD-R (recordable CD) media
•
Write to ultra-speed CD-RW (rewritable CD) media
•
Read CD-ROM and CD-R data media, and CD-RW and CD-DA (audio) media
ENGLISH

E
N
GLI
S
H
6
Format Compatibility
BD write: BD-R Version 1.1, BD-RE Version 2.1
BD read: BD-ROM Version 1.3
DVD write: DVD+R Version 1.0 & 1.1, DVD+R9 Version 1.0, DVD-R9 Version 3.0,
DVD+RW Version 1.1, DVD-R Version 2.1, and DVD-RW Version 1.1, DVD-RAM Version
2.2 (only for drives that support DVD-RAM rewriting)
DVD read: DVD-ROM single/dual layer (PTP, OTP), DVD-R, DVD+R, DVD+R9, DVD-R9,
DVD-RW, DVD+RW, DVD-RAM (only for drives that support DVD-RAM reading)
CD write: Orange Book Part 2 CD-R Volume 1, Part 2 CD-R Volume 2 Multi Speed, Part 3
CD-RW Volume 1 Low Speed, Part 3 CD-RW Volume 2 High Speed, Part 3 CD-RW Volume
3 Ultra Speed
CD read: CD-DA, CD-ROM, CD-ROM/XA, Photo-CD, Multi-session, Karaoke-CD, Video
CD, CD-I FMV, CD Extra, CD Plus, CD-R, and CD-RW
Recording Modes Supported
Track at
Once
Data can be recorded to disc one track at a time. New tracks can be added later. This mode
requires the disc to be “closed” (through the software application) before music CDs can be
played back in a CD player or CD-ROM drive.
Disc at
Once
Data can be recorded to an entire disc in one pass. In this mode, new data can not be added
later.
Session at
Once
Data can be recorded to a disc one session at a time. In this mode, new sessions can be written
later. This mode allows more disc space to be used than multi-session mode allows, because no
gap is created between sessions.
Multi
Session
Data can be recorded to a disc in one session. In this mode, new sessions can be written later.
This mode allows less disc space to be used than session-at-once mode allows, because a gap is
created between sessions.
Packet
Writing
Data can be added directly to or deleted from rewritable media. (Useful for data backup.) This
mode requires software that supports packet writing.
ENGLISH

E
N
GLI
S
H
7
S
YSTEM
C
ONFIGURATION
System Requirements
To ensure stable read/write/rewrite performance, a Windows-based PC system with the
following features is required.
CPU Pentium 4 2.0GHz or faster
Operating System
Microsoft Windows 2000 SP4 / Windows XP SP2 / Windows
Vista/Windows7
Memory 512MB or higher RAM
Hard Drive Minimum 30GB available capacity
Interface Available Serial ATA (SATA) interface connector
For High Definition BD Movie Playback & BD Authoring:
CPU Pentium D 3.4GHz or faster
Operating System
Microsoft Windows XP SP2 / Windows Vista/ Windows7
Memory 1GB or higher RAM
Hard Drive Minimum 60GB available capacity
Display Devices
for Digital Output
•
HDCP capable monitor or
TV
•
HDCP capable graphics card with 256MB RAM, PCI Express
x16, 1920x1200 resolution, 32bit color
GPU Requirements:
Support DXVA decoding for MPEG2 High Definition Video,
Support DXVA decoding for H.264 High Definition Video,
Support decoding 2 DXVA streams simultaneously (these 2
streams may in different format),
Blending 3 High Definition (1920x1080) ARGB32 texture less
than 3ms,
Support HDCP for DVI / HDMI output via COPP
Recommended GPU:
nVIDIA GeForce 7600GT / 7800GTX512 / 7900GX2 /
7900GTX / 7950GX2,
and ATI X1600 / X1800 / X1900 Series
Graphics card drivers have to support HDCP standard:
nVIDIA ForceWare 92.91 or later version,
ATI CATALYST 6.7 or later version
*Remark 1:
HDCP: High-bandwidth Digital Content Protection
DXVA: Direct X Video Acceleration
DVI: Digital Visual Interface
HDMI: High Definition Multimedia Interface
OPP: Certified Output Protection Protocol
ENGLISH

E
N
GLI
S
H
8
Intel
CPU
Recommend
Pentium
EE
840(3.2G),
955(3.4G)
Pentium D 9xx
Series
945(3.4G), 950(3.4G),
960(3.6G)
Core
Duo
T2500(2G), T2600(2.16G),
T2700(2.33G)
Core 2
Duo
E6300(1.8G), E4400(2.0G), E
6400
(
2.13
G
)
,
E4500(2.2G), E6550(2.33G), E
6600
(
2.4
G
)
,
E6700(2.66G), E6750(2.66G), E
6850
(
3.0
G
)
X
6800
(
2.93
G
)
*Remark 2:
Recommended CPU requirements for high definition BD movie playback & BD authoring:
AMD
CPU
Recommended
Athlon 64
FX
FX-60(2.6G), FX-62(2.8G),
F
X
-
70
(
2.6
G
)
,
FX-72(2.8G),
F
X
-
74
(
3.0
G
)
Athlon 64
X2
4200+(2.2G), 4400+(2.3G),
4600
+
(
2.4
G
)
,
4800+(2.5G),
5000
+
(
2.6
G
)
,
5200+(2.6g),5600+(2.8),
6000
+
(
3.0
G
)
Turion 64
FX
TL-60(2.0G)
ENGLISH

9
E
N
GLI
S
H
F
EATURES AND
C
ONTROLS
Front View
Figure: Front view of BD drive
A
Eject / Close Button Push button to open or close the tray.
B
On / Busy LED Indication of drive's operation status. When LED is on, the disc is
loaded and ready; when blinking, the drive is reading / writing /
rewriting or the disc is loading.
C
Pin Hole Eject If the Eject button fails to work properly, insert a paper clip into
this hole to open the tray.
CAUTION: Turn off power to the drive before performing manual
ejection.
Note:
Turn on the power before operating the drive.
ENGLISH

E
N
GLI
S
H
10
Rear View
Figure: Rear of BD drive
A
Power Outlet
Connect the drive to the power supply.
B
USB3.0 USB
Connector Standard USB B Type connector, used to connect the drive
with the high speed USB cable.
C
Power Switch Turn on/off the power to the drive.
ENGLISH

E
N
GLI
S
H
11
I
NSTALLING
T
HE
BD
D
RIVE
1. Connect the BD drive with the external power cord.
2. Connect the high-speed USB cable.
ENGLISH

E
N
GLI
S
H
12
O
PERATION
Installing Device Drivers and Software
Your Windows system already has device drivers that let you use the drive to install and set
up software from CD-ROMs and DVD-ROMs as soon as the drive is installed. However, to
make use of all the drive’s features, such as writing to discs and playing commercially
recorded movies, you need to install additional software.
To Use the BD Writer:
As a CD-ROM drive: Most Windows Operating Systems (Windows Vista, Windows
XP, Windows 2000) supply a generic CD-ROM device driver that lets the BD drive
function as a standard CD-ROM drive as soon as it’s installed. If you’re using one of
these operating systems, you do not need to install additional software to read or play
CDs.
As a DVD-ROM drive: Most operating systems also let the DVD drive function as a
DVD-ROM drive as soon as it’s installed. If you’re using one of these operating systems,
you do not need to install additional software to read or play DVDs.
As a CD, DVD or BD writer: To write to CD, DVD or BD media (recordable or
rewritable), you need to install additional software. The software CD included with your
BD drive includes this software, offering functions such as mastering, packet writing,
backing up your hard disk or files, capturing audio, and more
To Install Software:
Install any software that came with your drive by inserting the software disc into the
drive and following the onscreen instructions.
ENGLISH

E
N
GLI
S
H
13
Loading and Unloading the Tray
(1) While the BD drive is powered up, push the Eject button on the front panel to
eject the tray.
(2) Place a disc in the tray’s depression. To write to the data side, place the disc
with the label side up. The disc should lie flat in the tray.
Figure: Loading the
Tray
(3) Press the Eject button again to retract the tray.
ENGLISH

E
N
GLI
S
H
14
R
ECORDING
& P
LAYING
Recording CDs, DVDs & BDs
To record CDs, DVDs & BDs, ensure that you have installed the proper software (see
previous page).
Playing DVDs & BDs
To play commercially released movies on DVD or BD on this drive, you must have BD
playback software installed on your PC. If you do not have BD playback software on your PC,
or if you want to replace your BD playback software, install the appropriate application
from
the
enclosed software CD (see previous page).
Playing Regionally Encoded DVDs
Some DVDs are encoded to be played in a certain region, such as North America or Europe.
Your drive must be set to the correct region code to play these discs.
No region code is preset when the BD drive is shipped. Instead, the first time a DVD with a
region setting is inserted into the BD drive, the act of inserting the DVD sets the drive to that
region code.
If you later insert a DVD with a different region code, you are prompted to accept a region
code change. If you do not accept the change, the DVD will not play. If you do accept the
change, the BD drive’s region code setting is changed.
NOTE: You may change the BD drive’s region code only 5 times. After that, you will not
be able to change your drive’s code setting. (Your DVD playback software will warn you if
you approach the 5-change limit.)
About Software & Manuals
The detailed user’s manual for the recording and playback software is automatically installed
on your computer when you install the software itself.
ENGLISH

E
N
GLI
S
H
15
L
IGHT
S
CRIBE
U
SER
G
UIDE
The following section describes the LightScribe, and the functions that only support for
the LightScribe burning data device. For details, please check the product packaging that
you purchased if it LightScribe compliant.
How to use LightScribe
To use LightScribe labeled CD or DVD, you will need to meet the following three elements:
LightScribe-enabled optical disc drive
LightScribe-supported software application (that came with the burning and other features of
LightScribe)
LightScribe media (available at computer stores)
You can burn your data either before or after you burn your LightScribe label. You can also use
the same disc label design for future disc label production. You do not need to care about the
content stored inside the disc in order to do the label burning process.
Note: When burning the LightScribe labe1, the printing will only be carry out on the LightScribe
label side.
Figure: Support LightScribe function Logo
ENGLISH

E
N
GLI
S
H
16
L
IGHT
S
CRIBE
C
REATE
L
ABELS
A
ND
B
URN
1. Start LightScribe labeling application. Your labeling application CD-ROM burning
software can be a part of it or it can be an independent application.
2. Choose the LightScribe design. The major labels production with LightScribe application
will ask you to design the label before selecting the LightScribe setting.
3. Start making the LightScribe label design. You can choose to use text and/or graphics to
make labels, and then choose to engrave the CD-ROM area- ranging from the simple word
written (“title only”) to the whole cover disc for the complete design (“Full label”). Try to
use a variety of different text, fonts, background template and your own photos and pictures
to design the most appropriate style for your label. (For ideas and suggestions, please visit
www.lightscribe.com/labeltips).
4. After the design is complete, insert a blank LightScribe CD into the burning drive with
the label side down. In the preview before the design or printing, the LightScribe system
will check whether the disc has been placed correctly inside the device, or if the disc is not
label-side down, the application message will be displayed.
5. Select "Preview" option to check your LightScribe label design appearance. Preview design
allows you to determine whether the design elements on the desired location, and label
design displays in grayscale, in which to facilitate you to check the disc label appearance.
6. Select the "Print" option to print to the label design of the LightScribe disc label. To print
the design to a disc, you can choose from three quality modes: Draft, Normal or Best.
"Draft" is the fastest printing mode, resulting in low contrast design; "Best" offers
optimized quality (high contrast level) with a longer printing time. The following table
shows the expected printing time.
Setting Title Only List of titles and content
Full label (with graphics)
Draft < 4 minutes
< 9 minutes < 36 minutes
Normal < 3 minutes
< 7 minutes < 28 minutes
Best < 2 minutes
< 4 minutes < 20 minutes
7. When the label production is complete, burn the disc will automatically exit.
ENGLISH

E
N
GLI
S
H
17
L
IGHT
S
CRIBE
C
OMMON
Q
UESTIONS
A
ND
A
NSWERS
Q: How does LightScribe it works?
A: The surface of a LightScribe disc is coated with a reactive dye that changes color when it
absorbs the infrared laser light. The process similar to film exposure, but LightScribe surface
only works with a specific laser light that generated strong reactions..
Q: If you try to use non-LightScribe discs in a LightScribe drive, how will the results?
A: The application will nor send a label mage to a non-LightScribe disc, so no label will
be burned if it is not a LightScribe sicc.. A Light cribe-enabled applications can support
LightScribe discs by floating on the pattern of the CD to conduct identification, only into
the appropriate disc, the system will build digital image and send it to the burning device.
Q: Can other computer applications can be used while my label is printing?
A: Yes.As with most software, you can work on other tasks while LightScribe is working..
Q: Can I leave my computer unattended while the LightScribe label is burning?
A: Yes. LightScribe does not require your presence during the burning process. In addition,
a LightScribe system will not go into sleep or power-save mode while it is burning a label..
Q: Can I rewrite a LighScribe label the same way some CD-RW or rewritable DVD ± RW
disc?
A: No. Current LightScribe technology is not erasable. Once the image is burned, it is
permanent.
Q: Will the LightScribe image cause an imbalance when the CD or DVD is spinning in the
drive, the way a paper label can?
A: No. A LightScribe disc is an evenly balanced as any high-quality CD or DVD, and it spins
evenly within the drive. Burning an image onto the disc does not change its balance, nor does it
impede the disc’s ability to spin properly.
Q: Will the LightScribe imaging process emit hazardous chemicals?
Answer: No. The laser imaging process initiates a chemical change in the disc coating, and no
hazardous chemicals are emitted during burning.
Q: Is LighScribe disc is hot or dangerous to handle immediately after the label is burned?
Answer: No. Although the terms “burning data” and “burning label” are standard in the
industry, there is no appreciable temperature change involve in either process. A CD or DVD
is safe to touch immediately upon being ejected from the drive..
Q: Does LightScribe print in full color?
A: No. Currently the LightScribe label is created in grayscale, similar to black and white
photograph. LightScribe's development strategy does include additional features in the future.
Due to business and legal requirements, it is inconvenience to announce more details.
.
ENGLISH
ENGLISH

E
N
GLI
S
H
18
R
ECOMMENDED
R
ECORDABLE
& R
EWRITABLE
M
EDIA
For consistent high quality, we recommend CD, DVD and BD media from the
following manufacturers (recommendations are subject to change without
notice):
CD-R
Media:
CMC, Daxon, Fujifilm, Gigastorage, LeadData, Maxell,
MBI, MCC, MPO, Postech, Princo, Prodisc, Ricoh, Ritek,
SAST, Sony, TDK, Taiyo-Yuden
Low Speed
CD-RW
Media:
CMC, Daxon, MCC, Ricoh, Ritek
High Speed
CD-RW
Media:
CMC, Daxon, Infodisc, MCC, Ricoh, Ritek
Ultra Speed
CD-RW
Media:
Mitsubishi
DVD-R
Media:
Maxell, Mitsubishi, TDK, Sony
DVD-R9
Media:
MKM
DVD-RW
Media:
CMC, JVC, MKM, Ritek, TDK
DVD+R
Media:
CMC, MBI, Mitsubishi, Taiyo-Yuden, TDK, Sony
DVD+R9
Media:
Mitsubishi, Ricoh, Ritek
DVD+RW
Media:
Infodisc, MBI, MCC, Philips, Prodisc, Ricoh, Ritek
Blu-ray Disc
Media BD-R: Mitsubishi, Panasonic, Philips, Sony, TDK
BD-RE: Mitsubishi, Panasonic, Philips, Sony, TDK
*
O
n
l
y
s
p
e
c
i
f
i
c
d
r
i
v
e
s
s
u
pp
o
r
t
D
V
D
-
R
A
M
,
d
ou
b
l
e
-
l
a
y
e
r
a
n
d
/
o
r
d
u
a
l
-
l
a
y
e
r r
e
c
o
r
d
i
n
g
.
R
e
f
e
r
t
o
y
ou
r
d
r
i
v
e
’
s
o
r
i
g
i
n
a
l
p
a
c
k
a
g
e
.
ENGLISH

E
N
GLI
S
H
19
T
ROUBLESHOOTING
If you have trouble during installation or use of your BD drive, please refer to the following
information.
Read Problems
Symptom
Possible Cause
So
lution
No power
•
Ensure that the power cord is connec
t
ed
securely (at all connec
ti
ons).
Does not opera
t
e
SATA cable not proper
l
y
connec
t
ed
•
Ensure that the SATA cable and
connectors are not damaged (check
t
he
pins carefully), and that both sides are
connec
t
ed.
Power cable not proper
l
y
connec
t
ed
•
Ensure that the power cord is connec
t
ed
securely (at all connec
ti
ons).
BD drive can not be
recogn
i
zed
SATA cable not proper
l
y
connec
t
ed
•
Ensure that the SATA cable and
connectors are not damaged (check
t
he
pins carefully), and that both sides are
connec
t
ed.
Unbalanced disc
l
oaded
•
Replace the disc with ano
t
her.
Excessive noise when
reading a d
i
sc
Sticker or label attached
t
o
the surface
•
Detach the sticker/label carefu
ll
y,
ensuring that you don’t scratch the d
i
sc.
Drive locked by sof
t
ware
•
Wait until the software activity
i
s
finished; or
•
Stop the software activity and then press
e
j
ec
t
.
Cannot open the
t
ray
(E
j
ec
t
)
Disc set incorrectly in
t
ray
•
Turn off power to the drive, then insert a
small stick or paper clip into
t
he
emergency eject hole to eject the
t
ray.
“Load Contents“ or “Import
Session“ was not se
l
ec
t
ed
during write process
•
Make sure you properly select “
i
mpor
t
previous sessions” when writing new
data to the d
i
sc.
Defective or damaged d
i
sc
•
Always use high-quality med
i
a.
•
Always handle discs with care and keep
them clean. Deep scratches, f
i
ngerpr
i
n
t
s,
or other contaminants on a disc’s surface
can make it unreadab
l
e.
Cannot read a prev
i
ous
session of a CD-RW
disc that has been
written to at least
t
w
i
ce
Disc inserted upside down
•
Remove the disc from the tray and
reinsert it label side up.
ENGLISH

E
N
GLI
S
H
20
Write Problems
Symptom
Possible Cause
Solution
Authoring software used
does not support your BD
dr
i
ve
•
Use the authoring software provided with
t
he
BD dr
i
ve.
•
If using other software, contact the sof
t
ware
supplier (or check the appropriate webs
it
e)
to ensure that it supports your BD dr
i
ve.
Disc inserted upside down
•
Reinsert the disc label side up.
Insufficient hard d
i
sk
capac
it
y
•
Ensure that 1.2 to 2 times the capacity of
t
he
write data is available on hard d
i
sk.
(Required capacity may vary according
t
o
write me
t
hod.)
No power
•
Ensure that the power cord is connec
t
ed
securely (at all connec
ti
ons).
Cannot write to d
i
sc
SATA cable not proper
l
y
connec
t
ed
•
Ensure that the SATA cable and connec
t
ors
are not damaged (check the pins carefu
ll
y),
and both sides are connec
t
ed.
Defective or damaged d
i
sc
•
Always use high-quality med
i
a.
•
Always handle discs with care and keep
them clean. Deep scratches, fingerprints, or
other contaminants on a disc’s surface can
make it unreadab
l
e.
Writing errors occur
Insufficient hard d
i
sk
capac
it
y
•
Ensure that 1.2 to 2 times the capacity of
t
he
write data is available on hard d
i
sk.
(Required capacity may vary according
t
o
write me
t
hod.)
SATA cable not proper
l
y
connec
t
ed
•
Ensure that the SATA cable and connec
t
ors
are not damaged (check the pins carefu
ll
y),
and both sides are connec
t
ed.
Drive no
t
recogn
i
zed
Authoring software used
does not support your BD
dr
i
ve
•
Use the authoring software provided w
it
h
your BD dr
i
ve.
•
If using other software, contact the sof
t
ware
supplier (or check the appropriate webs
it
e)
to ensure that it supports your BD dr
i
ve.
BD/DVD/CD media no
t
compatible with high speed
•
Use media rated for the highest speed your
drive can write
t
o.
Cannot write a
t
highest speed
Defective or damaged d
i
sc
•
Always use high-quality med
i
a.
•
Always handle discs with care and keep
them clean. Deep scratches, fingerprints, or
other contaminants on a disc’s surface can
make it unreadab
l
e.
ENGLISH
This manual suits for next models
1
Table of contents