Living Home CM80LV User manual

BJWC
1 Mercer Road
Natick, MA 01760
www.bjs.com
Programmable Gourmet Coffee Maker
OWNER’S MANUAL
Model: CM80LV
120V., 60Hz., 900 Watts

1. Read all instructions for use carefully
and look at the illustrations before you
start using the appliance.
2. To protect against risk of electrical
shock, do not immerse power cord,
plug or coffee maker in water or any
other liquid.
3. Close supervision is necessary when
any appliance is used by or near
children.
5. Unplug from outlet when not in use,
before putting on or taking off
accessories and before cleaning the
appliance.
6. Do not operate any appliance with a
damaged cord or plug, or after the
appliance malfunctions, has been
dropped or damaged in any manner.
Return the appliance to the manufacturer
at the address indicated on the warranty
page for examination, repair or
adjustment.
7. The use of accessory attachments not
recommended by the appliance
manufacturer may cause injuries.
8. Do not touch hot surfaces. Use handles
or knobs.
9. Do not leave appliance unattended while
in use.
10. Do not use outdoors.
11. Do not let cord hang over the edge of
the table, counter or touch hot surfaces.
12. Do not place on or near a hot gas or
electric burner, or in a heated oven.
13. Always plug cord into the wall outlet
before turning on any controls. To
disconnect turn power control to OFF,
then remove plug from wall outlet.
14. Always use cold water to make coffee.
Warm water or other liquids could cause
damage to the coffee maker.
15. Scalding may occur if the cover is lifted
or removed during the brewing cycle.
16. Do not use appliance for other than
intended household use.
SAVE THESE INSTRUCTIONS
FOR HOUSEHOLD USE ONLY
This appliance has a polarized plug (one blade is wider than the other). To reduce
the risk of electric shock, this plug is intended to fit into a polarized outlet only one
way. If the plug does not fit fully into the outlet, reverse the plug. If it still does not
fit, contact a qualified electrician. Do not attempt to modify the plug in any way.
IMPORTANT SAFETY INSTRUCTIONS
When using electrical appliances, basic safety precautions should always be
followed, including the following:
Rev. 07/05A
1
WARNING: To avoid breakage of, or
injury from glass carafe follow these
precautions:
•Do not set a hot carafe on a wet cold
surface.
•Do not place hot carafe on or near
paper, cloth, or other flammable
material.
•Never use the carafe on a range top or
in a microwave oven.
•Do not allow liquid to evaporate from
carafe. Do not heat carafe when
empty.
•Do not move entire unit when carafe
contains hot liquid.
• Use the lid on the glass carafe while
brewing and pouring coffee.
• Discard carafe if damage in any
manner, or a carafe having a loose or
weakened handle. A chip or crack
could result in breakage or contaminate
liquid contents with glass particles.
WARNING: TO REDUCE THE RISK OF
FIRE OR ELECTRIC SHOCK. DO NOT
REMOVE THE BOTTOM COVER. NO
USER SERVICEABLE PARTS INSIDE.
REPAIR SHOULD BE DONE BY AN
AUTHORIZED SERVICE TECHNICIAN
ONLY. Call customer service at
1 (866) 213-9592 for service information.
CAUTION: Do not immerse in any liquid.
This unit has a short power supply cord to
Reduce the risk resulting from becoming
entangled in or tripping over a long cord.
An extension cord may be used if you are
careful in its use:
1. The electrical rating of the extension
cord should be at least as great as the
electrical rating of the appliance.
2. An extension cord with the power cord
must be arranged so that it will not
drape over the countertop or tabletop
where they can be pulled on by
children or tripped over accidentally.
GETTING TO KNOW YOUR COFFEE MAKER
Technical Specifications
Voltage: 120V., 60Hz.
Power: 900 Watts
2
1. Glass Carafe
2. Carafe Lid
3. Filter Basket Door
4. Filter Basket
5. Filter Basket Door
Release Button
6. Water Reservoir Cover
7. Illuminated Water Reservoir
8. Brew Pause Activator
9. Easy-Glide Wheel
10. Cord Storage
11. Non-Stick Warming Plate
Control Panel
12. Set Hour Button
13. Set Minute Button
14. Program Button
15. Brew Strength Button
16. Power/Timer Button
17. Timer “On” Indicator Light
18. Power “On” Indicator Light
19. Brew Strength “On” Indicator Light
20. Digital Clock/Advance Timer Display
Illustrations may differ from actual product.
Control Panel

COFFEE MAKER FEATURES
3
7. Easy Pour Carafe
The unique design of the carafe
with the all-around lip and
traditional pour spout allow you
to conveniently pour without
spilling. The easy grip handle is
for added comfort. Cup markings
on each side of the handle make
it easier to measure the water
level when filling the carafe.
9. Non-Stick Warming Plate
Spilled coffee will not stick to the
surface of the warming plate,
just wipe with a damp cloth to
clean.
10. Cord Storage
Hidden cord storage allows you
to hide excess cord for a cleaner
counter top.
11. Swing Away Basket and Filter
Basket Release Button
Filter door swings for convenient
filling. The filter basket release
button allows you to open the
filter basket with one quick
motion.
12. Cone Filter Basket
Cone shaped filter basket
enriches flavor and prevents
bitter taste. A standard #4 cone-
shaped filter must be used.
13. Brew Strength Button
The brew strength button
enhances the flavor of the coffee
when a richer tasting coffee
brew is preferred.
General Features
1. 2 Hour Automatic Shut-Off
For safety, this coffee maker has
been designed with an auto shut-off
feature. The coffee maker shuts off
automatically 2 hours after the
brewing cycle has completed, for
both the regular and advance timer
mode. To restart ,simply press the
power button until the “On” light
illuminates.
2. Brew Pause
This feature allows you to interrupt
the brewing cycle and pour a cup of
coffee before the pot of coffee has
completed brewing. To restart the
brewing process, return carafe to
warming plate and coffee will
automatically begin flowing through
the filter basket. Make sure the
carafe is placed correctly on the
warming plate.
NOTE: Do not remove the carafe for
longer than 30 seconds or the filter
basket may overflow.
3. Digital Clock/Advance Timer
Display
The 24-hour digital clock found on
the front of the unit will keep the
correct time, even after the unit has
been shut off. The timer can be
programmed up to 24 hours in
advance to automatically start
brewing fresh, hot coffee.
4. Illuminated Water Reservoir
The large easy-to-read numbers
indicate how many cups of water
have been poured into the coffee
maker.
5. Illuminated Water Reservoir and
On Light
There are two ways to easily see
if the coffee maker is on, the
power “On” indicator light and the
illuminated water reservoir. When
the unit is on, both will light up.
6. Flavor Seal
The carafe lip and lid seal to help
preserve the coffee’s natural flavor
and temperature by preventing
excessive evaporation.
4
OPERATING INSTRUCTIONS
Control Panel Features
Familiarize yourself with the control panel
before using your coffee maker.
1. Digital Clock/Advance Timer
Display
A 24 hour clock display and display for
the advance timer feature.
2. Set Hour Button
This button allows you to set the clock
for the hour time and to pre-program
the coffee maker’s advance timer hour.
3. Set Minute Button
This button allows you to set the clock
for the minute time and to pre-program
the coffee-maker’s advance timer in
minutes.
4. Program Button
This button programs the coffee maker
up to 24 hours in advance. Hold down
this button while adjusting the time –
hour and minutes to begin the advance
timer action.
5. Brew Strength Button
The brew strength button is used to
enhance the flavor of the coffee. This
feature slows down the brewing time by
50%. The coffee maker will go “On” and
“Off” at 30 second intervals which will
bring out more flavor from the coffee
grounds.
6. Power/Timer Button
This button controls three modes:
A. Auto Mode
Depress this button once to activate
the Auto Mode. Use to set the
advance timer.
B. Power On Mode
Depress twice to activate the Power
On Mode. This begins the brew
cycle immediately.
C. Power Off Mode
Depress three (3) times to activate
the Power Off Mode. This shuts off
the unit completely, including the
warming plate.
Fig. 1
1
23
456
7
8
9
7. Timer “On” Indicator Light
This timer indicates that the coffee
maker is in a delayed brewing cycle.
To verify what time the brew cycle will
begin depress the program button.
8. Power “On” Indicator Light
This light indicates that the unit is
turned on.
9. Brew Strength “On” Indicator Light
This indicator lights up when the brew
strength feature has been selected for
brewing.
How to Set the Clock
When the unit is first plugged in the
display will read 0:00 and begin to flash.
To set the correct time of day:
1. Press and hold the set hour button until
the correct hour is displayed.
2. Press and hold the set minute button
until the correct minute is displayed.
NOTE: Unplugging the unit will reset the
clock to “0:00” and flashing will resume.
Preparing Your Coffee Maker
Before using the coffee maker for the first
time:
1. Carefully unpack the coffee maker and
remove all packaging materials.
2. Thoroughly clean the carafe, carafe lid,
and filter basket with warm, soapy
water. Rinse well and dry.
CAUTION: Do not use harsh or abrasive
cleaners as this could damage the glass
carafe.
3. Wipe the warming plate with a clean
damp cloth.
WARNING: Do not immerse the coffee
maker in water or other liquids.
4. Before brewing your first pot of coffee,
run a full carafe of cold water through
the system 2 or 3 times, without a filter
or coffee grounds. This will remove any
dust or sediment that may have settled
in the components during the shipping
process.

5
OPERATING INSTRUCTIONS
Using the Coffee Maker
Select a level flat surface to place the
coffee maker, preferably near an outlet.
1. Replace the lid after cleaning and
ensure that it is secured to the carafe.
2. Replace the filter basket into the filter
basket compartment.
3. Lift up the hinged water reservoir cover
4. Fill the glass carafe with as much water
as is needed for the amount of
servings.
5. Empty the water from the carafe into
the illuminated water reservoir. The
water window indicates how much
water is in the reservoir. (Fig. 2)
3. For best results use coffee that is
ground for use with automatic drip
coffeemakers. (See chart below for
suggested amounts)
Tip: When you use a paper filter, it is
important that the filter fits flush against the
sides of the filter basket. If the filter
collapses, dampen the filter before placing
it in the filter basket and adding the ground
coffee.
4. Swing the filter basket door closed until
it snaps into place.
CAUTION: Do not operate your coffee
maker if the door does not close
completely. If the door does not close
completely, check to see that the filter
basket is properly seated, and snap the
door back into place.
5. Depress the power/timer button twice
to activate the brew cycle.
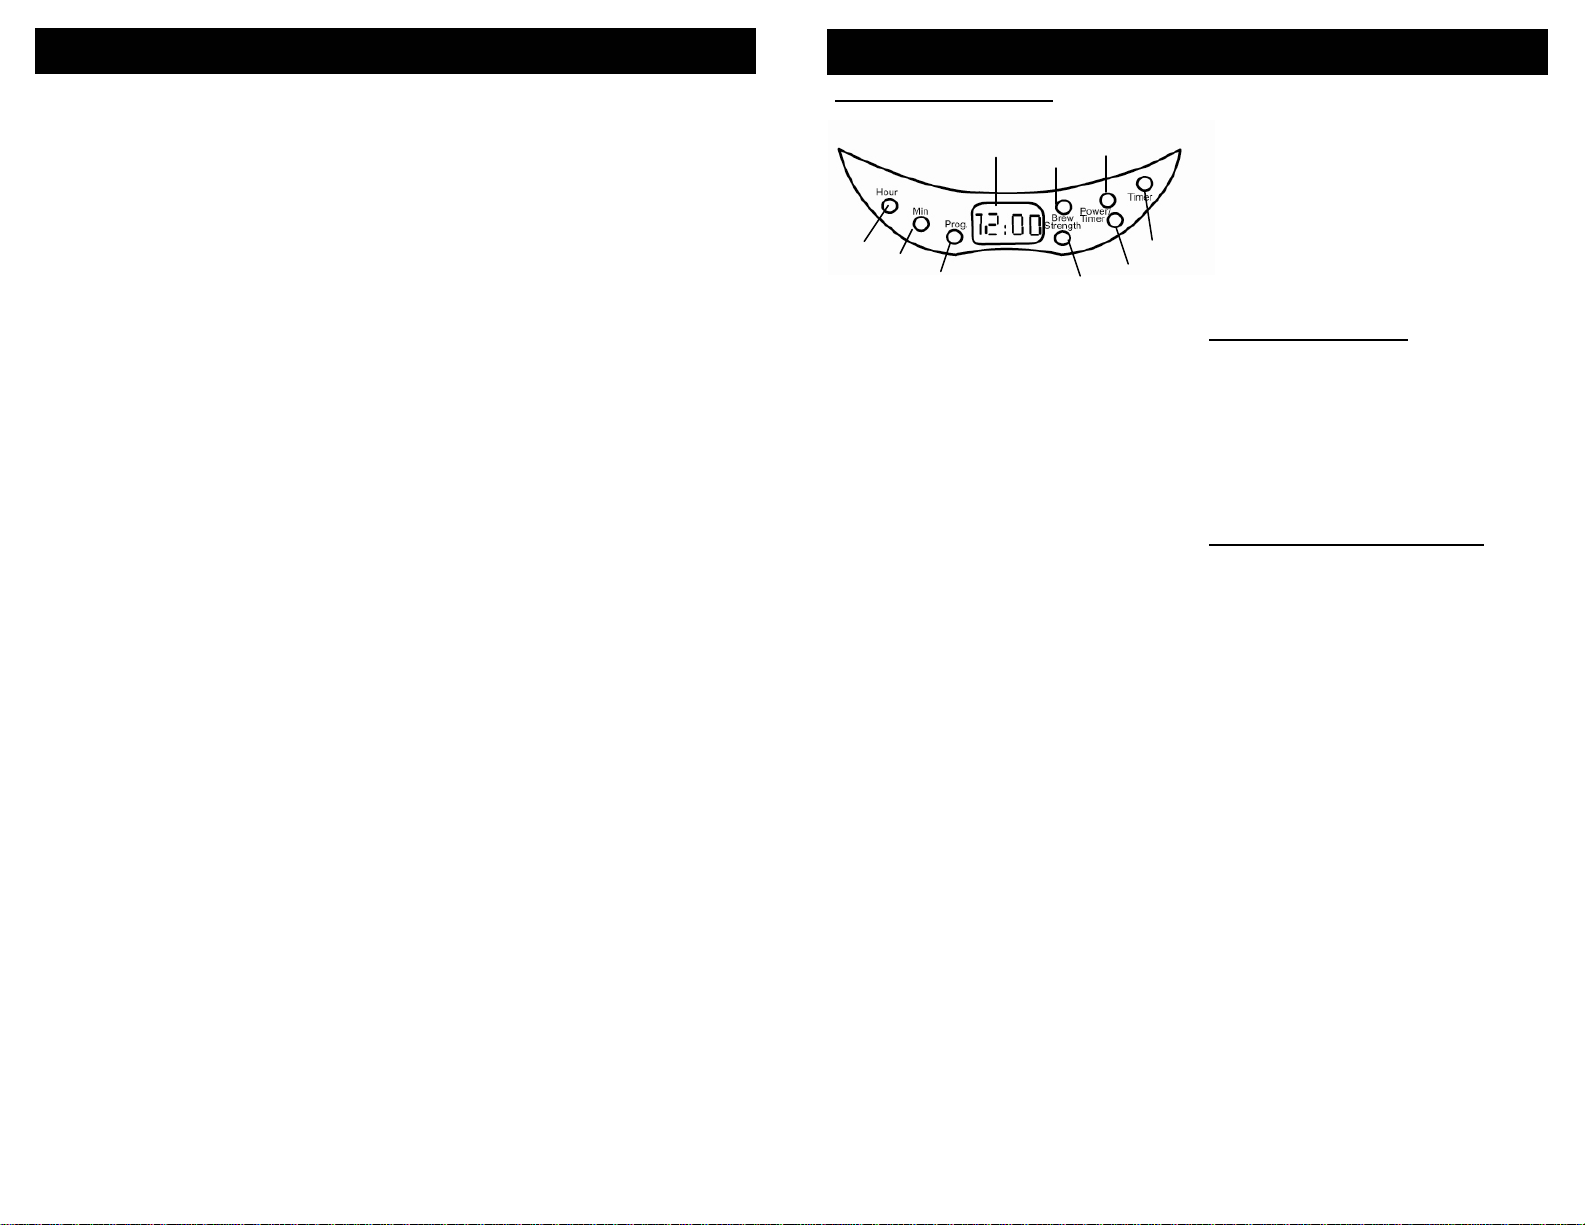
Program Mode
1. Press and hold the program button. At
the same time, press the set hour
button until the desired brew time
hour is displayed.
2. Then press the set minute button until
the desired minute has been displayed.
3. Release the program button.
4. Press the power/timer button once. The
timer “On” indicator light will illuminate.
This indicates that the coffee maker is
waiting for the preset brew time to be
reached before it will begin the brew
cycle.
CAUTION: If the power/timer button
is pressed before the program button, the
advance program mode will not activate.
6. Close the illuminated water reservoir lid.
7. Place the glass carafe with the lid in
place onto the warming plate.
CAUTION: The small opening at the rear
of the illuminated water reservoir prevents
accidental overflow of coffee into the filter
and or carafe. Do not overfill the
illuminated water reservoir.
Putting in the Coffee
1. Depress the filter basket door release
button and insert a #4 cone shaped
paper filter into the filter basket.
NOTE: A permanent filter may be used in
place of a paper filter.
2. Fill the filter with the required amount of
coffee depending on amount. (Fig. 3)
Fig. 2
Fig. 3
One Cup = Five ounces brewed coffee
1.52
34
46
68
710
912
TABLESPOONSNUMBER OF CUPS
6
OPERATING INSTRUCTIONS
Using the Coffee Maker To Make
Tea
Make sure that the filter basket, lid and
carafe has been completely cleaned in
warm soapy water, especially if it was used
to make coffee previously.
1. Depress the filter basket door release
button to swing open the filter door.
2. Place tea bag(s) into the filter basket.
NOTE: If loose tea is used, place a paper
filter in the filter basket before measuring
the amount of loose tea required.
3. Fill the illuminated water reservoir with
the right amount of water depending on
serving needs.
4. Depress the power/timer button to
desired mode, program button or power
on.
5. An alternate suggestion is to place the
tea, loose or bags directly into the
carafe, allowing water to flow into the
carafe to steep the tea.
To Remove Calcium Build Up from
the Coffee Maker
Calcium deposits may build up in the
coffee maker as a result of minerals
commonly found in drinking water. The
build up is normal and may result in a
slow down on the coffee maker’s brewing
time, or the taste of the coffee. The slow
down can be eliminated by periodically
decalcifying the coffee maker.
1. Fill the carafe with cold water and two
tablespoons of plain white household
vinegar.
2. Pour the solution into the water
reservoir, then close the reservoir
cover.
3. Place the carafe on the warming plate
and allow the coffee maker to brew the
vinegar solution.
4. Do not use a filter when decalcifying.
5. When the vinegar solution has finished
brewing, empty the carafe and rinse
out with cold water.
6. Refill the illuminated water reservoir
with cold water only and run another
brew cycle to remove any remaining
vinegar solution.
To Remove Calcium Build-up from
Carafe
Hard water or repeated use can leave a
white stain on the carafe, which will turn
brown from the coffee or tea. To clean the
carafe:
1. Fill the carafe with a solution of equal
parts of tap water and vinegar and let
the carafe stand with the solution for
20-30 minutes.
2. Use a soft brush to brush the inside of
the carafe to further loosen the build
up.
3. Discard the solution and wash the
carafe with warm soapy water then
rinse well.
NOTE: Frequency of cleaning required
depends on frequency of use and
cleaning between brews.
SUGGESTED CLEANING INTERVALS:
Type of Water Cleaning Frequency
Soft Water: After 80 brews
Hard Water: After 40 brews
Cleaning the Coffee Maker
CAUTION: Always make sure the coffee
maker is unplugged and warming plate
is cool before attempting to clean. To
protect against electric shock, do not
immerse cord, plug or unit into water or
other liquids.
1. The outside of the coffee maker can be
cleaned with a damp, soft cloth.
2. The glass carafe, carafe lid and
removable filter basket may be washed
with warm, soapy water or placed in the
top rack of the dishwasher. Do not
place any other parts of the coffee
maker in the dishwasher.
3. To clean the permanent filter, empty the
grounds and rinse thoroughly.
4. DO NOT clean the inside of the water
reservoir with a cloth as the cloth may
have a lint residue that could block the
coffee maker.
5. For stubborn stains, use a nylon or
plastic pad with a non-abrasive cleaner,
Do not use metal scouring pads or
abrasive cleansers.

7
OPERATING INSTRUCTIONS
Tips for Great Coffee
• Before using your appliance for the first
time, operate the coffee machine 2 or 3
times without coffee grounds.
• Fill the water tank with cold water only.
• Using filtered water improves the taste
of coffee or tea.
• Ensure that the lid is securely on the
carafe to ensure proper operation of the
anti-drip function.
• A dash of salt in the coffee grounds
before brewing can eliminate bitterness.
• A clean coffee maker ensures better
tasting coffee.
• Fresh coffee grounds greatly improves
the taste of a pot of coffee.
TROUBLESHOOTING GUIDE
PROBLEM POSSIBLE REASON POSSIBLE SOLUTION
“On” light and
illuminated water
reservoir does not
illuminate.
1. The unit is not firmly plugged
in.
2. No electricity in the wall outlet.
3. Blown fuse/tripped circuit
breaker.
1. Plug the unit firmly into the outlet.
2. Check fuse or breaker
3. Replace fuse/reset circuit
breaker.
Coffee is not
brewing
1. The water reservoir is empty.
2. The filter basket is not properly
inserted.
3. The carafe is not placed all the
way on the warming plate.
1. Fill the water reservoir with water.
2. Seat the filter basket correctly
into the filter basket
compartment.
3. Place the carafe correctly onto
the warming plate.
Coffee maker only
brews water 1. No grounds in filter basket. 1. Place filter with grounds into the
filter basket.
Coffee maker
brews slowly 1. Coffee maker needs cleaning.
2. Brew strength function is “On”.
1. Follow cleaning instructions to
decalcify the unit.
2. Turn brew strength function “Off”.
Filter basket
overflows
1. The filter basket is not properly
inserted.
2. Carafe is not placed all the
way on the warming plate.
3. Carafe lid not on carafe.
4. Too many grounds placed in
filter.
5. Carafe was removed from
warming plate for longer than
30 seconds.
1. Insert the filter basket correctly.
2. Ensure that the carafe is placed
all the on the warming plate.
3. Place carafe lid onto carafe
correctly.
4. Reduce the amount of grounds in
the filter.
5. Ensure that carafe is quickly
replaced onto the warming plate
to prevent overflow.
Burning coffee
smell
1. Empty carafe was left on a hot
warming plate.
2. Coffee was spilled on the
warming plate.
1. Wash carafe thoroughly and wait
for warming plate to cool before
replacing.
2. Wipe warming plate with a damp
clean cloth.
Coffee tastes bad 1. Coffee grounds other than
automatic drip were used.
2. Ground coffee-to-water ratio is
not correct.
1. Use only grounds for an
automatic drip coffee maker.
2. Use appropriate coffee amounts
for cups required.
Grounds found in
coffee
1. Paper filter was not properly
inserted into filter basket.
2. Filter overflowed.
1. Dampen the paper filter before
inserting into the filter basket.
2. Discard coffee when filter
overflows.
NOTE: For any additional assistance call Customer Service at: 1 (866) 213-9592
ONE (1) YEAR LIMITED WARRANTY
This product is warranted to be free from defects in material and workmanship
for a period of one (1) year from the date of the original purchase, when utilized
for normal household use, subject to the following conditions, exclusions and
exceptions.
If your appliance fails to operate properly while in use under normal household
conditions within the warranty period, return the complete appliance and
accessories, freight prepaid to:
94 Main Mill Street, Door 16, Plattsburgh, NY 12901
If the appliance is found to be defective in material or workmanship, the
manufacturer will repair or replace it free of charge. Proof of purchase date and
$9.95 to cover the cost of return shipping and handling must be included. *
Non-durable parts including, without limitation, glass carafe and other parts
which normally require replacement are specifically excluded from warranty.
The liability of the manufacturer is limited solely to the cost of the repair or
replacement of the unit at our option. This warranty does not cover normal wear
of parts and does not apply to any unit that has been tampered with or used for
commercial purposes. This limited warranty does not cover damage caused by
misuse, abuse, negligent handling or damage due to faulty packaging or
mishandling in transit. This warranty does not cover damage or defects caused
by or resulting from damages from shipping or repairs, service or alterations to
the product or any of its parts, which have been performed by a repair person
not authorized by the manufacturer.
This warranty is extended to the original purchaser of the unit and excludes all
other legal and/or conventional warranties. The responsibility of the
manufacturer if any, is limited to the specific obligations expressly assumed by
it under the terms of the limited warranty. In no event is the manufacturer liable
for incidental or consequential damages of any nature whatsoever. Some
states do not permit the exclusion or limitation of incidental or consequential
damages, so the above may not apply to you.
This warranty gives you specific legal rights, and you may also have other
rights which vary from state to state.
*Important: Carefully pack item to avoid damage in shipping. Be sure to
include proof of purchase date and to attach tag to item before packing
with your name, complete address and phone number with a note giving
purchase information, model number and what you believe is the problem
with item. We recommend you insure the package (as damage in shipping
is not covered by your warranty). Mark the outside of your package
“ATTENTION CUSTOMER SERVICE”. We are constantly striving to
improve our products, therefore the specifications contained herein are
subject to change without notice.
Printed in China
Model
CM80LV
8
Table of contents