Livongo BG1000 User manual

Livongo for
Diabetes
User Guide
Your Welcome Kit includes:
• Livongo Connected Meter (1)
• LIvongo Lancing Device (1)
• Livongo Lancets (100)
• Livongo Blood Glucose Test Strips (150)
• Livongo Blood Glucose Control Solution (2)
• Livongo User Guide / Instructions for Use (1)
• AC Adapter (wall charger) and USB Cable (Set)
• Travel Case (1)
PL04132 Rev. B

3 4
Livongo for Diabetes User Guide Livongo for Diabetes User Guide
Welcome to the Livongo for Diabetes program.
This guide will help you get started in less than
5 minutes. If you have any questions, please call
Member Support at (800) 945-4355 or email us at
[email protected]om. We’re available 24
hours a day, 7 days a week.
Contents
The Livongo for Diabetes Program ................................................................ 5
Getting Started .................................................................................... 6
Checking Your Blood Sugar ....................................................................... 7
Accessing Your Data ............................................................................... 9
Charging the Livongo Meter....................................................................... 9
Power On / Power Off / Sleep Mode. . . . . . . . . . . . . . . . . . . . . . . . . . . . . . . . . . . . . . . . . . . . . . . . . . . . . . . . . . . . . . . 10
Storing the Livongo Meter ........................................................................ 10
Using the Livongo Lancing Device ................................................................11
Important Safety Instructions and Warnings ..................................................... 15
Important Symbols ............................................................................... 17
Troubleshooting Error Messages ................................................................. 18
Cleaning and Disinfecting the Livongo Meter .................................................... 21
Appendix
Livongo Blood Sugar Monitoring System: Instructions for Use ................................... 26

5 6
Livongo for Diabetes User Guide Livongo for Diabetes User Guide
The Livongo for Diabetes Program
The Livongo for Diabetes program is a new approach to diabetes management
designed to empower you to make better decisions. The program includes: the
Livongo connected blood glucose meter, unlimited test strips and lancets, access to
coaches at any time, personalized insights, and much more. Get started to discover
all the benets.
Getting Started
The Livongo meter comes ready to use right out of the box and is
already charged and ready for your rst blood sugar check.
Note: If you have cellular connectivity, your meter’s date and time
will be automatically updated after you do your rst check.
Before checking your blood sugar and to ensure accurate
results, wash your hands with soap and water and dry
them thoroughly.

7 8
Livongo for Diabetes User Guide Livongo for Diabetes User Guide
Checking Your Blood Sugar
Place your meter on
a at surface, then
insert a test strip.
Choose a meal tag.When your meter displays “Apply
blood to the strip,” apply a drop of
blood into the strip chamber. (See
page 11 for instructions on how to
use the lancing device.)
Select a tag that
describes how
you’re feeling.
Wait while your meter
checks your blood sugar.
(Do not move or touch
the screen of your meter
during this time.)
Click “Submit” to securely
upload your blood sugar
reading and tags (meals
and feelings) to your
Livongo account.
3 4 5 621 153 mg/dL
In Range
Add a Meal Tag
Before Breakfast After Breakfast
Before LunchA fter Lunch
Before DinnerA fter Dinner
No MealO ther / Snack
153 mg/dL
In Range Before Dinner
Select a Feeling Tag
I feel
fine
I donÕt
feel well
Light
headed
Stressed
out
After
exercise
Ate
more
Increase
meds
Back
Missed
meds Other
Submit
153 mg/dL
High OtherBefore Dinner
Select a Feeling Tag
I feel
fine
I donÕt
feel well
Light
headed
Stressed
out
After
exercise
Ate
more
Increase
meds
Back
Missed
meds Other
Submit
Your data is being securely
uploaded...

9 10
Livongo for Diabetes User Guide Livongo for Diabetes User Guide
Accessing Your Data
You can access your data on the Livongo meter by tapping See More on the home screen data
card.
Charging the Livongo Meter
Your Livongo meter is powered by a rechargeable battery. You’ll receive a notication on the
meter when your battery level is low. To charge it, plug the charger cord with power adapter
attached into the port on the left side of the meter. The meter will show the progress on the
screen. Please note that you won’t be able to perform a blood sugar check while it’s charging. Do
not plug in your charging cord while performing a blood sugar check.
Please wait for 30 minutes after charging the Livongo meter to check your
blood sugar.
The service life of the battery depends on the service time and frequency. It can generally be
charged and discharged at least 400 times.
Use only the Livongo-supplied AC adapter and USB cable to charge the Livongo meter. Avoid
charging your meter in extreme high or low temperatures.
Power On / Power Off / Sleep Mode
• To power on your Livongo meter when it is completely off, press and hold the power button for
2 seconds.
• To conserve battery, your Livongo meter will go to sleep automatically after a period of
inactivity. You can also put the meter to sleep by tapping the power button.
• To completely power off your Livongo meter for extended periods of non-use or storage, press
and hold the power button for 2 seconds and then select Power Off on the screen.
To ensure the best experience possible, we recommend keeping your Livongo meter in sleep
mode instead of completely powered down during normal usage periods. In sleep mode, your
Livongo meter will wake up automatically when you insert a test strip.
Storing the Livongo Meter
The Livongo meter is best stored in the Livongo travel case included in the Welcome Kit. The case
is designed to protect the device and help you carry everything you need to check your blood
sugar. You can even check without removing the meter from the case.

11 12
Livongo for Diabetes User Guide Livongo for Diabetes User Guide
Using the Livongo Lancing Device
The Livongo lancing device is simple to use. Please follow these instructions:
1. Remove the lancing device cap: Remove the cap by turning it counterclockwise and then
pulling it straight off the lancing device.
2. Insert a lancet: Align the lancet so that it ts into the lancet holder. Push the lancet into the
device until it snaps into place. Twist the protective cover until it separates from
the lancet.
3. Replace the lancing device cap: Place the cap on the lancing device and turn clockwise to
secure the cap. Avoid contact with the exposed lancet.
Useful Tips:
• Gently massage from the base of the nger to the tip of the nger to obtain the required blood
volume.
• Rotating ngers helps avoid callus buildup, which will make drawing blood easier.
• Prior to checking, wash your hands with soap and water and dry them thoroughly. Use warm
water to increase blood ow in your ngers.
3
2
1

13 14
Livongo for Diabetes User Guide Livongo for Diabetes User Guide
Using the Livongo Lancing Device (Cont.)
4. Adjust the depth setting: The lancing device has 11 puncture depth settings,
numbered 0 through 5. Smaller numbers are for a shallower puncture. Turn the depth
wheel to choose the setting.
Tip: A shallower puncture may reduce discomfort. It is recommended that you start
with a shallower setting and increase the depth until you get an adequate drop of
blood. Greater pressure of the lancing device against your nger will also increase the
puncture depth.
5. Cock the lancing device: Pull the cocking barrel back to set the lancing device. The
release button will turn light blue and you may hear a click.
6. Puncture your finger: Hold the lancing device rmly against the side of your nger.
Press the release button to prick your nger. Remove the lancing device from your
nger.
4
5 6

15 16
Livongo for Diabetes User Guide Livongo for Diabetes User Guide
Important Safety Instructions
Please take a minute to read through this important safety information. Remember, this is a medical
device and it needs to be used with caution and care. This device is for indoor use only.
Warnings
qKeep your Livongo meter and supplies away from children at all times. The blood glucose test strips
and lancets are choking hazards and could be inhaled or swallowed.
qDo NOT puncture, drop, crush, microwave, incinerate, paint, or insert foreign objects into the Livongo
meter.
qDo NOT use re to dispose of your Livongo meter. The battery may explode and may cause
serious injury.
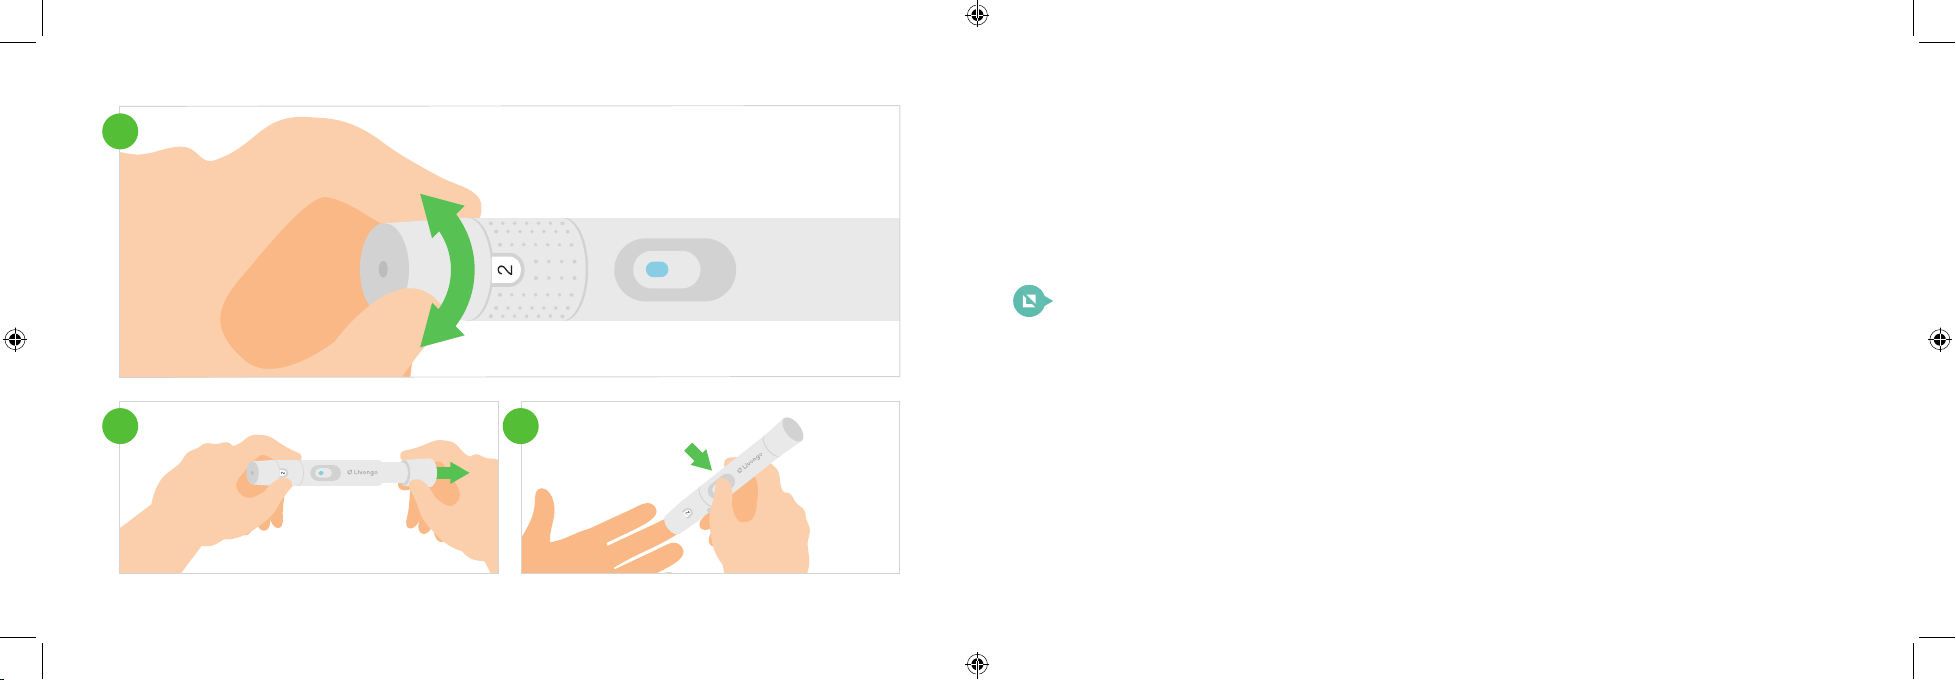
qThe Livongo meter and lancing device are for single-patient use. For safety reasons, do not share it
with anyone, including your family members.
qAll parts of the kit are considered biohazardous and can potentially transmit infectious diseases, even
after being cleaned and disinfected.
qAlways wash your hands thoroughly with soap and water and dry well after handling your Livongo
meter, test strips, lancets, or lancing device.
qDo NOT try to open and change the Livongo meter’s battery. It is built-in and not changeable.
qDo NOT use your meter in close proximity to sources of strong electromagnetic radiation.
qOther equipment could interfere with the Livongo meter, even if the other equipment complies with
CISPR8 emission requirements.
Precautions
qDo NOT use with any accessories that are not specied or certied by Livongo.
qUse only the Livongo-supplied AC adapter and USB cable to charge the Livongo meter. Avoid
charging your meter in extreme high or low temperatures. For replacement of the AC adapter or USB
cable, contact Livongo Member Support.
qDo NOT open, tamper with, repair, disassemble, or abuse your Livongo meter. There are NO user
serviceable parts inside your device.
qDo NOT attempt to clean the Livongo meter while it is being charged.
qAvoid exposing your device to high temperatures, humidity, cold, dust, or dirt. If your device is
exposed to temperatures outside the stated operating and storage temperatures, move it to a room
environment and wait 30 minutes before using.
qDispose of the Livongo meter and accessories according to local regulations after their service lives.
They can also be returned to the dealer or manufacturer for recycling or proper disposal.
qUse of the Livongo meter in a dry environment, especially if synthetic materials are present (synthetic
clothing, carpets, etc.) may cause damaging static discharges that may hinder in the transfer of the
readings.

17 18
Livongo for Diabetes User Guide Livongo for Diabetes User Guide
Blood Applied
Too Quickly
Blood was applied too quickly after the strip was inserted and before the meter was ready.
After inserting the strip, please wait until you see the message “Ready to Check Blood Sugar”
to apply blood.
Contaminated
or Used Strip
Do not apply blood to the test strip before inserting it into the meter. Please use a new strip
and try again.
Insufcient
Blood Sample
Sometimes the blood sample might be too small to be measured with accuracy. Please
remove the strip and try again using a new strip.
Glucose Strip
Coding Error
Please insert a new test strip from the same vial and try again. If the error persists, contact
Member Support.
Temperature
Too High
The outside temperature is above 113°F, which is too high to give an accurate reading.
Temperature
Too Low
The outside temperature is below 41°F, which is too low to give an accurate reading.
Troubleshooting Error Messages
In the event of an error while checking your blood sugar, an error message will appear on your
meter screen.
Important Symbols
Biological risks Includes control solution
Consult instructions for use 86 F
41 F
Temperature limitation
In vitro diagnostic medical device Use by date
Caution, consult
accompanying documents
90%
10%
Humidity limitation
Catalog number
75 kP a
Atmospheric pressure limitation
Keep away from sunlight Keep dry
Direct current FCC

19 20
Livongo for Diabetes User Guide Livongo for Diabetes User Guide
Troubleshooting Error Messages (Cont.)
In the event of an error while checking your blood sugar, an error message will appear on your
meter screen.
Test Strip
Removed
If the strip is removed before a reading can be obtained, you’ll receive this error message.
Please fully remove the strip and try again with a new strip.
Hematocrit
Error
Your hematocrit level is below 20% or above 70%. The Livongo meter operates in the
hematocrit range of 20% to 70%. Very high (above 70%) and very low (below 20%)
hematocrit levels can cause false results. Talk to your doctor to learn more about your
hematocrit level.
Severely High:
> 600 mg/dL
The Livongo meter can measure blood glucose accurately from 40 mg/dL to 600 mg/dL. If
your blood glucose is higher than 600 mg/dL, the screen will display this message. Please
call your doctor if you receive this message.
Severely Low:
< 40 mg/dL
The Livongo meter can measure blood glucose accurately from 40 mg/dL to 600 mg/dL. If
your blood glucose is lower than 40 mg/dL, the screen will display this message. Please call
your doctor if you receive this message.
Troubleshooting Error Messages (Cont.)
In the event of an error while checking your blood sugar, an error message will appear on your
meter screen.
If you have any questions about your Livongo meter, please contact Member Support at (800)
a week.
Internal
Calibration
Error
Please turn off the meter for 30 seconds and turn it back on. If the error persists, contact
Member Support.
Internal Meter
Error
Please turn off the meter for 30 seconds and turn it back on. If the error persists, contact
Member Support.
Meter CRC
Error
Repeat the BG check with the same test strip. If the error persists, contact Member Support.
If you are not in cellular range, your blood glucose results will not be transmitted. The results
will be stored in the meter’s memory and transmitted the next time you check your blood
glucose or retrieve messages in your message inbox.

21 22
Livongo for Diabetes User Guide Livongo for Diabetes User Guide
Cleaning and Disinfecting the Livongo Meter
CAUTION: Do NOT disinfect the meter with any product containing bleach.
Pre-Cleaning and Disinfection of the Meter
Before disinfecting the meter, please rst use a PDI Super Sani-Cloth Germicidal Disposable Wipe
(EPA Registration No. 9480-4) to pre-clean the entire meter surface by removing any stains or
debris. This pre-cleaning process is for preparing the meter surface to be ready for disinfection
process.
After pre-cleaning, please use another wipe to disinfect the meter. Wipe the entire meter
thoroughly and leave the surface wet according to the contact time listed below.
Disinfection Wipe EPA Registration No. Contact Time
PDI Super Sani-Cloth Germicidal
Disposable Wipe
9480-4 2 minutes
NOTE: Only the disinfectant listed should be used on the device for the life span of the device.
The effect of using more than one disinfectant interchangeably has not been evaluated.
After disinfection wiping, please allow the meter to air-dry completely before using the meter
again. Avoid inserting any wipes into the inside of the strip port and data port when performing
the pre-cleaning and disinfection procedure.
Intended Use for Disinfection and Pre-Cleaning Before Disinfection
The disinfection process is for preventing potential transmission of infectious diseases through
blood-borne pathogens. The pre-cleaning process is to ensure the removal of any stains or debris
so that effective disinfection can be achieved for the meter surface.
You should also wash your hands thoroughly with soap and water after handling the meter and
test strips.
Disinfection Wipes Material and Where to Buy Them
The materials suitable for the Livongo meter pre-cleaning and disinfection are listed on the
next page.

23 24
Livongo for Diabetes User Guide Livongo for Diabetes User Guide
Cleaning and Disinfecting the Livongo Meter (Cont.)
Disinfection Wipe EPA Registration No. Active Ingredients Where to Purchase
PDI Super Sani-
Cloth Germicidal
Disposable Wipe
9480-4 Isopropyl alcohol 55%,
n-alkyl dimethyl benzyl
ammonium chlorides
0.25%, n-alkyl dimethyl
ethyl benzyl ammonium
chloride 0.25%
Available through online
retailers such as
www.amazon.com
Pre-Cleaning and Disinfection Frequency
Your Livongo meter should be cleaned and disinfected once a week. If someone else is helping
you test, the meter should be disinfected prior to operation by that person. Your meter has been
tested for 260 cycles of the cleaning and disinfection process (one disinfection cycle per week for
5 years).
Your meter has been tested to withstand the pre-cleaning and disinfection process during the
5-year meter life based on the operation frequency mentioned above.
However, if you have any problem with your meter, please contact Member Support at
Note: All parts of the kit are considered biohazardous and can potentially transmit infectious
diseases, even after you have performed cleaning and disinfection. Please follow proper
precautions when handling your meter.
No signs of meter deterioration in appearance or performance were observed after 260 cycles of
the recommended pre-cleaning and disinfection procedure. However, you should always inspect
your meter after performing the cleaning and disinfection procedure. External signs of meter
deterioration might include polymer crazing (thin silver streaks), cracking, swelling, dissolving,
softening, or becoming brittle. Signs of meter performance deterioration might include buttons
not functioning properly, audio not working, missing display segments, error messages during
testing, or control solution test results that are out of range.
If any signs of external or performance deterioration are observed on your meter after cleaning
and disinfection, please stop using your meter and lancing device and contact Member Support
at (800) 945-4355 for assistance.

25 26
Livongo for Diabetes User Guide Livongo for Diabetes User Guide
If you have any questions about your Livongo meter,
please contact Member Support at (800) 945-4355
available 24 hours a day, 7 days a week.
Appendix

27 28
Livongo for Diabetes User Guide Livongo for Diabetes User Guide
Specifications and Limitations
Specifications
• Test measured: Blood glucose
• Glucose methodology: Glucose
oxidase biosensor
• Glucose test results: mg/dL (Plasma values)
• Result Calibration: Plasma-equivalent,
calibrated by using YSI (Model 2300
STAT PLUS) Glucose Analyzer reference
instrument, which is traceable to NIST
reference standard.
• Sample: Capillary whole blood from
ngertip
• Measuring range: 40–600 mg/dL
• Acceptable hematocrit range: 20% to 70%
• Length of test: 5 seconds
• Test strip volume: 0.6 µL
• Weight: 5.0 oz (142 g) (Batteries included)
• Size 5.0 x 2.5 x 0.5 in (130 x 60 x 12.7 mm)
• Livongo-supplied AC adapter
• Input voltage range: 90~264 Vac
• Input frequency: 47~63 Hz
• AC input current 0.2A(rms) Max. @115Vac
• Output Voltage 5V 1A
Operating Ranges
• Temperature: 50°F to 104°F (10°C to 40°C)
• Humidity: 10% to 90% relative humidity
• Altitude: up to 10,000 ft (3,048 m)
• Meter data storage: 1,000 results
• Pressure: 70kPa
Electrical & Power Ratings
• Electrical specications: Rechargeable Li-ion
Battery, 3.85V, 2400mAh, 9.24Wh
• Maximum current (Battery): 2A peak
• Maximum power (Battery): 3.0W peak
• Rated capacity (Battery): 2400mAh, 9.24Wh
• Maximum current (USB input, charging):
1A continuous
• USB charging input: 5V 1A
Environmental
• The storage temperature range for the
meter: 36°F to 95°F (2°C to 35°C).
• The storage temperature range for the test
strips and control solution: 36°F to 95°F (2°C
to 35°C).
• The storage humidity range: 10% to 90%
non-condensing.

29 30
Livongo for Diabetes User Guide Livongo for Diabetes User Guide
FCC Statement
This device, model BG1000, complies with
Part 15 of the FCC Rules. Operation is subject
to the following two conditions: (1) this
device may not cause harmful interference,
and (2) this device must accept any
interference received, including interference
that may cause undesired operation.
Modications not expressly approved by
Livongo Health, Inc. could void the user’s
authority to operate the equipment.
Note: This equipment has been tested and
found to comply with the limits for a Class B
digital device, pursuant to Part 15 of the FCC
Rules. These limits are designed to provide
reasonable protection against harmful
interference in a residential installation.
This equipment generates, uses and can
radiate radio frequency energy and, if not
installed and used in accordance with the
instructions, may cause harmful interference
to radio communications. However, there
is no guarantee that interference will not
occur in a particular installation. If this
equipment does cause harmful interference
to radio or television reception, which can
be determined by turning the equipment
off and on, the user is encouraged to try to
correct the interference by one or more of
the following measures:
– Reorient or relocate the receiving antenna.
– Increase the separation between the
equipment and receiver.
– Connect the equipment into an outlet on
a circuit different from that to which the
receiver is connected.
– Consult Livongo Health or an experienced
radio/TV technician for help.
Interference from external equipment has
not been found to affect the Livongo meter.
FCC ID: 2AA92LV02795
Radiofrequency Radiation
Exposure Information:
The device uses cellular radio frequency
technology to accomplish required
communications with Livongo’s server. The
device communicates with Livongo’s server
only in three circumstances: when used
to check blood glucose (which typically
happens up to 8 times per day); before the
device goes to sleep (which follows every
blood glucose check); when used to share a
summary report (which typically happens
every 1-3 months).
The average human exposure to such radio
frequency radiation remains far below
the regulatory limits set by the US Federal
Communications Commission (FCC)
provided that the device is used at positions
as instructed in this manual during
communication with Livongo’s server.
Keep the device 0.6 in (1.5 cm) from the
body and 8 in (20 cm) from a pacemaker.
California Proposition 65 Warning
THIS PRODUCT CONTAINS CHEMICALS
KNOWN TO THE STATE OF CALIFORNIA TO
CAUSE CANCER AND BIRTH DEFECTS OR
OTHER REPRODUCTIVE HARM.

31 32
Livongo for Diabetes User Guide Livongo for Diabetes User Guide
Warranty
Your Livongo connected meter is guaranteed
to be free of material and workmanship
defects for one (1) year from the date of
receipt (except as noted below). If at any
time during the rst year after purchase,
your meter does not work for any reason
(other than as described below), it will be
replaced with a new meter free of charge.
Limitations On Warranty
This warranty is subject to the following
exceptions and limitations:
• This warranty is applicable only to the
original purchaser.
• This warranty does not apply to units
that malfunction or are damaged due
to obvious abuse, misuse, alteration,
neglect, unauthorized maintenance or
failure to operate meter in accordance
with instructions.
• We have no knowledge of the
performance of the Livongo meter when
used with test strips other than Livongo
Strips. Therefore, we make no warranty as
to the performance of the Livongo meter
when used with any test strips other than
Livongo Test Strips.
• There is no other express warranty for
this product. The option of replacement,
described above, is Livongo’s only
obligation under this warranty.
For Warranty Service
Please contact Member Support at
(800) 945-4355.
Privacy Policy
As the manufacturer of the Livongo meter, we are committed to securing your personal information
responsibly and in compliance with the law. Learn more at: https://my.livongo.com/common/docs/
privacy-practices.pdf

E-1 E-2
Instructions for Use Instructions for Use
BLOOD GLUCOSE MONITORING SYSTEM
Instructions for Use
Contents
Blood Glucose Monitoring System ......................................................................................................... E-3
Blood Glucose Test Strips ...................................................................................................................... E-4–15
Blood Glucose Control Solution....................................................................................................... E-15–19
Lancing Device .......................................................................................................................................... E-20–25
References ............................................................................................................................................................ E-26
Limited Warranty ............................................................................................................................................. E-26
Contact Information ...................................................................................................................................... E-27

E-3 E-4
Instructions for Use Instructions for Use
BLOOD GLUCOSE MONITORING SYSTEM
PRINCIPLE AND INTENDED USE
The Livongo Blood Glucose Monitoring System is comprised of the Livongo Blood Glucose
Meter and Livongo Blood Glucose Test Strips. The Livongo Blood Glucose Monitoring System is
intended to be used for the quantitative measurement of glucose in fresh capillary whole blood
from the ngertips. The Livongo Blood Glucose Monitoring System is intended for self-testing
by people with diabetes at home as an aid to monitoring the effectiveness of diabetes control
programs. The Livongo Blood Glucose Monitoring System is intended for single-patient use and
should not be shared. The Livongo Blood Glucose Monitoring System is for in vitro diagnostic use.
The Livongo Blood Glucose Monitoring System is not intended for the diagnosis of or screening
for diabetes, nor intended for use on neonates.
The Livongo Blood Glucose Monitoring Systems use electrochemical methodologies that use
a reagent system that includes glucose dehydrogenase (FAD-GDH) and a mediator that reacts
with the glucose in the whole blood sample obtained from the ngertip, forearm, and/or palm to
produce an electrical current signal. This current is measured using an amperometric detection
method. The meter then calculates and displays the blood glucose concentration reading,
calibrated to plasma reference.
BLOOD GLUCOSE TEST STRIPS
Materials Provided
•Test Strips • Instructions for Use •Lancing Device • Meter • Sterile Lancets • Control Solution
PRINCIPLE AND INTENDED USE
The Livongo blood glucose test strips are used with the Livongo meter in the quantitative
measurement of glucose in fresh whole capillary blood from the ngertip. The Livongo meter
is intended for use by people with diabetes at home as an aid to monitor the effectiveness of a
diabetes control program and should not be used for the diagnosis of/or screening for diabetes
mellitus or for neonatal use. The blood glucose test strips are thin strips. The strips have a chemical
reagent system. They work with the Livongo meter to measure the glucose level in whole blood.
Blood is applied to the end tip of the test strip. The blood is then absorbed into the reaction cell. This
is where the reaction takes place. A transient electrical current is formed during the reaction and
detected by the meter. The amount of glucose is then calculated based on this current. The result
is shown on the meter display. The meters are calibrated to display plasma equivalent results. The
system is used to monitor how well a diabetes control program works. The blood glucose test strips
can be used only outside the body. They are used by persons with diabetes for self-testing purposes.

E-5 E-6
Instructions for Use Instructions for Use
BLOOD GLUCOSE TEST STRIPS
Composition
Each test strip has reactive and non-reactive chemicals. These chemicals are: FAD-dependent
Glucose Dehydrogenase <25 IU, Mediator <300 µg, Buffer, and Non-reactive Ingredient. Each test
strip vial contains a drying agent.
Storage and Handling
• Test strips should be kept in their vial. The cap must be tightly closed to keep the test strips in
working condition.
• Store in a cool, dry place between 36–95°F (2–35°C) and 10-90% relative humidity and keep out
of direct sunlight.
• Do not freeze or refrigerate.
• For accurate results use the test strips at room temperature.
• Keep the text side up and blank side down when you insert the strip into the strip port.
• Do not store or use the test strips in a humid place such as a bathroom.
BLOOD GLUCOSE TEST STRIPS
• Do not store any part of the system near bleaches or cleaners that contain bleaches.
• Do not move the test strips to a new vial or any other container.
• Repeated insertion and removal of a test strip into the meter strip port may cause errors.
• Replace the vial cap as soon as you take a test strip out.
• Use the test strip as soon as it is taken out of the vial.
• Do not use your test strips past the unopened expiration date printed on the vial. Using test strips
past the expiration date may cause inaccurate results.
Note: All expiration dates are printed in Year-Month-Date format. 2020-01-30 means
January 30, 2020.
• A new vial of test strips may be used for 6 months after rst being opened. After 6 months they
will expire. Write the date opened on the vial after opening.
Precautions
• For in vitro diagnostic use. The test strips are to be used only outside the body for testing purposes.
• Your Blood Glucose Meter is for single-patient use. Do not share it with others including family
members. Remember to follow the required pre-cleaning and disinfection procedure. This
procedure is important to prevent the potential transmission of infectious diseases.

E-7 E-8
Instructions for Use Instructions for Use
BLOOD GLUCOSE TEST STRIPS
• Do not use test strips after the expiration date that is shown on the vial. Expired test strips may
give an incorrect result.
• Do not use test strips that are torn, bent, or damaged.
• Do not reuse test strips.
• Apply sample only to the tip of the test strip. Do not apply to the top of the test strip. This may
result in a false reading.
• Discard the vial and any unused test strips 6 months after you rst open it. Constant exposure
to air may destroy chemicals in the test strip. This can cause false readings.
• Keep the test strip vial away from children and animals.
• Consult your doctor before making any changes to your treatment plan.
Please contact Member Support at (800) 945-4355 for information about ordering more
test strips.
BLOOD GLUCOSE TEST STRIPS
Instructions for Use
1. Open the cap of the test strip vial and take out a test strip. Replace the cap to protect the other
test strips.
2. Run the test following the instructions on page 7.
3. The blood glucose test result will be shown on the meter display. This result should fall within
the target range recommended by your doctor. If your blood glucose test results are higher or
lower, ask your doctor what to do. Always consult your doctor before changing your treatment
plan.
Note: The system reads glucose in whole blood within the range of 40–600 mg/dL. If a result is
below 40 mg/dL, the meter will display “Severely Low.” If a result is above 600 mg/dL, the meter
will display “Severely High.”
Range of Expected Values
Blood glucose monitoring requires the help of a doctor. Together you can set your own range of
expected blood glucose values. You can also arrange your testing times. In addition, you should
discuss the meaning of your blood glucose results together. Expected blood glucose levels for
people without diabetes:1
Table of contents
Other Livongo Blood Glucose Meter manuals
Popular Blood Glucose Meter manuals by other brands

Acon
Acon ON-CALL PRO user manual

Home Aide Diagnostic
Home Aide Diagnostic Easy Trak II G-425-3 user manual

Arkray
Arkray Glucocard 01 User instruction manual

Lifescan
Lifescan INDUO Quick reference guide

SD Biosensor
SD Biosensor SD GlucoNavii NFC User instruction guide

MediSure
MediSure Blood glucose monitoring system user guide