MediVena ONE-CARE PRO Reference guide
ONE-CARE® PRO Blood Glucose Monitoring System
(Model AC500 PRO)
For in vitro diagnostic use only
Operations & Procedures Manual

Introduction
Intended Use Statement
Important Safety Instructions
About the Product
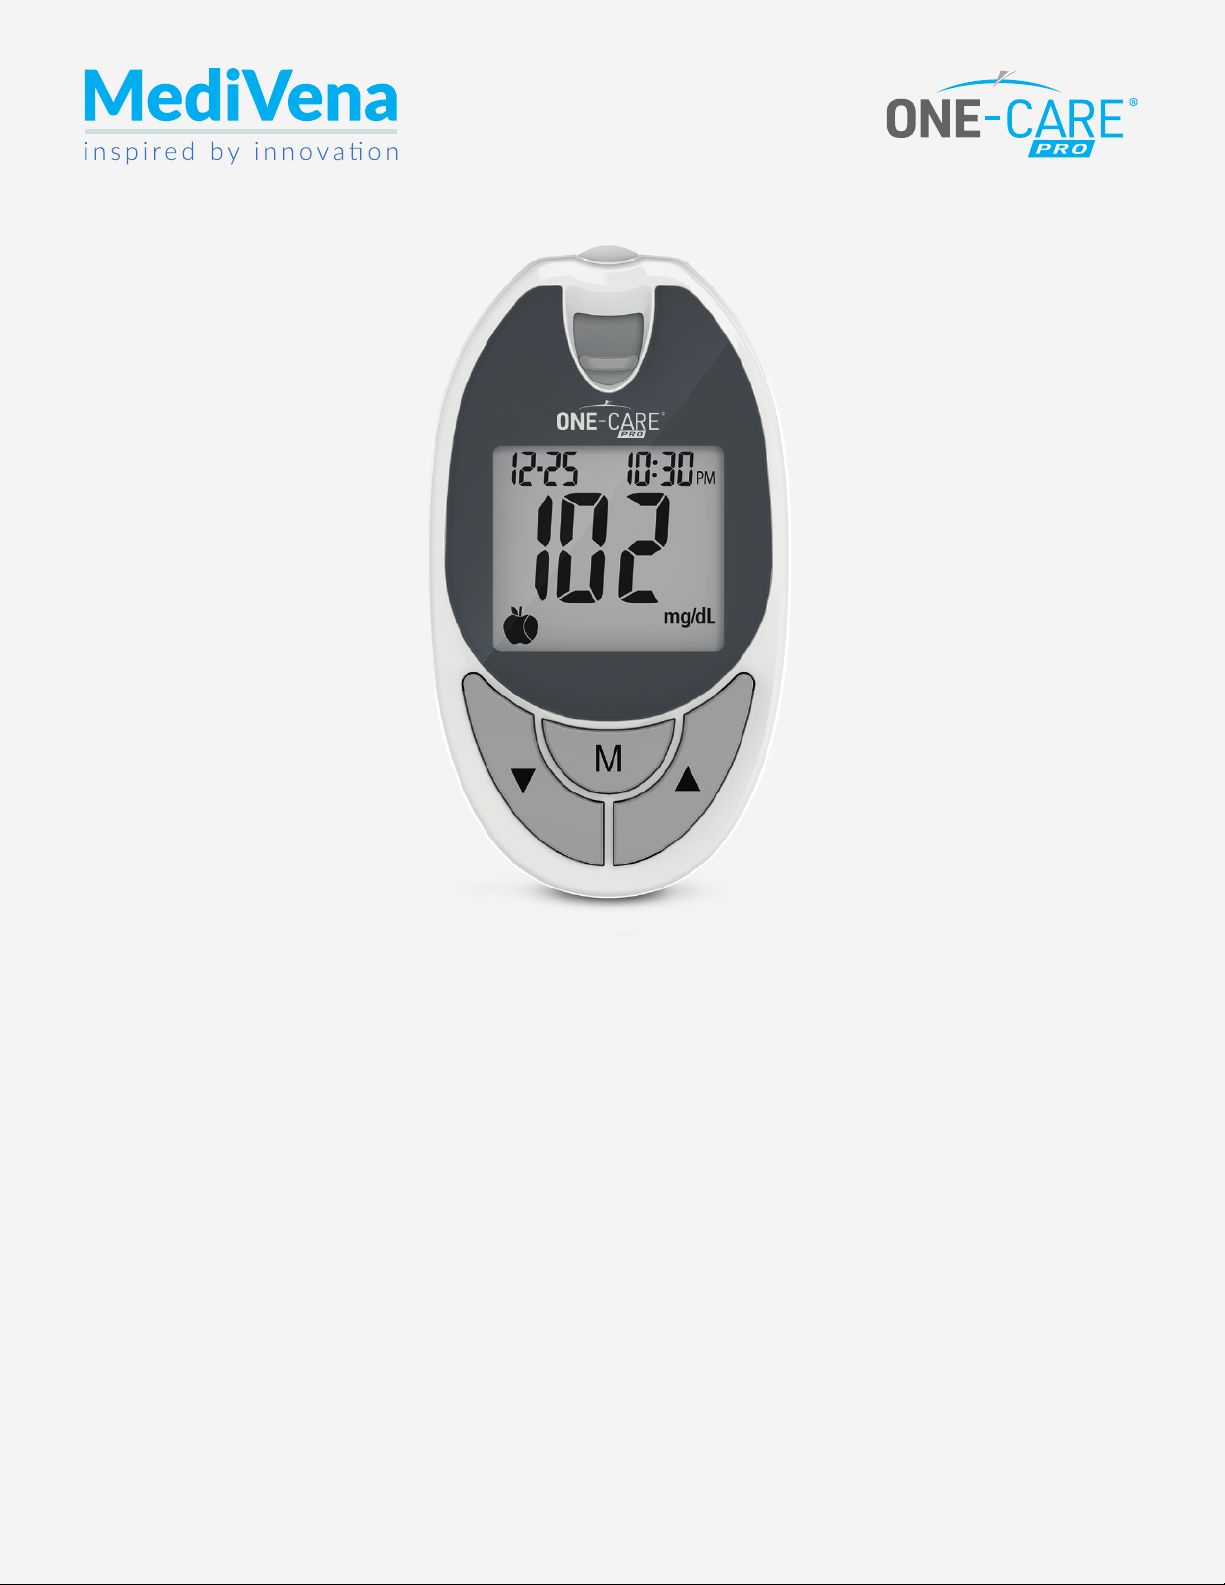
About the Meter
About the Meter Display
About the Test Strip
About the Test Strip Vial
Installing/Replacing the Battery
Setting Up the Meter
Setting the Date, Time
Setting the Reminder Alarm
Setting the HI / LO Alarm
Setting the Sound
Important Information
Testing Your Blood Glucose Level
Preparing the Test Strip
Obtaining a Blood Sample
Applying Blood Sample to the Test Strip
Available Alternate Sites Testing: Palm and Forearm
Control Solution Test
Memory Features
Transfer Test Results to a Computer
Cleaning and Disinfection Procedures
Care and Storage
Display Messages
Other Problems that May Occur
Specications
Icon Description
Tolerance summary of Interference Substance
Service and Warranty
Customer Service
02
02
03
03
04
05
06
06
07
08
08
09
10
11
12
13
13
14
15
17
18
20
22
23
24
25
26
27
28
29
31
31
TABLE OF CONTENT
01

INTRODUCTION
Thank you for choosing the ONE-CARE® PRO (Model AC500 PRO) Blood Glucose Monitoring System.
As you already know, self monitoring of blood glucose (SMBG) is a necessary part of the treatment
plan of people with diabetes mellitus. Adapted for its ease of use and quick response time, the
ONE-CARE® PRO (Model AC500 PRO) Blood Glucose Monitoring System has the ability to process
accurate results utilizing only a small volume of blood for in vitro diagnostics.
The ONE-CARE® PRO (Model AC500 PRO) Blood Glucose Monitoring System is been designed with
auto coding feature. It means the meter will code itself automatically every time you insert a test
strip.
Please read the entire User’s Manual carefully before using this product.
INTENDED USE STATEMENT
The ONE-CARE® PRO (Model AC500 PRO) Blood Glucose Monitoring System is Intended to be used
for the quantitative measurement of glucose (sugar) in fresh capillary whole blood from ngertip,
palm, or forearm. The ONE-CARE® PRO (Model AC500 PRO) Blood Glucose Monitoring System is
intended for testing outside the body (in vitor diagnostic use) and is intended for multiple-patient
use in professional healthcare settings as an aid to monitor the eectiveness of diabetes control
program. This system should only be used with auto disabling, single-use lancing devices.
The ONE-CARE® PRO (Model AC500 PRO) Blood Glucose Monitoring System should not be used for
the diagnosis of or screening of diabetes or for neonatal use. Alternative site testing should be done
only during steady-state times (when glucose is not changing rapidly).
The ONE-CARE® PRO (Model AC500 PRO) Blood Glucose Test Strips are for use with the ONE-CARE®
PRO (Model AC500 PRO) Blood Glucose Meter to quantitatively measure glucose (sugar) in fresh
capillary whole blood samples drawn from the ngertips, forearm or palm.
02

• Users need to adhere to Standard Precautions when handling or using this device. All parts of the
glucose monitoring system should be considered potentially infectious and are capable of transmit-
ting bloodborne pathogens between patients and healthcare professionals. For more information,
refer to “Guideline for Isolation Precautions: Preventing Transmission of Infectious Agents in Health-
care Settings 2007”, http://www.cdc.gov/hicpac/2007ip/2007isolationprecautions.html.
• The meter should be disinfected after use on each patient. This Blood Glucose Monitoring System
may only be used for testing multiple patients when Standard Precautions and the manufacturer’s
disinfection procedures are followed.
• Only auto-disabling, single use lancing devices may be used with this device.
Cleaning Solution and Disinfecting Solution: CaviCide Surface Disinfectant (Metrex Research Co.,
EPA Reg. No. 46781-6) For more product information, contact Metrex at 1-800-841-1428 or visit
website at www.metrex.com.
IMPORTANT SAFETY INSTRUCTIONS
ABOUT THE PRODUCT
Your ONE-CARE® PRO (Model AC500 PRO) Blood Glucose Monitoring System is made up of several
components. This booklet is designed to guide you through the operation of the system with
detailed directions and pictures. Your ONE-CARE® PRO (Model AC500 PRO) Blood Glucose Monitoring
System contains:
˙ONE-CARE® PRO (Model AC500 PRO) Blood Glucose Meter
˙ONE-CARE® PRO (Model AC500 PRO) User Manual
Note: 50 test strips vial can be purchased individually.
03

7
8
9
1. Test Port
2. Strip Eject Button
3. Display
4. M Button
5. ▼Button
6. ▲Button
7. Battery Cover
8. Label
9. Data Port
(Side of the meter)
ABOUT THE METER
Insert the test strip here.
Press this button to ejects the test strip.
Shows blood glucose results and messages.
Press this button to set the year/date/time; to view results and test average
in memory; to enter control solution test mode or to turn the meter o.
Press this button to decrease number/move forward in meter setting.
Press this button to set the reminder alarm and HI / LO alarm.
Press this button to increase number/move backward in meter setting.
Slide cover to install and replace batteries.
Contains meter serial number and customer service phone number.
Connect interface cable to transfer data.
Front view Back view
M
4
5
1
3
6
2
(Model: AC500 PRO)
MediVena
1 Glenlake Pwy, Ste 700
Atlanta, GA 30328, USA
TOLL FREE:
+1 888 270 6457
Manufactured for:
Manufacturado para:
ONE-CARE PRO
Blood Glucose Meter
Medidor de Glucosa
4001-00 Rev.00
0123456789
AL001-0199000N(01)
04

1. Memory Symbol
Indicates in memory mode.
2. Control Solution Test
Appears when doing a control solution test and marking the result as a control solution test.
3. Date
4. Test Result Area
Display test results.
5. Alarm Function Symbol
Appears when the clock alarm is set.
6. Buzzer Icon
Appears when buzzer is ON
7. Meal Indicator
Pre-meal and post-meal
8. Day Average Symbol
Shows the average value of test results.
9. Time
10. Blood Drop Symbol
Flashes when it is ready to apply sample to test strip.
11. Warning Symbol
Appears when result is out of the range of your setting reference value.
12. Test Strip Symbol
Appears to tell you when the meter is ready for test.
13. Unit of Measurement
Unit of mg/dL will appear with the test result
14. Temperature Message
Appears if your meter is out of operating temperature range.
15. Battery Symbol
Appears when the battery is low or must be replaced.
ABOUT THE METER DISPLAY
13
14
15
12
11
10
9
8
7
6
5
4
3
2
1
05

ABOUT THE TEST STRIP
Each strip can be used only once.
The test strip consists of the following parts:
1. Target Area
This is where blood is drawn into the test strip.
2. Conrmation Window
This is where you can conrm that enough blood has been applied to the target area.
3. Contact Bar
This end of the test strip is inserted into the test port to activate the meter. (white side face up).
ABOUT THE TEST STRIP VIAL
31-61
86-146
263-353
Tiras Reactivas para Glucosa en Sangre
Blood Glucose Test Strips
Store at 39 ~ 86°F (4 ~ 30°C), Do not refrigerate
Use within 90 days after opening
Do not store test strips outside this vial
Re-cap immediately
Use only with
One-Care Pro (Model: AC500 PRO) Blood Glucose Meter!
ONE-CARE PRO
Almacenar a 39 ~ 86°F (4 ~ 30°C), No refrigerar
Una vez abierto usar en 90 días
No guardar las tiras fuera de este vial
Tapar inmediatamente
¡Usar solo con
ONE-CARE®
PRO Medidor de Glucosa en Sangre (Modele: AC500 PRO)!
Manufactured for / Manufacturado para:
MediVena, 1 Glenlake Pwy, Ste 700
Atlanta, GA 30328, USA
TOLL FREE: +1 888 270 6457
4008
4008-00 Rev. 00
(Model: AC500 PRO)
Test Strip Vial
1
2
3
Test Strip Vial Label
Tiras Reactivas para Glucosa en Sangre
Blood Glucose Test Strips
Store at 39 ~ 86°F (4 ~ 30°C), Do not refrigerate
Use within 90 days after opening
Do not store test strips outside this vial
Re-cap immediately
Use only with
One-Care Pro (Model: AC500 PRO) Blood Glucose Meter!
ONE-CARE PRO
Almacenar a 39 ~ 86°F (4 ~ 30°C), No refrigerar
Una vez abierto usar en 90 días
No guardar las tiras fuera de este vial
Tapar inmediatamente
¡Usar solo con
ONE-CARE®PRO Medidor de Glucosa en Sangre (Modelo: AC500 PRO)!
Manufactured for / Manufacturado para:
MediVena, 1 Glenlake Pwy, Ste 700
Atlanta, GA 30328, USA
TOLL FREE: +1 888 270 6457
Control Solution Range:
Rango Solución Control:
10
4008
4008-00 Rev. 00
(Model: AC500 PRO)
06

INSTALLING/REPLACING THE BATTERY
When the battery is low, the meter will show a warning signal. When this display appears, it is time
to replace a new battery. When the low battery warning signal is shown, the meter will provide
accurate results for approximately 50 more measurements.
How to Replace the Battery
1. From the back of the meter, gently slide and remove the battery cover.
2. Insert the batteries (two AAA) with the + and – ends matching the marks in the battery compartment.
3. Slide battery cover back into place.
07

SETTING UP THE METER
To turn the meter on, rst install the batteries, then proceed with the following instructions.
SETTING THE DATE, TIME
1. Press and hold M for 4 seconds with meter turn o to enter this mode.
2. Press ▲or ▼to select “24hr” or “12hr” setting. Press M to set. (Fig.1)
3. The year will now appear and ash. Press ▲or ▼to select the year. Press M to set. (Fig.2)
4. The number in the month position will now ash. Press ▲or ▼to select the month. Press M to
set. (Fig.3)
5. The day will now ash. Press ▲or ▼to select the date. Press M to set. (Fig.3)
6. The number in the hour position will now ash. Press ▲or ▼to select the hour. Press M to set.
(Fig.4)
7. The minute will now ash. Press ▲or ▼to select the minute. Press M to set. The date and time
you set will show on the display screen. Press M to turn o the meter. You have now completed
the meter date/ time setting. (Fig.4)
(Fig.1) (Fig.2) (Fig.3) (Fig.4)
08

SETTING THE REMINDER ALARM
The meter provides four user setting reminder alarms for worry free testing. (Default is alarm o.)
1. Press and hold ▼for 4 seconds with meter turn o to enter this mode.
2. The rst reminder alarm will appear on the display. (Fig.5). Press ▲or ▼to seclect which alarm
you want to set (number 1 to 4). Press Mto conrm.
3. Press ▲or ▼to select “YES”or“NO”. If “NO” is chosen and Mis pressed, the meter goes back to
reminder alarm setting mode. If “YES” is chosen, press Mto conrm and the time will appear. (Fig.6)
4. The number in the hour position will now ash. Press ▲or ▼to seclect hour. Press Mto set.
(Fig.7)
5. The minutes will now ash. Press ▲or ▼to select the minutes. Press Mto set and meter will goes
to reminder alarm setting. (Fig.8)
6. Press ▲or ▼to seclect reminder alarm 2 to 4. Repeat steps 3 to 5 to set the next three reminder
alarms. (if needed).
7. After nishing reminder alarm setting, HI alarm setting appear.
NOTE:
When the alarm is ringing, press any one button to turn o or the alarm will turn o automati-
cally after 30 sec.
(Fig.5) (Fig.6) (Fig.7) (Fig.8)
09

1. Press and hold ▼for 4 seconds with meter turn o to enter this mode.
2. Press and release▼to move through reminder alarm setting, the HI alarm setting will appear.
Press Mto conrm. (Fig.9)
3. To change HI alarm setting, press ▲or ▼until you reach your desired HI setting and then press M
to set. (The HI alarm value range is 100-400mg/dL / 6.0-21.0mmol/L, default is 180mg/dL /
10mmol/L.) (Fig.10)
4. To change LO alarm setting(Fig.11), press ▲or ▼until you reach your desired value and then
press Mto set. (Fig.12). You have now completed the meter alarm setting. Press Mto turn o the
meter. (The LO alarm value range is 30-90mg/dL / 2.4-5.8mmol/L, default is 70mg/dL / 4.0mmol/L.)
NOTE:
The hypoglycemic (LO) and hyperglycemic (HI) alarm glucose values should be selected in
consultation with your health care provider.
SETTING THE HI / LO ALARM
(Fig.9) (Fig.10) (Fig.11) (Fig.12)
10
(Fig.13) (Fig.14)
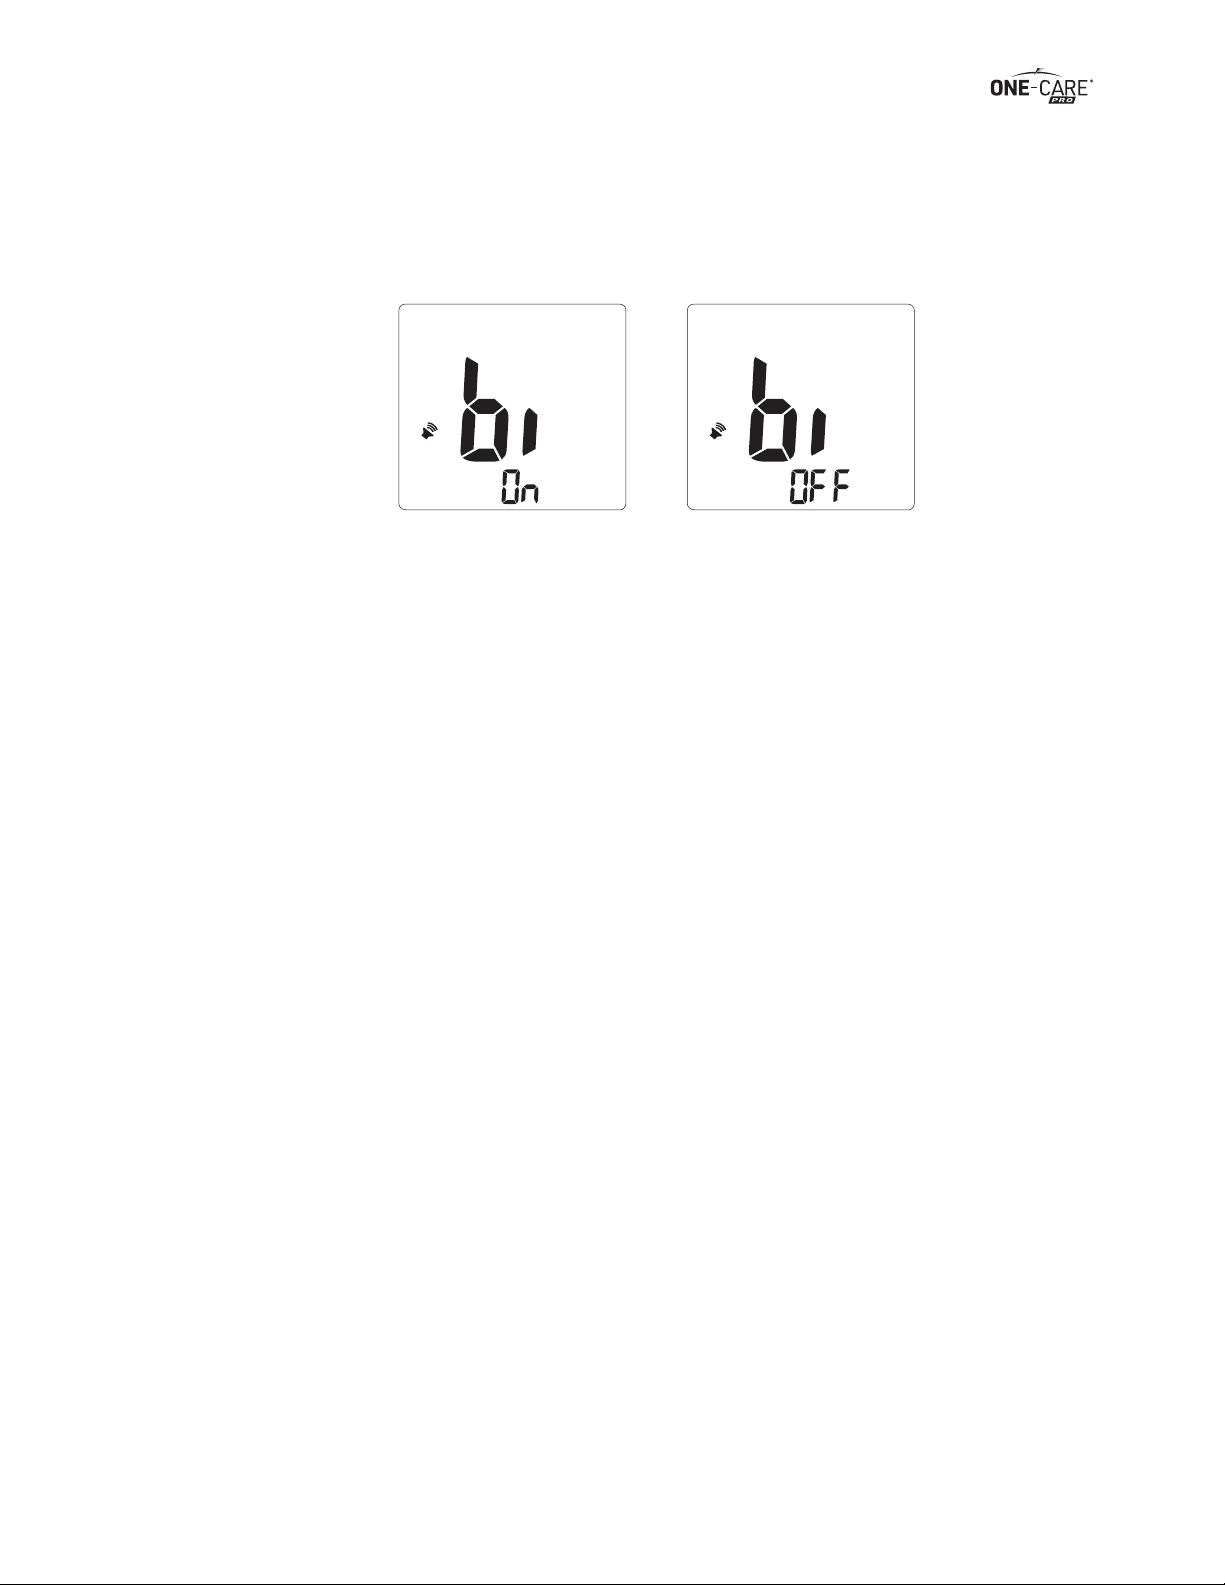
1. Press and hold ▲for 4 seconds with meter turn o to enter this mode. The“bi and speaker icons”display
will appear. (Fig.13)
2. If you want to hear a beep sound during testing, press ▲or ▼to select “On”, then press Mto set.
To turn the beep sound o, press ▲or ▼to select “OFF”, then press M to set. (Fig.14)
SETTING THE SOUND
11

You have to know before testing
˙Always keep the test strips in the original vial only. Tightly close the vial immediately after remov
ing a test strip.
˙Do not use test strips and control solutions beyond the expiration date printed on the package
since this may cause inaccurate results.
˙Use each strip immediately after removing it from the vial. Each test strip can be used once.
˙Any change or administer of medication based on the ONE-CARE® PRO (Model AC500 PRO)
blood glucose test results without the consent and advice of a physician or healthcare
fessional is not recommended.
˙Low or high blood glucose readings can indicate a potentially serious medical condition. If your
blood glucose reading is unusually low or high, or if you do not feel the way your reading indicates,
repeat the test with a new test strip. If your reading is not consistent with your symptoms or if your
blood glucose result is less than 60 mg/dL (3.3 mmol/L) or higher than 240 mg/dL (13.3 mmol/L)
you should contact your healthcare fessional and follow his or her treatment advice.
IMPORTANT INFORMATION
12

PREPARING THE TEST STRIP
1. Wash hands using soap and warm water. Rinse and dry thoroughly.
2. Pull out a test strip from the vial and re-cap the vial immediately.
3. Insert the test strip, white side face up, into the test port. The meter will automatically turn on.
4. A beep will sound, and a clockwise moving dotted lines will appear.
5. After system checking ok, a ashing “ “ symbol will appear. You can press ▲or▼to select the
meal indicator for marking the test as premeal or postmeal test (default premeal).
6. Now you are ready to obtain a blood sample.
Before testing blood glucose, you need the following items:
1. ONE-CARE® PRO (Model AC500 PRO) meter
2. ONE-CARE® PRO (Model AC500 PRO) test strip
3. Single use disposable safety lancet
TESTING YOUR BLOOD GLUCOSE LEVEL
13
SAMPLE MAY BE OBTAINED FROM FINGER, PALM or FOREARM
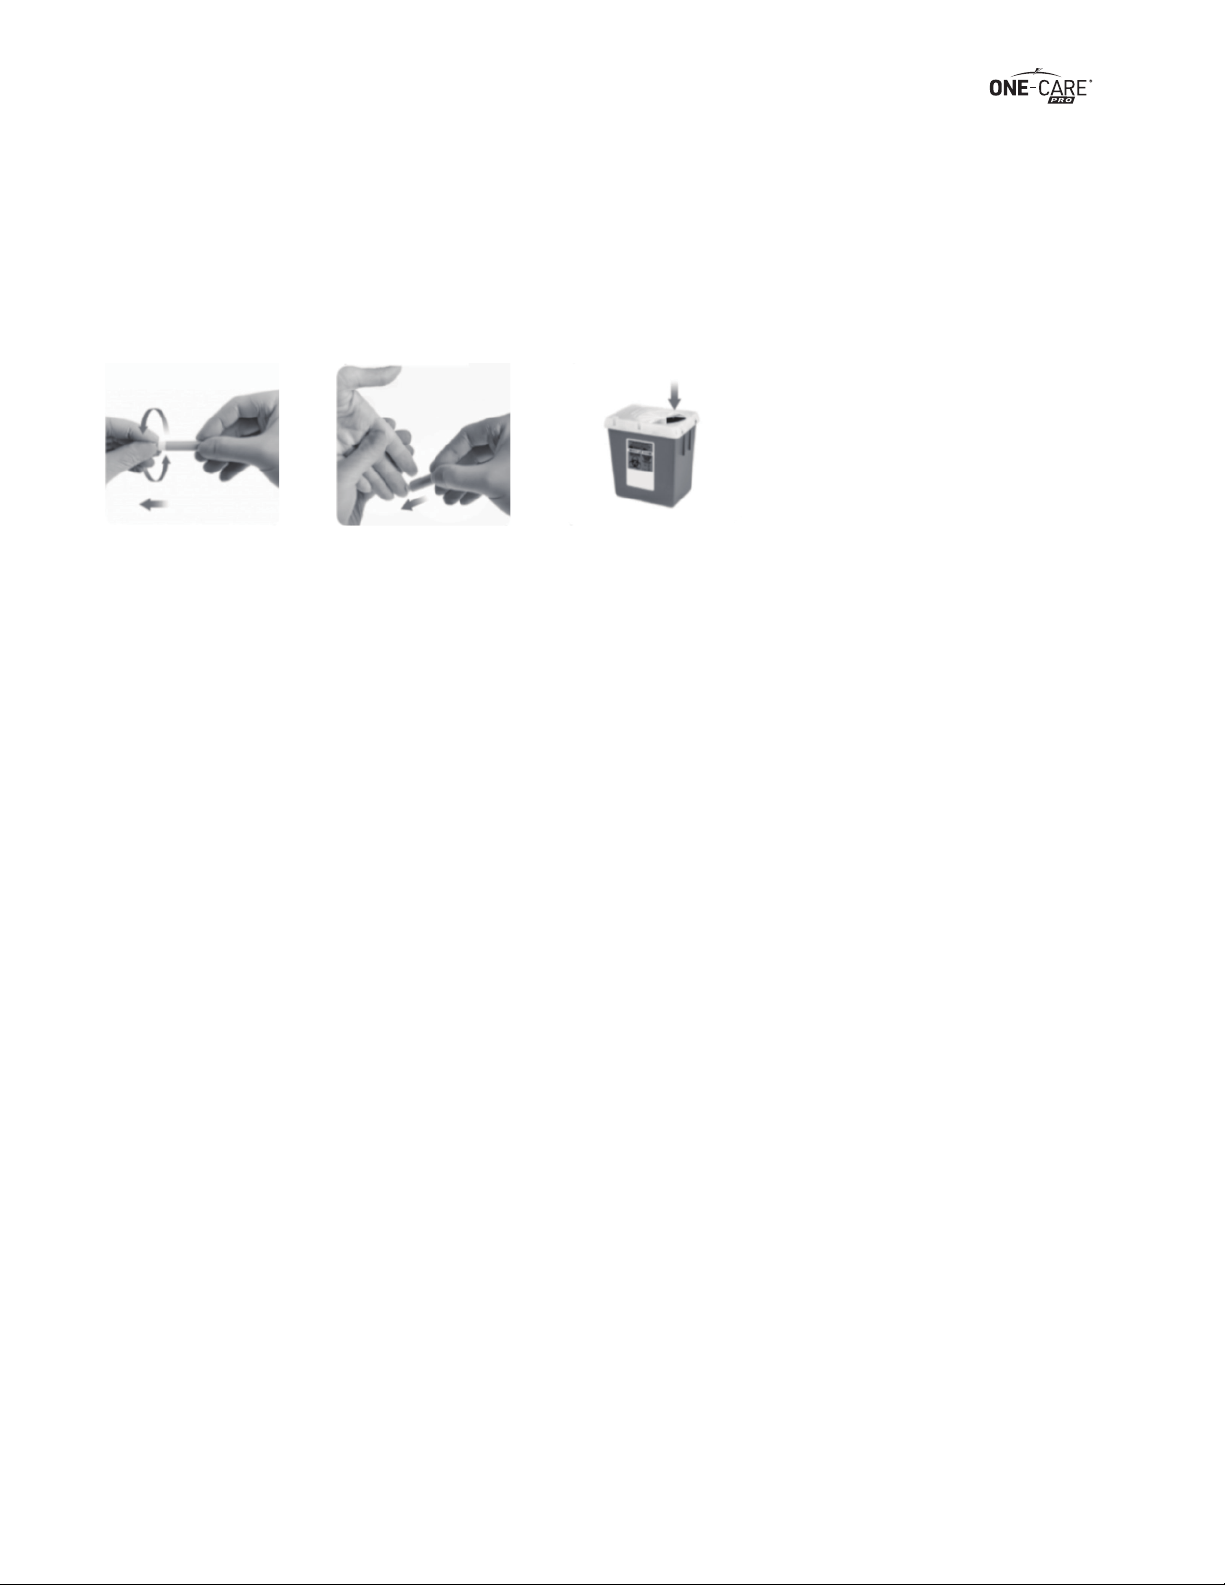
1. Twist and pull o protective tab to break seal on lancet and place in disposal.
2. Position lancet rmly against puncture site as illustrated. Press down rmly until an audible click is
heard.
3. To obtain sucient blood sample, hold the puncture site downward and gently apply intermittent
pressure to the surrounding tissue.
4. Dispose of used lancets at the point of use in an approved sharps container. Never reuse lancets.
Note:
Auto-disabling, single use lancing device is commonly available at medical supply distributors
or drug stores.
CAUTION:
All parts of the glucose monitoring system should be considered potentially infectious and are
capable of transmitting blood-borne pathogens between patients and healthcare professionals.
To reduce the chances of infection:
˙Only an auto-disabling, single use lancing device should be used.
˙Wear gloves during any procedure that involves potential exposure to blood or body uids.
A new pair of clean gloves should be worn by the user before testing each patient.
˙Whenever possible, blood glucose meters should be assigned to an individual person and not
be shared.If blood glucose meters must be shared, the device should be cleaned and disin
fected after every use,to prevent carry-over of blood and infectious agents.
˙Refer to section "Cleaning and disinfection procedure" (page.45) for how to clean / disinfect
the meter.
˙Wash hands throughly with soap and water after handling the meter, lancing device, or test
strips.
OBTAINING A BLOOD SAMPLE
14
Please refer the following practice guidelines:
˙Biosafety in Microbiological and Biomedical Laboratories (BMBL) found at
http://www.cdc.gov/biosafety/publications/bmbl5/
˙“Protection of Laboratory Workers From Occupationally Acquired Infections; Approved Guide
line-Third Edition” Clinical and Laboratory Standards Institute (CLSI) M29-A3.
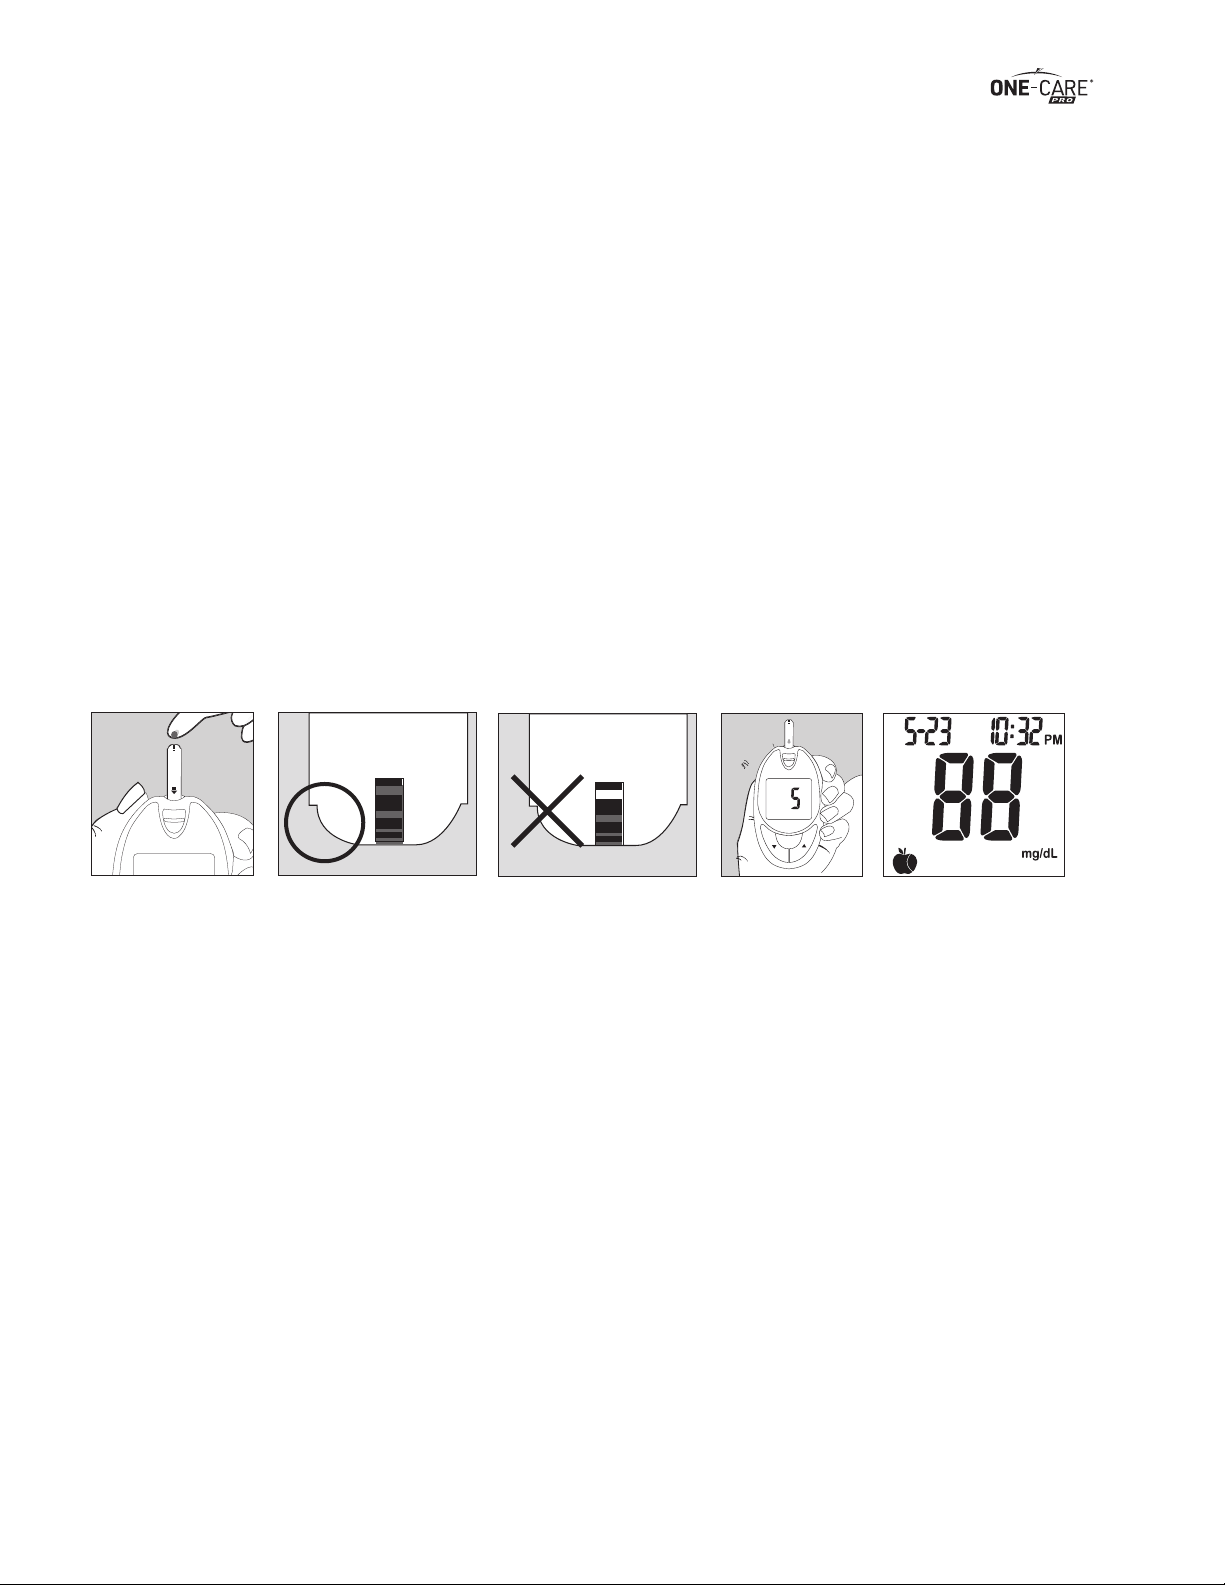
1. After obtaining a blood sample, discard the rst drop of blood prevent the contamination of body
uid, touch the tip of the test strip to the drop of blood. Blood is automatically drawn into the test
strip. Hold the tip of the test strip touching the blood drop until the meter beeps.
2. As soon as enough blood has lled the conrmation window (see picture) of the test strip, the
meter will starts the countdown from 5 to 1. Your blood glucose result will appear on the display
and will be stored into the meter memory automatically.
NOTE:
To ensure accurate results, make sure the conrmation window of the test strip is completely
lled with your blood sample.
APPLYING BLOOD SAMPLE TO THE TEST STRIP
M
15

HI and LO Readings
1.The meter is designed to display test results range between 20 to 600 mg/dL (1.1 to 33.3 mmol/L).
If a “HI” message appears on the display, your meter has detected that your blood glucose level is
higher than 600 mg/dL(33.3 mmol/L).
It is suggested that you review your testing procedure and test again with a new test strip to
conrm the result. If the same result occurs, consult your healthcare professional immediately.
2. If a “LO” message appears on the display, your meter has detected that your blood glucose level is
lower than 20 mg/dL (1.1 mmol/L). It is suggested that you review your testing procedure and test
again with a new test strip to conrm the result. If the same result occurs, consult your healthcare
professional immediately.
M
3. After the test result appears, if no further tests are performed, the meter will automatically shut o
after 3 minutes. After nishing the test, you can push the strip eject button to remove the used
strip or use a tissue to remove test strip from the meter for proper disposal.
Warning: Always discard the used test strip into suitable waste container.
CAUTION:
Used lancets and test strips may be considered biohazardous waste in your area.
Dispose of used lancets and test strips at the point of use in a proper container.
Be sure to follow your local regulations for proper disposal.
16

AVAILABLE ALTERNATE SITES TESTING: PALM AND FOREARM
ONE-CARE® PRO (Model AC500 PRO) Blood Glucose Monitoring System provides you alternate sites
testing (AST). This system provides you to test on the palm and the forearm with the equivalent results to
ngertip testing.
CAUTION:
1. Physiologic dierences in the circulation between the nger and other test sites like the forearm
and palm may result in dierences in blood glucose measurements from the other test sites and
your ngertips. Changes in blood glucose may be observed in nger blood samples sooner than
blood samples from the forearm and other alternate sites. Rub the alternate test sites about 20
seconds before lancing. If you are testing for hypoglycemia (low blood glucose), or if you suer
from hypoglycemia unawareness, we recommend that you test on your ngertips.
2. Talk to your doctor to see if alternate site testing is right for you. With a little bit of education, you
can give your ngertips a rest and maybe test more often than you do now. For people with
diabetes, more frequent testing is a good thing. Just remember: any time you want to be sure of
an accurate, up-to-date blood glucose reading, test on your ngertip.
3. We strongly recommend you do AST ONLY in the following intervals:
˙In a pre-meal or fasting state (more than 2 hours since the last meal).
˙Two hours or more after taking insulin.
˙Two hours or more after exercise.
DO NOT use AST if:
˙You think your blood glucose is low.
˙You are unaware of hypoglycemia.
˙Your AST results do not match the way you feel.
˙You are testing for hyperglycemia.
˙Your routine glucose results are often uctuating.
˙If you are pregnant.
There are limitations for doing AST. Please consult your healthcare professional before you do AST.
Forearm
Palm
Limitations:
(a) AST measurements should never be used to calibrate continuous glucose monitors (CGMs).
(b) AST measurements should never be used in insulin dosing calculations.
17

CONTROL SOLUTION TEST
The control solution is used to check and ensure that the system is working properly and that you are
performing the test correctly.
When to Perform a Control Solution Test
1. When you are using your system for the rst time.
2. When you are using a new batch of test strips.
3. Anytime you question the performance of the system, or on a regular basis to ensure accuracy, e.g.
once a week.
4. When you adjust your diabetic medication plans.
5. When your blood glucose test result is lower or higher than your normal level.
NOTE:
There are three control solutions at dierent desired range of aqueous glucose (Level 1, Level 2
or Level 3). For more information about the control solution, please read your control solution
package insert. Two sets of control solution should be used, a high level and a low level control
solution of your choice. For order information, please contact customer service.
To Perform a Control Solution Test
1. Make sure the control solution is at room temperature (59ºF to 82ºF or 15ºC to 28ºC ) prior to testing.
2. Insert a test strip, white side face up, contact bar’s end rst, into the test port. The meter will
automatically turn on.
3. All segments of the LCD display will appear, a beep will sound, and a clockwise moving dotted lines
will appear.
18

4. After system checking ok, a ashing “ “ symbol will appear.
5. Press and hold Mfor 4 sec to switch to control solution mode. The“ “ will appear which indi
cates that the meter will mark your current test as a control solution test. Now you are ready to
apply the control solution.
6. Discard the rst drop of control solution and squeeze a small drop of control solution on a clean
nonabsorbent surface (such as a clean piece of wax paper). Do not apply control solution to the
test strip directly from the bottle.
7. Bring the tip of the test strip to lightly touch the drop of Control Solution. Control Solution is
automatically pulled into the strip through the tip. Hold until the meter beeps. The meter will now
starts the countdown from 5 to 1 and the control solution test result will appear.
CAUTION:
Please remember that in order to prevent contamination, follow the above instructions
properly when performing the control solution test.
Comparing Control Solution Results
The system is functioning properly if the result falls inside the specied range printed on the test
strip vial. If the test result falls outside the specied range, repeat the test.
Results falling outside the specified range may be caused by
˙Error in performing the test
˙Control solution temperature is lower than 59°F(15°C ) or higher than 82°F(28°C)
˙Expired or contaminated control solution
˙Expired or contaminated test strips
˙Meter malfunction
Note:
The result will not be included in calculating the average when the meter is set in the control
solutiontest " " mode. DO NOT use the system if the problem persists. Please contact custom-
er service.
19
This manual suits for next models
1
Table of contents


