Whirlwind Cargo User manual

1
Whirlwind Cargo Tricycle Assembly
Assembly instructions for the Whirlwind Cargo handcycle Tricycle
For videos on assembly and adjustment visit http://www.whirlwindwheelchair.org/tech-support
Ralf Hotchkiss riding the Cargo Handcycle Tricycle

2
1
2
4
3
5
9
8
6,7
10
11
12
13
14
15
16
24
25
17
18
20
21
22
23

3
CARGO TRIKE ADJUSTMENTS
SEAT HEIGHT UP AND DOWN SEAT POSITION FRONT-BACK
CRANK HEIGHT UP AND DOWN BACKREST HEIGHT
SEAT ANGLE TENSION ADJUSTABLE BACKREST

4
SCI SEATING KIT:LATERAL
WEDGES, CHEST STRAP, AND
PRESSURE RELIEF CUSHION
BACKREST ANGLE

5
Accessories
Additional Accessories not pictured:
SCI Kit
Cargo Canopy/ Overhead storage and shelter
Sun Canopy

6
Identify all components, from front to back
1) Front wheel
2) Fork
3) Crank Boom
4) Chain Idler assembly
5) Chain
6) Left Crank
7) Right Crank with Chainring
8) Crank handles
9) Optional Front Brake
10) Steering Centering Spring
11) Front Frame
12) Frame attachment location with bolts
13) Rear Frame
14) Brakes
15) Brake Mount Clamp
16) Brake Lock Assembly
17 Seat Frame
18) Seat base/cushion
19) Optional Pressure relief cushion with separate seat base (not shown)
20) Backrest Frame
21) Backrest posts
22) Tension adjustable backrest straps
23) Backrest cover
24) Rear wheel, Left
25) Rear wheel, right

7
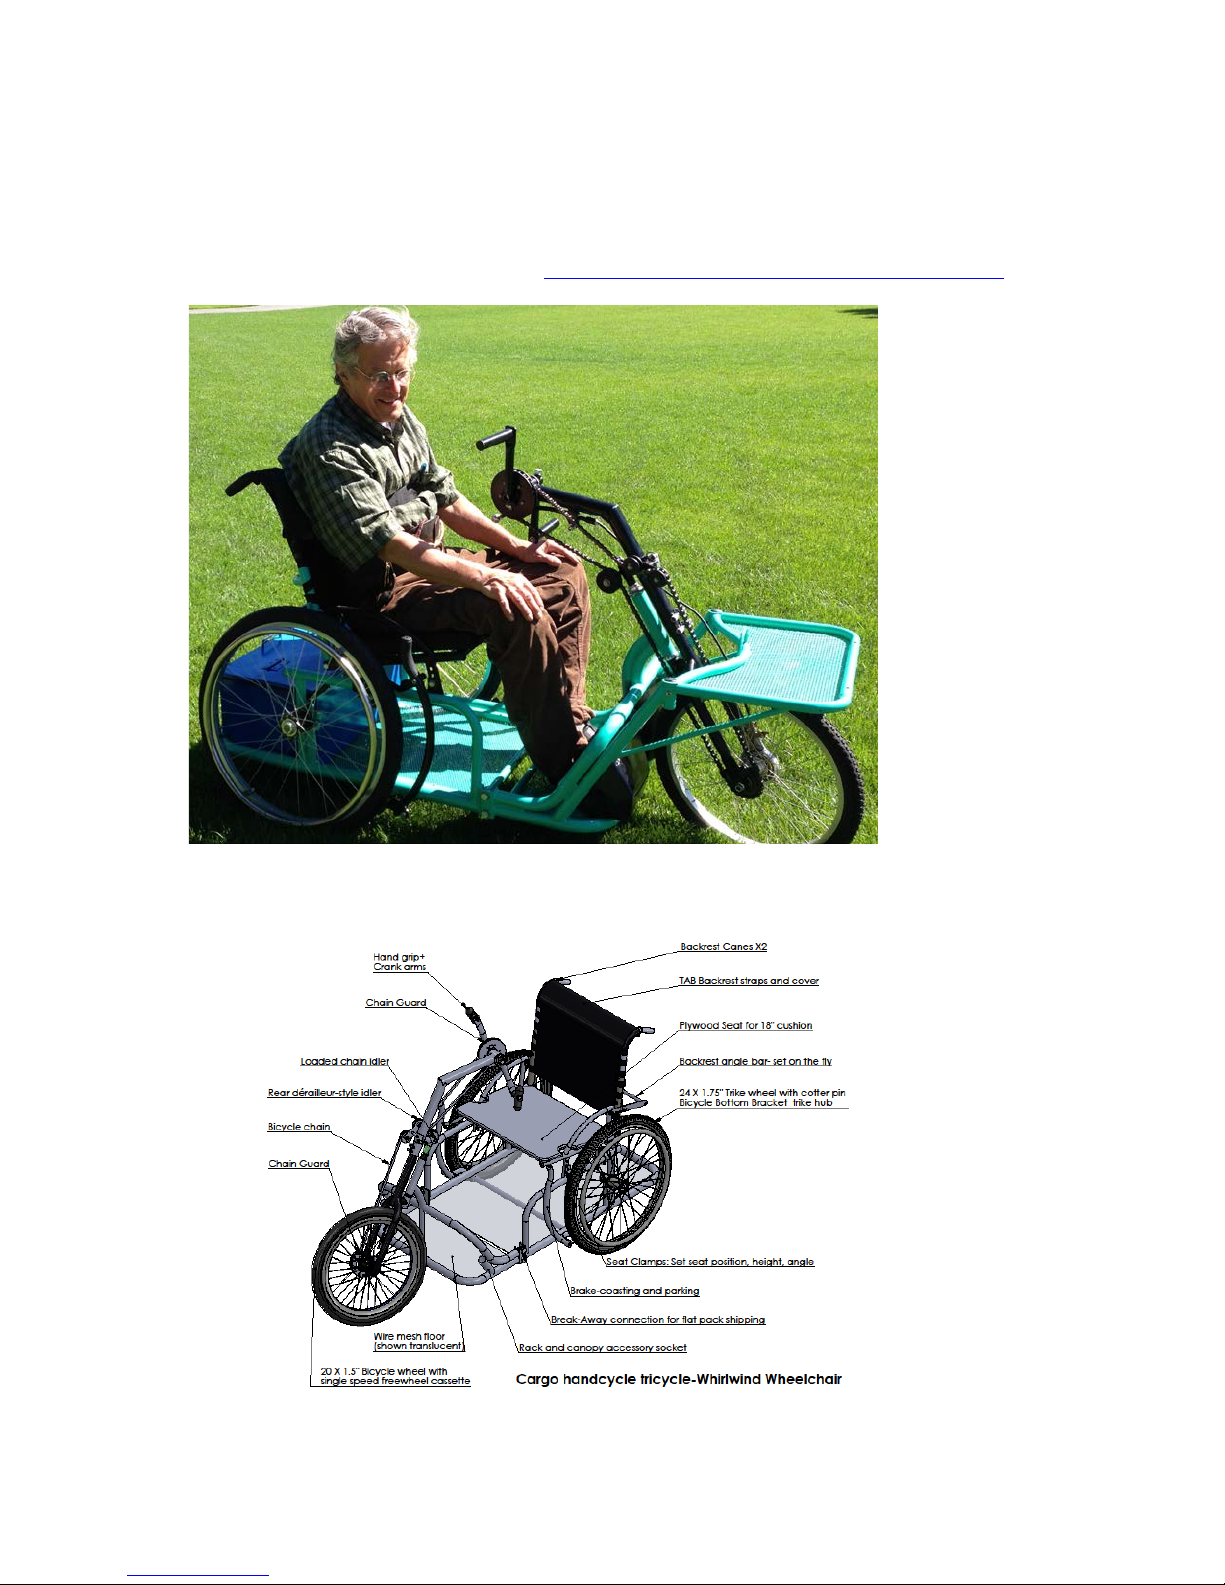
The following components are pre-assembled:
•Bottom bearing cone “crown race” installed on fork steerer tube
•Top and bottom bearing cups are installed in head tube on front of mainframe
•Chain idler wheels (2) installed on rotating bar of chain idler, with torsion spring installed.
•Tensioned chain idler pulley with bearings is installed securely.
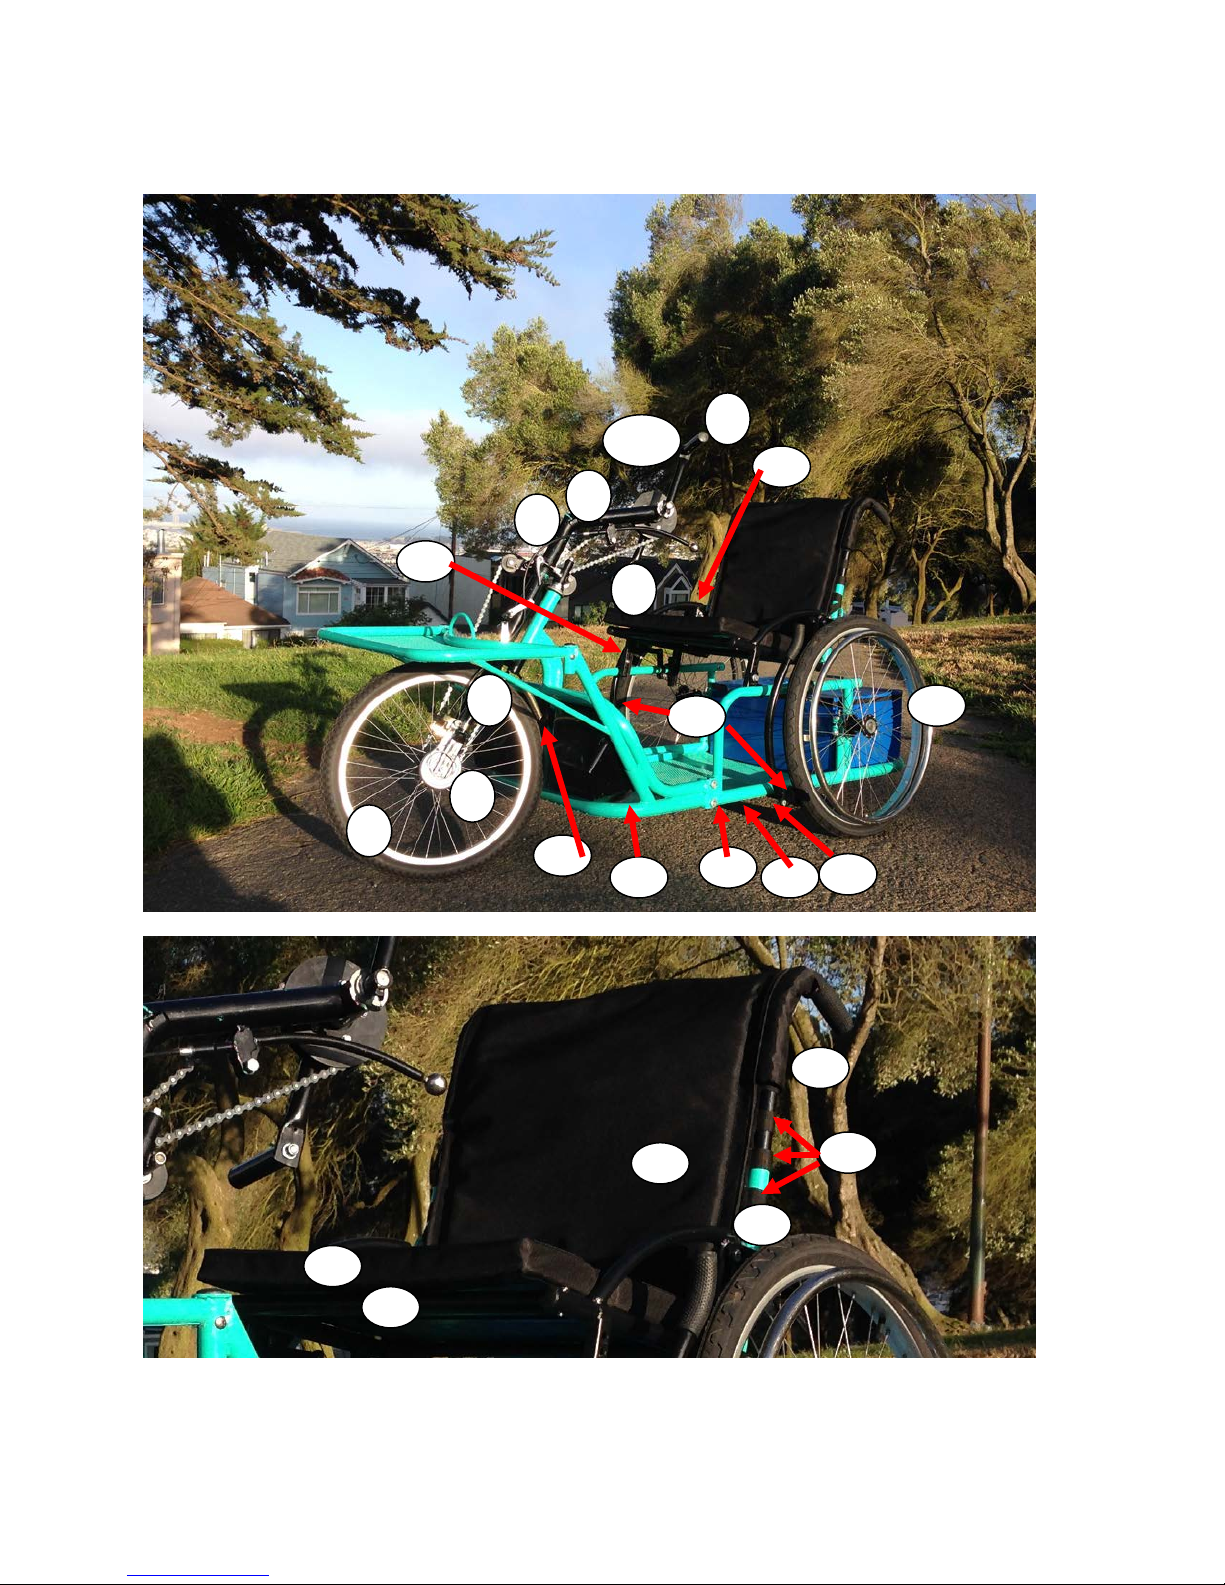
•Rear wheel clamp bolt and lock bolt are installed on rear main frame.
•Center spring clamp is installed on front main frame
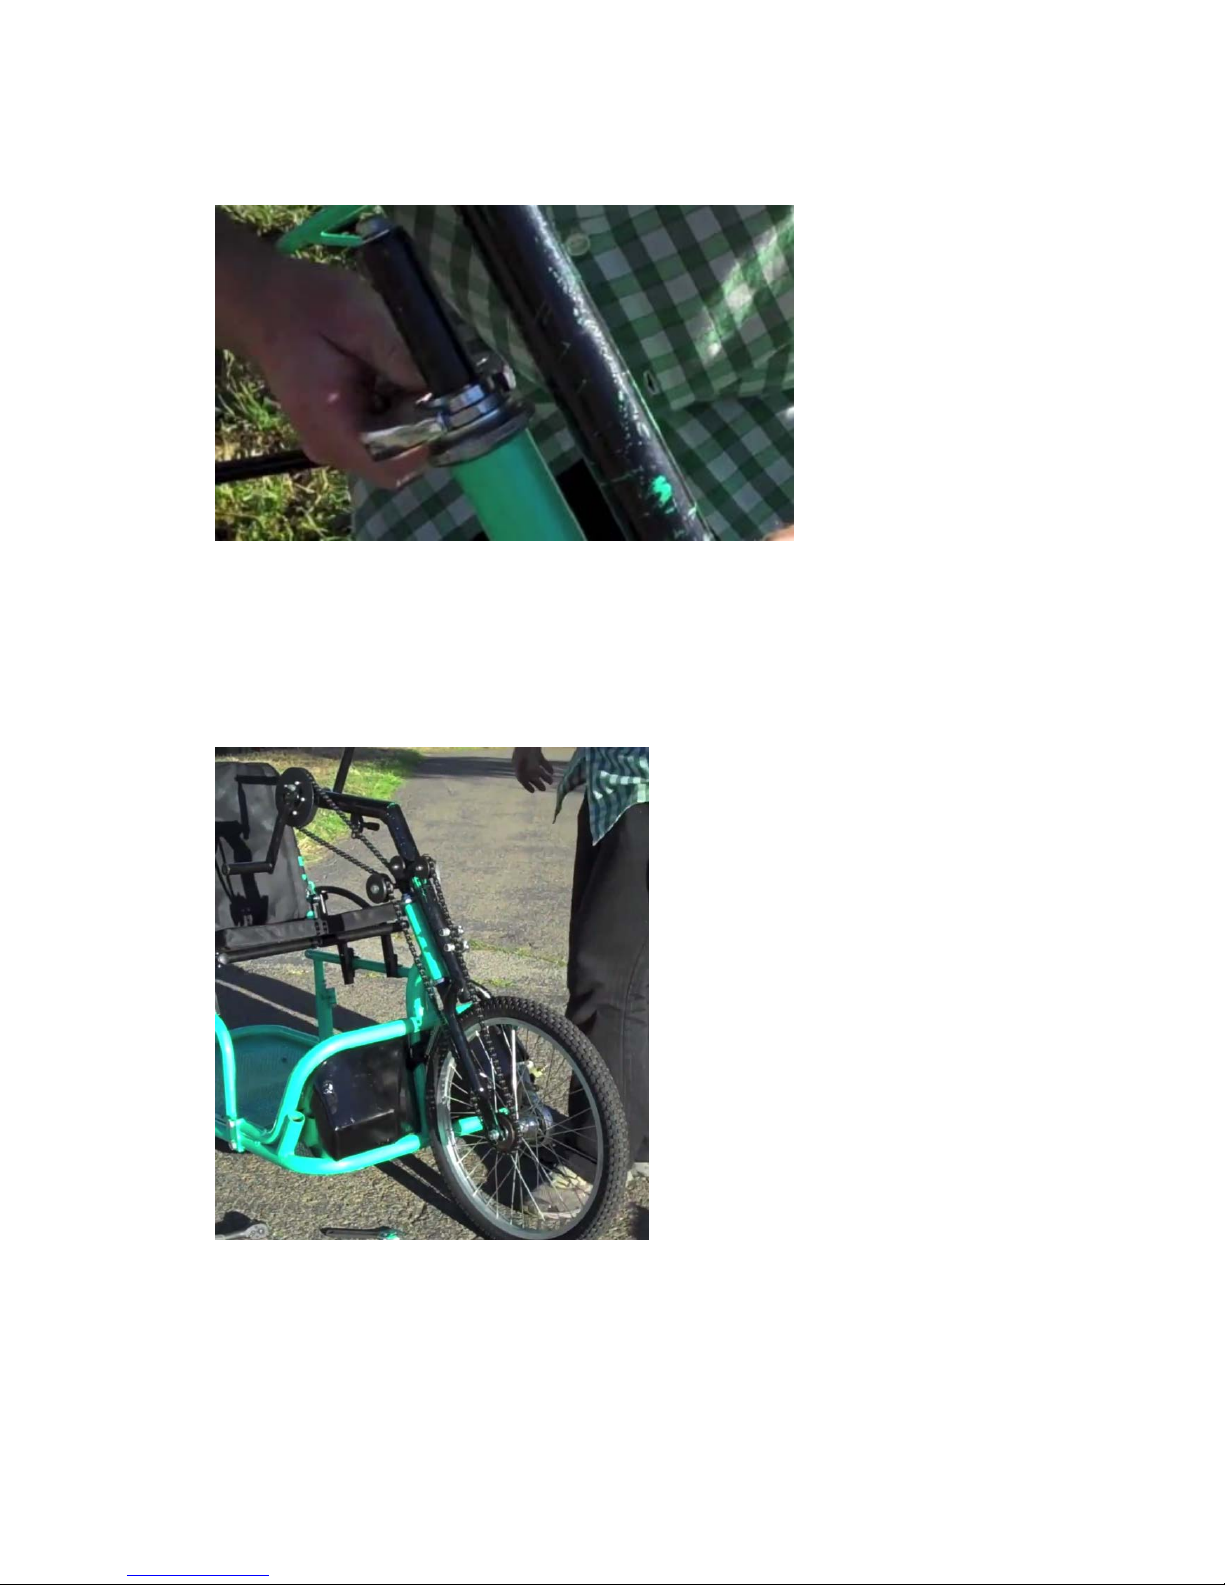
•Bolt and wedge are installed on stem quill.
•Chain Idler brace is installed on crank boom
•Bottom bracket is installed on Crank Boom, with the long side of the bottom bracket spindle on
the right side when viewed from the back of the trike.
•Handrims, rim strip, tube, and tire are installed on rear wheels. Refer to the RoughRider
wheelchair assembly materials available from Whirlwind. Note: There are different left and right
wheels. The right wheel has the adjustable cup of the hub on the same side as the handrim,
and the left wheel has the fixed cup on of the hub on the same side as the handrim.
•The crank chain ring has chain guards discs installed on both sides of the cog.
•Hand grips are installed onto “pedals”/ crank arms.
•The TAB tension adjustable backrest straps are installed on the backrest posts.
•Brake lock parts are attached to brake arm.
•Brake plastic bushings are installed on brake pivot tubes.
•Foot guards are installed.
•Centering spring clamp protector is installed.
•Fenders are installed on seat.
•Quick release bolts installed on crank boom and idler brace.

8
Assembly Instructions:
1. Apply grease to the bearing cups on the headtube.
2. Apply grease to the bearing on the “crown race” of the fork. The bearing should be installed
with the ball retaining ring on the bottom side.
3. Insert the fork steerer tube through the head tube.
GREASE

9
4. Install the centering spring (this is easier to install before the headset is tightened).
5. Install the top bearing with the ball retaining ring on the top side.

10
6. Install the threaded headset cone and lockring. Tighten the lockring against the cone, so that the
bearings spin freely but there is no wiggle in the bearings. This is a standard bicycle assembly.
7. Install the chain idler with the idler wheels on the same side as the chain rings (right side when
viewed from the rear).
8. Install the crank boom with the crank facing backwards.
9. The bottom bracket / crank spindle is the same as a bicycle. Make sure that the longest side of
the spindle is on the right side with the gears, when viewed from the back of the trike. Note: the
left side may be “left-hand threaded” and tighten counter-clockwise (opposite from most bolts).

11
The left side cup may also be welded to the frame, depending on manufacturer. This part is pre-
installed.
10. During maintenance of the crank / “bottom bracket”, the Right side /adjustable cup should be
tightened last, with the lockring tightened against the right side cup so that the spindle can spin
freely, but there is no wiggle. This should be secured quite tight, and is a standard bicycle
assembly.
11. Attach the left crank to the spindle; make sure that the bolt touches the flat face in the spindle
securely and is very tight.
12. Attach the right crank with the gear to the spindle; make sure that the bolt touches the flat face
in the spindle and is very tight. Note: The cranks can be installed with handles together or
opposite, depending on user preference. Use the flat faces in the spindle to set this position.
Cranks Opposed configuration, left Cranks together configuration, right

12
13. Tighten the crank boom with 2 quick release bolts or 2 regular bolts; make sure that the crank
gears are aligned and parallel on the top and bottom.
14. Check that the centering spring is installed correctly.
15. Install the stem quill into the fork steerer tube. Tighten. The height of the exposed tube should
be approximately 50mm above the top of the fork steerer tube.

13
16. Slide the chain idler down over the stem quill. Position the chain idler such that the idler wheels
can rotate freely without touching the crank boom quick release bolts. Tighten the chain idler
with the quick release bolt.

14
17. Install the chain. First install the chain on the Top chainring. Second install the chain on the
bottom cassette on the wheel. Third, rotate the Chain idler 1 (one) full revolution or until the
torsion spring is wound enough to hold the chain tight. Install the chain as shown. Make sure
that the chain is guided over the tensioned idler wheel.
TENSION FROM SPRING KEEPS
CHAIN TIGHT
SPRING EXHERTS FORCE
THIS DIRECTION

15
18. Install the front wheel. If the wheel has a drum brake, the brake should clamp to the left side of
the fork, and the cog for the cassette will be on the right side, when viewed from the back of the
trike. Tighten the front wheel securely with a 15mm wrench. Make sure that the tire is centered
in the fork and is vertical when viewed from the front or rear.
19. Install the chain guard on the axle of the front wheel. This chain guard helps keep the chain on
the lower gear (cassette) if the chain tension is too loose, and on very rough terrain.

16
20. Attach the front and back chassis/main frame pieces together with four (4) M12 bolts. The bolt
heads should be on the outside of the trike frame, and the nuts and washers on the inside. If it is
difficult to align the holes, install one at a time and do not tighten fully until they are all
installed. Tighten fully with two 19mm wrenches/socket wrenches. Note: If required, a
screwdriver or other flat metal tool can be inserted between the locknut and the trike frame to
prevent rotation. Tighten securely with large wrenches if possible. It is unlikely that these bolts
will need to be removed.

17
21. Identify the RIGHT REAR WHEEL. This wheel has the Adjustable cup of the hub (with lockring) on
the same side as the handrim. Install the right wheel onto the right side of the main frame
chassis, when viewed from the rear. Inflate the right rear wheel.

18
22. Insert the axle with the slot / flat part facing up, and position the axle so the M8 bolt on the top
of the axle clamp can be tightened into that slot. Tighten the axle security bolt and locknut with
a 13mm wrench. Next, tighten the M12 axle clamp bolt with two (2) 19mm wrenches.
ABOVE: LEFT WHEEL VIEWED FROM UNDER SEAT LOOKING OUT.
RIGHT WHEEL. ( AXLE SLOT FACES UP FOR INSTALLATION ON BOTH WHEELS)
23. Repeat for the LEFT REAR WHEEL. Inflate the left rear wheel. The left wheel has the Fixed cup of
the hub on the same side as the handrim.
24. Install the Left rear wheel (same method as right side).
BOLT TIGHTENS INTO
AXLE SLOT WHICH
FACES UP TO MEET
BOLT

19
25. Identify the holes on the seat which will be used for the seat clamps and seat rail guides.
Different riders require different seating positions. The seat can be adjusted forward and
backwards after it is installed.
FRONT: SEAT RAIL GUIDE
(Shown with bolt above tube, and can be
installed with bolt below tube for low seats for
riders with short legs)
REAR: SEAT CLAMP
(Shown with bolt above tube, and can be
installed with bolt below tube for low seats for
riders with short legs)
Example: Seat mounting
for 46cm seat height at 12
degree seating angle

20
SEE SEAT HEIGHT ASJUSTMENT SECTION OF THIS GUIDE AND VIDEO FOR MORE INFORMATION
26. Note on seat height: the bolts on the seat clamp and seat rail guide are usually installed above
the seat rail but can also be installed below in order to lower the seat.
27. With the seat off of the tricycle: Install the front seat rail guides with M8 bolts to the front
ladder of the seat as shown. The bolt head should be outside the seat, and the M8 locknut is
trapped inside the channel. Align the faces of the nut so that it is secured inside the channel.
LOCK NUT TRAPPED INSIDE
CHANNEL
BOLT HEADS CAN BE ABOVE OR
BELOW SEAT RAIL, IN ANY ONE
OF THE 6 HOLES TO SET SEAT
HEIGHT AND SEAT ANGLE
SEAT CLAMP
ABOVE: BRAKE CLAMP
PARTS, (THIN MATERIAL),
NOT FOR SEAT
Table of contents