The Lock/Alarm 'Mini' is designed to help protect your valuable possessions from theft in 2 ways: (1) If the cable is cut, or, (2) if the motion
sensor is set the alarm will also sound if there is any movement of the lock.
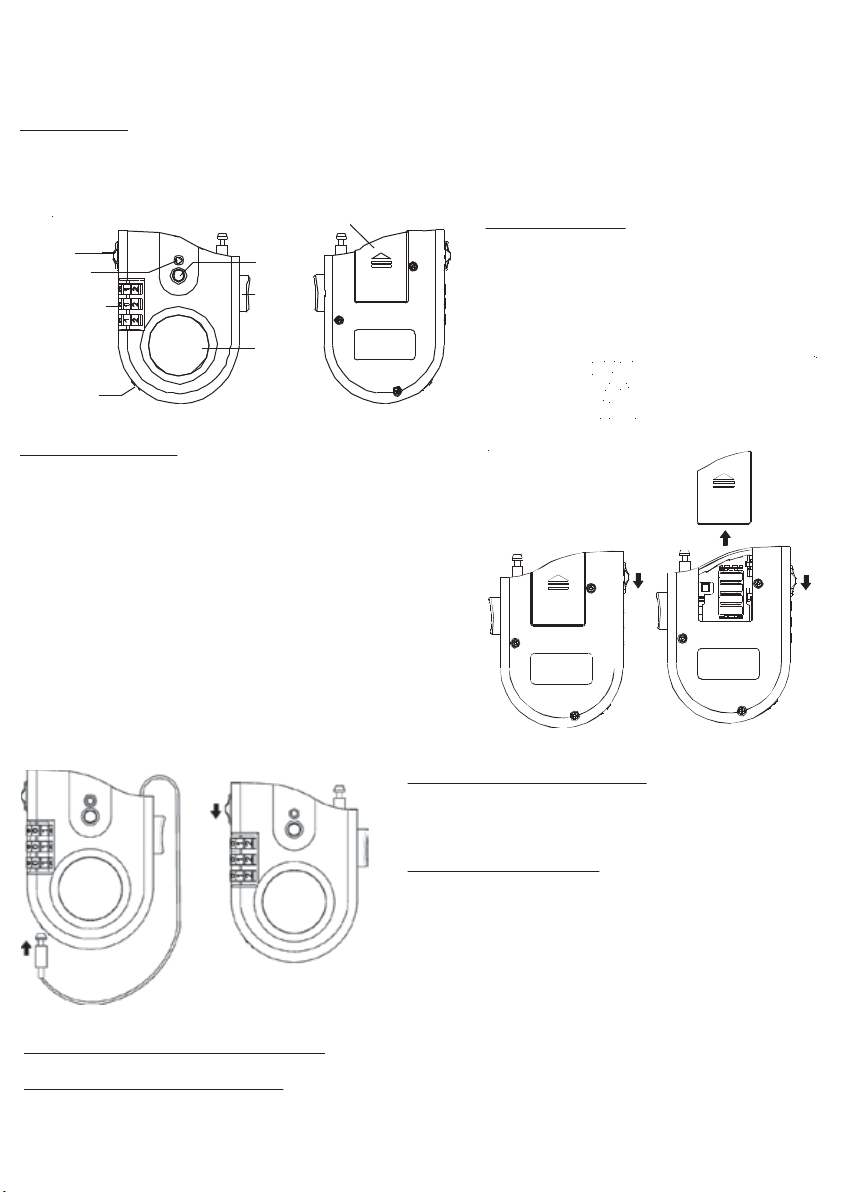
Battery Installation: The Lock/Alarm 'Mini' requires four LR44 (1.5 volt) batteries. For security, the battery cover can only be opened when
the unit is in the "unlocked" mode. Firstly set the dials to the correct combination code (the factory preset is 0-0-0). Then push down the
Lock Release Button and hold down. At the same time push the battery cover up, as shown on figure 1 below. Insert the batteries into
the compartment and then replace the battery cover. You will need to once again hold down the Lock Release Button while you slide the
battery cover back in place. Let go of the Lock Release Button and ensure the battery cover is secure.
Setting the Combination
When new, the combination is preset at 0-0-0. To change
the code set the dials at the current combination. If the
cable is locked in place push down the Lock Release
Button to release the cable. Whilst pressing the Cable
Trigger Button pull out enough cable so the plug end of
the cable can touch the Combination Set Button at the
base of the unit. Firmly push in the Combination Set
Button with the plug end of the cable (as shown if figure 2)
and turn the dials to your desired combination. Then push
the Lock Release Button down until the end of the
Combination Set Button is back in its original position.
The new combination is now set and ready to use.
Lock Release
Button
LED Light
Combination
Dials
Combination
Set Button
Motion
Sensor
Activation
Button
Battery Cover
Cable
Trigger
Button
Siren
Using the Lock/Alarm 'Mini'
With the Lock/Alarm 'Mini' in the "unlocked" mode, press the Cable Trigger
Button and pull out as much steel cable as required. Guide the cable around
the item(s) you wish to protect and preferably also an immovable object such
as a post or railing (to prevent your items from being easily snatched by a
thief). Insert the plug end of the cable into the lock hole on the top of the unit
and firmly push down until it clicks in place. Turn the dials to scramble the
combination. If the motion sensor feature is required, after locking the unit
press the Motion Sensor Activation Button on the front of the unit. The LED
light will begin flashing and the unit will also start "beeping". You have
approximately 5 seconds to leave the Lock/Alarm 'Mini' and your item(s)
before the unit becomes armed. After this period, if the unit detects any
movement then the unit will "beep" for several seconds before the alarm
starts sounding. The alarm will then continue to sound for approximately
30 seconds before resetting. To unlock the Lock/Alarm 'Mini' simply set the
dials to the correct combination and press down the Lock Release Button
until the plug end of the cable ejects out of the lock hole. If the motion sensor
is set you have approximately 5 seconds to conduct this procedure before the
alarm sounds. When the cable unlocks the alarm automatically disarms.
Low Battery Indication and Power Saving
The LED will normally flash a red color, however if the battery condition
is low the LED will flash yellow. When battery level is low replace
batteries immediately before using. To conserve batteries, when not in
use always unlock the unit and unplug the cable end from the lock hole.
Using the Computer Slot Adapter
To enable you to secure a laptop computer you will require the computer
slot adapter. Firstly locate the security slot on your computer (this is
normally located on the side or the back of the computer). Turn the
flattened end of the adapter until it springs partially out of the cylinder.
Slide the small 'T' shaped end of the adapter into the security slot on
your computer until it has pushed in as far as it will go. Rotate the
adapter 90 degress so the 'T' shaped end engages in the security slot
and the adapter cannot be pulled out. Push in the flattened knob of the
adaptor (ensuring the prongs at the other end slide into the security slot)
and turn 180 degrees until the holes in the side of the adapter are
aligned. Thread the steel cable of Lock/Alarm 'Mini' through the holes
in the computer slot adapter and loop the cable around an immovable
object such as the leg of a heavy table, before locking the end of the
cable in place. See "Using the Lock/Alarm 'Mini" section.
LOCK/ALARM 'MINI' - Laptop Computer Lock
Figure 1
Figure 2
TROUBLESHOOTING
Alarm doesn’t sound or only makes a “clicking” sound when activated
Check battery life, and replace batteries if necessary. If battery life is OK, remove
and refit batteries to reset.
The steel cable will not totally retract back into the main unit
Whilst pressing the cable trigger button gently pull some of the cable out again
and then allow it to retract back slowly into the unit. Repeat several times if
necessary pulling out less cable each time.
troubleshooting hints.
Push
Push
Push
Hold
down
Disclaimer: Lock/Alarm’Mini’ has been designed as a deterrent to theft. The manufacturer
or supplier cannot accept any liability for personal injury, property damage or loss.


