Loewe BluTech Vision User manual

233–33146.020
33146020
Operating Manual
Blu-ray Player
BluTech Vision

- 2
Contents
Remote Control Assist – Blu-ray Player Operation........... 3
Front View .......................................................................4
Rear View & Display .......................................................5
Welcome ..........................................................................6
Scope of delivery...........................................................................................6
Setting Up.....................................................................................................6
Environmental Protection..............................................................................7
Cardboard Box and Packaging ...................................................................7
The unit......................................................................................................7
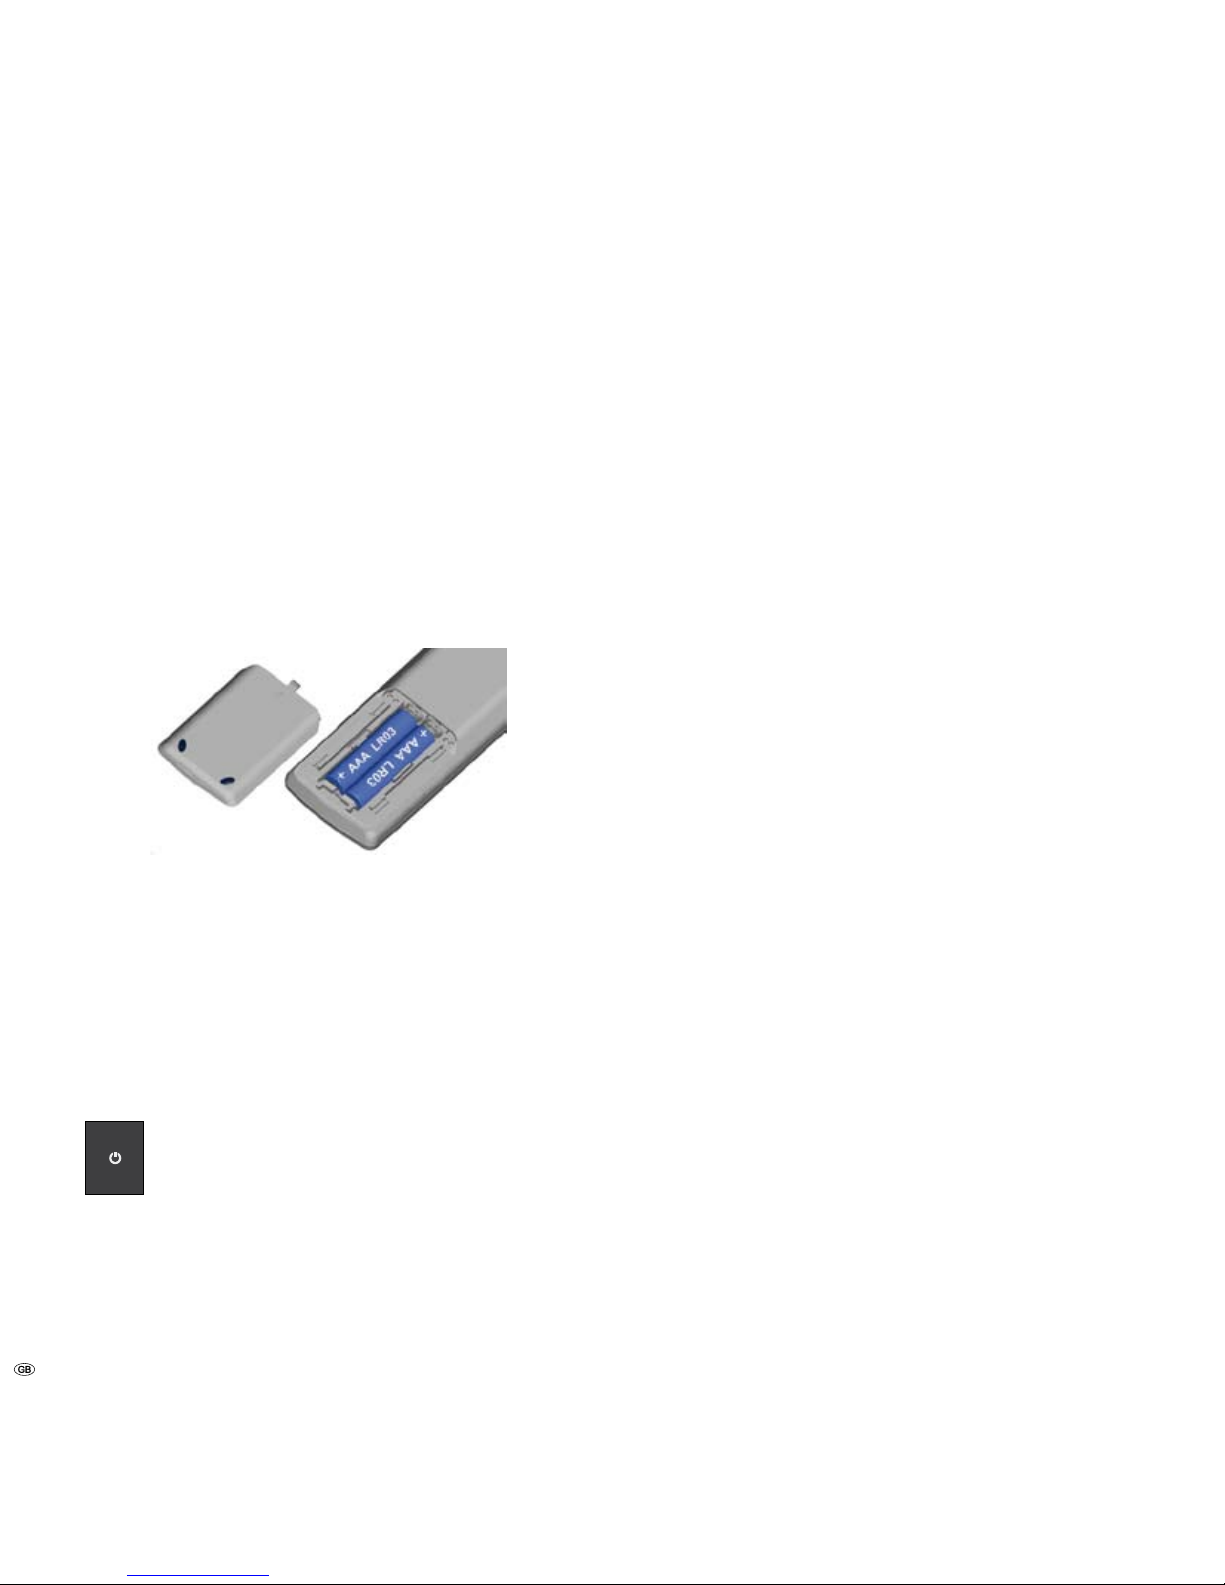
Remote control batteries............................................................................7
Advantages of connecting to a Loewe TV set ................................................7
Use for the intended purpose and ambient conditions ...............................8
Supervision ................................................................................................8
Cleaning.....................................................................................................8
About this user guide.................................................................................8
For Your Safety................................................................8
The Basics........................................................................ 9
Playable Discs...............................................................................................9
Regional Code ..............................................................................................9
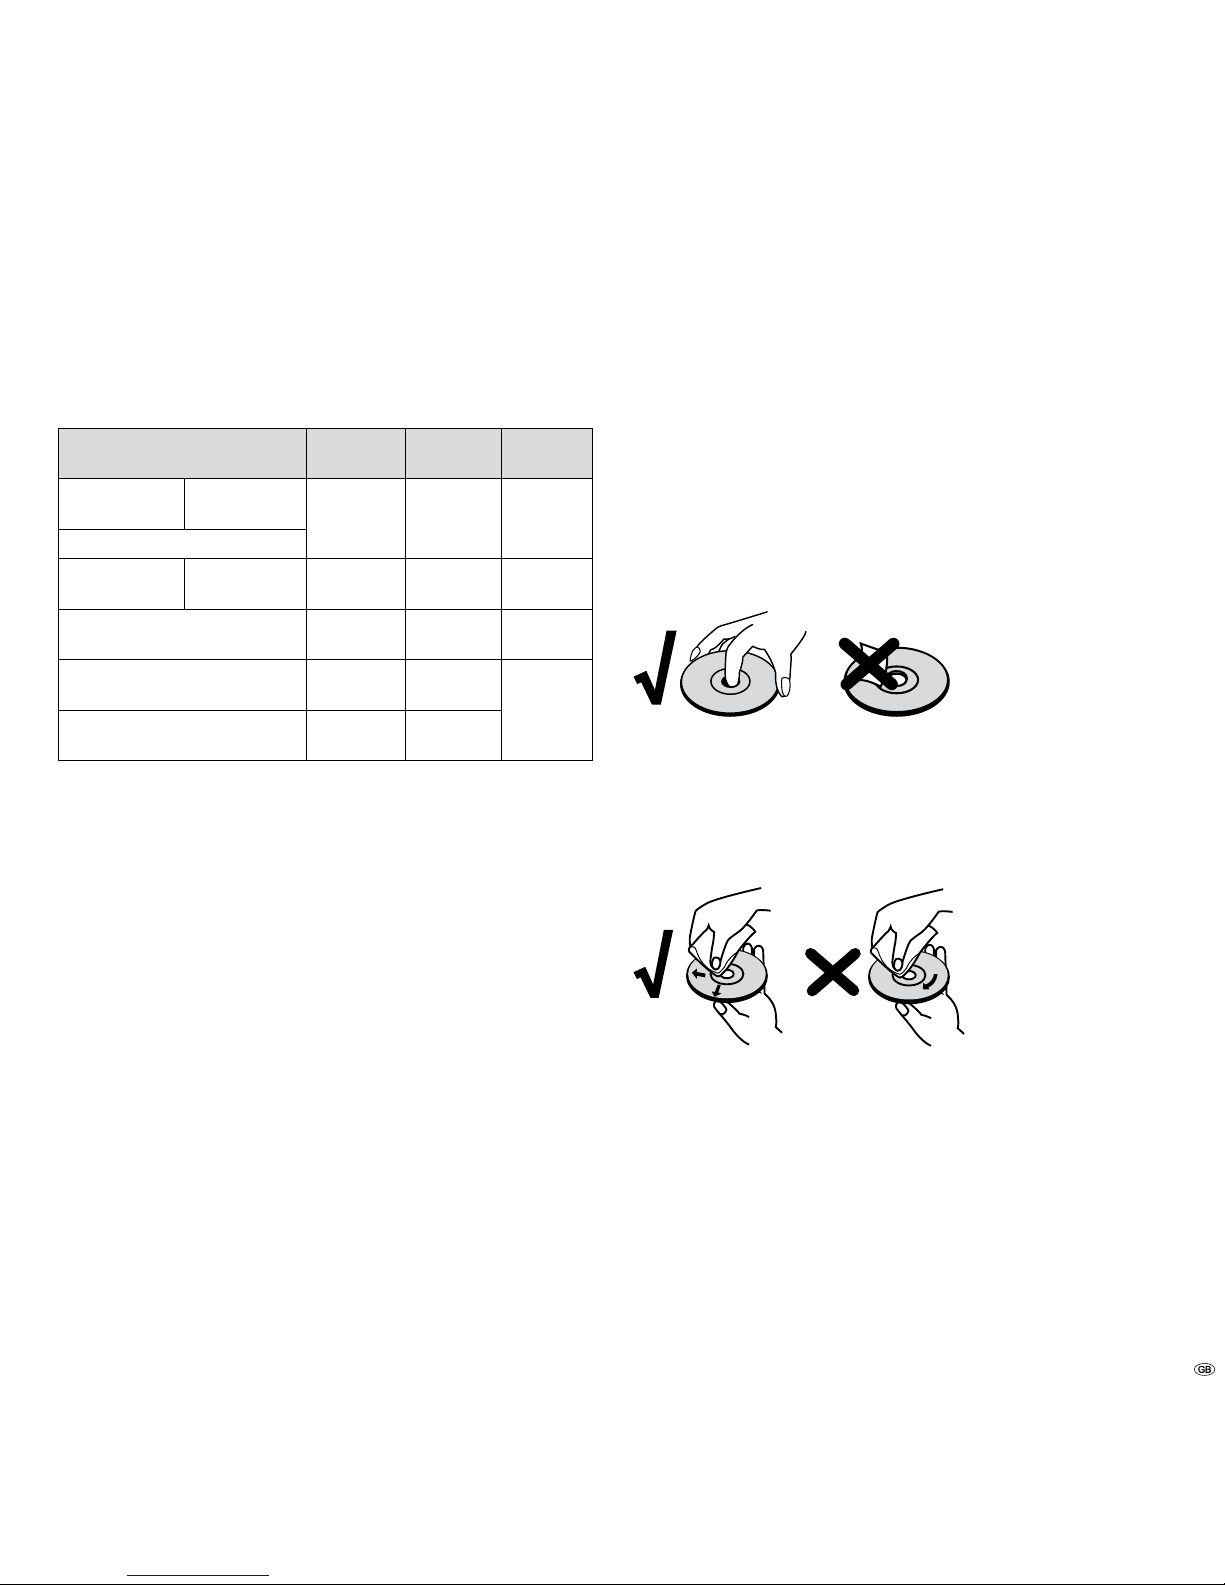
Handling Discs..............................................................................................9
Storing Discs .............................................................................................9
Cleaning Discs............................................................................................9
Terminology from the World of Discs...........................................................10
Title..........................................................................................................10
Chapter....................................................................................................10
Messages....................................................................................................10
Using the remote control for the first time ..................................................10
Resetting the unit .......................................................................................10
Connecting up – General ............................................................................10
Connecting to the TV set.............................................................................10
HDMI connection.....................................................................................10
Component Video Connection..................................................................10
S Video Connection..................................................................................10
Video Connection.....................................................................................10
Analogue Stereo Audio Output.................................................................10
Analogue 5.1 Audio Output .....................................................................10
Digital Audio Output................................................................................10
Initial Set-up .................................................................. 11
Connecting to a Loewe TV System...............................................................11
Connecting to a Loewe TV Audio System.....................................................12
Connecting to the Mains Supply .................................................................13
Switching on/off..........................................................................................13
Concealed Set-up........................................................................................13
Configuration Menu....................................................................................13
Navigation in the Menu ...........................................................................13
Menu Language..........................................................................................14
Menu Settings.............................................................................................14
Audio / Video Settings.................................................................................14
TV Aspect Ratio........................................................................................14
TV Type.....................................................................................................14
Component Video Out..............................................................................15
HDMI Video Out.......................................................................................15
HDMI Auto Detection...............................................................................16
Audio Out ................................................................................................16
Dynamic Range Control............................................................................17
Speaker settings..........................................................................................17
Speaker Set-up.........................................................................................17
Testing Speaker Settings...........................................................................18
Quick start..................................................................................................18
Auto Power Off...........................................................................................18
Digital Link HD............................................................................................19
Playback settings ........................................................................................19
Setting PIN code ......................................................................................19
Changing PIN code ..................................................................................19
Deleting PIN code ....................................................................................19
Parental control........................................................................................20
Disc Language .........................................................................................20
Angle Mark Display..................................................................................21
Front Display/LED........................................................................................21
Version........................................................................................................21
Software update .........................................................................................21
Factory Settings ..........................................................................................21
Switching video output ...............................................................................21
Video Operation............................................................. 22
Playing a BluRay disc or DVD......................................................................22
Preparation ..............................................................................................22
Playback ..................................................................................................22
Selecting a Title........................................................................................22
Selecting a Chapter..................................................................................22
Search......................................................................................................22
Disc Menu................................................................................................23
Info Menu................................................................................................23
Zoom........................................................................................................23
Function Menu............................................................................................23
Selecting Title / Chapter............................................................................23
Time (playback from ...)............................................................................24
Subtitles...................................................................................................24
Angle mark ..............................................................................................24
Digital Sound Formats, Film Language and Audio Channels.....................24
Repeat .....................................................................................................24
Audio Operation ............................................................ 25
Audio Playback ........................................................................................25
Play another title......................................................................................25
Search......................................................................................................25
Info Menu................................................................................................25
Function menu............................................................................................25
Selecting a title ........................................................................................26
Time (playback from ...)............................................................................26
Digital Sound Formats and Audio Channels..............................................26
Repeat .....................................................................................................26
Troubleshooting............................................................. 27
Technical Specifications .................................................28
Masthead ...................................................................................................28
Operation of Additional Units........................................29
Setting the remote control ..........................................................................29
Operating Loewe Equipment.......................................................................29
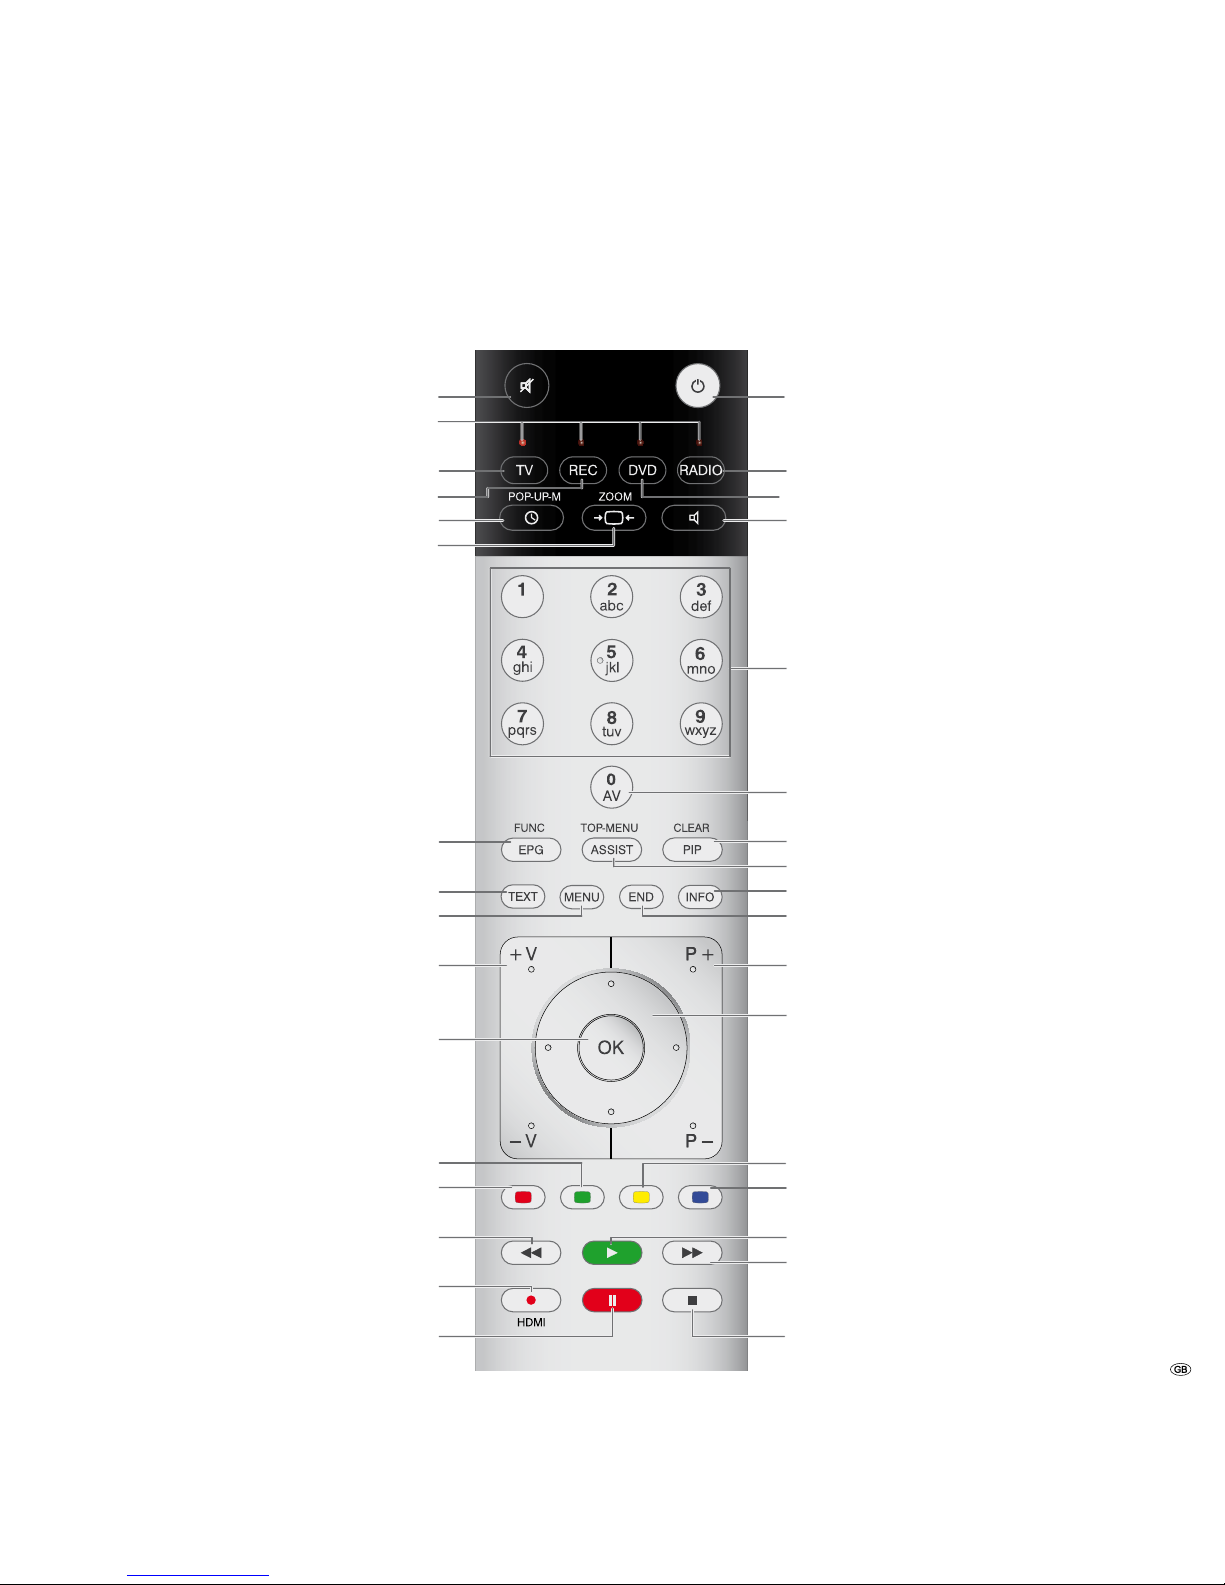
Remote Control Assist – TV Operation ..........................30
Service ........................................................................... 31
Glossary ......................................................................... 32
Index.............................................................................. 33
Please fold out this page.

3 -
Remote Control Assist – Blu-ray Player Operation
Switch on/off on standby................................ (page 13)
Loewe TV: Digital radio; long: Auro radio
Loewe Blu-ray Player; long: DVD Player/Auro..(page 13, 30)
Audio selection
MENU: Enter numbers
MENU: Enter numbers
Delete entry
"Top Menu" / List of titles ................................ (page 22)
Info menu........................................................ (page 23)
Hide menu
Next/previous chapter...................................... (page 22)
MENU: select/set ............................................. (page 13)
1) Colour button yellow..................................... (page 23)
1) Colour button blue........................................ (page 23)
Playback.......................................................... (page 22)
Search forwards............................................... (page 22)
Stop................................................................. (page 22)
1) Function depends on disc
Loewe TV: Sound on / off
LED indicator for current operating mode
Switch over to operate Loewe TV
Switch over to operate Loewe DVD recorder
(page 23)............................Popup menu on inserted disc
(page 23) ............................................................... Zoom
(page 23)..................................................Function menu
Back in menu
Menu settings
Loewe TV: Volume
(page 13).................................... Confirm menu selection
(page 23).......................................1) Colour button green
(page 23)...........................................1) Colour button red
(page 22).............................................Search backwards
(page 21).................................. HDMI/component output
(page 22)................................................................Pause

- 4
Front View
On
Off in Standby
Disc drawer
Disc drawer
open / close
Front ap (closed)
Display Front ap
(opened)
Operating indicator BluRay indicator

5 -
VIDEO
Connection of a
TV with video
input
Rear View & Display
Numerical information
Total playback time, title /
chapter / track number, status etc.
OPTICAL AUDIO OUT
Optical audio digital
output
COAXIAL DIGITAL
Coaxial
audio digital output
COMPONENT VIDEO
OUT (Y Pb Pr)
Connection of a TV with
component inputs (Cinch)
2CH AUDIO L/R
Connection of a TV with
stereo audio inputs (Cinch)
Mains cable
Important: Do not touch the inside pins in the connecting sockets on the back of the unit!
Electrostatic discharge which may occur can cause lasting damage to the unit.
HDMI OUT
Connection of a TV
with HDMI input
S-VIDEO
Connection of a
TV with S-video
input
5.1 CH AUDIO OUT
Connection of a surround
sound audio system (Cinch)
USB socket
only for service

- 6
Welcome
Thank you
for choosing a Loewe product. We are happy to welcome you as our customer.
At Loewe we combine the highest standards of technology, design and user
friendliness. This is equally true of TV, DVD, video, audio and accessories. Neither
technology nor design is an end in itself, but both are intended to provide our
customers with the best possible audio and visual experience. Our design is not
influenced by short-term, fashionable trends. You have, after all, purchased a
high-quality piece of equipment which you do not want to tire of tomorrow or
the day after.
Scope of delivery
BluRay Player Loewe BluTech Vision
Remote Control Assist with 2 batteries
HDMI cable
AV Cinch cable
Mains cable
These operating instructions
You can control three units using the remote control: this Player, a Loewe TV set
and a Loewe Recorder or Loewe Audio System.
Trademark rights
Manufactured under licence from Dolby Laboratories. Dolby, ProLogic and the
double-D symbol are trademarks of Dolby Laboratories.
"DTS" and "DTS Digital Out" are trademarks of Digital Theater Systems Inc.
HDMI, the HDMI Logo and High-Definition Multimedia Interface are trademarks or
registered logo of HDMI licensing LLC.
Java and all trademarks and logos based on Java are trademarks or registered
trademarks of Sun Microsystems, Inc. in the United States of America and/or other
countries.
•
•
•
•
•
•
Setting Up
Place the Player on a stable, level surface.
Do not move the Player during operation or shortly after switching it off.
Do not set up the Player near strong heat sources or in direct sunlight.
When setting up in a cupboard or enclosed shelving: Leave at least 2.5 cm of
free space around the Player to allow air to circulate freely and to prevent heat
accumulation. Do not cover the fan and opening on the back.
The picture and sound of a TV set, a player or a radio nearby could have
their transmissions distorted. If this is the case, do not set the unit up in
the immediate vicinity of a TX set, player or radio or switch the unit off after
removing the disc.
Set the Player up so that the infra-red signal of the remote control can directly
reach the display of the Player (or, if this is not possible, refer to "Advantages
of connecting up a Loewe TV set" page 7).
Do not place any strong artificial light source in front of the unit. This could
have a detrimental effect on the infrared reception.
Incorrect voltages can damage the unit. The unit may only be connected to an
electricity supply with the voltage and frequency stated on the rating plate and
using the enclosed mains cable.
During thunderstorms, disconnect the mains plug. A voltage surge caused by
lightning conducted through the mains could damage the unit.
During a lengthy absence, the plug should also be disconnected from the
mains.
The mains plug must be easy to reach to ensure that the unit can be disconnected
from the mains at any time.
Position the mains cable in such a way that it can not be damaged. The mains
cable may not be bent or laid across sharp edges, walked on or exposed to any
chemicals; the latter applies to the whole unit. A mains cable with damaged
insulation can cause electric shocks and represents a fire hazard.
When you want to unplug from the mains, do not pull on the cable, but on the
housing of the plug. The cables in the mains plug could otherwise be damaged
and could cause a short-circuit when being plugged in again.
Please also read and follow the safety advice on the following pages.
•
•
•
•
•
•
•
•
•
•
•
•
•

7 -
Welcome
Shipping the Unit
The original shipping box and packaging materials should be used in this case.
To protect the unit as much as possible, pack it in the same way as it was packed
when you originally received it.
Environmental Protection
Cardboard Box and Packaging
In line with national regulations regarding the disposal of packaging materials, we
pay a fee to authorised recyclers who collect packaging from dealers. Nevertheless,
we recommend that you keep the original cardboard box and the rest of the
packaging materials so that the unit can, if necessary, be transported in the safest
possible conditions.
The unit
Important: The EU Directive 2002/96 /EC governs the proper
return, handling and recycling of used electronic appliances. Old
electronic appliances must therefore be disposed of separately.
Never dispose of this unit in the normal domestic waste! You can
hand in your old unit free of charge at identified collection points
or to your dealer if you buy a similar new unit.
Other details about return (also for non-EU countries) are available
from your local authorities.
Remote control batteries
The batteries provided contain no harmful materials such as
cadmium, lead or mercury.
Regulations concerning used batteries mean that batteries may
no longer be thrown out with the household rubbish. You can
dispose of used batteries free of charge at the collection points
in commercial outlets. Your dealer will also have a collection point
for used batteries.
Advantages of connecting to a Loewe TV set
Using the Digital Link HD you can set the Player up for example in a closed rack
or wall unit, without a direct line of sight to the Player. You can operate basic
functions (Play, Pause, Stop, Search backwards/forwards, Top Menu) of the Player
via the Loewe TV set using the remote control. You have to switch on Digital Link
HD on the Player (page 19).
If you use the HDMI connection, the TV set is automatically switched to this input
when the Player is switched on, providing your TV set supports this function.

- 8
For your own safety, and to avoid unnecessary damage to your unit, please read
and follow the safety advice below.
Use for the intended purpose and ambient conditions
This Player is intended exclusively for the playback of video and audio signals and
is designed for home and office use and may not be operated in rooms with high
humidity (e.g. bathroom or sauna) or a high concentration of dust (e.g.
workshops).
The terms of the warranty only cover normal use of the Player.
If the unit is used outdoors, make sure that it is protected from moisture (rain,
drips, spray or dew). High concentrations of moisture and dust lead to creepage
current in the unit which can make it dangerous by touching a voltage or can cause
a fire.
If you have moved the unit out of the cold into a warm environment, leave it
switched off for about an hour to avoid the formation of condensation.
Always switch off your system (BluTech Vision, TV set and any other components
which may be connected) before connecting or disconnecting other devices or
speakers.
Do not open the housing to ensure that you do not expose yourself directly to the
laser beam. Laser radiation is visible in the open unit.
DO NOT LOOK DIRECTLY INTO THE LASER BEAM!
Protect your Player from:
Wet conditions and moisture.
Knocks and mechanical stress.
Magnetic and electric fields.
Cold, heat, direct sunlight and high temperature fluctuations.
Dust.
Covers that inhibit ventilation.
Interference with the internal workings of the unit.
•
•
•
•
•
•
•
IMPORTANT:TO AVOID RISK OF ELECTRIC SHOCK, DO NOT REMOVE THE
COVER (AND THE BACK OF THE UNIT). THERE ARE NO PARTS INSIDE THE UNIT
THAT CAN BE REPAIRED BY THE USER. REPAIRS SHOULD ONLY BE CARRIED
OUT BY A LOEWE DEALER.
As far as possible, only use original accessories, such as Loewe mounting
systems.
Supervision
Do not allow children to use the Player/TV set unsupervised. Do not allow children
to play in the immediate vicinity of the Player/TV set. The unit could be knocked
over, moved or pulled off the surface it is on and could hurt somebody.
Cleaning
Only clean your Player with a slightly damp, soft, clean cloth (without any aggressive
or scouring cleaning agents).
If the Player does not read a disc correctly, it is possible that the reading device in
the unit is dirty. Use a commercially available cleaning disc.
Keep the disc drawer closed so that no dust gets onto the lens from the drawer.
About this user guide
The information in this guide refers to the Loewe product BluTech Vision.
Unless stated otherwise, the instructions refer to the operating elements on the
Assist remote control.
Paragraphs beginning with the ➠symbol indicate important hints, tips or conditions
for perfect operation.
Terms which you will find in the menu or printed on the recorder are printed in
bold type.
In the functional descriptions, the necessary operating elements are arranged to
the left of the text containing the handling instructions.
For Your Safety

9 -
Playable Discs
Only use discs that conform with conventional standards.
This can be ascertained from the logos applied.
Disc Type Recording
Format Contents Disc Size
BD Video Regional Code
B / ALL
— Audio +
Video (Film)
12 cm (5")
BD-RE/BD-R *
DVD Video Regional Code
2 / ALL
Video Mode Audio +
Video (Film)
12 cm (5")
8 cm (3")
DVD±RW/DVD±R * Video Mode Audio +
Video (Film)
12 cm (5")
Audio CD * Audio CD
(CD-DA)
Audio
12 cm (5")
8 cm (3")
CD-RW/CD-R * Audio CD
(CD-DA)
Audio
* only nalised discs
➠ If you write a disc with a PC, it may not be possible to play back the disc,
even though its format is compatible, possibly because of the settings in the
application software used to burn it. (You can get further information on this
from the software provider).
➠ Do not apply stickers or labels of any kind to either side of the disc (either
the side with writing or the recorded side).
➠ Do not use any unusually shaped CDs (e.g. heart-shaped or octagonal).
Otherwise malfunction can not be ruled out.
➠ Dirt and scratches on the disc can impair playback or make it impossible.
Take care of the discs.
➠ Due to the high quality coatings on discs, they are relatively insensitive to
small scratches and fingerprints. This is why no protective casing is required.
Regional Code
This Player can only play back coded Blu-ray discs for the region "B" or "All". DVDs
can only be played back for the region "2" or "All".
The regional code on the labels of many DVDs shows which type of DVD player can
play back these discs. If you try to play other discs, you will see the error message
"Wrong country code. Playback not possible." on the TV screen.
On some DVD discs, the label with the regional code is missing, even though the
disc can not be played back in all regions.
Handling Discs
Do not touch the recorded side of the disc. Hold the disc by the edges to avoid
touching the surface with your fingers. Do not apply any paper or sticky tape to
either side of the disc.
Storing Discs
Replace the disc back in its case after playing it. Do not expose the disc to any
direct sunlight or heat sources and never leave it in a parked car that is directly in
the sun, as the temperature in the car can rise dramatically.
Cleaning Discs
Before playing the disc, clean it with a clean cloth. Wipe the disc from the middle
to the edge.
Do not use use any strong solvents such as alcohol, petrol, thinner, commercially
available cleaner or antistatic spray intended for vinyl records.
The Basics

- 10
Terminology from the World of Discs
Title
A title is the main content of the film of music album. It is simple to access using
the assigned title number.
Chapter
A chapter are parts of a film or music track which are part quantities of a title. It
is simple to access one using the assigned chapter number.
Messages
During operation you may see FUNCTION NOT POSSIBLE on the screen. This
means that the required function is (possibly momentarily) not available.
Using the remote control for the first time
To insert or change the batteries, press on the arrow. While doing so, simply
slide the battery compartment lid down and remove it. Insert alkali manganese
batteries LR 03 (AAA) and ensure the correct position of + and –. Slide the cover
on again from the bottom.
Resetting the unit
If one of the following problems occurs
The unit is connected but can not be switched on or off.
The display on the console is not working.
The Player is not working normally,
you can reset the Player as follows:
Press the button on the unit for at least 8 seconds. The unit will
switch itself off or unplug it from the mains; wait for at least 20
seconds and then connect the cable again.
Press the button again to switch the unit back on.
•
•
•
Connecting up – General
➠ Depending on the TV set and the other units that you want to connect, there
are several options available for connecting the Player to your TV set. Only use
the connections described in the following.
➠ If applicable, read the accompanying documentation for your TV set, your
audio system and other units to make the connections described below.
➠ Do not connect the AUDIO OUT socket of the Player to the Phono In socket
of the audio system.
Connecting to the TV set
➠ The Blu-ray Player must be registered in the connection assistant if you have
a Loewe TV set.
HDMI connection
Using the enclosed HDMI cable, connect the socket HDMI OUT of the Player to
the HDMI input socket on the TV set (for Loewe TVs, socket HDMI 2). Make the
settings as described in page 15/16.
Component Video Connection
Using a Y Pb Pr cable (can be obtained from specialist retailers), connect the
COMPONENT VIDEO OUT sockets on the Player to the corresponding input
sockets on the TV set.
S Video Connection
Using an S video cable (can be obtained from specialist retailers), connect the
S-VIDEO AV OUT socket of the Player with the S Video input socket of the TV
set.
Video Connection
Using a cinch cable (can be obtained from specialist retailers), connect the
VIDEO AV OUT socket of the Player with the S Video input socket of the TV set.
Analogue Stereo Audio Output
Using a stereo cinch audio cable (can be obtained from specialist retailers), connect
the 2CH AUDIO AV OUT sockets of the Player to the stereo AUDIO-IN sockets
on the TV set.
Analogue 5.1 Audio Output
Using a 6 pin cinch audio cable (can be obtained from specialist retailers) , connect
the 5.1CH AUDIO AV OUT sockets of the Player to the 5.1 surround AUDIO-IN
sockets on the TV set.
Digital Audio Output
Connect the COAXIAL or OPTICAL DIGITAL AUDIO OUT socket of the Player to
the DIGITAL IN socket of the surround amplifier.
The Basics

11 -
Connecting to a Loewe TV System
Make the connections as shown here:
Initial Set-up
S-VIDEO OUT
Loewe DVD-Recorder
Loewe Flat-TV
Loewe Blu-ray Player
SCART cable
HDMI cable
HDMI cable

- 12
Connecting to a Loewe TV Audio System
Make the connections as shown here:
To show the OSD display of the Sound Projector,
use a SCART Cinch cable.
Initial Set-up
ON
Line IN
Power OUT
OFF
230V~50/60Hz
Surr.
Front
Right
Surr.
Front
Subw.
Left
Right
Center
Left
R
R
L
C
L
Bass Intensity
Phase
Min. Max.
0 180
Crossover Frequency
Audio Link
System connector
50 250.
Loewe Sound Projector
Loewe Flat-TV
Loewe Blu-ray Player
Loewe Individual Sound-System (Subwoofer)
Audio Link
Digital AUDIO
SCART Cinch
RS-232C
HDMI cable

13 -
Connecting to the Mains Supply
First of all, plug the small plug of the mains cable plug into the power supply
socket on the back of the Player and then plug the large mains plug into a mains
socket 220-240V~ 50 Hz.
Switching on/off
Set the remote control for Player operation by briefly pressing
the button DVD.
Press the on/off button on the unit or
The on/off button on the remote control.
The operating indicator flashes red first of all and then lights
up green (page 4).
Press the on/off button on the remote control again to switch
the unit off.
Concealed Set-up
With Digital Link HD (CEC), Loewe TV sets pass the signals from the remote control
via the HDMI connection from the TV set to the Player. Digital Link HD makes sense
if you want to set up the Player concealed, e.g. in a closed rack.
➠ The TV set needs to be switched on.
➠ The function Digital Link HD has to be activated in the
Player (page 19).
On the TV set, select the AV programme slot for HDMI.
As long as HDMI is selected as the programme slot, most TV remote control
commands (ASSIST in TV mode) will be passed on to the connected HDMI unit.
Volume, sound on/off, sound adjustment and picture format however, still affect
operation of the TV set. The DVD commands (ASSIST in DVD mode) are not passed
on by the TV.
With the TV button (press briefly), in TV operation you switch
back to the last station watched and terminate the Player
control.
By pressing the TV button for a long time, you can switch between
HDMI and TV operation. Pressing the TV button briefly switches
back to TV mode.
➠ The configurationmenucannotbeopenedwithconcealedset-up;
it can only be opened through direct operation with the remote
control ASSIST in DVD mode.
Configuration Menu
The menu system offers several possibilities to change the settings. Most menus
have several levels on which options can be set. If you press , then first of all
the configuration menu is shown.
SETUP MENU
SELECT ENTER RETURN EXIT
DISPLAYS THE TITLE LIST SETTINGS
ON SCREEN LANGUAGE
Navigation in the Menu
In these operating instructions, the arrow buttons on the Remote Control Assist
are shown as follows:
In the text, the arrows correspond to: "5634".
The OK button on the remote control is shown as OK in the
text.
Call up the menu.
5634 Select required option.
Confirm OK.
Go back one level in the menu.
Close menu.
➠ Marked options are shown in the menu with a blue button.
Options that are currently set are shown with a white button.
Initial Set-up

- 14
Menu Language
Select a language for menus and dialogues which are shown by the Player.
Call up the menu.
5634 Select option MENU [ON SCREEN LANGUAGE].
Confirm OK.
MENU [ON SCREEN LANGUAGE]
SELECT ENTER RETURN EXIT
SELECT DISPLAY LANGUAGE.
SÈLECTZIONNER LA LANGUE S'AFFICHAGE.
ANZEIGESPRACHE WÄHLEN.
DEUTSCH
ENGLISH
ESPAÑOL
FRANÇAIS
ITALIANO
SVENSKA
NEDERLANDS
PORTUGEUSE
5634 Select option ENGLISH.
Confirm OK.
Menu Settings
Set the Player up to meet your individual requirements and configuration.
Call the menu.
5634 In the configuration menu select the option
SETTINGS.
Confirm OK.
MENU [AUDIO VIDEO SETTINGS]
SELECT ENTER RETURN EXIT
AUDIO VIDEO SETTINGS
SPEAKER SETTINGS
QUICK START
AUTO POWER OFF
DIGITAL LINK HD
PLAYBACK SETTING
FRONT DISPLAY/LED
VERSION
SOFTWARE UPDATE
SYSTEM RESET
Audio / Video Settings
TV Aspect Ratio
WIDE Select this setting if a wide screen TV set with the picture
format 16:9 is connected.
NORMAL Select this setting if a TV set with the picture format 4:3 is
connected. With Letter Box Mode the display of wide screen
formats has black bars at the top and bottom edges of the
picture. Using Pan-Scan, the picture is stretched so that no
black bar is visible, but the left and right edges are cut off.
56 In the menu SETTINGS select the option AUDIO VIDEO
SETTINGS.
Confirm OK.
56 Select option TV ASPECT RATIO.
Confirm OK.
MENU [AUDIO VIDEO SETTINGS - TV ASPECT RATIO]
SELECT ENTER RETURN EXIT
TV ASPECT RATIO
TV TYPE
WIDE
SELECT THE CORRECT ASPECT
RATIO FOR YOUR CONNECTED TV.
NORMAL
COMPONENT VIDEO OUT
HDMI VIDEO OUT
HDMI AUTO DETECTION
AUDIO OUT
DYNAMIC RANGE CONTROL
16 : 9 4 : 3
34 Select option WIDE or NORMAL (Letter Box or Pan-
Scan).
Confirm OK.
TV Type
You can choose between:
AUTO Select this setting if you have a multi-standard TV set
connected.
PAL Select this setting if the TV set you have connected can only
play back the PAL colour standard.
56 In the menu SETTINGS select the option AUDIO VIDEO
SETTINGS.
Confirm OK.
56 Select option TV TYPE.
Confirm OK.
34 Select option AUTO or PAL.
Confirm OK.
Initial Set-up

15 -
Component Video Out
Set the resolution for the analogue video signal at the interface
COMPONENT VIDEO OUT.
56 In the menu SETTINGS, select the option AUDIO VIDEO
SETTINGS.
Confirm OK.
56 Select the option COMPONENT VIDEO OUT.
Confirm OK.
MENU [AUDIO VIDEO SETTINGS - COMPONENT VIDEO OUT]
SELECT ENTER RETURN EXIT
TV ASPECT RATIO
TV TYPE
1080i
SELECT COMPONENT VIDEO OUTPUT
RESOLUTION. FOR DVD PLAYBACK,
ONLY 576/480p or 576/480i SIGNAL
CAN BE SUPPORTED.
CURRENT SETTING IS 576/480i.
720p
576/480p
576/480i
COMPONENT VIDEO OUT
HDMI VIDEO OUT
HDMI AUTO DETECTION
AUDIO OUT
DYNAMIC RANGE CONTROL
3456 Select option 1080i, 720p, 576/480p or 576/480i
depending on the display options the connected TV set has.
Confirm OK.
34 Select option YES.
Confirm OK.
56 Select option CONFIRM.
Confirm OK.
HDMI Video Out
Set the resolution for the digital video signal at the interface
HDMI OUT.
56 In the menu SETTINGS, select the option AUDIO VIDEO
SETTINGS.
Confirm OK.
56 Select the option HDMI VIDEO OUT.
Confirm OK.
MENU [AUDIO VIDEO SETTINGS - HDMI VIDEO OUT]
SELECT ENTER RETURN EXIT
TV ASPECT RATIO
TV TYPE
1080p
AUTO
SELECT HDMI VIDEO OUTPUT
RESOLUTION.
IF [AUTO] IS SELECTED, THEN VIDEO
OUTPUT WILL BE SET BASED ON THE
TYPE OF TV CONNECTED.
1080i
720p
576/480p
COMPONENT VIDEO OUT
HDMI VIDEO OUT
HDMI AUTO DETECTION
AUDIO OUT
DYNAMIC RANGE CONTROL
3456 Select option 1080p, 1080i, 720p or 576/480p
depending on the display options the connected TV set has, or
select option AUTO for automatic adjustment to the TV set.
Confirm OK.
34 Select option YES.
Confirm OK.
56 Select option CONFIRM.
Confirm OK.
➠ The HDMI Out can not be used at the same time as the
Component Video Out.
➠ If this Player is connected to a TV set that is suitable for
1080p24 display (page 33), the Player switches to this mode for
playback if the option Auto has been selected at HDMI Out.
Initial Set-up

- 16
HDMI Auto Detection
With this setting the Player automatically switches to the HDMI
Out if an HDMI Output signal is detected.
56 In the menu SETTINGS select the option AUDIO VIDEO
SETTINGS.
Confirm OK
56 Select option HDMI AUTO DETECTION.
Confirm OK.
MENU [AUDIO VIDEO SETTINGS - HDMI AUTO DETECTION]
SELECT ENTER RETURN EXIT
TV ASPECT RATIO
TV TYPE
IF HDMI AUTO DETECTION IS ENABLED,
VIDEO OUTPUT AUTOMATICALLY
CHANGES
TO HDMI WHEN THE PLAYER DETECTS
HDMI CONNECTION.
TURN ON THE FUNCTION?
*VIDEO SIGNALS CANNOT BE OUTPUTTED
SIMULTANEOUSLY FROM HDMI AND
COMPONENT VIDEO OUTPUT.
YES
NO
COMPONENT VIDEO OUT
HDMI VIDEO OUT
HDMI AUTO DETECTION
AUDIO OUT
DYNAMIC RANGE CONTROL
34 Select option YES.
Confirm OK.
Audio Out
Set the audio out to the connected audio equipment.
56 In the menu SETTINGS select the option AUDIO VIDEO
SETTINGS.
Confirm OK.
56 Select option AUDIO OUT.
Confirm OK.
MENU [AUDIO VIDEO SETTINGS - AUDIO OUT]
SELECT ENTER RETURN EXIT
TV ASPECT RATIO
TV TYPE
SELECT AUDIO OUTPUT TERMINAL THAT
CONNECTS TO SURROUND EQUIPMENT.
HDMI OUTPUT
OPTICAL / COAXIAL DIGITAL OUT
5.1ch AUDIO OUTPUT
2ch AUDIO OUTPUT
COMPONENT VIDEO OUT
HDMI VIDEO OUT
HDMI AUTO DETECTION
AUDIO OUT
DYNAMIC RANGE CONTROL
56 Select option according to the audio playback options on
the connected TV set or amplifier.
HDMI Out Audio out via the interface HDMI OUT.
OPTICAL/COAXIAL Audio output via the interface OPTICAL
DIGITAL OUT DIGITAL OUT or COAXIAL DIGITAL OUT.
5.1ch AUDIO OUTPUT
Audio output via the interface 5.1ch AUDIO OUT.
2ch AUDIO OUTPUT
Audio output via the interface 2ch AUDIO L/R.
Confirm OK.
Another menu then appears. Here you select the respective
suitable audio formats for the selected interface.
MENU [AUDIO VIDEO SETTINGS - AUDIO OUT]
SELECT ENTER RETURN EXIT
TV ASPECT RATIO
TV TYPE
SELECT AUDIO OUTPUT FORMAT FROM
HDMI TERMINAL.
* IF [AUTO] IS SELECTED, AUDIO FORMAT
WILL BE SET AUTOMATICALLY IN
ACCORDANCE WITH THE CONNECTED
EQUIPMENT.
AUTO
PCM (SURROUND)
COMPONENT VIDEO OUT
HDMI VIDEO OUT
HDMI AUTO DETECTION
AUDIO OUT
DYNAMIC RANGE CONTROL
AUTO Select this option if you have connected a unit with
an integrated multichannel decoder, e.g. Dolby
Digital at the interface HDMI OUT.
PCM (SURROUND) Output of linear PCM Audio Signal with surround
sound at HDMI OUT.
PCM (STEREO) Output of 2 channel sound.
BITSTREAM Output of surround sound to a unit with an
integrated multichannel decoder.
Confirm OK.
An overview of the selected audio output format settings
appears.
Confirm OK.
➠ The audio format settings depend on each other and can
influence each other.
Initial Set-up

17 -
Dynamic Range Control
With this setting you can limit the dynamics (this means the
difference between the loudest and the quietest sounds). You can
therefore also play back a film with lower volume differences.
➠ Turn the volume down before changing this setting.
56 In the menu SETTINGS select the option AUDIO VIDEO
SETTINGS.
Confirm OK.
56 Select option DYNAMIC RANGE CONTROL.
Confirm OK.
MENU [AUDIO VIDEO SETTINGS - DYNAMIC RANGE CONTROL]
SELECT ENTER RETURN EXIT
TV ASPECT RATIO
TV TYPE
ADJUST AUDIO RANGE WHEN DOLBY
DIGITAL PLAYBACK SIGNAL IS WEAK.
NORMAL
SHIFT
COMPONENT VIDEO OUT
HDMI VIDEO OUT
HDMI AUTO DETECTION
AUDIO OUT
DYNAMIC RANGE CONTROL
34 Select option.
NORMAL Unchanged sound output.
SHIFT With the output of Dolby Digital audio signals, the
volume of quiet sounds is raised and the volume of
loud sounds is reduced.
Confirm OK.
Speaker settings
You can connect a surround sound amplifier to the Player. In the speaker settings,
you can set the necessary parameters to do so.
➠ Please also read the notes in the operating instructions for your surround
system.
➠ Remove the disc from the Player before you start adjusting the speaker
settings.
Speaker Set-up
56 In the menu SETTINGS select the option SPEAKER
SETTINGS.
Confirm OK.
MENU [SPEAKER SETTINGS]
SELECT ENTER RETURN EXIT
AUDIO OUTPUT CAN BE SET ACCORDING TO THE CONNECTED
AMPLIFIER AND SPEAKER SYSTEMS.
(WHEN 5.1 CH OUTPUT TERMINAL IS NOT USED, IT IS NOT NECESSARY
TO SET IT.)
DO YOU WANT TO ADJUST THE SPEAKER SETTINGS?
* SPEAKER SETTINGS ARE AVAILABLE, WHEN PCM (SURROUND) SIGNAL IS
SOURCED FROM HDMI TERMINAL.
YES
NO
34 Select option YES.
Confirm OK.
You will see a menu with the loudspeakers represented as
symbols (L: left speaker, R: right speaker, C: centre speaker, SW:
subwoofer, LS: left surround speaker, RS: right surround speaker)
and their listening position.
TEST START
FINISH
SET THE SPEAKER SIZE, DISTANCE FROM LISTENING POINT, AND THE SOUND
LEVEL TO EACH SPEAKERS. SELECT SPEAKER.
MENU [SPEAKER SETTINGS]
SELECT ENTER RETURN EXIT
LS
2.0m/0dB
3,8m/0dB
L
3,8m/0dB
C3,8m/0dB
R
SW
0dB
RS
2.0m/0dB
34 Select speaker.
Confirm OK.
Initial Set-up

- 18
SIZE
LARGE 3.8m 0dB
DISTANCE LEVEL
SET THE SPEAKER SIZE, DISTANCE FROM LISTENING POINT, AND THE SOUND
LEVEL TO EACH SPEAKERS.
MENU [SPEAKER SETTINGS]
SELECT ENTER RETURN EXIT
LS
2.0m/0dB
3.8m/0dB
L
3.8m/0dB
C3.8m/0dB
R
SW
0dB
RS
2.0m/0dB
34 Select option.
34 Select the corresponding parameter respectively.
SIZE Select the option LARGE if the largest speaker in the box has
a diameter of 16 cm or more. Otherwise select SMALL. If you
do not have speakers connected, select NO.
DISTANCE Set the distance from the selected speaker to your listening
position.
LEVEL Set the output level to between -6 dB and +6 dB.
Confirm OK.
Testing Speaker Settings
3456 Select the button TEST START.
Confirm OK.
You will hear test sounds from the speakers one after the
other. If the volume of the sounds differs too much, correct the
setting LEVEL.
6To do so, select the button TEST TONE STOP
and confirm
with OK.
Select the required speaker and set the parameters as
described above.
6Once you have finished with the speaker settings, select the
button END and confirm with OK.
➠ The distance of the speakers Land Rare shifted equally.
➠ The speakers Land Rare automatically set to LARGE if
NO subwoofer is selected.
Quick start
If quick start is enabled, the start-up time from standby mode will be shortened.
However the voltage consumption in standby increases slightly (page 28).
56 In the menu SETTINGS select the option QUICK
START.
Confirm OK.
MENU [QUICK START]
SELECT ENTER RETURN EXIT
IF QUICK START IS ENABLED, THE START-UP TIME FROM
STANDBY MODE WILL BE SHORTENED.
DO YOU WANT TO TURN ON THIS FUNCTION?
YES
NO
34 Select option YES.
Confirm OK.
Auto Power Off
The Player will automatically switch to standby mode after 10 minutes when no
activity is detected.
56 In the menu SETTINGS select the option AUTO POWER
OFF.
Confirm OK.
MENU [AUTO POWER OFF]
SELECT ENTER RETURN EXIT
WHEN AUTO POWER OFF MODE IS SET, THE UNIT WILL SWITCH TO
STANDBY MODE AUTOMATICALLY AFTER 10 MINUTES WHEN NO
ACTIVITY IS DETECTED.
DO YOU WANT TO ACTIVATE THIS FUNCTION?
YES
NO
34 Select option YES.
Confirm OK.
Initial Set-up

19 -
Digital Link HD
With Digital Link HD (CEC), Loewe TV sets pass the signals from the remote control
to the Player via the HDMI connection. Digital Link HD is worthwhile if you want
to set the Player up concealed, e.g. in a closed rack (page 13).
56 In the menu SETTINGS, select the option DIGITAL LINK
HD.
Confirm OK.
MENU [DIGITAL LINK HD]
SELECT ENTER RETURN EXIT
WHEN THE UNIT IS CONNECTED TO A LOEWE TV VIA
HDMI CONNECTION, IT CAN BE CONTROLLED BY
THE TV REMOTE THROUGH DIGITAL LINK HD FUNCTION.
DO YOU WANT TO ACTIVATE THIS FUNCTION?
YES
NO
34 Select option YES.
Confirm OK.
Playback settings
Setting PIN code
To provide protection from unauthorised changes, a four-digit PIN code can be
set up.
56 In the menu SETTINGS select the option PLAYBACK
SETTINGS.
Confirm OK.
56 Select the option PIN CODE SETTING.
Confirm OK.
MENU [PLAYBACK SETTING - PIN CODE SETTING]
SELECT ENTER RETURN EXIT
PARENTAL CONTROL
DISC LANGUAGE
IN ORDER TO SET THE PARENTAL
CONTROL LEVEL, A PIN CODE NEEDS TO
BE SET UP INITIALLY.
DO YOU WANT TO SET THE PIN CODE?
ANGLE MARK DISPLAY
PIN CODE SETTING
YES
NO
If you have not entered a PIN code yet:
34 Select option YES.
Confirm OK.
MENU [PLAYBACK SETTING - PIN CODE SETTING]
0 - 9 INPUT RETURN EXIT
ENTER 4-DIGIT PIN CODE.
ENTER PIN CODE AGAIN FOR CONFIRMATION.
* * * *
-
-- --
Use the number buttons to enter a four-digit number.
Then enter the PIN code again for control purposes.
Confirm OK.
➠ If the entry is wrong, press CLEAR/PIP to delete the entry.
Changing PIN code
56 In the menu SETTINGS select the option PLAYBACK
SETTINGS.
Confirm OK .
56 Select the option PIN CODE SETTING.
Confirm OK.
Use number buttons to enter the valid four-digit PIN code.
34 Select option YES.
Confirm OK.
Deleting PIN code
56 In the menu SETTINGS select the option PLAYBACK
SETTINGS.
Confirm OK.
56 Select the option PIN CODE SETTING.
Confirm OK.
Use number buttons to enter the valid four-digit PIN code.
34 Select option NO.
Confirm OK.
Initial Set-up

- 20
Parental control
This function prevents discs that have an adult rating from being played, providing
the discs have a corresponding code.
➠ A four-digit PIN code is set up (page 19).
56 In the menu SETTINGS select the option PLAYBACK
SETTING.
Confirm OK.
56 Select the option PARENTAL CONTROL.
Confirm OK.
MENU [PLAYBACK SETTING - PARENTAL CONTROL]
RETURN EXIT
PARENTAL CONTROL
DISC LANGUAGE
ANGLE MARK DISPLAY
PIN CODE SETTING
ENTER 4-DIGIT PIN CODE.
-
-- --
0 - 9 INPUT
Use number buttons to enter the valid four-digit PIN code.
The menu PARENTAL CONTROL appears. The option PARENTAL
CONTROL LEVEL FOR DVD VIDEO is selected.
MENU [PLAYBACK SETTING - PARENTAL CONTROL]
SELECT ENTER RETURN EXIT
PARENTAL CONTROL
DISC LANGUAGE
SET PARENTAL CONTROL LEVEL
FOR DVD VIDEO.
ANGLE MARK DISPLAY
PIN CODE SETTING ◄ ►
OFF
SET PARENTAL CONTROL LEVEL FOR BD-
ROM.
NO LIMIT
SET THE COUNTRY CODE.
UK
34 Set option.
OFF The disc is played completely.
LEVEL 1 ... 8 Only the scenes of the inserted disc are played which
have been marked with the selected parental control
level or lower. Level "1" has the most playback
restrictions.
Confirm OK.
The option PARENTAL CONTROL LEVEL FOR BLU-RAY DISC:
is selected.
34 Set option.
OFF The disc is played completely.
0 ... 99 Only the scenes of the inserted disc are played which
have been marked with the selected parental control
level or lower. Level "0" has the most playback
restrictions.
Confirm OK.
The option COUNTRY CODE is selected.
34 Set required country.
Confirm OK.
Disc Language
You can set the preferred language for subtitles, audio and disc menus.
56 In the menu SETTINGS select the option PLAYBACK
SETTING.
Confirm OK.
56 Select the option DISC LANGUAGE.
Confirm OK.
MENU [PLAYBACK SETTING - DISC LANGUAGE]
SELECT ENTER RETURN EXIT
PARENTAL CONTROL
DISC LANGUAGE
SELECT THE PREFERRED LANGUAGE
FOR PLAYBACK FROM DISC.
ANGLE MARK DISPLAY
PIN CODE SETTING ◄ ►
ENGLISH
ENGLISH
SUBTITLE
AUDIO
MENU
ENGLISH
56 Select option.
34 Set parameters.
SUBTITLE Pre-set the language of the subtitles contained on the
disc.
AUDIO Pre-set the language for the soundtrack.
MENU Pre-set the language for the disc menu.
These languages will automatically be used when playing a
disc.
Confirm OK.
Initial Set-up
Table of contents
Other Loewe Blu-ray Player manuals