Loewe BluTechVision 3D User manual

233–34466.020
User Guide
Blu-ray DiscTM Player
BluTechVision 3D
_34466_BTV3D_00_Buch_EN.indb 1 27.01.2011 08:41:15

Preparation
TV operation
BluTechVision operation press briefly
Switch device on/off
Insert disc Button on device – Insert Disc –
Operating modes
Select operating mode Movie - Music - Photo OK
If applicable select mediumDisc - USB OK
Playback
Playback
Pause
Stop (Continue)
Stop
Search forwards
extended press, then press several times
Search backwards
extended press, then press several times
Next/Previous Chapter P+/-
Volume V+/-
Individual frame (press several times)
Slow motion /
press for a long period, then press several times
Other Functions
Call up the menu
Close menu
Title menu
Disc Menu (Blu-ray, Disc™/DVD)
Pop-Up Menu (Blu-ray Disc™)
Menu Picture Mode
Repeat (press several times) OK
Zoom Menu
zoom out
zoom in
Screen off/on (Music)
Sets a marker
Marker call up
34
extended pressOK
HDMI Format
BD-LIVE™
Pop-UP Menu (Blu-ray Disc™)
Sub-menu/MenuBD-LIVE™
OK
Getting Started
Please unfold this page.
- 2
_34466_BTV3D_00_Buch_EN.indb 2 27.01.2011 08:41:17

Remote Control Assist – BluTechVision 3D Operation
Switch on/off in standby mode .........................(Page 13)
Device set, e.g. Operate AudioVision
AudioVision short: CD/DVD/USB/iPod; long: FM-Radio
Device set, e.g. Operate BluTechVision
Sound adjustment/sound via (Loewe TV set)
MENU: Enter numbers or letters
Menu Picture Mode..........................................(Page 29)
Home Menu......................................................(Page 14)
Title Menu ........................................................(Page 25)
Close menu.......................................................(Page 14)
DISC: Select title up/down.................................(Page 26)
FILE: Browse list forwards/backwards ...............(Page 31)
Select Setup menu............................................(Page 14)
Yellow button: Menu Marking: delete marking
Blue button: short: Set marker
long: Search bar
Playback ..........................................................(Page 25)
short: Next chapter...........................................(Page 25)
long: Search forwards (press several times)
Stop..................................................................(Page 25)
Audio off / on (Loewe TV set)
LED display for current operating mode
Switch over to operate TV
Device set, e.g. Operate DVD Recorder
(Page 29)............................................ Pop-Up/Disc menu
(Page 28)...................................................... Zoom menu
(Page 25)..............................................................Repeat
(Page 28)....................... DISC: Menu of the inserted DVD
(Page 14)...................................................... Setup menu
Volume (Loewe TV set)
(Page 14)................................................... Confirm/Open
Green button: Code screen for subtitles
Red button: Music: Screen off/on
(Page 25)..................................... short: Previous chapter
long: Search backwards (press several times)
HDMI resolution
(Page 25)................................................................Pause
3 -
_34466_BTV3D_00_Buch_EN.indb 3 27.01.2011 08:41:44

Freeze Frame 25
Front / Rear View 6
G
Getting Started 2
Glossary 37
H
Handling Discs 24
HDMI CEC 13
HDMI Colour Adjustment 16
HDMI Format 35
Home Menu 14, 31
I
Initialize 22
Inserting Discs 24
Intended Use 9
L
Language 15
Language code list 38
Last Scene Memory 28
M
Mains supply 13
Menu Display 16
Music Files 33
N
Network 20
O
Operating Loewe Equipment 12
P
Password 18
Performance 7
Photo Files 34
Picture Mode 29
play 25
Playable Discs 24
R
Rating 19
REC button 12
Regional Code 24
Remote Control 3, 12
Repeat 25, 28
Resolution 16, 35
Index of key words
3D Mode 16
A
Area Code 19
Area Code List 38
Audio 17
Audio channels 26
B
BD-LIVE 21, 30
Blu-ray 7
Blu-ray Disc Rating 19
Blu-ray Disc Storage Clear 22
Blu-ray Disc Storage Select 22
C
Cabling 10
Cabling AudioVision (other TV sets) 11
Chapter 26
Cleaning 9
Company and editorial details 39
Conditions 24
Connecting 10, 11, 24
Connection options 7
D
Device buttons 12
Digital Link HD (HDMI CEC) 13
Digital Sound Formats 26
Disc Languages 15
Disc Menu 27, 28, 29
Disc Playback 26
Display 16
Disposal 35
DivX Registration Code 19
DivX Subtitle 32
DivX® VOD 22
DRC 17
DVD button 12
E
Ejecting the Disc 24
Electrical Data 39
Environment 35
F
Factory settings 12
Fast forward 25
File formats supported 39
Film language 26
Frame by Frame 25
S
Sampling freq. 17
Saving energy 22
Scope of delivery 8
Search 25
Security 9
Selecting a Title 26
Setting up 8
Setting up the Assist Remote Control 12
Setup Menu 14
Slow motion 25
Sound functions 12
Start-up 12, 13
Subtitles 26
Supervision 9
Switching on/off 12, 13
Symbols 24
T
Technical specications 39
Time 26
Trademark rights 39
TV Aspect Ratio 16
TV button 12
U
Updating Software 23
USB Operation 32
V
Video Files 31
- 4
_34466_BTV3D_00_Buch_EN.indb 4 27.01.2011 08:41:44

Contents
Getting Started ................................................................ 2
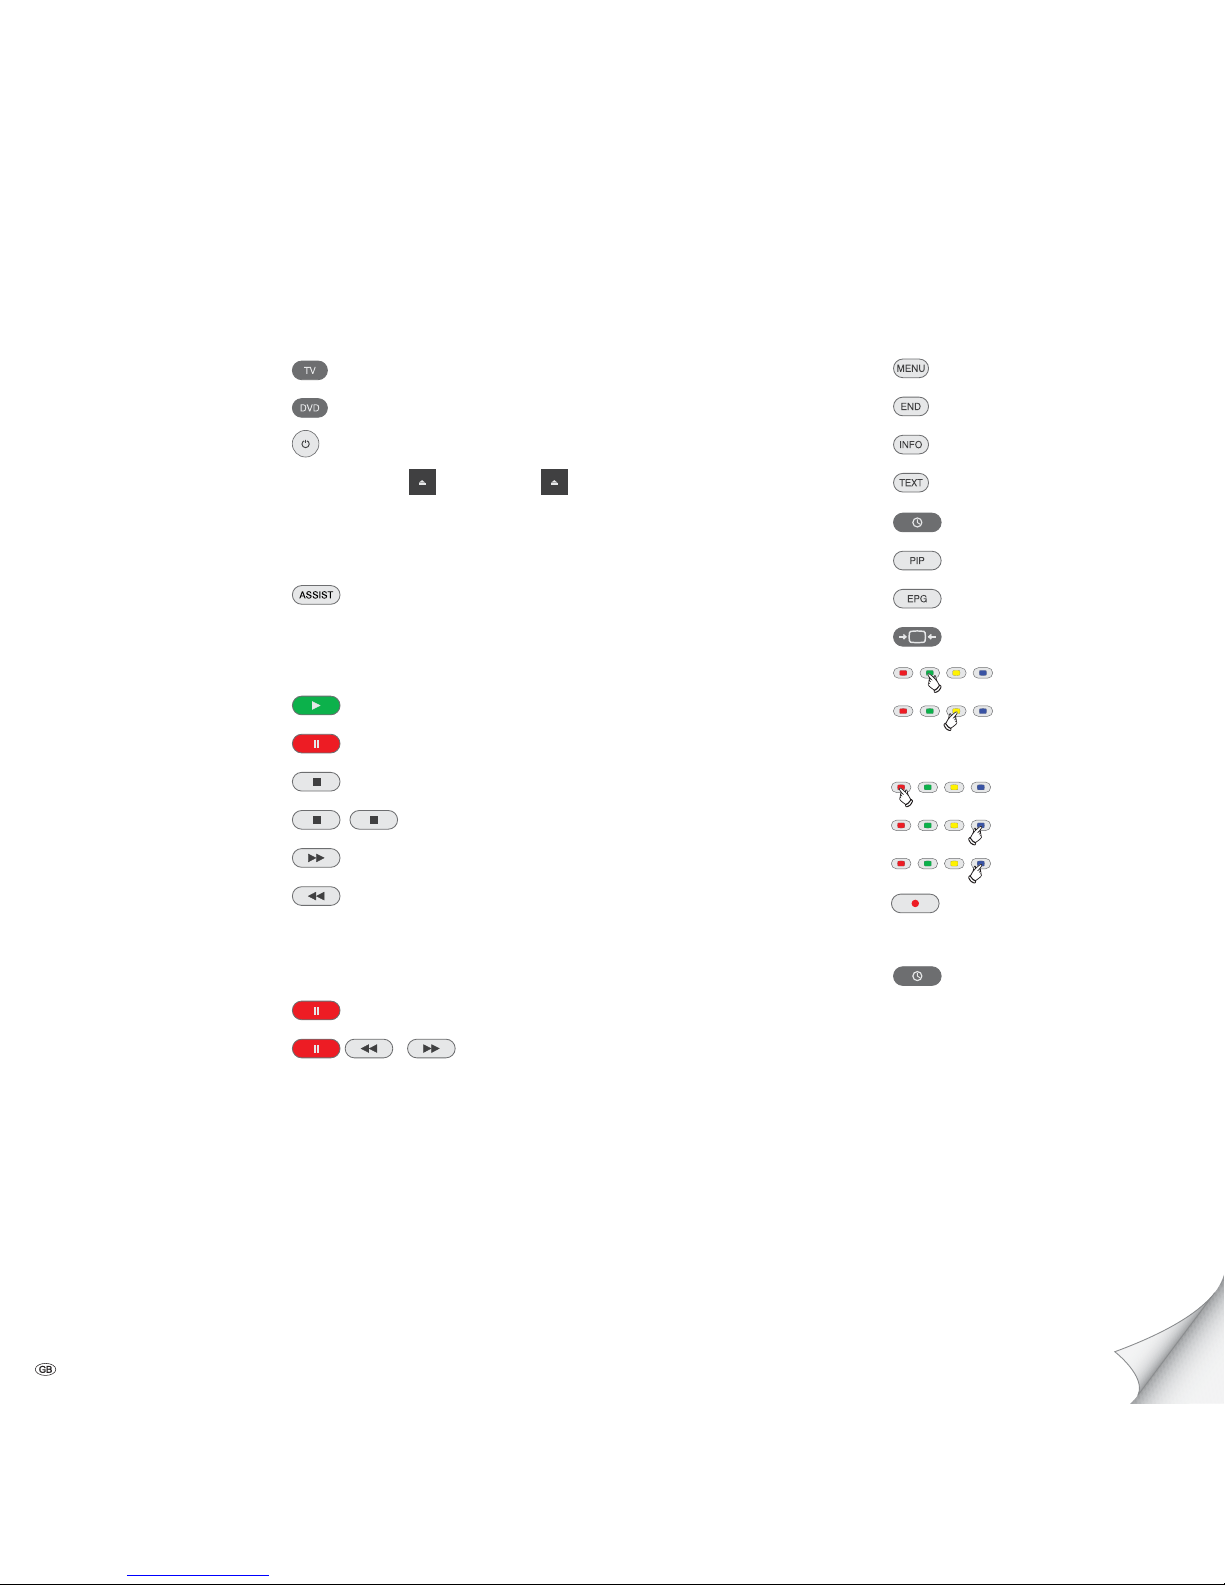
Remote Control Assist – BluTechVision 3D Operation ..... 3
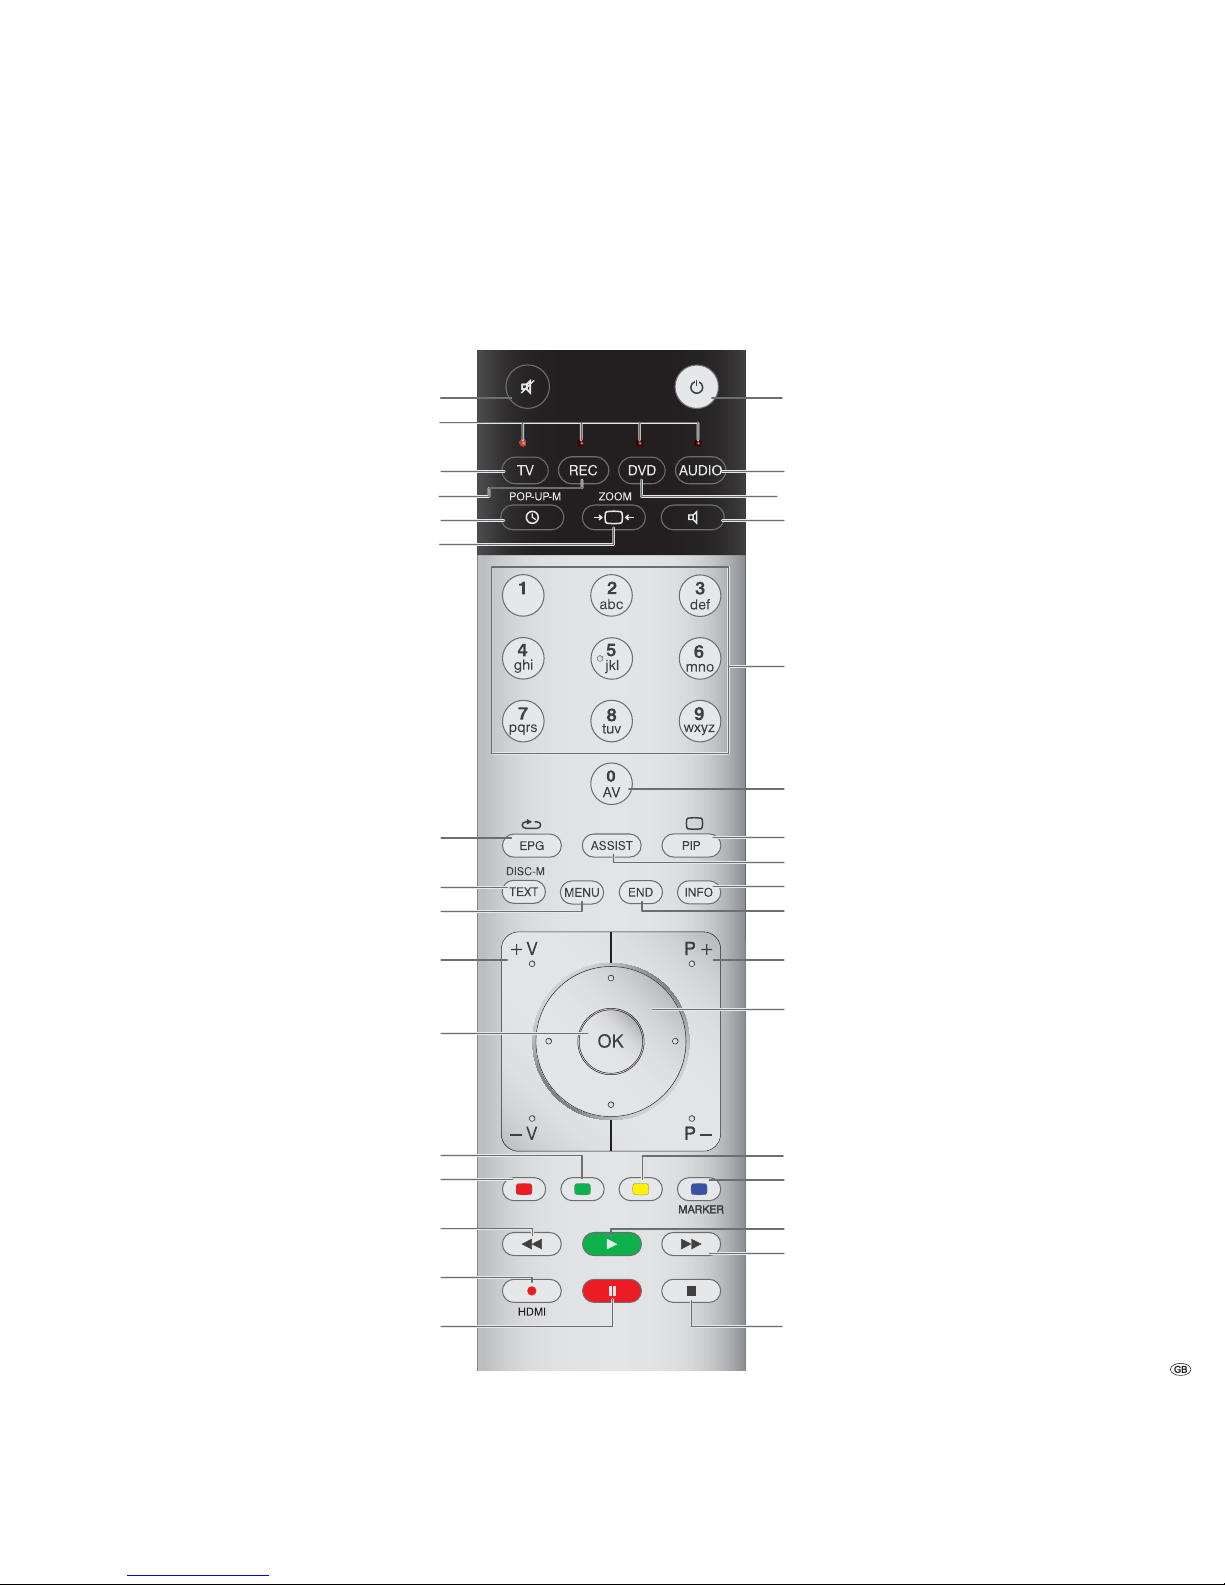
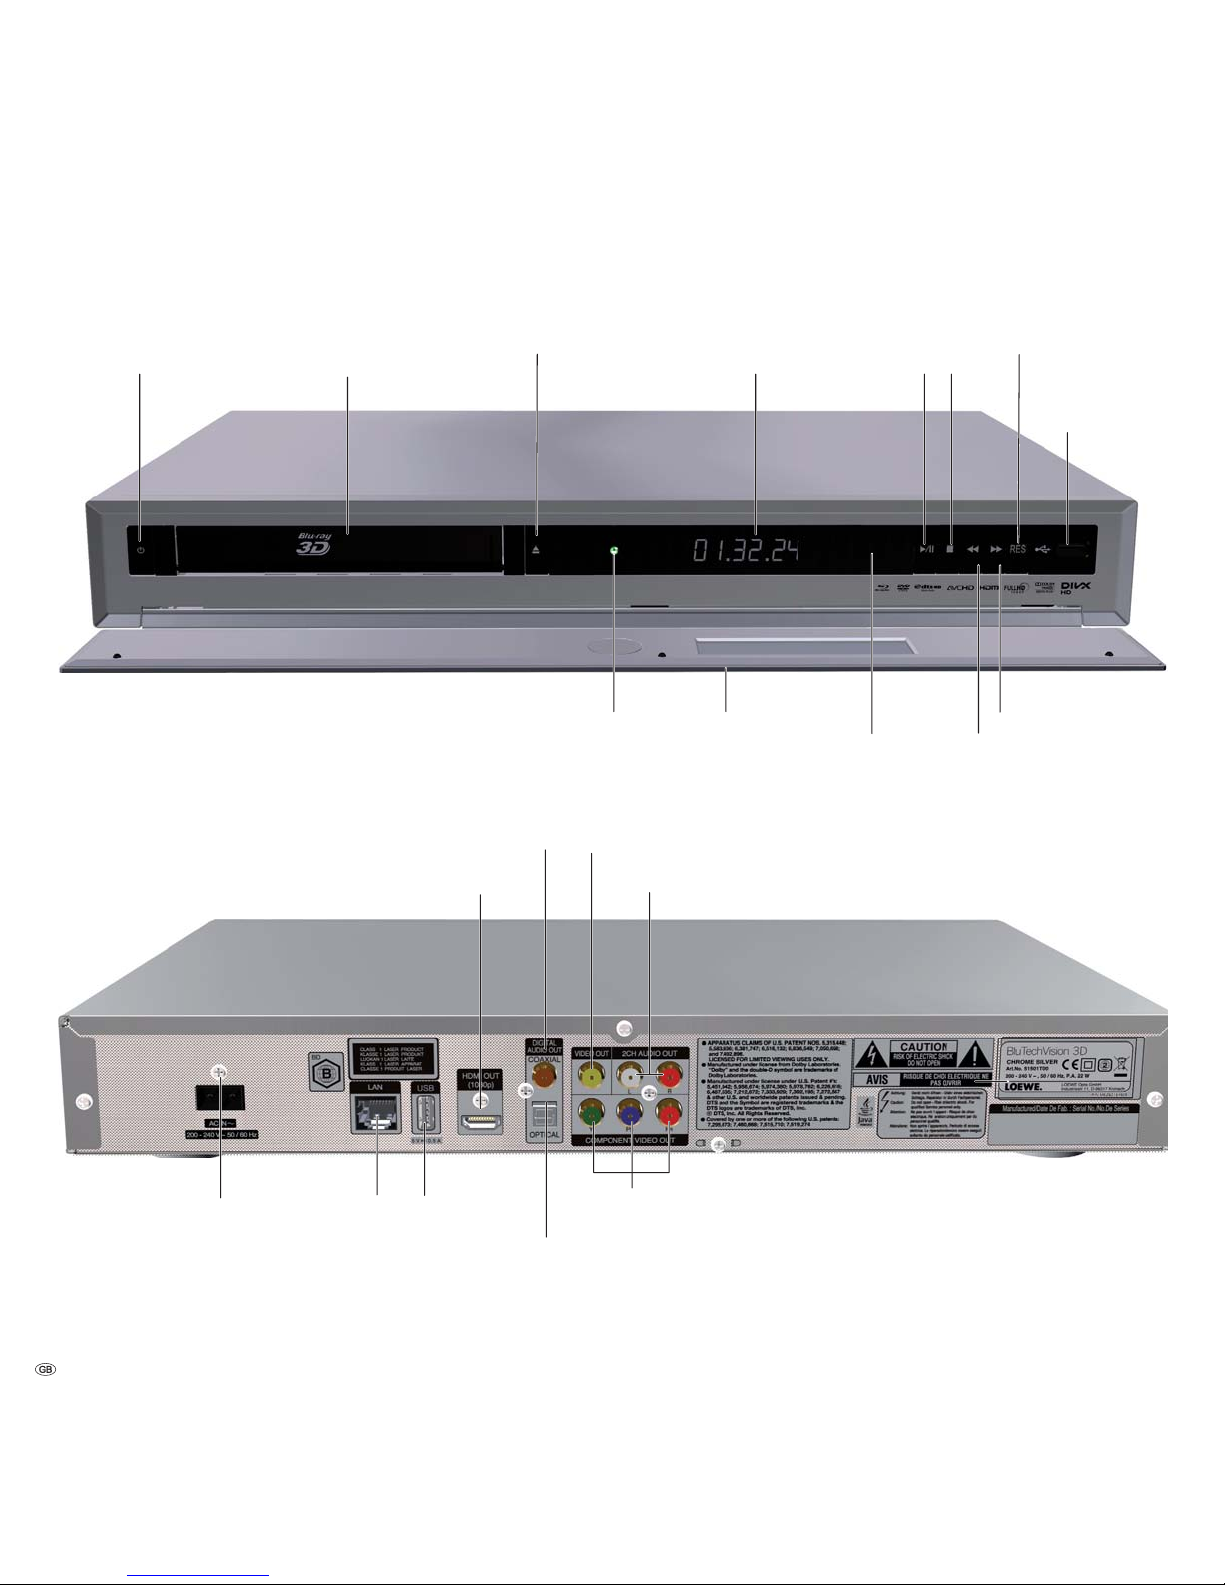
Front / Rear View.............................................................6
Performance .................................................................... 7
Welcome ..........................................................................8
Scope of delivery...........................................................................................8
Setup............................................................................................................8
For your Safety ................................................................9
About these operating instructions ...............................................................9
Connecting..................................................................... 10
Cabling BluTechVision 3D (from chassis L271x/SLxx)...................................10
Cabling BluTechVision 3D (other TV-/audio devices) ....................................11
Start-up ......................................................................... 12
Installation of the Assist Remote Control.....................................................12
Setting up the Assist Remote Control..........................................................12
Operating Loewe Equipment.......................................................................12
Connecting to the Mains Supply .................................................................13
Switching on/off..........................................................................................13
Digital Link HD............................................................................................13
Digital Link HD (HDMI CEC) ........................................................................13
Navigation in the Menu..............................................................................14
Home Menu................................................................................................14
Setup Menu ................................................................................................14
Language Menu..........................................................................................15
Menu Display..............................................................................................16
Menu Audio................................................................................................17
Menu Lock..................................................................................................18
Network Menu............................................................................................20
Menu Others...............................................................................................22
Updating Software ........................................................ 23
Playback of Discs........................................................... 24
Conditions ..................................................................................................24
Playback in General ....................................................................................25
Disc Playback..............................................................................................26
Last Scene Memory.....................................................................................28
Disc Menu ..................................................................................................29
Picture Mode ..............................................................................................29
BD-LIVE™ ...................................................................................................30
Playback of Media Files................................................. 31
Home Menu................................................................................................ 31
Video Files ..................................................................................................31
USB Operation............................................................................................32
Music Files..................................................................................................33
Photo Files..................................................................................................34
Other Functions ............................................................ 35
HDMI Format Setup ....................................................................................35
Environment .................................................................. 35
Environmental Protection............................................................................35
Troubleshooting.............................................................36
Glossary ......................................................................... 37
Language code list.........................................................38
Area Code List ...............................................................38
Technical specifications .................................................39
Company and editorial details.....................................................................39
Trademark rights.........................................................................................39
Service ...........................................................................40
5 -
_34466_BTV3D_00_Buch_EN.indb 5 27.01.2011 08:41:44

Front / Rear View
- 6
Display
CD/DVD/Blu-ray
Drive
USB socket
Front side
HDMI Output
(HDMI output)
LAN
(RJ-45 network-
connection)
DIGITAL AUDIO OUT COAXIAL
(digital sound output)
Stop
Playback /
Pause
IR Receiver
Open / Close Disc Drawer Screen ResolutionOn
Switching Off in Standby
Operating
display
Mains Socket
2CH AUDIO OUT
(analogue sound output stereo L/R)
VIDEO OUT
(analogue video output)
DIGITAL AUDIO OUT OPTICAL
(optical digital sound output)
COMPONENT VIDEO OUT
(Component TV video output)
Front ap
(opened)
USB
USB socket
Back
Next chapter
Previous chapter
_34466_BTV3D_00_Buch_EN.indb 6 27.01.2011 08:41:44

Performance
Your Loewe BluTechVision 3D offers you comfortable access to your me-
dia collection. It plays Blu-ray Discs™ in the 2D/3D format, audio-CDs and
video-DVDs. Digital Video, Photo and Music Files can also be played from USB
Sticks and from Data Discs.
Connection options
2x USB 2.0
HDMI OUT (HDMI output)
VIDEO OUT (Video output)
COMPONENT VIDEO OUT (Components Video Output)
2CH AUDIO OUT L/R (analogue sound output stereo L/R)
DIGITAL AUDIO OUT - COAXIAL (digital sound output)
DIGITAL AUDIO OUT - OPTICAL (optical digital sound output)
LAN (network connection)
Blu-ray™/CD/DVD-Player
Playback of Blu-ray™ 2D and 3D Discs
Playback from Audio CDs, CD-R and CD-RW Discs
Playback from DVD-Video, DVD-ROM and DVD-RW Discs
DVD Upscaling (720p/1080p)
Operation using drive buttons on the device and Assist remote control
Media management
Display of album graphics
Music Play
Playback of MP3, WMA Audio files
Repeating Titles, Tracks or Directories
Shuffle
Video Playback
Playback of DivX(HD) Video Files
Playback of Subtitles
Photo Playback
Playback of JPEG photo files
Slideshow with music
Use with other Loewe system components
Connection of Loewe flat TV sets via Digital Link HD (HDMI CEC) (from mainframe
L271x - if necessary, a software update of the TV set must be carried out) and
operation only with one Assist remote control - also with the concealed setup of
BluTechVision Interactive 3D.
7 -
_34466_BTV3D_00_Buch_EN.indb 7 27.01.2011 08:41:46

Thank you
for choosing a Loewe product. We are happy to welcome you as our customer.
At Loewe, we combine the highest standards of technology, design and user-
friendliness. This is equally true of TV, DVD, video, audio and accessories. Neither
technology nor design is an end in itself, but both are intended to provide our
customers with the best possible audio and visual experience. Our design is not
influenced by short-term, fashionable trends. You have, after all, purchased a
high-quality piece of equipment which you do not want to tire of tomorrow or
the day after.
Scope of delivery
• BluTechVision 3D
• Assist Remote Control with 2 batteries
• HDMI cable
• Mains cable
• These operating instructions
Setup
• Place the device on a stable, level surface.
• Do not set up the unit near strong heat sources or in direct sunlight.
• If setting up in a shelf or a closed cupboard: Leave at least 2.5 cm clearance
around the unit, so that the air can circulate unhindered and there is no heat
build-up.
• The picture and sound of a TV set, a player or a radio nearby could have their
transmissions distorted. If this is the case, do not place the device in the im-
mediate proximity of these devices.
• Set the device up so that the infrared signal of the remote control can directly
reach the display of the player (or, if this is not possible, refer to ”Digital Link
HD (HDMI CEC)“ page 13).
• Do not place any strong artificial light source in front of the unit. This could
have a detrimental effect on the infrared reception.
• Incorrect voltages can damage the unit. This unit may only be connected up to
an electricity supply with the voltage and frequency stated on the rating plate.
• During thunderstorms, disconnect the mains plug. A voltage surge caused by
lightning conducted through the mains could damage the unit.
• If the unit is not to be used for an extended period, the plug should also be
disconnected from the mains.
• The mains plug must be easy to reach to ensure that the unit can be discon-
nected from the mains at any time.
• Position the mains cable in such a way that it can not be damaged. The
network cable must not be bent or placed on sharp edges, should not be
walked on and not be subjected to any chemicals. The latter applies to the
entire unit. A mains cable with damaged insulation can cause electric shocks
and represents a fire hazard.
• When you want to unplug from the mains, pull on the plug housing rather
than on the cable. The cables in the mains plug could otherwise be damaged
and could cause a short-circuit when being plugged in again.
Please also read and follow the safety advice on the following pages.
Welcome
- 8
_34466_BTV3D_00_Buch_EN.indb 8 27.01.2011 08:41:46

For your Safety
For your safety, and to avoid unnecessary damage to your unit, please read
and follow the safety advice below.
Please keep the safety information in a safe place.
Use for the intended purpose and ambient conditions
This unit is intended exclusively for playback of video and audio signals. It is de-
signed for living or office rooms and may not be used in rooms with a high level
of humidity (e.g. bathroom, sauna) or a high dust concentration (e.g.
workshops).
The terms of the warranty only cover the intended use of the unit.
If the unit is used outdoors, make sure that it is protected from moisture (rain,
drips, spray or condensation).
High concentrations of moisture and dust lead to creepage current in the unit
which can make it dangerous if a live wire is touched, or it may cause a fire.
If you have moved the unit out of the cold into a warm environment, leave it
switched off for about an hour to avoid the formation of condensation.
Always switch off your system (BluTechVision 3D, TV set and any other components
which may be connected) before connecting or disconnecting other devices or
speakers.
Protect your device from:
• Water, moisture, drips or sprayed water, steam.
• Impacts and mechanical stress
• Magnetic and electric fields
• Cold, heat, direct sunlight and high temperature fluctuations
• Dust
• Covers that inhibit ventilation
• Interference with the internal workings of the unit
Do not place objects containing liquids on top of the unit.
Candles and other open flames must be kept away from the unit at
all times to prevent the spread of fire.
Do not cover ventilation slits with magazines or blankets. Pay attention, for
example, to curtains etc.
ATTENTION: TO PREVENT ELECTRICAL SHOCK, DO NOT REMOVE
THE COVER. THERE ARE NO PARTS INSIDE THE UNIT THAT CAN
BE REPAIRED BY THE USER. REPAIRS SHOULD ONLY BE CARRIED
OUT BY A LOEWE DEALER.
Only use Original accessories and spare parts from
Loewe.
Supervision
Do not allow children to use the unit/TV set unsupervised. Do not allow children to
play in the immediate vicinity of the unit/TV set. Do not operate your BluTechVision
3D without supervision. Please disconnect from the mains if you are going to be
away for a long time.
Cleaning
Only clean your unit with a slightly damp, soft, clean cloth (without any aggressive
or scouring cleaning agents).
About these operating instructions
The information in this guide refers to the Loewe product BluTechVision 3D.
Unless stated otherwise, the instructions refer to the operating elements on the
Assist remote control.
Paragraphs beginning with the ➠symbol indicate important hints, tips or conditions
for perfect operation.
Terms which you will find in the menu or printed on the unit are printed in bold
type.
In the functional descriptions, the necessary operating elements are arranged to
the left of the text containing the handling instructions.
The diagrams in these operating instructions are only by way of example. This may
vary from the actual display you see.
9 -
_34466_BTV3D_00_Buch_EN.indb 9 27.01.2011 08:41:46

Connecting
Cabling BluTechVision 3D (from chassis
L271x/SLxx)
Use the HDMI cable supplied to connect the socket HDMI OUT on the BluTechVision
3D with the socket HDMI IN on your TV set.
Using an optional RJ-45 network cable of the BluTechVision 3D to a network
connection (e.g. Switch or DSL Router) with a connection to the internet.
Plug the small connector on the mains cable into the socket behind the unit (page 6)
and then plug in the large connector on the mains cable into a 220-240V 50/60 Hz
mains socket.
➠It is possible that your Loewe TV set may need a software update. Please
contact your specialist retailer.
- 10
Loewe Flat TV set (from SL L271x)
BluTechVision 3D
Network cable
Mains cable
HDMI cable
_34466_BTV3D_00_Buch_EN.indb 10 27.01.2011 08:41:47

Cabling BluTechVision 3D (other TV-/audio
devices)
Use the HDMI cable supplied to connect the socket HDMI OUT on the BluTechVision
3D with the socket HDMI IN on your TV set.
If your TV set does not have an HDMI IN socket, use three video-capable cinch cables
to connect the three COMPONENT VIDEO OUT of the BluTechVision 3D with
three video-suitable Cinch cables with the COMPONENT IN sockets on your TV set.
You can also make a connection to a TV set using a video-compatible cinch cable
via the VIDEO OUT socket.
Using an optional RJ-45 network cable of the BluTechVision 3D to a network
connection (e.g. Switch or DSL Router) with a connection to the internet.
In order to play the audio from the BluTechVision 3D using your TV set (without
HDMI) or your audio equipment, you need to make an audio connection between
the audio equipment and the BluTechVision 3D. It is preferable to use an op-
tional, digitally compatible audio cinch cable and to connect it to the DIGITAL
AUDIO OUT COAXIAL socket.If your audio equipment has an optical digital input
(TOSLINK), you can also make the connection with an optional fibre-optic cable
using the socket DIGITAL AUDIO OUT OPTICAL.
Alternatively, you can feed your audio equipment with the stereo audio signal from
the BluTechVision 3D using an optional stereo cinch cable with the sockets 2CH
AUDIO OUT on your BluTechVision 3D.
Plug the small connector on the mains cable into the socket behind the unit (page 6)
and then plug in the large connector on the mains cable into a 220-240V 50/60 Hz
mains socket.
Connecting
11 -
TV set
BluTechVision 3D
Digital Audio
Mains cable
HDMI cable
Component Video Cable
Network cable
_34466_BTV3D_00_Buch_EN.indb 11 27.01.2011 08:41:48

Start-up
Installation of the Assist Remote Control
To insert or change the batteries, press where the arrow is embossed on the cas-
ing. While doing so, simply slide the battery compartment lid down and remove it.
Insert alkaline manganese batteries LR 03 (AAA) and ensure the correct position
of + and –. Slide the cover on again from the bottom.
Setting up the Assist Remote Control
Other Devices
You can operate various Loewe devices using the Assist Remote Control. The device
buttons REC - DVD - AUDIO can be set up for this.
Press the required device buttons and the Stop button
simultaneously for 5 sec. until the corresponding LED display
flashes twice.
Then select the two-digit device code from the table:
Unit Code Factory Set
Loewe ViewVision 8106 H 10
Loewe ViewVision, Centros 21x2 12
Loewe ViewVision DR+ DVB-T 13 REC
Loewe Auro 2216 PS/8116 DT 14
Loewe BlutechVision 15
Loewe Sound Projector 17
Loewe TV Radio digital 19 AUDIO
Loewe Mediacenter 20
Loewe BluTechVision 3D 21 DVD
HDMI CEC Mode ¾¾ 22
Loewe AudioVision 24
Loewe Sound Projector SL 25
Restore factory settings 99
The corresponding LED Display flashes twice.
Sound functions
It is possible to set the devices with which the buttons with the sound functions
(V+/-, Mute and sound mode) should work.
Press the device button TV and, at the same time, the button
with the single digit function code from the list, for 5 sec. until
the LED Display flashes twice.
Function Code Figure
Loewe AudioVision 3 Page 11
Loewe Mediacenter 4
Loewe TV ¾5 Page 10
Loewe Sound Projector 6
¾Factory settings
¾¾ From mainframe L271x, Software V9.16
Operating Loewe Equipment
Using the remote control for a Loewe TV set
Press TV button; the LED Display above it
lights up for approx. 5 seconds
Using the remote control for a Loewe recorder
Press the REC button; the LED Display above
it lights up for approx. 5 seconds
Use the remote control for BluTechVision 3D
Press the DVD button; the LED Display above
it lights up for approx. 5 seconds
Using the remote control for AudioVision
Press the AUDIO button; the LED Display
above it lights up for approx. 5 seconds
Every time a button is pressed, the LED display lights up for the selected operating
mode for checking purposes (TV – REC – DVD – AUDIO).
Please refer to the respective operating conditions on how to operate the
individual devices.
- 12
_34466_BTV3D_00_Buch_EN.indb 12 27.01.2011 08:41:48

Start-up
Connecting to the Mains Supply
Plug the mains plug (page 6) into a mains socket 220-240V/50-60 Hz.
Switching on/off
Set the remote control for BluTechVision 3D operation by
briefly pressing the button DVD.
Your BluTechVision 3D switches on. If you have connected a
Loewe TV set (from L271x/SL 1xx) via HDMI, then this will switch
on as well. Otherwise, switch your TV set on and set the respec-
tive AV programme slot.
➠For your TV set you may have to adjust operation of BluTechVision
3D to suit the AV socket used (look under e.g. ”Operating other
devices“ in the respective operating instructions for your TV set.
As soon as BluTechVision 3D is ready to go, the green Operating
Display (page 6) lights up.
To switch the device off, press the On/Off button on the
BluTechVision 3D or on the remote control Assist again.
Digital Link HD
With Digital Link HD, Loewe TV sets and other TV sets supporting the CEC standard
forward the signals from the remote control via the HDMI connection from the TV
set to the BluTechVision 3D.
➠The TV set must be switched on.
On the TV set, select the AV programme slot for HDMI.
As long as HDMI is selected as the programme slot, most TV remote control
commands (ASSIST in TV mode) will be passed on to the connected HDMI unit.
Volume, sound on/off, sound adjustment and TV aspect ratio however, still affect
operation of the TV set. The AUDIO commands (ASSIST in AUDIO mode) are not
passed on by the TV.
By pressing the TV button for a long time, you can switch between
HDMI and TV operation. Pressing the TV button briefly switches
back to TV mode.
With the TV button (press briefly), in TV operation you switch
back to the last station watched and terminate the device
control.
➠It is possible that your Loewe TV set may need a software
update. Please contact your specialist retailer.
Digital Link HD (HDMI CEC)
With Digital Link HD, Loewe TV sets (from Mainframe L271x, Software V9.2) pass
the signals from the remote control via the HDMI connection from the Loewe TV
set to compatible additional devices, such as BluTechVision 3D. Digital Link HD
makes sense if you want to set up BluTechVision 3D in a concealed location and
all the devices are to be controlled via the Loewe TV set.
First of all, assign the HDMI CEC function for the Assist
remote control to the desired device button (e.g. DVD) using
Code 22 as described on page 12.
Then carry out the allocation of the Digital Link HD function to
the HDMI interface of the TV set used by pressing the button
set above (e.g. DVD) for 5 sec.
A selection menu will appear.
OK
OK
HINT
Here you select the device which you want to switch over your remote control
to with the key. After confirming the selection with OK all remote control
commands are passed on to the selected device via the TV set in future when
you press this key.
SELECT HDMI DEVICE FOR KEY
DVD
BluTech Vision
No device
Adopt
AUDIO
Select the desired equipment (e.g. BluTechVision).
Confirm OK.
Now, the signals from the Assist remote control of the Loewe
TV set are transmitted to the BlueTechVision 3D if the
relevant device button (e.g. DVD) is pressed beforehand.
➠It is possible that your Loewe TV set may need a software
update. Please contact your specialist retailer.
13 -
_34466_BTV3D_00_Buch_EN.indb 13 27.01.2011 08:41:50

Start-up
Navigation in the Menu
In these operating instructions, the arrow buttons on the Assist Remote Control
are shown as follows:
In the text, the arrows correspond to: ”“.
The OK button on the remote control is shown as OK in the text.
Call up the Setup menu.
Select the desired option.
Move Back in the menu.
Close the menu.
Confirm OK.
Home Menu
The Home Menu of the BluTechVision 3D is shown on the screen of the TV set
connected to it. Here you can select the desired functions.
Call up Home Menu.
Movie Music Photo Setup
Select the desired function.
Confirm OK.
Movie Display of Film menu (page 31) for playback of video
files or the disc menu
Photo Display of the Photo menu (page 34) for photo file
playback
Music Display of Music menu (page 33) for playback of
audio files
Setup Display of Setup menu (page 14) to make settings
➠In order to call up the Home Menu it may be necessary to
close other open menus with .
➠The Movie, Photo and Music menus can be selected when
a corresponding medium is available.
Setup Menu
In the Setup Menu you can carry out any settings and adaptations of your TV
set, for example.
79$VSHFW5DWLR 2ULJLQDO
5HVROXWLRQ $XWR
S'LVSOD\0RGH +]
+'0,&RORU6HWWLQJ <&E&U
'0RGH 2Q
'LVSOD\
$XGLR
/RFN
1HWZRUN
2WKHUV
/DQJXDJH
Call up the Setup menu.
Select desired category.
Select the desired sub-category.
Make the desired setting.
Confirm OK.
Close the menu.
➠If the blue bar for menu selection appears at the first level
(left), you will see the current settings in the overview at the
third level (right).
- 14
_34466_BTV3D_00_Buch_EN.indb 14 27.01.2011 08:41:55

Start-up
Language Menu
Your BluTechVision 3D attempts to set the menu language automatically over
the HDMI-CEC connection to the same language as that of the Loewe TV set. You
can also set the desired menu language manually.
'LVSOD\0HQX'LVSOD\
'LVF$XGLR$XGLR
'LVF6XEWLWOH/RFN
1HWZRUN
2WKHUV
'LVF0HQX/DQJXDJH (QJOLVK
)UDQ¨DLV
,WDOLDQR
(VSD²RO
1HGHUODQGV
'HXWVFK
Call up the Setup menu.
Select Language option.
Select the Display Menu option.
Select required language.
Confirm OK.
Close the menu.
Disc Languages
Select a language for the menu, the sound and the subtitles of the disc. If you
want to use a language other than the ”original“ version of the disc, then select
it here if it is available on the disc.
Select option Disc Menu, Disc Audio or Disc Subtitles.
Select the desired option.
Off Switch off Subtitles on Disc
Original The original language of the disc is selected.
Other Select another language (page 38).
Confirm OK.
Close the menu.
15 -
_34466_BTV3D_00_Buch_EN.indb 15 27.01.2011 08:42:13

Start-up
Menu Display
In the menu DISPLAY you can set the screen view of your BluTechVision 3D on
your TV set.
➠These settings are automatically imported when the HDMI
socket is used.
79$VSHFW5DWLR
S'LVSOD\0RGH
+'0,&RORU6HWWLQJ
'0RGH
5HVROXWLRQ
/HWWHU%R[
3DQ6FDQ
2ULJLQDO
)XOO
$XGLR
/RFN
1HWZRUN
2WKHUV
/DQJXDJH
Call the Setup menu.
Select option DISPLAY.
TV Aspect Ratio
Select option TV Aspect Ratio.
4:3 Letter Box Select this setting if a standard TV unit with 4:3 TV
Aspect Ratio is connected. In the wide screen aspect
ratio, the picture appears with a black bar at the top
and at the bottom of the screen
4:3 Pan Scan Select this setting if a standard TV unit with 4:3
TV Aspect Ratio is connected. The picture fills the
complete screen and, if required, the areas on both
sides are cut off
16:9 Original Select this setting if a wide-screen TV unit with 16:9
TV Aspect Ratio is connected. The 4:3 picture is
displayed in the original TV aspect ratio with black
strips on the left and right edges of the picture.
16:9 Full Select this setting if a wide-screen TV unit with 16:9
TV Aspect Ratio is connected. The 4:3 picture is
stretched horizontally (with the same side ratio) in
order to fill the entire screen.
Confirm OK.
Close the menu.
Resolution
You can set the resolution of the video signal at the socket HDMI OUT and
COMPONENT VIDEO OUT.
Select Resolution option.
Auto Recordings in wide-screen format appear with black
bars at the top and bottom of the screen
576i
Output in 576 lines Interlaced Mode (Component only)
576p Output in 576 lines Progressive Mode
720p Output in 720 lines Progressive Mode
1080i Output in 1080 lines Interlaced Mode
1080p Output in 1080 lines Progressive Mode
1080p Display Mode
Select the option 24Hz in order to show movies smoothly on HDMI compatible TV
sets with 1080 lines at 24Hz picture frequency.
Select the option 1080p Display Mode.
24HZ 24Hz picture frequency for cinema movies
50Hz 50Hz picture frequency for TV movies
➠At the 24Hz frequency, picture faults can arise when changing
between video and film material. In this case you should set
to 50Hz.
➠Even if the option 1080p Display Mode is set to 24Hz, the
actual picture frequency of the video output is set to 50 Hz
or 60 Hz, depending on the format of the video source, if
your TV set does not support the 1080/24p resolution.
HDMI Colour Adjustment
Select the video output signal depending on which video output socket you use
(page 11).
Select the option HDMI Color Setting.
YCbCr Select this setting when using the COMPONENT
VIDEO OUT sockets
RGB Select this setting when using the HDMI OUT sockets
3D Mode
You can switch the 3D-depiction on or off.
Select the option 3D Mode.
On When a 3D-capable TV-set is connected to
HDMI-OUT, 3D content can be played
Off When playing, Blu-ray™ 3D media are replayed in 2D
- 16
_34466_BTV3D_00_Buch_EN.indb 16 27.01.2011 08:42:15

Start-up
Menu Audio
In the AUDIO menu you can make various sound settings.
➠These settings are automatically imported when the HDMI
socket is used.
6DPSOLQJ)UHT
'5&
'761HR
3&00XOWL&K
'765H(QFRGH
3ULPDU\3DVV7KUX
'LJLWDO2XWSXW
3&06WHUHR
+'0,'LVSOD\
$XGLR
/RFN
1HWZRUN
2WKHUV
/DQJXDJH
Call up the Setup menu.
Select option AUDIO.
HDMI/digital output
The digital audio signal, which is outputted from the HDMI OUT or DIGITAL AUDIO
OUT - COAXIAL/OPTICAL (SPDIF) socket (page 6), can be adjusted.
PCM Stereo Select this option if a unit with a twin channel stereo
amplifier is connected to the BluTechVision 3D
PCM Multi-Ch Select this option if a unit with a digital multi-channel
decoder is connected to the BluTechVision 3D
(HDMI only)
DTS Re-Encode Select this option if a unit with a DTS decoder is
connected to the BluTechVision 3D
Primary Pass-Thru Select this option if a unit with a Dolby Digital Plus,
Dolby True HD, DTS or DTS HD decoder is connected
to the BluTechVision 3D.
➠If the option HDMI is set to PCM Multi-Ch, the audio may,
under certain circumstances, be outputted as PCM stereo
audio if the PCM Multi-Ch information cannot be obtained
from the HDMI unit.
Sampling Freq.
If you use the socket DIGITAL AUDIO OUT - COAXIAL/OPTICAL (SPDIF), you can
set the sampling frequency.
48KHz Select this option if your connected unit cannot
process 192 KHz or 96 KHz signals. In this selection,
your BluTechVision 3D automatically converts
192 KHz and 96 KHz signals into 48 KHz signals.
96KHz Select this option if your connected unit cannot
process 192 KHz signals. In this selection, your
BluTechVision 3D automatically converts 192 KHz
signals into 96 KHz signals.
192KHz Select this option if your connected unit can process
192 KHz signals.
DRC (Night Mode)
With the setting Function DRC, you can limit the dynamics (i.e., the difference
between the loudest and the softest sounds). In this manner, you can play a film
even with minor loudness differences (e.g. in the night).
Auto Select this option if you wish to play audio signals
with the coding Dolby True HD with reduced
dynamics
Off Audio signals are replayed with the full scope of
dynamics
On Select this option if you wish to play audio signals
with the coding Dolby Digital or Dolby Digital Plus
with reduced dynamics
DTS Neo: 6
If the device is connected with an AV-receiver via HDMI-OUT, 2-channel audio
signals can be replayed in multi-channel surround quality.
Off Stereo replay through front speakers
Music Select this option if you wish to play stereo music in
multi-channel quality
Cinema Select this option if you wish to play a film in multi-
channel quality
➠For this function, only audio signals with a sampling frequency
of up to 48 kHz are possible.
➠This function is only available if the option Audio - HDMI is
set on PCM Multi-Ch.
17 -
_34466_BTV3D_00_Buch_EN.indb 17 27.01.2011 08:42:19

Start-up
Menu Lock
In the LOCK menu you can set playback limitations.
2.
3DVVZRUG
%OXUD\'LVF5DWLQJ
$UHD&RGH
'9'5DWLQJ
1HZ
9HULI\
'LVSOD\
$XGLR
/RFN
1HWZRUN
2WKHUV
/DQJXDJH
Call the Setup menu.
Select the LOCK option.
Setting up a Password
Please set your personal password.
Select option Password.
Select option New.
Enter a four digit password using numeric keypad.
Confirmation of the new password.
Confirm OK.
➠If entry is incorrect, before pressing OK, press repeatedly
to delete the numbers.
Reset password
If you have forgotten your password or wish to disable the password function,
you can reset it.
➠Remove all media (Disc, USB) and close all menus.
Call the Setup menu.
Select the LOCK option.
Select option Password.
Using the numeric keys, input the key number (page 37).
Password protection is now disabled. If required set up a new
password, as described in ”Set up password“.
- 18
_34466_BTV3D_00_Buch_EN.indb 18 27.01.2011 08:42:21

Start-up
DVD-Rating
This function limits play of DVDs that have an adult rating, providing the discs
have a corresponding code. For full play you are asked to enter the password.
Select option DVD Rating.
Press button.
Use number buttons to enter the current four-digit Password.
Confirm OK.
Select the desired option.
Unlock The disc is played completely
Rating 1 to 8 Only the scenes of the disc inserted are played which
comply with the assigned security level or with a
security level below this. Level ”1“ has the most play
restrictions.
➠Not all discs have a rating.
Blu-ray Disc Rating
This function limits playback of Blu-Ray discs™ that have an adult rating, provid-
ing the discs have a corresponding code. For full play you are asked to enter the
password.
Select option Blu-ray Disc Rating.
Press button.
Use number buttons to enter the current four-digit Password.
Confirm OK.
Enter the three-digit code for adult rating release using the
number buttons (this code can be found on the Blu-Ray disc ™
or on the accompanying material).
Confirm OK.
255 The disc is played completely
0 to 254 Only the scenes on the inserted disc which comply
with the assigned security level or with a security
level below this are played. Code ”0“ has the most
playback restrictions.
➠Not all discs have a rating.
Area Code
To use playback limitations of the discs, enter the Area Code of the respective
country (list see page 38).
Select option Area Code.
Press button.
Use number buttons to enter the current four-digit Password.
Confirm OK.
Select the desired code.
Confirm OK.
19 -
_34466_BTV3D_00_Buch_EN.indb 19 27.01.2011 08:42:31

Start-up
Network Menu
Your BluTechVision 3D can be connected to a home network (LAN) with internet
connection via the LAN connection on the back (page 10). This allows you to
use the BD-LIVE™ service which provides you with optional information from the
manufacturer of the Blu-Ray disc.
You can carry out the settings required for your home network in the NETWORK
Menu.
%'/,9(FRQQHFWLRQ
3DUWLDOO\SHUPLWWHG
3URKLELWHG
&RQQHFWLRQ6WDWXV
3HUPLWWHG
3HUP
&RQQHFWLRQ6HWWLQJ'LVSOD\
$XGLR
/RFN
1HWZRUN
2WKHUV
/DQJXDJH
Setting the network connection automatically
If you have DHCP server in your home network (e.g. a DSL Router), your BluTechVision
3D can carry out all network parameter settings automatically.
Call up the Setup menu.
Select option Network.
Select option Connection Setting.
Confirm OK.
The menu Connection Setting appears.
&RQQHFWLRQ6HWWLQJ
,30RGH
'166HUYHU
,3$GUHVV
6XEQHW0DVN
3ULPDU\
*DWHZD\
6HFRQGDU\
&DQFHO
'\QDPLF
$XWR 0DQXDO
6WDWLF
2.
Confirm OK.
Your BluTechVision 3D now tries to create a connection to the
internet router in your home network. In doing so, the standard
setting shown above (IP Mode: Dynamic, DNS-Server: Auto) is
used for the automatic search of the network parameters.
If a dynamic IP Address has been allocated, a corresponding
message appears.
&RQQHFWLRQ6HWWLQJ
6HWWLQJ:LUHG'\QDPLF,3FRPSOHWHG
)RUWKHFRQQHFWLRQWHVWSUHVV7HVW
7HVW 2.
Select Test option in order to carry out a connection test.
Confirm OK.
HEEFDGDE
&RQQHFWLRQ6WDWXV
1HWZRUNLVQRWFRQQHFWHG
:LUHG1HWZRUN
0$&
,3
6XEQHW0DVN
*DWHZD\
,QWHUQHW6XFFHVV
/RFDODUHDQHWZRUN6XFFHVV
6HWWLQJ 7HVW 2.
3ULPDU\'16
6HFRQGDU\'16
If the connection test is successful a corresponding message
appears in the Connection Status Menu.
OK Close menu.
Test Repeat connection test
Setting Open Connection Settings menu
Connection Status Menu
You can have the current network parameters displayed.
Call up the Setup menu.
Select option Network.
Select the option Connection Status.
Confirm OK.
The Connection Status Menu appears.
- 20
_34466_BTV3D_00_Buch_EN.indb 20 27.01.2011 08:42:38
Other manuals for BluTechVision 3D
1
Table of contents
Other Loewe Blu-ray Player manuals