Lok8u NU-M8+ User manual

nu•m8+ User Guide V1.06
User Guide
The world‟s first GPS locator that locates your child, not just the device

nu•m8+ User Guide V1.06
1
Table of Contents
Preface ..................................................................................................................................................2
Lok8u Ltd and its Subsidiaries...........................................................................................................4
1. Introduction......................................................................................................................................5
2. Product Design and Functionality Summary................................................................................5
3. Getting Started.................................................................................................................................6
3.1 Charge nu•m8+ ............................................................................................................................6
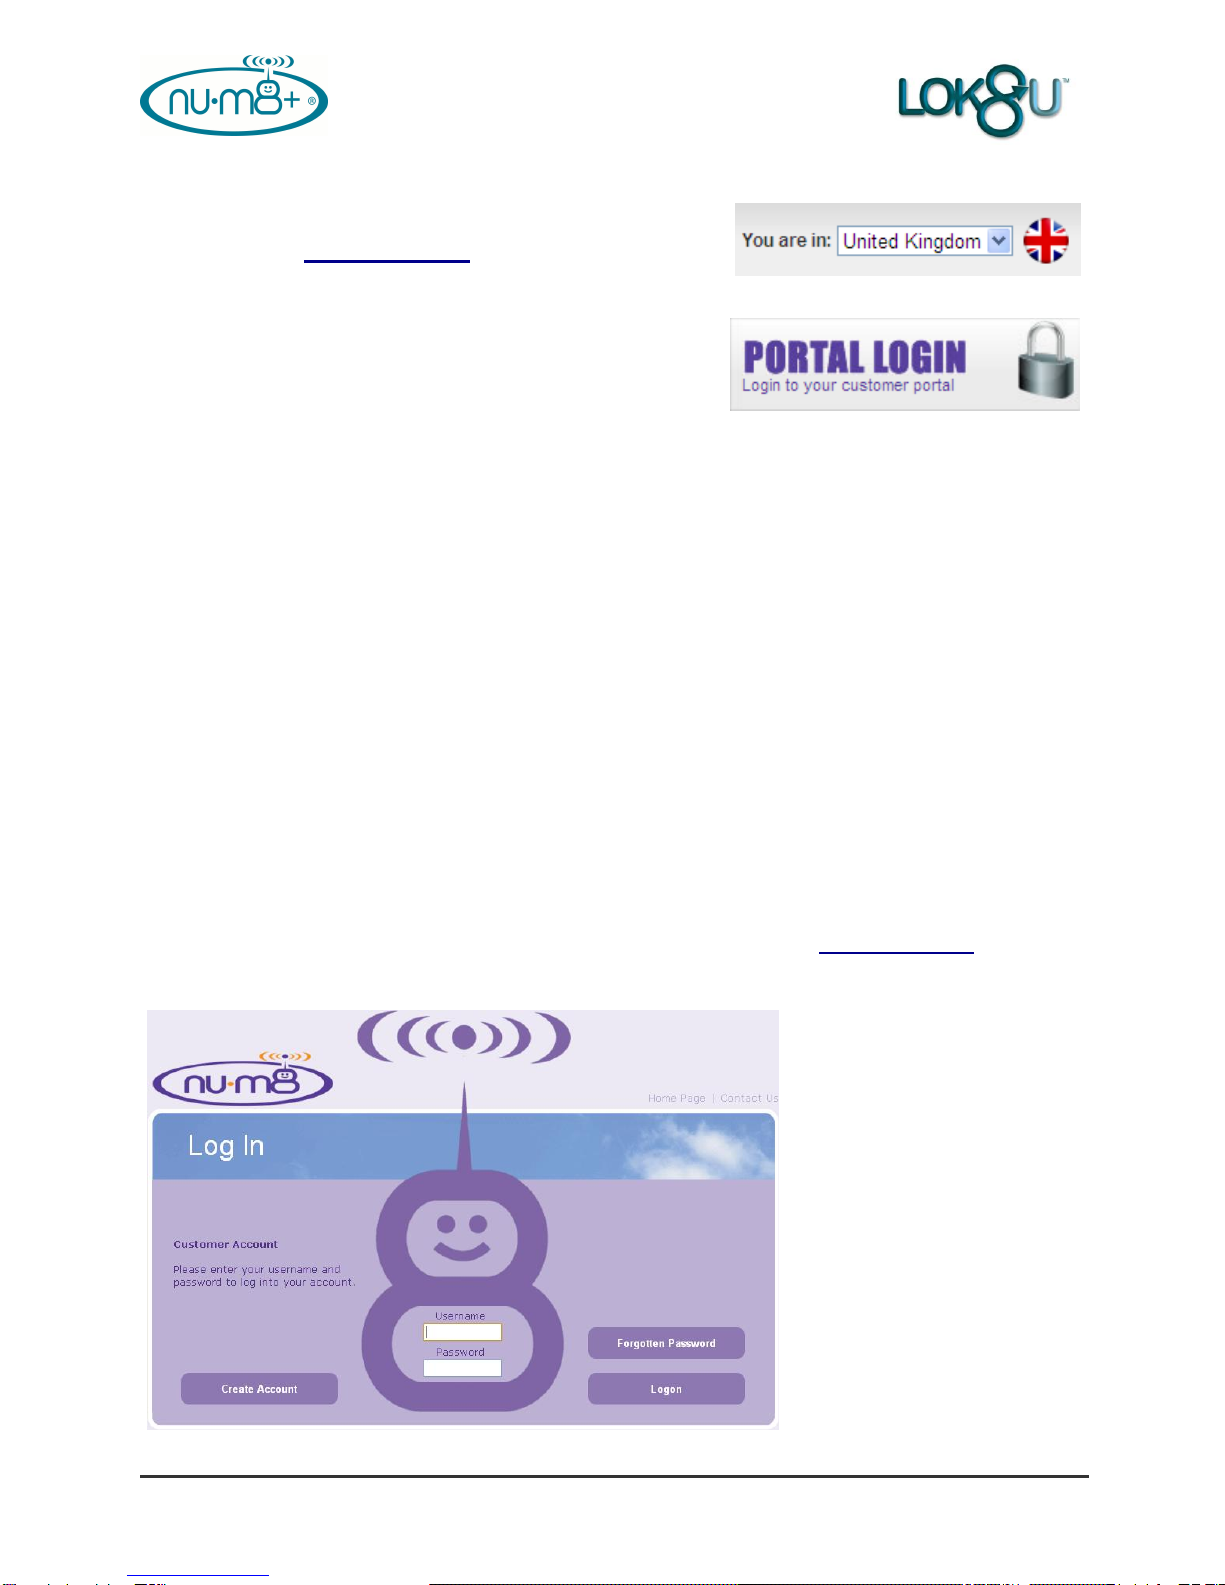
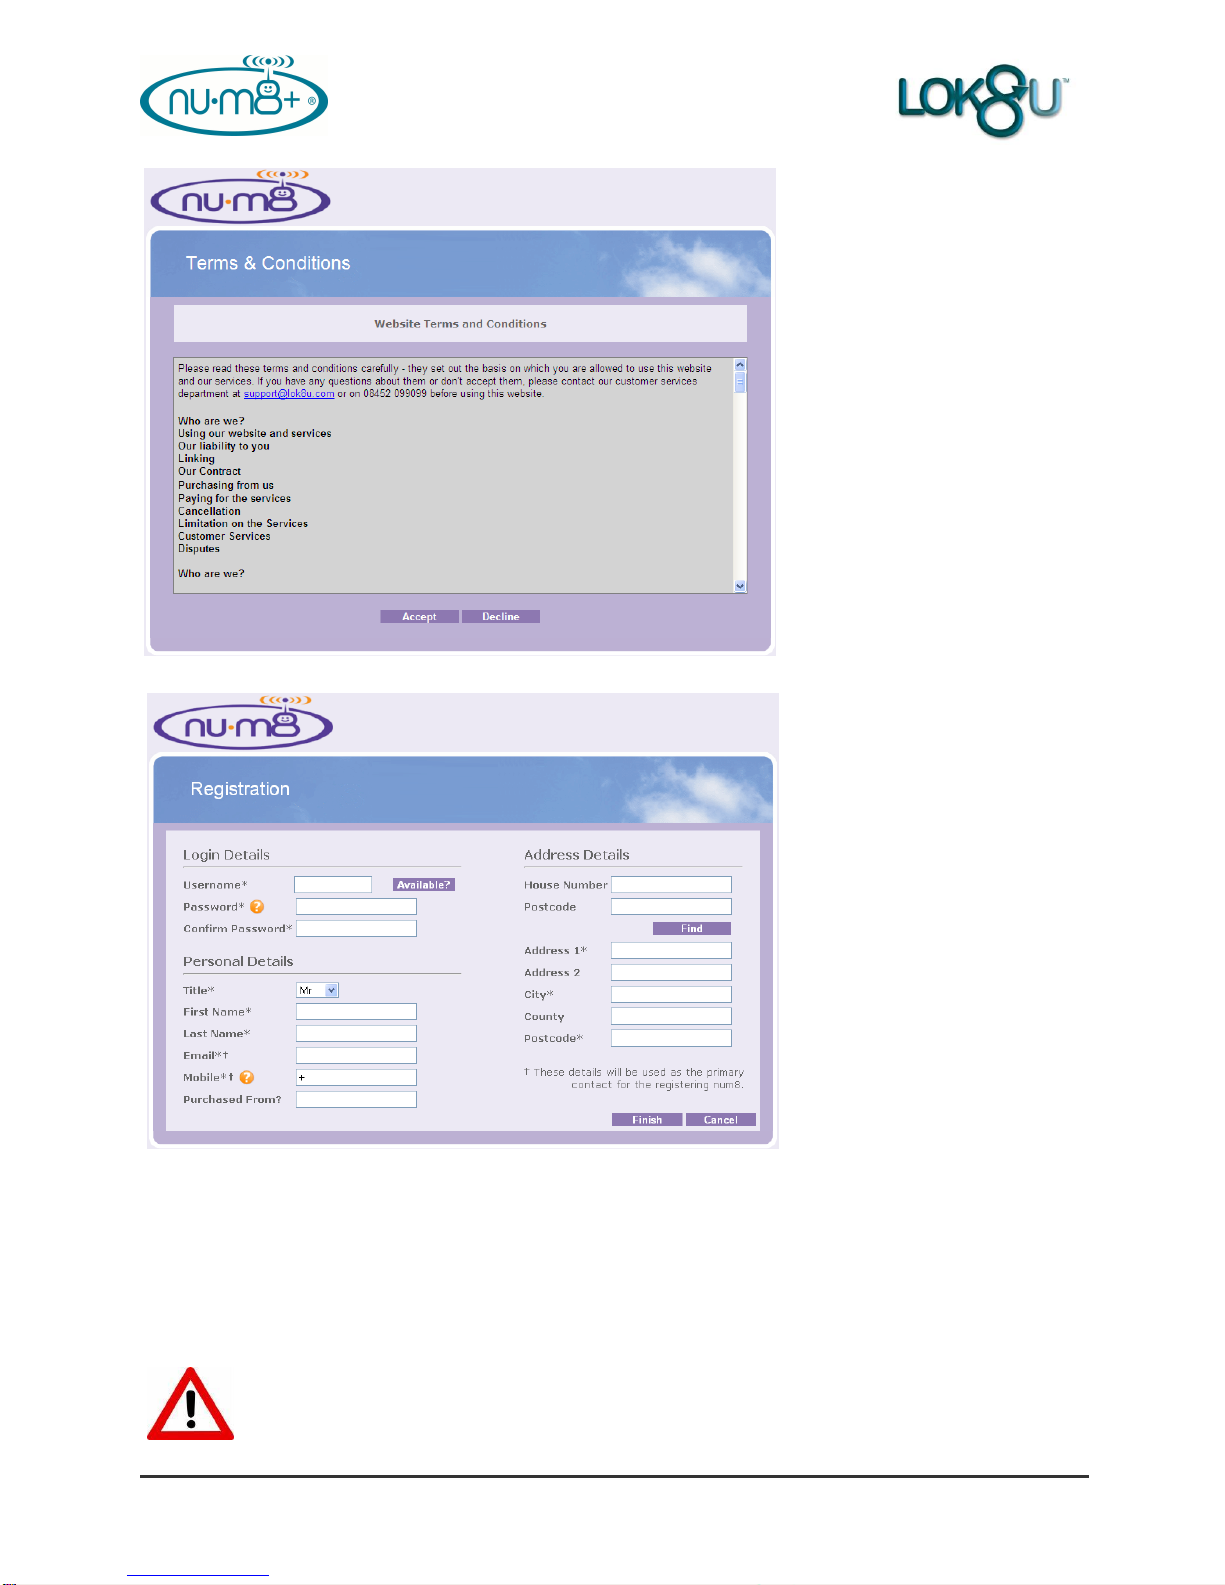
3.2 Create Account and Register nu•m8+..........................................................................................7
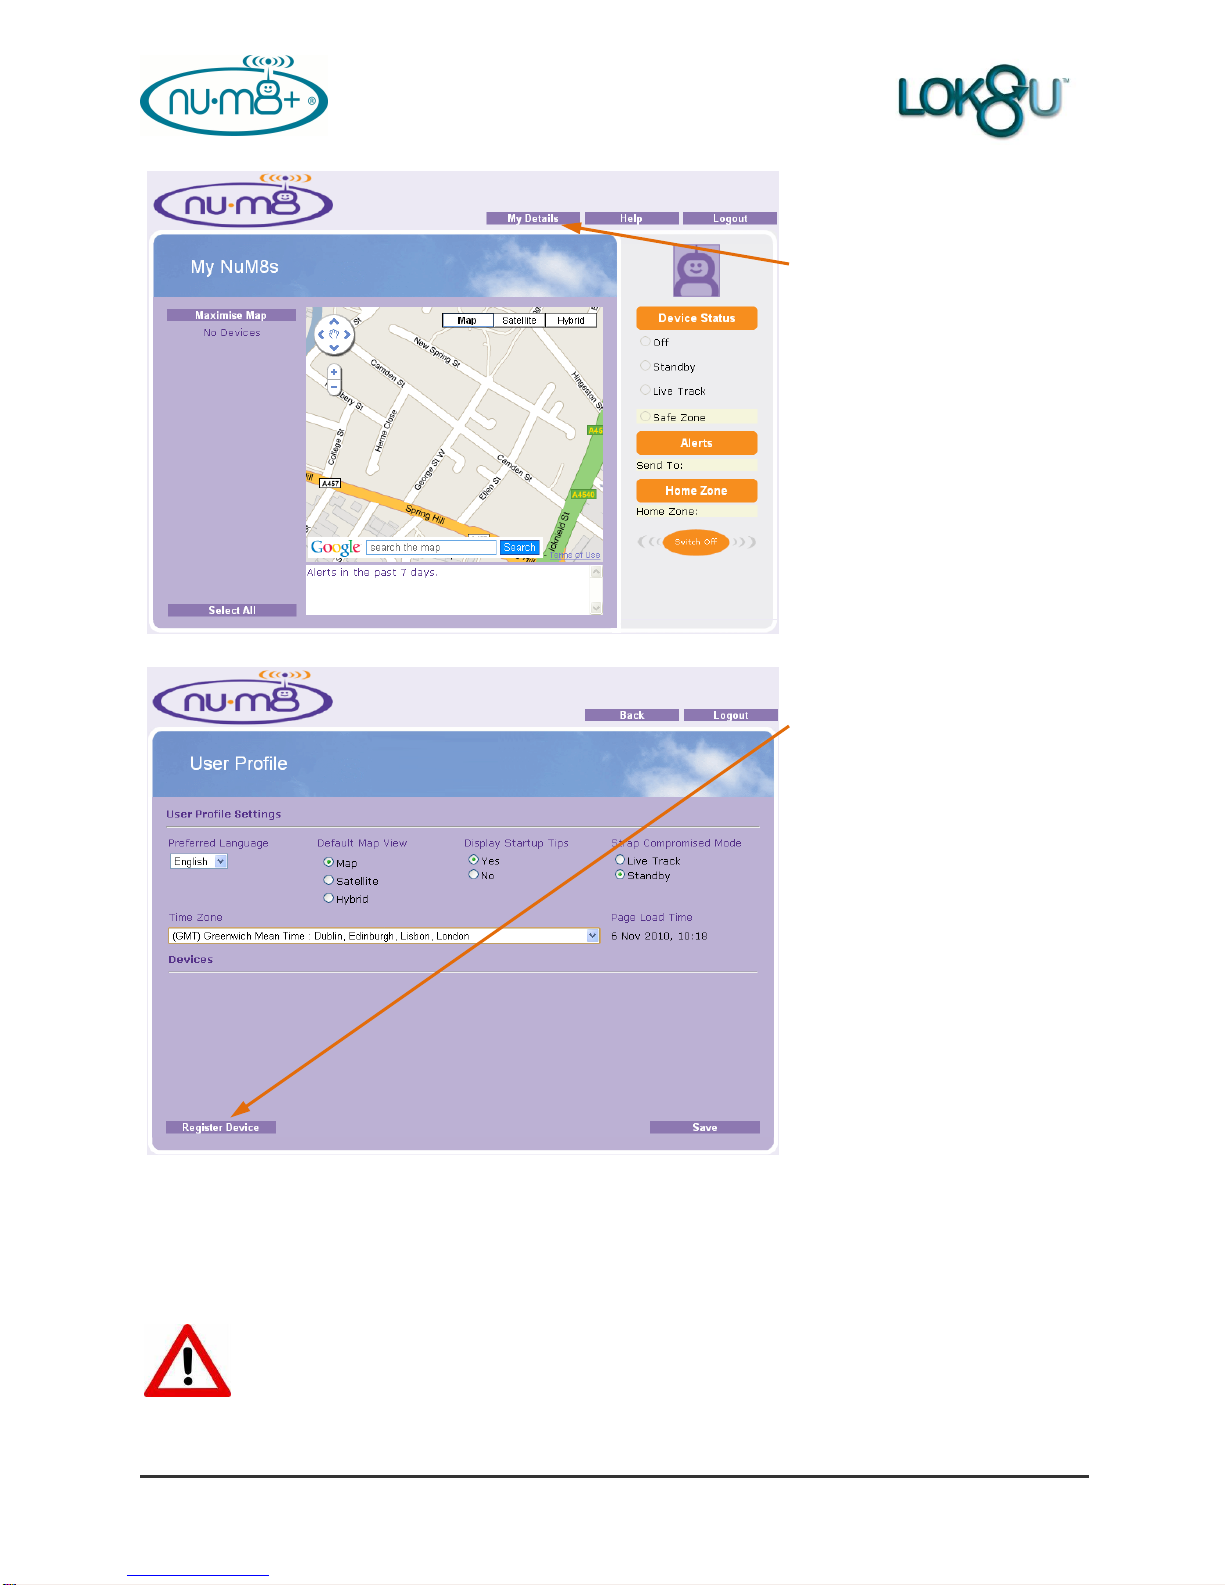
3.3 Activate nu•m8+ .........................................................................................................................12
3.4 nu•m8+ Battery...........................................................................................................................15
4. nu•m8+ Start-up .............................................................................................................................16
5. Time Configuration........................................................................................................................17
5.1 Clock Display..............................................................................................................................17
5.2 Setting the correct Time Zone....................................................................................................17
6. Customer Portal Login..................................................................................................................18
6.1 My nu•m8+‟s – Main Page .........................................................................................................19
6.2 Help ............................................................................................................................................21
6.3 Forgotten Password ...................................................................................................................22
7. Mobile Phone Text Commands ....................................................................................................22
8. Where are you “wru” Request......................................................................................................23
8.2 From your Mobile Phone............................................................................................................23
8.2 From a Desk-top Computer (Customer Portal)..........................................................................24
9. Set, Apply and Edit a Safe Zone...................................................................................................28
9.1 From your Mobile Phone............................................................................................................28
9.2 From a Desk-top Computer (Customer Portal)..........................................................................29
10. Removing nu•m8+ without triggering an Alert .........................................................................38
10.1 From your Mobile Phone..........................................................................................................38
10.2 From a Desk-top Computer (Customer Portal)........................................................................39
11. Live Track .....................................................................................................................................41
12. Alerts.............................................................................................................................................44
12.1 Add New Recipient of Alerts.....................................................................................................44
12.2 Change the Recipient of Alerts ................................................................................................45
12.3 Edit Recipient of Alerts.............................................................................................................46
13. Home Zone....................................................................................................................................47
13.1 Create New Home Zone...........................................................................................................48
14. My Details .....................................................................................................................................49
15. Product Specification..................................................................................................................51
16. Waterproof Specification ............................................................................................................51
17. Certification..................................................................................................................................52
17.1 CE Certification.........................................................................................................................52
17.2 WEE..........................................................................................................................................52
17.3 SAR ..........................................................................................................................................53
17.4 Dermatological..........................................................................................................................53
17.5 FCC ..........................................................................................................................................53
18. Product Information.....................................................................................................................54
19. APPENDIX I...................................................................................................................................56
19.1 Useful Information ....................................................................................................................56
20 APPENDIX II...................................................................................................................................57
20.1 Troubleshooting........................................................................................................................57
21. APPENDIX III.................................................................................................................................58
21.1 nu•m8+ FAQ‟s ..........................................................................................................................58
©
C
o
p
y
r
i
g
h
t
E
n
v
i
s
i
o
n
S
B
S
.
2
0
0
4
.
A
l
l
r
i
g
h
t
s
r
e
s
e
r
v
e
d
.
P
r
o
t
e
c
t
e
d
b
y

nu•m8+ User Guide V1.06
2
Preface
Thank you for purchasing nu•m8+,the world‟s first location device specifically designed to be
worn by children.
It is my hope that nu•m8+ will make parents feel more comfortable in allowing their children to
play un-supervised, so that “kids can be kids” and enjoy the benefits of being free to interact
with their peers through unstructured play.
I know, like you, that the social environment in which our children are growing up can, at times,
be perilous and therefore we all want to make sure our children are safe and free from harm.
nu•m8+ does not make the environment safer but will allow you to know where your children
are, control the areas in which they play and be the first to know if they are at risk.
Please read this simple user guide carefully to get the best out of your nu•m8+ and remember
it is an aid to parental care and control; it must not be regarded as a substitute.
As a parent myself, it was the urge to keep my children safe, whilst letting them enjoy the
freedom of childhood that I enjoyed that spurred the development of nu•m8+.
I know that it will live up to your expectations but if there are any suggestions that you think
would be sensible to incorporate, I will give them my full attention. I can be contacted at
Steven K Salmon
Chief Executive
©
C
o
p
y
r
i
g
h
t
E
n
v
i
s
i
o
n
S
B
S
.
2
0
0
4
.
A
l

nu•m8+ User Guide V1.06
3
User Guide
This user guide is to introduce the nu•m8+ GPS child locator with the complete technical data
and the instructions showing how to operate nu•m8+ easily and correctly. Please read this
manual carefully before using this product. Most problems could be solved through the
explanations and the troubleshooting tips. Once you finish reading it, keep it handy for
necessary reference.
Trademarks
Lok8u, nu•m8+ and certain other trademarks and logos appearing in this document are filed or
registered trademarks of Lok8u and / or in other countries.
Copyright
This manual is copyrighted by Lok8u with all rights reserved. No part of this manual may be
reproduced, modified or disclosed to third parties in any form without the prior written
permission of Lok8u.
Lok8u hereby grants permission to download a copy of this user manual from the Lok8u
website, www.lok8u.com, onto a hard disk or other electronic storage medium to be viewed and
to print a copy of this manual or of any revision hereto, provided that such electronic or printed
copy of this manual must contain the complete text of this copyright notice and provided further
that any unauthorized commercial distribution of this manual or any revision hereto is strictly
prohibited.
Disclaimer and Limitation of Liability
The content of this user guide is accurate and reliable and is provided “as is”. Lok8u makes no
warranties of any kind, either express or implied, including, but not limited to, any implied
warranties of merchantability, fitness for a particular purpose, are made in relation to the
accuracy, reliability or contents of this document. The recipient of the documentation shall
endorse all risks arising from its use. In no event shall Lok8u be liable for any incidental, direct,
indirect, consequential, or punitive damages arising from the use or inadequacy of the
documentation, even if Lok8u has been advised of the possibility of such damages and to the
extent permitted by law.
Information in this document is subject to change without notice. Lok8u reserves the right to
change or improve its products and to make changes in the content without obligation to notify
any person or organization of such changes or improvements. Visit the Lok8u website,
www.lok8u.com, for current updates and supplemental information concerning the use and
operation of this and other Lok8u products.
General information about Lok8u and its range of products is available at the following internet
address, www.lok8u.com.
Important Notice
Due to the nature of wireless communications, transmission and reception of data can never be
guaranteed. Data may be delayed, corrupted (i.e., have errors) or be totally lost. Although
significant delays or losses of data are rare when wireless devices such as the nu•m8+ device
are used in a normal manner with a well-constructed network, Lok8u accepts no responsibility
for damages of any kind resulting from delays or errors in data transmitted or received using its
products, or for failure of its products to transmit or receive such data.

nu•m8+ User Guide V1.06
4
Lok8u Ltd and its Subsidiaries
United Kingdom (UK) United States (USA) South Africa (SA)
Lok8u Ltd Lok8u LLC Lok8u SA (Pty) Ltd
Unit 2 2500 Plaza Five, 25th Fl PO Box 4459
Colemeadow Road Jersey City, NJ 07311 Tygervalley
North Moons Moat Western Cape
Redditch, Birmingham 7536
B98 9PB
Tel: 08 452 099 099 Tel: 1 888 423 1887 Tel: +27 861 6 56588
email: suppo[email protected]m email: support-usa@lok8u.com email: support@lok8u-sa.co.za
Europe Czeck Republic Turkey
Lok8u Ltd eLokator Turk Cell
Unit 2 Povltavska 5 Turkcell Plaza Mesrutiyet Cad
Colemeadow Road Prague 7 Tepebasi
North Moons Moat 171 00 Istanbul
Redditch, Birmingham 80050
B98 9PB Tel: 601601101 (CR)
Tel: 601601701 (SK) Tel: 0532 444 0 532
email: suppo[email protected]m email: info@elokator.sk (SK) @turkcell.com.tr

nu•m8+ User Guide V1.06
5
1. Introduction
nu•m8+ is the world‟s first GPS locator device specifically designed to be worn by children.
Launched by UK location service‟s company, Lok8u Ltd, this new GPS child locator is cleverly
concealed within a child‟s digital watch. Its unique design features ensure that the parent
locates their child, not the technology.
nu•m8+ is innovative and fundamentally different to other products available in the market. It
does not rely upon the child to be responsible enough to keep their locator with them in a bag or
pocket. Instead, when nu•m8+ is securely fastened to a child‟s wrist it stays there unless
deactivated by a parent. Parents can therefore be assured that wherever nu•m8+ is, their child
is.
Please note that nu•m8+ should not be regard as a substitute for parental care
and supervision.
2. Product Design and Functionality Summary
As far as the child is concerned, nu•m8+ is a digital watch. For parents it has been designed
with simplicity and ease of use in mind.
A Lok8u secure Customer Portal is also available on the internet and will be accessible
worldwide from any PC. Each user will have a user name and password and will have the
ability to request and display the child‟s location as an icon on Google maps with street address
and postal code. The nu•m8+ technology is accessible at home, abroad or on holiday from
any computer or mobile phone.
To locate the child, simply text “wru” from a mobile phone to the nu•m8+ or click “Where ru” on
the Lok8u secure Customer Portal. The child‟s location is then presented as an icon on Google
maps and/or the street address and postal code is displayed.
In addition, parents can set unique “Safe Zones“, in which their child can safely play. This
function is activated simply by texting “safe”, followed by a number, which represents the metre
radius for the child‟s safe area, to nu•m8+, or selecting a “Safe Zone”from the Lok8u secure
portal. As long as the child remains in this area no alerts will be sent and the parent can still
communicate with the device using the “wru” function. However, if they stray a priority alert will
be sent to the parent‟s mobile phone and / or email address.
When the nu•m8+ device is forcibly removed from the child‟s wrist an alert, “Strap
Compromised”,is sent immediately to a designated mobile phone and / or email address with
the child‟s location to give parents an early warning of potential danger.
The device can only be removed from the wrist, without triggering an alarm, when de-activated
by the authorised parent/guardian. A “Home Zone” can also be configured for easy and safe
removal of the nu•m8+.
©
C
o
p
y
r
i
g
h
t
E
n
v
i
s
i
o
n
S
B
S
.
2
0
0
4
.
A
l
l
r
i
g
h
t
s
r
e
s

nu•m8+ User Guide V1.06
6
3. Getting Started
nu•m8+ is supplied in a high quality carton enclosure with information and functionality of the
product, printed on the outside. The packaging contains all the equipment that is necessary for
operation. The packaging includes the following:
nu•m8+GPS Watch
Desk-top Charger with Release Tool
USB Interface Cable
USB AC Wall Charger
Quick Start Guide
Self adhesive 3M Derma Label (pre-fitted)
nu•m8+Desk-top Charger USB Cable *USB AC Wall nu•m8+
GPS Watch with Release Tool Charger QUICK START GUIDE
*Optional in some Countries
If any of the components are missing, contact your local Distributor.
3.1 Charge nu•m8+
Remove nu•m8+ and the accessories from its packaging and place it on charge for a full 8
hours before use. Connect the DC socket of the USB interface cable to the side of the Desk-
top Charger (indicated by ) and USB connector to the USB AC Wall
Charger or USB port of a PC. (A standard USB port on a PC or USB Wall
Charger can be used to charge nu•m8+.)
Place nu•m8+ on the Desk-top Charger. The
Red LED will illuminate whilst nu•m8+ is
charging. This will be replaced by the Green LED
illuminating when nu•m8+ is fully charged. The Green LED light may
illuminate faster than quoted above but it is still advised that you charge
it the full 8 hours to ensure that the battery is fully charged.
Whilst there may be some residual charge from manufacture it is not safe to
use nu•m8+ until it is fully charged, as described above.
QUICK START
GUIDE

nu•m8+ User Guide V1.06
7
3.2 Create Account and Register nu•m8+
To create a new account and register nu•m8+, go to the
Lok8u website, www.lok8u.com and select your country
on the home page.
On the home page of your country, click on the icon,
Portal Login.
In the Log In window, click on “Create Account” too follow the easy steps to create your
account, to register your nu•m8+ and to request the activation of the incorporated SIM card.
All the steps must be completed with all the required detail to continue to the next step.
Once the registration has been successfully completed, you will receive an email confirming that
your Portal Account has been successfully created.
After verification, you will receive an email confirming that the SIM card has been activated,
together with the phone number of your nu•m8+, within a maximum of 48 hours. nu•m8+ will
then be ready for activation and use.
To complete the registration process you will need:
The serial number of your nu•m8+, (found on the base of the packaging)
Valid debit or credit card registered at your address
Telephone number of the mobile phone and email address that you want to receive alerts to
as primary contact
A digital photograph of your child, or other image, if you want to upload it to your part of the
customer portal, maximum size 200kb
Select the required subscription tariff (to select the subscription that is most appropriate for
your planned use of nu•m8+, please refer to the Lok8u website, www.lok8u.com and select
your country to view the available Tariff Options)
Log In
Click on “Create Account”
to start with the registration
process for the new
nu•m8+.

nu•m8+ User Guide V1.06
8
Terms & Conditions
Please read through the
Terms and Conditions and
click on “Accept” to continue
with the registration.
You will not be able to create
an account to register your
device if you “Decline” the
Terms and Conditions.
Registration
Enter your “Login Details”,
“Personal Details” and
“Address Details”.
Click on “Cancel” to cancel
the Registration of the new
account.
Click on “Finish” to
complete the Registration of
the new account. You will
now be directed to your
Customer Portal Main Page.
Please note that details with “ *” is mandatory.
Details with “ †“ will be used as the Primary Contact for the registering nu•m8+.
The “Address Details” provided should be the physical Street Address of your home. These
details will be used to display the area of your home on Google Maps, every time when logged
in to your Customer Portal account.
Select a “User Name” and “Password” that is secure and only known to you.
Ensure to keep your “Username” and “Password” safe and not recommended to
share this information with others.

nu•m8+ User Guide V1.06
9
My nu•m8+‟s - Main Page
To register a nu•m8+, click
on “My Details”.
User Profile
Click in “Register Device” to
register a new nu•m8+.
Click on “Back” to return to
the Main Portal page.
Click on “Logout” to log out
of Portal.
Click on “Save” to save any
changes made.
The following can be changed in your User Profile:
You can select the Default Map View between Map, Satellite or Hybrid.
You can enable or disable the Display Start-up Tips when Log In.
You can select the mode in which nu•m8+ must go when the Strap is Compromised.
It is recommended that nu•m8+ is configured to enter the “Standby” mode
when the Strap is Compromised.
You can select and configure your Time Zone.

nu•m8+ User Guide V1.06
10
Terms & Conditions
Please read through the
Terms and Conditions and
click on “Accept” to continue
with the registration.
You will not be able to
register your device if you
“Decline” the Terms and
Conditions.
Registration
The registration consists of 2
easy steps:
Step1: Add Devices
Step2: Payment
All the steps must be
completed to continue to the
next step.
Click on “Add”to add the
details of your nu•m8+.
Click on “Cancel” to cancel
adding a new device.

nu•m8+ User Guide V1.06
11
Device Details
Enter the details of the
nu•m8+, select an Icon
Colour and upload an image
of your child.
You can “Edit” the details of
your device in the main
Portal when logged in.
All the fields marked with “*”
are mandatory.
Click on “Next” to continue to
the next step.
Continue with Step 2 “Payment” to complete the registration.
Step 2 “Payment” –Provide details of payment method for monthly debit order.
Once the registration has been successfully completed, it can take a maximum of 48 hours to
activate the SIM card. Once this has been completed you will receive an email confirming that
the SIM card has been activated together with the phone number of your nu•m8+.
Once you have received the confirmation email you can then activate and use nu•m8+.
Please note to ONLY activate nu•m8+ once the confirmation email with your
mobile phone number was received.

nu•m8+ User Guide V1.06
12
3.3 Activate nu•m8+
Before activating nu•m8+ ensure that the battery is fully charged. To activate nu•m8+ you
MUST switch it On by inserting the strap into the housing whilst the watch is off the wrist and
press the Reset button gently for 5 seconds with the release tool provided in the desk-top
charger base. (The Reset button is found on the back plate next to the gold charging pins).
Inserting Strap Locking Mechanism Strap Secured Reset Button
nu•m8+ will now go through its activation process and log on to the mobile phone network.
This is shown by a message “Loading” and a black bar moving around the four sides of the LCD
display, as indicated below. (Please note that it may be necessary to take nu•m8+ outside to
enable this process to complete.)
Monitor the status of the LCD display when nu•m8+ has been switched On. If the screen
shows „Loading‟ but the black bar is not moving around the sides of the LCD display, then
nu•m8+ is not acquiring a mobile phone signal. Take nu•m8+ to a know area that has good
mobile phone signal / coverage or take nu•m8+ outside to acquire the mobile phone signal.
Step 1 Step 2 Step 3 Step 4
Step 1 –Found and Connect to a mobile phone network
Step 2 –Internal GPS check OK
Step 3 –GPRS connection made
Step 4 –Full Service Communication completed and successful.
Once the activation is successful the time will display on the LCD display; leave for 10 minutes
to synchronise your nu•m8+.
For first time activation, nu•m8+ may defaults to GMT (Greenwich Mean Time), depending on
configuration.
When you turn nu•m8+ On, it may show a discrepancy of one hour or a couple of hours,
depending on your location and time zone. To adjust the time, see Section 5, Time
Configuration, for configuration. (See Section 4, nu•m8+ Start-up, for more detail.).
You will only have to do this configuration once, nu•m8+ will remember the setting and will
start-up with the correct time thereafter.
Reset

nu•m8+ User Guide V1.06
13
IT IS CRITICAL THAT IN ORDER TO COMPLETE THE ACTIVATION PROCESS
THE FOLLOWING 3 STEPS ARE FOLLOWED.
STEP 1
When switching nu•m8+ ON for the first time, the GPS needs learn the satellite location in your
area, in order to obtain a GPS location.
To enable the GPS functionality of your nu•m8+, place nu•m8+ outside with good line of sight
and clear view of the sky. Go to the portal and click “Live Track” and select an update rate of
“2 minutes”. Leave the device in this mode until the portal map shows the GPS icon ( ). For
the first time set up, it can take up to 45 minutes.
Please note that GPS systems require good line of sight and clear view of the
sky in order to achieve a GPS location.
Please note the following information regarding the operation of the GPS receiver:
When a GPS is new (from factory), has been turned Off for a long period of time, or has been
transported for a long distance since it was turned On, it will take longer to get a "Time to First
Fix" (TTFF), because the GPS must update its almanac and ephemeris data and store it in
memory.
Time to First Fix (TTFF) describes the time and process required for a GPS device to acquire
enough usable satellite signals and data to provide accurate locations.
A GPS must have three sets of data before it can provide accurate locations: GPS satellite
signals, almanac data, and ephemeris data.
The GPS almanac is a set of data that every GPS satellite transmits, and it includes information
about the state (health) of the entire GPS satellite constellation, and coarse data on every
satellite's orbit. When a GPS receiver has current almanac data in memory, it can acquire
satellite signals and determine initial position more quickly.
When the GPS comes from the factory, the receiver has no knowledge whatsoever of almanac
data in turn to locate the satellites and retrieve ephemeris data. For a full almanac to be
downloaded, it can take approximately 15 minutes, but can take up to 45 minutes.
One thing to bear in mind is that the average time for First Time to Fix (TTFF) will vary.
Depending on where you are can dramatically change the quickness of acquiring a satellite
lock. To load the ephemeris data from the satellites, the GPS receiver requires a full 30 seconds
of data reception. If this is interrupted from a tall building, or a branch from a tree, or if the signal
you are receiving is being reflected off of a building then all of this can cause a problem in the
data reception. If the data isn‟t received in full, the ephemeris data collection has to start again
at the next cycle.
A "cold" start refers to a situation in which the GPS must acquire all data in order to start
navigation, and may take up to 15 minutes.

nu•m8+ User Guide V1.06
14
A "warm" start means the GPS has most of the data it needs in memory, and will start quickly -
a minute or less.
GPS receivers cannot receive a signal underground, underwater, under any conductive type
material like metal, indoors or become inaccurate under thick glass as the signal travels slower
through glass.
The accuracy of a GPS location depends on the amount of satellites it can receive signals from.
The minimum satellites required to provide a GPS location is four.
STEP 2
Log in to the Customer Portal and click the “Switch Off” button to turn nu•m8+ “Off”.(See
Section 6, Customer Portal Login, for more detail on the Customer Portal Log In, for your
selected country.) When this action has completed the “Off” button on the Customer Portal will
be filled and the LCD display on nu•m8+ will be blank.
Disconnect the strap from the housing using the release tool provided.
nu•m8+ is now ready for normal use.
Please note that it is recommended to always “Switch Off”
nu•m8+ before disconnecting the strap from the housing.
Release Strap
STEP 3
Adjust the strap to fit your child‟s wrist. Use the release tool located in the back of the desk-top
charger base to un-do and re-do the locking screw in the strap. It is important that the strap is
tight enough so that it cannot be slipped over the hand, but not so tight that it is uncomfortable.
The strap is adjusted as follows:
Release Tool Un-do Locking Screw Adjust Strap and
Re-do Locking Screw
Tool

nu•m8+ User Guide V1.06
15
Your nu•m8+ is now ready to be used.
Simply place nu•m8+ around your child‟s wrist, insert and
lock the open end of the strap into the housing of the
nu•m8+, as indicated.
The back plate of the nu•m8+ is manufactured from Stainless Steel. If you
child has a know allergic reaction to Stainless Steel and or Nickel, the Self
adhesive 3M medical label, supplied in the packaging, must be applied to the
back plate of the nu•m8+, before placing nu•m8+ around your child‟s wrist.
Stainless steel contains nickel, but it is bound in such a way that makes stainless steel
safe for most nickel-sensitive individuals.
3.4 nu•m8+ Battery
When charging nu•m8+ for the first time, it is advised that you charge nu•m8+ the full 8 hours
to ensure that the battery is fully charged. The charging time after the initial charge is
approximately 2 hours.
Like any battery operated device, the more you use it the shorter the battery life is of the device.
The expected battery life of the device in standby is between 24-30 hours.
The following will have an effect on the battery life of your nu•m8+:
Poor GSM coverage or handshaking between multiple base stations, i.e. during a car
journey will also consume extra battery power.
Powering up the GPS module consumes the most power. It is expected that 5-10 “wru”
requests, when outdoors, will give you 14-18 hours of battery life. It is expected that 5-10
“wru” requests, when indoors, will give you 10-12 hours of battery life.
It is expected that when configured for “Live Track” or “Safe Zone” with intervals of 10
minutes, the battery life will be 4-5 hours.
Battery not fully charged. It is imperative to ensure that the battery is fully charged before
using the device.

nu•m8+ User Guide V1.06
16
4. nu•m8+ Start-up
It is recommended to ensure that nu•m8+ is fully charged and that the correct
time display on nu•m8+ before you let your child out to play.
When the correct time display on nu•m8+, it is a visible indication that nu•m8+ is connected to
the mobile phone (GSM) network. If you have poor network coverage at home, this process
may not complete successfully.
When you turn nu•m8+ On, it may show a discrepancy of one hour, depending on your location
and time zone. To adjust the time, see Section 5, Time Configuration, for configuration. You
will only have to do this configuration once, nu•m8+ will remember the setting and will start-up
with the correct time thereafter.
Place nu•m8+ around your child‟s wrist and push the strap to lock it in place. nu•m8+ will go
through an automatic start-up process to check the status of the core functions of the product
(GPS, GSM, battery, valid subscription) and update any status changes that you have recently
made on the Customer Portal, such as alert information, Safe Zone etc. This is shown by a
message “Loading” and a black bar moving around the four sides of the LCD display, as
indicated in Section 3.3, Activate nu•m8+.
When this process is completed the time will appear as a digital clock
display. To adjust the clock settings, see Section 5, Time
Configuration, for configuration.
If the clock does not appear, nu•m8+ is not connected to the mobile
phone (GSM) network. The most common reason for this is poor
mobile phone coverage. If you take your child outside this will help
it to acquire the necessary signal strength. Once coverage is
established, nu•m8+ will hold the signal even in areas where it
couldn‟t get signal at boot-up.
If you have taken nu•m8+ off your child during the start-up sequence the watch will think it is in
“Strap Compromise”. You will be notified by a “Strap Compromise” text alert (SMS) and the
Customer Portal will show a strap alert. It will be necessary to turn nu•m8+ “Off”'
using “Switch Off”from the portal or texting “Off”from the approved mobile phone and wait for
the LCD display to go blank on nu•m8+. You should then initiate the start-up process again.
If you have taken nu•m8+ off during the start-up process and don‟t get a “Strap Compromise”
alert then re-insert the strap in to the housing and gently press the Reset button on the back
plate. nu•m8+ will then go through the start-up process again.
When the clock appears on the LCD display, nu•m8+ has logged on to the mobile phone
(GSM) network and you must now go to the Customer Portal and send nu•m8+ the “Switch
Off”command.

nu•m8+ User Guide V1.06
17
When this has been processed and the Customer Portal has updated showing nu•m8+ is “Off”
(“Off”checked in the right hand status panel), release the strap from the housing, using the
release tool supplied. nu•m8+ is now ready to be placed on your child and the start-up
sequence re-commenced.
If nu•m8+ is out of subscription it will not operate and should be removed from your
child. To update your subscription details contact the support service of your
selected country. (See Lok8u Ltd and its Subsidiaries, Page 4, for contact details.)
5. Time Configuration
nu•m8+ defaults to GMT (Greenwich Mean Time). When you turn nu•m8+ On it may show a
discrepancy of one hour, depending on your location and time zone.
The time of nu•m8+ can only be adjusted from the mobile phone set to receive
alerts.
This will be the primary contact details given at registration. (See Section 12, Alerts, for
information on how to change and configure Alerts)
5.1 Clock Display
The nu•m8+ display can be adjusted to show:
Analogue watch or
12 hour digital or
24 hour digital.
Clock display configuration text commands:
To set analogue watch text “clock”
To set 12 hour digital text “12”
To set 24 hour digital text “24”
5.2 Setting the correct Time Zone
To correct the time text “time+(hour)”, or “time-(hour)” to nu•m8+.
Example:
If the actual time is 9.00am and nu•m8+ shows 8.00am text “time+1” to nu•m8+.

nu•m8+ User Guide V1.06
18
6. Customer Portal Login
To log in to the Customer Portal, go to the Lok8u website,
www.lok8u.com and select your country on the home
page.
On the home page of your country, click on the icon,
Portal Login.
Log In
To use the Customer Portal,
log in using the Username
and Password that were
chosen at registration and
click on “Go”.
My nu•m8+‟s - Information
After successful log in, the
information screen will
display.
Simply click the Red Cross to
close the window and to
continue.
(To disable the pop-up
screen to not appear again
tick the box at the bottom,
“Do not show message on
next login”, before navigating
away from the pop-up box).
It is recommended to keep the Start-up pop-up screen enabled, to be informed
about new tips and functionality.

nu•m8+ User Guide V1.06
19
6.1 My nu•m8+‟s –Main Page
You are now ready to interact with nu•m8+ using the functionality that is described in the
following sections of this user guide.
The map displayed in the main page will always open as default on the address
that was entered at registration.
Main Page Functions and Information:
nu•m8+ Alert Configuration:
Battery Status Indication:
Alerts in the past 7 days will be displayed
in the information window below the map.
Logout of Portal
Help function
for assistance
Change / Edit User
Profile and register
new devices
Click on where ru
to request a location
of your nu•m8+
Switch nu•m8+off
before strap release
Icons of nu•m8+‟s
configured with Alert
status indication
Configuration details
of selected nu•m8+
Maximise Map to
view larger format
Strap compromise Alert indication
Battery status indication
Safe Zone Alert indication
Green Level - very good
Amber Level - average
Red Level –requires Charging
Amber - Strap compromise Alert
Amber - Safe Zone Alert
Click on the icon to
select anu•m8+
Other manuals for NU-M8+
1
Table of contents
Other Lok8u GPS manuals