Lomography Diana User manual

Manual

[9]
[12]
[7]
[11]
[4]

[10]
H
a
l
f
-
F
r
a
m
e
m
o
d
e
Square
[2]
[4]
[3]
[2]

[16]
[11]
[10]
[4]
[14]
[13] [1] [6]
[8]

[15]
[20]
[17]
[18]
[19]
ISO 100
ISO 400 NNN
N
N
N
B "
B15
"B 15
"B1"
EXPOSURE GUIDE

7 / ENGLISH
MINIInstructions
Hooray! You are now the proud owner of a Diana Mini – our favorite little analogue
princess! Take a moment to run through these instructions to make sure you get
the best out of this brilliant box of magic and fabulous ash.
Choosing Your Film
The Diana Mini will take any type of standard 35 mm lm, from black and white to
color negative and slide lm. There are dierent “speeds” of lm known as fast and
slow, this is dened by an ISO number. The most common are ISO 50, ISO 100, ISO
200, ISO 400, ISO 800, ISO 1600 and ISO 3200. On a sunny day, slow lms such as
ISO 100 and ISO 200 are good for the Diana Mini. On a grey day, fast lms such as
ISO 400 or ISO 800 would work best.
Choosing Your Format
The Diana Mini can shoot two dierent frame formats – rectangular ‘half-frame’
format (which is 17 × 24 mm) and square format (which is 24 × 24 mm). Half-frame
will produce 72 shots on a single roll of 35 mm lm while the square format will
produce a standard 36 shots. When shooting half-frames, the rectangular frame
takes a portrait shot when the camera is held normally. If you want to take a land-
scape shot when shooting half-frame, then just turn the camera 90 degrees.

Switching Between Formats
You can switch between frame formats on the same roll of lm – just remember
to take a blank shot (keep your lens cap on) between shots when switching from
half-frame to square format to avoid accidentally double exposing the same bit of
lm. Alternatively, you could throw caution to the wind and embrace those sorts
of happy accidents!
When to Use Each Format
This is entirely up to you! If you’re in a situation where you need to t more into
the shot, then make it square as that gives you a wider eld of view. If you want to
maximize how many shots you get on a roll, then use half-frame. You can also use
half-frame if you want to produce two shots on one frame.
Loading Your Film
Before you start, take a blank shot by pressing the shutter release [11]. Do not
wind the advance wheel [4] forward yet. Turn the rear door switch [1] to open and
slide the rear door o. Move the pressure plate [2] down and put the new 35 mm
lm into the left-hand side. Pull the lm towards the clip on the take–up spool [3]
clip it on. Turn the advance wheel [4] anticlockwise a little to move the lm up to
the yellow mark. Check that the lm sprockets are aligned with the sprocket gear
spool [5] then close the movable lm plate [2]. Slide the rear door back on. You
may need to move the rewind lever [6] left and right a little to ensure it aligns with
8 / ENGLISH

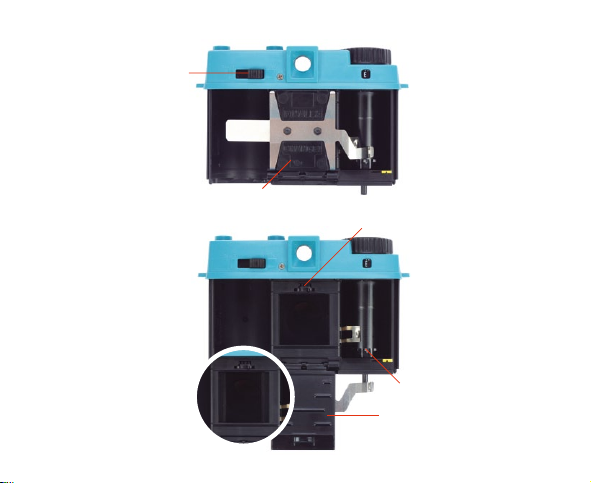
the lm to allow the rear door to lock properly. Turn the rear door switch [1] to
close and wind the advance wheel [4] anticlockwise until it stops. Make sure you
don’t force the advance wheel [4] forward after you feel it has stopped naturally to
avoid snapping the lm.
Before Taking a Photo
The Diana Mini has four focus settings: 0.6 m, 1–2 m, 2–4 m and innity. You can
choose your setting by turning the lens [7] clockwise or anticlockwise to match the
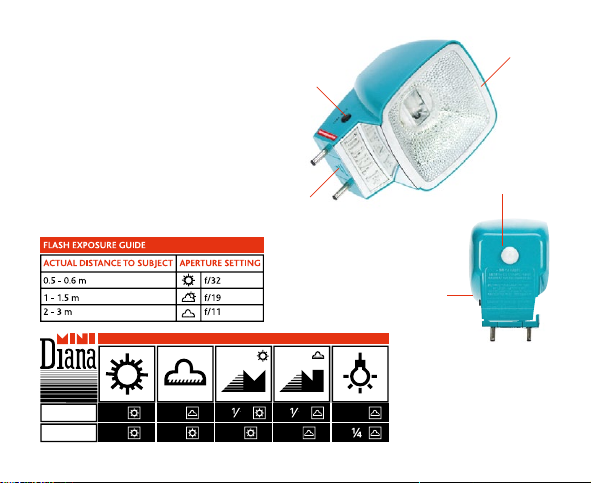
marker of your desired focal length. Depending on the weather, set the aperture
switch [8] to either sunny (F/11) or cloudy (F/8). Make sure the shutter switch [9]
is set to the correct position. For daytime shots, position the switch to ‘N’. For long
exposures or nighttime shots, position the switch to ‘B’. Lastly, it’s time to choose
your frame format. Slide the frame switch [10] to either rectangular half-frame
format (72 photos on one roll) or square format (36 photos on one roll).
Shoot Some Blanks Before You Start!
Now that the focus, aperture, shutter speed and frame format are all set, you are
almost ready to go! Just one thing left to do – keep the lens cap on and shoot three
or four blank shots, this way the photo lab will know when the rst frame starts.
Now you are good to go! Frame your shot, compose it or just point the camera
without looking through the viewnder and push down on the shutter release [11].
After each photo, turn the advance wheel [4] anticlockwise until it stops. You will
9 / ENGLISH

need to turn it more in the square mode than in the rectangular half–frame mode.
In square mode it’s 1⁄2 a turn and in half–frame it’s about 1⁄4 turn. Make sure you do
not accidentally hold the rewind spool [6] with your thumb on the left while trying
to turn the advance wheel [4] on the right. Now you are ready to take another shot!
Rewinding the Film
When you have nished the lm you will not be able to turn the advance wheel [4] any
further. Hold down the rewind button [14], release the arm from the rewind spool [6]
and turn it in the direction of the arrow until the lm is fully rewound (you should hear
it unclip from the sprocket gear spool). Finally, unlock the rear door switch [1] and slide
the rear door o. Remove the lm and head to the processing lab! Load a new lm
and take your Diana Mini with you – you never know what you might see on your way!
Long Exposures
If you’re out in the evening don’t leave your Diana Mini at home. You can take
shots at nighttime by setting the shutter switch [9] to ‘B’. When you take a photo in
‘B’ mode you can hold down the shutter release [11] for as long as it takes to get
enough light onto the lm – take a look at the exposure guide at the end of these
instructions for recommended times. You can also screw a cable release into the
lens [12] and use that. Using a cable release will help you to avoid camera shake,
especially if the Diana Mini is xed onto a tripod thanks to the tripod mount [13].
10 / ENGLISH

Tripod Attachment
The Diana Mini comes with a tripod mount which is useful for long nighttime expo-
sures. No stress if you don’t fancy carrying one around with you though, you can
always rest the Diana Mini on a solid surface as an alternative. Diana Mini can be
held sideways against a wall, placed on the oor or if you’re feeling statuesque, why
not try to hold it steady in your own bare hands!
Multiple Exposures
The Diana Mini can take multiple exposures! This is when you take more than one
photo before winding the lm forward thus layering your photos on top of each
other. The more exposures you take on a single frame, the more you expose that
part of the lm to light. If you take too many shots, the lm will overexpose. On
a sunny day, you can take a double exposure using slow lm and on a grey day,
you can take a triple exposure using slow lm. When using fast lm you might
overexpose the frame but as the Diana Mini takes 72 shots on one roll of lm, we
encourage you to experiment!
Overlapping Exposures
The Diana Mini allows you to take full creative control and overlap frames if you
want! You can take a photo and then wind the lm forward a small amount (rather
than all the way to the next frame) and then take another shot. This will overlap
frames capturing a mixture of single exposures, double exposures and long pano-
11 / ENGLISH

ramic images. It can be done in both frame formats so play around and see which
one you prefer!
Flash
The Diana Mini comes with the fabulous Diana Flash+ [15]. Simply connect your
ash to the top of the Diana Mini [16], turn it on and you’re ready to go! The Diana
Flash+ is perfect for nighttime shots with subjects in the foreground and also dur-
ing the day if you want to shoot against the sun and use the ash as a ll. Take a
look at the ash exposure guide at the end of these instructions for recommended
exposures.
Installing the Battery and Using Your Diana Flash+
1. Slide open the Flash Battery Door [17] located at the bottom of the ash.
2. Install one AA battery (1.5 V) into the battery chamber.
3. Close the Flash Battery Door [17].
4. Switch on the Diana Flash+ using the Flash ON/OFF switch [18], and wait until
the Flash Ready Indication [19] lights up red.
5. Press the Test Button [20] to make sure that the Diana Flash+ works. You’re
now ready to install the ash onto the camera.
12 / ENGLISH

Cable Release
Another fantastic feature of the Diana Mini is its cable release compatibility! By at-
taching a cable release to the lens, you can take a photo without using the shutter
release. This is great for avoiding camera shake when taking long exposures, taking
self-portraits from a distance or maintaining eye contact with your subjects while
taking a photo of them.
Troubleshooting
1. My daytime shots are really washed out and blurry!
Ah, you are most likely shooting with the “B” shutter setting by accident. Be
sure to use “N” for daylight.
2. My nighttime shots are really blurry and insane!
For sharp long exposures, you need to keep the camera as steady as pos-
sible. Use a tripod if you have one or pop your Diana Mini down on a at
surface if not. No at surfaces in sight? Try holding your breath and pressing
your Diana Mini against your face to keep her steady.
3. My daytime images are really dark!
Get faster lm. You’ll need full sunlight to shoot ISO 100 or slower on the “N”
setting.
4. My images are overlapping each other!
You might not be winding your lm forward enough after taking a shot. Also
if you move from half-frame to square format then the rst frame will over-
13 / ENGLISH

lap. In this case take a blank shot by covering the lens and then wind on.
5. My images are totally black!
Oops, that sounds a lot like you left the lens cap on!
6. The back cover doesn’t slide on properly!
Try moving the rewind spool left and right so that it connects properly with
the lm in the camera.
7. Can I change format many times on one roll of lm?
Yes, you can! But before you slide the frame switch, make sure you have
red the shutter release. If you have already taken a shot and wound the lm
on then simply cover the lens, take a shot and then move the frame switch.
8. When I get two images on one photo from the lab one is dark and the other is too
light?
There is a reason for this and it’s no one’s fault! The machine at the lab
takes an average reading of the whole roll of lm. If one photo is too dark,
the machine will lighten it up and as a result the image next to it can look
overexposed or washed out. You can adjust this by scanning the frames
individually to select the correct levels or you could try asking your lab to do
two scans of the same image.
9. I think I may have fallen in love with the Diana Mini!
This is a common occurrence and nothing to worry about – she is a total
heartthrob after all.
14 / ENGLISH

Care and Maintenance
A little care will go a long way towards keeping your Diana Mini in tip-top condition:
1. Keep the lens cap on the lens when the camera is not in use.
2. Do not clean the lens with any harsh chemicals or solvents. A proper lens
cleaning solution and a soft lens cloth are your best bet.
3. If the lm is really hard to advance then do not force it as you could break
the advancing mechanism. If you have just started a new lm, then calmly
reload it. If you’re well into the roll, then unload it in a totally dark room or
light-sealed bag.
4. Be careful when transporting the Diana Mini, she’s pretty tough but not in-
vincible. If you place her in a bag with heavy things she could get broken. Just
keep an eye out for her well-being.
Contact and Warranty
Your Diana Mini includes a 2-year warranty against any manufacturer defects.
In the event of a defect, the Lomographic Society will repair or replace the item
at our discretion. For the warranty service, please contact your closest Lomo-
graphic Oce.
15 / ENGLISH

MINIAnleitung
Hurra! Du bist jetzt der stolzer Besitzer einer Diana Mini – unserer kleinen analo-
gen Prinzessin! Nimm Dir einen Moment Zeit, um diese Anleitung durchzugehen,
um sicherzustellen, dass Du das Beste aus dieser brillanten Box voller Magie und
fabelhaftem Blitzlicht herausholst.
Der richtige Film
Die Diana Mini nimmt jede Art von Standard–Kleinbildlm auf, vom Schwarzweiß-
lm über Farbnegativ– bis zum Dialm. Es gibt verschiedene „Geschwindigkeiten“
des Films, die als schnell und langsam bezeichnet werden, dies wird durch eine
ISO–Nummer deniert. Die gebräuchlichsten sind ISO 50, ISO 100, ISO 200, ISO
400, ISO 800, ISO 1600 und ISO 3200. An einem sonnigen Tag sind langsame Filme
wie ISO 100 und ISO 200 gut für die Diana Mini. An einem bewölkten Tag werden
schnelle Filme wie ISO 400 oder ISO 800 am besten funktionieren.
Wähle Dein Format
Die Diana Mini kann zwei verschiedene Bildformate fotograeren – das rechteckige
„Halbformat“ (17 x 24 mm) und das quadratische Format (24 x 24 mm). Das Halb-
bildformat ergibt 72 Aufnahmen auf einer einzigen Rolle 35 mm–Film, während
16 / DEUTSCH

das quadratische Format standardmäßig 36 Aufnahmen ergibt. Bei der Aufnahme
von Halbbildern macht der rechteckige Rahmen eine Porträtaufnahme, wenn die
Kamera normal gehalten wird. Wenn Du bei der Aufnahme von Halbbildern eine
Querformataufnahme machen möchtest, drehe die Kamera einfach um 90 Grad.
Zwischen den Formaten wechseln
Du kannst zwischen den Bildformaten auf derselben Filmrolle wechseln – denke
nur daran, zwischen den Aufnahmen eine Leeraufnahme zu machen (lass den Ob-
jektivdeckel auf), wenn Du vom Halbformat zum quadratischen Format wechselst,
um eine versehentliche Doppelbelichtung desselben Filmstückes zu vermeiden.
Alternativ kannst Du Dich wild ins Abenteuer stürzen und diese Art von glücklichen
Unfällen in Kauf nehmen!
Wann welches Format?
Das liegt ganz bei Dir! Wenn Du Dich in einer Situation bendest, in der mehr auf
das Foto passen muss, dann mach es quadratisch, denn das gibt Dir ein größeres
Sichtfeld. Wenn Du die Anzahl der Schüsse auf einer Rolle maximieren willst, dann
verwende das Halbbild. Du kannst auch ein Halbbild verwenden, wenn Du zwei
Aufnahmen auf einem Bild machen möchtest.
17 / DEUTSCH

Einen Film laden
Bevor Du beginnst, solltest Du eine Leeraufnahme machen, indem Du den Auslö-
ser drückst [11]. Spulee das Vorschubrad [4] noch nicht vor. Drehe den Schalter
um die hintere Tür [1] zu önen und schiebe die hintere Tür auf. Schiebe die
Andruckplatte [2] nach unten und lege den neuen Kleinbildlm in die linke Seite
ein. Ziehe den Film gegen den Clip auf der Aufwickelspule [3] und klippe ihn ein.
Drehe das Vorschubrad [4] etwas gegen den Uhrzeigersinn, damit sich der Film
bis zur gelben Markierung bewegt. Vergewissere Dich, dass die Filmzahnräder mit
der Zahnradspule [5] uchten, und schließe dann die bewegliche Filmplatte [2].
Schiebe die hintere Tür wieder auf. Eventuell musst Du den Rückspulhebel [6]
etwas nach links und rechts bewegen, um sicherzustellen, dass er auf den Film
ausgerichtet ist, damit die hintere Tür richtig einrasten kann. Drehe den Schalter
der hinteren Tür [1] zum Schließen und drehe das Vorschubrad [4] gegen den
Uhrzeigersinn bis zum Anschlag. Achte darauf, dass Du das Vorschubrad [4] nicht
mit Gewalt nach vorne drückst, nachdem Du das Gefühl hast, dass es auf natür-
liche Weise zum Stillstand gekommen ist, um ein Reißen des Films zu vermeiden.
Bevor Du ein Foto machst
Die Diana Mini hat vier Brennweiteneinstellungen 0,6 m, 1–2 m, 2–4 m und unend-
lich. Du kannst die Einstellung auswählen, indem Du das Objektiv [7] im oder ge-
gen den Uhrzeigersinn drehst, um die Markierung auf die gewünschte Brennweite
abzustimmen. Stelle den Blendenschalter [8] je nach Wetterlage entweder auf
18 / DEUTSCH

sonnig (F/11) oder bewölkt (F/8). Vergewissere Dich, dass der Blendenschalter [9]
auf die richtige Position eingestellt ist. Stelle den Schalter für Aufnahmen bei Tag
auf ‚N‘ und für Langzeitbelichtungen oder Nachtaufnahmen auf ‚B‘. Zuletzt ist es
an der Zeit, das Bildformat zu wählen. Schiebe den Rahmenschalter [10] entweder
auf rechteckiges Halbrahmenformat (72 Fotos auf einer Rolle) oder quadratisches
Format (36 Fotos auf einer Rolle).
Mach ein paar Leeraufnahmen bevor Du beginnst!
Jetzt, wo Fokus, Blende, Verschlusszeit und Rahmenformat eingestellt sind, bist Du
fast startklar! Es bleibt nur noch eines zu tun – den Objektivdeckel aufbehalten und
drei oder vier Leeraufnahmen machen, damit das Fotolabor weiß, wann das erste
Bild beginnt. Jetzt kannst Du loslegen! Mach Deine erste Aufnahme, komponiere sie
oder richte einfach die Kamera aus, ohne durch den Sucher zu schauen, und drü-
cke den Auslöser [11]. Drehe nach jedem Foto das Vorschubrad [4] gegen den Uhr-
zeigersinn, bis es einrastet. Im quadratischen Modus musst Du es weiter drehen
als im rechteckigen Halbbildmodus. Im quadratischen Modus ist es 1⁄2 Umdrehung
und im Halbbildmodus ist es etwa 1⁄4 Umdrehung. Achte darauf, dass Du nicht
versehentlich die Rückspulspule [6] mit dem Daumen auf der linken Seite festhältst,
während Du versuchst, das Vorschubrad [4] auf der rechten Seite zu drehen. Jetzt
bist Du bereit für eine weitere Aufnahme!
19 / DEUTSCH

Den Film zurück spulen
Wenn Du den Film voll geknipst hast, kannst Du das Vorschubrad [4] nicht mehr weiter
drehen. Halte den Rückspulknopf [14] gedrückt, löse den Arm [6] vom Rückspulknopf
und drehe ihn in Pfeilrichtung, bis der Film vollständig zurückgespult ist (Du solltest
hören, wie er sich von der Zahnkranzspule löst). Entriegle abschließend den Schalter
der hinteren Tür [1] und schiebe sie auf. Entferne den Film und begib Dich ins Entwick-
lungslabor! Lege einen neuen Film ein und nimm Deine Diana Mini mit – man weiß nie,
welch spannende Momente sich unterwegs ergeben könnten!
Langzeitbelichtungen
Wenn Du abends unterwegs bist, lass Deine Diana Mini nicht zu Hause. Du kannst
auch nachts fotograeren, indem Du den Belichtungshebel [9] auf ‚B‘ stellst. Wenn
Du im ‚B‘–Modus fotograerst, kannst Du den Auslöser [11] so lange gedrückt hal-
ten, bis genügend Licht auf den Film gelangt – die empfohlenen Zeiten ndest Du
in der Belichtungshilfe am Ende dieser Anleitung. Du kannst auch einen Drahtaus-
löser in das Objektiv schrauben [12] und diesen verwenden. Die Verwendung ei-
nes Drahtauslösers hilft Dir, Kamera–Verwacklungen zu vermeiden, insbesondere
wenn die Diana Mini mittels der Stativhalterung [13] auf einem Stativ befestigt ist.
Stativhalterung
Die Diana Mini wird mit einer Stativhalterung geliefert, die für lange Nachtaufnah-
men nützlich ist. Kein Stress, wenn Du keine Lust hast, eines mit Dir herumzutra-
20 / DEUTSCH
Table of contents
Languages:
Other Lomography Digital Camera manuals