Lovfeel F156 User manual

V1.0
Model:F156
R


1
CONTACT US................................................................................................................................................................2
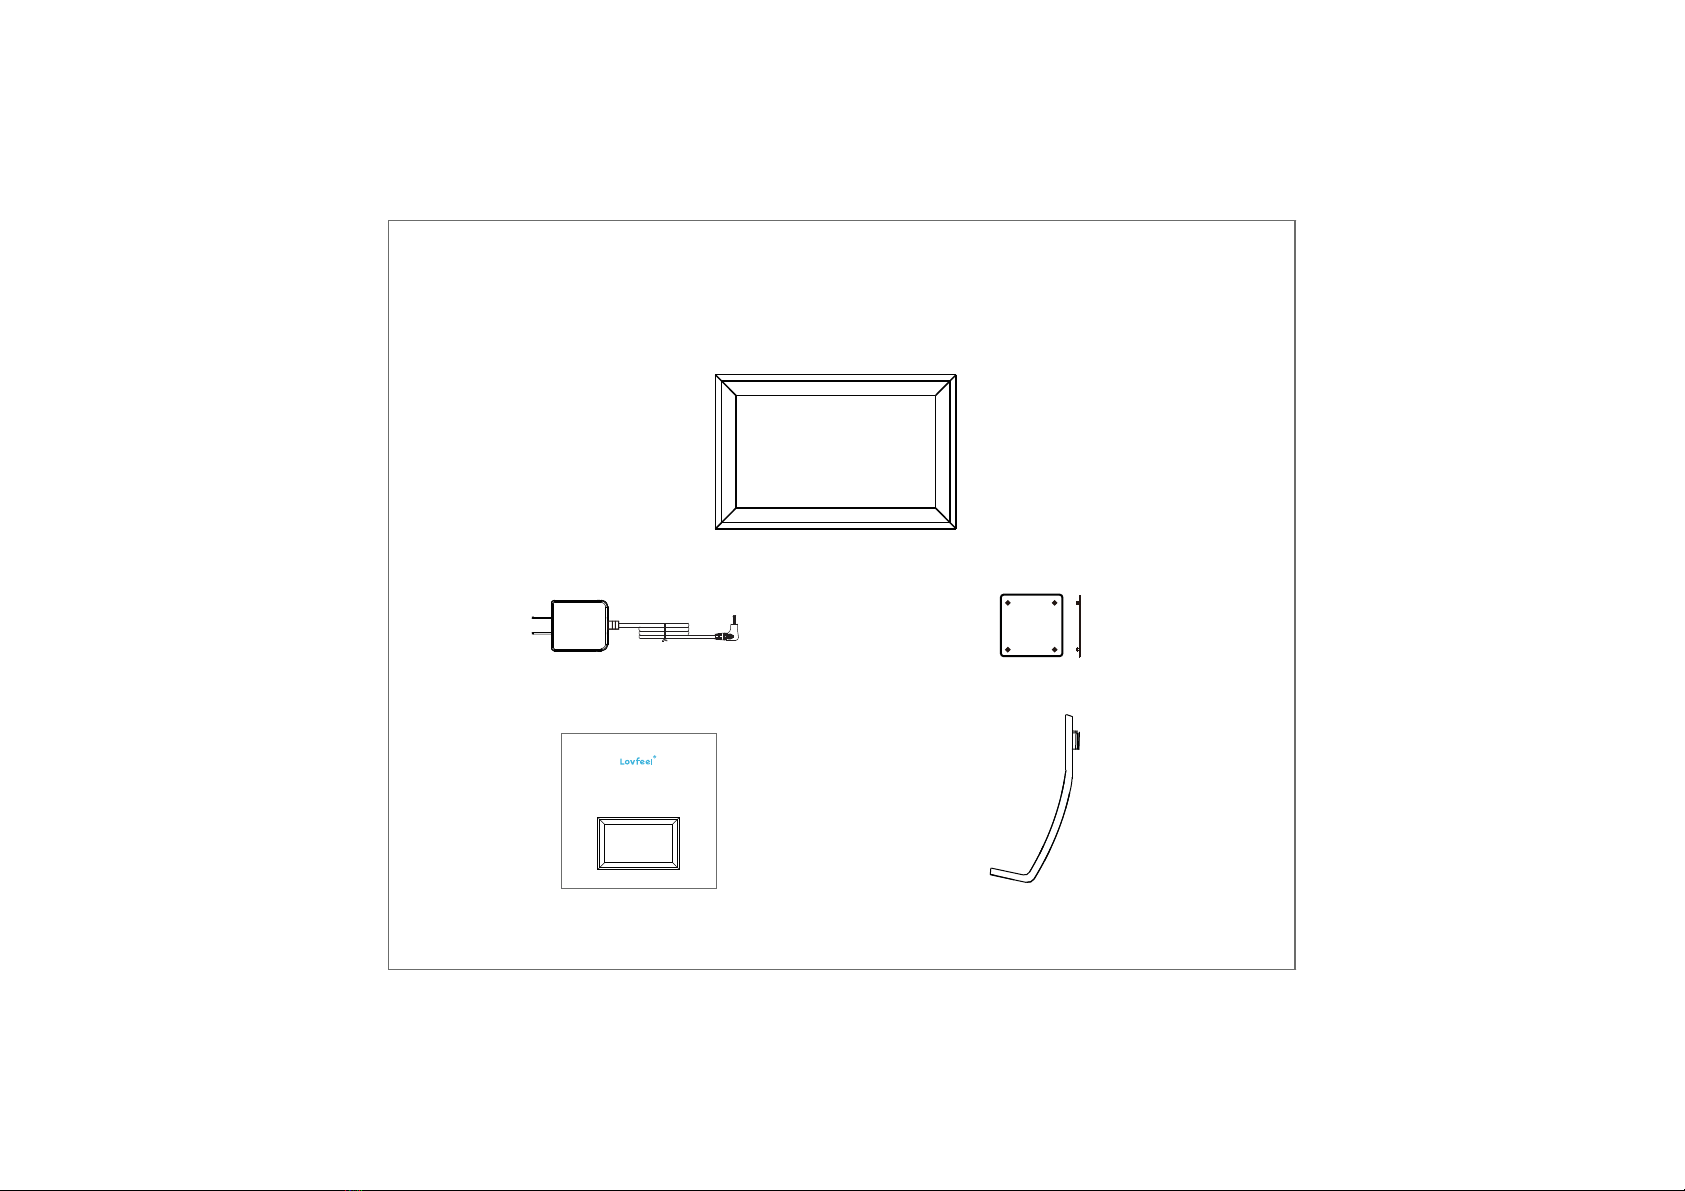
WHAT’S IN THE BOX.....................................................................................................................................................3
GET TO KNOW YOUR DIGITAL PICTURE FRAME.........................................................................................................4
PRODUCT FEATURES............................................................................................................................................4
PRODUCT SPECS.......................................................................................................... ........................................4
SYSTEM REQUIREMENTS.................................................................................................... .................................5
FRONT AND BACK SIDE OF FRAME.................................................................................................................................5
WALL MOUNT YOUR FRAME
.................................................................................................................................6
IMPORTANT SAFETY PRECAUTIONS...................................................................................................................7
SAFETY INSTRUCTIONS........................................................................................................................................7
CARE AND MAINTENANCE..................................................................................................................................8
GET YOUR FRAME READY............................................................................................................................................9
GETTING STARTED......................................................................................................................................................10
HOW TO USE UHALE FRAME.....................................................................................................................................11
SHARE PHOTOS..........................................................................................................................................................12
NAVIGATING YOUR FRAME.......................................................................................................................................14
SETTINGS....................................................................................................................................................................18
PRIVACY.......................................................................................................................................................................27
SUPPORT.....................................................................................................................................................................27
FULL ONE YEAR MANUFACTURER'S WARRANTY.....................................................................................................28
OBTAINING WARRANTY SERVICE.................................................................................................................. ...........28
Contents

2
In case you face any issues with the product you have received, please contact our support team by:
[email protected]
We will offer prompt and authoritative reply within 24 hours and try our best to solve your problem ASAP! More
Safe Guarantee with LOVFEEL! If you are not satisfied with our product, please tell us about your thought. That
would be much appreciated.
CONTACT US

3
LOVFEEL Digital Picture Frame *1 pcs
Please check the accessories as soon as you receive the frame to make sure you have all of them.
Stand * 1pcs
Power Adaptor * 1pcs
User Manual * 1pcs
WHAT’S IN THE BOX
VESA Bracket * 1pcs
Model: F156
WI-FI Digial Photo Frame
USER MANUAL

4
1920*1080
2 PRODUCT SPECS
1 PRODUCT FEATURES
3 This photo frame supports SD cards up to 64GB, but only NTFS format, and SD cards of all
formats with less than 64GB memory.
GET TO KONW YOUR DIGITAL PICTURE FRAME
32
32
27
30
E

5
4 FRONT AND BACK SIDE OF FRAME
• Wi-Fi router with a 2.4GHz internet connection
• Android mobile device with OS 6.0 or higher, or Apple mobile device with iOS 10.0 or higher
This digital photo frame is NOT compatible with Linux or Windows phones.
3 SYSTEM REQUIREMENTS
NOTE:
Front of Frame
B
CD
E
F
Back of Frame
A
H
G
G
1920*1080
32

6
A: Power Button
Turns the digital frame on or puts it into standby. Long press around three seconds for turning on/off,
short press for standby.
C: Headphone/Speaker Port
Connect your headphones or speakers.
D: USB Port
Import photos to the digital photo frame from a USB drive (max 128GB).
B: SD/SDHC Card Slot
Import photos to the digital photo frame from a SD/SDHC card (max 128GB), of which 64G and 128G
only support NTFS format.
E: Mini USB port
For after-sales service only.
F: Power adapter DC input(12V)
Plug in the power adapter for power.
G: Loudspeakers
Built-in loudspeaker.
H: Removable bracket slot
Plug in the the bracket and slide up to lock into place.
5 WALL MOUNT YOUR FRAME
You have two ways to mount your frame on the wall.
1)Drill two screws on the wall, leave a 10mm gap between the wall and the head of screw. Mount the frame onto
the screws by wall mount hole and slide down to lock into place.
2)Prepare a VESA mount bracket. Lock the VESA mount bracket into the VESA holes on the back side of the frame.
Then you can hang the frame on the wall.

7
• High voltage product. Please do not open the casing of the digital photo frame. Servicing of the frame should
be done by qualified personnel only.
• To reduce the risk of fire or electric shock, do not expose this product to rain or moisture.
• To avoid permanent loss of data, do not insert or remove memory cards or USB devices when the frame is
powered on.
6 IMPORTANT SAFETY PRECAUTIONS
• Keep product away from open flames, such as candles.
• Keep the digital photo frame clean and never store it near a heat source or in dirty, humid, or wet places. Keep
it out of direct sunlight.
• Do not drop the product. It may result in damage to the product and loss of data.
• Do not attempt to repair or disassemble the unit by yourself. Only qualified service personnel should perform
repairs.
• Do not expose the product to liquids or objects filled with liquids, such as vases. Use in a dry location only.
7 SAFETY INSTRUCTIONS
NOTE:
A VESA mount bracket is included in our merchandise.
Wall Mount Holes *2
75*75mm
75*75mm
VESA Holes*4

8
• The digital photo frame is for indoor use only.
• Use only the DC 12V/1.5A power adaptor supplied with this product. Do not unplug the adaptor while viewing
the pictures.
• Always turn off the unit and remove the power adaptor from the electrical outlet before cleaning the unit.
• Use a soft dry cloth to clean this product.
• Never spray or pour liquids directly onto the screen or casing.
• Do not use abrasive materials or chemical cleaners such as alcohol, benzene, etc. Do not allow any water or
other liquid to enter the device.
• Do not drop the device as the devices cannot withstand shock from falls.
• Do not hit or scratch the screen. Handle it with care. The LCD panel of the photo frame may be damaged due
to excessive force or if it comes in contact with sharp objects.
8 CARE AND MAINTENANCE
• Do not block the ventilation holes on the back of the digital photo frame.
• Children should be supervised to ensure safety.
• Please insert the plug into the DC IN jack on the unit completely before connecting the AC adapter to an
electrical outlet.
• Do not use the product in extreme temperatures over 105° F (40° C).
• Do not allow metallic objects to touch the DC plug when the digital photo frame is on.
• To prevent overheating and damage to the screen, unplug the product when you do not intend to use it for a
long period of time.

9
1 Hook on the frame stand on the back. You can place the frame either in landscape or portrait (we recommend
you to place it in landscape during the first setup).
2 Connect the frame into the DC connector, and plug the power adaptor into the wall socket, the frame will turn on
automatically, then you can follow the on-screen instructions.
GET YOUR FRAME READY

10
Uhale Web
Uhale App
Introduce the Uhale Frame
Uhale Frame displays wonderful moments shared by mobile devices. Touch-screen operation is easy to use,
making sharing photos and videos smoother and more convenient.
Uhale Web is a convenient and fast web-based photo sharing tool that allows users to log in and use without
registering an account. It supports sending up to 500 photos at once, making it easy for you to share your
precious memories.
The Uhale App supports rich features for both Android and iOS systems, allowing easy sharing with connected
photo frames anytime and anywhere. No matter where you are in the world, you can send photos at any time.
Download the Uhale App
Download the App by scanning the QR code.
Find the Uhale App on:
Android: Search for "Uhale" on Google Play
iOS: Search for "Uhale" on the App Store
If you are new to using Uhale:
1. Power on; 2. Start by following the Uhale quick setup on page or follow the on screen guide.
Once you have set up your Uhale, start connecting with your friends and family.
GETTING STARTED

11
When starting your frame for the first time, you will need to setup the frame.
•Uhale Frame may request to upgrade to the latest version. If so, it is recommended to upgrade the photo
frame before proceeding.
•Choose a language you preferred as default.
•Connect the photo frame to the Internet via Wi-Fi.
•Set the date, time and set the time zone if needed.
•Name the photo frame (E.g. Jack’s Frame).
•Set the location of the photo frame (E.g. Living Room, Kitchen, Office).
•Check the quick guide on the Uhale frame.
HOW TO USE UHALE FRAME

SHARE PHOTOS
12
You can share photos/videos in four ways.
Uhale App
You can download "Uhale" app from Google Play or App Store.
Before sharing, please connect Uhale app on mobile phone with the photo frame.
Connecting a new friend:
•Make sure that your friend has downloaded and installed the Uhale App.
•Click the "Add friend" icon on your frame . A dialog will appear and show both QR code and paring
code (valid for 12 hours).
•Now share either the QR code or the paring code through your preferred way E.g. SMS, E-Mail, IM,
phone call, to your friend.
•Once the frame is connected to your friend’s Uhale App, you will be able to find them in “manage
accounts” on the frame.
eded
an
andd
ee
.
.

Uhale web
You can visit Uhale Web for sharing at: https://uhale.zeasn.tv.
13
Note: plese connect with the photo frame in “Uhale” App before sharing from Uhale Web.
External storage(SD card)
You can copy photos and videos to SD card, then insert the SD card into the frame, and import photos
to the frame through “Frame” – “Settings” – “Manage Photos” – “Import Photos”.
•Visitor Login
Support login to the web terminal by visitor login, If you change browser or clear your cache, user data willnot be
retained.
Direct playback of photos from external storage(SD card)
You can play photos and videos directly from external devices without importing.
•Scan code login
Visit the website to get access to Uhale Web: https://uhale.zeasn.tv
Note:Download, install and open the "Uhale" App on your mobile devices, and find the QR code under [Scan]
to log in.
•Account Login
Support login to the web terminal by account password.
Note: Email account registration is not supported on the web version. You need to download, install, and open the
"Uhale" App on your mobile device to register for an account.

Connecting with your friend
SN and QR code are generated for device connection by tapping the icon .
Use either of the two to connect the frame with mobile devices to enable photo sending.
Gallery
Open the gallery and browse media sources in the gallery.
•In the gallery, you can view photos shared by different accounts;
•In the gallery, you can hide categories to view more photos;
•In the gallery, you can view photos in chronological order/reverse order;
•In the gallery, you can only view videos or photos;
•In the gallery, you can play a particular category individually;
•In the gallery, you can view photos directly in the SD card;
•In the gallery, you can easily find and review your photos and videos by using the Photo tab.
You interact with your frame through its touch screen.
Swipe left or right to go through your photos. To access the menu bar, simply tap once on the screen, this will show
the menu.
In the menu you will find quick access to and .
From the menu it is also possible to make relevant settings for the currently displayed photos, such as and .
NAVIGATING YOUR FRAME
14
n
n
.
.
hh
tt
o
o
a
a
kkll
dd
.
.
d
d
..
tttttiti
s
s
aa

15
Single repeat/ Repeat all
To set the picture display mode: select , the current photo or video will be presented in a loop;
select to play the contents of the gallery in sequence.
Hide photos
Hide the current photo. It means this photo will no longer be displayed in the slide show but still stored in the
library. Go to settings-> Manage photos-> Show/hide photos.
Fill frame/Fit to frame
This function is to switch the photo display mode in the frame.
Fill frame: It is the default display mode. The photo is scaled proportionally to fit the entire frame.
Fit to frame: the entire photo is displayed in the frame as its original proportion.
Delete
Press and hold the screen to delete the current photo or video.
Favorite
Click the on the screen to favorite the current photo or video. To hide the favorite button on the homepage,
you can go to Settings - Photo Settings and turn off the "Show favorite" option. To show it, turn on the option.
tt
,
,
t
t

16
Adjust photos
You can adjust the photo up, down, left and right to choose the best display content. After adjusting it,
click OK to return to the home page.
Rotate photos
You can adjust it 90 degrees clockwise. After adjusting it, click OK to return to the home page.
Slideshow
Set the playback effect through the menu's [Slideshow]. But only valid for the photo slideshow.
Auto rotation
Automatically rotate the photo based on actual positioning (landscape/portrait) of the frame.
Pause/Play
You can pause a playing video.
Volume/Brightness settings
Volume setting: For video, you can set the volume through the menu or swipe on the right side of the screen
to achieve your comfortable listening enjoyment.
Brightness setting: You can adjust it by sliding on the left side of the screen to achieve your comfortable visual
enjoyment.

17
Weather & Time
The home screen will display the weather and time in your area. To hide the weather and time on the homepage, you
can go to Settings - Display Settings and turn off the "Show weather and time" option. To show it, turn on the option.
Best wishes
Show the wishes sent by your family or friends. You can manage the blessings in Settings - Manage photos -
Best wishes.
1)Open the Uhale APP on your phone. Tap the icon.
2)Write down your wishes in text.
3)Select a style.
4)Choose a frame(s) you would like to send wishes to.
How to send out wishes?
Note: Please upgrade the APP to version 3.14 or above.

SETTINGS
With this setting, you can personalize your photo frame according to your needs.
My frame
Auto sync date & time
Use network-provided time.
Set date/time
The date and time can be manually adjusted after the automatic date&time is turned off.
Frame location
Set/Change the location of the photo frame. This location is displayed in the list of connected photo frames
of your friends and family, helping to identify multiple frames.
Set time zone
Set time zone for a photo frame.
Set language
Set language used for a photo frame.
Frame name
Set/Change the name of the frame. The frame name is also displayed in connected mobile devices, under the
list of connected photo frames in the App.
18
Table of contents