LSC maxim S User manual

Lighting Control Desks
Models S & M
Operator Manual
Version 3.00 May 2008
LSC Lighting Systems (Aust) Pty. Ltd.
ABN 21 090 801 675
Building 3, 66-74 Micro Circuit
Dandenong South, Victoria 3175 Australia
Tel: +61 3 9702 8000
Fax: +61 3 9702 8466
email: info@lsclighting.com.au
web: www.lsclighting.com.au
Designed and
in
Manufactured
Australia
Supplied by:

maXim S & M
Operator Manual V3
LSC Lighting Systems (Aust) Pty. Ltd
This page intentionally left blank.

maXim S & M
Operator Manual V3
LSC Lighting Systems (Aust) Pty. Ltd.
CONTENTS
1maXim S & M QUICK REFERENCE 1
1.1 RECORD A SCENE_______________________ 1
1.2 GRAB THE OUTPUT IN GRAB MASTER______ 1
1.3 RECORD A CHASE_______________________ 1
1.4 PLAYBACK A SCENE OR CHASE ___________ 1
1.5 CONTROLLING A SCENE OR CHASE________ 1
1.6 CHASE MODES__________________________ 1
1.7 RECORD A STACK _______________________ 1
1.8 PLAYBACK A STACK _____________________ 1
2PRODUCT DESCRIPTION 2
2.1 INTRODUCTION _________________________ 2
2.2 FEATURES _____________________________ 2
2.3 SPECIFICATIONS ________________________ 3
2.4 OPTIONS_______________________________ 3
2.5 CARING FOR YOUR maXim________________ 3
2.6 LABELING YOUR maXim __________________ 3
2.7 TERMINOLOGY__________________________ 3
2.8 SECONDARY FUNCTIONS ________________ 3
2.9 SOFTWARE_____________________________ 4
2.10 NEW FEATURES IN VERSION 2 SOFTWARE _ 4
2.11 NEW FEATURES IN VERSION 3 SOFTWARE _ 5
3GETTING CONNECTED 6
3.1 POWER INPUT __________________________ 6
3.2 DMX DIGITAL OUTPUT (DMX 512) __________ 6
3.3 VIDEO MONITOR ________________________ 6
3.4 SWITCHING ON _________________________ 6
3.5 SWITCHING OFF_________________________ 6
3.6 POWER SUPPLY RESET __________________ 6
3.7 FUSE __________________________________ 6
3.8 AUDIO INPUT ___________________________ 6
3.9 DESK LAMP_____________________________ 6
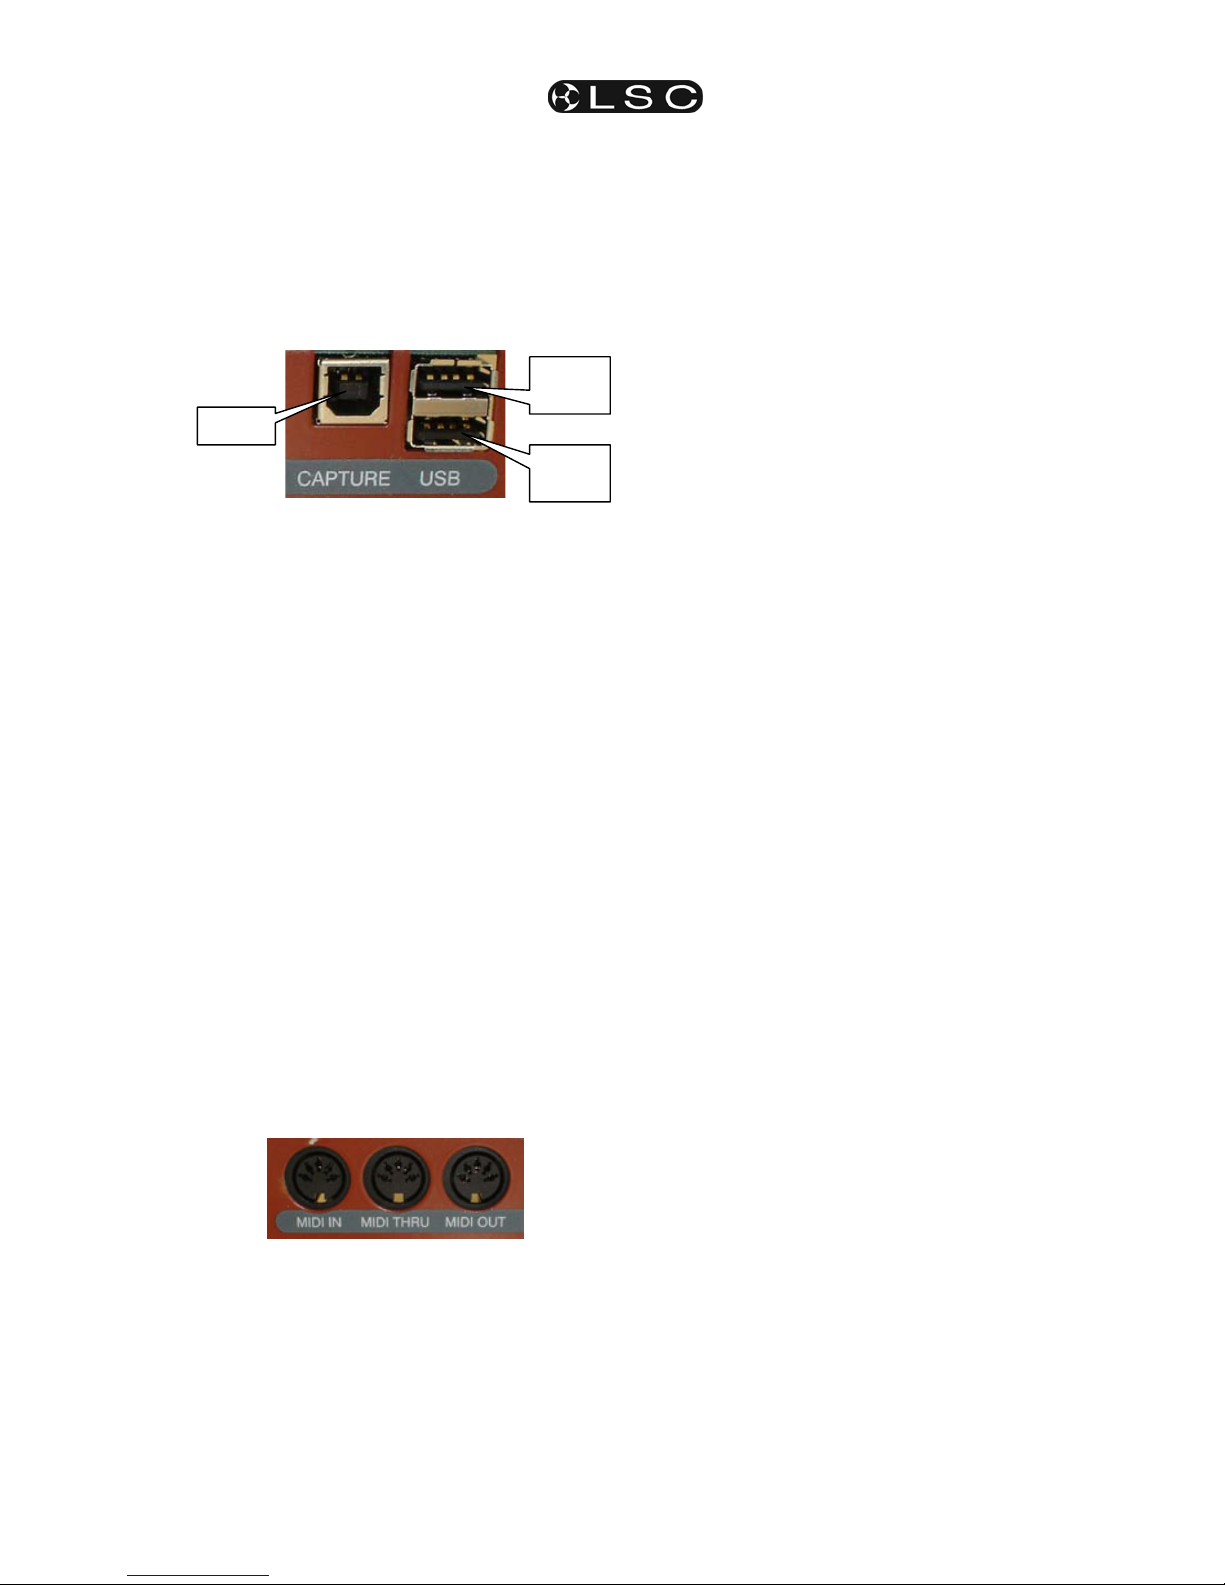
3.10 USB Connectors (Optional) _________________ 6
3.11 Capture (optional)_________________________ 6
4FRONT PANEL TOUR 7
4.1 YELLOW BANK FADERS __________________ 7
4.2 YELLOW BANK MASTER __________________ 7
4.3 MODE RED BANK BUTTON ________________ 7
4.4 RED BANK FADERS ______________________ 7
4.5 RED MASTER ___________________________ 7
4.6 FLASH ASSIGN f/a BUTTONS ______________ 7
4.7 MASTERS FLASH BUTTONS_______________ 8
4.8 GRAB MASTER__________________________ 8
4.9 GRAB f/a BUTTON _______________________ 8
4.10 IN and OUT TIME FADERS_________________ 8
4.11 FLASH LEVEL CONTROL__________________ 8
4.12 ADD/SOLO BUTTON______________________ 8
4.13 PAGE RED BANK BUTTON AND DISPLAY____ 8
4.14 STACK MASTER _________________________ 9
4.15 STACK FLASH___________________________ 9
4.16 > (STACK) ______________________________ 9
4.17 < (STACK) ______________________________ 9
4.18 STOP/STEP (STACK) _____________________ 9
4.19 DOT MATRIX DISPLAY AND LEDS __________ 9
4.20 RECORD SCENE BUTTON ________________ 9
4.21 RECORD CHASE BUTTON_________________ 9
4.22 RECORD STACK BUTTON________________ 10
4.23 ASSIGN COPY BUTTON__________________ 10
4.24 SELECT BUTTON _______________________ 10
4.25 EDIT BUTTON __________________________ 10
4.26 REMOVE BUTTON ______________________ 10
4.27 ADD BUTTON __________________________ 10
4.28 FUNCTION BUTTON_____________________ 10
4.29 EDIT WHEEL___________________________ 10
4.30 EDIT WHEEL INDICATOR ________________ 10
4.31 > (YES) BUTTON________________________ 10
4.32 < (NO) BUTTON_________________________ 10
4.33 STEP STOP (OK) BUTTON________________ 10
5MODES OF OPERATION 11
5.1 OVERVIEW ____________________________ 11
5.2 PRESET MODE_________________________ 11
5.3 WIDE MODE ___________________________ 11
5.4 PLAYBACK MODE ______________________ 11
6QUICKSTART TUTORIAL 12
6.1 RESET ________________________________ 12
6.2 CONTROLLING LIGHTS__________________ 12
6.3 TIMED FADES BETWEEN BANKS__________ 12
6.4 RECORDING A SCENE __________________ 13
6.5 REPLAYING A SCENE ___________________ 14
6.6 RECORDING A CHASE __________________ 14
6.7 REPLAYING A CHASE ___________________ 14
6.8 RECORDING A STACK___________________ 14
6.9 REPLAYING A STACK ___________________ 15
7MEMORY STRUCTURE 16
7.1 OVERVIEW ____________________________ 16
7.2 “PLAYBACK” MEMORY ACCESS___________ 16
7.3 MODE/PAGE FREEZE ___________________ 16
7.4 FREEZE INDICATOR ____________________ 16
7.5 “RECORD” MEMORY ACCESS ____________ 16
7.6 SELECT PLAYBACK_____________________ 16
7.7 EDIT MEMORY _________________________ 16
7.8 EXTERNAL STORAGE ___________________ 16
8FADE TIMES 17
8.1 TIME FADERS__________________________ 17
8.2 TIMED FADES__________________________ 17
8.3 MEMORY TIMES________________________ 17
8.4 MANUAL FADES ________________________ 17
8.5 CHANNELS FADE TIMES_________________ 17
8.6 MASTERS FADE TIMES__________________ 17
8.7 PLAYBACK FADE TIMES _________________ 17
8.8 GRAB MASTER FADE TIMES _____________ 17
8.9 STACK FADE TIMES_____________________ 17
9SCENES 18
9.1 OVERVIEW ____________________________ 18
9.2 SCENE RECORDING ____________________ 18
9.3 SCENE PLAYBACK______________________ 19
9.4 EDITING A SCENE ______________________ 19
9.5 COPYING A SCENE _____________________ 20
9.6 REMOVING (DELETING) A SCENE _________ 20
10 CHASES 21
10.1 OVERVIEW ____________________________ 21
10.2 CHASE TERMINOLOGY__________________ 21
10.3 CHASE RECORDING ____________________ 21
10.4 CHASE PLAYBACK______________________ 22
10.5 EDITING A CHASE ______________________ 23
10.6 COPYING A CHASE _____________________ 24
10.7 REMOVING A CHASE____________________ 24

Contents maXim S & M
Operator Manual V3
LSC Lighting Systems (Aust) Pty. Ltd
11 GRAB MASTER 25
11.1 OVERVIEW ____________________________ 25
11.2 GRAB AS A GRAB MASTER ______________ 25
11.3 GRAB AS A SCENE MASTER _____________ 25
11.4 GRAB AS A CHASE MASTER _____________ 25
11.5 GRAB AS A MEMORY ___________________ 25
12 STACKS 26
12.1 OVERVIEW ____________________________ 26
12.2 RECORDING A STACK___________________ 26
12.3 STACK PLAYBACK______________________ 27
12.4 STACK TIMES__________________________ 27
12.5 EDITING A STACK ______________________ 28
12.6 COPYING A STACK _____________________ 29
12.7 REMOVING (DELETING) A STACK _________ 29
12.8 CLEARING THE STACK MASTER __________ 29
13 FLASH 30
13.1 OVERVIEW ____________________________ 30
13.2 ADD/SOLO MODE_______________________ 30
13.3 FLASH LEVEL __________________________ 30
14 PATCH 31
14.1 OVERVIEW ____________________________ 31
14.2 REMOVE All PATCHES __________________ 31
14.3 PATCHING_____________________________ 31
14.4 PATCHING MULTIPLE SLOTS_____________ 31
14.5 SET A PATCH LEVEL____________________ 31
14.6 UNPATCH A DMX SLOT FROM A CHANNEL _ 31
14.7 1 TO 1 PATCH__________________________ 31
15 STL (SOUND TO LIGHT) and SyncoBEAT
32
15.1 OVERVIEW ____________________________ 32
15.2 CONNECT STL TO CHASE _______________ 32
15.3 STL (SOUND TO LIGHT) MODE____________ 32
15.4 SYNCOBEAT MODE_____________________ 33
16 MIDI 34
16.1 OVERVIEW ____________________________ 34
16.2 MIDI ON/OFF___________________________ 34
16.3 MIDI TRANSMIT ON/OFF _________________ 34
16.4 maXim MIDI MAPPING ___________________ 34
16.5 CONTROLLING THE maXim FROM A MIDI
DEVICE ___________________________________ 34
16.6 CONTROLLING A MIDI DEVICE FROM THE
maXim. ____________________________________ 35
17 CAPTURE 36
17.1 OVERVIEW ____________________________ 36
17.2 CONNECTING THE CAPTURE PORT _______ 36
17.3 CAPTURE DEMO SHOWS ________________ 36
17.4 CAPTURE DEMO MODE _________________ 36
17.5 CAPTURE FULL ________________________ 36
18 UTILITIES 37
18.1 USB DISK OPERATIONS _________________ 37
18.2 RESET________________________________ 37
18.3 SETUP MEMU__________________________ 37
18.4 LOCK _________________________________ 37
18.5 PREFERENCES ________________________ 38
18.6 SOFTWARE UPGRADE __________________ 39
18.7 VIDEO ________________________________ 39
18.8 DIAGNOSTICS _________________________ 40
19 DMX 512A 42
DMX512 APPLICATIONS ______________________42
20 TERMINOLOGY 43
20.1 FIXTURE _______________________________43
20.2 CHANNEL ______________________________43
20.3 LOOK__________________________________43
20.4 HIGHEST TAKES PRECEDENCE (HTP) ______43
20.5 DIPLESS CROSSFADE ___________________43
20.6 SCENE_________________________________43
20.7 CHASE_________________________________43
20.8 STACK_________________________________43
20.9 PLAYBACK _____________________________43
21 COMPLIANCE STATEMENTS 43
21.1 C TICK COMPLIANCE STATEMENT _________43
21.2 CE COMPLIANCE STATEMENT ____________43
21.3 DISCLAIMER____________________________43
22 COMPANY PROFILE 44

maXim S & M
Operator Manual V3
LSC Lighting Systems (Aust) Pty. Ltd Page 1
1 maXim S & M QUICK REFERENCE
1.1 RECORD A SCENE
To record the output as a Scene, press;
[record scene] [f/a] (scene number) (any of the red
bank flash/assign buttons).
1.2 GRAB THE OUTPUT IN GRAB MASTER
To record the output in the Grab master, press;
[record scene] [f/a] (grab master)
1.3 RECORD A CHASE
To record a Chase press;
[record chase] [f/a] (chase number) (any red bank
flash/assign buttons) (or the grab f/a).
Each step of a chase consists of either a previously
recorded scene or a snapshot of the maXim output.
•To add a scene as a step, press;
[f/a] (scene number) (any of the red bank
flash/assign buttons).
•To record a snapshot (of the current maXim
output) as a step, press; [record scene]
Continue to add steps as above.
When all steps have been recorded, complete the
chase by pressing;
[record chase].
1.4 PLAYBACK A SCENE OR CHASE
Select “Playback” mode by pressing;
[mode red bank]
until the “p’back” LED lights.
If necessary, select the page containing the scene or
chase by tapping [page red bank]. Fade up the red
Playback containing the scene or chase and also fade
up the red master.
1.5 CONTROLLING A SCENE OR CHASE
Use [select]to alter a playback without affecting the
recorded memory.
Press;
[select], [f/a] (playback to control).
Repeatedly press [function] to cycle though the control
parameters. See “Chase Modes” below for details.
When finished, press;
[select].
Use [edit]to permanently change the contents of a
memory. The changes are also seen live on the
playback if the playback fader is up.
Press;
[edit], [page] (optional), [f/a] (memory to edit).
Repeatedly press [function] to cycle though the
parameters that you can edit. See “Chase Modes”
below for details.
When finished, press;
[edit].
Changes are automatically saved.
1.6 CHASE MODES
To change the settings of a chase, press either;
[select] or [edit] (see above for differences), [f/a]
(Chase number).
To set the SPEED, rotate the EDIT wheel.
To set the FADE between steps, press [function] until
both the “in” & “out” LEDs light, then rotate the EDIT
wheel.
To change the MODE or DIRECTION of a chase use
the 3 buttons below the EDIT wheel.
BUTTONS ACTION
[step/stop]STOPS a running chase
then STEPS a stopped
case
[>](Forward) RUNS A CHASE
FORWARD
[<] (Reverse) RUNS A CHASE
REVERSE
Hold [>] Tap [<]Selects BOUNCE mode
[>]or [<]De-selects BOUNCE
mode
Hold [step/stop]
Tap [>]Selects SINGLE SHOT
mode
[>]or [<]RUNS A SINGLE SHOT
Hold [step/stop]
Tap [>] De-selects single shot
mode
When finished, press [select] or [edit].
To step a chase press its [f/a] button.
1.7 RECORD A STACK
To record a stack, press;
[record stack],
[page] (optional),
[f/a] (stack number) (any red bank f/a buttons).
To add a scene or chase as a step, press;
[page] (optional),
[f/a] (scene or chase number) (any of the red bank f/a
buttons).
To add a snapshot (of the output) as a step, press;
[record scene].
As each step is added, you can repeatedly press
[function] to set the fade IN time, OUT time and LINK
(automatically to next step) time.
Pressing [function] again shows the current step
number and allows you to record the next step.
Continue to record steps as above.
When all steps have been recorded, complete the stack
by pressing;
[record stack].
1.8 PLAYBACK A STACK
To assign a stack to the stack master, press
[assign],
[page] (optional),
[f/a] (stack number),
[stack flash].
Fade up the stack master to reveal the first step.
To crossfade to the next step, press [ >].
To stop a crossfade press [step/stop].
To start a stopped crossfade press [>].
To momentarily start hold [step/stop].
To reverse a stopped crossfade press [<].
To fade back one step, press [<] (reverse).
You may only crossfade back one step but you may
“step” back to any step.
To instantly step a stack in the forward direction, hold
[step/stop], tap [>].
To instantly step a stack in the reverse direction, hold
[step/stop], tap [<].
To randomly select a step HOLD [step/stop] and rotate
the EDIT wheel.
To clear the stack master, press;
[remove], [stack flash], [yes].
This manual suits for next models
1
Table of contents
Other LSC Dj Equipment manuals