manuals.online logo
Brands
  1. Home
  2. •
  3. Brands
  4. •
  5. Lucky Lifestyle
  6. •
  7. Electric Shaver
  8. •
  9. Lucky Lifestyle MASTER BARBER KIT User manual

Lucky Lifestyle MASTER BARBER KIT User manual

Model:
HCL62ACA
10W
complies with
INTERNATIONAL
IEC60335
SAFETY SPECIFICATIONS
PLEASE READ ALL INSTRUCTIONS BEFORE USE
MASTER BARBER KIT
WARRANTY
10
HCL62ACA_IM.indd 1 2017/04/10 3:12:28 PM
Dear customer,
Thank you for choosing to purchase a Lucky brand
product. Thanks to its technology, design and opera-
tion and the fact that it exceeds the strictest quality
standards, a fully satisfactory use and long product life
can be assured.
1. Parts description
1. Blades
2. Blades shift lever
3. On/off switch
4. 3mm comb guide (1/8 inch) #1
5. 6mm comb guide (1/4 inch) #2
6. 9mm comb guide (3/8 inch0 #3
7. 12 mm comb guide (1/2 inch) #4
8. Bottle of lubricating oil
9. Cleaning brush
10. Blades protective cover
2. Safety advice and warnings!
Read these instructions carefully before switching
on the appliance and keep them for future reference.
Failure to follow and observe these instructions could
lead to an accident. Clean all the parts of the product
that will be in contact with head, as indicated in the
cleaning section, before use.
2.1. Use or working environment:
2.1.1. Keep the working area clean and well lit. Clut-
tered and dark areas invite accidents.
2.1.2. Use the appliance in a well ventilated area.
2.1.3. Do not place the appliance on hot surfaces, such
as cooking plates, gas burners, ovens or similar items.
2.1.4. Keep children and bystanders away when using
this appliance.
2.1.5. Place the appliance on a horizontal, flat, stable
surface away from other heat sources.
2.1.6. Do not use the appliance in association with a
programmer, timer or other device that automatically
switches it on.
2.1.7. Do not use the appliance if the cable or plug is
damaged.
2.1.8. Ensure that the voltage indicated on the rating
label matches the mains power supply voltage before
plugging in the appliance.
2.1.9. Connect the appliance to the mains power sup-
ply with an earth socket withstanding a minimum of 10
amperes.
2.1.10. The appliance’s plug must fit into the mains
power supply socket properly. Do not alter the plug.
2.1.11. If using a multi plug check ratings carefully as
the current used by several appliances could easily
exceed the rating of the multi plug.
2.1.12. If any of the appliance casings breaks, imme-
diately disconnect the appliance from the mains power
supply to prevent the possibility of an electric shock.
2.1.13. Do not use the appliance if it has fallen on the
floor or if there are visible signs of damage.
2.1.14. Do not force the power cord. Never use the
power cord to lift up, carry or unplug the appliance.
2.1.15. Do not wrap the power cord around the appli-
ance.
2.1.16. Do not clip or crease the power cord.
2.1.17. Do not allow the power cord to hang or to
come into contact with the surfaces.
2.1.18. Check the state of the power cord. Damaged or
tangled cables increase the risk of electric shock.
2.1.19. Power cord should be regularly examined for
signs of damage, and if the cord is damaged, the appli-
ance must not be used.
2.1.20. Do not touch the plug with wet hands.
2.2. Personal safety:
2.2.1. CAUTION: Do not leave the appliance unattended
during use as there is a risk of an accident.
2.2.2. Do not touch the heated parts of the appliance,
as it may cause serious burns.
2.2.3. This appliance is only for domestic use, not for
industrial or professional use. It is not intended to be
used by guests in hospitality environments such as
bed and breakfast, hotels, motels, and other types of
residential environments, even in farm houses, areas
of the kitchen staff in shops, offices and other work
environments.
1
2
6
7
3
10
4
8
5
9
HCL62ACA_IM.indd 2 2017/04/10 3:12:28 PM
2.2.4. This appliance is not intended for use by
persons (including children) with reduced physical,
sensory or mental capabilities, or lack of experience
and knowledge, unless they have been given supervi-
sion or instruction concerning use of the appliance by
a person responsible for their safety.
2.2.5. This appliance is not a toy. Children should be
supervised to ensure that they do not play with the
appliance.
2.3. Use and care:
2.3.1. Fully unroll the appliance’s power cable before
each use.
2.3.2. Do not use the appliance if the parts or acces-
sories are not properly fitted.
2.3.3. Unplug the appliance from the mains power
supply when not in use and before undertaking any
cleaning task.
2.3.4. This appliance should be stored out of reach
of children.
2.3.5. Do not store the appliance if it is still on/hot.
2.3.6. Never leave the appliance unattended when in
use and keep out of the reach of children.
2.3.7. If, for some reason, the appliance were to catch
fire, disconnect the appliance from the mains power
supply and DO NOT USE WATER TO PUT THE FIRE
OUT.
2.4. Service:
2.4.1. Make sure that the appliance is serviced only
by suitably qualified technician, and that only original
spare parts or accessories are used to replace existing
parts/accessories.
2.4.2. If the power cord is damaged, the manufacturer
or its service agent or a similarly qualified person must
replace it in order to avoid a hazard.
2.4.3. Any misuse or failure to follow the instructions
for use renders the guarantee and the manufacturer’s
liability null and void.
3. Instructions for use
3.1. Before use:
3.1.1. Remove the appliance’s protective film(if ap-
plicable).
3.1.2. Before using the product for the first time, clean
the parts that will come into contact with your head in
the manner described in the cleaning section.
3.2.1 Use and care:
Using the appliance:
3.2.1.1. Unroll the cable completely before plugging it
in.
3.2.1.2. Connect the appliance to the mains.
3.2.1.3. Remove the protective lid (Fig 1)
3.2.1.4. Make sure that the blades are correctly al-
ligned.
3.2.1.5. To attach a comb guide, pick it up by its two
tips and press it against the blades of the appliance un-
till it is firmly fixed. To remove it, just pull it out (Fig 2)
3.2.1.6. Turn the appliance on using the on/off switch.
3.2.1.7. You can restart the appliance using the switch,
but only once the control device has cooled. If it is has
not restarted, do not force it and leave it to cool.
Using the power screw:
3.2.1.8. The blade track is set to the optimum setting
in production; however, the blade track can be changed
as a result of the voltage fluctuations.
3.2.1.9. You can set this blade track if necessary, use
HCL62ACA_IM.indd 3 2017/04/10 3:12:28 PM
the key (included with your pack) or screwdriver. Do
the following in order to adjust it:
3.2.1.10. Switch the clipper on.
3.2.1.11. Turn the adjusting screw clockwise until hear
a loud noise.
3.2.1.12. Then turn the adjusting screw anti-clockwise
until the loud noise stops. This is the optimum point for
the clipper to operate, leave the screw in this position.
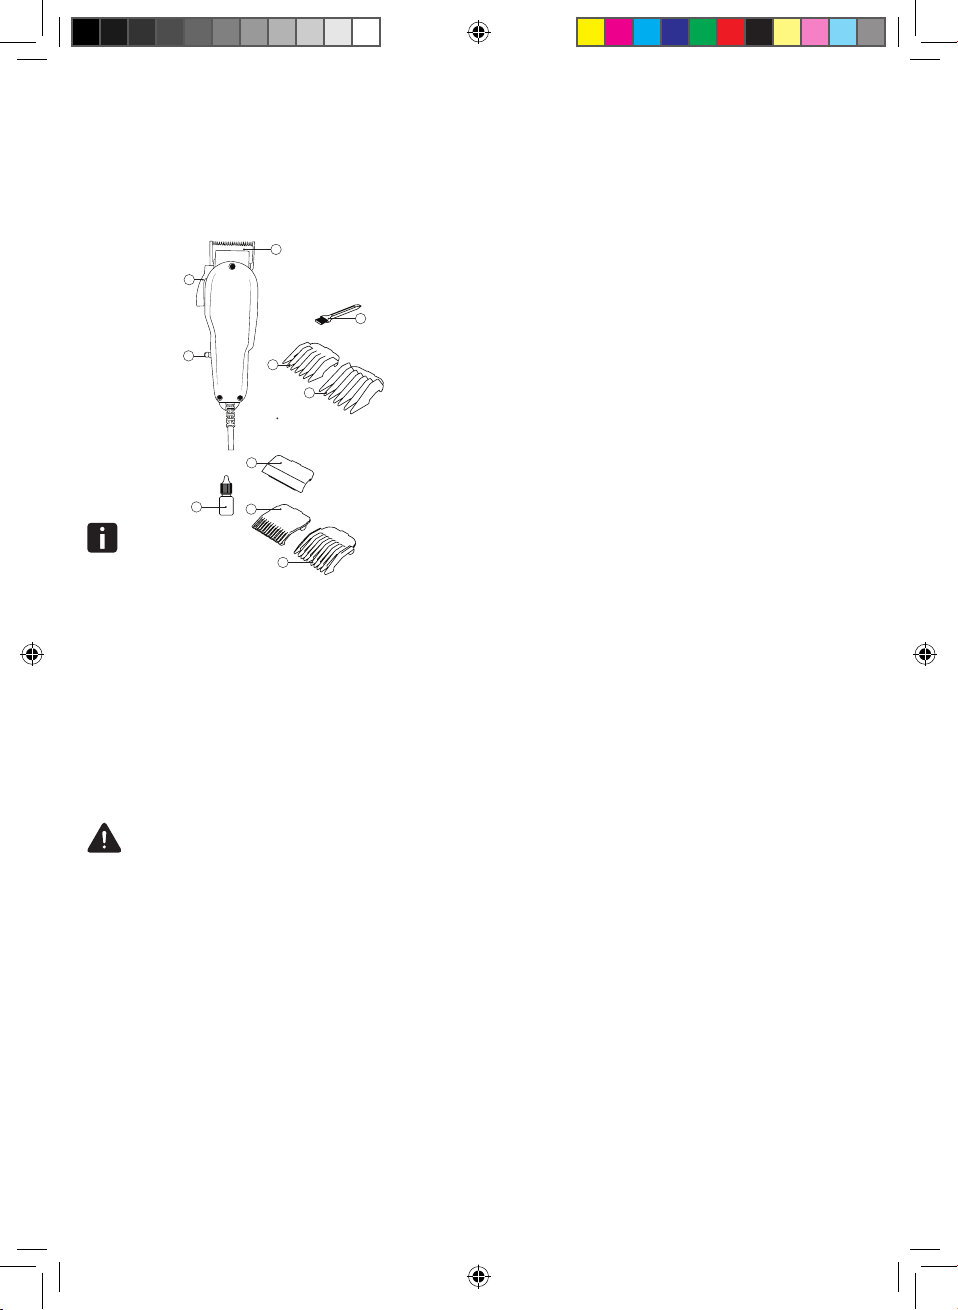
Cutting with attachment combs:
3.2.1.13. Depending on the desired hair cut, the clipper
can be operated with or without an attachment comb.
3.2.1.14. There are four attachment combs (3, 6, 9 and
12mm) included with this product.
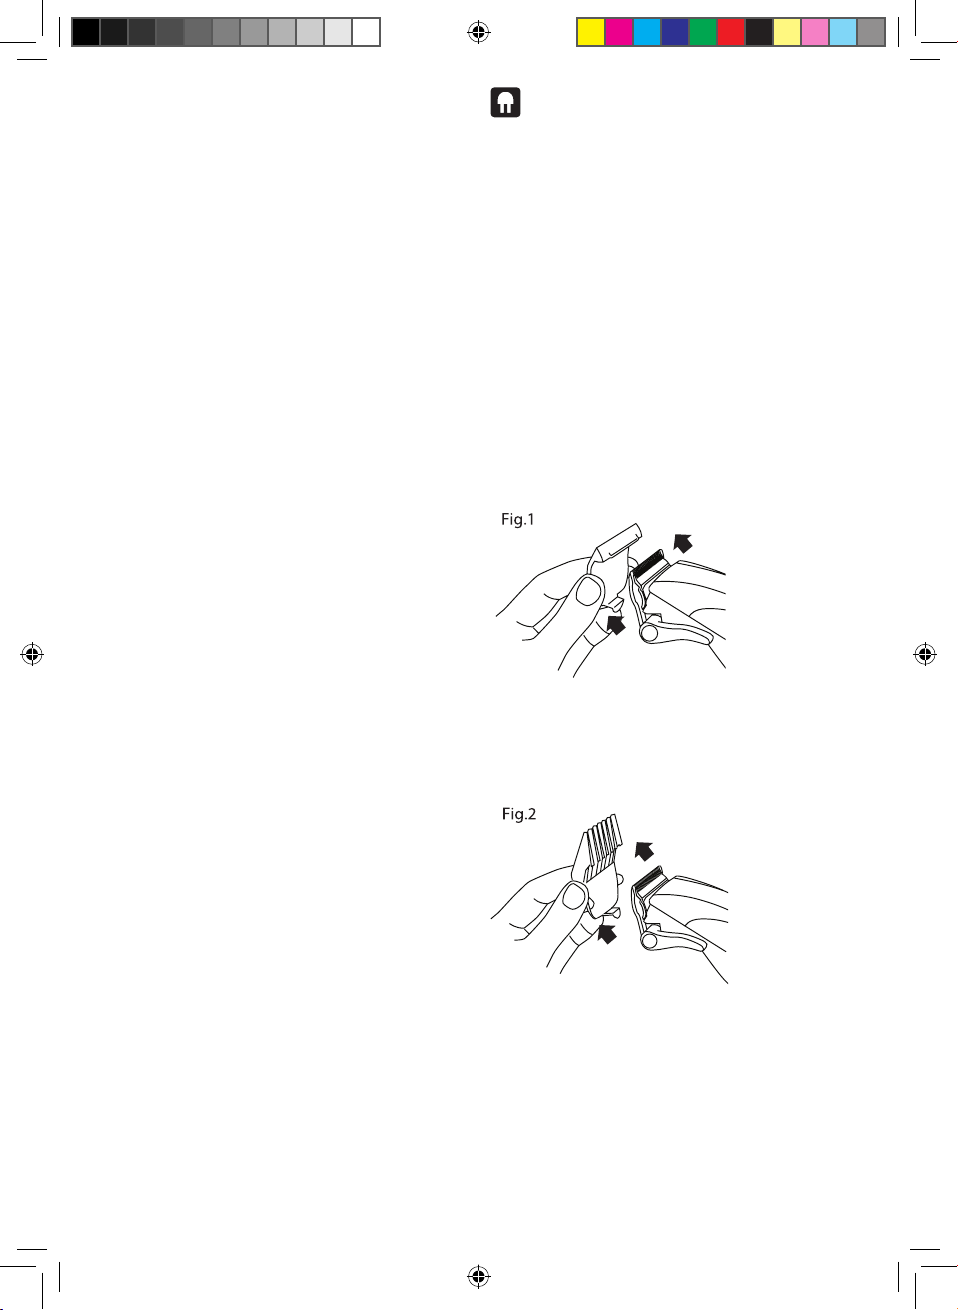
3.2.1.15. To attach a comb, hold comb with the teeth
showing upward and slide it onto and along the clipper
blade until the front of the comb firmly clicks into the
clipper blade and push the back of the comb down until
it is clipped into position.
3.2.1.16. To remove the comb, simply pull the comb
upward and away from the clipper blade.
How to use the blade lever:
3.2.1.17. The lever is conveniently located above the
on/off switch so it can easily be adjusted while the
clipper is in your hand.
3.2.1.18. The lever adds versatility to the clipper by
allowing a gradual change to the length of a cut without
an attachment comb.
3.2.1.19. When the lever is in the uppermost position,
the blades will give the closest cut leaving the hair very
short. Pushing the lever gradually downward increases
the cutting length.
3.2.1.20. In its lowest position, the lever will leave the
hair approximately the same length as a #1 comb.
3.2.1.21. The lever will also extend the blade’s life as a
longer cut requires less work from the blades.
3.2.1.22. While the clipper is running, move the Lever
from “close cut” to “longer cut” a number of times.
This will help keep cut hair away from the blades. If the
clipper stops cutting, and the method above does not
help, then the blades are blunt and need to be replaced.
Changing the blades:
3.2.1.23. Switch off the clipper and disconnect from
the mains.
3.2.1.24. Undo both screws on the blades; remove the
bottom blade and top blade.
3.2.1.25. When assembling, the bottom blade and top
blade should be aligned as follows:
3.2.1.26. Raise the adjustable taper control lever to the
shortest cutting length.
3.2.1.27. The distance between the front edge of the
bottom blade and the front edge of the top blade should
be between 0.8mm and 1.5mm.
3.2.1.28. The sides of the two blades should be parallel
to each other.
3.2.1.29. The first tooth of the top blade (from the left)
must cover the first tooth of the bottom blade.
3.2.1.30. The tooth on the far right of the top blade
must touch the outermost large tooth of the bottom
blade.
3.2.1.31. Once aligned tighten both screws.
3.2.2. How to cut the hair:
3.2.2.1. Situate the person whose hair you are going to
cut so that the top of their head is at your eye level.
3.2.2.2. For optimum restults, it is reccomended that
you use the appliance on dry hair, as it is much easier
to control the hair and the result.
3.2.2.3. Hold the appliance in a calm and relaxed man-
ner in order to ensure maximim control of the cut and
a uniform result. Proceed to used short cuts gradually
going around the head.
3.2.2.4. Leave the hair a little longer than the desired
length as it can always be altered later.
3.2.2.5. While working, adapt the comb / comb guid to
achieve the desired result.
3.2.2.6. At regular intervals, stop cutting in order to
comb the hair anf check the results so far.
3.2.3 Nape:
3.2.3.1. Attach comb guide size: 3mm - 6mm.
3.2.3.2. Hold the appliance with the razor facing
downwards and begin to cut the hair from the base of
the neck.
3.2.3.3.Make some upward movements, raising the
appliance gradually and away from the head, cutting
the hair gradually until the height of the ears (Fig. 3)
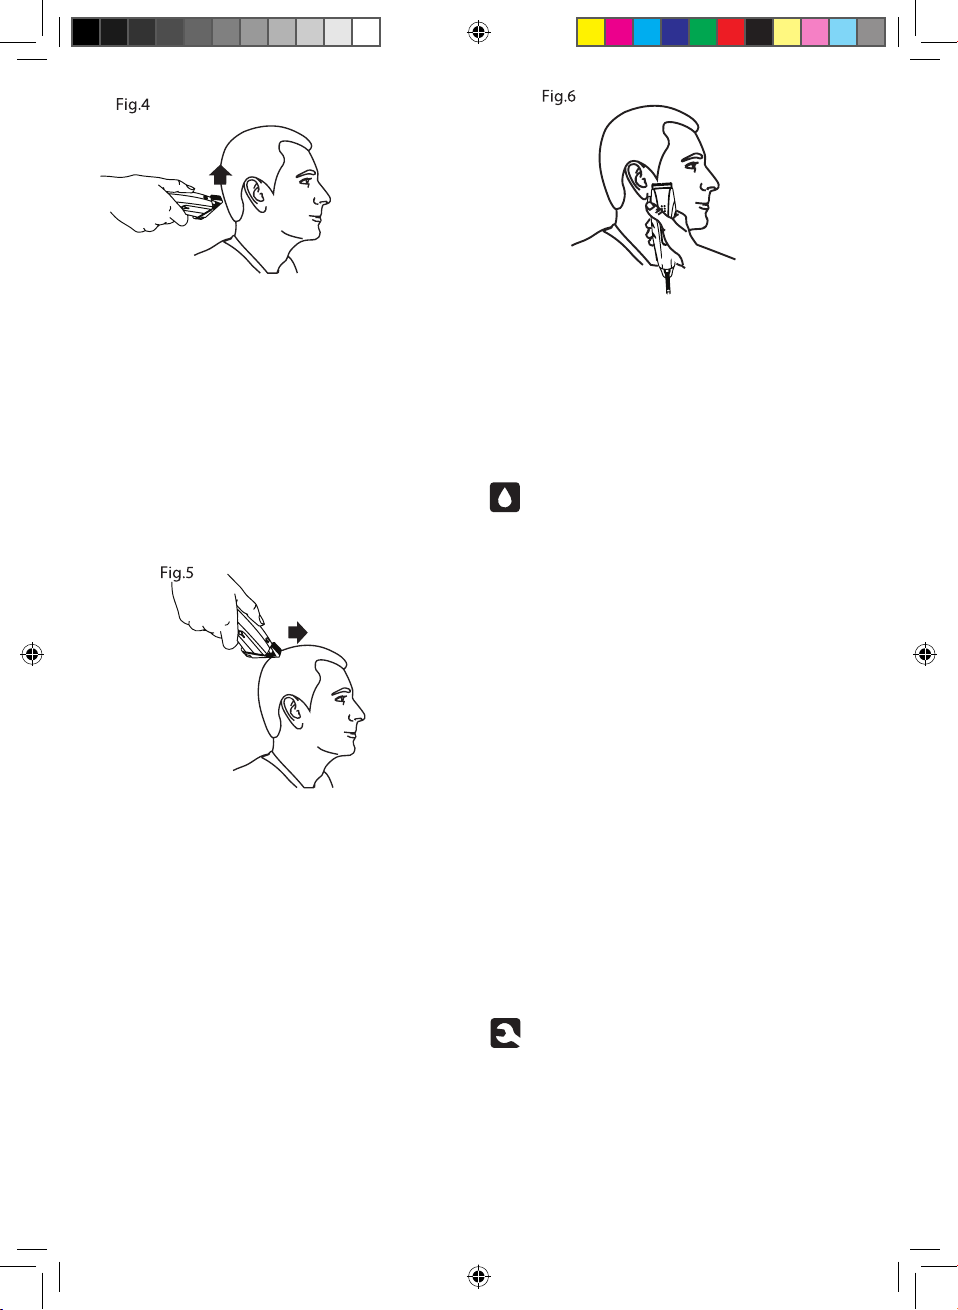
3.2.4 The back of the head:
3.2.4.1. Attach comb guide size 9-12mm and continue
with the back of the head (Fig 4)
HCL62ACA_IM.indd 4 2017/04/10 3:12:28 PM
3.2.5 The side of the head:
3.2.5.1. Attach comb guide size: 3mm - 6mm to trim
the sideburns.
3.2.5.2. Attach the longest comb guide size
9mm/12mm again and continue until you reach the top
of the head.
3.2.6 The top of the head:
3.2.6.1. Attach comb guide size 9mm or 12mm, pass
the appliance from the back to the front, against the
growth of the hair (Fig 5). In some cases it’s necessary
to go over what you have done a second time from
front to back.
3.2.6.2. Attach comb guide size 3mm or 6mm when
you want to achieve a more precise cut.
- Use comb guides size 12-15mm to leave hair at a
longer length. Hold the hair up with the comb or the
comb and your fingers and cut.
3.2.6.3. Always work from the back to the front reduc-
ing the length between your fingers or the comb and
the head gradually.
3.2.7 The final touch:
3.2.7.1. Finally use the appliance without attaching any
comb guides to the blades to cut the hair around
the base of the neck, the sides of the neck and
the ears.
3.2.7.2. To make the sideburns straight, turn the ap-
pliance
over to use the upper blades (Fig 6). Move the
appliance adapting it the physiognomy of the
head.
3.3 Once you have finished using the appliance:
3.3.1. Allow appliance to cool down.
3.3.2. Unplug the appliance from the mains power
supply.
3.3.3. Clean the appliance as described in the cleaning
section.
3.3.4. Put the protective cover back on.
4. Cleaning
4.1. Disconnect the appliance from the mains power
supply and allow it to cool completely before undertak-
ing any cleaning task.
4.2. Clean the removable crumb tray with a
damp cloth and dry.
4.3. Clean the outer parts of the appliance with a damp
cloth with a few drops of washing-up liquid and then
dry. CAUTION! Do not immerse electrical parts of the
appliance in any liquid.
4.4. Do not use solvents, or products with an acid
or base pH such as bleach, or abrasive products, for
cleaning the appliance.
4.5. Never submerge the appliance in water or any
other liquid or place it under running water.
4.6. During the cleaning process, take special care with
the blades, as they are very sharp.
4.7. Clean the blades and the comb guides with the
cleaning brush. Remove the hairs from the blades and
from inside the appliance with the brush. It is important
to clean off remaining hairs after each use.
5. Anomalies and repair
5.1. Take the appliance to an authorised support centre
if product is damaged or other problems arise.
5.2. If the connection to the mains has been damaged,
it must be replaced and you should proceed as you
would in the case of damage.
HCL62ACA_IM.indd 5 2017/04/10 3:12:28 PM
-This symbol signifies that the appliance must not be
used near water
This appliance complies with Directive 2006/95/EC on
Low Voltage and Directive 2004/108/EC on Electromag-
netic Compatibility.
HCL62ACA_IM.indd 6 2017/04/10 3:12:29 PM
Lucky guarantees that this product has been thoroughly inspected and tested before being dispatched and is free from
mechanical and electrical defects and complies with the applicable safety standards. However, should defects due to
faulty material or workmanship develop, under normal domestic use, within 6 months from the date of purchase please
return the product to the store from where it was purchased for a full refund or replacement.
The following conditions apply:
1) Please ensure you retain your receipt as this must be presented when making a claim under the terms of the warranty.
It is impossible to determine the warranty period without proof of purchase, so please keep this in a safe place.
2) If a refund or exchange is required the product must be complete with all accessories, parts and packaging. Missing
parts will render the warranty void.
3) Upon receipt of your appliance check it for any transport damage to ensure it is safe for use. Return it to the store as
soon as possible for exchange if damaged. The warranty is void if products are damaged after use, so please do not
use the damaged product.
4) Your product is designed for normal domestic household use. Failure to read and comply with the instructions
for use, cleaning and maintenance will render your warranty void, so please read these instructions carefully to
ensure your safety, and get the most effective use from the product. (e.g. lime scale; water deposits; and/or insect
infestation)
5) Any abuse, negligent, improper or accidental use or care will render the warranty void and Creative Housewares (Pty)
Ltd will not be liable for any loss or damage.
6) Any attempted repair, or replacement of unauthorised parts will render the warranty void, so please contact an
authorised service centre or agent for any service or repair requirements.
Extended 12 Month Limited Warranty
Lucky offer an extended 12 month limited warranty from the date of purchase to offer the consumer peace of mind on
their purchase. Should defects due to faulty material or workmanship develop, under normal domestic use, within 12
months from the date of purchase, please return the product to the store from where it was purchased for replacement.
Before returning your product, check for the following:
1) Your household mains supply socket is working and switched on.
2) The mains supply circuit is not overloaded (White trip switch on your DB board is off).
3) You have read the trouble shooting guide in your Instructions for Use.
4) All accessories and parts are present.
If service or repair becomes necessary outside the warranty period, this service is still available however all transport/
postage, spares and labour costs will be paid by the consumer. All chargeable repairs will require the consumers’
approval in writing once the quote is accepted. Once the go-ahead has been received Lucky will undertake to conduct
the repair within a reasonable time and maintain the condition of the product as received.
All repairs carry a 3 month warranty. Lucky will attempt to conduct repairs within reasonable industry standards but
cannot be held responsible or liable for any circumstances not under their direct control.
1 year warranty
Cape Town
20 Te kstiel Street, Parow, Cape
Town, 7493, South Africa • P.O. Box
6156 Parow East, 7501, South Africa
Tel: +27 21 931 8117
Fax: +27 21 931 4058
Durban
35 Adrain Road, Windermere,
Durban, South Africa, 4001
Tel: +27 31 303 3465
Fax: +27 31 303 8259
Johannesburg
U n i t 2 5 & 2 6 S a n C r o y
O f f i c e p a r k, D i e A g o r a R o a d ,
C r o y d o n , 1 6 1 9
Tel: +27 11 392 5652
Fax: +27 11 392 1694
HCL62ACA_IM.indd 7 2017/04/10 3:12:29 PM
HCL62ACA_IM.indd 8 2017/04/10 3:12:29 PM

This manual suits for next models

1

Other Lucky Lifestyle Electric Shaver manuals

Lucky Lifestyle MSH3HRWA User manual

Lucky Lifestyle

Lucky Lifestyle MSH3HRWA User manual

Lucky Lifestyle Master Barber Kit HCL07AC User manual

Lucky Lifestyle

Lucky Lifestyle Master Barber Kit HCL07AC User manual

Lucky Lifestyle NTRB31SA User manual

Lucky Lifestyle

Lucky Lifestyle NTRB31SA User manual

Popular Electric Shaver manuals by other brands

Panasonic ES518 operating instructions

Panasonic

Panasonic ES518 operating instructions

Norelco QuadraAction 7825XL Specifications

Norelco

Norelco QuadraAction 7825XL Specifications

KING P070 instruction manual

KING

KING P070 instruction manual

Philips Lumea SC2009 user manual

Philips

Philips Lumea SC2009 user manual

ECG ZS 1420 instruction manual

ECG

ECG ZS 1420 instruction manual

Philips NORELCO SP9883 manual

Philips

Philips NORELCO SP9883 manual

Philips HQ177 Specifications

Philips

Philips HQ177 Specifications

Philips S5000 series manual

Philips

Philips S5000 series manual

UFESA CP6550 instruction manual

UFESA

UFESA CP6550 instruction manual

Remington WR-5000 Use and care guide

Remington

Remington WR-5000 Use and care guide

Sunbeam MG6500 Instruction booklet

Sunbeam

Sunbeam MG6500 Instruction booklet

Panasonic ES-8163 operating instructions

Panasonic

Panasonic ES-8163 operating instructions

Philips Norelco 6000 Series manual

Philips

Philips Norelco 6000 Series manual

Philips PT732 manual

Philips

Philips PT732 manual

Remington PR1355 quick start guide

Remington

Remington PR1355 quick start guide

Philips Norelco S5570CC manual

Philips

Philips Norelco S5570CC manual

Remington SMOOTH AND SILKY WDF-4840 instructions

Remington

Remington SMOOTH AND SILKY WDF-4840 instructions

McGREGOR ERP929122426 instruction manual

McGREGOR

McGREGOR ERP929122426 instruction manual

manuals.online logo
manuals.online logoBrands
  • About & Mission
  • Contact us
  • Privacy Policy
  • Terms and Conditions

Copyright 2025 Manuals.Online. All Rights Reserved.