Lumicon Easy Guider LG1015 User manual

Lumicon Easy Guider
for 2 inch focuers
The Original Off Axis Guider. Patent:4,448,500 - 1981
Part number LG1015
Configured for DSLR Camera setups

2
Congratulations and thank you for purchasing one of the most
powerful astrographic accessories on the market today – The
Lumicon Easy Guider.
Lumicon first patented the Off-Axis Guider in 1981 and has been
manufacturing this same device since that time. Lumicon OAG’s
have been sold world wide and is the most used off-axis guiding
system in the world. We’re pleased to add the performance
and quality, that tens of thousands of astronomers have
enjoyed, to your imaging setup. With a few short minutes of
careful setup you will be enjoying the benefits of off-axis
guiding.
Benefits of Off-Axis Guiding
•Guiding occurs with the same light path as the imaging
detector thereby eliminating the effects due to
differential flexure/slop of the auxiliary guide scope.
•Differential flexure in guiding setups often introduces
errors far worse than the actual corrections actually
needed. Off-axis Guiding avoids this problem.
•Auxillery guide scopes are blind to image shifting due to
primary mirror “flop” in telescopes with moving primary
mirrors (SCT’s). Off-axis guiding corrects for this
problem.
•Guiding occurs at the same focal length as the main
imaging camera. Although CCD guiding software can
compute tracking errors to sub-pixel accuracy, many
guide scope combinations have marginal or too-short
focal lengths to be properly effective. Off-Axis Guiding
Avoids this problem.

3
Off-Axis Guiding Tips
•First things first. If your mount has a periodic error
correction system make sure it is well trained. We
recommend using PEMPro.
•Make sure your mount is well polar aligned. Guiding will
keep the guide star stationary but the field will still
rotate. We recommend learning to use a drift
alignment technique with assist software such as
PEMPro.
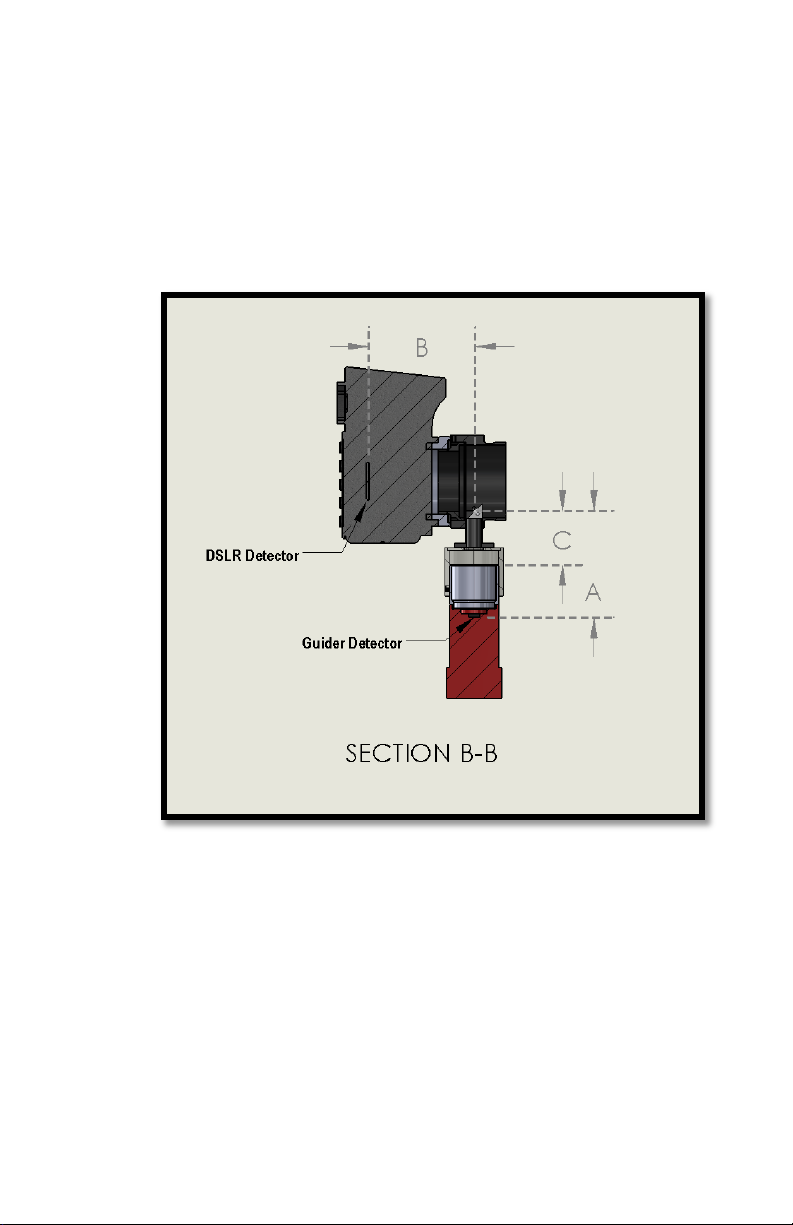
•Adding an Off-Axis Guider to your system adds a layer
of mechanical complexity to the imaging train. Make
sure all of the connections between the telescope and
detector are tight and wiggle/slop free. A tight system
is your best starting point for success.
•Make sure the guide camera is equally locked in place.
Any movement of the guide camera will introduce
artificial guiding errors.
•Off-Axis Guiding is powerful. A common mistake made
when configuring guiding software is to set it to be too
responsive. If the servo loop is set too tight then the
guiding system will attempt to respond to star
movement due to atmospheric seeing disturbances.
•Use longer guide camera exposures to help smooth out
seeing displacements.
•Use longer guide exposure intervals to avoid responding
to seeing displacements.
•An auto-guiding system is working best when it is
making the fewest amount of guiding corrections
needed to maintain suitable tracking.
•Remember, the goal of guiding is to correct for drive
tracking errors and not seeing and wind turbulence
errors.

4
Guider Layout & Setup
The guider is fairly straightforward and consists of the main
guider body, a pick-out prism, guide camera drawtube, and
removable/rotating T-thread adapter. To assemble your
system, loosen the 3 locking screws that hold the T-thread
adapter in place and remove the adapter from the guider body.
Thread the adapter into the front of your camera adapter (DSLR
T-ring) and firmly tighten. (You may need to use a spacer ring or
alternate adapter in order for the
guide camera to reach focus; see
specific configurations later). Re-
attach the adapter and camera to
the guider body. Before tightening
the locking screws adjust the
orientation of the camera so the
detector is “square” with the edge
of the prism. Look through the
guider into the camera to view this
alignment.

5
Guider Setup Continued
Attach the 1.25” extension tube to the guide camera. DSLR
cameras have a larger Back Focal Distance, therefore the guide
cameras need to be spaced back further. The extension tube
allows for the required back focus spacing.

6
Guider Setup Continued
Insert the guide camera into guide camera drawtube, midway
down the tube, and lightly lock the thumb screws. In later steps
you will adjust the position (focus) of the guide camera and re-
lock the screws more firmly. As you insert the guide camera
into the drawtube align the orientation of the guide chip with
the edge of the pick-out prism in a similar fashion as you did the
main camera. However, this time it will be a blind alignment.
Just do your best. In the figure below we’ve turned the guide
camera transparent for illustration purposes. Again, just do
your best to align the long edge of the chip with the long edge
of the prism.
Finally, attach your assembled imaging train, plus off-axis
guider, to your telescope focuser. Adjust the orientation of the
whole assembly as necessary.

7
Optical Spacing Configuration
In order for the off-axis guider to work, both the main camera
and the guide camera have to come to focus. For this to
happen, the distance of both camera detectors must be located
the same distance from the center of the pick-out prism.
All units in mm.
Goals:
A must = B
C must be > 27mm and < 48mm
A = Guide Camera Back Focal Distance + C
B = Camera Back Focal Distance + 17.5mm + T Ring thickness – Extension Tube
Length
C = B – Guider Camera BFD

8
Example #1:
•NIKON D7000 DSLR
oBFD = 46.5mm
•T-Ring Thickness = 8.0mm
oBFD = 20mm
•ZWO ASI “Mini” camera (all models) as guider
oBFD = 8.5mm
•Extension Tube Length (Provided with Guider)
oBFD = 25.0mm
Calculation:
First Calculate B:
B = Camera BFD + 17.5 + T-Ring thickness – Extension Tube
Length
B = 46.5 + 17.5 + 8 - 25
B = 47mm
Next Evaluate C:
C = B – Guider camera BFD
C = 47 – 8.5
C = 38.5
C is greater than 27 and less than 48 so the guide camera will
come to focus.

9
Example #2:
•Canon 5D DSLR
oBFD = 44.0mm
•T-Ring Thickness = 8.0mm
oBFD = 20mm
•ZWO ASI “Mini” camera (all models) as guider
oBFD = 8.5mm
•Extension Tube Length (Provided with Guider)
oBFD = 25.0mm
Calculation:
First Calculate B:
B = Camera BFD + 17.5 + T-Ring thickness – Extension Tube
Length
B = 44+ 17.5 + 8 - 25
B = 44.5mm
Next Evaluate C:
C = B – Guider camera BFD
C = 47 – 8.5
C = 38.5
C is greater than 27 and less than 48 so the guide camera will
come to focus.

10
Zwo guiders Back Focal Distance Table
Mini's / Guiders
Model
Back Focus (mm)
ASI120MM Mini Mono
8.5
ASI174MM Mini Mono
8.5
ASI290MM Mini Mono
8.5
Other Guiders Back Focal Distance Table
Model
Back Focus (mm)
Lodestar
12.5
QHYCCD5 Version 1
12.5
QHY5III174
11.0
QHY5III178
11.0
QHY5III185C
11.0
QHY5III224
11.0
QHY5III290
11.0
Model
Back Focus (mm)
Canon EF mount cameras
44
Nikon F Mount Cameras
46.5

11
Final Guider Setup – Focusing
Once your camera and OAG setup is attached to the telescope
and connected to the control computer: Center a bright star
such as Vega or Antares and bring the main camera to focus
using the telescope’s focuser. We recommend using a Bahtinov
mask to assist if the telescope is manually focused and
autofocus software, such as FocusMax, if the focus is controlled
by the computer. Next loosen the guide camera lock screws
and adjust the focus of the guide frame by moving the guide
camera in and out of its draw tube. A Bahtinov mask is very
useful for this task. Once best focus is found, lock down the
guider camera locking screws. It is imperative that the guide
camera have no wiggle or slop or it will introduce guiding errors
as it moves relative to the main camera.
Guiding Software
Last, configure your auto guiding software as necessary. Many
imaging control software packages now integrate auto guiding
features. Prism, TheSky X, MaximDL etc. PHD2 is also a very
good open source package.
Now go take some amazing astrophotos or collect some
excellent scientific data.
Thank you!

12
Lumicon is owned by Optical Structures Incorporated.
11371 Pyrites Way, Suite A
Rancho Cordova, CA 95670
916-638-2003
www.FarpointAstro.com
Table of contents