M-Life ML0656 User manual

Wireless telephone
ML0656
ENOwner’s manual
PLInstrukcja obsługi


3
Owner’s manual
EN
1. GETTING STARTED
This user guide provides you with all the information you need to
get the most from your phone.
Before you make your rst call you will need to set up your phone.
Hearing aid
Please note that the ML0656 works by sending radio signals
between base and handset.
These signals may interfere with some hearing aids, causing a
humming noise.
1.1 Functions
• 50 Name and number phonebook for storing your most
frequently used numbers.
• Caller Display shows you who’s calling before you answer the
phone* and keeps a list of your last 40 callers. You can also dial
numbers direct from the Calls list.
• Redial up to 10 of the last numbers called.
• Use up to 5 handsets with your phone.
• Make Internal calls and transfer external calls between handsets.
• Choose from 5 different ringtones for internal and external calls
as well as numbers stored in the phonebook.
* Requires subscription to your network’s caller Display service.
WARNING
Do not place your ML0656 in the bathroom or other humid areas.
1.2 Handset range
The ML0656 has a range of up to 300 m outdoors when there is a
clear line of sight between the base and handset. Any obstruction
between the base and handset will reduce the range signicantly.
With the base indoors and handset either indoors or outdoors, the

Owner’s manual
4
EN
range will normally be up to 50 m. Thick stone walls can severely
affect the range.
1.3 Signal strength
The icon on your handset display indicates when you are in
range of the base. When it ashes and you hear a warning beep,
you are out of range and will need to move close to the base.
IMPORTANT
Do not connect the telephone line cord to the telephone line wall
socket until the handset is fully charged. The base station should
be plugged into the mains power socket at all times.
1.4 Location
You need to place your ML0656 within 2 m of the mains power
socket and telephone socket so that the cables will reach. Make
sure it is at least 1m away from other electrical appliances to
avoid interference. Your ML0656 works by sending radio signals
between the handset and base. The strength of the signal depends
on where you site the base. Putting it as high as possible can help
to provide the best signal.
1.5 Setting up the base and handset
1. Plug the power adaptor and telephone cable into the back of
the base.
2. Plug the power adaptor into the mains wall socket and switch
the power on. When connected correctly, the green Power light
on the base comes on.

5
Owner’s manual
EN
3. Insert the 2 x AAA rechargeable batteries supplied, taking not of
the polarity markings inside the battery compartment, then slide
the battery compartment shut.
4. Place the handset on the base to charge. You should let the
batteries charge continuously for at least 24 hours. The batteries
and case may become warm during charging, this is normal.
5. Once fully charged, plug the telephone line cord into the
telephone wall socket.
WARNING
Never use non-rechargeable batteries. Only use the approved
batteries. Using unapproved batteries will invalidate your guarantee
and may damage the telephone.
1.6 Talk / Standby time
Under ideal condition, the handset batteries should give about
10 hours 30 minutes talk time or 160 hours standby on a single
charge (this does not mean you can unplug the base or leave it
for this length of time without charge). Please note that new NiMH
rechargeable batteries do not reach full capacity until they have
been in normal use for several days. Battery low warning.
If the battery icon is ashing in the display and you hear a
warning beep every minute during a call, you will need to recharge
your handset before you can use it.
1.7 Connect the charger(s) and charge the handset(s)
1. Plug the mains power adaptor into the power socket on the
underside of the charger and plug the other end to the mains
power wall socket.

Owner’s manual
6
EN
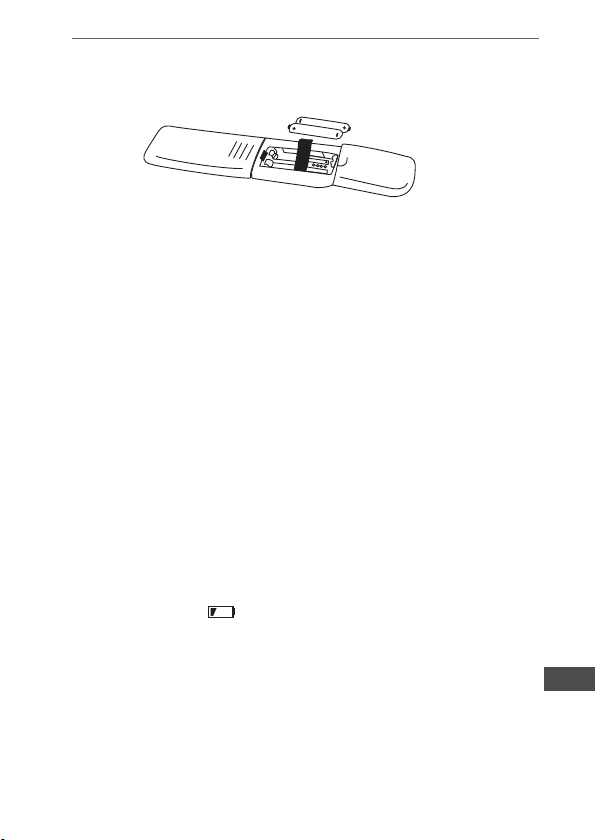
2. Insert the 2 x AAA rechargeable batteries supplied, taking note
of the polarity markings inside the battery compartment then
slide the battery compartment shut.
3. Place the handset on the charger. You should let the batteries
charge continuously for at least 24 hours.
The display will show the time and the handset number. e.g. 2 to
show it is registered to the base.
Your phone is now set up to make and receive calls.
1.8 Battery Performance
To keep the batteries in the best condition leave the handset off the
base for a few hours at a time. Running the batteries right down
at least once a week will help them last as long as possible. The
charge capacity of rechargeable batteries will reduce with time as
they wear out, thus reducing the talk/standby time. Eventually they
will need replacing.
2. GETTING TO KNOW YOUR PHONE
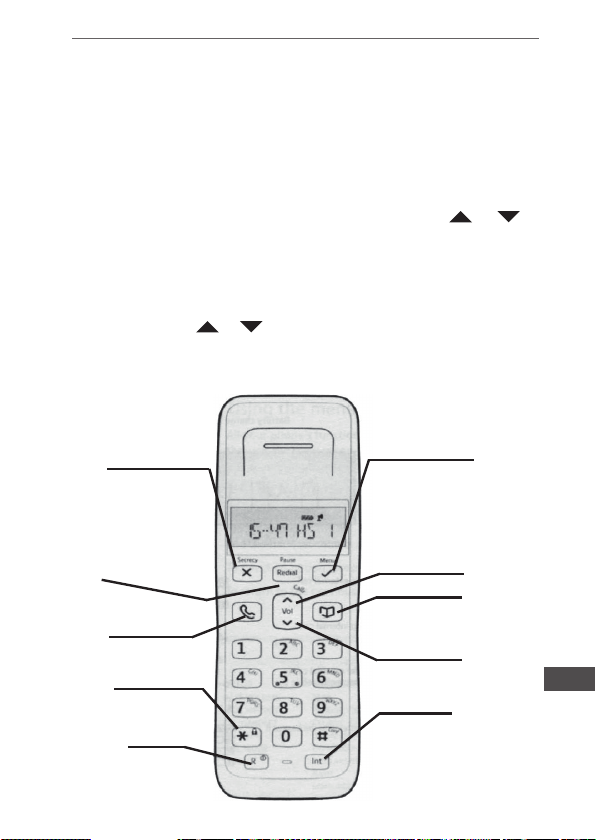
2.1 Handset buttons
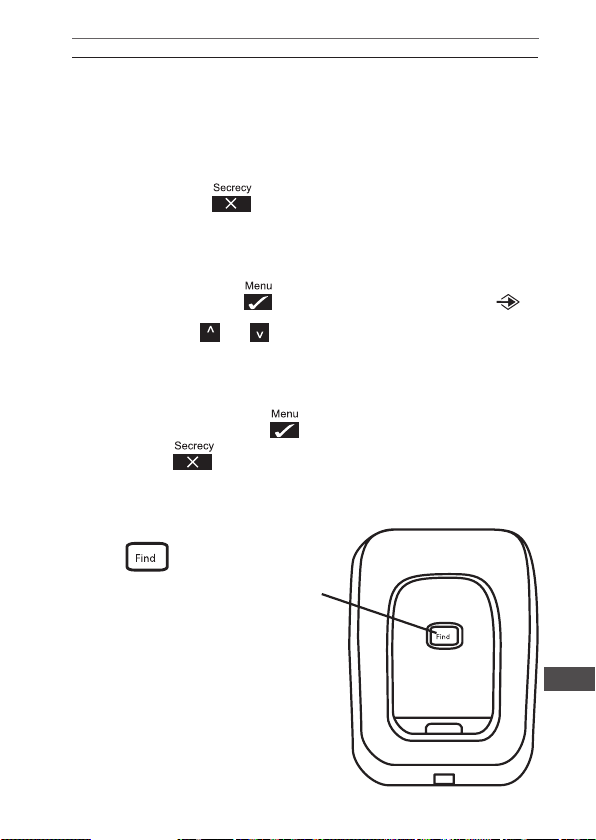
1. Secrecy / Clear / Back: During a call. press to switch secrecy
on/off. When on, your voice will be muted so your caller cannot
hear you. In menu mode, press to return to the previous menu
or press and hold to exit and return to standby. In enter / edit
mode, press to delete characters and digits, when viewing the
calls/redial list, press to delete the displayed entry or press and
hold to delete all entries.
2. Redial / Pause Press: to open the redial list. When dialling/
storing a number, press to enter a pause.
3. Talk / End call: Press to make, receive and end calls.
4. / Keypad lock: Use to lock / unlock the keypad to prevent

7
Owner’s manual
EN
accidental dialling. During pulse dialing, press and hold to switch
temporarily to tone dialling.
5. R / Power On Off: Use with switchboard services and BT Calling
Features. Press and hold to switch the handset on / off.
6. Menu / OK: Press to open the menu. Press to select menu
options and to conrm a displayed option.
7. Scroll: Scroll up or down through menu options, calls lists, redial
lists and phonebook entries. During a call, press or to
adjust the earpiece volume. While the phone is ringing, press up
or down to adjust the handset ringer volume.
8. Phonebook: Press to open the phonebook. When viewing the
redial/Calls list or when editing, press to exit and return to standby.
9. Calls: Press or to open and scroll through the Calls list.
10. Int: Use to make internal calls and transfer calls to other handsets
registered to the base.
1
2
3
4
5
6
8
7
9
10

Owner’s manual
8
EN
2.2 Standby screen
2.3 Handset display icons
EXT Flashes to indicate an incoming external call.
EXT External call in progress.
INT Flashes to indicate an incoming internal call.
INT Internal call in progress.
3 Way call in progress or transfer external call to another
ML0656 handset registered to the base during an external call.
Indicates signal strength Flashes when handset is not
registered to the base or if you go out of range.
Menu open.
Phonebook open.
Flashes to indicate new calls list entries received*.
Answered call (when viewing the Calls list)*.
Unanswered call (when viewing the Calls list)*.
Keypad locked.
The displayed number is longer than 12 digits.
Battery charge full.
Battery charge medium.
Battery charge low.
Flashing - Battery charge nearly empty.
Current time
Battery charge level Range Indicator
Handset number

9
Owner’s manual
EN
* The feature requires subscription to your network provider’s Caller Display
service.
2.4 Quick exit to menu
If you want to exit to menu or cancel an operation at any time you
can press and hold to return to the standby screen.
2.5 Using the menu
All your phone’s functions and settings can be accessed through
the main menu. Press to enter the menu. The icon is
displayed. Press or to scroll through the menu options.
When you reach the end of the list, the rst option is displayed
again and the handset sounds a beep.
To select an option, press . To return to the previous menu
display, press .
2.6 Base
Press to page handsets
registered to the base. Can be useful fo
nd misplaced handsets.
Use to register handsets and de-register
handsets registered to the base.

Owner’s manual
10
EN
3. USING YOUR PHONE
3.1 Switch the handset power on/off
1. To switch off, press and hold until the display goes off.
2. To switch the handset on, press and hold .
3.2 Make a call
1. Press When you hear the dial tone, dial the phone number.
3.3 Preparatory dialling
1. Enter the phone number rst. The number is shown in the display.
2. Press to dial the number.
3.4 End a call
1. Press or place the handset back on the base / charger.
3.5 Receiving calls
1. When the phone rings, press to answer the call, or if the
handset is on the base or charger, simply lift it to answer the call. If
you would rather press after lifting thehandset to receive a call,
you will need to switch Auto-answer off.
3.6 Dialling numbers quickly
Numbers can also be dialled direct from the phonebook, the
calls list, or the redial list. If you make a mistake as you enter the
number, press to delete a digit.

11
Owner’s manual
EN
3.7 Call timer
After the rst 15 seconds of your call, the call timer is displayed.
3.8 Caller display
If you have subscribed to your network’s Caller Display service, the
caller’s number (or name, if an exact number match is found in the
phonebook) will also be displayed.
3.9 Secrecy
You can stop your caller from hearing you while you talk to
someone else close by.
1. During a call, press The handset microphone is muted
and the display shows .
2. Press again to resume your call.
3.10 Adjusting the earpiece volume
1. During a call press to increase or to decrease the volume.
3.11 Redial
The last 10 numbers dialled are stored in the redial list.
1. Press to open the redial list. The most recently dialled
number is displayed. If the number matches an entry stored in the
handset phonebook the name is displayed.
2. Scroll or to the number or name you want.
3. Press to redial the entry displayed.
3.12 Delete a number from the redial list
1. Press then scroll or to the entry you want.
2. Press is displayed, press to conrm or
to cancel.

Owner’s manual
12
EN
3.13 Delete the entire redial list
1. Press to open the redial list, then press and hold .
Display shows
2. Press to conrm or to cancel.
3.14 Copy a redial number to the phonebook
1. Press then scroll or through the list to the entry you want.
2. Press , the display shows Press again.
3. The display shows Use the keypad to enter the name,
then press
4. The number is displayed, edit the number if necessary, then
press , is displayed.
5. Scroll or to select a ringtone and press to conrm.
The entry is stored. Each number saved in the redial list can be up 32 digits long.
3.15 Display the name or number
In the redial list, when the name is displayed, you can switch to the
number by pressing .
3.16 Keypad lock
You can lock the handset keypad to prevent accidental dialling
while carrying it around. You do not need to unlock the keypad to
answer a call, just press or lift te handset as normal.
1. To lock the keypad press and hold until the display shows
the icon.
2. To unlock the keypad press any button, the display shows
.

13
Owner’s manual
EN
3. Press within 3 seconds.
3.17 Find / Paging
You can alert handset users that they are wanted or locate a
missing handset. Paging calls cannot be answered by a handset.
1. Press on the base. All handsets registered to the base will
ring. To stop the ringing, press any button on a handset or press
again on the base.
4. USING THE PHONEBOOK
You can store up to 50 name and number entries on each handset
registered to your base. Each name can be up to 12 characters
long and each number up to 24digits long. You open the phonebook
with the button.
4.1 Add an entry to the phonebook
For each entry you store, you can select one of 5 different
ringtones. For example, you can assign one ringtone to friends
and family and another ringtone to other callers.
1. Press then scroll to and press
2. The display shows . Press
3. The display shows Use the keypad to enter the name
and press
4. The display shows Use the keypad to enter the
phone number and press . It’s best to enter the full number,
including the area code.

Owner’s manual
14
EN
5. The display shows , press or to select the
ringtone you want.
6. Press to conrm is displayed. You can now
enter your next name and number or press twice to return to
standby.
4.2 Dial from the phonebook
1. Press to open the phonebook. The icon is displayed.
2. Scroll or to the entry you want.
Or, search alphabetically by entering the rst letter of the name.
The rst name that starts with this letter or the nearest letter in
the alphabet will be displayed. You can now rene your search by
scrolling or .
3. Press to dial or to return to standby.
4.3 Entering names
Use the keypad to enter the letters shown on each button.
For example to store TOM
Press once to enter to
Press three times to enter
Press once to enter
If the next letter you want to enter is on the same button, wait a
moment then press the button.
Press to delete an incorrect character or digit
To enter a space press
To enter a dash, press twice.

15
Owner’s manual
EN
4.4 Edit an entry
1. Press . The display shows , press .
2. Scroll to and press .
3. Scroll or to the entry you want edit, or search alphabetically
and press .
4. Press to the name if required, then enter the new name
and press .
5. Press to delete the number if required, then enter the new
number and press .
6. If required, select a new melody then press to conrm.
7. is displayed. You can now enter your next name
and number or press twice to return to standby.
4.5 Delete an entry
1. Press . The display shows , press
2. Scroll to and press
3. Scroll or to the entry you want to delete, or search
alphabetically.
4. Press . Display shows
5. Press to conrm or to cancel.
4.6 Internal calls
If you have more than one handset registered to your base, you can:
• make internal calls between handsets
• transfer an external call from one handset to another
• hold a conference call between two internal handsets and an
external call.

Owner’s manual
16
EN
• make an internal call between two handsets while a third is on
an external call.
You can have up to 5 handsets registered to your Bell ML0656 base.
4.7 Make an internal call
1. Press then enter the handset number (1-5) you want. The
icon is displayed to indicate an internal call.
4.8 Receive an internal call
1. The icon is displayed to indicate an internal call and the
number of the handset calling you. Press to answer the call.
4.9 Transfer an external call
You can transfer an external call to another handset registered to your base.
1. During an external call, press . Your caller is put on hold.
2. Enter the number of the handset you want to transfer the call to.
3. When the other handset answers press to transfer the call.
If the other handset does not answer, press to speak to your
external caller again.
4.10 3-Way call
You can hold a three-way conversation between an external caller
and another handset user.
1. During an external call, press . Your caller is put on hold.
2. Enter the handset number you want to invite.
3. When the handset answers, press to connect all three
callers. The icon is displayed to indicate a 3-way call.
4. If the other handset does not answer, press to return to your
external caller. Press to end the call.

17
Owner’s manual
EN
5. CALLER DISPLAY & THE CALLS LIST
5.1 Caller Display
Caller Display show who is calling and if the caller’s number
matches an entry stored in the phonebook, the number will alternate
with the name. To use Caller Display you must rst subscribe to
your network provider’s Caller Display service. A quarterly fee may
be payable.
Caller Display information contains the full telephone number,
including the area code. So when storing number in the phonebook
remember to include the area code, otherwise the caller’s number
will not match.
5.2 Calls List
The Calls list stores details of your last 40 calls received, including
the phone number and date and time of the call.
The Calls list also alerts you to unanswered calls. When a new
call is received in the Calls list, the icon will ash in the display
when in standby mode to alert you. When you have viewed the new
call, the icon will disappear but the icon will remain. The
list is shared between all handsets registered to the base. When
the Calls List is full, the most recent calls received automatically
replace the oldest calls. You open the Calls list with the or
button.
During a call, the caller’s details are replaced by the call timer after
15 sec. To review the calls list after the call, press and then
press to transfer to call timer from the caller’s details.
5.3 Caller information
The display can show the rst 12 characters of phone numbers

Owner’s manual
18
EN
and names. For this feature to work you must subscribe to a Caller
Display Service. With some incoming calls, the telephone number
of the caller is not available and cannot therefore be displayed.
In this case some explanatory information will be displayed.
- the caller has withheld their number
- the number is unavailable.
- ringback call.
- international call.
- call from operator.
- call from a payphone.
5.4 View the Calls list
1. Press to open the Calls list. If there are no calls in the list, the
display shows empty.
2. Press or to scroll through the list. When the icon is
displayed, this call was answered; when icon is displayed, the
call was unanswered.
When you reach the end of the list, the handset will beep.
If the caller’s number exactly matches an entry stored in the
handset phonebook, the display will alternate between the name
and the number.
Press to see the caller’s number.
Press again o see the time and date of the call.
Pressing again will give you the option to add this entry in the
phonebook if it’s not already stored. If it is already stored in the
phonebook you can still add the entry by pressing again.

19
Owner’s manual
EN
5.5 Dial a number in the Calls list
1. Press then scroll or through the list to the entry you want.
2. Press to dial the displayed entry.
5.6 Copy a number to the phonebook
1. Press then scroll or through the list to the entry you want.
2. Press repeatedly until the display shows
Press again.
3. The display shows Use the keypad to enter the name,
then press .
4. The number is displayed, edit the number if necessary,
then press .
5. Scroll and to select a ringtone and press to conrm.
The entry is stored.
5.7 Delete an entry
1. Press then scroll or through the list to the entry you want.
2. Press . Display show
3. Press to conrm or press to cancel.
5.8 Delete the entire Calls list
1. Press
2. Press and hold . Display shows
3. Press to conrm or press to cancel.

Owner’s manual
20
EN
6. HANDSET SETTINGS
6.1 Handset ringer volume
You can adjust the ring volume and set different levels for internal
and external calls.
Choose from 5 levels and off.
1. Press , scroll to and press
2. Scroll to or and press
3. Press or to select the volume (1 to 5 or OFF).
4. Press to conrm or to return to the previous menu.
6.2 Handset ringer melody
You can set different ringer melodies for internal and external calls.
Choose from 5 different melodies.
1. Press , scroll to and press
2. Scroll to or and press
3. Press or to select the ringer melody (1 to 5).
4. Press to conrm or to return to the previous menu.
Calls from numbers stored in the phonebook will ring using the
ringer melody set when storing the entry.
6.3 Handset name
You can give your handset a name according to use, e.g. Kitchen
or Michael. The name appears in the display.
1. Press , scroll to and press
2. Scroll to and press
3. Enter the new handset name and press to conrm.
Table of contents
Languages: