Maestro mr650 User manual

Owner’s manual. Hair clipper set
Instrukcja obsługi. Zestaw do strzyżenia włosów
Manualul proprietarului. Set (masină) de frezat
Керівництво з експлуатації. Набір для стрижки волосся
Руководство по эксплуатации. Набор для стрижки волос
Model/Модель: MR650
Сerticated in Ukraine
Виріб сертифіковано в Україні
076
2 3
Pictures/ Rysunki/ Figurila/ Рисунки/ Малюнки
1
2
3
Dear customer, we thank you for purchase of goods
Functionality, design and conformity to the quality standards
guarantee to you reliability and convenience in use of this device.
Please read and comply with these original instructions prior to the
initial operation of your appliance and store them for later use of
subsequent owners.
This appliance is designed for domestic use only.
Under condition of observance of user regulations and
a special-purpose designation, a parts of appliance do not contain
unhealthy substances.
Technical specications
Model MR650
Electrical supply:
Alternating current- AC;
Rated voltage 220-240V;
Rated frequency 50Hz;
Power consumption 15W
Protective class II
Protection class IPX0
EN
B
C
D
E
А
4 5
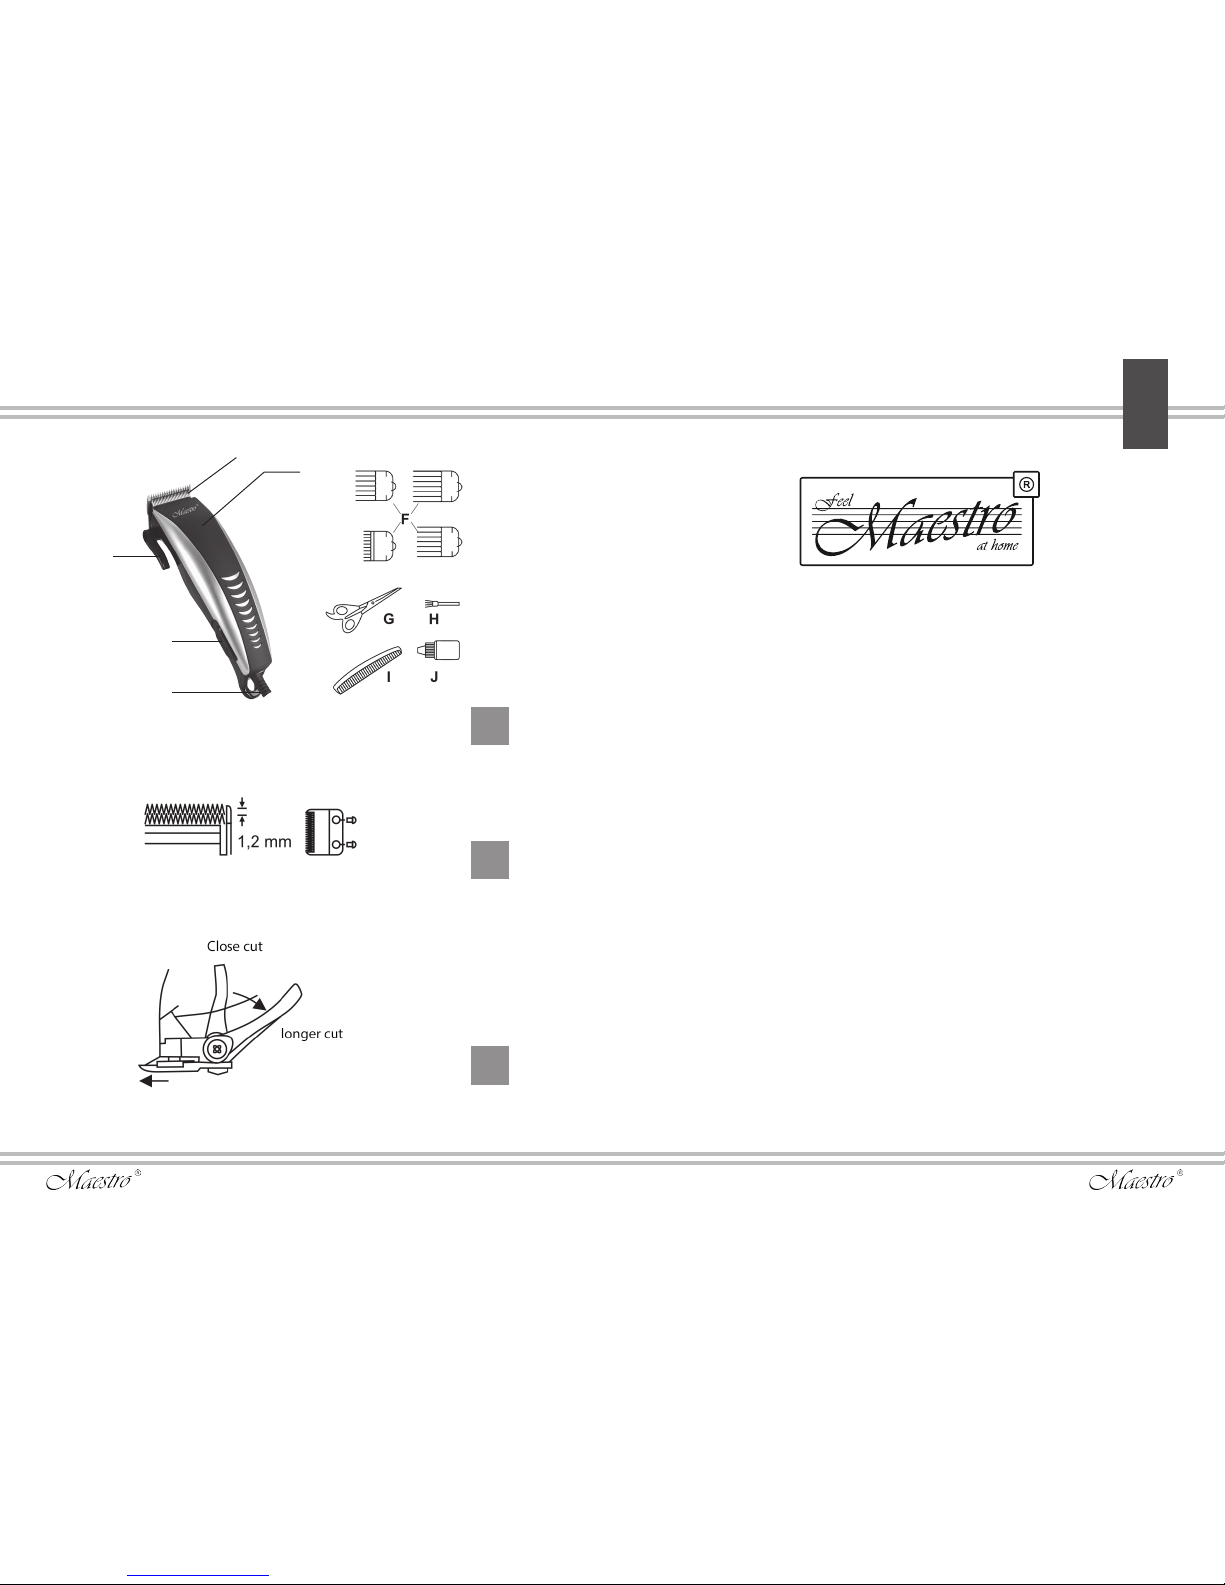
Description of the appliance
Picture1 (page 2)
A. Blades
B. Housing
C. Blade lever
D. On/Off Switch
E. Power cord
Accessories
F. Attachment Combs
G. Scissors
H. Cleaning brush
I. Comb
J. Oil
Safety instructions
When using your appliance, basic safety precautions should
always be followed,including the following:
SPECIAL INSTRUCTIONS
WARNING!
NEVER immerse the appliance, cable or plug in any liquid.
DO NOT allow water and moisture on the electrical parts of the
device.
NEVER touch the appliance with wet or damp hands.
Otherwise, there is a risk to get an electric shock!
- DO NOT let children or untrained persons use the appliance
without supervision.
- DO NOT leave the appliance unnecessarily plugged in.
Disconnect the plug from the mains when the appliance is
not being used.
- DO NOT use the power cord or the appliance in order to pull the
plug out of the socket.
- DO NOT leave the appliance exposed to the weather (rain, sun,
etc.).
- DO NOT leave the appliance without supervision when it is
connected to the power supply.
- Close supervision is necessary when the appliance is used near
children.
- Always use the appliance on a dry, level surface.
- Always unplug from the plug socket when not in use and before
cleaning.
- Do not operate the appliance if damaged, after an appliance
malfunctions or it has been damaged in any manner, return to at
authorized service engineer for repair.
- In the interest of safety, regular periodic close checks should be
carried out on the supply cord to ensure no damage is evident.
Should there be any signs that the cord is damaged in the slightest
degree, the entire appliance should be returned be authorized
service engineer.
- Do not let the cord hang over the edge of a table or counter or
touch hot surfaces.
- This appliance is not intended for use by persons (including
children) with reduced physical, sensory or mental capabilities, or
lack of experience and knowledge, unless they have been given
supervision or instruction concerning use of the appliance by a
person responsible for their safety.
- Children should be supervised to ensure that they do not play with
the appliance.
- Do not place or store appliance where it can fall or be pulled into a
EN

6 7
bath or sink.
- Do not use while bathing or in a shower.
- Do not place the appliance on any surface while it is operating.
- Never drop or insert any object into any opening on this appliance
WARNING! Do not use this appliance with a damaged or broken
comb nor with teeth missing from the blades as injury may occur.
- Before use, make sure certain blades are oiled and aligned
properly.
- Do not cut wet hair, before cutting dry and comb hair.
- Do not cut hair when there are dermatitis.
- Do not use this appliance for grooming pets.
THIS APPLIANCE IS FOR HOUSEHOLD USE ONLY. DO NOT
USE THE APPLIANCE FOR ANYTHING OTHER THAN INTENDED
USE.
- Do not use it for commercial purpose.
Actions in extreme situations
- If your device has fallen into water or water has penetrated it,
immediately disconnect it from the mains without contacting the
device itself or the water.
- If there appears smoke, sparkling, strong smell of burning
isolation, immediately stop using the device, disconnect the device
from the mains and apply to the nearest service center.
Operation
Before startup
- Remove all wrap materials and stickers
- Make sure that all the parts of appliance don’t have damages.
Blade alignment
- Your Clippers were carefully examined to ensure that the
blade were oiled and aligned before leaving our factory.
- Blades must be realigned if they have been removed for cleaning
or replacement.
- To realign the blades, simple match the upper and bottom
blades teeth up, point for point. (End of top blade teeth should
be approximately 1.2mm back from bottom blade. Compare your
clipper blade with the Picture 2 (page 2).
- If blade alignment is correct, add a few drops of oil to the blades,
turn clipper on for a few moments, turn off and unplug. Loosen
screws slightly and adjust. Tighten the screws after blade is aligned.
Oil
- To maintain your clipper in peak condition, the blades should be
oiled every few haircuts.
- Do not use hair oil, grease oil mixed with kerosene or any solvent,
as the solvent will evaporate and leave the thick oil which may slow
down the blades motion.
- Add a few drops of oil to the blades, turn clipper on for a few
moments, turn off and unplug. Wipe off any excess oil.
Blade lever
-The lever is conveniently located near your thumb (if you’re right-
handed) so it can readily be adjusted while the clipper is in your
hand.
-The lever adds versatility to your clipper by allowing you to
gradually change the closeness of your cut without an attachment
comb.
-When the lever is in the uppermost position, the blades will give
you the closest cut and -leave the hair very short. Pushing the lever
EN

8 9
downward gradually increases the cutting length. See Picture 3
(page 2).
-In its lowest position, the lever will leave the hair approximately the
same length as the #1 comb.
-The lever will also extend the use of your blades since a different
cutting edge is used in each setting. In addition, if extremely heavy
hair cutting has jammed the blades, it will help you remove hair that
has become wedged between the two blades without removing the
blades.
-While the clipper is running, rapidly move the lever from “close
cut” to “longer cut“ a couple of times. Doing this each time after you
have nished using your clipper will help to keep the blades clear. If
your clipper stops cutting and this does not help, your cutting blades
are dulled. Replace them with new blades.
Preparation for use
- Remove all wrap materials and stickers
- Make sure that all the parts of appliance don’t have damages.
- Inspect the clipper, making sure that it is free of oil between the
cutting blade teeth and turn the unit on to distribute the oil and to
make sure it is running smoothly. Wipe off any excess oil. This
should be done before each use.
-While using the unit, untwist the cord from time to time to avoid
tangling.
- Seat the person so their head is approximately at your eye level.
This allow ease of visibility while cutting and a relaxed control of the
unit
- Before cutting always rst comb the hair so it is tangle free and as
it is naturally worn.
Reminders
- Cut the hair in a relaxed and slow manner. Use short strokes only
to work gradually over the entire head.
- Always take off a little hair at a time; you can always trim off
additional hair later.
- As you work, comb the hair frequently back into the style to which
you are cutting.
- When cutting with this hair clipper it is better to leave the hair dry,
not wet. With the hair dry, it is much easier to control the amount of
hair being cut.
Attachment Combs (see main diagram).
Each comb attachment is marked accordingly on its outside middle
surface.
- To attach a comb, hold it with its teeth, upward and slide it along
the clipper blade until the front of the comb rmly seats against the
clipper blade.
- To remove the comb, simple pull the comb upward and away from
the clipper blade.
For even cutting, allow the comb attachment/cutter to cut its way
through the hair. Do not force it through quickly. Also remember to
comb the hair frequently to remove trimmed hair and to check for
uneven strands.
EN
Attachment Comb leaves hair length mm (inch)
№1 3(1/8)
№2 6(1/4)
№3 9(3/8)
№4 12(1/2)
10 11
Maintenance and care
WARNING!
Before cleaning the appliance in any way, make sure that the
appliance plug is not connected to the socket.
Never place it in water or any other liquid.
- The appliance must be cleaned after each use.
- Clean appliance with brush.
- Wipe the housing with a soft dry cloth.
- After cleaning oil the blades.
Storage
- Clean and oil the blades before storage.
- Keep the appliance in cool dry place, away from children and
persons with reduced mental or physical abilities.
Environmental protection
Old appliances contain valuable materials that can be recycled.
Please arrange for the proper recycling of old appliances. Please
dispose your old appliances using appropriate collection systems.
Subject to technical modications!
Dziękujemy za zakup sprzętu
Funkcjonalność, wzornictwo i standardy jakości gwarantują
Państwu niezawodność i łatwość obsługi urządzenia.
Prosimy o zapoznanie się z niniejszą instrukcją i zachować ją jako
punkt odniesienia w całym okresie użytkowania urządzenia.
Urządzenie jest przeznaczone do użytku domowego.
Jeżeli urządzenie używane jest zgodnie z jego przeznaczeniem nie
wytwarza szkodliwych substancji.
Charakterystyka techniczna:
Model: MR 650
Zasilanie:
Prąd zmienny;
Częstotliwość znamionowa: 50 Hz;
Napięcie znamionowe: 220-240 V;
Moc znamionowa: 15W;
Klasa ochrony przed porażeniem prądem elektrycznym II;
Wykonanie Korpusu Ochrony przed wilgocią odpowiada normie
IPХ0;
PL
12 13
Konstrukcja urządzenia
Rysunek 1 (strona 2)
A- Ostrze
B- Korpus
C- Regulator długości cięcia włosów
D- Włącznik
E- Kabel
F- Nasadki
G- Nożyczki
H- Szczotka do czyszczenia ostrza
I- Grzebień
J- Olejarka dla oliwienia оstrza
Środki bezpieczeństwa
UWAGA!
-Nie należy używać urządzeń elektrycznych w pobliżu basenów,
łazienek, pryszniców, w każdym miejscu, gdzie występuje
możliwość kontaktu z wodą lub wilgocią.
-Nigdy nie zanurzaj urządzenia, jego przewodu zasilającego i
wtyczki w wodzie lub innych cieczach.
-Nie należy dotykać urządzenia mokrymi rękami.
Przy nieprzestrzeganiu powyższych zasad istnieje
niebezpieczeństwo porażenia prądem!
- Nie należy pozostawiać włączonego urządzenia bez kontroli!
- Przed rozpoczęciem korzystania z urządzenia należy upewnić
się, czy napięcie zasilania podane na urządzeniu jest zgodne z
napięciem zasilania w Twoim domu.
- Wykorzystanie przedłużaczy elektrycznych lub adapterów
wtyczki zasilania może stać się przyczyną uszkodzenia
urządzenia lub powstania pożaru.
- Jeżeli urządzenie zostanie wniesione z zimnego do ciepłego
pomieszczenia, nie podłączaj urządzenia do prądu przed upływem
2 godzin, dla uniknięcia uszkodzenia z powodu wykształcenia się
kondensatu na częściach wewnętrznych urządzenia.
- To urządzenie nie jest przeznaczone do użytku przez dzieci i
osoby niepełnosprawne lub upośledzone umysłowo, lub ludzi którzy
nie mają wiedzy i doświadczenia w zakresie korzystania z urządzeń
gospodarstwa domowego. Zawsze muszą pozostać pod stałą
kontrolą rodzica lub opiekuna.
- Nie pozwól aby dzieci bawiły się opakowaniem produktu.
- Nie należy korzystać z urządzenia na zewnątrz.
- Nigdy nie używaj urządzenia z uszkodzonym przewodem lub
wtyczką, jeśli urządzenie nie działa prawidłowo, jeśli urządzenie
jest uszkodzone lub wpadło do wody. Nie naprawiaj urządzenia
samodzielnie, skontaktuj się ze sprzedawcą.
- Nie należy używać akcesoriów nie zawartych w zestawie.
- Zawsze należy odłączyć urządzenie od sieci elektrycznej, gdy nie
jest w użyciu.
- Nigdy nie należy odłączać urządzenia, wyciągając wtyczkę z
gniazdka za przewód.
- Nie wykorzystuj urządzenia w czasie burzy lub wichury. Ponieważ
wtedy możliwe są skoki napięcia sieciowego.
- Nie dopuszczaj do dotykania przewodu zasilającego do
nagrzanych i ostrych powierzchni.
- Unikać silnych naprężeń, zaginania się i skręcania przewodu
zasilającego. Nie owijaj przewodu zasilającego wokół obudowy.
- Nie rzucaj urządzeniem.
- Nigdy nie odkładaj pracującego urządzenia.
PL
14 15
UWAGA!
- Nie używać urządzenia z uszkodzoną nasadką np.; brak jednego
z zębów- może to prowadzić do zniszczenia fryzury.
- Przed rozpoczęciem sprawdzić poprawność nałożenia nasadek.
- Regularnie smaruj ostrze.
- Nie ciąć maszynką mokrych lub wilgotnych włosów. Włosy muszą
być wysuszone!
- Nie używać urządzenia podczas zapalenia skóry głowy.
- Nie używać maszynki do strzyżenia zwierząt.
Działania w sytuacjach ekstremalnych:
- Jeśli urządzenie wpadnie do wody, należy natychmiast odłączyć
przewód zasilający bez dotykania samego urządzenia lub wody do
której wpadło.
- W przypadku pojawienia się dymu, iskrzenia, silnego zapachu
przypalonej izolacji, natychmiast przerwij wykorzystanie urządzenia,
wyjmij wtyczkę z rozetki i zwróć się do sprzedawcy.
Korzystanie z urządzenia
- Należy usunąć opakowanie i naklejki reklamowe. Całkowicie
rozwinąć przewód zasilania. Należy szczegółowo obejrzeć
urządzenie, przekonać się o braku uszkodzeń mechanicznych
części urządzenia, przewodu zasilania i wtyczki.
Regulacja ostrza
- Przed wysłaniem gotowych produktów z fabryki, ostrza maszynki
zostały skorygowane i nasmarowane.
- Po wymianie noży, lub jeśli są one demontowane do czyszczenia,
korekta powinna być wykonana ponownie.
- Prole zębów obu ostrzy po zainstalowaniu muszą pasować
dokładnie.
- Końce zębów stałe (dolnego) z ostrzem może tam wystąpić
różnica około 1,2 mm nad końcem ruchomego zębów
(górnego), jak pokazano na Rys.2. (strona 2)
- Jeżeli ostrza prawidłowo są nasmarowane i wyregulowane ale
maszynka przestały strzyc,ostrza stępiły się. Należy wymienić
ostrza.
Ostrze
- Aby zapewnić ciągłą i bezawaryjną pracę urządzenia, należy
regularnie smarować ostrze.
- Nie zaleca się do smarowania maszynki tłuszczami i olejami,
rozcieńczonych naftą lub innymi rozpuszczalnikami.
-Dla prawidłowego smarowania nanieść 1-2 krople oleju na ostrza,
następnie włączyć maszynkę
i dać popracować kilka sekund żeby olej równomiernie
rozprowadził się między ostrzami.
Wyłączyć maszynkę, nadmiar oleju usunąć za pomocą szmatki.
Długość strzyżenia
- Uchwyt dźwigni, znajduje się na lewym boku maszynki umożliwia
łatwe dostosowanie długości cięcia włosów, utrzymując urządzenie
w dogodnym położeniu.
- Możliwa jest płynna zmiana długość cięcia włosów bez
dodatkowego narzędzia. Rysunek 3 (strona 2)
- Pionowe położenie dźwigni najkrótsze strzyżenie, długość
zwiększa się sukcesywnie w miarę opuszczania dźwigni.
- Na dolną część można założyć nakładkę aby zwiększyć zakres
cięcia np.: № 1 (3mm).
- Wykorzystanie regulatora zwiększa żywotność ostrzy, ponieważ
podczas cięcia używane są różne części robocze ostrzy.
- Regulator pomaga również szybko usunąć włosy które dostały się
między ostrza bez ich rozkręcania. Aby to zrobić należy kilka razy
PL

16 17
szybko podnieść i opuścić dźwignię.
- Przeprowadź tą operację na biegu jałowym, po końcu każdego
strzyżenia - w celu usunięcia resztek włosów.
- Jeśli usuwa się włosy z trudem, lub maszynka szarpie, należy
wymienić stępione ostrze.
Rozpoczęcie Pracy
- Przed rozpoczęciem sprawdzić poprawność instalacji nasadek.
- Podłącz urządzenie do gniazdka.
- Aby włączyć urządzenie należy ustawić przełącznik na «ON».
- Włącz urządzenie, aby równomiernie rozprowadzić oleju pomiędzy
ostrzami. Wykonać tę operację, po każdym strzyżeniu.
- Przed rozpoczęciem strzyżenia, upewnij się, że nie ma oleju
między zębami.
- Przed rozpoczęciem strzyżenia dokładnie przeczesać włosy.
Nasadki:
- Każda nasadka posiada odpowiednie oznaczenie.
- Pamiętaj aby dobrze zamontować nasadkę.
- Aby uzyskać gładką fryzurę, nie prowadzić maszynki szybciej niż
to możliwe. Podczas strzyżenia czesz głowę jak najczęściej.
Czyszczenie i konserwacja
UWAGA!
- Nigdy nie czyścić urządzenia podłączonego do sieci elektrycznej.
- Przed czyszczeniem zawsze odłączaj urządzenie od sieci
elektrycznej.
- Nie należy używać agresywnych środków czyszczących.
- Uważaj, aby woda lub inny płyn nie dostał się do wnętrza
obudowy.
Urządzenie należy oczyścić i nasmarować po każdym użyciu.
- Oczyścić noże i urządzenia ze ścinków włosów za pomocą
dołączonej do zestawu szczotki.
- Przetrzyj suchą, miękką szmatką.
- Oczyszczanie i smarowania ostrza, jak to opisano powyżej.
Magazynowanie
- Przed przechowywaniem ostrze musi być nasmarowane.
- Nie należy owijać przewodu zasilającego wokół urządzenia.
- Przechowywać w suchym, chłodnym miejscu z dala od dzieci i
osób niepełnosprawnych zycznie i umysłowo.
Utylizacja
Urządzenie oraz jego części nie powinny być mieszane z innymi
odpadami. Należy odpowiedzialnie podchodzić do przetwarzania
surowców wtórnych i dbać o prawidłowe wykorzystanie zasobów
naturalnych. Jeśli zdecydowałeś się wyrzucić urządzenie, skorzystaj
ze specjalnych punktów zwrotów urządzeń elektrycznych.
Charakterystyka, wyposażenie i wygląd zewnętrzny wyrobu mogą
zostać nieznacznie zmienione przez producenta, bez pogorszenia
podstawowych właściwości konsumpcyjnych wyrobu.
PL
Numer Nasadki Długość włosów mm/ cale
№1 3mm 1/8’
№2 6 mm 1/4’
№3 9mm 3/8’
№4 12mm 1/2’
18 19
Vă mulțumim pentru achiziționarea tehnicii
Funcționalitatea, design-ul și conformitatea cu standardele de
calitate garantează siguranța și ușurința în utilizarea acestui
dispozitiv.
Vă rugăm să citiți cu atenție acest manual de utilizare și păstrați-l ca
un ghid de referință pe întreaga durată de funcționare a aparatului.
Set (masină) de frezat este destinat pentru uz casnic.
În condiția respectării normelor de exploatare și destinației ținte,
piesele produsului nu conțin substanțe dăunătoare.
Caracteristici tehnice
Model: 650
Alimentarea electrică:
Curent electric alternativ;
Frecvența nominala: 50 Hz;
Tensiunea electică (interval): 220V – 240V;
Puterea de consum (nominală): 15W;
Clasa de protecție împotriva electrocutării II;
Protecția carcasei cu privire la pătrunderea umidității este normală,
corespunde cu IPX0;
RO/
MD Structura produsului
Figura 1 (pagină 2)
А- lamele
В- carcasa
С- regulator lungimea părului pentru frezat
D- comutator
E- cablu de alimentare
F- piepteni detaşabili
G- foarfece
H- perie pentru curatarea lamelor
I- piepten
J- ulei pentru lubrierea lamelor
Măsuri de securitate
Stimate utilizator, respectarea normelor de siguranță acceptate
și regulilor, stabilite în acest manual, face utilizarea acestui
aparat excepțional de sigură.
ATENTIE!
-Niciodată nu scufundați dispozitivul, cablul de alimentare și
ștecherul acestuia în apă sau alte lichide.
-Nu permiteți pătrunderea apei și a umidității pe componentele
electrice ale dispozitivul.
- Nu puneți și nu păstrați mașina în locuri de unde poate cădea în
chiuvetă ect.
- Nu apucați dispozitivul avînd mâinele ude.
În caz de nerespectare a regulilor de mai sus apare pericolul de
electrocutare!
- Niciodată nu lăsați dispozitivul în funcțiune fără supraveghere
Table of contents
Languages:
Other Maestro Electric Shaver manuals


