Magic Chief VM11B-8P Owner's manual

JCare &Use
How to keep your microwave oven at its best.
RANGECOMBINATION
MICROWAVEOVENMODULE
8110P094-60

Help us
help you...
Read this book carefully. Be sure your microwave
It is intended to help you operate oven is registered.
and maintain your new microwave
oven properly.It is important that weknow the
location of your oven should a need
Keep ithandy for answers to your occur for adjustments.
questions. Yoursupplier is responsible for
If you don't understand something registering you as the owner.
or need more help... Pleasecheck withyour supplier to
Write: (includeyour phone be surehe has doneso;also send in
number) your Consumer Product Ownership
Customer Service Registration Card. If you move, or
at the address if you are not the original
listed on your purchaser pleasewrite to us,
warranty stating model and serial numbers.
This appliance must be registered.
Please be certain that it is.
Write down the model
and serial numbers. Write to:
You'll find them on a label inside MicrowaveRecords
the oven on the upper left side,if P.O. 730
cabinet mounted. Cleveland, TN 37311
If your microwaveis the upper (eye
level) portion of a combination gas
or electric range this information is If you received a
located as follows: damaged oven...
Electric Combination--On main
front, behind service drawerpanel. Immediately contact the dealer
Gas Combination--Lift the main (or builder) that sold you the
cooking top. Model and serial microwave oven.
" numbers will be to the right on the
wall ofthe burner box. Save time and money.
These numbers arealso on the Before you request service...
check the Problem Solver on
Consumer ProductOwnership page21.Itlists minor causes of
Registration Cardthat camewith
your microwaveoven.Beforeoperating problems that you can
sending in this card,pleasewrite correct yourself.
these numbers here:
Model NumberThe electric output of this ]
microwave oven is 625 watts. I
Serial Number
Usethesenumbersin any
correspondenceor servicecalls
concerningyourmicrowaveoven.
Thismicrowave oven is UL listedforinstallationover electric and
gas ranges.
Optional Accessory
available at extra cost from your supplier.
HMA-11A Charcoal Filter Kit for non-vented installation.

'Contents IMPORTANT J
SAFETY INSTRUCTIONS
BeforeMicrowaving ........... 2 Read all instructions beforeusing this appfiance. Q
SafetyInstructions.......... 3,4-
FeaturesofYour Whenusingdeetficalappliances *As withanyappliance,close
MicrowaveOven............ 5 basicsafetyprecautionsshouldbesupervisionis necessarywhen fD
Features of YourMicrowave followed,includingthefollowing: usedbychildren.
Touch Control Panel....... 6,7WARNING-To reducethe*Toreducetheriskof firein the e,t.
¢B
SettheClock .7 ovencavity:
............... riskofburns,electricshock,fire,
CookingbyTime ............. 8injurytopersonsorexposureto--Do notovercookfood.Carefully
Cook'NWatch............... 8excessivemicrowaveenergy: attendapplianceifpaper,plastic,or
Cooking by Temperature ....... 9 •Use thisapplianceonlyforits othercombustiblematerialsare
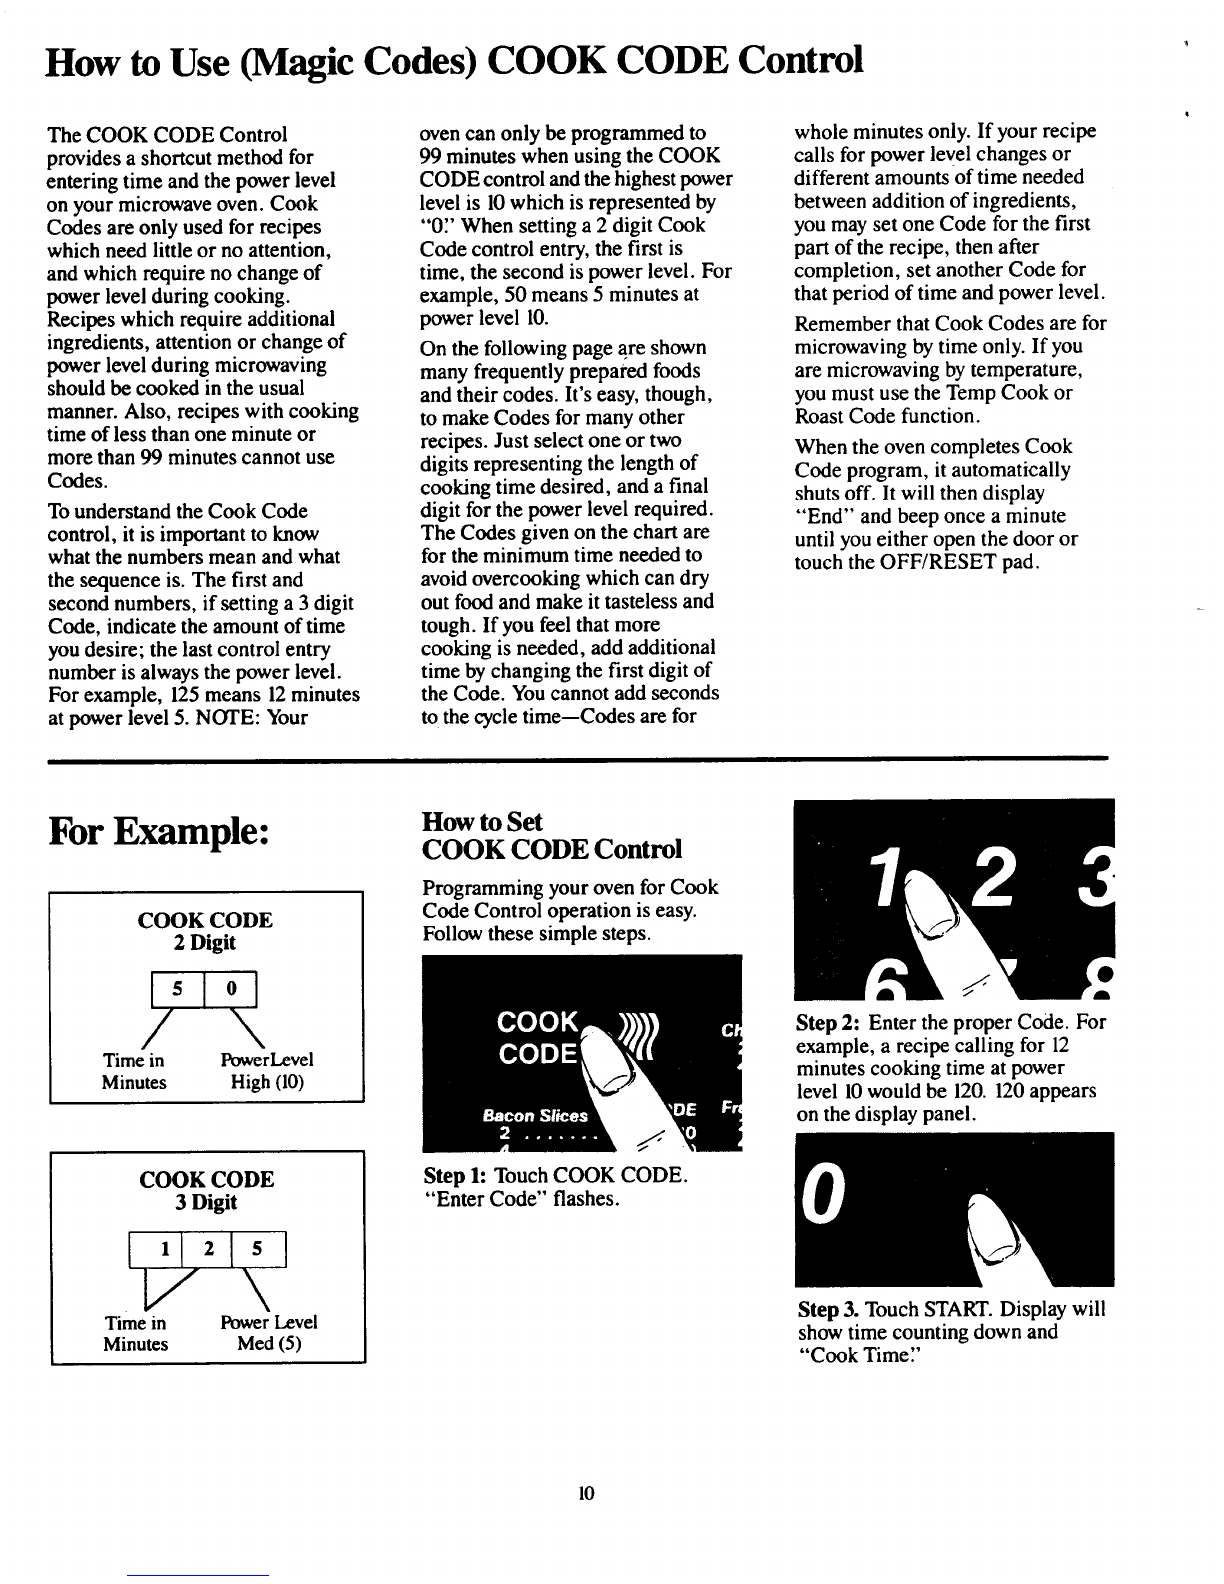
CookCodeControl........ 10,11intendeduseasdescribedinthis placedinsidetheoventofacilitate
Defrosting.................. 13 manual." cooking.
--Removewiretwist-tiesfrom
AutomaticRoasting ........ 14,15* Readandfollowthespecific paperor plasticbagsbefore
Timer ..................... 16 "PRECAUTIONSTOAVOID
ExhaustFeature............. 17 POSSIBLEEXPOSURETO placingbagin oven.
CareofYourEXCESSIVEMICROWAVE --Do notuseyourmicrowaveoven
MicrowaveOven ........ 18,19 ENL_GY"onpage2. todrynewspapers.
GroundingInstructions ....... 20 • Thisappliancemustbegrounded. --Paper towels,napkinsandwax _.
TheProblemSolver .21 Connectonlytoproperlygrounded paper.Recycledpaperproducts _ _
......... cancontainmetalfleckswhich
outlet.See"GROUNDING O
If YouNeedService ....... 22 INSTRUCTIONS"onpage20. maycause arcingor ignite.Paper
productscontainingnylonor nylon
•Forbestoperation,plugthis filamentsshouldbeavoided,as[_
applianceintoitsownelectrical theymayalsoignite.
outlet,topreventflickeringof --Do notoperatetheovenwhile _"
Microwaving Tips figh_,blowingoffuseortripping emptytoavoiddamageto the gJ
ofcircuitbreaker. I_
ovenand thedangeroffire.Ifby
•Installorlocatethisappliance accidenttheovenshouldrunempty;
• Makesureallutensilsusedin
yourmicrowaveovenarelabeled onlyinaccordancewiththe aminute or two,noharmis done. _.
"suitableformicrowaving" Checkprovidedinstallationinstructions. However,try to avoidoperatingthe _l
yourCookbookforspecifictestto •Do notcoveror blockany ovenemptyat all times--itsaves ¢B
determine"microwavesafe"utensils, openings on the appliance, energyandprolongsthe lifeof
•Papertowels,waxpaper,and• Do notuseoutdoors,the oven.
plasticwrapcanbeusedtocover --Do notpop popcornin your
dishesinordertoretainmoisture • Donotimmersepowercordor
andpreventspattering, plug in water, microwaveovenunlessinaspecial
microwavepopcornaccessoryor
•Somemicrowavedfoodsrequire • Keeppowercordawayfrom unlessyouusepopcornlabeledfor
stirring,rotating,or rearranging,heatedsurfaces, useinmicrowaveovens._'_
CheckyourCookbookforspecific • Do notletpowercordhangover --If materialsinsideovenshould
instructions, edgeoftableorcounter, ignite,keepovendoorclosed,tam
•Steambuildsuppressureinfoods *Donotoperatethisapplianceifit oven off, anddisconnectpower t,.t.
whicharetightlycoveredbyaskin t_
hasadamagedpowercordorplug, cord,or shutoffpowerat fuseor
ormembrane.Piercepotatoes,egg
yolks andchickenliversto prevent if itis notworkingproperly,orif it circuitbreakerpanel. I_
bursting, hasbeendamagedordropped. • Someproductssuchaswhole
•Seedoor surfacecleaning eggsandsealedcontainers--forf_
eq-
instructionsonpage 18. example,closedglassjars--may tq
•This applianceshouldbe explodeandshouldnotbeheated
servicedonlybyqualifiedserviceinthis oven.
personnel.Contactnearest•Avoidheatingbabyfoodin t.,,.
authorizedservicefacilityforglassjars, evenwithouttheirlids; 0
examination,repairor adjustment, especiallymeatandeggmixtures.
3

IMPORTANT SAFETY INSTRUCTIONS(continued)
• Don't defrost frozen beverages* Plastic utensils--Plastic utensils THE EXHAUST HOOD:
innarrowneckedbottles (especially designedfor microwavecooking * Have it installed and properly "
carbonated beverages). Even if are very useful, but should be grounded by a qualified installer.
the container is opened, pressure used carefully. Even microwave See the special installation booklet
can build up. This can cause the plastic may not be as tolerant of packed with the microwave oven.
container to burst, resulting in overcooking conditions as are glass
injury, or ceramic materials and may *The vent fan in your oven will
•Use metal only as directed in soften or char if subjected to shortoperate automatically under
Cookbook. Foil strips as used on periods of overcooking. In longer certain conditions (see
meat roasts are helpful when used exposures to overcooking, the food Automatic Fan Feature, page
as shown in Cookbook. and utensils could ignite. For 7). While thefan is operating
these reasons: 1)Use microwave caution is required to prevent
TV dinners may be microwaved plastics only and use them in strict the starting and spreading of
in foil trays less than 3/4" high; compliance with the utensil accidental cooking fires while
remove top foil cover and return manufacturer's recommendations, the vent fan is in use. For this
tray to box. When using metal in 2) Do not subject empty utensils to reason:
microwaveoven,keepmetal atleast microwaving. 3) Do not permit --Never leave surface units
1 inch away from sides of oven. children to use plastic utensils unattended athigh heat settings.
• Cooking utensils may become without complete supervision. Boilovercauses smokingand greasy
hot because of heat transferred *Whencooking pork follow spilloversthat may igniteand spread
from the heated food. Potholders our directions exactly and always ifvent fan isoperating. Tominimize _
maybe needed to handlethe utensil, cook the meat to at least 170°E automatic fan operation, use
•Sometimes, the oven floor can This assures that, in the remote adequate sized utensils and use
becometoo hot to touch. Be possibility that trichina may be high heat settings 0nly when
careful touching the floor during present in the meat, it will be necessary.
and after cooking, killed and meat will be safe to eat. --In the event of a grease fire,
•Foods cooked in liquids (such * Boiling eggs is not smother flaming pan on surface
as pasta) may tend to boil over recommended in a microwaveunit by covering pan completely
more rapidly than foods containing oven. Pressure can build up with well-fitting lid,cookie sheet
less moisture. Should this occur, inside egg yolk and may cause it or fiat tray.
refer to page 18for instructions on to burst, resulting in injury. --Never flamefoods under the
how toclean theinside of the oven. *Foods with unbroken outer oven with the ventfanoperating
because it may spread the flames.
• Thermometer--Do not use a "skin" such as potatoes, sausages,
thermometer in food you are tomatoes, apples, chicken livers --Keep hood and grease filters
microwaving unless the and other giblets, and egg yolks clean,according toinstructions on
thermometer is designed or (see previous caution) should be pages 17and 19,to maintain good
recommended for use in the piercedtoallow steam to escape venting and avoid grease fires.
microwave oven. during cooking.
• Remove the temperature probe * "Boilable"cooking pouches SAVE THESE
from the oven when not in use. If and tightly closed plastic bags INSTRUCTIONS
you leavethe probeinsidethe oven should beslit, pierced or vented
withoutinsertingitinfoodorliquid,as directed in Cookbook.Ifthey
and turn on microwave energy, it are not, plastic could burst during
can create electrical arcing in the or immediately after cooking,
oven and damage oven walls, possibly resulting in injury. Also,
plastic storagecontainers shouldbe
at least partially uncoveredbecause
they form a tight seal. When
cooking with containers tightly
covered with plastic wrap, remove
coveting carefullyand direct steam
awayfrom hands and face.

f
Features of YourMicrowave Oven
Cooking Complete Reminder
{ForTIMECooking and DEFROSTcycles) _J_
Toremind youthatyouhave food inthe _,_
oven, the oven will beep once a minute until
you either openthe ovendoor or touch the
OFF/RESET PAD. ¢_
1',,,4
I,d.
0
I=
:-. -=- ---
_ .: -__=_
m@nOQ m
1. Door Handle. Pull to open 5. Plastic Mode Stirrer Cover. 9. Grease Filters. {_
door. Door must besecurely Protects the modestirrer which
latched for oven to operate, distributes microwave energy into 10.Cooktop Light.
2. Window with Metal Shield. the oven. 11. Oven Light. Light comes on I_
Screenallows cooking tobe viewed & TemperatureProbe. Use when door is opened or when oven II
while keeping microwaves confined with Temp Cook and Roast Code is operating in any function.
in oven. functions only. 12. Touch Control Panel and
3. Model and Serial Numbers. 7. Receptacle for Temperature Digital Readout Display. For O
(Cabinet mountedonly. Seepage 2 Probe. Probe must be securelydetailed information on each I,_
forcomplete information.) insertedinto receptacle before oven feature, see pages 6 and 7. I_
will start any temperature or Roast 13. Hood Controls.
4. OvenVent. Code cooking. Fan Pads. Press HI, LO or OFF. 1_
Light Pad. Press ONtoilluminate ii
8. Oven Floor. counter surface. O

t
FeaturesofYourMicrowaveTouchControl Panel
The TouchControl Panel allows you to set the oven
controls electronically withthe touchof a finger.It's
designed to be easy to use and understand. Withyour
microwave oven, you have the option of using your
Cook Code or Roast Codepads for quick andeasy
convenience cooking.Oryou may make your own
programs to suit yourindividualized cooking style.
"EE EE"Appears on Readout
•When using Temp Cook function,you have entered
a temperature less than 90°E or more than 199°F.
"PR OB"Appears on Readout:
•Probe has been forgotten when RoastCodeor Temp
Cook functions are being used.
•Probe is not securely seated in oven wall receptacle.
1. Readout Panel. Displays time of day,time counting
down during cooking functions, temperature, power
level and cooking mode.
2. Time I and Time 2. Microwave for a preset
amount of time using automatic Power Level 10or
change power level after setting time.(See page 8.)
3. Cook Code Control. Use this pad as a short-cut
method for entering cooking time and power level.
(See pages 10and 11.)
4. Defrost. Gentle,more uniform thawing at
automatic PowerLevel 3,or change power level after
entering time. (See page 13.)
5. Temp Cook. Use the temperature probe to cook by
using a preset temperature.When internal food
temperature reaches 90°E, oven shows temperature
until preset temperature is reached and holds
temperaturefor upto one hour.(See page 9.)
6. Cook 'N Watch. Use this pad for short term
cooking whichautomatically turns oven off after
3 minutes.(See page 8.)
7. Power. Touchthis padbefore entering another
power level if you want to change from automatic
Power Level 10 (HIGH) for cooking or Power Level 3
(LOW) for defrosting.
8. Timer. This featureuses no microwave energy
while it functions as botha kitchen timer or as a
holding period between defrost and time cooking.(See
page 16.)

When Power is Connected to the Oven
Thepanel displays four8'sandall of theoven
functions on the lower portion. After 15seconds,
all lights disappear and "PF" appears in the upper
portion. Touch OFF/RESET pad and oven is ready for
use and the clock can be set.
If power is disrupted at any time, the above sequence
reoccurs, and you must reset CLOCK after touching
OFFRESET. I_
9.Roast Code. Insert probe, touch thispad and
desired number pad for Code to slow-cook or P'e.t,
temperature cook meat with automatic preset 1_
program. (See pages 14 and 15.) tq
10. NumberPods.Touch these pads to enter Time, fD
Temperature, Power Level, Cook Code and Roast fI]
Codecodes. 0
11.Clock. Touch this pad to enter time of day or
check time of day while microwaving. To set clock,
first touch CLOCK pad and then enter time of day. For
example, if time is 1:30, touch number pads 1, 3, and O
0 and 1:30 will appear in the readout display. "Start" 1_
will flash onreadout directing you totouch START tq
thus setting the clock. If you wish to reset or change
time, simply repeat the above process. I_
O
12. Off/Reset. When touched, it stops the ovenand tJ.
erases all settings except for time of day.
13.Start.Must touch this pad for oven to begin any _"
function.
14.Vent Fan. Press HI, LO, or OFF for desired fan _'_
speed.
15. Light. Touch ON to illuminate counter,el-
AUTOMATIC FANFEATURE O
Cooking appliances installed under the oven might, I_
under some heavy usage conditions, cause temperatures
high enough to overheat some internal parts ofthe
microwave oven.
To prevent overheating from taking place, the vent t--.,
fan is designed to automatically turn on at low speed
if excessive temperaturesoccur. Should this happen,
the fan cannot be manually turned off, but it will
automatically turn off when the internal parts have
cooled. The fan may stay on up to approximately 30
minutes after the range and microwave oven controls
have been turned off.

Cooking byTime
The time cooking feature allows To Use Cook 'N Watch
you to preset the cooking time. Step1: Touch COOK 'NWATCH.
The oven shuts off automatically. "Start Cook 'N Watch" flashes on
PowerLevel 10 (HIGH) is display.
recommended for mostcooking, Step 2:Touch START. "Cook 'N "
but you may change this for moreWatch" andtime countingup to
cookingflexibility. See yourStep 4: Touch START. "Cook 3 minutes aredisplayed.Power
Cookbook.Time" andtimecounting downLevel 10is automatically set in
Tobecome betteracquainted with show ondisplay, oven butanotherpower levelcan be
time cooking, make a cup of coffee Step 5:When timeis up_ the oven selectedeither duringprogramming
by followingthe steps below, signals andflashes "End_'Oven, or duringcooking.
light, and fan shut off. Step 3: Open the door or touch the
Step 6: Open the door. OFF/RESET padtostop cooking.
The oven will automatically signal,
flash "End" andshut off at the end
Using the Time2 Featureof 3 minutes.
With the Time2feature, you can
set twotime cookingfunctions Questions andAnswers
withinone program. This would be Q.I set my oven for the time
ideal if youdesiredtochange powercalled for inthe recipe, but at the
Step 1: Fill a cup 2/3 full of levelsduringyourcooking operations. end of the time allowed, my dish
waterandadd I teaspoonof instant The following is an exampleof howwasn't done. Whathappened?
coffee andstir to dissolve. Use a
cup that has no metal decoration to change power levels using Tune 2. A. Since house power varies due to
and is microwave safe. Place cup Step 1: Repeat Steps 1,2 and 3. time or location many Time Cooking
in oven and close door. Step 2" Touch TIME 2. recipes give you a time range to
prevent overcooking. Set the oven
Step 3: Set your time as in Step 3. for minimum time, test the food for
Step 4: To change the power level, doneness, and cook your dish a
touch POWER pad and desired little longer, if necessary.
number pad for new power level. Q.Itouched the number pads
Step 5: Touch START. and selected mypower level. When
Step 6: Power Level 10isin useI touched START, however, my
and Time 1countsdown. oven didn't come on. Why not?
Step 2:Touch TIME 1.Display Step 7:At the end of Time 1the A. TheTIME 1 pad must be
shows :0. "Enter 1 Cook Time" next selected power level is in use touched before setting the number
flashes, and Tune 2 is shown counting down. pads or else your oven will not
Step 8: When time is up, the oven begin cooking.
signals and flashes "End7 Oven, Q. I want to cook on a power
light, and fan shutoff.level other than HIGH. What do
P- Step 9: Openthe door.I need to do?
A. Tochange the power level, touch
thePOWER pad. "P-10" appears
Cook 'N Watch on thedisplaypanel. Enter new
•The Cook 'N Watch feature is a number.
short term cooking program which Q.Can I interrupt my Time
Step 3: Select your time. Touch automatically turns theoven off Cooking function tocheck the food?
1,2 and Ofor a minuteand 20 after 3minutes. It's ideal for A. Yes. To resumecooking,
seconds. Displayshows 1:20. melting cheese on food or other simplyclosethe door and press
"1 Cook Time" flashes, quickcooking operations where theSTART pad. The timermust be
If another power level is desired, yon want to stop cooking at just reset forcooking to resumeunless
touch Powerpad and desired number,theright time. timeis remaining on timer.
although Power Level l0 (HIGH) is
preferred for this cup of coffee.

' Cooking byTemperature
t
Internal temperature is the best How to TempCook a Rolled Questions and Answers
test of doneness for many foods. Beef Rib Roast to Medium Q. After I followed the steps
"TempCook" takes the guesswork Step 1: Insert temperature probe and touched the START pad,
out ofcooking because the oven and attach probesecurely inoven"EE EE" flashed in the display O
automatically switches to "Hold" O
setting after reaching the presetfood wall. Close the door. and a signalsounded. What's
wrong?
temperature and maintains that Step 2: Touch TEMP COOK. I=_.
temperature forup toone houroruntil "Enter Temp Cook" flashes. A. "EEEE" flashes if you set _l
the temperature either below 90°E
youtouch the OFF/RESET pad. Step 3: Touch 1,2, 5 for 125°E or above 199°E The oven tells you,
"Temp Cook" flashes and "125"between the flashing of "EE EEl' _,m
The Temperature Probe shows on display, what incorrect entry was made. To ¢_
HANDLE CABLE Step.4: Touch Power pad."P-" re-enter, touchOFF/RESET pad
and begin again.
El Dappears on display. Touch 5 for k_
medium power. "Temp Cook;' Q. Are there any foods Ican't _°
SENSORCLIPI "125"and "P-5" show on display. Temp Cook?
The temperature probe is afood Step 5: Touch START. If internalA. Yes. Delicate butter icings, ice
thermometer that gauges the temperature of the roast is less than cream, frozen whipped toppings,
internal temperature of your food; 90°E, display will show -90 or if etc. soften rapidly at warm
it must be used when using "Temp temperature is 9ff'F. or above, display temperatures. Batters, doughs and
Cook" or "RoastCode_' Toutilize shows temperaturecountingup. frozenfoods are also difficult to
your probe properly, follow directions cook precisely v;,iththe probe.It's
for use and insertion in this book Step 6: After approximately half of best to Time Cook these foods.
in the section entitled "Automatic cooking time, open door and turn
Roasting?roast over. Close door and touch Q. Why did "PROB" flash on
start. (Remember to re-insert probe.) thedisplay after I touched the
START pad?
Step7: When 125°E is reached, A. "PROB" will flash if you
the oven will sound and display don't seat the cable end of the probe
"Hold?The oven will then hold securely into the receptacle in the
the temperature. oven wall or if you touch the TEMP
Step 8: Touch the OFF/RESET COOK pad and forget to use the
pad to stop the cycle, probe.
Step 9: Remove probe and food Q. Can I leave my probe in the t_
from the oven. oven if it's not inserted in food?
A. No, if it touches the ovenwall,
Cooking Tips you may damage the oven. t_.
• Usealower power level; it will Q. Can I Temp Cook different
heat more evenly even though portions of foodat different UM
requiringmore time. temperatures?
• Be sure frozen food has been A. Yes. The temperature probe¢_
completely defrosted before inserting gives you the freedom to cook
probe. Probe may break off if used different portions of food at
in frozen foods, different temperatures to suit
individual eating styles. Simply [_
• Use the clip to keep the probe in place probe in food and change
place while heating, temperature setting as needed. I_
• Cover foods loosely for moisture ._.
control and quick, even heating. _'-_
9

How to Use (Magic Codes) COOK CODE Control
¢
The COOK CODE Control oven can only beprogrammed to whole minutes only.If your recipe
provides a shortcut method for 99 minutes when using the COOK calls forpower level changes or
entering timeandthe power level CODE control andthe highest power different amounts of time needed
on your microwave oven.Cook level is 10whichis represented by between addition of ingredients,
Codes are only used for recipes"07When setting a 2digit Cook you may set one Code for the first
whichneed little or no attention, Code control entry,the first is partof the recipe, then after
andwhich requireno change of time,the second is power level.For completion,set anotherCode for
power level during cooking, example, 50 means 5minutes at that period of time and power level.
Recipes whichrequireadditional power level 10.Remember that Cook Codes are for
ingredients, attention or change of Onthe following page aye shown microwaving by time only. If you
power level during microwaving many frequently prepared foods are microwaving by temperature,
should be cooked in the usual and their codes.It'seasy,though, you must use the Temp Cook or
manner. Also,recipes withcooking to makeCodes for many other Roast Codefunction.
time of less than oneminuteor recipes.Just select oneor two When the oven completes Cook
morethan 99 minutes cannot usedigits representing the lengthof Codeprogram,it automatically
Codes.cooking time desired,and a final shuts off.It will then display
To understand the Cook Code digit forthe power level required. "End"andbeep once a minute
control,it is important to know The Codes given on the chart are until you either open the door or
what the numbers mean and what for the minimum time needed to touchthe OFF/RESET pad.
the sequence is.The first and avoid overcooking whichcan dry
second numbers,if setting a 3 digit out food and make it tasteless and
Code, indicate the amount of time tough. If you feel that more
you desire:the last control entry cooking is needed,add additional
number is always the power level,time by changing the first digit of
For example, 125 means 12minutes the Code.Youcannot add seconds
atpower level 5. NOTE: Your to the cycle time--Codesare for
ForExample: How to Set
COOK CODE Control
Programming your oven for Cook
COOK CODE Code Control operation is easy.
2 Digit Follow thesesimplesteps.
I101 -°
_Step 2: Enter the proper Code. For
Nexample, a recipe calling for 12
Time in PowerLevel minutes cooking time at power
Minutes High (10) level 10would be 120. 120appears
on the display panel.
COOK CODE Step 1: Touch COOK CODE.
3 Digit "Enter Code" flashes.
Step3. Touch START. Display will
Time in PowerLevel show time counting down and
Minutes Med (5) "Cook Time:'
10

' COOK CODE Control Guide
Detach and Tape to Inside Cabinet Door or Other Prominent Place
d
The COOK CODE Control feature givesyou an easy Cookbook which comes with your microwave oven.
automatic way to accurately set microwave time for Always use the microwave-safe containers and
foods requiring only one power level and little microwave techniques as described in the Cookbook.
attention during cooking. The Chart below shows To set Codes for many other foods or recipes refer to
frequently prepared foods and the suggested Codes to page 10 in this Use and Care Book. COOK CODE
use with each. For specific information on stirring, Codes given are for minimum time. Check and add
turning or rotating, check the Microwave Guide and time if necessary to complete cooking.
FOOD COOKING CODE FOOD COOKING CODE
Appetizers (Warming) Meats/Main Dishes
Dip (Cream Cheese) Bacon
I/2Cup 25 2 Slices20
1Cup 454 Slices 40
Dips (SourCream) Chicken
IACup 13 8-10Pieces 180
1Cup 23 2Pieces 50
Pastry Bites (Reheating) 4 Pieces 100
2 Servings 17 Chuck Roast (3 Ibs.) 605
4 Servings 10Eggs, Baked (2 Eggs)27 -
"- Breads and Desserts Eggs, Scrambled (2 Eggs) 20
Entrees, Frozen
Apples (2) 60 8OZ. 50
"o Bran Muffins (5-6) 37 16oz. 110
Brownies, Mix 60 2 Ibs. 200
o Cakes, Mix (16cups fluted mold) 177 Fish Fillets (1 lb.) 60
Cheese Bread, Yeast (i loaf) 105 Frank (in bun)
"_ 2 20
¢O' Chocolate Chip Bars60 4 30
Nut Bread Mix (1loaf) 97 Meat Loaf (1½ ibs.) 237
BeveragesSausage (Raw)
Coffee,Soup (1cup) 10 4 Patties 30
Milk Bases (1 Cup) 27 4 Links 20
Swiss Steak (2 ibs.) 705
Frozen Foods (Defrost) Frozen TVDinner (12oz.)80
Note:Times given below areforentiredefrostcycle.
Usually food must be rotated,broken up or turned over Vegetables (Fresh)
while defrosting.Check Cookbook forspecific information. Beans,Green (1lb.) 150
Cake, WholeIced23 Broccoli (l tA-I½ lbs.)
Chicken,Cut-up(2½-3 ½lbs.) 143 Spears 147
DessertTopping,Whipped13 Cut120
Doughnuts or Pastries(2-4) 13 Cauliflower, Head 137
Corn onCob (4) 120
Fish Fillets (1lb.) 83
Hamburger (2 lbs.) 123 Potatoes (4) 120
Pie, Fruit Filling, Whole 83 Squash (1lb.) 100
Zucchini (I lb.) 100
Roast (4-5 ibs.) 403
Steak or Chops (2 lbs.) 123 Vegetables (Frozen)
l0 oz. pkg. 80

'Defrosting
'The Defrost setting is designed Questions and Answers
for even thawing for large amounts
of food and is one of the most Q. When I press START, I hear
important advantages of a a dull thumping noise. What is it?
microwave oven. A. This sound is normal.It is
• PowerLevel 3 is automatically letting you know the oven isusing a
setfordefrosting,butyou may PowerLevel lower than 10(HIGH).
change this formore flexibility.Q. Can I Defrost small items in
• See yourCookbook for Step 4: TouchSTART. "Def Time" a hurry?
defrosting help.shows andtimecounts down on A. Yes,but theywill need more
To become better acquainted with display. When cycle is completed, frequent attention than usual. Raise
the defrost function, defrost frozen the oven signals and flashes "End,'" the Power Level after entering the
pork chops by following the steps then automatically shuts off. time by touching the power pad and
below. Step 5: Turn package over, close the desired number pad for another
Step 1"Place package of frozen door and repeat Steps 2, 3 and 4. power level. Power Level 7 cuts the
time about in 1/2; Power Level
chops in the oven and close door. Step 6: Open door, remove 10cuts the time to approximately
package and separate chops to 1/3. During either, rotate or stir
finish defrosting, food frequently.
Defrosting Tips Q. Why don't the defrosting
times in the Cookbook seem right
• Foods frozen in paper or plastic for my food?
can be defrostedin the package. A. Cookbook times are average.
Defrosting time can vary according
to the temperature in your freezer.
Step 2: Touch DEFROST. Display Set your oven for the time indicated O
shows :0 and "'Enter Def Time" in your Cookbook. If your food is
flashes, still not completely thawed at the I_-
end of that time, reset your oven _l
and adjust the time accordingly.
Q. Should all foods be
completely thawed before
• For even defrosting, some foods cooking?
need to be broken up or separated A. Some foods should not be
part of the way through the
defrosting time. completely thawed before cooking.
For example, fish cooks so quickly
Step3: Touch 8, 0 and 0 for 8 it is better to begin cooking while it
minutes. Display shows 8:00 and is still slightly frozen.
"DefTime"flashes. If you wish to Q. Can I open the door during
change power level, touch Power - _ _ defrosting to check on the
pad and then new number, progress of myfood?
A. Yes. You may open the door at
any time during microwaving. To
resume defrosting, close the door
• Pre-packaged frozen dinners and press START. The oven begins
can be defrosted and microwave operating if time is left on timer.
cooked. They should be replaced in If not, reset timer.
their boxes. Be sure to remove any
foil covers. Keep metal trays at
least l" away from cavity walls.
• Check your Cookbook for other
defrosting tips.
13

AutomaticRoasting
RoastCode uses the temperature
probe tocook tothe desired serving
temperature. Unlike Temp Cook,
which uses asingle power level,
Roast Code uses up to 3 power /-....
settings which automatically switch .,.
during roasting, thus providing
even, tender cooking results Step2. At 90°E, display switches
without overcooking, to show meat's internal temperature.
Just as in conventional roasting,
only tender roasts should be roasted
until specified internal temperatures Poultry, pork or ham roasts need no
are reached. Less tender roasts trivet. Add 1/2cup water to roast
should be microwaved by time, dish, cover with plastic wrap. (For
according to the Cookbook which cooking bag method, see Cookbook.)
comes with your oven. Complete
information on preparing roasts for
microwaving is in your Cookbook. _ ____.>/___ Step 3. After apre-programmed
temperature is reached,depending
Preparing Roasts onthe codeselect,oven flashes
for Roasting ,)/_ "turn"andbeeps four times.Open
the oven door and turnthe meat
over.The probemaybe disconnected
for easier access tothe meatwithout
interruptingthe program.(Remember
to re-insert the probe.)
Place meat in oven with probe to
the right. Insert cable end of probe
firmly into receptacle on oven wall.
How to Roast Beef
to Medium
Place tender beef roaston trivet in
microwavesafedish. Insertprobe Step 4. Closedoor andtouch
from the front horizontally into the START. The temperature willreturn
center meaty area not touching bone on display. Oven monitors internal
or fat. Make sure the handle does food temperature; automatically
not touch the food or top or sides of switching to lower powez:as meat's
the oven. Cover with wax paper, temperature rises. This helps
prevent toughening or overcooking.
Step 1. Touch ROAST CODE
Pad. "Enter Code" flashes. Touch
number pad 2. "Code 2" appears on
display and "Start" flashes. Touch
START. Display shows -90 and
"Temp Cook:'
Step 5. After final temperature is
reached, oven switches to holdtemp
for up to 1hour, then shuts off.
14

IRoast Code Chart
•Use containers and coverings as directed atleft. Place probe correctly in roast before cooking.
• When oven beeps andflashes"turn_' turn meat over.
• Recommended Codes are also shown on Roast Code Chart on control panel. 1_
Final Approx. Time Hold*
Food Code Temp. (min. per lb.) Minutes O
Beef
Tender Roast
Rare 1 115° 12-14 5-10 I,_.
Medium 2 125° 14-16 10-15
Well 3 145° 17-18 30
Pork[_
A
Loin Roast 4 175° 18-20 20
Precooked Ham 1 115° 17-19 5-10 ('_f,_
Poultry _'_,d.
Whole Chicken (3 lbs.) 5 190° 13-15 20 [_l
Turkey Breast 4 175° 13-15 20
(Insert probe horizontally into meatiestarea.)
*Recommendedstanding time before serving.
AutomaticSimmerSimmer
(Roast Code 6) (Roast Code 6)
YourCookbook has information on Approx.
Automatic Simmering,including Food Time/Hrs.
chart andrecipes.
Total time includes timeto bring Beef
food to 180OF.andhold atthatPotRoast* 6-8
temperature untildone.Oven switchesto"Hold"at Stew 6-8
180OF.untilyou remove food and Chili 11-13
turn off oven.If stirring is Chicken*
recommended, you can reset oven Stewing 11-12
by retouching START.TouchBroiler/Fryer 4-6
OFF/RESET after cooking.Ham or Pork
Roast 4-6
Soup 0
SetSimmer like Roast Code, example Stock/Vegetable 3_6 _,_
left. Display shows - 90 until food Split Pea 13-15 t_
is 90°F., then switches to show *For frozen,add 2 to 3 hours.
food temperature until 180°F. O
gl'
15

m
HowtoUse theTimer
The TIMER has three timing
functions:
• It operates as a minute timer.
•It can beset to delay cooking.
•It can beused as a hold setting
after defrosting.
The TI1VfERoperates without Step 2: Touch DEFROST pad. Step8: Touch START. "Def
microwave energy. Time;' and 15:00 counting down
show on display. As each function is
How toTime a 3-Minute automatically performed oven
display shows instructions entered
Phone Calland the function.
1. Touch TIMER pad. The display Step 9: When time is up, the oven
shows :0 and "Enter Time"
flashes. The display shows :0 and "Enter signals and flashes "End."
2. Touch number pads 3,0 and 0 DefTime" flashes. Questions andAnswers
(for 3 minutes and no seconds). Step 3: Touch pads l, 5,0 and 0 for
Display shows 3:00 and "'Time" 15minutes defrosting time. 15:00 Q. Whatwill happen ifl
flashes, appearson display. (Defrosting is accidentallyreverse mydefrost,
3.Touch START. Display shows automatically set on power level 3 hold and cook instructions? -
time counting down. but can be changed by touching the A. The oven will automatically
4. When time is up, oven signals, Power pad and the desired power rearrange your program. Defrosting
flashes "'End," and display shows level.) will always come first, then hold,
time of day. and then the cooking function.
Programming a HOLDQ. Can Idefrost and hold only?
A. Yes.Sometimes you mayonly
TIMEwanttodefrost afood, hold it, and
The Timer can alsobe usedto_cook itlater. All you needto do is
program "hold time" between0program in Defrostand amountof
microwavecooking functions. The time. Then program Hold andthe
timecan rangefrom one second to Step 4: Set standing or hold timeamountof time. Besure toput the
99 minutes and99 seconds.Aby touching TIMER. The display thawed dishin the refrigerator
HOLD, or "standing" time may be shows :0 and "Enter Time" promptly.
found in someof your own recipes flashes.NOTE:Let foods remain atroom
orCookbook.Step 5: Touch1,0,0 and 0 tohold temperatureonly as long assafe.
forten minutes.10:00 appears on Times will vary.
Programming Delayed display and "Time" flashes.
CookingQ.Iprogrammed my oven for a
specific defrosting timebut it
To set the oven to delay cooking up defrosted longer than necessary.
to 99 minutes follow Steps ! and 2 What happened?
to enter hold time. Then,touch A. When instructions conflict,
TIME 1and enter cooking time the oven carries out the last
before pressing START. instruction. Youmay have set the
oven to Defrost for 4 minutes,
How to Defrost, Hold andStep6: Touch TIME 1pad. The Hold/Time for 2 minutes, and then
Time Cook display shows :0 and "Enter 1 Defrost for 6 minutes. In this case,
Let's say you want to defrost a frozen Cook Time" flashes, the oven would Defrost for 6
minutes and Hold/Time for 2
casserole for 15minutes, hold for Step 7: Touch 2, 5, 0 and 0 for minutes.
10minutes and then Time Cook for twenty-five minutes of cooking
25 minutes. Here's how to do it: time. "i Cook Time" flashes and
Step 1: Take casserole from freezer 25:00 appears on display.
and place in oven.
16

J
The Exhaust Feature
r
[C
METAL METAL
FILTER FILTER
COOKTOPLIGHT
The exhaust hoodfeature onyour Then pull filter downwardand to
microwave oven is equipped with the front. The filter will drop out. t'_
two metal filters which collect _'J
grease. When the fan is operated, To clean grease filter, soak, then
air is drawn up through the filters _/ agitate filter in hot detergent
and is then discharged through the _......t_./t solution. Don't use ammonia or I_
__kN-- other alkali because it will darkenI,_o
provided venting to the outside.
The hood also has a light for //:___K_,_Nk II metal. Light brushing can be used
illuminating the counter space, f " ' _'_ t[to remove embedded dirt. Rinse,
__--_1 _ shakeandremove moisture before
replacing. Filters should be
cleaned at least once a month.
Never operate your hood without
To replace grease filter, slide the the filter in place. In situations
filter in the frame sloton the back whereflaming might occur on
®...._, --_'_i_ of the opening, surfaces below hood, filter will
:_ i " retardentry of flames intothe unit.
Ii
To remove grease filter, grasp the _ ' _'_ --_.',"
totherear."fingerhold" on the filter and slide ___ff[®_,'.-.'_ti _
Pull filter upward and to the front
to lock intoplace. _J
17

l
6
Care of Your Microwave Oven
Your new Microwave Ovenis How to Clean the Inside How to Clean the Outside
a valuable appliance. Protect
it from misuse by following Walls, floor and plastic cover. Case. Clean the outside of your
Becausethereis little heat except oven withsoap anddamp cloth, they
these rules: in the food,or sometimes in the rinseand dry.Wipethe window
• Keep your oven clean and utensils,spills andspatters are easy clean witha damp cloth. Chrome
sweet-smelling. Opening the oven to remove.Somespatters can be trim is best wiped witha damp
door a few minutes after cooking removed witha paper towel,others clothandthen witha dry towel.
helps "air-out"the interior.An may requirea damp cloth. Remove
occasional thoroughwiping witha greasy spatters witha sudsy cloth, Control Panel. Wipe witha damp
solution of baking soda and water then rinsewith a damp cloth. Do not cloth. Dry thoroughly. Do not use
keeps theinteriorfresh, use abrasivecleaners on oven walls, cleaning sprays, large amounts of
NEVER USE A COMMERCIAL soap and water, abrasives, or sharp
• Don'tuse sharp-edged utensils on OVEN CLEANER ON ANY objects on thepanel--they can
your oven.Theinsideand outsidePART OFYOUR MICROWAVE damageit.
oven wallscan bescratched. The OVEN. Door Surface.When cleaning
control panel can bedamaged. Door (inside).Window: Wipe up surfaces of door and oven that
•Don't remove the mode stirrer spattersdaily, wash when soiled, come together onclosingthe door,
cover at the top of theoven with a minimum of sudsy, warm useonlymild, non-abrasivesoaps
(microwave feature 5 on page 5). water. Rinsethoroughly anddry. or detergents applied with a sponge _
Youwill damage the oven. or soft cloth.
Metal and plastic parts on door:
BE CERTAIN POWER IS OFF Wipe frequently with a damp Power Cord. If the cord becomes
BEFORE CLEANING ANY cloth to remove all soil. DO NOT soiled, unplug and wash with a damp
PART OF THIS OVEN. USE ABRASIVES, SUCH AS cloth. For stubborn spots, sudsy
CLEANING POWDERS OR water may be used, but be certain
STEEL AND PLASTIC PADS. to rinse and dry thoroughly before
THEY WILL MAR THE plugging cordinto outlet.
J _ SURFACE.
AutomaticTemperature Probe.
Probe is sturdy, but care shouldbe
taken in handling.Do not twist or
bend; avoid dropping temperature
probe.
Clean as soon afterusing as
possible. To clean, wipe with sudsy
cloth, then rub lightlywith plastic
scouringball if necessary. Rinse
anddry. (Orwash in dishwasher.)
18

To replace hood, disconnect power To replace your oven lamp, first Clean off the grease and dust on
at main fuse or circuitbreaker disconnectpower atmain fuse hood surfaces often. Use a warm
panel orpullplug. Remove 1 or circuit breakeror pullplug. detergent solution. About 1
screw from each side of lower panel Remove the top grill by taking off tablespoon of ammonia may be
and 3 screws from front edge. Lower 3 screws which hold it in place, added to the water. Take care not
panel until it rests on range below, to touch the filters and enameled
Be sure bulbs to be replaced are surfaces with this. Ammonia will
cool before removing. Remove bulbs tend to darken metal.
andreplace with40 wattincandescent/_"L__F_--i; _ ?--7-'% _t_ "_ C[}
bulbs available from your supplier, t
Raise lower panel and replace i _ 1--_ O
screws. Connect electrical power
to microwave oven.
Next, remove the single screw
= - located above door near center of
___===__)(oven thatsecures lamp housing, i
Replace burned-out bulb with a
30-watt lamp available from your
REMOVE 7 SCREWSsupplier.
Note:
Also remove the two screws
mounting the upper glass retainer
trim for easier lamp replacement. O
19

w
GROUNDING INSTRUCTIONS
This appliance must be grounded. Where a standard two-prong wall
In the event of an electrical short receptacle is encountered, it is
circuit, grounding reduces the risk your personal responsibility and
of electric shock by providing an obligation to have it replaced with
escape wire for the electric current, a properly grounded three-prong
This appliance is equipped with a wall receptacle.
power cord having a grounding
wire withagrounding plug. The Donotunder anycircumstance
plug must be plugged intoan outlet cut or remove the third (ground)
that is properly installed and prong from the power cord.
grounded. (Fig. l) Do notuse an adapterplug
with this appliance.
Do notuse an extension cord
WARNING-Improperwith this appliance.
use of the grounding plug can result
in a risk of electric shock.
INSUREPROPER
GROUNDEXISTS
Fzg.1 BEFOREUSE
Consult a qualifiedelectrician or
service technician if the grounding
instructions are not completely
understood, or if doubt exists as to
whether the appliance is properly
grounded.
20

The Problem Solver l
To save time and money-- t,q_'_
beforeyou request service, All these things arenormal on your Microwave Oven: 6
check the Problem Solver.
If you have a problem, it may be •Steamor vapor escapingfrom *Dull thumping sound while
minor. You may be able to correct around the door. operating at power levels other _l
ityourself. Just use this Problem •Lightreflectionaround door or than high. _,J
Solver to locate your problem and outer case. *Some TV-Radio interference .t,qt_"
then follow the suggested might be noticed while using your ff_
recommendations. *Dimming oven light and change
in blower sound may occur while microwave oven. It's similar to the
operatingat power levels other interference caused by other small I,-,4
than high. appliances and does not indicate a
problem with your oven. eq-
PROBLEM POSSIBLE CAUSE AND REMEDY
OVEN WILL NOT A fuse in your home may be blown or the circuit breaker tripped. Replace fuse or reset p_"
COME ON circuit breaker. V
Makesure 3-prongplugonovenis fullyinserted into wall receptacle.
CONTROL PANEL Door not securely closed.
LIGHTED, YET OVEN START must be touched after entering cooking selection. -
WILL NOT START Another selection entered already in oven and OFF/RESET not touched to cancel it.
Make sure you have entered cooking time after touching TIME 1 or TIME 2.
OFF/RESETwas touched accidentally. Reset cooking program and touch START.
Temperature probe not inserted properly or not being used during Roast Code or
Temp Cook.
Make sure you have entered a desired finished temperature after touching TEMP COOK.
Make sure you entered a code number after touching ROAST CODE or COOK CODE.
FOODS ARE EITHER Cooking times may vary because of starting food temperature, food density or amount
OVERCOOKED OR of foods in oven. Touch TIME 1and additional cooking time for completion.
UNDERCOOKED Incorrect power level entered. Check Cookbook for recommended power level or
changing levels during cooking if necessary. I_
Dish was not rotated, turned or stirred. Some dishes require specific instructions. _'_
Check Cookbook or recipe for these instructions.
Too many dishes in oven at same time. Cooking time must be increased when cooking
more than one food item. Check Cookbook for recommendation on increasing time. I_
Probe not inserted properlyinto meat or dish when using Temp Cook or Roast Code
functions. Check Cookbook or Roast Code sectionof this book fbr specific instructions, v_'_
"EE EE" APPEARS When using Temp Cook, a temperature less than 90°E or mo_e than 199°F. has
ON DISPLAY been entered.
When using Clock, you have not entered a valid clock time.
"PR OB" APPEARS Probe has been forgotten or not seated properly in oven wall when using Temp Cook
ON DISPLAY or Roast Code functions. O
<
tq
21
Table of contents
Other Magic Chief Microwave Oven manuals