MAGPiX B350 User manual

1
Introduction
The MAGPiX B350 is a digital camera with a specially
designed 5x telescopic lens. Combined with its very
high-speed shutter, the MAGPiX B350 produces amazing
freeze-frame action pictures.
These images can be downloaded and viewed on your
personal computer through the USB port after installing the
software included in this package. To get the most out of your
camera, please read this manual carefully.
This manual is divided into seven parts:
A. Getting To Know Your Camera
B. Using Your Camera
C. Camera Modes and Settings
D. Viewfinding and Taking Better Picture Tips
E. Downloading Your Pictures To Your PC
F. Technical Specifications
G. Troubleshooting and Frequently Asked Questions

2
A. Getting To Know Your Camera
Below are three views of the MAGPiX B350 to help familiarize
you with your new camera. The parts and corresponding
numbers will be referred to throughout this manual.
1Left Barrel
2Left Objective Lens
3Camera Lens
4Right Objective Lens
5Right Barrel
6Dioptric Knob
7Right Eyepiece
8Shutter/Select Button
9USB Port
10 Power/Mode Button
11 Left Eyepiece
12 Focus Knob
13LCD Display
Figure 1. Top View

3
8 Shutter/Select Button
9 USB Port
10 Power/Mode Button
Figure 2. Front View
14 Camera Lens
15 Eyepieces
16 Battery Compartment
17 Tripod Mount
Figure 3. Side View

4
B. Using Your Camera
1. Load The Batteries. Open the Battery Compartment (16)
and insert two AAA batteries (included), paying attention to
insert them in the correct direction. Close the compartment.
Always download your pictures
regularly (see Part E), if the
batteries run out, your pictures will
be lost. A flashing LCD indicates
the batteries are low. You should
download your pictures as soon as
possible. Figure 5. Loading The Batteries
2. Turn On Your Digital Camera. Press Power/Mode Button
(10) to turn on the camera. The preset mode of high resolution
(HI) allows 52 VGA images and is indicated by a 3-star symbol
on the LCD Display (13).
Figure 6. High Resolution Figure 7. Pictures Remaining

5
3. Use The Eyepieces (7 & 11) To Aim Your Camera. The
camera works best at taking pictures of outdoor objects, 40ft
away from you or more. Also, since the camera is point and
shoot and independent from the binoculars, you do not need
to focus the binoculars to get great in-focus pictures.
4. Take Your Picture. Hold your MAGPiX B350 steady and
aim at a scene or object 40ft. or greater away from you.
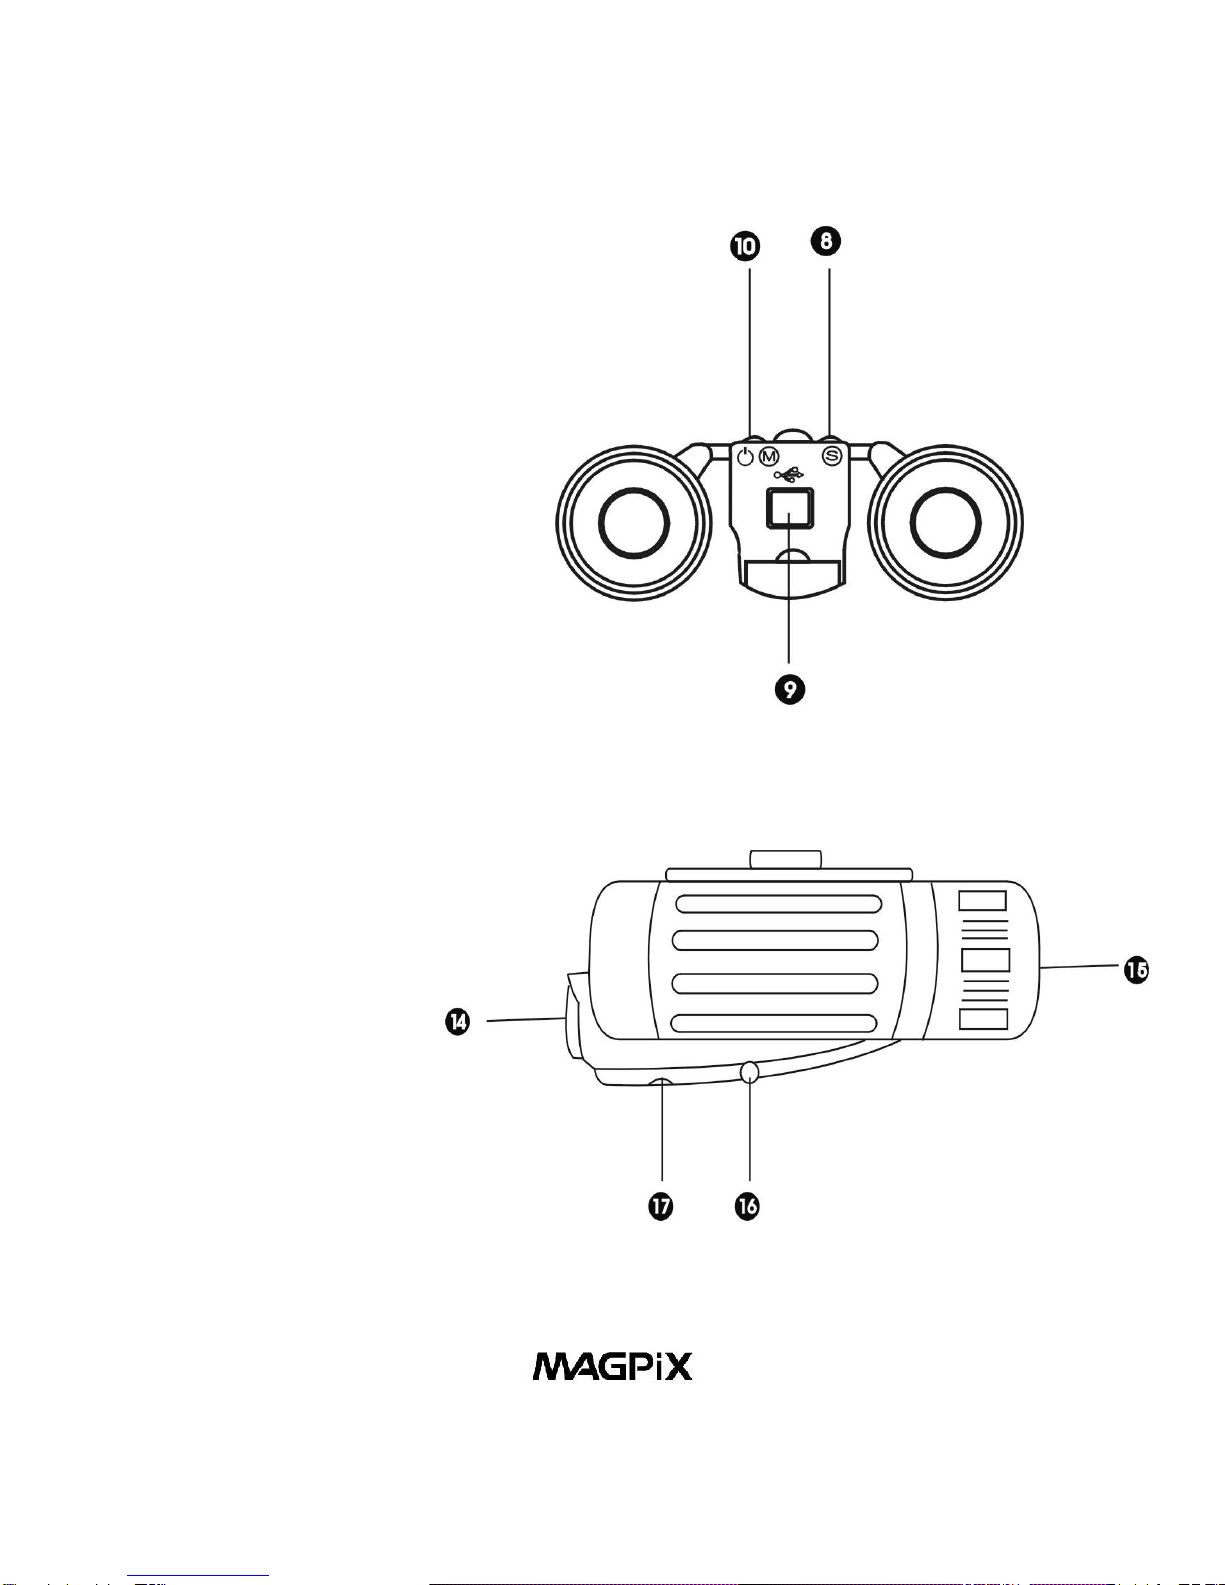
Press the Shutter/Selection Button (8) to take the picture.
You will hear a beep. The LCD Display (13) will show “---“,
and when the number of available exposures has decreased
by one on the LCD Display (13), you will hear another ‘beep’,
and the camera is ready to take another picture. If you hear a
quick ‘double beep’ and the counter does not go down, it
means that there was not enough light for the camera to take
a picture.
.
Figure 8. Shooting Symbol Figure 9. LCD Display After
First Exposure

6
5. Turn off Your Camera. Press the Power/Mode Button (10)
once and the LCD Display (13) will show “oFF”. -Then
press the Shutter/Select Button (8) to turn off the camera.
The camera will also automatically shut off after
approximately 1minute of inactivity.
Figure 10. Off Mode
C. Camera Modes and Settings
Different camera modes and settings can be cycled through by
pressing the Power/Mode Button (10) after the camera is turned
on. *** It is important to wait 1 second before each press of
the Power/Mode Button. ***
1. Off Mode
2. Self-timer
3. Erase All Pictures
4. Erase Last Picture
5. Resolution Selection

7
1. Off Mode
When the camera is turned on, pressing the Power/Mode
Button (10) once, will cause “oFF” to show on the LCD Display
(13). Then press the Shutter/ Select Button (8) and the camera
will turn off.
Figure 11. Off Mode
2. Self-Timer Mode
When the camera is turned on, pressing the Power/Mode
Button (10) two times, waiting one second between each
press of the button -will put the camera in the Self-Timer
Mode. When you see the timer icon, press the Shutter/Select
Button (8) to activate the self-timer. The camera will beep for
10 seconds before taking the picture automatically. When LCD
Display (13) no longer shows “---“, the camera is ready to
take another picture.

8
Figure 12. High Resolution + Self-timer Figure 13. Low Resolution +
Self-timer
3. Erase All Pictures
When the camera is turned on, pressing the Power/Mode
Button (10) three times, waiting one second between each
press of the button -will put the camera in Erase All Pictures
Mode. When you see the Erase All Pictures icon, press the
Shutter/Select Button (8) and the LCD will begin to blink. While
the LCD is blinking press the Shutter/Select Button (8) again,
and the camera will erase all pictures that have been taken.
Figure 14. Erase All Pictures

9
4. Erase Last Picture
When the camera is turned on, by pressing the Power/Mode
Button (10) four times, waiting one second between each
press of the button -will put the camera in Erase Last
Pictures Mode. When you see the Erase Last Pictures icon,
press the Shutter/Select Button (8) to erase the last picture.
The number of available pictures on the LCD Display (13) will
be increasedby one.
Figure 15. Erase Last Picture

10
5. Resolution Selection
When the camera is turned on, pressing the Power/Mode
Button (10) five times, waiting one second between each
press of the button -will put the camera in Resolution
Selection Mode. When you see the Resolution Icon, press the
Shutter/Select Button (8) to change the preset high resolution
(52 VGA images of 640 x 480 pixels) to low resolution (209
QVGA images of 320 x 240 pixels).
Figure 16. Changing Between High Resolution and Low Resolution
If you change the resolution to low,
the LCD Display (13) will show the
following when you turn on your
digital camera again. To change
the resolution back to high -follow
the steps above one more time.
Figure 17. Low Resolution

11
D. Viewfinding and Taking Better Picture Tips
How to use the binoculars:
1. Hold the MAGPiX B350 in a comfortable viewing
position,and adjust the left and right barrels (1 & 5) apart or
together until one single circular field is seen with both of
your eyes at the same time.
2. To adjust the focus, look into the Left Eyepiece (11)
with your left eye (with the right eye closed) to aim at any
object 5 meters away,rotatethe Focus Knob (12) clockwise
or anti-clockwise to get the best focus. Then look into the
Right Eyepiece (7) with your right eye (with the left eye
closed), and rotate the Dioptric Knob (6) to the left or to the
right to get the best focus.
3. Now you can look with both eyes into the left and right
eyepieces (2 & 4) and bring nearby or far away objectsinto
focus by adjusting the Focus Knob (12).

12
Viewfinding
•The function of the binocular is as the viewfinder for the
binoculars.
•The area seenthrough the binocular is a circular area,
approximately 8 times the magnification of original
image.
•The MAGPiX B350 lens producesa 5 times enlarged
image with 4x3 standard shape.
Figure 17. View area difference between binocular and camera
•You do not need to focus the binoculars for a focused
picture. The camera is auto-focus and is independent
from the binoculars.
Area Seen Through
Binocular
Area of Picture Taken

13
•Depending upon the amount of available light, the shutter
speed is fast enough that you can capture terrific action
shots.
•Try taking a picture of a helicopter in flight. You’ll notice
that when you view your picture, you will have stopped
the helicopter’s rotor blade in mid-flight.

14
E. Downloading Your Pictures To Your PC
1. Install the drivers and photo software. The CD included
in the box contains the MAGPiX B350 driver and bonus
software (Photo Express 4.0). The driver must be installed
before you connect the MAGPiX B350 to your computer.
Ulead PhotoExpress is bonus software, and is not necessary
to view your pictures.
Insert the installation CD into the CD-ROM drive of your
computer. A screen will appear as shown in Figure 18.
Figure 18. B350 CD start-up screen

15
Click once on “Install MAGPiX B350 Driver” to start the
installation of the driver, and follow the instructions on the
screen step by step. After the installation is completed,
select “Restart your computer now”. (Go directly to step 2, if
you do not want to install PhotoExpress on your computer).
After your computer restarts, re-insert the MAGPiX B350 CD
and click once on “Install Ulead Photo Express 4.0” to install
Photo Express. Follow the instructions on the screen step by
step. After the installation is completed, exit the installation
screen and restart your computer.
2. Connect your MAGPiX B350 to your computer. Plug in
the large end of the included USB cable to the USB port of
your computer, and connect the smaller end of this cable to
the MAGPiX B350. Your computer will find new hardware and
update its system. Follow the onscreen instructions, if any.
3. Downloading your pictures from the MAGPiX B350.
By using the MAGPiX Quick Download Utility:
1.
Make sure the MAGPiX B350 is connected with the USB
cable to your computer.
2. Launch the MAGPiX B350 by going to: Startà
ProgramsàMAGPiX B350àMAGPiX B350. (See
Figure 19).

16
Figure 19. MAGPiX Quick Download Utility

17
3. Click on the Red/Pink camera icon to download images
from the camera.
4. The thumbnail images can be enlarged by clicking on
them with your right mouse button. Select the photos
you want to save and click on the save icon and click
“Save”.
5. After the pictures are downloaded, you may delete the
pictures from your MAGPiX B350 by following the
directions on page 8 of this manual.
6. You can now open your saved photos with your favorite
photo applications.
By using Ulead PhotoExpress:
1. Make sure the MAGPiX B350 is connected with the USB
cable to your computer.
2. Launch the PhotoExpress 4.0 application.
3. Along the left hand side of the application, select the
folder that you like to download your pictures to.
4. Click on “Get Photos” and select “Digital Camera” from
the drop down menu, as shown in Figure 20.
5. Make sure “MAGPIX B350 “ is selected along the left
hand side of the application under “Select Data Source”
6. Click “Acquire” at the bottom left of the screen to
download your pictures in the camera. See Figure 21.
7. After the pictures are acquired, you may delete the

18
pictures from your MAGPiX B350 by following the
directions on page 8 of this manual.
8. Ulead PhotoExpress 4.0 offers many more functionalities
as an image-editing program. To learn how to use
PhotoExpress 4.0, please insert the CD that came with
the B350 and select “Ulead PhotoExpress 4.0 User
Manual”, or visit www.ulead.com on the Internet.
Figure 20. Click “Get Photos”and select “Digital Camera”

19
Figure 21. Click ‘Acquire”at the bottom left of the screen

20
F. Technical Specifications
•Sensor Resolution:CMOS, 640x480 pixels
•Built-in Memory:8MB, SDRAM
•Image Storage:VGA (640x480) -52 images
QVGA (320x240) -209 images
•Status LCD:3-digit B/W
•White Balance: Auto
•Exposure: Auto
•Shutter Speed:Auto (1/8000 sec, Max.)
•Focal Length:33 mm (equalsto 230 mm of 35 mm
camera)
•Aperture: F=4
•Self Timer: 10 seconds
•Interface:USB
•Delete Image:All / last one
•Auto Power Off:45 seconds
•Battery: 2x AAA Alkaline Battery
•Dimensions: 115x90x55 mm
•Weight: 225 grams (w/o battery)
•Operating System: Windows 98SE/ME/2000/XP
•Veiwfinder Full functioned 8x21 binocular
Other manuals for B350
1
Table of contents
Other MAGPiX Digital Camera manuals