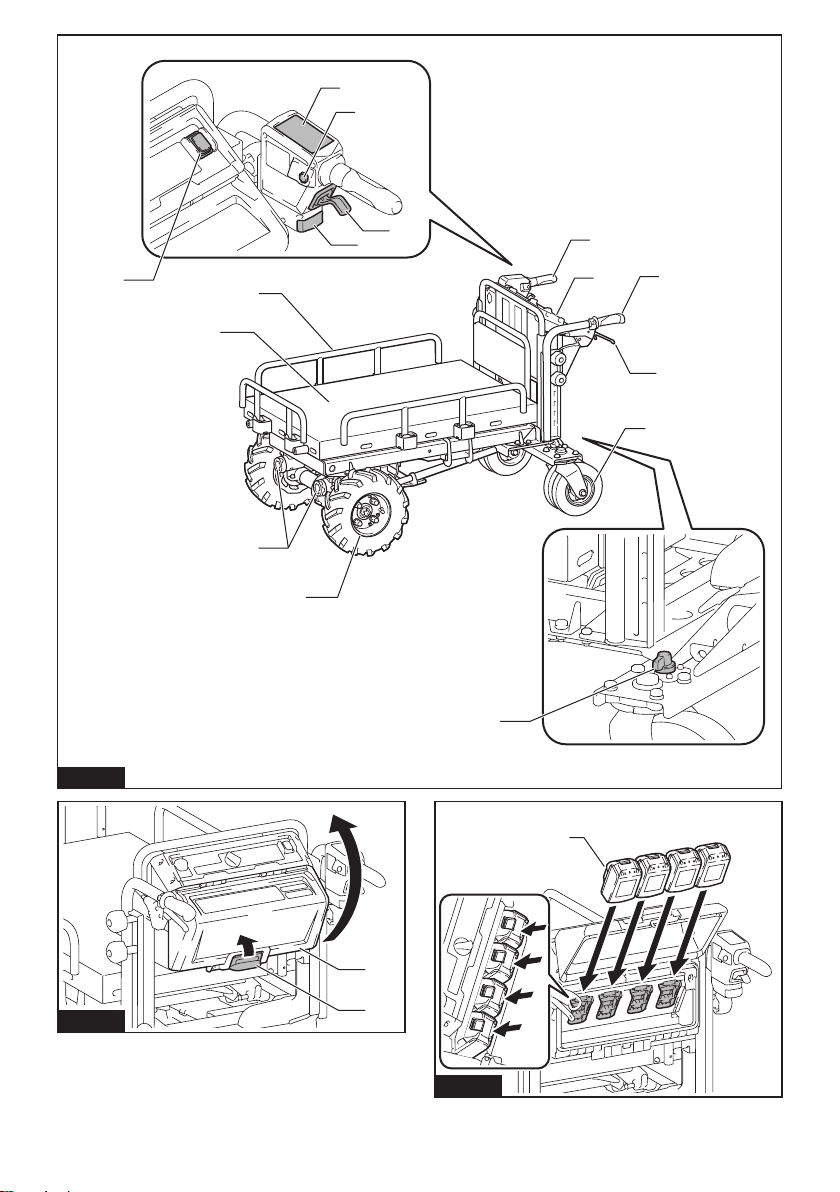
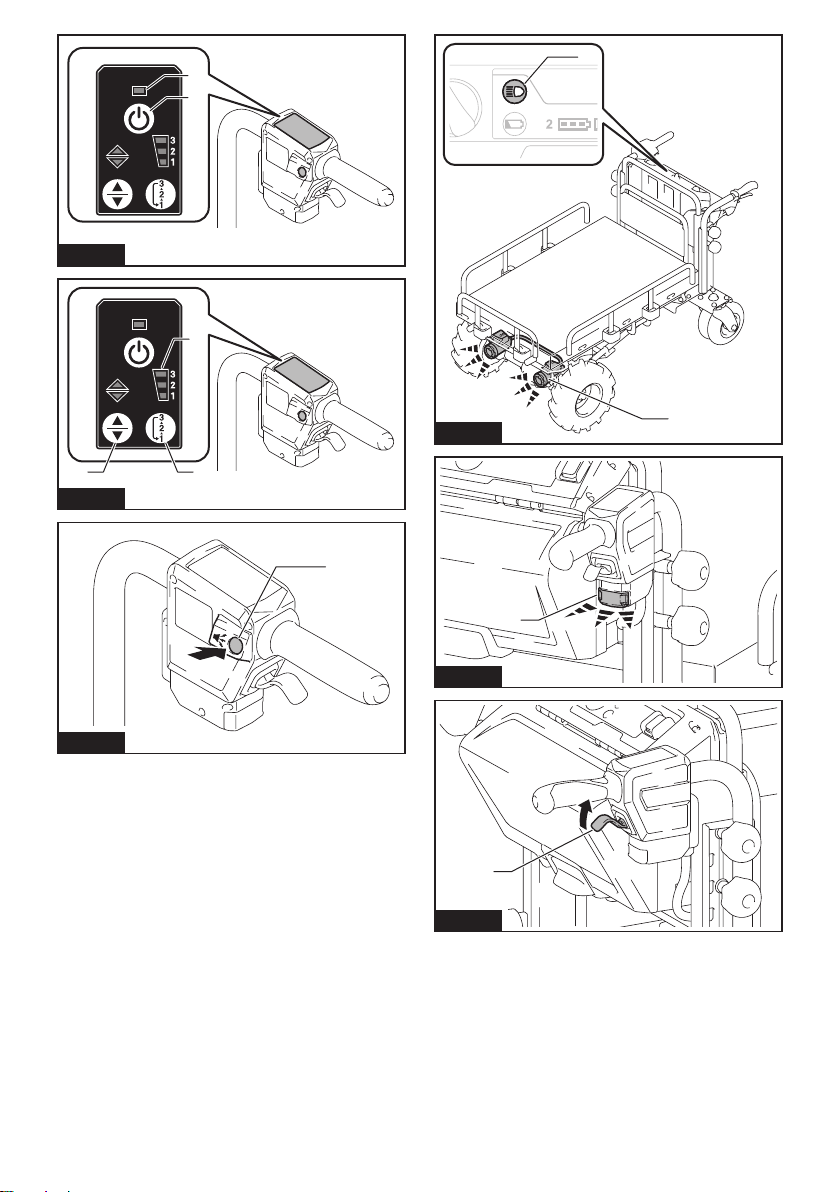
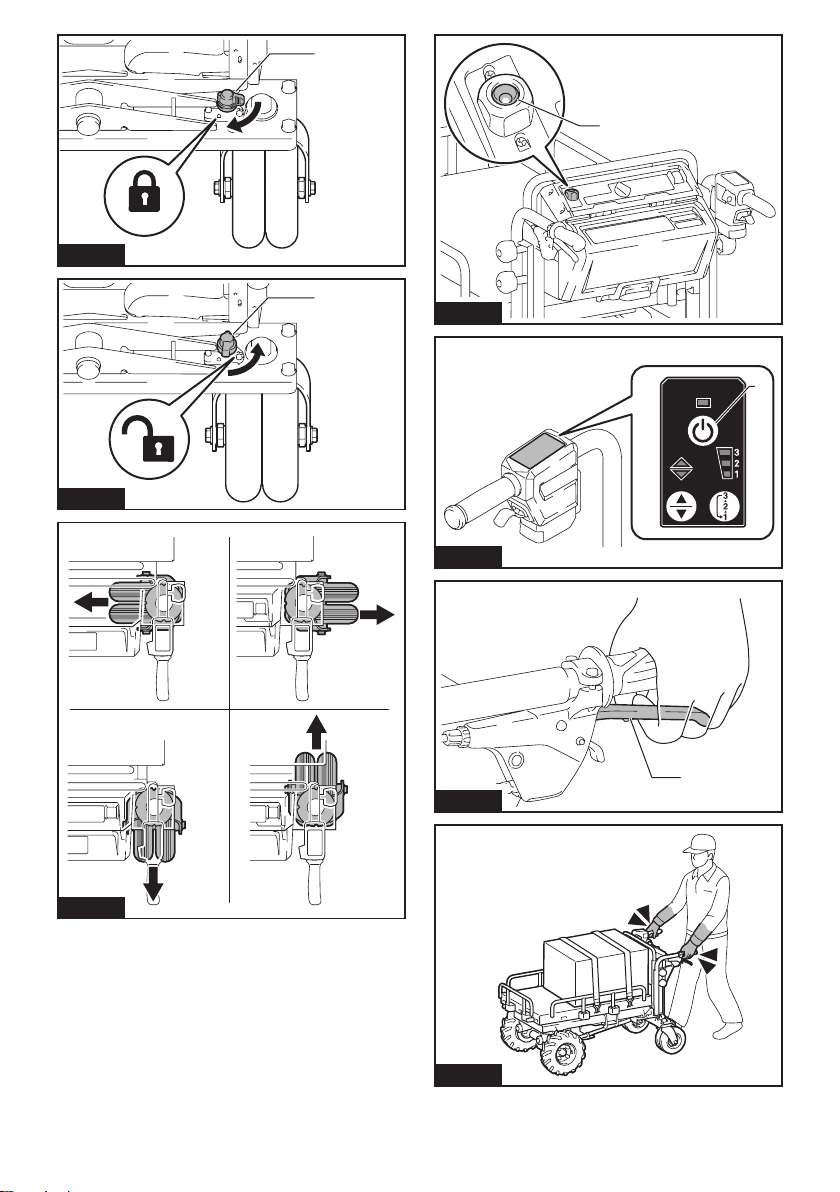
Makita DCU601 User manual

DCU601
EN Battery Powered
Wheelbarrow INSTRUCTION MANUAL 13
PL Taczka z napędem
akumulatorowym INSTRUKCJA OBSŁUGI 26
HU Akkumulátoros talicska HASZNÁLATI KÉZIKÖNYV 41
SK Akumulátorový fúrik NÁVOD NA OBSLUHU 55
CS Akumulátorový vozík NÁVOD K OBSLUZE 69
UK Візок самохідний з
акумулятором ІНСТРУКЦІЯ З
ЕКСПЛУАТАЦІЇ 82
RO Roabă cu motor MANUAL DE INSTRUCŢIUNI 97
DE Akku-Schubkarre BETRIEBSANLEITUNG 111

2
1
2
3
5
46
76
8
9
10
11
12
13
14
Fig.1
2
1
Fig.2
1
Fig.3

3
1
Fig.4
1
Fig.5
1
Fig.6
11
2
Fig.7
1
2
Fig.8
1
Fig.9

4
1
2
Fig.10
13
2
Fig.11
1
Fig.12
1
2
Fig.13
1
Fig.14
1
Fig.15

5
1
2
Fig.16
1
Fig.17
1
Fig.18
1
Fig.19
1
Fig.20
1
Fig.21

6
1
Fig.22
1
Fig.23
Fig.24
1
Fig.25
1
Fig.26
1
Fig.27
Fig.28

7
1
Fig.29
Fig.30
Fig.31
1
Fig.32
Fig.33
1
Fig.34
Fig.35

8
Fig.36

9
1
3
5
2
4
6
Fig.37

10
1
3
5
2
4
6
Fig.38

11
7
9
11
8
10
12
Fig.39

12
Fig.40
1
Fig.41
1
Fig.42

13 ENGLISH
ENGLISH (Original instructions)
SPECIFICATIONS
Model: DCU601
Dimensions (L x W x H) *1 1,400 mm x 730 mm x 820 - 1,030 mm
Traveling speed Forward 5.0 / 3.5 / 1.5 km/h
Reverse 1.0 km/h
Maximum load capacity On at ground 300 kg
On slope (3 ° - 12 °) 180 kg
Maximum climbing capacity 12°
Minimum turning radius *2 1,150 mm
Brake Hand brake and support brake
Tire Front wheel Pneumatic tire
Rear wheel Pneumatic tire
Rated voltage D.C. 36 V
Net weight 144 - 145 kg
Protection degree IPX4
*1. The maximum height when the carrier is lifted is 1,020 mm, requiring a space of 1,260 mm above the machine.
*2. Outer diameter when turning with front wheel as axis.
• Due to our continuing program of research and development, the specications herein are subject to change
without notice.
• Specications may dier from country to country.
• The weight may dier depending on the attachment(s), including the battery cartridge. The lightest and heavi-
est combinations, according to EPTA-Procedure 01/2014, are shown in the table.
Applicable battery cartridge and charger
Battery cartridge BL1815N / BL1820B / BL1830B / BL1840B / BL1850B / BL1860B
Charger DC18RC / DC18RD / DC18RE / DC18SD / DC18SE / DC18SF /
DC18SH / DC18WC
• Some of the battery cartridges and chargers listed above may not be available depending on your region of
residence.
WARNING: Only use the battery cartridges and chargers listed above. Use of any other battery cartridges
and chargers may cause injury and/or re.
WARNING: Never use Portable Power Pack PDC1200 or PDC01 with this product. Using them together
may cause personal injury or malfunction.
Symbols
The followings show the symbols which may be used
for the equipment. Be sure that you understand their
meaning before use.
Read instruction manual.
Do not change direction on slopes.
This machine cannot be used on
public roads.
Do not load or unload objects on
slopes.
Do not use the machine for trans-
porting people.
Do not lift the carrier on slopes.
Load objects on the carrier evenly.
Do not load objects unevenly or only
on front side.

14 ENGLISH
Pinch and crush hazard. Keep
hands clear during operation. Do not
put your hands or part of your body
into the moving parts.
Maximum load capacity: 300 kg on
at ground and 180 kg on slopes
(up to 12°).
Do not directly look into lamps.
Do not wash the machine with high
pressure washer.
Keep bystanders away from the
machine during operation.
Do not operate the machine around
uneven surfaces.
Do not operate the machine
when the carrier is not returned
completely.
Always wear non-slip and protective
footwear.
❶ ❷
Lock the brake before pulling out the
neutral change lever.
❶ ❷
Lock the brake before returning the
neutral change lever.
Air pressure: front tire 280 kPa and
rear tire 525 kPa.
When a beep sound is emitted, lock
the brake lever.
When you release the switch trigger,
lock the brake lever.
To cancel the beep sound, release
the switch trigger and pull the brake
lever.
Ni-MH
Li-ion
Only for EU countries
Due to the presence of hazardous
components in the equipment, waste
electrical and electronic equipment,
accumulators and batteries may
have a negative impact on the envi-
ronment and human health.
Do not dispose of electrical and
electronic appliances or batteries
with household waste!
In accordance with the European
Directive on waste electrical and
electronic equipment and on accu-
mulators and batteries and waste
accumulators and batteries, as well
as their adaptation to national law,
waste electrical equipment, batteries
and accumulators should be stored
separately and delivered to a sep-
arate collection point for municipal
waste, operating in accordance with
the regulations on environmental
protection.
This is indicated by the symbol of the
crossed-out wheeled bin placed on
the equipment.
Guaranteed sound power level
according to EU Outdoor Noise
Directive.
Sound power level according to
Australia NSW Noise Control
Regulation.
Intended use
The machine is intended for loading, carrying, and lifting
up objects with battery powered assistance.
Noise
The typical A-weighted noise level determined accord-
ing to EN62841-1 and EN12053 as applicable:
Sound pressure level (LpA) : 70 dB(A) or less
Uncertainty (K) : 4 dB (A)
The noise level under working may exceed 80 dB (A).
NOTE: The declared noise emission value(s) has
been measured in accordance with a standard test
method and may be used for comparing one tool with
another.
NOTE: The declared noise emission value(s)
may also be used in a preliminary assessment of
exposure.
WARNING: Wear ear protection.
WARNING: The noise emission during actual
use of the power tool can dier from the declared
value(s) depending on the ways in which the
tool is used especially what kind of workpiece is
processed.
WARNING: Be sure to identify safety mea-
sures to protect the operator that are based on an
estimation of exposure in the actual conditions of
use (taking account of all parts of the operating
cycle such as the times when the tool is switched
o and when it is running idle in addition to the
trigger time).

15 ENGLISH
Vibration
The vibration total value (tri-axial vector sum) deter-
mined according to EN62841-1:
Work mode: operation without load
Vibration emission (ah) : 2.5 m/s2or less
Uncertainty (K) : 1.5 m/s2
NOTE: The declared vibration total value(s) has been
measured in accordance with a standard test method
and may be used for comparing one tool with another.
NOTE: The declared vibration total value(s) may also
be used in a preliminary assessment of exposure.
WARNING: The vibration emission during
actual use of the power tool can dier from the
declared value(s) depending on the ways in which
the tool is used especially what kind of workpiece
is processed.
WARNING: Be sure to identify safety mea-
sures to protect the operator that are based on an
estimation of exposure in the actual conditions of
use (taking account of all parts of the operating
cycle such as the times when the tool is switched
o and when it is running idle in addition to the
trigger time).
Declarations of Conformity
For European countries only
The Declarations of conformity are included in Annex A
to this instruction manual.
SAFETY WARNINGS
General power tool safety warnings
WARNING Read all safety warnings, instruc-
tions, illustrations and specications provided with
this power tool. Failure to follow all instructions listed
below may result in electric shock, re and/or serious
injury.
Save all warnings and instruc-
tions for future reference.
The term "power tool" in the warnings refers to your
mains-operated (corded) power tool or battery-operated
(cordless) power tool.
Battery powered wheelbarrow safety
warnings
1. While operating the machine, always wear
non-slip and protective footwear. Non-skid,
closed-toed safety boots and shoes will reduce the
risk of injury.
2. Inspect pathway before hauling objects/mate-
rials. Familiarizing yourself with the pathway and
ensuring it is wide enough to safely navigate the
machine under load will help reduce losing control
of the machine.
3. Use extreme caution on slippery, loose and
unstable terrain. Wet and slippery surfaces, such
as wet grassy areas, snow or ice, and loose and
unstable terrain, such as sand or gravel surfaces,
may cause the machine to lose traction and may
adversely aect steering, braking and stability.
4. Do not operate the machine on excessively
steep slopes. This reduces the risk of loss of
control, slipping and falling which may result in
personal injury. Slopes greater than the maxi-
mum recommended grade and side grades may
increase the risk of instability and may adversely
aect the ability to stop safely.
5. When working on slopes, always be sure of
your footing, always work across the face
of slopes, never up or down, and exercise
extreme caution when changing direction. This
reduces the risk of loss of control, slipping and
falling which may result in personal injury.
6. Whenever possible, use level areas for stop-
ping, loading and unloading and never leave
machine unattended on a slope. The machine is
more unstable when resting on a slope than when
resting on a level surface.
7. When leaving the machine unattended, set
parking brake once the machine is located in a
safe stopping area. The parking brake prevents
unwanted movement of the front wheel and can
improve stability.
8. Ensure that ramps are clean, strong and
secure. In order to reduce the risk of injury, all
ramps must be clear of loose debris and strong
enough to withstand the weight of anticipated
loads that will be moved over them. They must
have adequate blocking underneath and to both
sides to eliminate deections and side-to-side
movement under load. All ramps must be wide
enough to have sure footing while hauling loads
across them.
9. Never operate the machine in an overloaded
condition. Make sure the machine has the proper
capacity rating for the objects or materials that
have to be hauled. Excessive loads will make
the machine more dicult to maneuver and stop,
will increase stopping time and distance, and will
increase the risk of instability.
10. Never operate your machine in an over stacked
condition. Stacking material above the tray rim or
over the sides of the tray can cause the machine
to be uncontrollably out of balance and control.
11. Use containers and tie-downs to secure loads.
Loose and/or insecure loads are more likely
to shift which can result in loss of stability and
control.
12. Always maintain a rm grip on handles. Loss of
control can increase the risk of personal injury.
13. Remove safety key when not in use. The safety
key prevents unwanted, powered use of the
machine, such as by children or other untrained
or unauthorized persons. Without the key, electric
power cannot be turned “on”.
14. This machine cannot be used on public roads.
Use of the wheelbarrow on a public road is unlaw-
ful and could result in local jurisdiction penalties in
addition it could result in personal injury.

16 ENGLISH
15. Use a sturdy plate with anti-slip and detach-
ment prevention function when loading and/
or unloading this machine for transportation,
or moving this machine between dierent
levels. Make sure the plate inclination does not
exceed 12°, and operate the machine slowly
and carefully. Unstable and quick operation
may result in overturn and/or falling.
16. Do not disassemble, repair, or modify this
machine.
Preparation
1. Before operating the machine, make sure that
there are no people around the machine.
2. Before operating the machine, perform
the inspections referring to the section for
maintenance.
Operation
1.
When operating the machine, stand behind the
machine and hold the handles with both hands rmly.
2. Do not operate the machine while riding on the
machine.
3. Do not allow others to ride on the machine.
4.
When operating the machine in reverse and
walking backward, watch behind you and watch
your step, and be careful not to slip or trip.
5. Do not use the machine when visibility is poor
because there is a risk of striking obstacles.
6. When operating the machine on rough ground
or going over the level dierence of the road,
decrease speed and exercise caution.
7. When using the machine, avoid soft ground
to prevent overturn due to the shoulder of the
road collapsing.
8. Do not operate the machine on slopes greater
than 12°.
9. I
f you nd an abnormality, stop the machine on
at ground. Before inspecting the machine, lock
the brake lever, and then turn the power o.
10. When operating the machine near walls, be
careful not to get your hands caught between
the handle and the wall.
11.
Do not use the machine in bad weather condi-
tions, especially when there is a risk of lightning.
This decreases the risk of being struck by lightning.
12. Do not touch the metal parts during use or
after use as they may get hot enough to cause
burns due to sunlight.
13. Be careful not to entangle the cords with the
load or obstacles.
14. When crossing a wooden bridge, etc., make
sure that the sum of the weight of product,
load capacity, and operator's weight does
not exceed the weight limit of the bridge, and
cross the bridge carefully at a constant speed.
15. Wear the gloves when operating the machine
in low temperature environments. Touching
the metal parts with bare hands may cause your
hands to stick.
16. If there are people or obstacles in the direction
of travel, avoid them in advance.
17. When you use the machine on muddy ground,
wet slope, or slippery place, pay attention to
your footing.
18. Do not submerge the machine into a puddle.
19. When you leave the machine while working,
be sure to completely return the carrier to its
original position, and lock the brake lever and
remove the lock key.
20. Do not leave the machine unattended while
objects are loaded on the carrier.
21. Do not lift or lower the carrier in windy condi-
tions. Doing so may make the machine unstable,
and it may cause an accident.
22. Do not lift or lower the carrier in locations
where the ceiling is low or where there is an
obstruction in the upward direction of the
machine. Doing so may cause an accident.
Operation on slopes
1. Do not cross on slopes.
2. Stop before the downhill, and be sure to
decrease speed and exercise caution.
3. If the speed is too fast when traveling downhill,
the beep sound is emitted. In this case, slow
down using the brake.
4. Exercise caution when starting or stopping the
machine on slopes.
5. As the loads become less stable on slopes,
rmly secure the loads with ropes.
6. As the machine becomes unstable depending
on the condition of the road, keep the load to a
minimum.
7. As the view is obscured on slopes, keep the
height of the load to a minimum.
8. Never stop the machine on slopes. Stop the
machine on at ground, and lock the brake
lever, and then turn the power o.
9. Do not change the direction or speed mode on
steep slopes.
10. Do not release the switch trigger on upward
slopes. The machine may go in reverse and
cause an accident.
11. Make sure that the remaining battery capacity
is enough before operating on slopes. If the
remaining battery capacity is not enough,
charge the battery or replace it with a charged
one.
12. When starting the machine on slopes, do not
place your foot behind the rear wheel since the
machine moves back a few centimeters.
Loading objects
1. Do not overload objects. When loading
objects, be sure to follow the instructions and
load limits in the manual.
2. Since the larger the load, the more dicult it
is to operate the machine, keep the load within
the range that does not aect the operation.
3. Firmly secure the objects with ropes.
4. Load the objects within the carrier. If the
objects protrude from the carrier, there is a risk
of accidents due to the objects falling or contact
obstacles such as walls.
5. Be sure that loaded objects are below eye
level. If the load is too high, it is dangerous
because the view is obscured. Also, there is a risk
of overturning and injury because the load is likely
to be unbalanced.

17 ENGLISH
6. Load the objects on the carrier evenly. If the
objects are loaded unevenly, there is a risk of
overturning and injury because the load is likely to
be unbalanced.
7. Be sure to load heavy objects rst to keep
balance.
8. Load and unload objects on at ground. Never
load or unload objects on slope.
Transportation of machine
1. Use the ladder rails that are at least 4 times
as long as the height of the truck bed, with
xtures suitable for the bed, with a non-slip
surface and sucient width, and capable of
withstanding the weight of the machine and
operator. Read the instruction manual of the
ladder rails carefully before use.
2. Before loading the machine, unload all objects
from the machine and remove mud and other
debris from the tires. Install the ladder rails on
a at and stable surface.
3. Before loading or unloading the machine,
make sure that there are no people around the
machine and the ladder rails. Load or unload
the machine at low speed, taking care to pre-
vent the machine from falling o the ladder
rails, and not to hit your head on the ceiling of
the truck. Use extreme caution when loading
or unloading the machine backward.
4. When transporting the machine, lock the brake
lever, turn the power o, remove the batteries
and lock key, and x the machine securely.
Maintenance and storage
1. Before storage or attempting to perform
inspections or maintenance, always be sure
to stop the machine on at ground and lock
the brake lever, and turn o the machine, and
remove the lock key and battery cartridges.
2. Do not leave the machine unattended outdoors
in the rain.
3. When storing the machine, avoid direct sun-
light and rain, and store it in a place where it
does not get hot or humid.
4. This machine is equipped with a hydraulic unit
on the underside of the carrier to automati-
cally lift or lower the carrier. Do not modify the
hydraulic unit, or do not loosen the mounting
bolts of the unit or the adjustment screws of
the relief valve. It is very dangerous as it may
cause accidents or malfunctions.
Battery tool use and care
1. Recharge only with the charger specied by
the manufacturer. A charger that is suitable for
one type of battery pack may create a risk of re
when used with another battery pack.
2. Use power tools only with specically desig-
nated battery packs. Use of any other battery
packs may create a risk of injury and re.
3. When battery pack is not in use, keep it away
from other metal objects, like paper clips,
coins, keys, nails, screws or other small metal
objects, that can make a connection from one
terminal to another. Shorting the battery termi-
nals together may cause burns or a re.
4. Under abusive conditions, liquid may be
ejected from the battery; avoid contact. If con-
tact accidentally occurs, ush with water. If
liquid contacts eyes, additionally seek medical
help. Liquid ejected from the battery may cause
irritation or burns.
5. Do not use a battery pack or tool that is dam-
aged or modied. Damaged or modied batteries
may exhibit unpredictable behaviour resulting in
re, explosion or risk of injury.
6. Do not expose a battery pack or tool to re or
excessive temperature. Exposure to re or tem-
perature above 130 °C may cause explosion.
7. Follow all charging instructions and do not
charge the battery pack or tool outside the
temperature range specied in the instruc-
tions. Charging improperly or at temperatures
outside the specied range may damage the
battery and increase the risk of re.
Electrical and battery safety
1. Do not dispose of the battery(ies) in a re.
The cell may explode. Check with local codes for
possible special disposal instructions.
2. Do not open or mutilate the battery(ies).
Released electrolyte is corrosive and may cause
damage to the eyes or skin. It may be toxic if
swallowed.
3. Do not charge battery in rain, or in wet
locations.
4. Do not charge the battery outdoors.
5. Do not handle charger, including charger plug,
and charger terminals with wet hands.
6. Do not replace the battery in the rain.
7. Do not wet the terminal of battery with liquid
such as water, or submerge the battery. Do not
leave the battery in the rain, nor charge, use,
or store the battery in a damp or wet place. If
the terminal gets wet or liquid enters inside of bat-
tery, the battery may be short circuited and there is
a risk of overheat, re, or explosion.
8. After removing the battery from the machine or
charger, be sure to attach the battery cover to
the battery and store it in a dry place.
9. Do not replace the battery with wet hands.
10. Avoid dangerous environment. Don't use the
machine in damp or wet locations or expose it
to rain. Water entering the machine will increase
the risk of electric shock.
11. If the battery cartridge gets wet, drain the
water inside and then wipe it with a dry cloth.
Dry the battery cartridge completely in a dry
place before use.
SAVE THESE INSTRUCTIONS.
WARNING: DO NOT let comfort or familiarity
with product (gained from repeated use) replace
strict adherence to safety rules for the subject
product. MISUSE or failure to follow the safety
rules stated in this instruction manual may cause
serious personal injury.

18 ENGLISH
Important safety instructions for
battery cartridge
1. Before using battery cartridge, read all instruc-
tions and cautionary markings on (1) battery
charger, (2) battery, and (3) product using
battery.
2. Do not disassemble or tamper with the battery
cartridge. It may result in a re, excessive heat,
or explosion.
3. If operating time has become excessively
shorter, stop operating immediately. It may
result in a risk of overheating, possible burns
and even an explosion.
4. If electrolyte gets into your eyes, rinse them
out with clear water and seek medical atten-
tion right away. It may result in loss of your
eyesight.
5. Do not short the battery cartridge:
(1) Do not touch the terminals with any con-
ductive material.
(2) Avoid storing battery cartridge in a con-
tainer with other metal objects such as
nails, coins, etc.
(3) Do not expose battery cartridge to water
or rain.
A battery short can cause a large current
ow, overheating, possible burns and even a
breakdown.
6. Do not store and use the tool and battery car-
tridge in locations where the temperature may
reach or exceed 50 °C (122 °F).
7. Do not incinerate the battery cartridge even if
it is severely damaged or is completely worn
out. The battery cartridge can explode in a re.
8. Do not nail, cut, crush, throw, drop the battery
cartridge, or hit against a hard object to the
battery cartridge. Such conduct may result in a
re, excessive heat, or explosion.
9. Do not use a damaged battery.
10.
The contained lithium-ion batteries are subject to
the Dangerous Goods Legislation requirements.
For commercial transports e.g. by third parties,
forwarding agents, special requirement on pack-
aging and labeling must be observed.
For preparation of the item being shipped, consult-
ing an expert for hazardous material is required.
Please also observe possibly more detailed
national regulations.
Tape or mask o open contacts and pack up the
battery in such a manner that it cannot move
around in the packaging.
11. When disposing the battery cartridge, remove
it from the tool and dispose of it in a safe
place. Follow your local regulations relating to
disposal of battery.
12. Use the batteries only with the products
specied by Makita. Installing the batteries to
non-compliant products may result in a re, exces-
sive heat, explosion, or leak of electrolyte.
13. If the tool is not used for a long period of time,
the battery must be removed from the tool.
14. During and after use, the battery cartridge may
take on heat which can cause burns or low
temperature burns. Pay attention to the han-
dling of hot battery cartridges.
15. Do not touch the terminal of the tool imme-
diately after use as it may get hot enough to
cause burns.
16. Do not allow chips, dust, or soil stuck into the
terminals, holes, and grooves of the battery
cartridge. It may cause heating, catching re,
burst and malfunction of the tool or battery car-
tridge, resulting in burns or personal injury.
17. Unless the tool supports the use near
high-voltage electrical power lines, do not use
the battery cartridge near high-voltage electri-
cal power lines. It may result in a malfunction or
breakdown of the tool or battery cartridge.
18. Keep the battery away from children.
SAVE THESE INSTRUCTIONS.
CAUTION: Only use genuine Makita batteries.
Use of non-genuine Makita batteries, or batteries that
have been altered, may result in the battery bursting
causing res, personal injury and damage. It will
also void the Makita warranty for the Makita tool and
charger.
Tips for maintaining maximum
battery life
1. Charge the battery cartridge before completely
discharged. Always stop tool operation and
charge the battery cartridge when you notice
less tool power.
2.
Never recharge a fully charged battery cartridge.
Overcharging shortens the battery service life.
3.
Charge the battery cartridge with room tempera-
ture at 10 °C - 40 °C (50 °F - 104 °F). Let a hot
battery cartridge cool down before charging it.
4. When not using the battery cartridge, remove
it from the tool or the charger.
5. Charge the battery cartridge if you do not use
it for a long period (more than six months).
PARTS DESCRIPTION
► Fig.1
1Up-and-down switch 2Control panel 3Beep button 4Switch trigger
5Rear lamp 6Handle 7Battery box 8Brake lever
9Rear wheel 10 Rear wheel lock 11 Front wheel 12 Front lamp
13 Carrier 14 Guard frame ----

19 ENGLISH
FUNCTIONAL
DESCRIPTION
Installing or removing battery
cartridge
CAUTION: Always switch o the machine and
lock the brake lever before installing or removing
of the battery cartridge.
CAUTION: Always install the battery cartridge
fully until the red indicator cannot be seen. If not,
it may accidentally fall out of the machine, causing
injury to you or someone around you.
CAUTION: Do not install the battery cartridge
forcibly. If the cartridge does not slide in easily, it is
not being inserted correctly.
CAUTION: Do not use the high-temperature
battery cartridge. When the high-temperature bat-
tery cartridge is used, the machine stops automati-
cally before a short beep sound is emitted, and may
cause an injury.
CAUTION: Be careful not to pinch your n-
gers when opening or closing the battery cover.
NOTICE: Make sure that the cover of the battery
box is closed securely before use. Otherwise, mud,
dirt, or water may cause damage to the product or the
battery cartridge.
Installing the battery cartridge
1. Pull up the lock lever, and then open the cover of
the battery box.
► Fig.2: 1. Cover 2. Lock lever
2. Align the tongue on the battery cartridge with the
slot on the battery box, and then slide the cartridge until
it locks in place with a little click.
► Fig.3: 1. Battery cartridge
3. Insert the lock key in the place shown in the gure
as far as it will go, and turn it clockwise.
► Fig.4: 1. Lock key
NOTE: To turn the lock key, insert the lock key
completely.
4. Close the cover of the battery box.
► Fig.5: 1. Cover
Removing the battery cartridge
1. Pull up the lock lever, and then open the cover of
the battery box.
2. Pull out the battery cartridge from the battery box
while sliding the button on the front of the cartridge.
► Fig.6: 1. Button
3. Turn the lock key counterclockwise, and pull it out.
4. Close the cover of the battery box.
Machine / battery protection system
The machine is equipped with a machine/battery
protection system. This system automatically cuts o
power to the motor to extend machine and battery life.
The machine will automatically stop during operation
if the machine or battery cartridge is under one of the
following conditions.
A short beep sound or long beep sound is emitted
before the machine stops automatically. The battery
indicators and lamps on the control panel blink while the
beep sound is emitted.
NOTE: To cancel the beep sound, release the switch
trigger and pull the brake lever.
Overload protection
When the machine/battery is operated in a manner
that causes it to draw an abnormally high current,
the machine automatically stops and the main power
lamp blinks in green. In this situation, turn the machine
o and stop the application that caused the machine
to become overloaded such as reducing the loaded
objects. Then turn the machine on to restart.
Overheat protection
When the machine is overheated, the machine stops
automatically and the main power lamp lights up in red.
In this case, let the machine and battery cool before
turning the machine on again.
Overdischarge protection
When the battery capacity is not enough, the main
power lamp and the corresponding battery indicator
blinks in red. In this case, switch the battery cartridges,
or change the battery cartridges to fully charged ones,
or remove the battery cartridges from the machine and
charge them.
NOTE: The main power lamp blinks in red when the
battery is overheated.
Protections against other causes
NOTICE: The main power lamp blinks in green
and red alternately when the abnormality occurs
in the machine. In this case, refer to the section
for troubleshooting.
Protection system is also designed for other causes that
could damage the machine and allows the machine to
stop automatically. Take all the following steps to clear
the causes, when the machine has been brought to a
temporary halt or stop in operation.
1. Turn the machine o, and then turn it on again to
restart.
2. Charge the battery(ies) or replace it/them with
recharged battery(ies).
3. Let the machine and battery(ies) cool down.
NOTICE: If no improvement can be found or
the machine stops due to a cause not described
above, refer to the section for troubleshooting.

20 ENGLISH
Indicating the remaining battery
capacity
CAUTION: Before checking the remaining
battery capacities or switching the battery car-
tridges, be sure to stop the machine.
CAUTION: When the battery capacity
becomes low, a short beep sound is emitted. In
this case, lock the brake lever, and then switch
the battery cartridges to charged ones or charge
the battery cartridges. If you continue to operate the
machine at low battery capacity and the remaining
battery capacity runs out, a long beep sound is emit-
ted and the machine automatically stops and this may
cause an accident or injury.
CAUTION: If the beep sound is emitted while
operating on slopes, move the machine to a safe
place, lock the brake lever, and then switch the
battery cartridges to charged ones or charge the
battery cartridges.
CAUTION: If the load is large and the beep
sound is emitted while operating on slopes, lock
the brake lever and pay attention to safety and
switch the battery cartridges to charged ones.
Move the machine to a safe place and lock the
brake lever. Reduce the load before operating the
machine again. For details, refer to the section for
troubleshooting.
Checking the battery level on the
battery box
► Fig.7: 1. Battery indicator 2. Check button
Press the check button to indicate the remaining battery
capacities. The battery indicators correspond to each
battery.
Battery indicator status Remaining
battery
capacity
On Blinking O
50% - 100%
20% - 50%
0% - 20%
Empty
Battery not
installed
NOTE: If you continue to pull the switch trigger even
if you hear the short beep sound, the machine stops
automatically. After the machine stops automatically,
the beep sound continues and the support brake is
enabled. To cancel the beep sound and release the
support brake, release the switch trigger and pull the
brake lever. Do not push the machine forcibly without
releasing the support brake.
NOTE: You can check the remaining battery capacity
even if the lock key is not inserted.
NOTE: The battery indicators for remaining battery
capacity are just for reference. Actual battery capacity
may vary depending on usage conditions.
Checking the battery level on the
battery cartridge
Only for battery cartridges with the indicator
Press the check button on the battery cartridge to indi-
cate the remaining battery capacity. The indicator lamps
light up for a few seconds.
► Fig.8: 1. Indicator lamps 2. Check button
Indicator lamps Remaining
capacity
Lighted O Blinking
75% to 100%
50% to 75%
25% to 50%
0% to 25%
Charge the
battery.
The battery
may have
malfunctioned.
NOTE: Depending on the conditions of use and the
ambient temperature, the indication may dier slightly
from the actual capacity.
NOTE: The rst (far left) indicator lamp will blink when
the battery protection system works.
Other manuals for DCU601
4
Table of contents
Languages:
Other Makita Utility Vehicle manuals
Popular Utility Vehicle manuals by other brands

Lean Cars
Lean Cars B012 Assembly & user instructions

HAUL MASTER
HAUL MASTER 38897 Assembly and operating instructions

forest river
forest river WIDE BODY Series operating manual

SunL
SunL SLGK-150 user manual

Landoll
Landoll 330B Operator's manual

American Sportworks
American Sportworks 7151 150cc Owner's manual / parts guide

Textron Specialized Vehicles
Textron Specialized Vehicles Cushman Shuttle 4 ELiTE 2020 owner's manual

Primo Water
Primo Water UT6x12-18HSS Assembly instructions

Truma
Truma Mover SE operating instructions

Bigab
Bigab 7-10 instruction manual

Toro
Toro Groundsmaster 360 Operator's manual

LeeBoy
LeeBoy 3000C Operation, service and parts manual