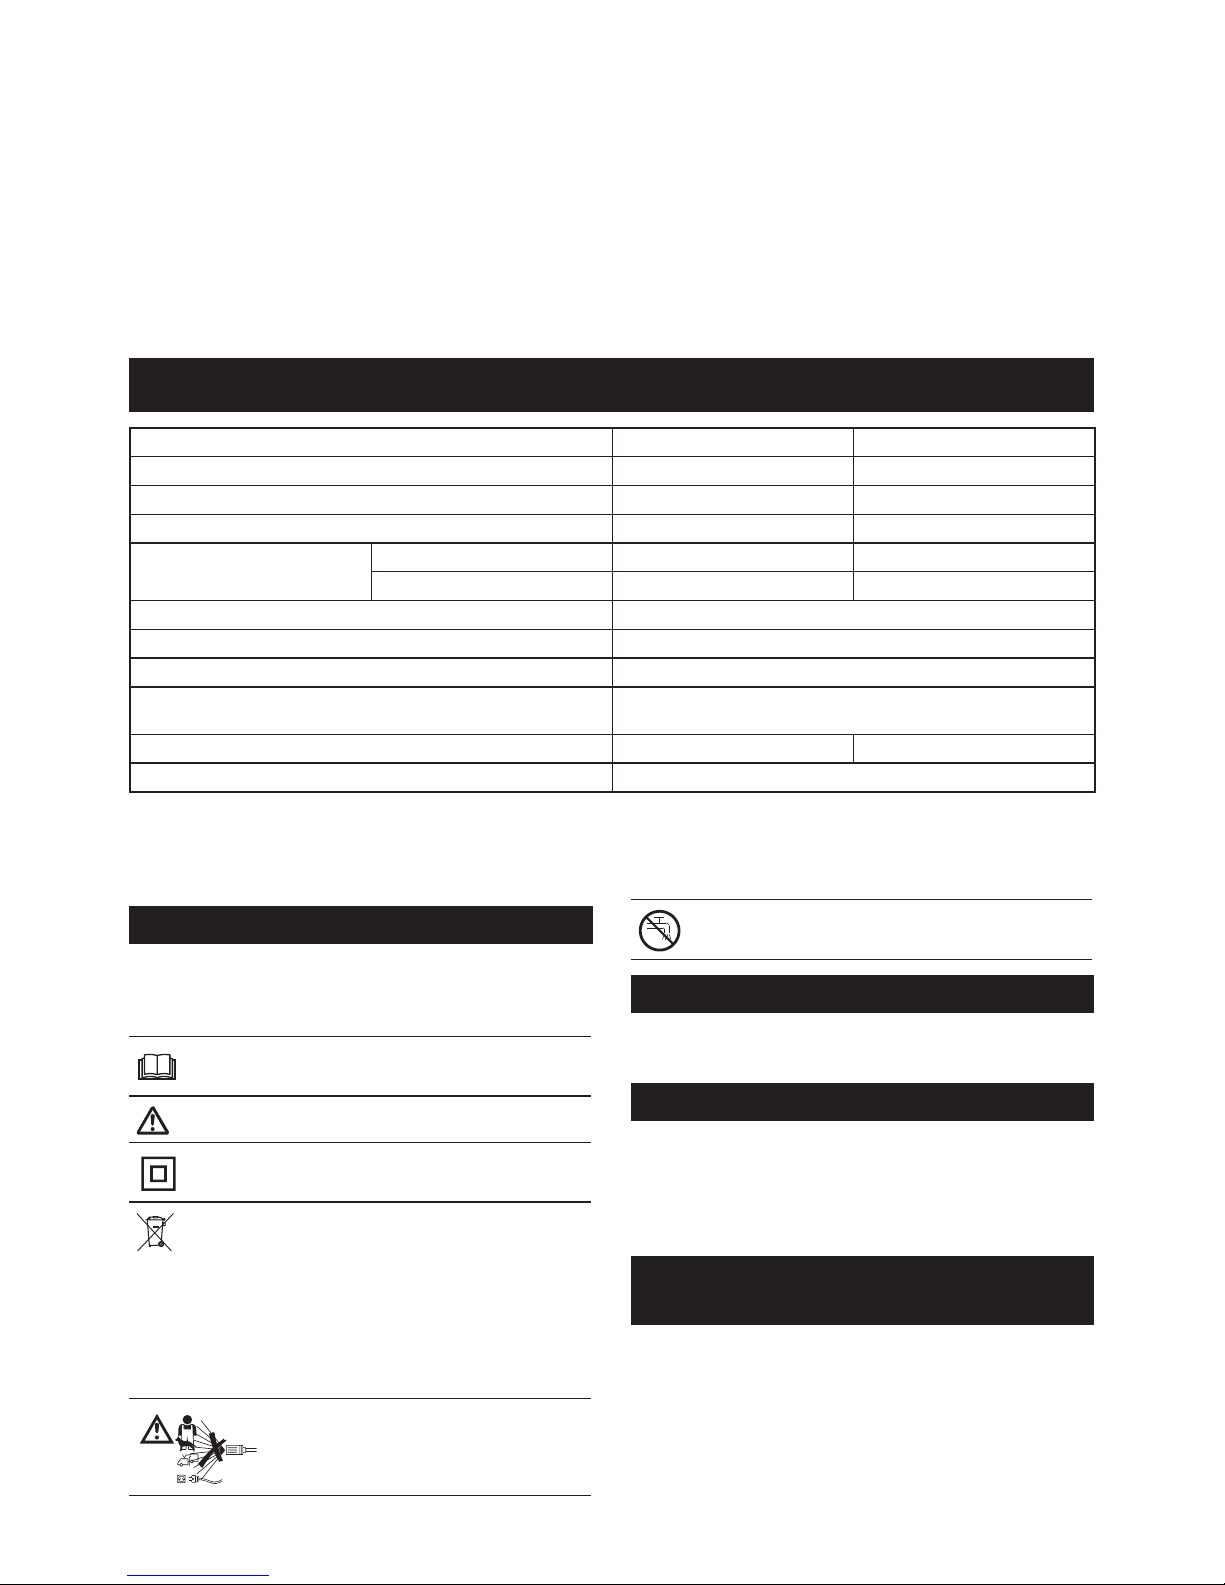
Makita HW1200 User manual

HW1200
HW1300
EN High Pressure Washer INSTRUCTION MANUAL 8
FR Nettoyeur Haute Pression MANUEL D’INSTRUCTIONS 17
DE Hochdruckreiniger BETRIEBSANLEITUNG 27
IT Idropulitrice ad alta pressione ISTRUZIONI PER L’USO 38
NL Hogedrukreiniger GEBRUIKSAANWIJZING 48
ES Hidrolavadora de alta presión MANUAL DE
INSTRUCCIONES 58
PT Lavadora de alta Pressão MANUAL DE INSTRUÇÕES 68
DA Højtryksrenser BRUGSANVISNING 78
EL Πλυστικό μηχάνημα υψηλής
πίεσης ΕΓΧΕΙΡΙΔΙΟ ΟΔΗΓΙΩΝ 87
TR Basınçlı Yıkama Makinası KULLANMA KILAVUZU 98

12
Fig.1
13
2
Fig.2
Fig.3
Fig.4
Fig.5
2
1
Fig.6
1
2
3
Fig.7
12
Fig.8
2

4 5 6
1 2
3
Fig.9
1
Fig.10
1
Fig.11
2
1
3
Fig.12
Fig.13
1
2
Fig.14
1
2
Fig.15
3

1
2
3
Fig.16
12
3
Fig.17
1
2
3
Fig.18
2
1
3
Fig.19
2 3
1
Fig.20
1
2
Fig.21
1
Fig.22
Fig.23
4

1
Fig.24
1
Fig.25
Fig.26
Fig.27
1
Fig.28
1
2
Fig.29
1
Fig.30
12
Fig.31
5

1
Fig.32
123
Fig.33
1
2
Fig.34
Fig.35
Fig.36
Fig.37
Fig.38
Fig.39
6

Fig.40
Fig.41
Fig.42
Fig.43
Fig.44
Fig.45
Fig.46
Fig.47
7

8ENGLISH
ENGLISH (Original instructions)
WARNING
• Machines shall not be used by children. Children should be
supervised to ensure that they do not play with the machine.
• This machine is not intended for use by persons (including chil-
dren) with reduced physical, sensory, or mental capabilities, or
lack of experience and knowledge.
• This machine has been designed for use with the cleaning agent
supplied or recommended by the manufacturer. The use of other
cleaning agents or chemicals may adversely affect the safety of
the machine.
• High pressure jets can be dangerous if subject to misuse. The jet
must not be directed at persons, live electrical equipment or the
machine itself.
• Do not use the machine within range of persons unless they
wear protective clothing.
• Do not direct the jet against yourself or others in order to clean
clothes or foot-wear.
• Riskofexplosion–Donotsprayammableliquids.
• High pressure cleaners shall not be used by children or
untrained personnel.
• Highpressurehoses,ttingsandcouplingsareimportantforthe
safetyofthemachine.Useonlyhoses,ttingsandcouplings
recommended by the manufacturer.
• To ensure machine safety, use only original spare parts from the
manufacturer or approved by the manufacturer.
• Always be sure that the tool is switched off and unplugged
before carrying out any work on the tool.
• Do not use the machine if a supply cord or important parts of the
machine are damaged, e.g. safety devices, high pressure hoses,
trigger gun.
• Inadequate extension cords can be dangerous. If an extension
cord is used, it shall be suitable for outdoor use, and the con-
nection has to be kept dry and off the ground. It is recommended
that this is accomplished by means of a cord reel which keeps
the socket at least 60 mm above the ground.

9ENGLISH
• Always switch off the mains disconnecting switch when leaving
the machine unattended.
•
Comply with the requirements of the local water supply company.
• For European countries:
According to EN12729 (BA), the appliance can also be con-
nectedtothemainsdrinkingwatersupplyifabackowpreventer
valve with drain facility is installed in the supply hose.
SPECIFICATIONS
Model: HW1200 HW1300
Max. feed volume 7.0 l/min 7.5 l/min
Waterowrate 5.5 l/min 6.0 l/min
Max. permissible pressure 12 MPa (120 bars) 13 MPa (130 bars)
Working pressure High mode 10 MPa (100 bars) 11 MPa (110 bars)
Low mode -8 MPa (80 bars)
Max. feed pressure 1 MPa (10 bars)
Max. feed temperature 40 °C
Max. suction height 1.0 m
Dimensions
(L x W x H)
292 mm x 358 mm x 830 mm
Weight 11.0 kg 12.7 kg
Motor protection IPX5
• Duetoourcontinuingprogramofresearchanddevelopment,thespecicationshereinaresubjecttochange
without notice.
• Specicationsmaydifferfromcountrytocountry.
• WeightaccordingtoEPTA-Procedure01/2003
Symbols
The following show the symbols used for the equip-
ment. Be sure that you understand their meaning before
use.
Read the instruction manual.
Take particular care and attention.
DOUBLEINSULATION
Only for EU countries
Do not dispose of electric equipment
together with household waste material! In
observance of the European Directive, on
Waste Electric and Electronic Equipment
and its implementation in accordance with
national law, electric equipment that have
reached the end of their life must be col-
lected separately and returned to an envi-
ronmentally compatible recycling facility.
Do not direct the jet at people including
yourself, animals, and live electrical
equipments.
Not suitable for connection to the potable
water mains.
Intended use
This tool is intended for cleaning stubborn dirt by using
water jet. This tool is intended for household use.
Power supply
The tool should be connected only to a power supply of
the same voltage as indicated on the nameplate, and
can only be operated on single-phase AC supply. They
are double-insulated and can, therefore, also be used
from sockets without earth wire.
For public low-voltage distribution
systems of between 220 V and 250 V
Switchingoperationsofelectricapparatuscausevoltage
uctuations.Theoperationofthisdeviceunderunfavor-
able mains conditions can have adverse effects to the
operation of other equipment. With a mains impedance
equal or less than 0.25 Ohms it can be presumed that
there will be no negative effects. The mains socket used
for this device must be protected with a fuse or protective
circuit breaker having slow tripping characteristics.

10 ENGLISH
Noise
The typical A-weighted noise level determined accord-
ing to EN60335-2-79:
Model HW1200
Soundpressurelevel(LpA) : 72 dB(A)
Uncertainty (K) : 3.8 dB(A)
Model HW1300
Soundpressurelevel(LpA) : 76 dB(A)
Uncertainty (K) : 2.4 dB(A)
The noise level under working may exceed 80 dB (A).
WARNING: Wear ear protection.
Vibration
The vibration total value (tri-axial vector sum) deter-
mined according to EN60335-2-79:
Model HW1200
Vibration emission (ah) : 4.11 m/s2
Uncertainty (K) : 1.5 m/s2
Model HW1300
Vibration emission (ah) : 4.86 m/s2
Uncertainty (K) : 1.5 m/s2
NOTE: The declared vibration emission value has
been measured in accordance with the standard test
method and may be used for comparing one tool with
another.
NOTE: The declared vibration emission value
may also be used in a preliminary assessment of
exposure.
WARNING: The vibration emission during actual
use of the power tool can differ from the declared
emission value depending on the ways in which the
tool is used.
WARNING: Be sure to identify safety measures
to protect the operator that are based on an estima-
tion of exposure in the actual conditions of use (taking
account of all parts of the operating cycle such as
the times when the tool is switched off and when it is
running idle in addition to the trigger time).
EC Declaration of Conformity
For European countries only
The EC declaration of conformity is included as Annex A
to this instruction manual.
SAFETY WARNINGS
WARNING: Read all safety warnings and
all instructions. Failure to follow the warnings and
instructionsmayresultinelectricshock,reand/or
serious injury.
Save all warnings and instruc-
tions for future reference.
Work area safety
1. Keep operating area clear of all persons.
2. Do not overreach or stand on unstable sup-
ports. Keep good footing and balance at all
times.
3. Always place the high pressure washer body
on a level and stable surface. Avoid areas
where the ejected water will run or pool.
4. Before cleaning, check the surroundings and
objects to be cleaned. High pressure jets can
scrape away paint or other surface treatments
including toxic chemicals. Take the preventive
measures if necessary.
5. Be careful not to trip over by the cord or hose
of the high pressure washer. Always be aware
of the conguration of the cord and hose
during operation.
6. During use, a small amount of water will come
out from the bottom of the high pressure
washer. Avoid locating the high pressure
washer in the areas where you don't want to
wet.
Personal safety
1. To protect against the jet and objects by the
jet, operators should wear appropriate cloth-
ing such as safety boots, safety gloves, safety
helmets with visors, hearing protection, etc.
2. Do not use the high pressure washer within
range of persons unless they wear protective
clothing.
3. To reduce the risk of injury, close supervision
is necessary when the product is used near
children.
4. Water that has owed through backow pre-
venter is considered to be non-potable.
Electrical safety
1. Never use the high pressure washer outdoors
in the rain.
2. Never touch the mains plug and/or socket with
wet hands.
3. Do not use the machine if the supply cord or
important parts of the machine are damaged,
e.g. safety devices, high pressure hoses, or
the trigger gun.
4. Plug must match the outlet. Never modify
the plug in any way. Do not use any adapter
plug with grounded tools.Unmodiedplugand
matching outlet will reduce risk of the electric
shock.
5. Inadequate extension cords can be dangerous.
If an extension cord is used, it shall be suitable
for outdoor use, and the connection has to be
kept dry and off the ground. It is recommended
that this is accomplished by means of a cord reel
which keeps the socket at least 60 mm above the
ground.
6. Note the following when using extension
cords:
• Use only extension cords that are
intended for outdoor use.

11 ENGLISH
• Use only extension cords with an elec-
trical rating equal to or higher than the
rating of the product.
• Do not use damaged extension cords.
• Examine extension cords before use and
replace if damaged.
• Do not abuse extension cords and do not
yank on cords to disconnect them.
• Keep cords away from heat and sharp
edges.
• Always disconnect the extension cord
from the receptacle before disconnecting
the product from the extension cord.
7. The electric supply connection shall be made
by a qualied electrician and comply with IEC
60364-1. It is recommended that the electric
supply to this machine should include either
a residual current device that will interrupt the
supply if the leakage current to earth exceeds
30 mA for 30 ms or a device that will prove the
earth circuit.
Power tool use and care
1. Read all the instructions before using the
product.
2. Know how to stop the high pressure washer
and bleed pressures quickly. Be thoroughly
familiar with the controls.
3. High pressure jets can be dangerous if mis-
used. The jet must not be directed at people,
live electrical equipment, or the machine itself.
4. This machine is not intended for use by per-
sons (including children) with reduced physi-
cal, sensory, or mental capabilities, or lack of
experience and knowledge.
5. Children should be supervised to ensure that
they do not play with the appliance.
6. Do not spray ammable and/or toxic liquids.
This may cause an explosion, intoxication, or
damage to the machine.
7. Do not direct the jet against yourself or others
in order to clean clothes or foot-wear.
8. High-pressure hoses, ttings and couplings
are important for the safety of the machine.
Use only hoses, ttings and couplings recom-
mended by the manufacturer.
9. Follow the instructions when changing
accessories.
10. Keep handles dry, clean, and free of oil or
grease.
11. Stay alert – watch what you are doing.
12. Do not operate the product when fatigued or
under the inuence of alcohol or drugs.
13. Do not run the high pressure washer without
water for longer than one minute. It will dam-
age the motor, resulting in malfunction.
14. Always turn off the power and shut off the
water mains when leaving the high pressure
washer unattended.
15. Be wary of the kickback. The trigger gun
recoils when the high pressure jet is ejected
from the nozzle. Hold the trigger gun rmly to
prevent accidental injuries.
16. Check for damaged or worn parts before use.
Also make sure that the hose is properly con-
nected and there is no leakage during oper-
ation. Operating the machine with functional
defects may cause an accident.
17. This machine has been designed for use with
the cleaning agent supplied or recommended
by the manufacturer. The use of other cleaning
agents or chemicals may adversely affect the
safety of the machine.
18. Do not pull the cord and/or hose to move the
high pressure washer body. This will damage
the cord, hose, and connecting parts and
result in a short circuit or functional defects.
19. Do not put heavy objects on the hose or let
vehicles drive over it.
20. Always discharge the residual pressure in the
trigger gun before disconnecting the hose.
21. When connecting the hose to the water mains,
observe the instructions of your local water-
works department or company.
Service
1. Follow the maintenance instructions specied
in the manual.
2. To ensure machine safety, use only original
spare parts from the manufacturer or approved
by the manufacturer.
3. Have your high pressure washer serviced by
a qualied repair person using only identi-
cal replacement parts. This will ensure that
the safety of the high pressure washer is
maintained.
4. In case of breakdown or malfunction of the
high pressure washer, immediately switch it
off and remove the mains plug. Contact your
local dealer or service center.
SAVE THESE INSTRUCTIONS.
WARNING: DO NOT let comfort or familiarity
with product (gained from repeated use) replace
strict adherence to safety rules for the subject
product.
MISUSE or failure to follow the safety rules stated
in this instruction manual may cause serious
personal injury.

12 ENGLISH
FUNCTIONAL
DESCRIPTION
CAUTION: Always be sure that the tool is
switched off and unplugged before adjusting or
checking function on the tool.
Power switch
NOTICE: Do not turn the power switch forcibly.
This may cause the switch to malfunction.
For the HW1200
►Fig.1: 1. OFF position 2. ON position
Turn the power switch clockwise to switch on the high
pressure washer.
For the HW1300
Turn the power switch clockwise or counterclockwise
depending on the pressure level. Turn the power switch
clockwise for high pressure mode, counterclockwise for
low pressure mode.
►Fig.2: 1. Low pressure mode 2. OFF position
3. High pressure mode
Nozzle functions
Vario-Power spray lance
►Fig.3
Jet pressure can be adjusted by rotating the nozzle.
CAUTION: When adjusting the jet pressure,
do not rotate the nozzle while pulling it toward the
trigger gun. The nozzle may come off from the trig-
ger gun and cause a personal injury.
Dirt blaster
►Fig.4
Aspiraljetisejected.Suitableforremovingstubborn
dirt.
NOTICE: Do not use the dirt blaster to clean frag-
ile surfaces such as windows or car bodies.
Foam nozzle
►Fig.5
Detergent can be sprayed as foam.
Trigger operations
Pull the trigger to eject a water jet. The jet continues as
long as the trigger is squeezed.
The trigger can be locked for safe handling of the trigger
gun. To lock the trigger, pull out the stopper and hook it
to the groove on the grip.
►Fig.6: 1.Stopper2. Groove
NOTICE: To avoid mechanical error in the pres-
sure switch, always leave a two-second interval
between trigger operations.
Safety valve
This appliance is equipped with a safety valve that
prevents undue overpressure. When the trigger is
released, the valve opens and the water recirculates
through the pump inlet.
CAUTION: Do not tamper with or adjust the
safety valve setting.
Hose reel
For the HW1300 only
To unreel the hose, take the end of the hose out of the
catchrst.Unfoldthehandleandturnitclockwise.
Always unreel the hose all the way to the end when
operating the high pressure washer.
►Fig.7: 1. Hose reel 2. Handle 3. End of the hose
When storing the hose, turn the handle counterclock-
wiseandxtheendofthehose.
►Fig.8: 1. Catch 2. Handle
Supplying water from a tank/
reservoir
Optional accessory
You can supply water from a tank or reservoir instead
of a faucet.
Replace the water hose connector with the suction hose
set (optional accessory). When connecting the suction
hoseset,disconnecttheltercasefromthehoseand
attach it to the inlet on the high pressure washer. Then,
connectthehosetotheltercase.
►Fig.9: 1. Tank/reservoir 2.Suctionhoseset3. Water
hose connector 4. Hose 5. Filter case 6. Inlet
on the high pressure washer
NOTICE: Always use Makita's suction hose set.
NOTICE: Always keep 1.0 m (3.28 ft) or less in
height between the inlet on the high pressure
washer and the water surface. Otherwise, the high
pressure washer will be unable to take the water up
into the pump.
To introduce water into the hose, remove the nozzle
from the trigger gun and switch on the high pressure
washer while the trigger is squeezed. Once water is
ejected stably from the trigger gun, release the trigger
and attach the nozzle for your purpose.
►Fig.10: 1. Trigger gun
NOTE: When water is not ejected, detach the suction
hose set and soak it in water. Then reconnect it to the
high-pressure washer.
►Fig.11: 1.Suctionhoseset

13 ENGLISH
ASSEMBLY
CAUTION: Always be sure that the tool is
switched off and unplugged before carrying out
any work on the tool.
Assembling the carrying handle
For the HW1200 only
1. Join the front and rear halves of the handle by
aligning the screw holes on the high pressure washer
body.
►Fig.12: 1. Front half of the handle 2. Rear half of the
handle 3. High pressure washer body
2. Securethecarryinghandlewithscrews(7pcs).
►Fig.13
Connecting the high-pressure hose
For the HW1200 only
Connect the high-pressure hose to the outlet (with the
gun marking). Turn the nut on the high-pressure hose
clockwise while screwing it onto the screw thread of the
outlet.
►Fig.14: 1. Outlet 2. Nut
CAUTION: Make sure that the high-pressure
hose is securely connected. A loose connection
may blow the high-pressure hose off, resulting in a
personal injury.
Attaching the trigger gun
Connect the high-pressure hose to the inlet on the trig-
ger gun. Turn the nut on the high-pressure hose clock-
wise while screwing it onto the screw thread on the inlet.
►Fig.15: 1. Inlet 2. Nut
CAUTION: Make sure that the high-pressure
hose is securely connected. A loose connection
may blow the high-pressure hose off, resulting in a
personal injury.
Connecting to a faucet
CAUTION: Always use a pressure-resistant
water hose with ø13 mm or larger diameter and
connect to the faucet using a proper ttings.
Otherwise,thewaterhoseand/orthettingmay
break and cause personal injury.
NOTICE: Use a pressure-resistant water hose
as short as possible. The amount of intake water
should be higher than the max feed volume of the
pump.
NOTICE: If you connect to the mains for drink-
ing water, use a backow preventer valve which
meets the regulations in your region.
Prepare a pressure-resistant water hose. Attach the
coupling sleeve to one end and connect the other end
to the faucet as follows.
1. Remove the nut on the coupling sleeve and pass
the pressure-resistant water hose through the nut.
Insert the end of the hose into the coupling sleeve and
then tighten the nut.
►Fig.16: 1. Pressure-resistant water hose 2. Nut of
the coupling sleeve 3. Coupling sleeve
NOTE: If you connect the pressure-resistant water
hose to the faucet using a coupling sleeve, attach it to
the both ends of the hose.
2. Connect the pressure-resistant water hose to the
faucet.Applyasuitablettingsuchashosebandor
water tap joint to secure the hose end with the faucet.
►Fig.17: 1. Hose band 2. Water tap joint 3. Pressure-
resistant water hose
NOTE:Thettingdependsontheshapeofthefaucet
to which you connect. Prepare a suitable commercial-
ly-boughttting.
3. Attach the water hose connector to the inlet (with
the faucet marking) and then insert the coupling sleeve.
►Fig.18: 1. Coupling sleeve 2. Water hose connector
3. Inlet
Connecting/disconnecting the
nozzle
CAUTION: Always lock the trigger when con-
necting/disconnecting the nozzle.
Insert the end of the nozzle into the slot on the trigger
gun and turn it in the direction of the arrow as shown in
thegure.Todisconnect,turnthenozzleinthereverse
direction while pressing it toward the trigger gun.
►Fig.19: 1. Trigger gun 2.Slot3. End of the nozzle
Someoptionalnozzlesrequiretheconnectingjoint
(optional accessory) to attach to the trigger gun. Attach
the connecting joint to the trigger gun in the same way
as the nozzle.
►Fig.20: 1. Nozzle 2. Connecting joint 3. Trigger gun
NOTE: The connecting joint is needed when using
the nozzles included with another model, HW112 or
HW121.
Connecting the foam nozzle
CAUTION: Always lock the trigger when con-
necting/disconnecting the nozzle.
Prepare a detergent before using the foam nozzle.
1. Remove the nozzle from the tank by rotating the
nozzle counterclockwise. Attach the nozzle to the trig-
ger gun.
►Fig.21: 1. Nozzle 2. Trigger gun
2. Pour the detergent into the tank and install it to the
nozzle.
►Fig.22: 1. Tank
NOTICE: Always use neutral detergent. Acidic or
alkaline detergent may damage the tank or nozzle.

14 ENGLISH
OPERATION
WARNING: Do not touch the water jet or
direct the it toward yourself or others. The water
jet is dangerous and can hurt you or others.
WARNING: When shooting the water jet,
never hold the object that you are cleaning or
place your hands and feet near the water jet.
CAUTION: Stay alert to the rebound of the
water jet and blown objects. Do not bring the
nozzle closer than 30 cm .
CAUTION: Do not run the high pressure
washer without water for longer than 1 minute.
CAUTION: Do not operate the high pressure
washer for a extended period of time. This may
causeoverheatingorre.Also,long-termusemay
cause vibration disorder.
CAUTION: Be aware of the direction of the
wind. If the detergent gets into your eyes or mouth,
rinse with fresh water immediately and seek medical
attention if necessary.
NOTICE: Avoid using the high pressure washer
for longer than 1 hour. After using 1 hour, leave a
same length of intermission.
1. Connect the end of the high-pressure hose to the
trigger gun. For the HW1200, connect the other end to
the high pressure washer. For the HW1300, unreel the
hose all the way to the end.
2. Connect the high pressure washer to the faucet
and then open the faucet.
►Fig.23
NOTICE: To protect the mechanism of the high
pressure washer, do not use water hotter than
40°C.
3. Plug the high pressure washer into the mains and
switch it on.
►Fig.24: 1. Power switch
4. To eject a water jet, unlock the stopper and
squeeze the trigger. The jet continues as long as the
trigger is squeezed.
►Fig.25: 1.Stopper
CAUTION: Hold the trigger gun rmly. The
trigger gun recoils when you pull the trigger.
CAUTION: Always hold the trigger gun by the
grip and barrel when cleaning. While the motor is
running, do not touch any part of the high pres-
sure washer body other than the carrying handle
and power switch.
NOTICE: Be careful not to pull the trigger gun
forcibly during operation. It may cause the high
pressure washer to fall over.
After operating
CAUTION: After operating, always perform
the procedure described in this manual. Residual
pressure in the trigger gun or high pressure washer
can cause personal injury or damage to the pump
inside.
1. After operating, leave the power switch on.
2. Close the faucet and disconnect the water hose
from the high pressure washer.
►Fig.26
3. Squeezethetriggeruntiltheremainingwaterin
the high pressure washer is discharged.
Do not run the motor for longer than 1 minute.
►Fig.27
4. Switchoffthehighpressurewasherandunplugit
from the mains.
►Fig.28: 1. Power switch
5. Disconnect the high-pressure hose from the trig-
ger gun.
►Fig.29: 1. Trigger gun 2. High-pressure hose
For the HW1200, also disconnect the high pressure
hose from the high pressure washer.
►Fig.30: 1. High pressure hose
FortheHW1300,reelthehoseandxtheendofthe
hose.
►Fig.31: 1. Catch 2. Handle
NOTICE: To prevent the high-pressure hose from
being damaged, remove the remaining water in
the hose before storing.
MAINTENANCE &
STORAGE
CAUTION: Always be sure that the tool is
switched off and unplugged before attempting to
perform inspection or maintenance.
NOTICE: Never use gasoline, benzine, thinner,
alcohol or the like. Discoloration, deformation or
cracks may result.
Cleaning the nozzle
Use the cleaner pin to remove dirt from or unclog the
nozzle.
►Fig.32: 1. Cleaner pin
NOTICE: Do not remove dirt or debris forcibly.
This may result in personal injury or damage to the
ejection hole causing deviated jet angles or poor
performance.

15 ENGLISH
Cleaning the lter
Detach the water hose connector and remove dirt and
debrisfromtheinsideofthelter.
►Fig.33: 1. Water hose connector 2. Filter 3.Sealing
ring
When using the suction hose set (optional accessory),
takethelteroutoftheltercaseandremovedirtand
debris.
►Fig.34: 1. Filter 2. Filter case
NOTE: To maintain the optimal performance, clean
thelterperiodically.
Storage
Reel the hose and cord. Put the trigger gun and nozzles
in the pockets.
HW1200
►Fig.35
HW1300
►Fig.36
CAUTION: Always store in an indoor location
where the temperature does not go below freez-
ing. If the high pressure washer freezes and malfunc-
tions, contact your local service center for repairs.
CAUTION: Always use the carrying handle
when moving the high pressure washer. Do not
carry it by the hose or cord. The hose or cord may
be damaged.
CAUTION: Do not carry the high pressure
washer with the hose and/or cord unreeled. The
extended hose or cord may be damaged or entan-
gled with other objects, resulting in personal injury or
breakage.
TomaintainproductSAFETYandRELIABILITY,
repairs, any other maintenance or adjustment should
beperformedbyMakitaAuthorizedorFactoryService
Centers, always using Makita replacement parts.
TROUBLESHOOTING
Beforeaskingforrepairs,conductyourowninspectionrst.Ifyoundaproblemthatisnotexplainedinthemanual,
donotattempttodismantlethetool.Instead,askMakitaAuthorizedServiceCenters,alwaysusingMakitareplace-
ment parts for repairs.
State of abnormality Probable cause (malfunction) Remedy
The washer does not start. No electricity Connect the plug to the mains. Also check if electric-
ity is being supplied to the mains.
The switch is not turned on. Turn on the switch.
Residual pressure in the pump Pull the trigger.
Damaged cord or electric circuit Contact an authorized service center for repairs.
No water jet / weak water jet No water supply Make sure that the faucet is open. If using the suc-
tion hose set, introduce water into the hose.
Poor water supply Turn on the faucet.
Poor water hose connection Check the connection between the water hose and
the faucet and inlet on the high pressure washer.
Cloggedhose,lter,ornozzle Unclogthehose,lter,ornozzle.
Airisblockingtheowofwater. Turn off the switch and then turn it on again while
squeezing the trigger.
Damaged or worn nozzle Replace the nozzle.
Pump or valve malfunction Contact an authorized service center for repairs.
Unstable water jet. Clogged nozzle Unclog on the ejection hole of the nozzle using the
cleaner pin.
Poor water suction Check the water hose starting from the faucet for
any leakage or clogs. Turn on the faucet.
The water is too hot. Supplycoolerwater.
Valve malfunction Contact an authorized service center for repairs.
Abnormal sound. The water is too hot. Supplycoolerwater.
Air is stuck in the pump. Contact an authorized service center for repairs.
Water/oil leakage. Poor connection Check the connection between the high pressure
hose and the trigger gun and high pressure washer.
Worn out sealings Contact an authorized service center for repairs.
The pump does not run even though
the motor sound is heard.
Unsuitable extension cord. Use an extension cord suitable for the rating of the
product.

16 ENGLISH
OPTIONAL
ACCESSORIES
CAUTION: These accessories or attachments
are recommended for use with your Makita tool
specied in this manual. The use of any other
accessories or attachments might present a risk of
injury to persons. Only use accessory or attachment
for its stated purpose.
If you need any assistance for more details regard-
ingtheseaccessories,askyourlocalMakitaService
Center.
NOTE:Someitemsinthelistmaybeincludedinthe
tool package as standard accessories. They may
differ from country to country.
Spray lance
►Fig.37
Jet width can be adjusted from 0° to 25° by rotating the
front end of the nozzle.
CAUTION: When adjusting the jet width, do
not rotate the nozzle while pulling it toward the
trigger gun. The nozzle may come off from the trig-
ger gun and cause a personal injury.
Washing brush (long)
►Fig.38
A nozzle equipped with a brush. Useful for washing out
dirt while scrubbing with brush.
Suction hose set
►Fig.39
Replace the water hose with this set to supply water
from a tank or reservoir.
Rotating wash brush
►Fig.40
Three brushes inside rotate slowly when ejecting the
jet.Suitableforcleaninglightdirtonaexteriorwall,car
body, bath tub, etc.
Lance extension
►Fig.41
Pipes to extend the length of the trigger gun. Three
different lengths are available by changing the number
of the pipes to be used.
Under body spray lance
►Fig.42
An extra long spray lance with angled nozzle. Best for
cleaning hard-to-reach areas such as car under body
and roof gutter.
CAUTION: Do not use the under body spray
lance with the lance extension.
Splash guard
►Fig.43
Reduces splash back when cleaning corners with the
dirt blaster.
Swivel joint
►Fig.44
Prevents the high-pressure hose from being twisted.
Connecting joint
►Fig.45
A joint to connect with a nozzle from other model.
NOTE: The connecting joint is needed when using
the nozzles included with another model, HW112 or
HW121.
Pipe-cleaning set (10 m/15 m)
►Fig.46
For cleaning and unclogging plumbing and downpipes.
CAUTION: Pay particular attention to the
water jet when using the pipe cleaning set. Highly
intense water jet is ejected backward.
Extension high-pressure hose (5 m/8
m/10 m)
►Fig.47
Extension hose to connect the high pressure washer
body with the trigger gun.

17 FRANÇAIS
FRANÇAIS (Instructions originales)
AVERTISSEMENT
• Les machines ne doivent pas être utilisées par des enfants. Les
enfantsdoiventêtresouslasurveillanced’unadulteandes’as-
surer qu’ils ne jouent pas avec la machine.
• Cette machine n’est pas destinée à être utilisée par des per-
sonnes (y compris les enfants) aux facultés physiques, senso-
rielles ou mentales diminuées ou sans expérience ni expertise.
• Cette machine a été conçue pour être utilisée avec le produit
nettoyant fourni ou recommandé par le fabricant. L’utilisation
d’autres produits nettoyants ou chimiques peut nuire à la sécu-
rité de la machine.
• Les jets haute pression peuvent être dangereux s’ils sont uti-
lisés à mauvais escient. Le jet ne doit pas être dirigé vers des
personnes, un appareil électrique sous tension ou la machine
elle-même.
• N’utilisez pas la machine à portée de personnes à moins qu’elles
ne portent des vêtements protecteurs.
• Ne dirigez pas le jet vers vous-même ou d’autres personnes
pour nettoyer les vêtements ou les chaussures.
• Risqued’explosion-Nepulvérisezpasdeliquidesinammables.
• Un nettoyeur haute pression ne doit pas être utilisé par des
enfants ou un personnel non formé.
• Les tuyaux haute pression, les raccords et les manchons sont
importants pour la sécurité de la machine. N’utilisez que les
tuyaux, raccords et manchons recommandés par le fabricant.
• Pour garantir la sécurité de la machine, utilisez uniquement des
pièces de rechange d’origine fournies par le fabricant ou approu-
vées par celui-ci.
• Avant d’effectuer toute intervention sur l’outil, assurez-vous tou-
jours qu’il est hors tension et débranché.
• N’utilisez pas la machine si un cordon d’alimentation ou des
pièces importantes de la machine sont endommagés, à savoir
les dispositifs de sécurité, les tuyaux haute pression ou le pisto-
let à gâchette.

18 FRANÇAIS
• Lesrallongesinappropriéespeuventprésenterundanger.Si
une rallonge est utilisée, elle doit convenir à l’utilisation en exté-
rieur, et le branchement doit être maintenu au sec et hors sol.
Pour ce faire, il est recommandé d’utiliser un enrouleur de cor-
don maintenant la prise à au moins 60 mm au-dessus du sol.
• Éteignez toujours le sectionneur d’alimentation lorsque vous
laissez la machine sans surveillance.
• Respectez les exigences de la compagnie des eaux locale.
• Pour les pays européens :
SelonEN12729(BA),l’appareilpeutégalementêtreraccordéà
l’arrivée d’eau potable si un disconnecteur hydraulique avec dis-
positif de vidange est installé sur le tuyau d’alimentation.
SPÉCIFICATIONS
Modèle : HW1200 HW1300
Débit max. 7,0 l/min 7,5 l/min
Débit volumétrique d’eau 5,5 l/min 6,0 l/min
Pression max. admise 12 MPa (120 bars) 13 MPa (130 bars)
Pression de fonctionnement Mode haute pression 10 MPa (100 bars) 11 MPa (110 bars)
Mode basse pression -8 MPa (80 bars)
Pression d’alimentation max. 1 MPa (10 bars)
Température d’alimentation max. 40 °C
Hauteur d’aspiration max. 1,0 m
Dimensions
(L x l x H)
292 mm x 358 mm x 830 mm
Poids 11,0 kg 12,7 kg
Protection du moteur IPX5
• Étantdonnél’évolutionconstantedenotreprogrammederechercheetdedéveloppement,lesspécications
contenuesdanscemanuelsontsujettesàmodicationsanspréavis.
• Lesspécicationspeuventvariersuivantlespays.
• PoidsselonlaprocédureEPTA01/2003
Symboles
Vous trouverez ci-dessous les symboles utilisés pour
l’appareil.Veillezàcomprendreleursignicationavant
toute utilisation.
Lire le mode d’emploi.
Veuillez être prudent et rester attentif.
DOUBLEISOLATION
Uniquement pour les pays de l’Union
européenne
Ne pas jeter les appareils électriques avec
les ordures ménagères ! Conformément
à la directive européenne relative aux
déchets d’équipements électriques et
électroniques ainsi qu’à son application
en conformité avec les lois nationales,
les appareils électriques qui ont atteint la
ndeleurduréedeservicedoiventêtre
collectés séparément et renvoyés à un
établissement de recyclage respectueux
de l’environnement.
Ne dirigez pas le jet vers vous-même ou
d’autres personnes, des animaux et des
appareils électriques sous tension.
Ne convient pas pour le raccordement à
l’arrivée d’eau potable.

19 FRANÇAIS
Utilisations
Cet outil est conçu pour le nettoyage des saletés
tenaces grâce à un jet d’eau. Cet outil est conçu pour
un usage domestique.
Alimentation
L’outil ne devra être raccordé qu’à une alimentation
delamêmetensionquecellequiguresurlaplaque
signalétique, et il ne pourra fonctionner que sur un
courant secteur monophasé. Réalisé avec une double
isolation, il peut de ce fait être alimenté par une prise
sans mise à la terre.
Pour les systèmes de distribution
publics à basse tension, entre 220 V
et 250 V
La mise sous tension et hors tension des appareils élec-
triquesentraînedesuctuationsdetension.L’utilisation
de cet appareil dans des conditions d’alimentation élec-
trique inadéquates peut avoir des effets néfastes sur le
fonctionnement des autres équipements. Il ne devrait
toutefois pas y avoir d’effets négatifs si l’impédance
de l’alimentation est égale ou inférieure à 0,25 ohm.
La prise de courant utilisée pour cet appareil doit être
protégée par un fusible ou un disjoncteur de protection
à déclenchement lent.
Bruit
Niveau de bruit pondéré A typique, déterminé selon
EN60335-2-79 :
Modèle HW1200
Niveau de pression sonore (LpA) : 72 dB (A)
Incertitude (K) : 3,8 dB (A)
Modèle HW1300
Niveau de pression sonore (LpA) : 76 dB (A)
Incertitude (K) : 2,4 dB (A)
Le niveau de bruit en fonctionnement peut dépasser 80
dB (A).
AVERTISSEMENT : Portez un serre-tête
antibruit.
Vibrations
Valeur totale de vibrations (somme de vecteur triaxial)
déterminée selon EN60335-2-79 :
Modèle HW1200
Émission de vibrations (ah) : 4,11 m/s2
Incertitude (K) : 1,5 m/s2
Modèle HW1300
Émission de vibrations (ah) : 4,86 m/s2
Incertitude (K) : 1,5 m/s2
NOTE : La valeur d’émission de vibrations déclarée
a été mesurée conformément à la méthode de test
standard et peut être utilisée pour comparer les outils
entre eux.
NOTE : La valeur d’émission de vibrations déclarée
peut aussi être utilisée pour l’évaluation préliminaire
de l’exposition.
AVERTISSEMENT : L’émission de vibrations
lors de l’usage réel de l’outil électrique peut être
différente de la valeur d’émission déclarée, suivant la
façon dont l’outil est utilisé.
AVERTISSEMENT : Les mesures de sécurité à
prendre pour protéger l’utilisateur doivent être basées
sur une estimation de l’exposition dans des condi-
tions réelles d’utilisation (en tenant compte de toutes
les composantes du cycle d’utilisation, comme par
exemple le moment de sa mise hors tension, lorsqu’il
tourne à vide et le moment de son déclenchement).
Déclaration de conformité CE
Pour les pays européens uniquement
La déclaration de conformité CE est fournie en Annexe
A à ce mode d’emploi.
CONSIGNES DE
SÉCURITÉ
AVERTISSEMENT : Lisez toutes les
consignes de sécurité et toutes les instructions. Il
y a risque d’électrocution, d’incendie et/ou de graves
blessures si les mises en garde et les instructions ne
sont pas respectées.
Conservez toutes les mises en
garde et instructions pour réfé-
rence ultérieure.
Sécurité de la zone de travail
1. Éloignez les personnes de la zone d’utilisation.
2. Ne vous penchez pas trop loin, ni ne vous
tenez sur une base instable. Maintenez
constamment une bonne assise et un bon
équilibre.
3. Placez toujours le corps du nettoyeur haute
pression sur une surface plane et stable.
Évitez les endroits où l’eau projetée s’écoulera
ou s’accumulera.
4. Avant le nettoyage, inspectez les environs et
les objets à nettoyer. Les jets haute pression
peuvent décoller la peinture ou les autres
traitements de surface, y compris les produits
chimiques toxiques. Prenez les mesures de
prévention requises.
5. Prenez garde de ne pas trébucher sur le cor-
don ou le tuyau du nettoyeur haute pression.
Soyez toujours attentif à la conguration du
cordon et du tuyau pendant l’utilisation.
6. Pendant l’utilisation, une petite quantité d’eau
s’échappera du bas du nettoyeur haute pres-
sion. Évitez de placer le nettoyeur haute pres-
sion dans un endroit que vous ne souhaitez
pas mouiller.

20 FRANÇAIS
Sécurité personnelle
1.
Pour se protéger du jet et des objets propulsés
par le jet, l’utilisateur doit porter des vêtements
appropriés comme des chaussures de sécurité,
des gants de sécurité, un casque de chantier
avec visière, des protège-tympans, etc.
2. N’utilisez pas le nettoyeur haute pression à
portée des personnes à moins qu’elles ne
portent des vêtements protecteurs.
3. An de réduire le risque de blessure, il est
nécessaire de redoubler d’attention lors de
l’utilisation du produit à proximité d’enfants.
4. L’eau ayant circulé à travers un disconnecteur
hydraulique n’est pas considérée potable.
Sécurité électrique
1. N’utilisez jamais le nettoyeur haute pression
dehors sous la pluie.
2. Ne touchez jamais la che et/ou la prise sec-
teur avec les mains mouillées.
3. N’utilisez pas la machine si le cordon d’ali-
mentation ou des pièces importantes de la
machine sont endommagés, à savoir les dis-
positifs de sécurité, les tuyaux haute pression
ou le pistolet à gâchette.
4.
La che doit correspondre à la prise de courant.
Ne modiez en aucun cas la che. N’utilisez pas
de che adaptatrice avec un outil relié à la terre.
Unechenonmodiéeetuneprisedecourant
adaptée réduisent le risque d’électrocution.
5. Les rallonges inappropriées peuvent présenter
un danger. Si une rallonge est utilisée, elle
doit convenir à l’utilisation en extérieur, et le
branchement doit être maintenu au sec et hors
sol. Pour ce faire, il est recommandé d’utiliser
un enrouleur de cordon maintenant la prise à au
moins 60 mm au-dessus du sol.
6. Veuillez noter les points suivants lorsque vous
utilisez une rallonge :
• Utilisez uniquement une rallonge conçue
pour l’usage extérieur.
• Utilisez uniquement une rallonge dont
la capacité électrique est supérieure ou
égale à celle du produit.
• N’utilisez pas de rallonges
endommagées.
• Examinez la rallonge avant utilisation et
remplacez-la si elle est endommagée.
• Ne maltraitez pas la rallonge et ne tirez
pas d’un coup sec sur le cordon pour le
débrancher.
• Tenez le cordon à l’écart de sources de
chaleur et de bords tranchants.
• Débranchez toujours la rallonge de la
prise avant de déconnecter le produit de
la rallonge.
7. Le raccordement à l’alimentation électrique
doit être effectué par un électricien agréé et
être conforme à IEC 60364-1. Il est recom-
mandé que l’alimentation électrique de cette
machine comprenne un dispositif différentiel à
courant résiduel qui coupera l’alimentation si
le courant de fuite vers la terre dépasse 30 mA
pendant 30 ms ou un dispositif qui prouvera le
circuit de mise à la terre.
Utilisation et entretien des outils électriques
1. Lisez toutes les instructions avant d’utiliser le
produit.
2. Vous devez savoir comment rapidement arrê-
ter le nettoyeur haute pression et abaisser la
pression. Vous devez bien vous familiariser
avec les commandes.
3. Les jets haute pression peuvent être dange-
reux s’ils sont utilisés à mauvais escient. Le jet
ne doit pas être dirigé vers les personnes, un
appareil électrique sous tension ou la machine
elle-même.
4. Cette machine n’est pas destinée à être utilisée
par des personnes (y compris les enfants) aux
facultés physiques, sensorielles ou mentales
diminuées ou sans expérience ni expertise.
5. Les enfants doivent être sous la surveillance
d’un adulte an de s’assurer qu’ils ne jouent
pas avec l’appareil.
6. Ne pulvérisez pas de liquides inammables
et/ou toxiques. Cela pourrait provoquer une
explosion, une intoxication ou des dégâts à la
machine.
7. Ne dirigez pas le jet vers vous-même ou
d’autres personnes pour nettoyer les vête-
ments ou les chaussures.
8. Les tuyaux haute pression, les raccords et les
manchons sont importants pour la sécurité de
la machine. N’utilisez que les tuyaux, raccords
et manchons recommandés par le fabricant.
9. Suivez les instructions lors du remplacement
des accessoires.
10. Gardez les poignées sèches, propres et sans
trace d’huile ou de graisse.
11. Restez vigilant - surveillez vos gestes.
12. N’utilisez pas le produit si vous êtes fatigué ou
sous l’emprise de drogues, de médicaments
ou d’alcool.
13. Ne faites pas fonctionner le nettoyeur haute
pression sans eau pendant plus d’une minute.
Cela endommagera le moteur, provoquant un
dysfonctionnement.
14. Éteignez toujours le nettoyeur haute pression
et coupez l’arrivée d’eau lorsque vous le lais-
sez sans surveillance.
15. Faites attention au recul. Le pistolet à gâchette
a un mouvement de recul lorsque le jet haute
pression sort de la buse. Tenez fermement le
pistolet à gâchette pour prévenir les blessures
accidentelles.
16. Vériez que les pièces ne sont pas abîmées ou
usées avant utilisation. Assurez-vous égale-
ment que le tuyau est correctement branché et
qu’il n’y a pas de fuite pendant le fonctionne-
ment. Utiliser la machine alors qu’elle présente
des défauts de fonctionnement peut provoquer
un accident.
17. Cette machine a été conçue pour être utilisée
avec le produit nettoyant fourni ou recom-
mandé par le fabricant. L’utilisation d’autres
produits nettoyants ou chimiques peut nuire à
la sécurité de la machine.
Other manuals for HW1200
6
This manual suits for next models
1
Table of contents
Languages:
Popular Washer manuals by other brands

Bosch
Bosch WAY32890EU Instruction manual and installation instructions

Maytag
Maytag MAH14PD Service manual

LG
LG WM2020C Series User's guide & installation instructions

Electrolux
Electrolux WA SL1 E 101 user manual

Clarke
Clarke KING 120 Operating & maintenance instructions

Samsung
Samsung WT80J8 Owner's instructions