M&G DuraVent DuraBlack User manual

DuraBlack
Single-wall interior stovepipe for
connecting wood stoves to
manufactured chimney
Installation Instructions

A MAJOR CAUSE OF VENT
RELATED FIRES IS FAILURE
TO MAINTAIN REQUIRED
CLEARANCES (AIR
SPACES) TO COMBUSTIBLE
MATERIALS. IT IS OF THE
UTMOST IMPORTANCE THAT
DURABLACK BE INSTALLED
ONLY IN ACCORDANCE WITH
THESE INSTRUCTIONS.
NOTE:
Read through all of these instructions
before beginning your installation. Failure
to install as described in this instruction
will void the manufacturer’s warranty, and
may have an effect on your homeowner’s
insurance. Keep these instructions for
future reference.
NOT A UL LISTED PRODUCT
Dear Customer, Installer, or End User:
We welcome any comments, ideas, input or
complaints regarding DuraVent products.
If you are searching for tech support or product
information, please phone us at 800-835-4429.
Or email us at:
IMPORTANT
DuraBlack must be installed with at least an
18” Clearance to Combustibles.
Read all instructions carefully before starting
the installation. The DuraVent warranty will be
voided, and serious re, health, or other safety
hazards may result from any of the following
actions:
• Installation of any damaged DuraBlack
component.
• Unauthorized modication of any
DuraBlack component
• Installation of any component part not
manufactured or approved by DuraVent.
• Installation other than as instructed
by DuraVent and the appliance
manufacturer. Consult your local building
codes before beginning the installation.
INSTALLATION PROCEDURE
Prior to beginning your installation, please
verify what style connector pipe you have. You
may have "Locking Tab" style, or "Trim Ring"
style per Fig.1. These are the methods for
attaching your connector pipe to the support
box (Fig.2).
Step 1. Insert the adapter or Connector
section of pipe into the previously installed
Ceiling Support Box. Position it so the seams
are facing the wall, and the smooth side is
facing the room. For "Locking Tab" connectors,
push the pipe in rmly, until the locking notches
engage the top of the rim of the hole in the
support box. For "Trim Collar" style connector,
insert the pipe into the support box. Slide the
trim collar on and slide up to the support box,
until it is next to the pipe bead. Using the four
pre-punched holes in the trim collar as a guide,
drill 1/8" diameter holes in the support box, and
afx using the sheet metal screws provided. It
is extremely important that the Support Box
be positioned so that the single wall pipe is
at least 18” from the combustible wall, and
also that the support box protrudes at least
2” below the ceiling.
Reposition the Support Box if necessary, to
meet these two requirements.
Step 2. If you have "Locking Tab" style
connectors and you are installing the optional
Trim Collar, slide the Trim Collar upwards over

3
the Slip Connector, until it is next to the bead.
Using the two, pre-punched holes in the Trim
Collar as a guide, drill two 1/8” diameter holes
in the Support Box. Screw the Trim Collar to
the Support Box, using the two sheet metal
screws provided with the kit.
Step 3. Slide the rst Pipe Section upwards
over the Slip Connector. Rotate it so the seam
is facing the wall. Push the Pipe Section
upwards about 1 inch, so it will be held in place
by the Slip Connector. The Slip Connector
slides inside the pipe.
Step 4. Install the second Pipe Section (with
seam facing the wall) on the stove collar or the
appliance adapter (whichever is appropriate
for your installation). Note that the bottom of
the Pipe Section goes inside the stove collar or
appliance adapter.
Step 5. You are now ready to connect the
top and bottom Pipe Sections. Align the
pipe system vertically so the Pipe Sections
align together. Adjust the pipe assembly for
height by pushing upwards against the top
Pipe Section. The top Pipe Section will slide
up the outside of the Slip Connector (up to
approximately 10” of· adjustment). Drop the
top Pipe Section down into the lower Pipe
Section. No cutting is required. If possible,
fasten the pipe assembly to the appliance
with screws. Should the stove not readily
accommodate the pipe system, the DuraVent
Catalog has a variety of adaptors.
Step 6. To insure the safety of the installation
and to increase the rigidity of the system, use
3 sheet metal screws equally spaced around
each joint. Drill three 1/8” holes around the
circumference of each joint, and screw in
the sheet metal screws. This is especially
important if there are any elbows in the
system.
Note: If 90 degree elbows are used in the
system, no drip-free representation may be
made. Single wall elbows inherently have a
certain amount of spacing at the joints, which
may in some cases permit creosote leakage.
If the ceiling is higher than 8 feet, obtain Pipe
Sections from your dealer to accommodate the
additional height. See dealer for available pipe
section lengths.
Note: DuraBlack pipe will exhibit a moderate
paint-like odor during the rst few uses. This is
normal curing of the nish and will disappear
after a few uses of the appliance.
Support Box
Slip Connector or
Locking Tab
Chimney Adapter
or Trim Plate
Chimney Adapter
DuraBlack Pipe
Bead
DuraBlack Pipe
Bead
Figure 2
Figure 1
Figure 1b- Trim Plate Style
Connector

M&G DURAVENT LIMITED LIFETIME WARRANTY
M&G DuraVent, Inc. (“DuraVent”) provides this limited lifetime warranty for all of its products with the exception ofVentinox® (lifetime), and
PolyPro® (ten years). Subject to the limitations set forth below, DuraVent warrants that its products will be free from defects in material or
manufacturing, if properly installed, maintained and used. DuraVent products are fully warranted if installed only by a professional installer.
ThisWarranty is transferable from the original homeowner to the buyer of the home.This warranty does not cover normal wear and tear, smoke
damage or damage caused by chimney res, acts of God, or any product that was: (1) purchased other than from an authorized DuraVent
dealer, retailer or distributor; (2) modied or altered; (3) improperly serviced, inspected or cleaned; or (4) subject to negligence or any use not
in accordance with the installation instructions included with the product as determined by DuraVent. Installation instructions are available
online at www.duravent.com under Support/Literature and through our Customer Service Department 800-835-4429 or customerservice@
duravent.com.This limited lifetime warranty applies only to parts manufactured by DuraVent.
DuraVent provides the following warranties for its products: One Hundred Percent (100%) MSRP 15 years from the date of purchase, and Fifty
Percent (50%) thereafter, except for the following limitations on: all Termination Caps and DuraBlack® are warranted at One Hundred Percent
(100%) for ve years.
All warranty obligations of DuraVent shall be limited to repair or replacement of the defective product pursuant to the terms and conditions
applicable to each product line.These remedies shall constitute DuraVent’s sole obligation and sole remedy under this warranty. This warranty
provides no cash surrender value.The terms and conditions of this warranty may not be modied, altered or waived by any action, inaction or
representation, whether oral or in writing, except upon the express, written authority of an executive ocer of DuraVent.
Corn, bio-fuels, driftwood or other wood containing salt, preservative-treated lumber, plastic and household trash or garbage, or wood pellets
containing such materials must not be burned in the appliance or replace. In case of a chimney re, the chimney must be inspected and
approved by a certied Chimney Sweep before reuse. After each annual inspection, maintenance, and cleaning, the certied Chimney Sweep
must ll out and date the appropriate section of the warranty card provided with the chimney liner.
LIMITATIONS ON INTERNET SALES: Notwithstanding any other terms or conditions of this Limited LifetimeWarranty, DuraVent provides no
warranty for the following specic products if such products are not installed by a qualied professional installer: DuraTech®, DuraPlus HTC®,
DuraChimney® II, PelletVent Pro®, DirectVent Pro®, FasNSeal®, FasNSeal® W2, FasNSeal® Flex, and PolyPro®, and M&G DuraVent’s relining
products including DuraLiner®, DuraFlex® (SW, Pro, 316, 304), andVentinox®. For purposes of this warranty, a trained professional installer is
dened as one of the following: licensed contractors with prior chimney installation experience, CSIA Certied Chimney Sweeps, NFI Certied
Specialists, orWETT Certied Professionals.
DuraVent must be notied and given the opportunity to inspect defective product prior to replacement under the terms of this limited lifetime
warranty. All warranty claims must be submitted with proof of purchase. Labor and installation costs are not covered under this warranty. To
obtain warranty service contact: DuraVentWarranty Service, 877 Cotting Ct.,Vacaville CA 95688, or call 800-835-4429.
WHERE LAWFUL, DURAVENT DISCLAIMS ALL OTHERWARRANTIES, INCLUDING BUT NOT LIMITED TO IMPLIEDWARRANTIES OF
MERCHANTABILITY AND FITNESS FOR A PARTICULAR PURPOSE. IN NO EVENTWILL DURAVENT BE LIABLE FOR INCIDENTAL, CONSEQUENTIAL,
PUNITIVE OR SPECIAL DAMAGES OR DIRECT OR INDIRECT LOSS OF ANY KIND, INCLUDING BUT NOT LIMITEDTO PROPERTY DAMAGE AND
PERSONAL INJURY. DURAVENT’S ENTIRE LIABILITY IS LIMITED TOTHE PURCHASE PRICE OF THIS PRODUCT. SOME STATES DO NOT ALLOW
LIMITATIONS ON IMPLIED WARRANTIES, ORTHE EXCLUSION OR LIMITATION OF INCIDENTAL OR CONSEQUENTIAL DAMAGES, SOTHE ABOVE
LIMITATIONS AND EXCLUSIONS MAY NOT APPLYTO YOU. THIS LIMITED WARRANTY GIVESYOU SPECIFIC LEGAL RIGHTS, ANDYOU MAY ALSO
HAVE OTHER RIGHTS THAT VARY FROM STATE TO STATE.
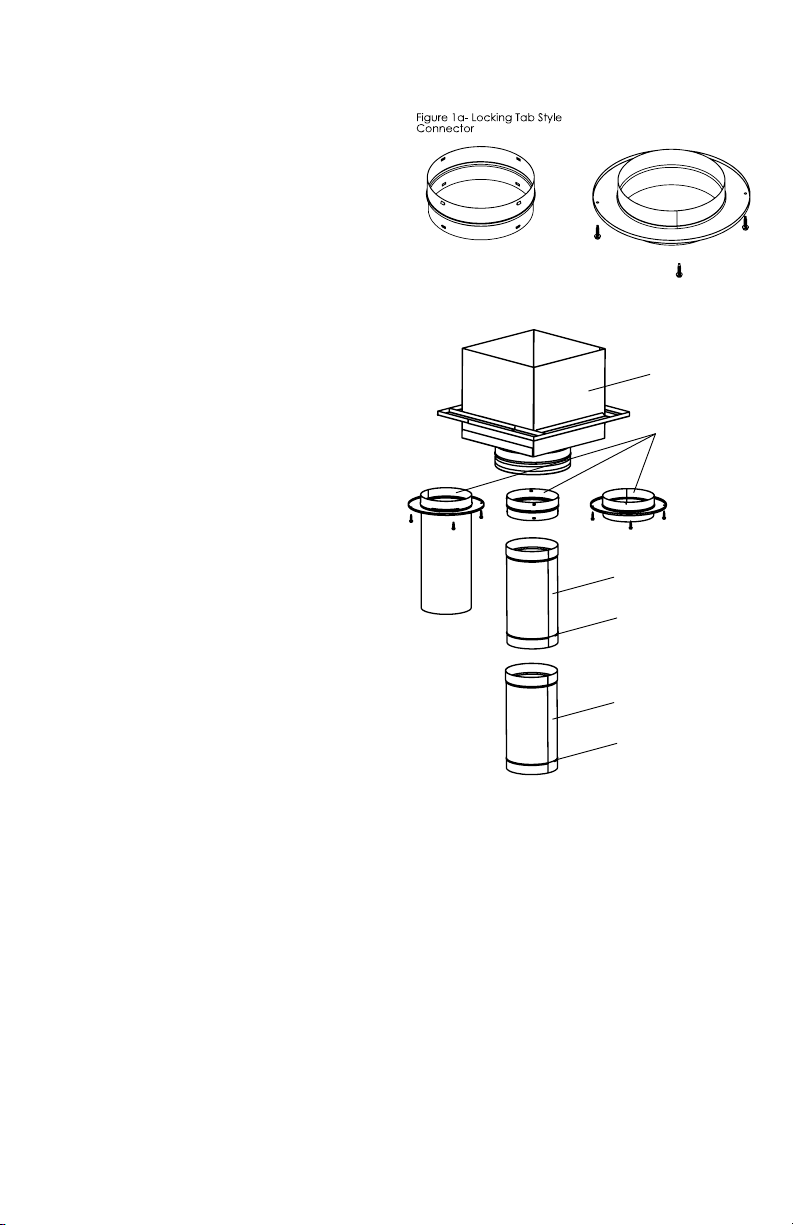
For the most up-to-date installation instructions, see
www. duravent.com
REV 3.22.2012
Manufactured inVacaville CA and Albany NY
DuraBlack is a registered trademark of the M&G DuraVent, Inc.
All rights reserved. Made in the USA. M&G DuraVent is a member of M&G Group. ©2012
Customer Service Support 800-835-4429 707-446-4740 FAX www.duravent.com
L122 06/2012
Popular Wood Stove manuals by other brands

Maine Wood Heat Company
Maine Wood Heat Company LE PANYOL 66 Construction manual

Ravelli
Ravelli VELA 11 Use and maintenance manual

Golden Embers
Golden Embers Wood Fired Ovens Installation and operating guide

ADURO
ADURO 3 user manual

Napoleon
Napoleon S9 installation instructions

Dik Geurts
Dik Geurts Jannik Medium LowEA Instructions for installation

Jøtul
Jøtul F480 Installation and operating instructions

HearthStone
HearthStone hase-Bari 8170 owner's manual

Contura
Contura C 35T-Low Installation instruction

Osburn
Osburn 2000 Installation and operation manual

Enerzone
Enerzone Solution 1.3 Installation and operation manual

Royal
Royal LEA US AIR 80 PRODUCT TECHNICAL DETAILS