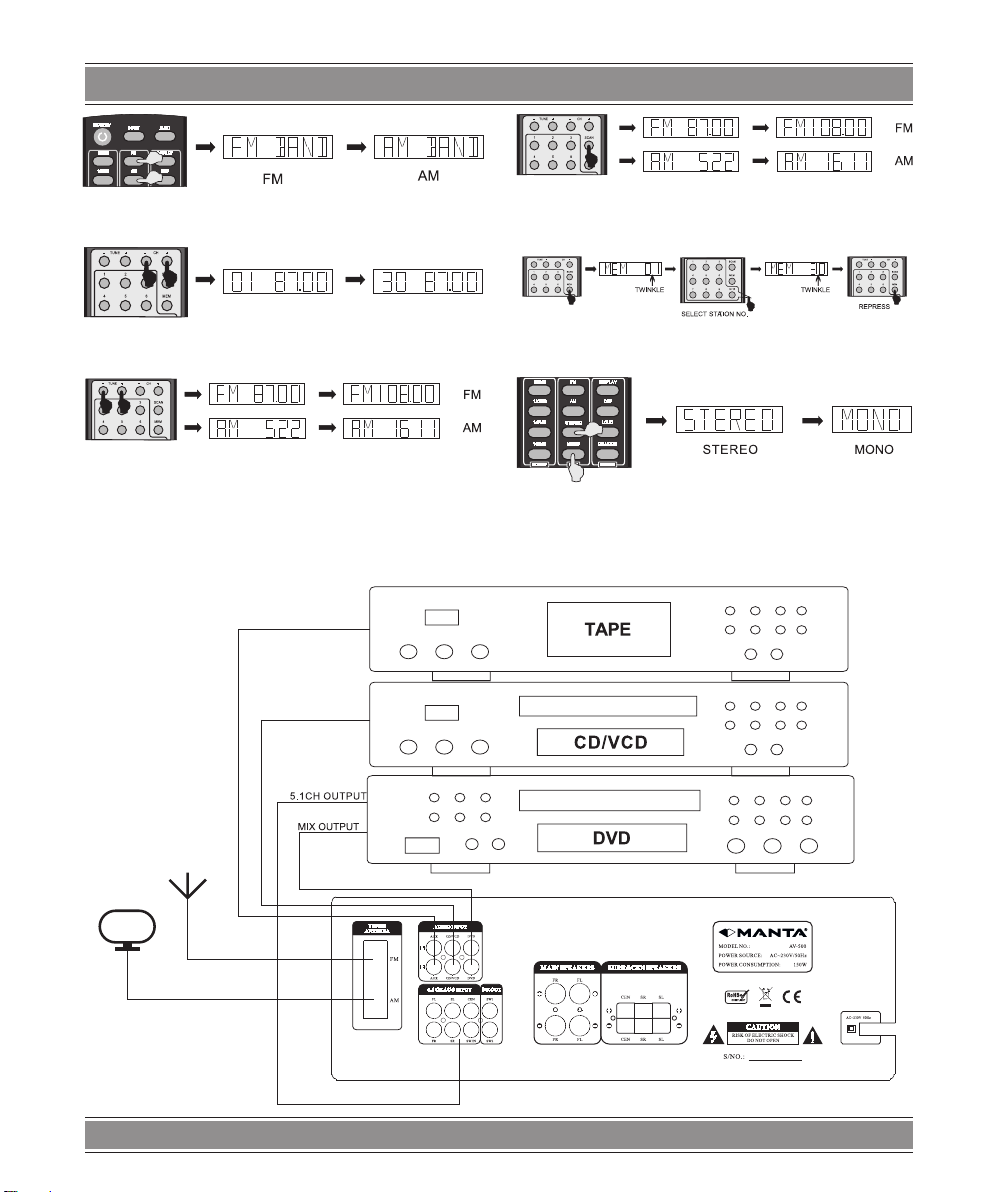
STEREO AMPLIFIER – AV-500
3
Instrukcja obsługi
Bezpieczeństwo
Unikaj otwierania obudowy
Nie otwieraj obudowy, nie manipuluj ani nie dotykaj czę-
ści wewnątrz Naprawy wewnętrzne mogą być wykonywa-
ne jedynie przez wykwalikowanych serwisantów
Zabezpiecz przewód zasilający
Unikaj silnego nacisku i stawania na nim, nie ciągnij i nie
pchaj zbyt mocno
Umieść urządzenie w przewiewnym miejscu.
Unikaj bezpośredniego nasłonecznienia i ogrzewania
Nie używaj w zamkniętym opakowaniu i zapewnij miejsce
na wymianę ciepła
Nie zakrywaj otworów wentylacyjnych
Zakrywanie otworów podwyższy temperaturę w urzą-
dzeniu i uszkodzi je
Zapobiegaj wpadaniu metalowych przedmiotów
Zapobiegaj wpadaniu do wnętrza urządzenia metalo-
wych igieł, spinek, monet i innych przedmiotów, mogących
spowodować zwarcie
Sprawdź, czy zasilanie ma parametry 230V
AC50Hz
Jeśli masz wątpliwości co do zasilania, skontaktuj się
ze sprzedawcą urządzenia lub dostawcą energii elektrycz-
nej
Ważne informacje
Przeczytaj instrukcję – Wszystkie informacje na te-
mat bezpieczeństwa i obsługi przeczytaj przed uży-
ciem urządzenia
Zachowaj instrukcję – Informacje na temat bezpie-
czeństwa i obsługi należy zachować do wykorzysta-
nia w przyszłości
Przestrzegaj instrukcji – Postępuj zgodnie ze wska-
zówkami na temat obsługi
Przestrzegaj ostrzeżeń – Weź pod uwagę wszystkie
ostrzeżenia na urządzeniu i w instrukcji obsługi
Zasilanie – Urządzenie powinno być podłączone do
zasilania zgodnego ze specykacją podaną w in-
strukcji obsługi i na urządzeniu
Ochrona przewodu zasilania – Przewody należy
prowadzić tak, aby nie były narażone na deptanie
lub przebicie przez umieszczone na nich przedmioty;
zwróć szczególną uwagę na wtyczki, rozgałęziacze i
miejsce wyjścia przewodu z urządzenia
Woda i wilgoć – Urządzenie nie powinno być używa-
ne w pobliżu wody (np wanny, umywalki, zlewu, w
pralni, w mokrej piwnicy, w pobliżu basenu itp)
Wentylacja – Umieść urządzenie tak, aby nie powo-
dować jego nieprawidłowej wentylacji, nie używaj go
na łóżku, kanapie, dywanie lub podobnej powierzch-
ni, mogącej zasłaniać otwory wentylacyjne
Ciepło – Umieść urządzenie z dala od źródeł ciepła
takich jak grzejniki, kratki, piece lub inne urządzenia
wytwarzające ciepło (łącznie ze wzmacniaczami)
Okresy nieużywania – Jeśli urządzenie nie będzie
używane przez dłuższy czas, należy odłączyć prze-
wód zasilania
Uszkodzenia wymagające serwisowania – Urządze-
nie powinno być serwisowane przez wykwalikowa-
ny personel, gdy:
a Przewód zasilania lub wtyczka ulegnie uszkodzeniu;
b Na urządzenie coś upadło lub rozlany został płyn;
c Urządzenie zostało wystawione na deszcz;
d Urządzenie nie działa normalnie lub wykazuje zna-
czące zmiany w działaniu;
e Urządzenie zostało upuszczone, lub jego obudowa
uległa uszkodzeniu
Serwisowanie – Użytkownik nie powinien podejmo-
wać prób serwisowania, przekraczających zakres
opisany w instrukcji Wszelkie inne czynności należy
zlecić wykwalikowanym serwisantom
Urządzenie należy czyścić wyłącznie suchą szmat-
ką
Odłącz urządzenie podczas wyładowań atmosfe-
rycznych lub podczas dłuższego okresu nieużywa-
nia
Uwaga!
Konstrukcja produktu i parametry techniczne mogą ulec
zmianie bez wcześniejszego powiadomienia Dotyczy to
przede wszystkim parametrów technicznych, oprogramo-
wania, sterowników oraz podręcznika użytkownika Niniej-
szy podręcznik użytkownika służy ogólnej orientacji doty-
czącej obsługi produktu