Marantz SA-10 User manual

.
Model SA-10 Owner’s Manual
Super Audio CD Player
You can print more than one page of a PDF onto a single sheet of paper.

Contents
Accessories .................................................................................... 2
About the remote control .............................................................. 2
Inserting the batteries ................................................................... 2
Operating range of the remote control unit .................................... 2
Features .......................................................................................... 3
High quality sound ........................................................................ 3
High performance ......................................................................... 3
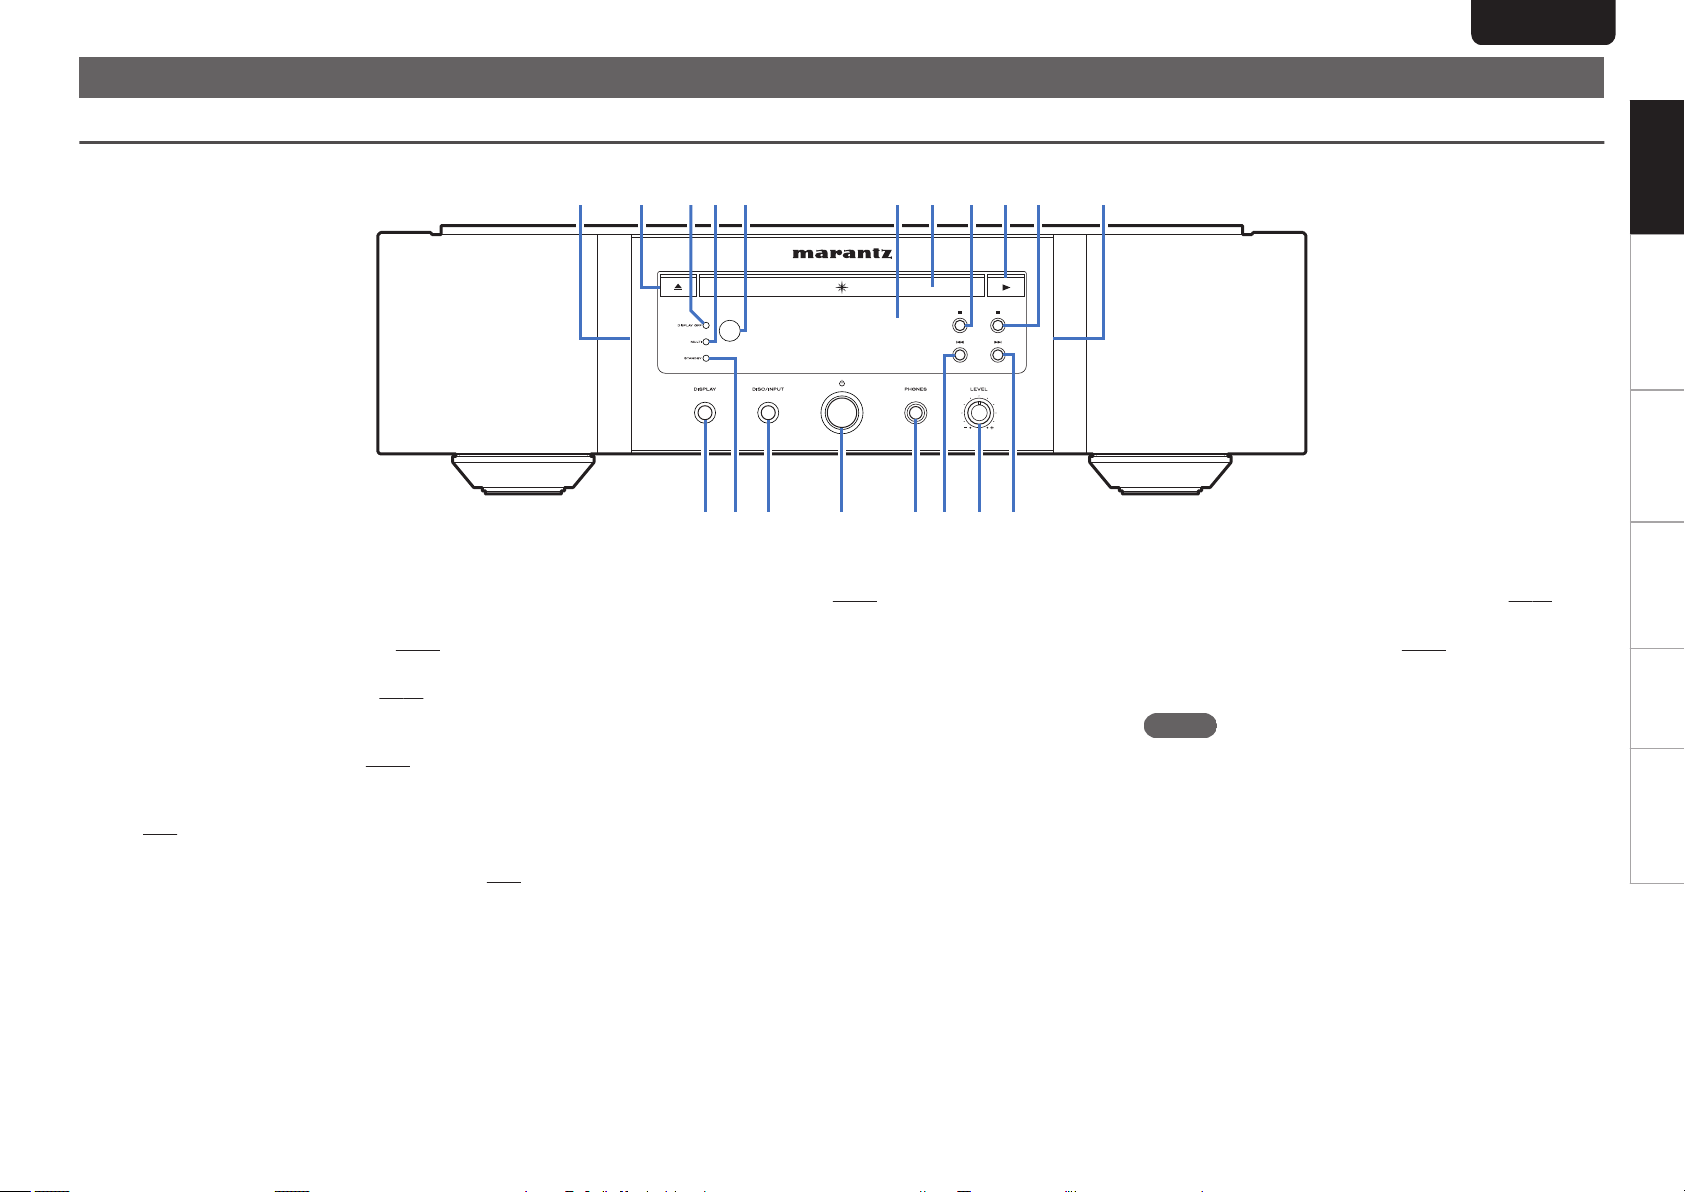
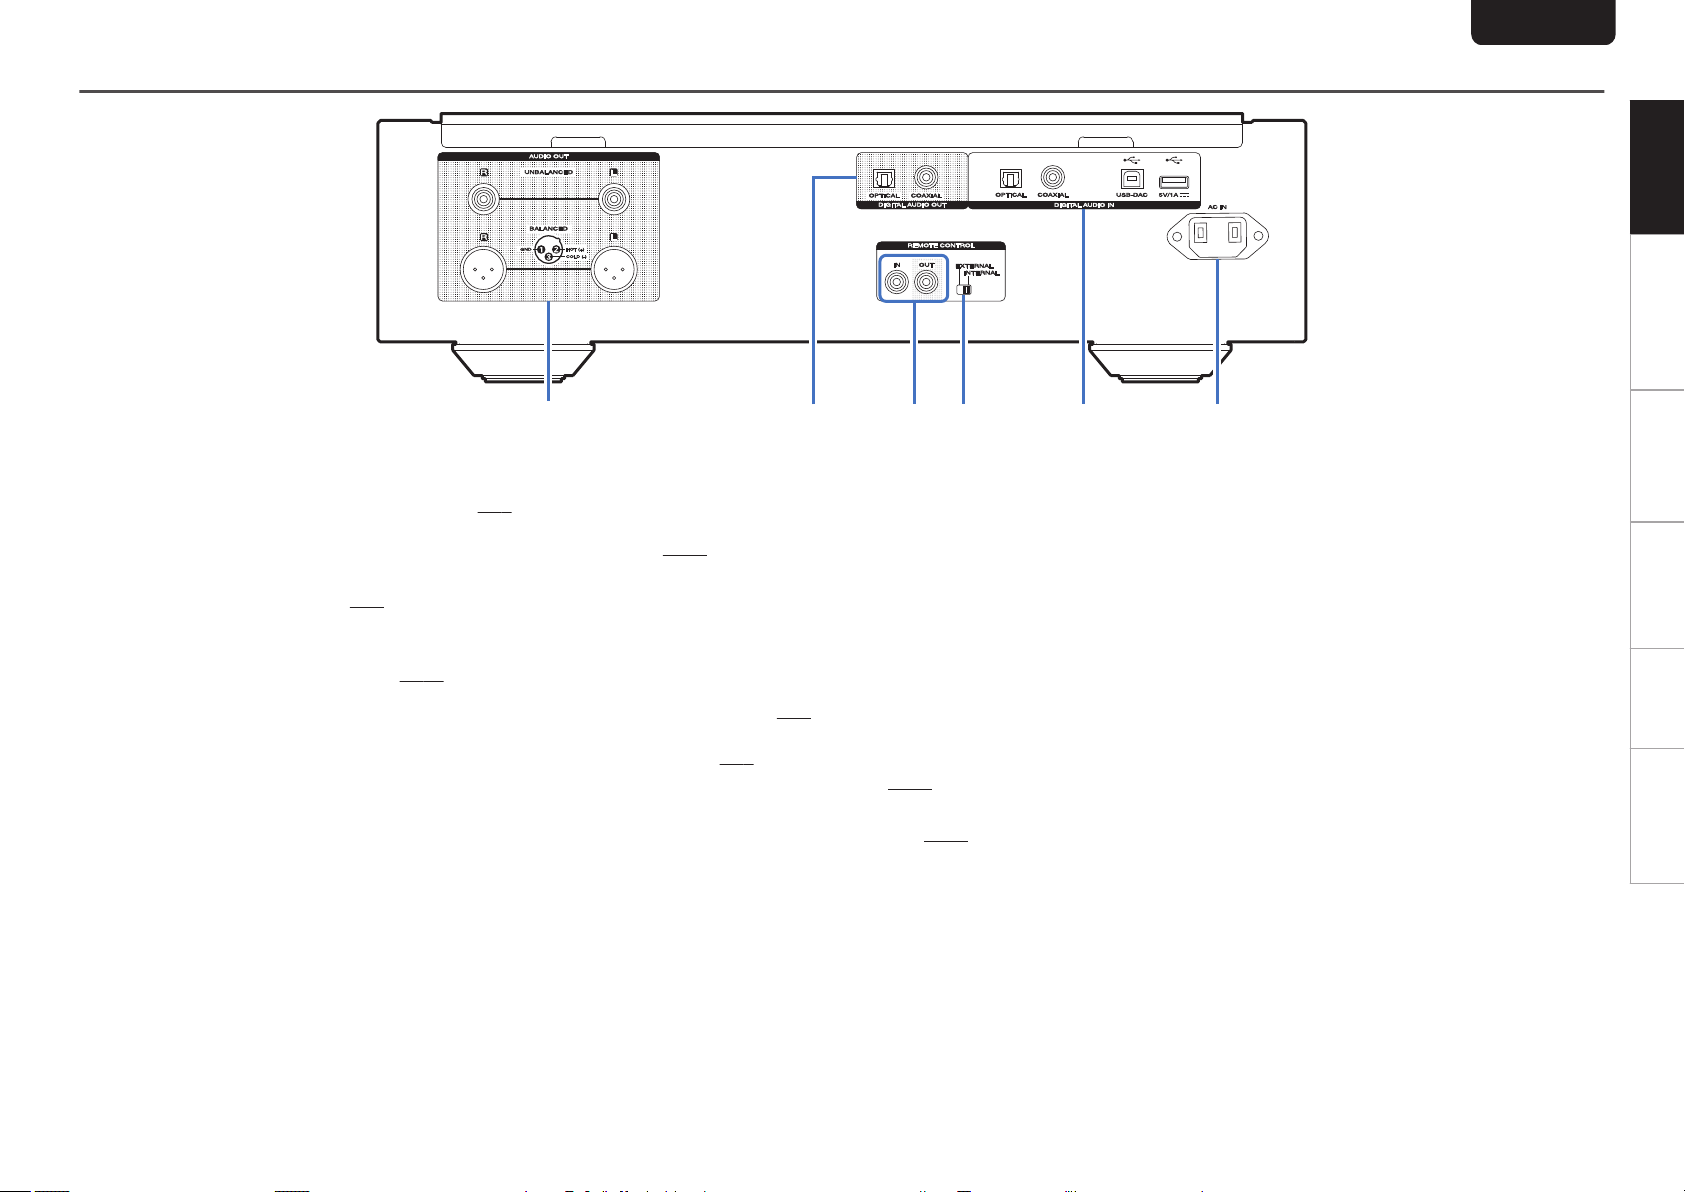
Part names and functions ............................................................. 4
Front panel ................................................................................... 4
Display .......................................................................................... 5
Rear panel .................................................................................... 6
Remote control unit ....................................................................... 7
Connections ........................................................... 8
Connecting to a stereo audio amplifier ....................................... 8
Connecting to a device with digital audio input connectors
.......................................................................................................... 8
Connecting to a device with digital audio output connectors
.......................................................................................................... 9
Connecting an iPod or USB memory device to the USB port
.......................................................................................................... 9
Connecting a PC or Mac ............................................................. 10
Connecting devices with remote control connectors .............. 10
Connection ................................................................................. 10
Setting ........................................................................................ 10
Connecting the timer device ...................................................... 10
Connecting the power cord ........................................................ 10
Playback ............................................................... 11
Basic operation ............................................................................ 11
Turning the power on .................................................................. 11
Selecting the playback media mode ........................................... 11
Having the display and the illumination lamp off ......................... 11
Having the illumination lamp always off ...................................... 11
Stopping digital outputs .............................................................. 12
Setting the top priority playback layer for Super Audio CDs ........ 12
Playing CDs/Super Audio CDs ................................................... 13
Playing CDs and Super Audio CDs ............................................. 13
Playing tracks in a specific order (Program playback) ................ 14
Playing Data CDs and Data DVDs .............................................. 15
Playing files ................................................................................ 15
Playing an iPod ............................................................................ 16
Listening to music on an iPod ..................................................... 16
Setting operation mode (“On-Display” mode) ............................. 16
Charging the iPod ....................................................................... 17
Playing a USB memory device ................................................... 18
Playing files stored on USB memory devices ............................. 18
Using as a D/A converter ............................................................ 20
Connecting and playing back from a computer (USB-DAC) ....... 20
Connect and playback from a digital device (Coaxial/Optical) .... 24
Specifying the desired sound quality ........................................ 24
Switching the filter characteristics ............................................... 24
Settings ................................................................ 25
Menu map ..................................................................................... 25
Menu operation ........................................................................... 25
Dither ............................................................................................ 26
NoiseShaper ................................................................................. 26
Phones .......................................................................................... 26
HP AMP Gain ................................................................................ 26
Resume Play ................................................................................ 27
Phase ............................................................................................ 27
AutoStandby ................................................................................ 27
Timer Play ..................................................................................... 27
Tips ....................................................................... 28
Tips ............................................................................................. 29
Troubleshooting .......................................................................... 30
Appendix .............................................................. 34
Playable media ............................................................................. 34
Discs ........................................................................................... 34
USB memory device ................................................................... 36
Playback order of music files ...................................................... 37
About discs and files ................................................................... 37
Cautions on using media ............................................................ 37
Inserting a disc ............................................................................ 37
How to handle media .................................................................. 38
Cleaning discs ............................................................................ 38
D/A converter ............................................................................... 39
Specifications of supported audio formats .................................. 39
Explanation of terms ................................................................... 39
Trademark information ............................................................... 40
Specifications .............................................................................. 41
Index ............................................................................................. 43
1

Thank you for purchasing this Marantz product.
To ensure proper operation, please read this owner’s manual
carefully before using the product.
After reading this manual, be sure to keep it for future
reference.
Accessories
Check that the following parts are supplied with the product.
.
R03/AAA batteries
Quick Start Guide Remote control unit
(RC004PMSA)
CD-ROM
(Owner’s Manual)
Safety Instructions
Power cord Remote connector cable
Audio cable
About the remote control
Inserting the batteries
1Remove the rear lid in the direction of the
arrow and remove it.
.
2Insert two batteries correctly into the battery
compartment as indicated.
.
Batteries
3Put the rear cover back on.
NOTE
0To prevent damage or leakage of battery fluid:
0Do not use a new battery together with an old one.
0Do not use two different types of batteries.
0Remove the batteries from the remote control unit if it will
not be in use for long periods.
0If the battery fluid should leak, carefully wipe the fluid off
the inside of the battery compartment and insert new
batteries.
Operating range of the remote
control unit
Point the remote control unit at the remote sensor when
operating it.
.
30°
Approx. 7 m
30°
ENGLISH
2
Overview Connections Playback Settings Tips Appendix

Features
High quality sound
0Toroidal transformer
This unit features a toroidal transformer that produces less
vibration and magnetic leakage flux compared to
conventional power transformers. The materials and
manufacturing process of the ring-shaped core are strictly
controlled to reduce vibration, while the short-ring attached
to the perimeter of the transformer reduce magnetic
leakage flux.
0Large-capacitance block capacitor
A large capacitance 4700 μF capacitor carefully selected
for its acoustic characteristics is incorporated into the
power supply circuit.
0Audiophile-grade film capacitors and electrolytic
capacitors
The unit’s features the same audiophile-grade film
capacitors and electrolytic capacitors specifically used in
top-range models.
0Low-noise low-distortion filter circuit and highspeed
HDAM®SA2-type output amplifier
0Double-layered chassis
0High-grade machined analog audio output
connectors
0High grade headphone circuit
The high-grade headphone circuit incorporates
HDAM®SA2 amplifier to enable headphone listening of
high quality sound reproduction, late at night or in other
such situations.
0Isolation design
To prevent audio quality from degrading due to noise from
external devices when this unit is connected to external
devices such as computers, the ground circuit for the USB
input interface device is isolated from the audio circuit.
0Optical Drive off design
When USB-DAC, Coaxial or Optical input is selected, this
unit achieves high quality sound by turning off the drive.
High performance
0Equipped with a USB-DAC function to support
playback of high-resolution sound sources
This unit supports the playback of high resolution audio
formats such as DSD (2.8/5.6/11.2 MHz) and PCM files up
to 384 kHz/32 bits. It provides high quality playback of high
resolution files into this unit from a computer via USB-B
connection.
0Can be used as a D/A convertor
Digital audio signals input from an external device or
computer into this unit can be converted and output as
analog signals using this unit’s D/A converter.
0Supports high-resolution audio sources stored on
discs
MP3, WMA, AAC, WAV, FLAC, ALAC, AIFF and DSD files
that have been recorded onto DVD-R/-RW/+R/+RW or CD-
R/-RW discs can be played back on this unit.
0Plays USB memory devices (MP3/WMA/AAC/WAV/
FLAC/ALAC/AIFF/DSD) and iPod®/iPhone®
You can play back audio files stored on a USB memory
device or iPod/iPhone by connecting the USB memory
device or iPod/iPhone to the USB port.
0Peripheral circuitry off function minimizes audio
output signal interference
In order to minimize noise from peripheral circuitry which
could interfere with the analog audio signal, this unit is
equipped with a peripheral circuitry off function which turns
off the digital output circuit, the display, and the illumination
lamp.
0Filter switching function
Switching between 2 types of filter characteristics is
possible during playback in the CD/DAC modes, allowing
the listener to enjoy different shadings of the music.
0Inverted-phase analog output signal is possible
The European system balanced output of this unit can be
inverted to permit a balanced input to a USA type amplifier.
ENGLISH
3

Part names and functions
Front panel
.
Q
2
Q
4
Q
3
Q
1
Q
5
Q
7
Q
6
Q
8
qewuoyitQ0 qr
AIllumination lamp
The illumination lamp lights (blue).
BDisc tray open/close button (5)
Opens and closes the disc tray. (v p. 13)
CDISPLAY OFF indicator
Lights when the display is off. (v p. 11)
DMULTI indicator
This indicator lights up when the Multi channel area of a
Super Audio CD is selected. (v p. 12)
ERemote control sensor
This receives signals from the remote control unit.
(v p. 2)
FDisplay
This displays various pieces of information. (v p. 5)
GDisc tray
Used to insert a disc. (v p. 13)
HPause button (3)
Pauses playback.
IPlay button (1)
Playback starts.
JStop button (2)
Stops playback.
KDISPLAY button
This turns the display on/off. Press and hold to turn the
illumination lamp on/off.
LSTANDBY indicator
This is lit as follows according to the power status:
0Power on : Off
0Standby : Red
0iPod charge standby : Orange
0Power off : Off
MDISC/INPUT button
Used to select the playback media mode. (v p. 11)
NPower operation button (X)
This turns the power on/off. (v p. 11)
OHeadphones jack (PHONES)
Used to connect headphones.
NOTE
0To prevent hearing loss, do not raise the volume level
excessively when using headphones.
PFast-reverse/Reverse-skip button (8)
Returns to the start of the currently playing track. Press
and hold to fast-reverse the track.
QHeadphone volume control knob (LEVEL)
Adjusts the headphone volume.
RFast-forward/Forward-skip button (9)
Plays the next track. Press and hold to fast-forward the
track.
ENGLISH
4
Overview Connections Playback Settings Tips Appendix

Display
.
wq tyery iuQ1oQ0
Q
2
APlayback mode indicators
1 : Lights up during playback.
3 : Lights up during pause.
BFilter indicators (FIL 1 2)
This indicator shows which filter (Filter 1 or Filter 2) is
selected. (v p. 24)
CRepeat mode indicators
Lights to match the repeat mode settings.
DProgram indicator (PROG)
Lights up during program playback.
ERandom indicator (RNDM)
Lights during random playback.
FTrack number indicator (TRK)
Lights up when displaying the track number.
GDisc media indicators
Displays the type of disc that is being played back.
“M FILE” lights up when a a CD-R/-RW or DVD-R/-
RW/+R/+RW is played.
HINV indicator
This indicator lights up when the inverted phase output
setting is in effect. (v p. 27)
IUSB indicator
This indicator lights up when “iPod/USB” is set as the
playback media mode.
JDigital output off indicator (D OFF)
This indicator lights up when the digital output setting is
set to off. (v p. 12)
KTime display indicators
REMAIN : This indicator lights up while the remaining
track time is displayed.
TTL : This indicator lights up while the total remaining
time.
LInformation display
Displays various information or playback elapsed time and
so on of the disc.
ENGLISH
5

Rear panel
.
q
wer t y
AAUDIO OUT connectors
Used to connect devices equipped with analog audio
inputs connectors or an external amplifier. (v p. 8)
BDIGITAL AUDIO OUT connectors (COAXIAL/
OPTICAL)
Used to connect an AV receiver or D/A converter that has
a digital input connectors. (v p. 8)
CREMOTE CONTROL connectors
Used to connect to a Marantz amplifier that is compatible
with the remote control function. (v p. 10)
DEXTERNAL/INTERNAL switch
Turn this switch to “EXTERNAL” to operate the unit by
pointing the remote control at the amplifier connected to
this unit using the remote control connection.
(v p. 10)
EDIGITAL AUDIO IN connectors
Used to connect a device with digital audio output
connectors (coaxial/optical) or to connect a USB memory
device, an iPod/iPhone with the supplied USB cable or a
computer.
0“Connecting to a device with digital audio output
connectors” (v p. 9)
0“Connecting an iPod or USB memory device to the USB
port” (v p. 9)
0“Connecting a PC or Mac” (v p. 10)
FAC inlet (AC IN)
Used to connect the power cord. (v p. 10)
ENGLISH
6
Overview Connections Playback Settings Tips Appendix

Remote control unit
nOperating this unit
To operate CD player, press REMOTE MODE CD button
to switch the remote control to the CD operation mode.
.
q
w
e
r
t
u
i
o
Q0
Q1
y
Q7
Q9
Q8
Q3
Q5
Q6
Q2
Q4
APower operation button (X CD)
This turns the power on/off (standby). (v p. 11)
BRemote mode select button (REMOTE MODE CD)
This switches the remote control operating mode to CD.
CCursor buttons (uio p)
These select items.
DDISPLAY button
This turns the display on/off. Press and hold to turn the
illumination lamp on/off.
ESystem buttons
These perform playback related operations.
0Skip buttons (8 / 9)
0Stop button (2)
0Play button (1)
0Pause button (3)
FInformation button (INFO)
This switches the track information shown in the display
during playback.
GNumber buttons (0 – 9, +10)
These enter numbers into the unit.
HRANDOM button
Switches the random playback.
IREPEAT button
Switches the repeat playback.
JFILTER button
This switches the filter characteristics. (v p. 24)
KSOUND MODE button
This switches the playback layer of a Super Audio CD.
LENTER button
This determines the selection.
MSETUP button
This displays the setting menu on the display.
(v p. 25)
NPlayback mode switching button (MODE/TRIM)
This switches the playback mode.
OOPEN/CLOSE button
Opens and closes the disc tray. (v p. 13)
PDISC/INPUT button
Used to select the playback media mode. (v p. 11)
QCLEAR button
This clears the program registration. (v p. 14)
RPROGRAM button
This sets program playback. (v p. 14)
SDIGITAL OUT button
This switches the digital audio out on/off. (v p. 12)
nAmplifier operations
A Marantz amplifier can be operated.
.
r
e
w
qy
t
u
i
o
Q0
ACursor buttons (uio p)
BDISPLAY button
CInput source select buttons (INPUT df)
DPower operation button (X AMP)
ERemote mode select button (REMOTE MODE AMP)
FENTER button
GSETUP button
HVolume balance adjustment menu button (MODE/
TRIM)
IVOLUME buttons (df)
JMUTE button
0The remote control may not operate some products.
ENGLISH
7

Connections
nContents
Connecting to a stereo audio amplifier 8
Connecting to a device with digital audio input
connectors 8
Connecting to a device with digital audio output
connectors 9
Connecting an iPod or USB memory device to the USB
port 9
Connecting a PC or Mac 10
Connecting devices with remote control connectors 10
Connecting the timer device 10
Connecting the power cord 10
NOTE
0Do not plug in the power cord until all connections have
been completed.
0Do not bundle power cords together with connection
cables. Doing so can result in noise.
nCables used for connections
Provide necessary cables according to the devices you want
to connect.
Audio cable
(supplied)
.
R
L
R
L
Balance cable
(Sold separately)
.
R
L
R
L
Remote connector
cable
(supplied) .
Optical cable
(Sold separately) .
Coaxial digital cable
(Sold separately) .
USB cable
(Sold separately) .
Connecting to a stereo audio
amplifier
This unit has both unbalanced and balanced connectors. The
balanced connectors have three pins, making it possible to
transmit audio signals as a balanced signal, reducing the
effect of external noise. They also have a removable lock
mechanism, which reduces shaking in the connector area,
making the connection highly reliable.
.
RL
RL
AUDIO
RL
IN
AUDIO
LR
IN
Amplifier
nPhases of the balanced connectors
The XLR connector for professional use is internally wired in
either of the following two systems. This unit employs the
European system.
0USA system (2 PIN=COLD 3 PIN=HOT)
.
1
2
3 HOT
COLD
GND
0European system (2 PIN=HOT 3 PIN=COLD)
.
1
2
3 COLD
HOT
GND
If a product that employs the USA system is connected with
this unit via a balanced cable, the output signal may be
phase-inverted. To correct the inversion, set the “Phase” to
“Inverted” at the menu setting. (v p. 27)
Connecting to a device with
digital audio input
connectors
You can enjoy digital audio playback by connecting an AV
receiver or D/A converter that has a digital audio terminal to
this unit.
.
OPTICAL
IN
COAXIAL
IN
AV receiver /
D/A converter
NOTE
0Digital audio output stops during playback of the HD layer
of Super Audio CDs and DSD files.
0Digital audio output stops during playback of the DSD files
and linear PCM signals with a sampling frequency of
352.8/384 kHz using this unit’s D/A converter.
ENGLISH
8
Overview Connections Playback Settings Tips Appendix

Connecting to a device with
digital audio output
connectors
Use this connection to input digital audio signals to this unit,
and convert the signals for playback using the D/A converter
of this unit. (v p. 20)
.
COAXIAL
OUT
OPTICAL
OUT
CD transport /
Digital device
nSpecifications of supported audio
formats
See “D/A converter” (v p. 39).
Connecting an iPod or USB
memory device to the USB
port
You can enjoy music stored on an iPod/iPhone or USB
memory device.
0To connect an iPod/iPhone to this unit, use the USB
adapter cable that was supplied with the iPod/iPhone.
0For operating instructions, see “Playing an
iPod” (v p. 16) or “Playing a USB memory
device” (v p. 18).
.
or
iPod
USB memory
device
0Marantz does not guarantee that all USB memory devices
will operate or receive power. When using a portable USB
hard disk drive (HDD) which came with an AC adapter, use
that device’s supplied AC adapter.
NOTE
0USB memory devices will not work via a USB hub.
0It is not possible to use this unit by connecting the unit’s
USB port to a PC via a USB cable.
0Do not use an extension cable when connecting a USB
memory device. This may cause radio interference with
other devices.
nSupported iPod/iPhone models
.
• iPod classic
• iPod nano
• iPod touch
• iPhone
ENGLISH
9

Connecting a PC or Mac
By connecting a computer to the USB port (USB-DAC) on the
rear panel of this unit using a commercially available USB
cable (Sold separately), this unit can be used as a D/A
converter. (v p. 20)
.
Ty p e A
USB 2.0 cable
(Sold separately)
Ty p e B Computer on which the driver software and audio player
software are installed
0Before USB connecting this unit to your computer, install
the driver software in your computer. (v p. 20)
0Download the driver software from the SA-10 page of the
Marantz website.
NOTE
0Use a cable that is 3 m or less to connect to the computer.
Connecting devices with
remote control connectors
When you use this unit connected to a Marantz amplifier, this
unit receives operation signals sent from the amplifier and
operates accordingly.
Next, configure the “Connection” and “Setting”.
Connection
Use the supplied remote connector cable to connect the
REMOTE CONTROL IN connector of this unit to REMOTE
CONTROL OUT connector of the amplifier.
Setting
Turn the EXTERNAL/INTERNAL switch on the unit to
“EXTERNAL”.
0This setting will disable remote sensor reception of this
unit.
0To operate the unit, point the remote control at the remote
sensor of the amplifier.
0To use this unit by itself without connecting an amplifier,
turn the switch to “INTERNAL”.
.
This unit
Remote
connector
cable
(supplied)
Signal flow
Amplifier
Set to
“EXTERNAL”.
Connecting the timer device
This unit can perform timer play when an amplifier and timer
device are connected to this unit.
(“Timer Play” (v p. 27))
.
This unit
Amplifier
To household power outlet
(AC 230V, 50/60Hz)
Timer device
Connecting the power cord
After completing all the connections, insert the power plug
into the power outlet.
.
Power cord (supplied)
To household power outlet
(AC 230 V, 50/60 Hz)
ENGLISH
10
Overview Connections Playback Settings Tips Appendix

Playback
nContents
Basic operation 11
Playing CDs/Super Audio CDs 13
Playing Data CDs and Data DVDs 15
Playing an iPod 16
Playing a USB memory device 18
Using as a D/A converter 20
Specifying the desired sound quality 24
Basic operation
.
CD
DISPLAY
FILTER DIGITAL OUT
DISC/INPUT
SOUND MODE
X
Turning the power on
1Press X on this unit to turn the power on.
0Press X CD on the remote control unit to turn on power
from standby mode.
0You can also press 1 on the main unit to turn on power
from standby mode.
nWhen power is switched to standby
1Press X CD.
The unit switches to standby mode, and the STANDBY
indicator lights red.
NOTE
0Power continues to be supplied to some of the circuitry
even when the power is in the standby mode. When
leaving home for long periods of time or when going on
vacation, either press X on the main unit to turn off the
power, or unplug the power cord from the power outlet.
Selecting the playback media mode
1Press DISC/INPUT to select the playback
media mode.
Disc
(Default) : Select to playback a disc.
iPod/USB: Select to playback a iPod and USB
memory device.
USB-DAC: Plays back audio files on the
computer.
Coaxial: Plays back the device connected
to the COAXIAL connector.
Optical: Plays back the device connected
to the OPTICAL connector.
0You can also select the playback media mode by pressing
DISC/INPUT on the unit.
Having the display and the
illumination lamp off
The display circuit operation can be stopped to minimize
noise from the display and the display circuit which could
interfere with the analog audio output signal.
1During playback, press DISPLAY
Each time you press DISPLAY, the display and the
illumination lamp (blue) switch on/off at the same time.
0When the display is switched off, the “DISPLAY OFF”
indicator lights.
0If you press DISPLAY at any time other than during
playback, the display and the illumination lamp (blue) do
not light off.
Having the illumination lamp always
off
The following procedure makes the illumination lamp always
off regardless of the display on/off operation.
1Press and hold DISPLAY for two seconds and
longer while display is lighted.
Press and hold DISPLAY for two seconds and longer
while the lamp is always off to return to the normal
setting.
ENGLISH
11

Stopping digital outputs
Stopping digital audio output reduces a source of noise that
affects sound quality, enabling higher sound quality playback.
1Press DIGITAL OUT.
The digital audio output is switched on and off each
time the button is pressed.
0When digital output is turned off, the “D OFF”
indicator lights up on the display.
Setting the top priority playback
layer for Super Audio CDs
The layer that is played with priority when the disc is loaded
can be set.
1Press DISC/INPUT to select the playback
media mode to “Disc”.
2Check that no disc is loaded.
0If the layer is switched while the disc is being loaded,
the playback layer switches for that disc, but the top
priority playback layer setting itself does not change.
3Press SOUND MODE and switch to the layer
you want to set.
STEREO
(Default):
Plays back the 2-channel area
of the Super Audio CD.
MULTI:
Plays back the multi-channel
area of the Super Audio CD.
The analog output of this unit
outputs a down-mixed 2-
channel signal.
CD: Plays back the CD layer of the
Super Audio CD.
0When a disc is loaded after the setting has been made, the
contents recorded on the set layer are displayed.
0If a disc that does not contain the layer set for top priority
playback is loaded, the contents recorded on another layer
are displayed automatically.
0This setting is stored in the memory and is not cleared
even when the disc holder is opened or closed or the
power is turned off. To change the setting, repeat the
procedure above.
0The priority playback layer cannot be set when a disc is
inserted or “Open” is shown on the display.
0If the area and layer have not been set for a disc, the
priority playback order is as follows:
ASTEREO
BMULTI
CCD
ENGLISH
12
Overview Connections Playback Settings Tips Appendix

Playing CDs/Super Audio
CDs
.
SOUND MODE
PROGRAM
0 – 9, +10
INFO
RANDOM
REPEAT
1
89
3
2
CLEAR
OPEN/CLOSE
Playing CDs and Super Audio CDs
1Press OPEN/CLOSE to insert a disc.
(v p. 37)
The playback media mode automatically switches to
“Disc”.
0You can also open/close the disc tray by pressing 5
on the unit.
0You can also close the disc tray by pressing 1, then
starts playback automatically.
2When playing back a Super Audio CD, press
SOUND MODE to set the playback
layer. (v p. 12)
3Press 1.
The 1 indicator lights on the display. Playback starts.
NOTE
0Do not place any foreign objects in the disc tray. Doing so
could damage the unit.
0Do not push the disc tray in by hand when the power is
turned off. Doing so could damage the unit.
Operation buttons Function
1Playback
3Pause
2Stop
8, 9
Skip to previous track / Skip to next
track
(Press and hold)
Fast-reverse / Fast-forward
0 – 9, +10 Select the track
REPEAT
Repeat playback
0Switching between All-track
repeat and Single-track repeat.
RANDOM Random playback
INFO
Time display switching
0Switching between elapsed time
of the current track, remaining
time of the current track and
remaining time of all tracks.
0The time displayed on this unit
may differ from this actual time,
as it is calculated by truncating to
the nearest 1 second.
Text information recorded on the
Super Audio CD appears in the
display.
ENGLISH
13

nSwitching the display
Press INFO.
Displays text and time information stored on media.
0The text information is only displayed for Super Audio
CD.
0The player can display the following characters :
ABCDEFGHIJKLMNOPQRSTUVWXYZ
abcdefghijklmnopqrstuvwxyz
0123456789
! ” # $ % & : ; < > ? @ \ [ ] _ ` l { } ~ ^ ’( ) * + , - . / =
(space)
nDiscs that can be played back
0See “Discs”. (v p. 34)
nPlaying a specific track (Direct
searching)
1Use 0 – 9 and +10 to select the tracks.
GExampleH
Track 4 :
Press number 4 to select track 4.
Track 12 :
Press numbers 1 and 2 consecutively to select track 12.
0The number you enter is set about 1.5 seconds after
you press the number buttons. To enter a two-digit
number, be sure to press the two number buttons, one
immediately after the other.
Playing tracks in a specific order
(Program playback)
Up to 20 tracks can be programmed.
1In the stop mode, press PROGRAM.
The “PROG” indicator on the display lights.
2Use 0 – 9 and +10 to select the tracks.
GExampleH
Track 4 : Press number 4 to select track 4.
Track 12 : Press numbers 1 and 2 consecutively to
select track 12.
0The number you enter is set about 1.5 seconds after
you press the number buttons. To enter a two-digit
number, be sure to press the two number buttons,
one immediately after the other.
3Press 1.
Playback starts in the programmed order.
0When REPEAT is pressed during program playback, the
tracks are played repeatedly in the programmed order.
NOTE
0The program is cleared when the disc tray is opened or the
power is turned off.
nChecking the order of the programmed
tracks
In the stop mode, press 9.
The tracks are shown in the programmed order in the
display each time 9 is pressed.
nTo clear the last track programmed
In the stop mode, press CLEAR.
The last track programmed is cleared each time the
button is pressed.
nClearing the all programmed track
In the stop mode, press PROGRAM.
ENGLISH
14
Overview Connections Playback Settings Tips Appendix

Playing Data CDs and Data
DVDs
.
INFO
MODE/TRIM
RANDOM
1
89
3
2
REPEAT
uio
ENTER
OPEN/CLOSE
0This section explains how to playback music files that are
recorded onto a CD-R/-RW or DVD-R/-RW/+R/+RW.
0There are many music distribution sites on the Internet
allowing you to download music files in MP3 or WMA
(Windows Media® Audio) format. The music (files)
downloaded from such sites can be stored on CD-R/-RW
or DVD-R/-RW/+R/+RW discs and played on this unit.
“Windows Media” and “Windows” are the trademarks
or registered trademarks of Microsoft Corporation in
the United States and other countries.
0The audio format types and specifications supported by
this unit for playback are as follows.
See “Playable files” for details. (v p. 35)
0MP3/WMA/AAC/WAV/FLAC/ALAC/AIFF/DSD
NOTE
0Copyright-protected files cannot be played.
0Note that depending on the software used for burning and
other conditions, some files may not play or display
correctly.
Playing files
1Load a CD-R/-RW or DVD-R/-RW/+R/+RW
disc containing music files into the disc
tray. (v p. 37)
0Press OPEN/CLOSE to open/close the disc tray.
2Use uio to select the folder to be played,
then press ENTER.
3Use ui to select the file to be played, then
press ENTER.
Playback starts.
Operation buttons
Function
1Playback
3Pause
2Stop
8 9
Skip to previous track / Skip to next
track
(Press and hold) Fast-reverse /
Fast-forward
oMoving up a level in the folder tree
u iSelect the item
ENTER Enter the selected item / Playback
MODE/TRIM Select the playback range
RANDOM Random playback
REPEAT
Repeat playback
0Switching between All-track
repeat and Single-track repeat.
INFO
Switch the display between the
elapsed playback time, text
information and the file format.
0To play another file while playing from a CD-R/-RW or
DVD-R/-RW/+R/+RW, press o to display the folder tree,
ui to select the file to be played, and then press ENTER.
nSwitching the display
During playback, press INFO.
0Switch the display between the elapsed playback time,
text information and the file format.
0If a file does not support text information or no track
information is recorded, the file name is displayed.
0The player can display the following characters:
ABCDEFGHIJKLMNOPQRSTUVWXYZ
abcdefghijklmnopqrstuvwxyz
0123456789
! ” # $ % & : ; < > ? @ \ [ ] _ ` l { } ~ ^ ’( ) * + , - . / =
(space)
0The file numbers are set automatically when the disc is
loaded.
nFiles that can be played back
0See “Playable files”. (v p. 35)
nSwitching the playback range
In the stop mode, press MODE/TRIM.
0The playback range of a track can be set.
Folder mode: All the files in the selected folder
are played.
All mode: All the files in the disc are played.
0The folder hierarchy is not displayed when “All mode” is
set as the playback range.
ENGLISH
15

Playing an iPod
.
REPEAT
RANDOM
MODE/TRIM
1
89
3
2
uiop
ENTER
DISC/INPUT
INFO
0You can use the USB cable provided with the iPod to
connect the iPod with the unit’s USB port and enjoy music
stored on the iPod.
0For information on the iPod models that can be played
back with this unit, see “Supported iPod/iPhone
models” (v p. 9).
Listening to music on an iPod
1Connect the iPod to the USB port. (v p. 9)
2Press DISC/INPUT to select the playback
media mode to “iPod/USB”.
“From iPod” is displayed on the display of this unit.
3Operate iPod itself directly while seeing the
iPod screen to play back music.
0The iPod display modes include “From iPod” and “On-
Display”. By default, “From iPod”, where you directly
operate the iPod itself while looking at the iPod screen, is
set.
NOTE
0Depending on the type of iPod and the software version,
some functions may not operate.
0Note that Marantz will accept no responsibility whatsoever
for any problems arising with the data on an iPod when
using this unit in conjunction with the iPod.
Setting operation mode (“On-
Display” mode)
In this mode, various lists and screens during playback on the
iPod are displayed on this unit.
This section describes the steps up to playing back tracks on
the iPod in “On-Display”.
1Press MODE/TRIM.
“On-Display” is displayed on the display of this unit.
2Use ui to select the file to be played, then
press ENTER.
Playback starts.
Operation mode From
iPod
On-
Display
Playable files Music file P P
Video file z
Active
buttons
Remote
control unit
(This unit)
P P
iPod P
z Only the sound is played.
ENGLISH
16
Overview Connections Playback Settings Tips Appendix

Operation buttons Function
1Playback
3Pause
2Stop
8 9
Skip to previous track / Skip to next
track
(Press and hold)
Fast-reverse / Fast-forward
RANDOM Random playback
REPEAT
Repeat playback
0Switching between Single-track
repeat and All-track repeat.
MODE/TRIM
Setting iPod operation mode
0Switching between “From iPod”
or “On-Display” mode.
u i o pSelect the item
ENTER Enter the selected item / Playback
INFO
Switch the display between the
elapsed playback time and text
information.
nSwitching the display
During playback, press INFO.
0This switches between the elapsed playback time and
text information.
0The player can display the following characters:
ABCDEFGHIJKLMNOPQRSTUVWXYZ
abcdefghijklmnopqrstuvwxyz
0123456789
! ” # $ % & : ; < > ? @ \ [ ] _ ` l { } ~ ^ ’( ) * + , - . / =
(space)
0A period (“.”) is displayed instead of any character that
cannot be displayed by the player.
Charging the iPod
You can charge an iPod or iPhone when the playback media
mode is switched to “iPod/USB” or “Disc” and the iPod or
iPhone is connected to the USB port.
0If the unit enters power standby mode while the iPod/
iPhone is charging, the unit will switch to standby charging
mode, and the iPod/iPhone will continue to be charged.
When in standby charging mode, the STANDBY indicator
light turns orange.
When charging is completed, the unit enters normal power
standby mode and the STANDBY indicator turns red.
ENGLISH
17

Playing a USB memory
device
.
REPEAT
RANDOM
MODE/TRIM
DISC/NPUT
INFO
1
89
3
2
uio
ENTER
0Playing back music stored on a USB memory device.
0Only USB memory devices conforming to mass storage
class standards can be played on this unit.
0This unit is compatible with USB memory devices in
“FAT16” or “FAT32” format.
0This unit can play back the following files.
0MP3/WMA/AAC/WAV/FLAC/ALAC/AIFF/DSD
Playing files stored on USB memory
devices
1Connect the USB memory device to the USB
port. (v p. 9)
2Press DISC/INPUT to select the playback
media mode to “iPod/USB”.
0When the menu’s “Resume Play” (v p. 27) is on,
playback starts automatically.
3Press o.
The file/folder list appears in the display of this unit.
0The file/folder list can also be displayed by pressing
2 to stop the playback.
4Use ui to select the folder, then press
ENTER.
5Use ui to select the file, then press ENTER.
Playback starts.
Operation buttons Function
1Playback
3Pause
2Stop
8, 9
Skip to previous track / Skip to next
track
(Press and hold)
Fast-reverse / Fast-forward
oMoving up a level in the folder tree
u iSelect the item
ENTER Enter the selected item / Playback
REPEAT
Repeat playback
0Switching between All-track
repeat and Single-track repeat.
RANDOM Random playback
MODE/TRIM
Switch to Folder playback mode
0Switching between “Folder” or
“All” mode.
INFO
Switch the display between the
elapsed playback time and text
information.
ENGLISH
18
Overview Connections Playback Settings Tips Appendix

NOTE
0To play another file while playing from a USB memory
device, press o to display the folder tree, ui to select the
file to be played, and then press ENTER.
0Do not remove the USB memory device from the unit when
the USB memory communication indicator is flashing.
Doing so may damage the USB memory device, or may
corrupt the files recorded on the USB memory device.
0Note that Marantz will accept no responsibility whatsoever
for any problems arising with the data on a USB memory
device when using this unit in conjunction with the USB
memory device.
nSwitching the display
During playback, press INFO.
0This switches between the elapsed playback time and
text information.
0While a WAV, AIFF or DSD (.dff) file is being played
back, the file name, file number and file format are
displayed.
0The player can display the following characters:
ABCDEFGHIJKLMNOPQRSTUVWXYZ
abcdefghijklmnopqrstuvwxyz
0123456789
! ” # $ % & : ; < > ? @ \ [ ] _ ` l { } ~ ^ ’( ) * + , - . / =
(space)
0A period (“.”) is displayed instead of any character that
cannot be displayed by the player.
nFiles that can be played back
See “USB memory device” (v p. 36).
nSwitching the playback range
In the stop mode, press MODE/TRIM.
0The playback range of a track can be set.
Folder mode: All the files in the selected folder
are played.
All mode: All the files in the USB memory
are played.
0The folder hierarchy is not displayed when “All mode” is
set as the playback range.
ENGLISH
19
Other manuals for SA-10
4
Table of contents
Other Marantz CD Player manuals

Marantz
Marantz CD Player User manual

Marantz
Marantz VC5200 User manual

Marantz
Marantz SA8004 User manual

Marantz
Marantz SA8003 User manual

Marantz
Marantz SVYD18 User manual

Marantz
Marantz CDR500 User manual

Marantz
Marantz CC3000 User manual

Marantz
Marantz SA7001/F User manual

Marantz
Marantz CDR510 User manual

Marantz
Marantz CD6003 User manual

Marantz
Marantz SA-1 User manual

Marantz
Marantz SA-7S1 User manual

Marantz
Marantz 74CD50 01B User manual

Marantz
Marantz SA8004 User manual

Marantz
Marantz SA8004 User manual

Marantz
Marantz SA-17S1 User manual

Marantz
Marantz CD5001 OSE Owner's manual

Marantz
Marantz ND8006 User manual

Marantz
Marantz SA-12S1 User manual

Marantz
Marantz CC-67 User manual