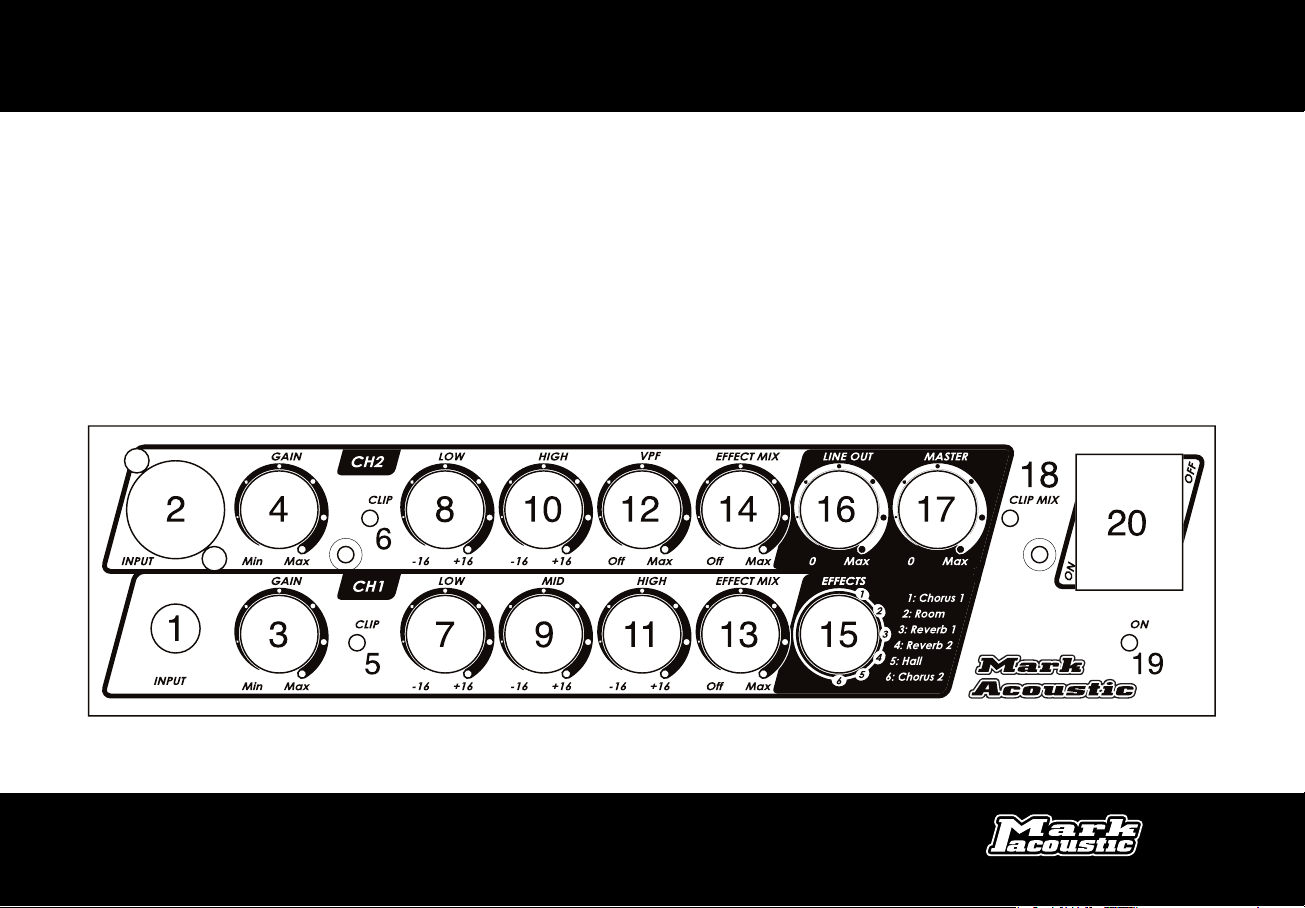
Mark Acoustic AC 101 User manual


1
1. Introduction
Congratulations on purchasing one of the world’s best acoustic guitar amplifiers! Mark Acoustic amps are built to the highest standards
by a small team of skilled technicians in San Giovanni Teatino, Italy.
We have spent many years researching not only the highest-quality technologies for amp design and construction, but also the practical
needs of the working acoustic guitarist. The end result is a product that combines outstanding sound quality with intuitive features,
attractive design and extreme reliability-all in one impossibly lightweight unit. This amp will allow your instrument to speak in its natural
voice, faithfully conveying your musical ideas to your audience with stunning clarity.
Your amplifier has passed rigorous product testing and should survive even the toughest of environments on the road, in clubs, rehear-
sal halls and concert stages. Nonetheless, please treat it with care and you will be rewarded with many, many years of glorious, rich,
powerful tone!
If the clarity and power of this amp inspire you to play better music, we will have succeeded in our mission. Good luck and enjoy your new
best friend!
Sincerely, Mark Acoustic

2
1.1 A word from Marco De Virgiliis
When I began to develop the concept of the Acoustic line in Italy several years ago, I had one objective in mind: to produce
top quality acoustic amps that would meet the needs of professional musicians everywhere. I wanted my amps to be com-
pact and lightweight and thanks to modern technology and the availability of high-quality components like digital power
supplies, neodymium speakers and so on, I was able to accomplish this.
The Acoustic line’s amplifier circuitry is designed specifically to not color the sound, but to faithfully reproduce the unique
tonal qualities of whatever instrument is played through it. I have worked very closely with many high-profile professional
musicians around the world to fine-tune the Mark Acoustic product line.
I am confident that these Mark Acoustic amps are now ready to satisfy the needs of acoustic musicians all over the world.
We encourage you to use your Mark Acoustic gear in all kinds of musical situations and please help us to continue develo-
ping our products by sending your comments to [email protected].
And above all, enjoy the music.
Marco De Virgiliis
Mark Acoustic
Marco De Virgiliis
MARKBASS - ITALY
WWW.MARKBASS.IT
3
2. Acoustic Amp Product Overview
The AC601/AC101 acoustic amp is a high-quality acoustic guitar amplifier with a solid-state preamp and an analog power amp, which deli-
vers 250W of power into a 4 ohm cabinet, or 150W into an 8 ohm cabinet.
The AC601 features one custom-designed 6” B&C neodymium speaker and one HF compression driver.
The AC101 includes instead one custom-designed 10” B&C neodymium speaker and one HF compression driver.
2.1 Acoustic Amp Front Panel

2
1.1 A word from Marco De Virgiliis
When I began to develop the concept of the Acoustic line in Italy several years ago, I had one objective in mind: to produce
top quality acoustic amps that would meet the needs of professional musicians everywhere. I wanted my amps to be com-
pact and lightweight and thanks to modern technology and the availability of high-quality components like digital power
supplies, neodymium speakers and so on, I was able to accomplish this.
The Acoustic line’s amplifier circuitry is designed specifically to not color the sound, but to faithfully reproduce the unique
tonal qualities of whatever instrument is played through it. I have worked very closely with many high-profile professional
musicians around the world to fine-tune the Mark Acoustic product line.
I am confident that these Mark Acoustic amps are now ready to satisfy the needs of acoustic musicians all over the world.
We encourage you to use your Mark Acoustic gear in all kinds of musical situations and please help us to continue develo-
And above all, enjoy the music.
Marco De Virgiliis
Mark Acoustic
Marco De Virgiliis
MARKBASS - ITALY
WWW.MARKBASS.IT
3
2. Acoustic Amp Product Overview
The AC601/AC101 acoustic amp is a high-quality acoustic guitar amplifier with a solid-state preamp and an analog power amp, which deli-
vers 250W of power into a 4 ohm cabinet, or 150W into an 8 ohm cabinet.
The AC601 features one custom-designed 6” B&C neodymium speaker and one HF compression driver.
The AC101 includes instead one custom-designed 10” B&C neodymium speaker and one HF compression driver.
2.1 Acoustic Amp Front Panel

INPUTS
The The INPUT JACK (2) connects your instrument to channel 2, and accepts either a balanced XLR input (in case your gui -
tar’s pickup supplies a balanced output) or an unbalanced
GAIN and MASTER
There are three knobs on the front panel of the AC601/AC101 acoustic amplifier that control the volume of your instrument.
The GAIN (3)(4) control determines how much signal is passed through the preamp stage of the unit, which includes equa-
lization and the effects loop. The MASTER (17) volume regulates how much output comes out of the power amp into your
cabinet.
If playing through the amp causes the blue CLIP (5)(6) light to turn on at all, you should turn down the GAIN (3)(4) control
to avoid distortion.
When you first plug into the amp, start with the GAIN (3)(4) and MASTER (17) controls set at their lowest levels, in other
words turned all the way counter-clockwise. Then, turn your instrument’s volume up to its full level and play as hard as
you do in your most aggressive moments, and turn up the GAIN (3)(4) control until the blue light starts illuminating. Next,
back off on the GAIN (3)(4) just enough so that the light stays off as you play. This method will result in the optimal gain
setting for the instrument you’re playing. Different guitars have different output levels, mostly depending on their pickups
and onboard preamp and EQ settings.
Once you’ve set the GAIN (3)(4) level, use your MASTER (17) knob to control the volume of your instrument.
EQUALIZATION
The AC601/AC101 acoustic amplifier is designed to faithfully reproduce the natural sound of your guitar. If you have a good
instrument, very little equalization (EQ)-if any-should be required. Acoustic guitars produce a very wide range of frequen-
cies, and all of them need to be conveyed in order to amplify the true sound of the instrument.
Since the AC601/AC101 has been designed to give you clear, detailed and musical sound at all frequencies, when the amp
is set “flat”-with all EQ knobs at 12 o’clock-you should hear a very true mirror of the sound of your guitar and its pickup.
However, if and when equalization is required, you will find this amp’s EQ to be powerful and musical.
The LOW EQ (7) (8) control the level of low frequencies. This means that it either boosts or cuts the volume of the frequen-
cies around 40 Hz, to a maximum of 16 decibels, (see the EQ curves on page 10).
The MID EQ (9) control (available on channel 1 only) boosts or cuts the frequencies around 600 Hz, by as much as 16 decibels.
4
5
The HIGH EQ (8) control boosts or cuts the high frequencies, by as much as 16 decibels.
VPF FILTER
The AC601/AC101 features a filter that alters the equalization of your signal with specially formulated musical results. The
VPF (10) (Variable Pre-shape Filter) boosts lows (around 35 Hz) and highs (around 10 kHz), and cuts mids at 380 Hz. This
filter can only be applied to channel 2.
EFFECTS
The AC601/AC101 offers six onboard preset EFFECTS (15) to sweeten your sound: Chorus 1, Room (reverb), Reverb 1, Reverb
2, Hall (reverb) and Chorus 2.
The EFFECT MIX knobs (13) (14) control the balance between the dry signal and the effected signal. With the effect mix con-
trol in the “off” position, you will hear no effect. At the “max” position, you will hear only effect and no dry signal. You
cannot select a different effect for each channel, but you can control how much effect is applied to each channel, using
the effect mix knobs.
LINE OUT LEVEL
The LINE OUT (16) knob allows you to control how much signal comes out of the LINE OUT output (24) on the rear panel.
This is useful in live situations, when the sound engineer may ask you to provide more or less signal to the PA.
2.2 Acoustic Amplifier Rear Panel
SPEAKER OUT
The AC601/AC101 can be connected to one or two speaker cabinets. The high-quality Neutrik SPEAKON COMBO jack (23) accepts either a
SPEAKON or a The AC601/AC101 delivers 150W of power into an 8 ohm cabinet, or 250W into a 4 ohm cabinet.
By default, the AC601/AC101 head is connected to the speaker cabinet housed in the combo. However, you can either connect the head
to a separate, external cabinet (unplug the

LINE OUT
This balanced XLR (24) output sends a balanced signal to the mixing console or snake in live and studio situations. The line out signal
combines the signals of both channels, includes effects, and is not affected by the master volume setting.
INSERT POINT
This jack allows you to insert an external component (e.g. another preamp, a compressor, etc.) into the preamplifier chain.
GROUND LIFT
Occasionally when you’re playing live and using the LINE OUT (24), the soundman will detect a hum from your amp’s signal. This is almost
always due to a grounding problem related to your power source; you will likely eliminate this hum simply by flipping the GROUND LIFT
(26) switch.
6
7
3. AC601/AC101 HF Compression Driver Level Control
On the left side of the AC601/AC101 there is a level control that attenuates the high frequency compression driver. When the knob is tur-
ned all the way clockwise, there is no signal going to the compression driver. Turned all the way counter-clockwise, the compression dri-
ver is at its maximum level.
3.1 AC601/AC101 Acoustic Amplifier Phantom 9V XLR Setting
The images below show how your amp can be modified to send 9V of phantom power to the XLR input, by installing a jumper in the amp.
Please note that this modification must be made by qualified Markbass service personnel only.

8
4. Acoustic Amplifier: Technical Details
INPUT
CHANNEL 1 Impedance: 500 Kohm - Max. Voltage: 10 Vpp
CHANNEL 2 Impedance: 3.3 Kohm - Max. Voltage: 12 Vpp
CONTROLS CH1
GAIN -45dB to +28dB range
EFFECT MIX Internal effect only
EQUALIZER Low: level ±16 dB (40Hz)
Mid: level ±16 dB (600Hz)
High: level ±16 dB (6KHz)
CONTROLS CH2
GAIN -43dB to +26dB range
EFFECT MIX Internal effect only
EQUALIZER VPF: center frequency (380Hz)
Low: level ±16 dB (60Hz)
High: level ±16 dB (5KHz)
OUTPUTS
INSERT POINT Unbalanced - Max. volyage 25Vpp
SEND MIX Balanced - Max output 20 Vpp
SPEAKER OUT Speakon 1/4”
OTHER SPECIFICATIONS
DIMENSIONS
Heighth 2.8 in. - 710 mm. - Depth 10.1 in. - 256 mm
Width 10.87 in. - 276mm
(can be extended to standard rack size with optional rack ears)
WEIGHT 4.63 lbs - 2,1 Kg
OUTPUT POWER
150W RMS @ 8ohm - 250W RMS @ 4ohm
POWER
REQUIREMENT
100V - 120V - 230V - 240V - 50/60Hz
(version set inside the equipment)
ONBOARD DIGITAL EFFECTS
Chorus 1
Room
Reverb 1
Reverb 2
Hall
Chorus 2
FUSE
EUROPE 3.15 A 250V T 5x20
AUSTRALIA/UK 3.15 A 250V T 5x20
USA/CANADA 6.3 A 250V T 5x20
JAPAN 6.3 A 250V T 5x20
9
5. AC601 - AC101: Technical Details
COMBO SERIES AC601 AC101
SPEAKER SIZE (inches) 1X6” 1X10”
TWEETER 1” HF comp. driver 1” HF comp. driver
CROSSOVER FREQUENCY 3.5 KHz 3.5 KHz
CAB POWER HANDLING 150W RMS 200W RMS
(AES Standard)
FREQUENCY RESPONSE 55 Hz to 18 KHz 45 Hz to 20 KHz
CABINET SENSITIVITY (dB SPL) 98 101
CABINET IMPEDANCE 8Ω 8Ω
REFLEX Rear Rear
WEIGHT KG. 8,8 10,5
WEIGHT LBS. 19.4 23.15
WIDTH MM. 313 353
WIDTH INCHES 12.32 13.90
HEIGHT MM. 331 367
HEIGHT INCHES 13.03 14.45
DEPTH MM. 285 367
DEPTH INCHES 11.22 14.45
PREAMP Solid-state Solid-state
POWER AMP 150 8Ω/250 4Ω Analog Analog
POWER SUPPLY All models are equipped with custom-designed Markbass switching power supplies.

6. Acoustic Amplifier Schematics
10
11
7. Acoustic Amplifier Filter and EQ Graphs

6. Acoustic Amplifier Schematics
10
11
7. Acoustic Amplifier Filter and EQ Graphs

12
4. Important Safety Instructions
1) Read these instructions;
2) Keep these instructions;
3) Heed all warnings;
4) Follow all instructions;
5) Do not use this apparatus near water;
6) Clean only with dry cloth;
7) Do not block any ventilation openings. Install in accordance with the manufacturerís instructions;
8) Do not install near any heat sources such as radiators, heat registers, stoves, or other apparatus (including amplifiers) that produce heat ;
9) Do not defeat the safety purpose of the polarized or ground-type plug. A polarized plug has two blades with one wider than the other. A grounding type plugs has two blades and a third groun-
ding prong. The wide blade or the third prong are provided for your safety. If the provided plug does not fit into your outlet, consult an electrician for replacement of the obsolete outlet;
10) Protect the power cord from being walked on or pinched particularly at plugs, convenience receptacles, and the point where they exit from the apparatus;
11) Only use attachments/accessories specified by the manufacturer;
12) Unplug this apparatus during lightning storms or when unused for long periods of time;
13) Refer all servicing to qualified service personnel. Servicing is required when the apparatus has been damaged in any way, such as power-supply cord or plug is damaged, liquid has been spil-
led or objects have fallen into the apparatus,the apparatus has been exposed to rain or moisture, does not operate normally, or has been dropped.
14) "Warning: to reduce the risk of fire or electric shock, do not expose this apparatus to rain or moisture and objects filled with liquids, such as vases, should not be placed on this apparatus".
4. Précautions d’emploi
1) Lire ces instructions;
2) Conserver ces instruction;
3) Suivre tous les conseils d'utilisations;
4) Suivre toutes les instructions;
5) Ne pas utiliser cet appareil au bord de l'eau;
6) Nettoyer uniquement avec un chiffon humide;
7) Ne pas bloquer le systéme de ventilation. Installer conformément aux instructions du fabricant;
8) Ne pas installer l'appareil prés d'une source de chaleur tel qu'un radiateur, un fourneau, ou bien un autre appareil qui produit de la chaleur;
9) Ne pas modifier le systéme de sécurité de la fiche polarisée ou de de la fiche pour les prises de terre. Une fiche polarisée a deux broches, l'une étant plus distante de l'autre. Une fiche pour
prise de terre a deux broches et une pointe pour la masse. La broche plus distante et la pointe pour la masse ont été installées pour votre sÈcurité. Si la fiche fournie de rentre pas dans votre
prise de courant consulter un électricien pour la substitution.
10) Protéger le cordon d'alimentation afin qu'il ne soit pas piétiné ou écrasé tout particuliérement au niveau des fiches, des prises de courant femelles, et des parties qui sortent de l'appareil;
11) Utiliser uniquement les accessoires recommendés par le fabricant;
12) Ne pas branché l'appareil en cas d'orage accompagné d'éclairs. Le débrancher en cas de non utilisation prolongée.
13) S'adresser à un service assistance agréé si l'appareil a subi des dommages, si le cordon d'alimentation ou la fiche a été endommagé, si un liquide a été renversé sur l'appareil ou bien si un
object est tombé dans l'appareil, si ce dernier a été exposé à la pluie ou à l'humidité, s'il ne fonctionne pas correctement ou s'il est tombé.
14) "Avertissant: pour réduire le risque du feu ou de dÈcharge Èlectrique, n'exposez pas cet appareil à la pluie ou l'humidité et les objets remplis de liquides, tels que des vases, ne devraient pas
Ítre placés sur cet appareil".


Produced & Distributed by
P
ARSEK srl
Italy • 66020 San Giovanni Teatino CH • Via Aterno, 44
T
el. +39 08544 65 705 • Fax. +39 08544 07 399
www.markbass.it • [email protected]
This manual suits for next models
1
Table of contents
Other Mark Acoustic Amplifier manuals