MasterCraft 299-5512-2 User manual

headline bars
continuation tabs
notes
warnings
headline bars
continuation tabs
notes
warnings
model no. 299-5512-2
IMPORTANT:
Please read this manual carefully before running this parts washer
and save it for reference.
INSTRUCTION
MANUAL
PARTS WASHER

headline bars
continuation tabs
notes
warnings
3
headline bars
continuation tabs
notes
warnings
model no. 299-5512-2 | contact us 1-800-689-9928
2
Mastercraft is Canadian Tire’s exclusive line of reliable and hardworking hand tools,
power tools and hardware products. Designed for the DIY customer but with the
features and benefits of the leading professional series tools, there are over 100
practical and powerful products available under 6 different categories including;
Stationary Power Tools, Handheld Power Tools, Hand Tools, Air Tools, Tool/Garage
Storage, and Other Hardware accessories. Now more than ever, Canadians can
tackle just about any project around the house or garage with confidence using a
Mastercraft product!
CanadianTire.ca
TABLE OF CONTENTS
TABLE OF CONTENTS
SPECIFICATIONS 4
SAFETY GUIDELINES 5
KEY PARTS DIAGRAM 9
SETUP 10
OPERATING INSTRUCTIONS 12
MAINTENANCE 13
TROUBLESHOOTING 14
PARTS LIST 15
WARRANTY 17
NOTE:
If any parts are missing or damaged, or if you have any questions, please call our
toll-free helpline at 1-800-689-9928.
SAVE THESE INSTRUCTIONS
This manual contains important safety and operating instructions. Read all
instructions and follow them with use of this product.

headline bars
continuation tabs
notes
warnings
model no. 299-5512-2 | contact us 1-800-689-9928
4 5
SPECIFICATIONS
SPECIFICATIONS
AC power for pump 120 V 60 Hz 0.25 A
Tank capacity 20 U.S. gallons (75.7 L)
Solvent capacity 12 U.S. gallons (45.4 L)
Flow rate 1 U.S. gallon (3.5 L) per minute
Power cord 72", 18 AWG x 3C (3 prong with ground)
Dimensions (H x L x W) 34 1/2 x 30 1/2 x 21" (87.6 x 77.5 x 53.3 cm)
Net weight 52 lb 14 oz (24 kg)
SAFETY GUIDELINES
SAFETY GUIDELINES
WORK AREA SAFETY WARNINGS
• Keep guards in place and in working order.
• Keep the work area clean, well ventilated and well lighted. Cluttered or dark areas increase the risks
of electric shock, fire, and injury to persons.
• Do not use in dangerous environment. Don't use this equipment in damp or wet locations, or expose to
rain.
• Keep bystanders, children, and visitors away while operating this equipment. Distractions can
cause you to lose control.
GROUNDED POWER TOOL SAFETY WARNINGS
• Grounded power tools must be plugged into an outlet properly installed and grounded in
accordance with all codes and ordinances. Never remove the grounding prong or modify the
plug in any way. Do not use any adapter plugs. Check with a qualified electrician if you are in
doubt whether the outlet is properly grounded. If the tool should electrically malfunction or break down,
grounding provides a low resistance path to carry electricity away from the users.
• Do not abuse the power cord. Never use the power cord to carry the tool or pull the plug from an
outlet. Keep the power cord away from heat, oil, sharp edges, or moving parts. Replace damaged
power cord immediately. Damaged power cords increase the risk of electric shock.
• Avoid body contact with grounded surfaces such as pipes, radiators, and refrigerators. There is an
increased risk of electric shock if your body is grounded.
• Do not expose power tools to rain or wet conditions. Water entering a power tool will increase the risk
of electric shock.
• When operating a power tool outside, use an outdoor extension cord marked "W-A" or "W". These
extension cords are rated for outdoor use, and reduce the risk of electric shock.
• Always keep the power extension cord away from moving parts on the tool.
PERSONAL SAFETY WARNINGS
• Stay alert. Watch what you are doing and use common sense when operating a power tool. Do
not use a power tool while tired or under the influence of drugs, alcohol, or medication. A moment
of inattention while operating power tools may result in serious personal injury.
• Dress properly. Do not wear loose clothing or jewellery. Contain long hair. Keep hair, clothing, and
gloves away from moving parts. Loose clothes, jewellery, or long hair increases the risk of personal injury
as a result of being caught in moving parts.
• Avoid unintentional starting. Make sure that the power switch is off before plugging in. Plugging in
power tools with the power switch on invites accidents.
• Do not overreach. Keep proper footing and balance at all times. Proper footing and balance enables
better control of power tool in unexpected situations.

headline bars
continuation tabs
notes
warnings
model no. 299-5512-2 | contact us 1-800-689-9928
76
• Avoid unintentional starting. Make sure that you are prepared to begin work before turning on the tool.
• Never leave the tool unattended when it is plugged into an electric outlet. Turn off the tool, and
unplug it from its electrical outlet before leaving.
• Always unplug the tool from its electrical outlet before performing any inspection, maintenance,
or cleaning procedures.
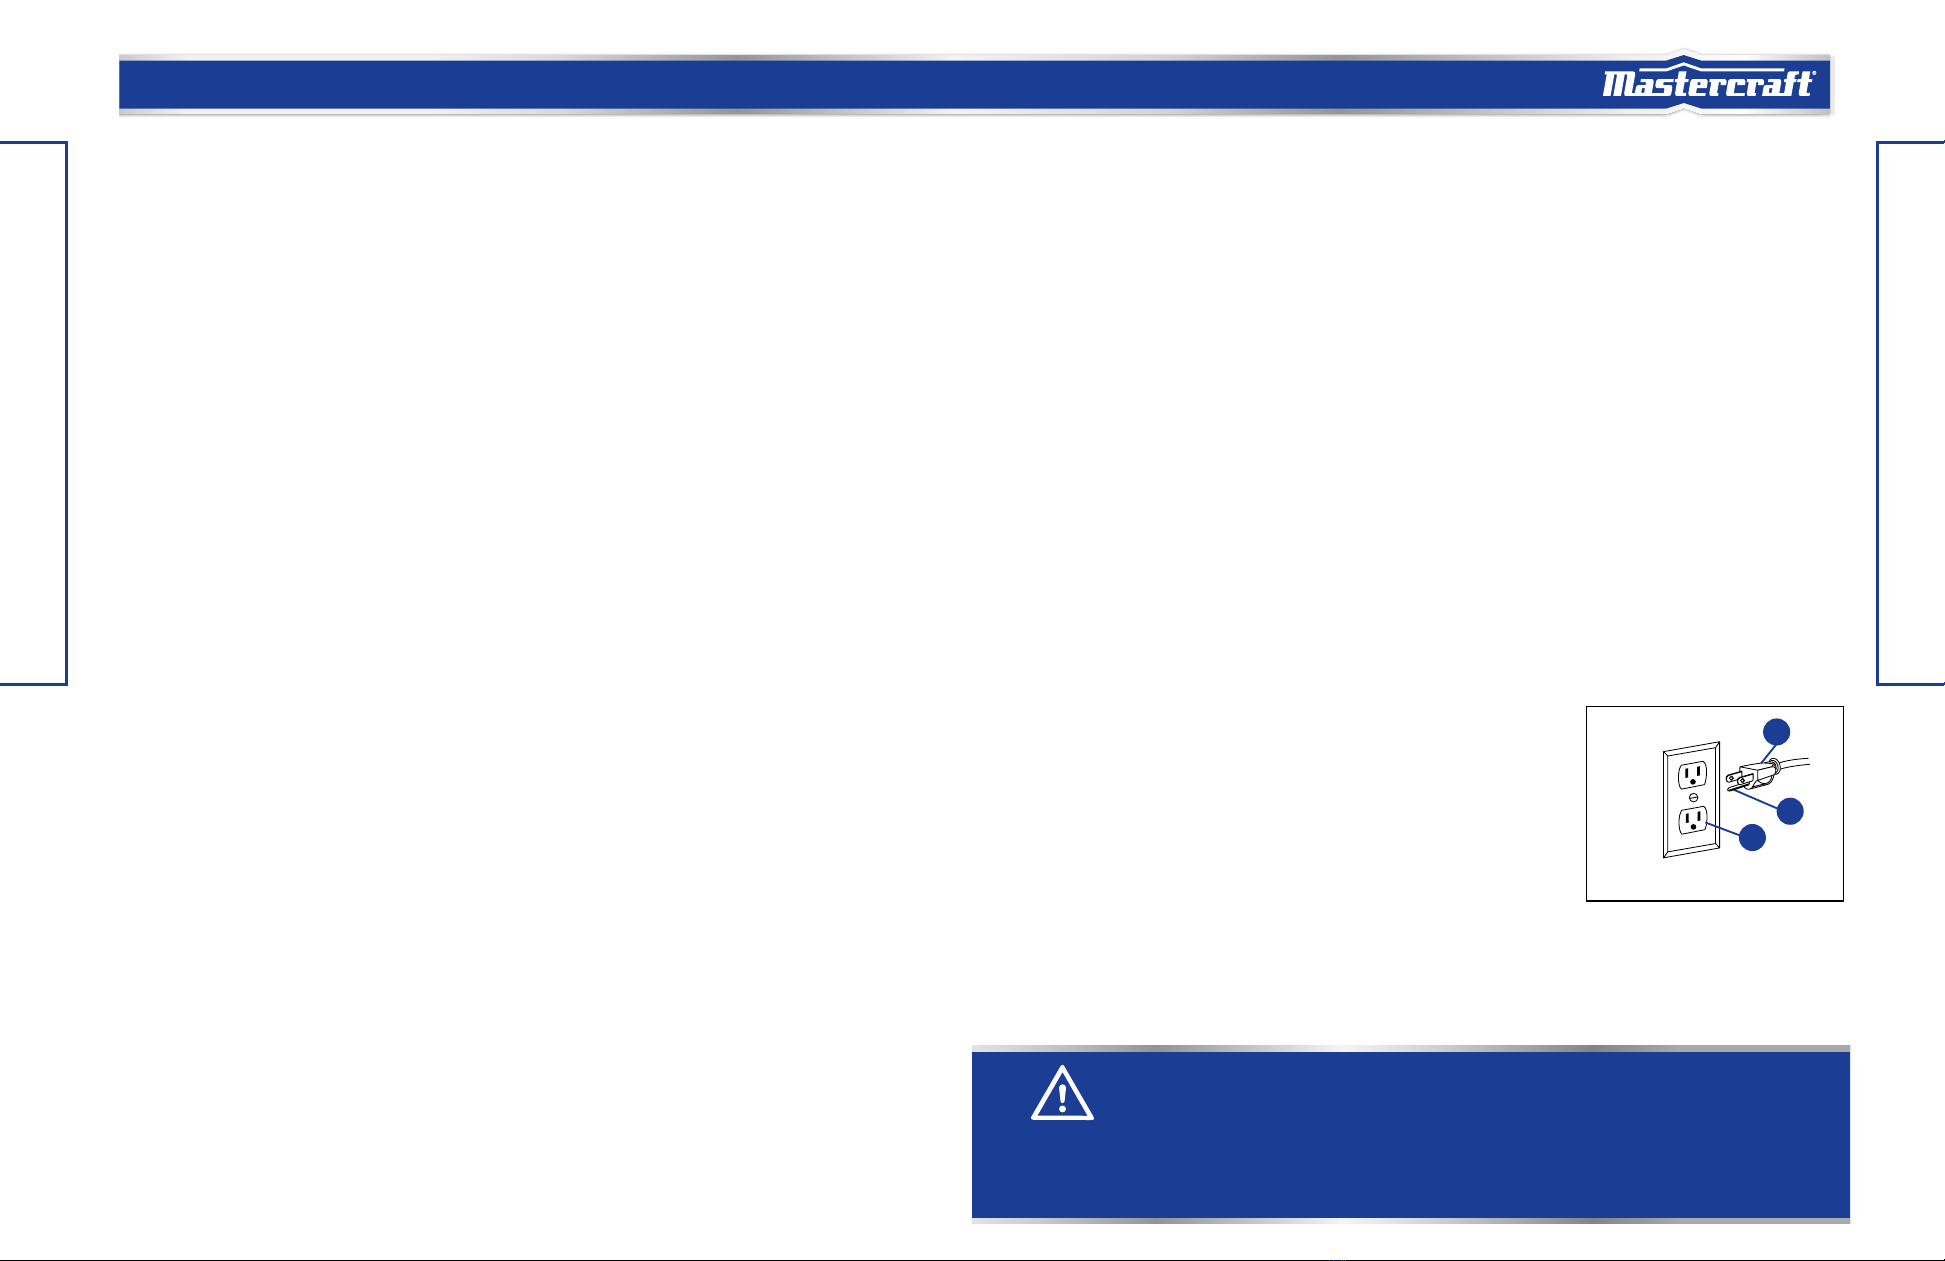
GROUDING INSTRUCTIONS
110-120 V~ GROUNDED TOOLS: TOOLS WITH THREE PRONG PLUGS
IN THE EVENT OF AN ELECTRICAL MALFUNCTION OR BREAKDOWN, grounding provides a path of least
resistance for electric current to reduce the risk of electric shock. This tool is equipped with an electric cord
having a grounding plug. The plug must be plugged into a matching outlet that is properly installed and grounded
in accordance with all local codes and ordinances.
DO NOT MODIFY THE PLUG PROVIDED – if it will not fit the outlet, have the proper outlet installed by a qualified
electrician.
YOUR GROUNDING PRONG in the plug is connected through the green wire inside the cord to the grounding
system in the tool. The green wire in the cord must be the only wire
connected to the tool's grounding system and must never be attached to an
electrically "live" terminal.
Check with a qualified electrician or service personnel if the grounding
instructions are not completely understood, or if in doubt as to whether the
tool is properly grounded.
USE ONLY 3-WIRE EXTENSION CORDS that have 3-prong grounding
plugs and 3-pole receptacles that accept the tool’s plug.
Repair or replace damaged or worn cord immediately.
SAFETY GUIDELINES
SAFETY GUIDELINES
• Use safety equipment. Always wear splash-resistant eye protection and rubber gloves. Dust
mask, non-skid safety shoes, or hard hat must be used for the appropriate conditions.
TOOL USE & CARE SAFETY WARNINGS
• Use proper cleaning solutions. Clean parts with water or household detergents only. Never use
highly volatile flammable solvents such as gasoline, toluene, diesel fuel, methyl ethyl ketone (MEK), or
1,1,1-trichloroethane. Read and understand all information concerning cleaning solvents before using.
• Do not use or store near open flames, pilot lights in stoves or heaters, or any other ignition
source. Solvents are highly flammable. Use in well-ventilated area. Do not smoke during use.
• Avoid intake of solvents. Materials used with cleaning and debris removed by cleaning may be harmful or
fatal if inhaled or swallowed.
• Do not force the tool. The tool will do the work better and safer at the speed and capacity for which it was
designed.
• Do not use the power tool if the power switch does not turn it on or off. Any tool that cannot be
controlled with the power switch is dangerous and must be replaced.
• Disconnect the power cord plug from the power source before making any adjustments,
changing accessories or storing the tool. Such preventative safety measures reduce the risk of starting
the tool accidentally.
• Store idle tools out of reach of children and other untrained persons. Tools are dangerous in the
hands of untrained users.
• Maintain tools with care and keep them clean. Properly maintained tools are less likely to bind and are
easier to control. Do not use a damaged tool.
• Check for misalignment or binding of moving parts, breakage of parts, and any other condition
that affects the tool’s operation. If damaged, have the tool serviced before using. Many accidents
are caused by poorly maintained tools.
• Use only accessories that are recommended by the manufacturer for your model. Accessories that
may be suitable for one tool may become hazardous when used on another tool.
• CA PROP 65: This product contains or, when used, produces chemicals known to the state of California to
cause cancer and birth defects or other reproductive harm. Wash hands after handling.
TOOL SERVICE SAFETY WARNINGS
• Tool service must be performed only by qualified repair personnel. Service or maintenance
performed by unqualified personnel could result in a risk of injury.
• When servicing the tool, use only identical replacement parts. Use of unauthorized parts or failure to
follow maintenance instructions may create a risk of electric shock or injury.
SPECIFIC SAFETY WARNINGS
• Maintain labels and/or nameplates on the tool. These carry important information. If unreadable or
missing, have them replaced.
• Make sure to read and understand all instructions and safety warnings in this manufacturer's
manual.
WARNING!
Read all safety warnings and instructions before attempting to install or operate this product. Failure to follow the warnings and
instructions may result in personal injury and property damage.
CAUTION!
The warnings, precautions, and instructions discussed in this instruction manual cannot cover all possible conditions and
situations that may occur. It must be understood by the operator that common sense and caution are factors which cannot be
built into this product, but must be supplied by the operator.
2
3
1
1 3-pronged plug 2 Properly grounded outlet
3 Grounding prong

headline bars
continuation tabs
notes
warnings
9
headline bars
continuation tabs
notes
warnings
model no. 299-5512-2 | contact us 1-800-689-9928
8
SAFETY GUIDELINES
This tool is intended for use on a circuit that has an outlet that looks like the one illustrated above: a 120 V~3-
Prong Outlet. The tool has a grounding plug that looks like the plug illustrated: a 120 V~3-Prong Plug.
The outlet must be properly installed and grounded in accordance with all codes and ordinances.
Do not use an adapter to connect this tool to a different outlet.
GUIDELINES FOR USING EXTENSION CORDS
Verify that the extension cord is in good condition. When using an extension cord, be sure to use one that
is heavy enough to carry the current that the tool will draw. An undersized cord will cause a drop in line
voltage, which will result in loss of power and overheating. The table below shows the correct size to use
according to cord length and the amperage rating on the tool’s nameplate. When in doubt, use the next
heavier gauge. The smaller the gauge number, the heavier the cord.
Verify that the extension cord is properly wired and in good condition. Always replace a damaged extension
cord, or have it repaired by a qualified electrician before using it. Keep extension cords away from sharp
objects, excessive heat, and damp or wet areas.
WARNING!
TO PREVENT ELECTRIC SHOCK AND DEATH FROM INCORRECT GROUNDING WIRE CONNECTION:
•Checkwithaqualifiedelectricianifyouareindoubtastowhethertheoutletisproperlygrounded.
•Donotmodifythepowercordplugprovidedwiththetool.
•Neverremovethegroundingprongfromtheplug.Donotusethetoolifthepowercordorplugisdamaged.Ifdamaged,
have it repaired by a service facility before use. If the plug will not fit the outlet, have a proper outlet installed by a qualified
electrician.
•Thistoolmustbegroundedwhileinuseinordertoprotecttheoperatorfromelectricshock.
Amperage rating of the tool
(120 V circuit only)
Total length of the extension cord
25’ (7.6 m) 50’ (15.2 m) 100’ (30.4 m) 150’ (45.7 m)
More than Not more than Minimum gauge for the extension cord (AWG)
0 6 18 16 16 14
14 12
14 12
6 10 18 16
10 12 16 16
12 16 14 12 Do not use
KEY PARTS DIAGRAM
C
G
I
H
J
F
E
B
A
D
K
M
N
L
WARNING!
If any part is missing or damaged, do not use the product until the missing or damaged part has been replaced.
KEY PARTS DIAGRAM
No. Description
A Lid
B Fusible link
C Flexible tube
D Pump
E Switch box
F Switch
G Power cord and plug
No. Description
H Leg
I Drain plug (invisible herein)
J Bolts, washers and nuts
K Storage shelf
L Work shelf
MTub
N Parts basket

headline bars
continuation tabs
notes
warnings
11
headline bars
continuation tabs
notes
warnings
model no. 299-5512-2 | contact us 1-800-689-9928
10
SETUP
SETUP
SETUP
ASSEMBLY OF PARTS WASHER
1. Lay the tub (1) upside down. Attach the legs (2) to the
tub (1) using the bolts, washers and nuts. (Fig. 1)
2. Attach the storage shelf (3) to the legs (2) using the
bolts, washers and nuts. (Fig. 2)
3. Turn the tub over and place in a level, stable, and well-
ventilated area.
4. Place the work shelf and parts basket into place inside
the tub.
5. Place the filter (4) inside the filter cover (5). Slide the
filter cover with filter into place on pump housing cover
(6). (Fig. 3)
6. Connect the flexible tube (7) to the elbow (8). (Fig. 4)
7. Place the pump housing (9) inside the tub (1) so that
the switch box (10) hangs outside the tub and slide it
down into position securely. (Fig. 5)
FILLING THE TUB
Fill the tub with the proper solution just below the crease
line inside the tub. Do not allow the level of liquid in the
parts washer to fall below the pump inlet. This could
damage the pump.
IMPORTANT: Know your solvents. Do not use any
highly volatile, flammable or combustible solvents, or fuels such as gasoline, diesel, or toluene. Only use
noncorrosive water-based solvents.
IMPORTANT: Chlorinated solvents, such as 1-1-1-trichloroethane and methylene chloride (also known as
methyl chloride) can chemically react with aluminum and may explode. Do not use these solvents. Many
tools and pieces of equipment contain aluminum.
IMPORTANT: Immerse the pump in liquid while operating. Fluid should be replaced, and parts washer
should be cleaned on a regular basis to avoid hazardous conditions. Avoid solvent contact with skin and
eyes.
SET UP OF WORKPIECE AND WORK AREA
1. Designate a work area that is clean and well lit. The work area must not allow access by children or pets
to prevent distraction and injury.
2. Route the power cord along a safe route to reach the work area without creating a tripping hazard or
exposing the power cord to possible damage. The power cord must reach the work area with enough
extra length to allow free movement while working.
3. There must not be objects, such as utility lines, nearby that will present a hazard while working.
Fig. 1
1
2
Bolt
Washer
Nut
Fig. 4
7
8
Fig. 2
3
2
Nut
Washer
Bolt
Fig. 5
10
1
9
Fig. 3
6
5 4

headline bars
continuation tabs
notes
warnings
model no. 299-5512-2 | contact us 1-800-689-9928
12 13
WARNING!
•Partsbeingcleanedmaycontainandleaveflammableorcombustibleresidueorfluidsinthepartswasher.
Check for solvent fumes to verify non-flammability and non-toxicity. Use in a well-ventilated area. Do not smoke.
•Non-waterbasedsolventsmayalsoexpelfumesthatarehazardoustoyourhealth,andmustnotbeusedatany
time. Keep away from ignition sources.
OPERATING INSTRUCTIONS
MAINTENANCE
OPERATING INSTRUCTIONS
1. Turn the power switch to the OFF ("O") position.
2. Plug the power cord into a grounded, GFCI-protected, 120 V electrical outlet.
IMPORTANT: If the work area is not equipped with a permanently installed Ground Fault Circuit Interrupter
outlet (GFCI), use a plug-in GFCI between the power tool or extension cord and the power receptacle.
3. Place object(s) to be cleaned into the cleaning solution.
4. Turn the power switch to the ON ("I") position and begin cleaning object(s).
5. When the object(s) is clean, turn the power switch to the OFF position, and remove the object(s) from the
cleaning fluid and air dry or wipe with clean shop towel.
6. Close the lid of the parts washer.
MAINTENANCE
GENERAL CARE
1. Before each use, inspect the general condition of the parts washer. Check for loose hardware,
misalignment or binding of moving parts, cracked or broken parts, damaged electrical wiring, and any
other condition that may affect its safe operation.
2. After use, wipe the external surfaces of the parts washer with clean cloth. Store the parts washer in a dry
location out of reach of children.
REPLACING CLEANING SOLUTION
1. Replace the cleaning solution when it has become dirty.
2. Place an empty container on the storage shelf that is larger enough to hold all of the liquid which is in the
tub.
3. Remove the drain plug from the bottom of the tub. The fluid should drain into the empty container on the
shelf below.
4. Dispose of the used cleaning solution properly. Do not drain the cleaning solution into the street drains,
hose drains, or into the earth. Contact local waste management officials for proper disposal methods.
5. Replace the drain plug, then refill the tub with new cleaning solution.
CLEANING THE TUBE AND IMPELLER
IMPORTANT: When the cleaning solution flow is reduced or stopped, it may be necessary to clean the
flexible tube.
1. Make certain that the indicator light on the switch box is on.
2. Turn the switch to the OFF position.
3. Unplug the power cord from the electrical outlet.
4. Remove the flexible tube from the elbow. Drain the pipe, inspect its interior for debris. Use compressed
air to blow clean.
5. Remove the pump housing cover, then clear and remove any foreign matter from the impeller.
6. Reattach the flexible tube to the elbow, and replace the pump housing cover.
WARNING!
•Turnthepowerswitchofthepartswasheroffandunplugfromitselectricaloutletbeforeperforming
maintenance.
•Topreventseriousinjuryfrompartswasherfailure,donotusedamagedequipment.Ifabnormalnoiseor
vibration occurs, have the problem corrected before further use.
•Ifthesupplycordofthispartswasherisdamaged,itmustbereplacedonlyaqualifiedservicetechnician.

headline bars
continuation tabs
notes
warnings
model no. 299-5512-2 | contact us 1-800-689-9928
14 15
TROUBLESHOOTING
PARTS LIST
TROUBLESHOOTING
Problem Possible Cause Likely Solutions
Tool will not start.
1. Cord not connected.
2. No power at outlet.
1. Check that cord is plugged in.
2. Check power at outlet. If outlet is unpowered, turn
off tool and check circuit breaker. If breaker is
tripped, make sure that circuit is right capacity for
tool and circuit has no other loads.
Reduced volume
flow or no flow of
cleaning liquid from
the flexible tube.
1. Foreign matter in the
flexible tube.
1. Clean and remove foreign matter in the flexible tube.
WARNING!
Follow all safety precautions whenever diagnosing or servicing the tool. Disconnect power supply before service.
1
2
3
4
5
6
7
8
9
10
11
11
13
14
15
16 17
18
19
20
21
22
23
24
25
26
27
28
3031323334
35
36
29
EXPLODED VIEW

headline bars
continuation tabs
notes
warnings
17
headline bars
continuation tabs
notes
warnings
model no. 299-5512-2 | contact us 1-800-689-9928
16
PARTS LIST
No. Description Qty.
1 Lid 1
2 Fusible link 1
3 Hinge 1
4 Work shelf 1
5 Parts basket 1
6Tub 1
7 Leg 4
8 Storage shelf 1
9 Bolt 25
10 Nut 25
11 Drain plug 1
12 O-ring 1
13 Pin 4
14 Gasket 4
15 Pin 1
16 Pin 3
17 Power cord and plug 1
18 Cord tie 1
No. Description Qty.
19 Screw 6
20 Power switch 1
21 Switch box 1
22 Cushion 1
23 Flexible tube 1
24 Pump housing 1
25 Bracket 1
26 Elbow 1
27 Spring washer 6
28 Nut 6
29 Cord cover 1
30 O-ring 1
31 Connector 1
32 O-ring 1
33 Pump 1
34 Pump cover 1
35 Filer cover 1
36 Filter 1
NOTE:
The manufacturer and/or distributor has provided the parts list and assembly diagram in this manual as a reference tool only. Neither the manufac-
turer nor distributor makes any representation or warranty of any kind to the buyer that he or she is qualified to make any repairs to the product, or
that he or she is qualified to replace any parts of the product. In fact, the manufacturer and/or distributor expressly states that all repairs and parts
replacements should be undertaken by certified and licensed technicians, and not by the buyer. The buyer assumes all risk and liability arising out of
his or her repairs to the original product or replacement parts thereto, or arising out of his or her installation of replacement parts thereto.
WARRANTY
3-Year Limited Warranty
This Mastercraft product is guaranteed for a period of three (3) years from the date of original retail
purchase, against defects in materials and workmanship.
Subject to the conditions and limitations described below, this product, if returned to us with proof of
purchase within the stated warranty period and if covered under this warranty, will be repaired or replaced
(with the same model, or one of equal value or specification), at our option. We will bear the cost of any
repair or replacement and any costs of labour relating thereto.
These warranties are subject to the following conditions and limitations
a) a bill of sale verifying the purchase and purchase date must be provided;
b) this warranty will not apply to any product or part thereof which is worn or broken or which has become inoperative
due to abuse, misuse, accidental damage, neglect or lack of proper installation, operation or maintenance
(as outlined in the applicable owner’s manual or operating instructions) or which is being used for industrial,
professional, commercial or rental purposes;
c) this warranty will not apply to normal wear and tear or to expendable parts or accessories that may be supplied with
the product which are expected to become inoperative or unusable after a reasonable period of use;
d) this warranty will not apply to routine maintenance and consumable items such as, but not limited to, fuel, lubricants,
vacuum bags, blades, belts, sandpaper, bits, fluids, tune-ups or adjustments;
e) this warranty will not apply where damage is caused by repairs made or attempted by others (i.e. persons not
authorized by the manufacturer);
f) this warranty will not apply to any product that was sold to the original purchaser as a reconditioned or refurbished
product (unless otherwise specified in writing);
g) this warranty will not apply to any product or part thereof if any part from another manufacturer is installed therein or
any repairs or alterations have been made or attempted by unauthorized persons;
h) this warranty will not apply to normal deterioration of the exterior finish, such as, but not limited to, scratches, dents,
paint chips, or to any corrosion or discolouring by heat, abrasive and chemical cleaners; and
i) this warranty will not apply to component parts sold by and identified as the product of another company, which shall
be covered under the product manufacturer’s warranty, if any.

headline bars
continuation tabs
notes
warnings
model no. 299-5512-2 | contact us 1-800-689-9928
18
Additional Limitations
This warranty applies only to the original purchaser and may not be transferred. Neither the retailer nor
the manufacturer shall be liable for any other expense, loss or damage, including, without limitation, any
indirect, incidental, consequential or exemplary damages arising in connection with the sale, use or inability
to use this product.
Notice to Consumer
This warranty gives you specific legal rights, and you may have other rights, which may vary from province
to province. The provisions contained in this warranty are not intended to limit, modify, take away from,
disclaim or exclude any statutory warranties set forth in any applicable provincial or federal legislation.
Made in China
Imported by
Mastercraft Canada Toronto, Canada M4S 2B8
WARRANTY
Table of contents