manuals.online logo
Brands
  1. Home
  2. •
  3. Brands
  4. •
  5. Matchmaster
  6. •
  7. Amplifier
  8. •
  9. Matchmaster 14MM-SM90-5G User manual

Matchmaster 14MM-SM90-5G User manual

PAGE 1 OF 1 | AU SUPPORT 1800 237 425 WWW.MATCHMASTER.COM.AU
14MM-SM90-5G INSTRUCTION MANUAL
Contents
1. Introduction
1.1. Product Description
1.2. Package Contents
2. Technical Specications
3. Hardware Installation
Installing the smart amp
Duplicate channel switch off
Duplicate channel switch on
LTE ltering
How autoscan works
How to force channel scan
4. Safety Instructions
5. Conditions of Warranty
1.Introduction
1.1. Product Description
• Scans all channels, amplies the weak signals while
keeping the strong channels
• All output channels have an equal and stable output
power
• Treats even the most difcult situations with
adjacent channels
• Channels with the same frequency can be amplied in and
re-located to the LTE band (switchable)
• Fully automatic channel scan and process function upon
double power start-up.
• Fully automatic recognition of the applied country
channel plan
• SAW lters for LTE (4G or 5G) protection on all inputs
• Outdoor weatherproof mast-head housing
• DC Power over coax
• All ports ESD protected
1.2. Package Contents
• 1 Smart Amp
Installing the Smart Amp
• Connect your Terrestrial antennas to the Smart Amp*
• Connect the Smart Amp output to the Power Supply
• Connect your TVs to the Power Supply
Important: Mount the module vertically to the mast or a wall
in a well-ventilated room and leave a minimum space of 15
cm around the product to guarantee a maximum ventilation
of the product
* The Smart Amp does not allow pass-through DC-power for
pre-ampliers or active antennas
How autoscan works
• Plug in Power Supply
• Status LED will blink green when scanning
• Status LED solid green when autoscan ready (This can
take up to 20 seconds)
• Status LED red when error during scan. Unpower and
repower within 6 seconds to restart autoscan
• WARNING: do not turn off the power during SCAN
How to reprogram or force channel scan
• When a power outage causes missing channels on your
TV, a reset is needed
• Reset: pull out the power supply and put it back in within
6 seconds
• The status LED will blink when re-scanning
• If a power interruption lasts longer than 6 seconds, there
is no channel scan and the initial settings are kept
• Important note for installers! Make sure the end-user or
installer can easily and safely unpower and
repower device
2. Technical Specifications
LTE Filtering
2. Hardware Installation
Inputs 3
Outputs 4G/5G (CH51)
Frequency range VHF BIII + UHF Automatic
channel plan selection
LTE Band Rejection >40
Output 1
Output Power 90 dBuv
LTE band Re-use L2 = CH52-69 (694MHz-862MHz)
Switch ON-OFF
Adjacent channel
isolation
>35
Input sensitivity 40 dBuv
Operating temperature -20 to +50
Power Supply External power supply
Power 12V/300mA (DC over coax)
(9VDC-18VDC)
Unplug power supply
Less
than
6 sec
Plug in power supply
PAGE 2 OF 1 | AU SUPPORT 1800 237 425 WWW.MATCHMASTER.COM.AU
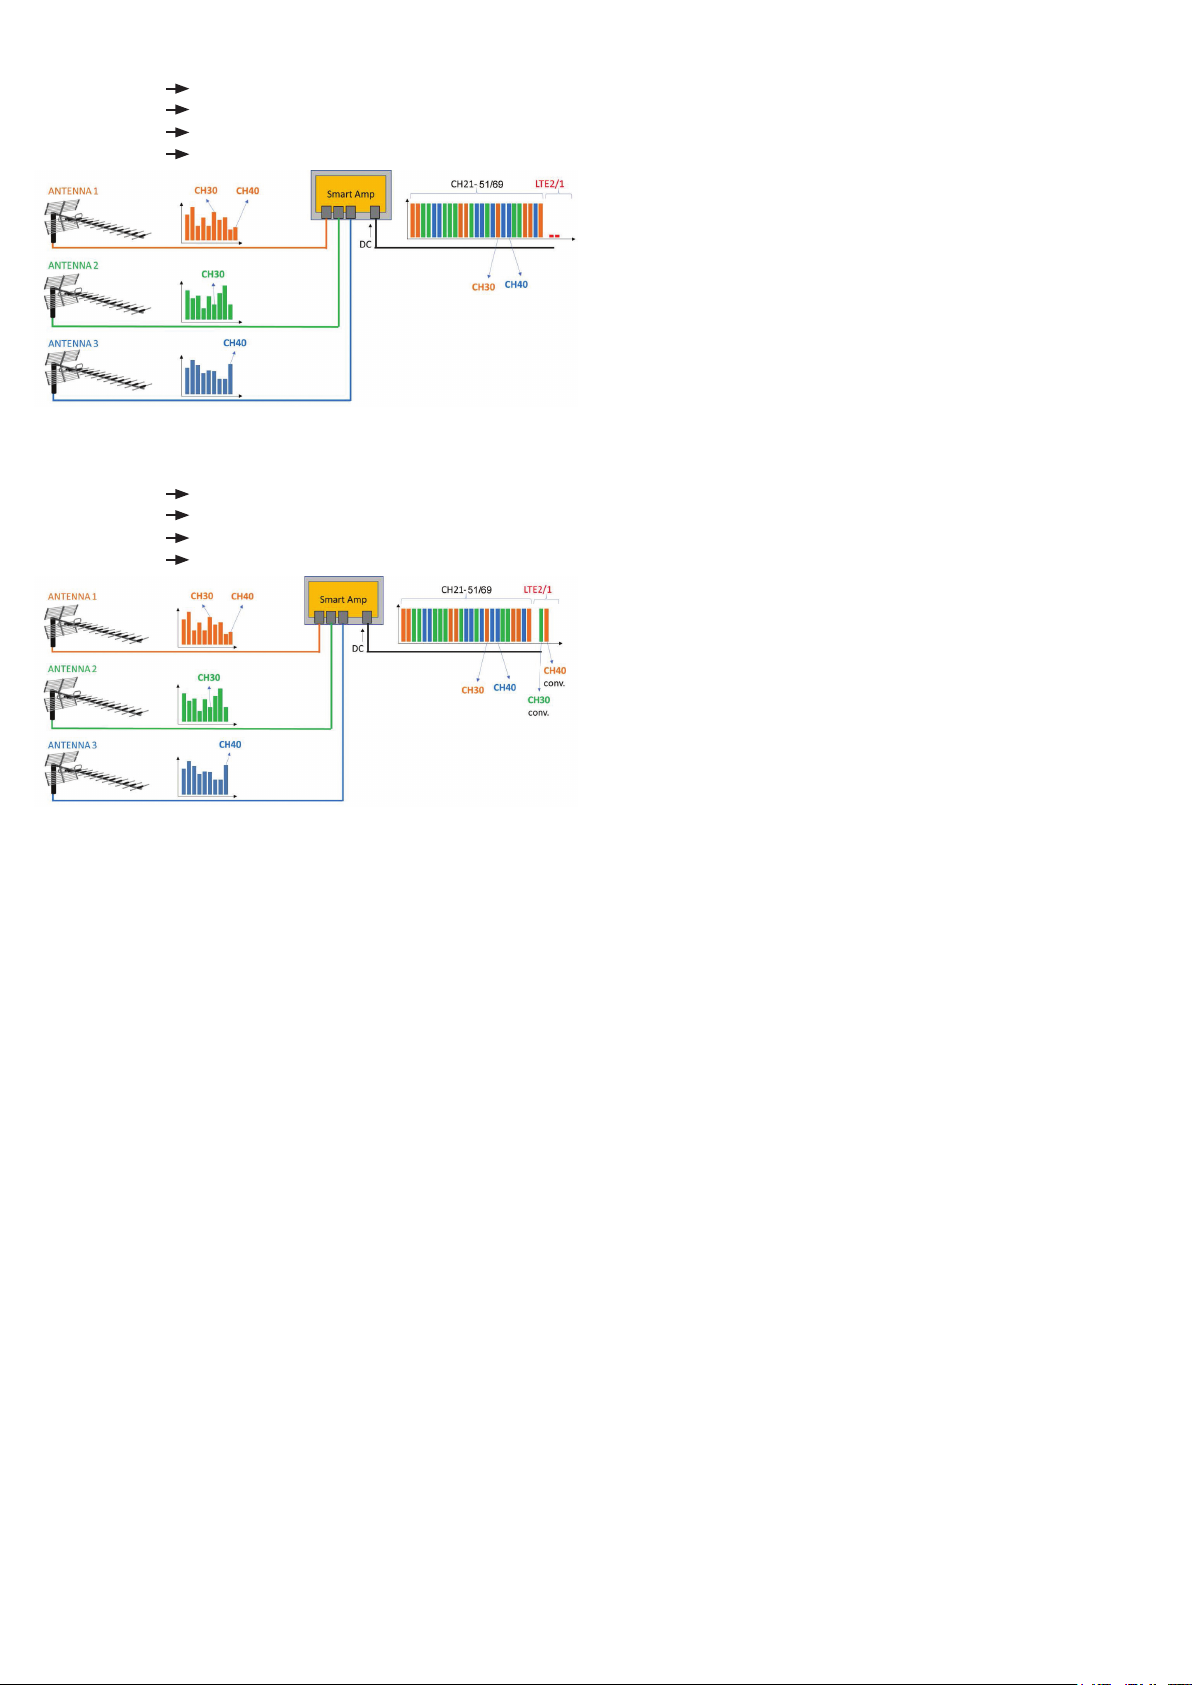
Duplicate channel switch OFF
Duplicate channel switch ON
Weakest channel is rejected. See example below:
CH30 > CH30 CH30 is transmitted
CH30 is rejected
CH40 < CH40 CH40 is rejected
CH40 is transmitted
Weakest channel is converted to LTE band.
See example below:
CH30 > CH30 CH30 is transmitted
CH30 is converted to LTE band
CH40 < CH40 CH40 is converted to LTE band
CH40 is transmitted
4.Safety Instructions
To prevent fire, short circuit or shock hazard:
• Do not expose the unit to rain or moisture.
• Install the unit in a dry location without inltration or
condensation of water.
• Do not expose it to dripping or splashing.
• Do not place objects lled with liquids, such as vases, on
the apparatus.
• If any liquid should accidentally fall into the cabinet,
disconnect the power plug.
To avoid any risk of overheating:
• Install the unit in a well aired location and keep a
minimum distance of 15 cm around the apparatus for
sufcient ventilation
• Do not place any items such as newspapers, tablecloths,
curtains, on the unit that might cover the ventilation
holes.
• Do not place any naked ame sources, such as lighted
candles, on the apparatus
• Do not install the product in a dusty place
• Use the apparatus only in moderate climates (not in
tropical climates)
• Respect the minimum and maximum temperature
specications
To avoid any risk of electrical shocks:
• Connect apparatus only to socket with protective
earth connection.
• The mains plug shall remain readily operable
• Pull out power plug to make the different connections
of cables
• To avoid electrical shock, do not open the housing
of adapter.
5. Conditions of Warranty
Matchmaster warrants the product as being free from
defects in material and workmanship for a period of 24
months starting from the date of production indicated on it.
See note below.
If during this period of warranty the product proves
defective, under normal use, due to defective materials or
workmanship, Matchmaster, at its sole option, will repair or
replace the product. Return the product to your local dealer
for reparation
The warranty is applied only for defects in material and
workmanship and does not cover damage resulting from:
• Misuse or use of the product out of its specications,
• Installation or use in a manner inconsistent with the
technical or safety standards in force in the country
where the product is used,
• Use of non-suitable accessories (power supply,
adapters...),
• Installation in a defect system,
• External cause beyond the control of Matchmaster.
such as drop, accidents, lightning, water, re, improper
ventilation.
The warranty is not applied if
• Production date or serial number on the product is
illegible, altered, deleted or removed.
• The product has been opened or repaired by a
non-authorized person.
Maintenance
• Only use a dry soft cloth to clean the cabinet.
• Do not use solvent
• For repairing and servicing refer to qualied personnel.

Popular Amplifier manuals by other brands

Peavey Classic Series Classic 50 operating guide

Peavey

Peavey Classic Series Classic 50 operating guide

Onkyo A-809 Service manual

Onkyo

Onkyo A-809 Service manual

Ground Zero RADIOACTIVE GZRA MICRO FOUR owner's manual

Ground Zero

Ground Zero RADIOACTIVE GZRA MICRO FOUR owner's manual

Extron electronics MPA 401-70V Setup guide

Extron electronics

Extron electronics MPA 401-70V Setup guide

Sony TA-P9000ES - Amplifier operating instructions

Sony

Sony TA-P9000ES - Amplifier operating instructions

Fame Audio MS 2002 D user manual

Fame Audio

Fame Audio MS 2002 D user manual

CARVIN BX600 operating manual

CARVIN

CARVIN BX600 operating manual

Jensen Power760x5D Installation manual & quick start guide

Jensen

Jensen Power760x5D Installation manual & quick start guide

Univox DLS-50 user guide

Univox

Univox DLS-50 user guide

EHRHORN Alpha 5841 manual

EHRHORN

EHRHORN Alpha 5841 manual

RFI BD Series user manual

RFI

RFI BD Series user manual

Radio Shack 15-2506 user manual

Radio Shack

Radio Shack 15-2506 user manual

Phonocar PH320 D installation instructions

Phonocar

Phonocar PH320 D installation instructions

Texas Instruments TAS5733L manual

Texas Instruments

Texas Instruments TAS5733L manual

quadral AURUM M10 User instructions

quadral

quadral AURUM M10 User instructions

US Blaster USB 7140 user manual

US Blaster

US Blaster USB 7140 user manual

Neve Portico 5032 user guide

Neve

Neve Portico 5032 user guide

Rotel RTC-940AX owner's manual

Rotel

Rotel RTC-940AX owner's manual

manuals.online logo
manuals.online logoBrands
  • About & Mission
  • Contact us
  • Privacy Policy
  • Terms and Conditions

Copyright 2025 Manuals.Online. All Rights Reserved.