MATE ValuGrind User manual

©2011 Mate Precision Tooling
ValuGrind™
Tool Grinding System
(400V Configuration)
LIT00834
Rev F

©2011 Mate Precision Tooling Page 2
Contents:
1. Safety Rules............................................................................................................................3
2. Machine Maintenance.............................................................................................................4
3. Intended Use of Machine .......................................................................................................6
4. Specifications .........................................................................................................................7
6. Description of wiring..............................................................................................................9
8. Putting the machine into operation.....................................................................................10
9. Machine Operation ...............................................................................................................12
9.1 Clamping Thick Turret Punches ...............................................................................12
9.2 Clamping Trumpf Punches........................................................................................13
9.3 Clamping Multi Tools – Thick Turret and Trumpf....................................................13
9.4 Clamping Whisper/Roof Top Punches .....................................................................14
9.5 Clamping a Die ...........................................................................................................15
9.6 Adjustment of Coolant...............................................................................................15
9.7 Grinding ......................................................................................................................16
9.8 Replacement of grinding wheel ................................................................................16
9.9 Warning.......................................................................................................................18
9.10 Possible defects and their repair..............................................................................18
Appendix: Wiring Diagram
Statement of Conformity
Spare Parts List
Fixture Diagrams
Coolant Recommendation
Coolant Material Safety Data
Warranty

©2011 Mate Precision Tooling Dimensions in Inches(millimeters) Page 3
1. Safety Rules
Installation and operation of the machine must comply with regulations valid in the country in which the
machine is installed. The person using the machine is responsible for observing the following regulations.
Modifications of the machine are not permitted. Only skilled operators who have been properly trained
and are acquainted with the operating instructions should operate the machine.
While working with the machine, observe the working instructions and warning labels. The following
activities are prohibited:
●Utilization of the grinding machine for purposes other than the purposes for which the grinding
machine is intended for
●Insertion of any objects in any way under the work pieces
●Grinding of work pieces made of aluminium, magnesium or other materials which pose a fire or
explosion hazard
●Utilization of the appliance without protective covers
Before every start of the machine, always carry out a visual inspection to check that the power cable is
undamaged. When working with the machine, always use safety goggles.
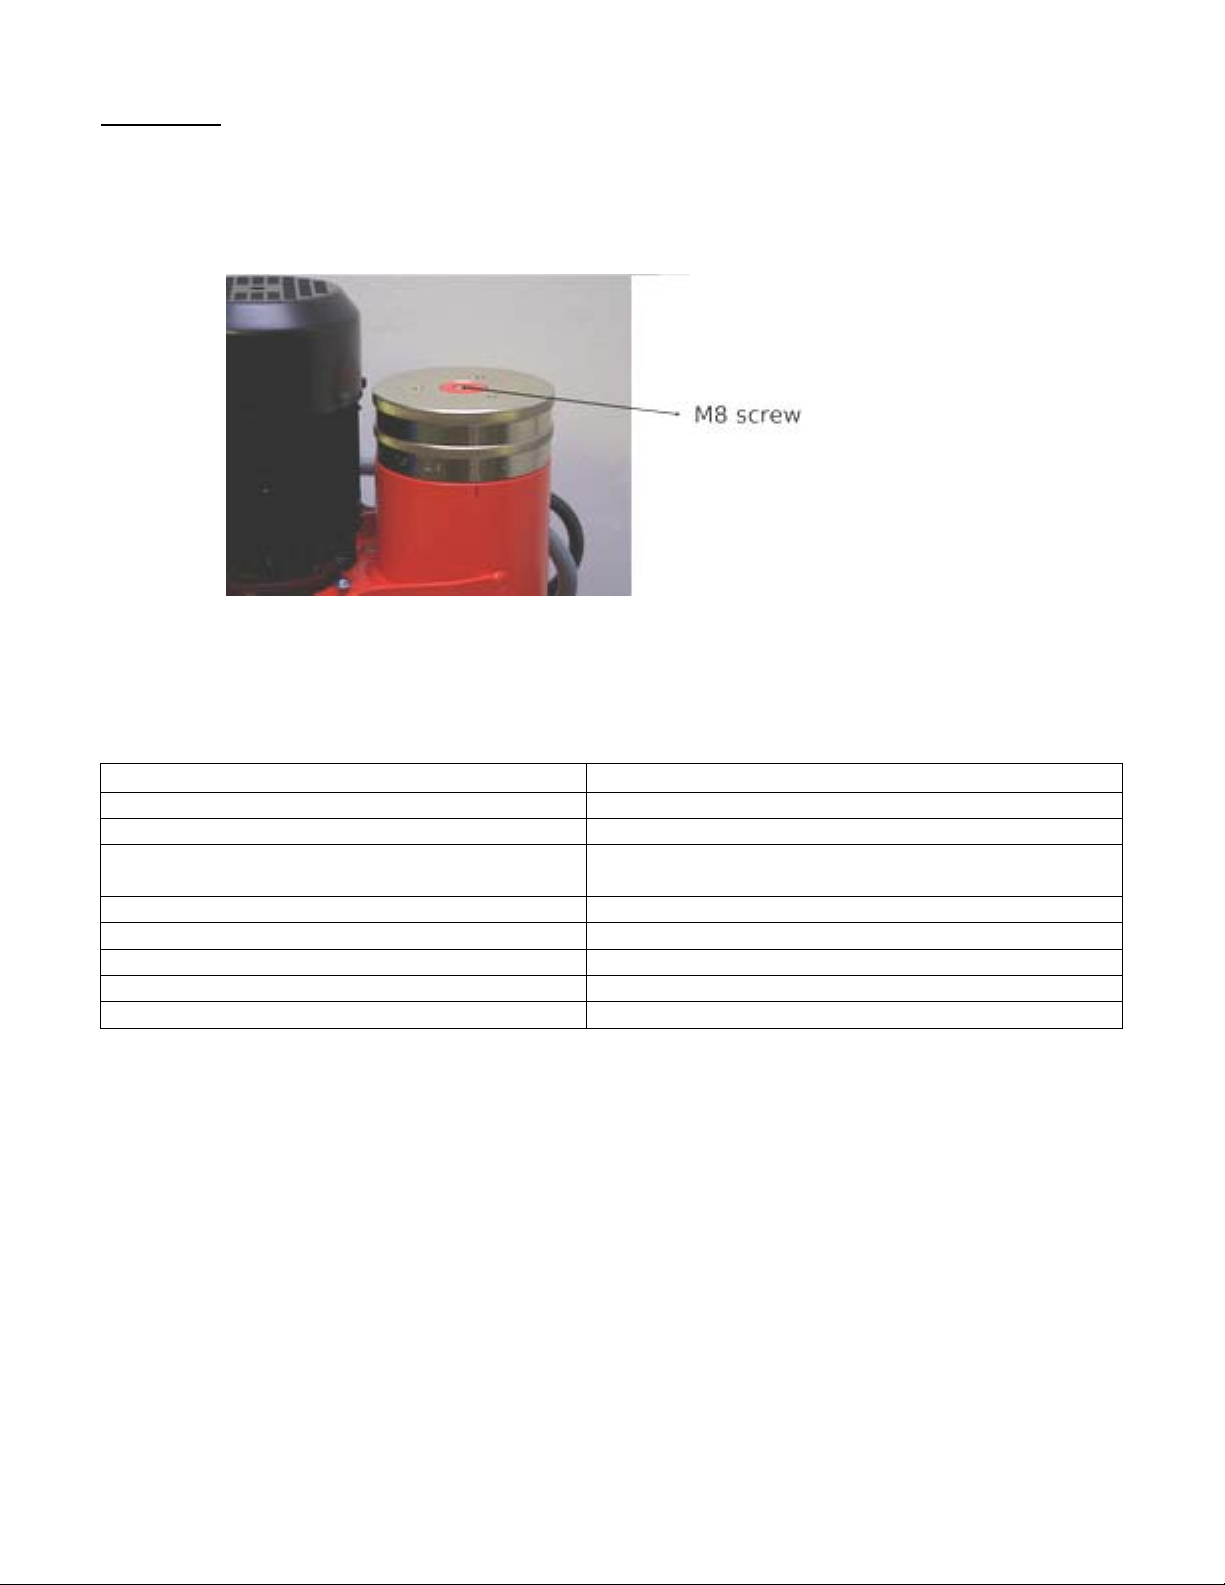
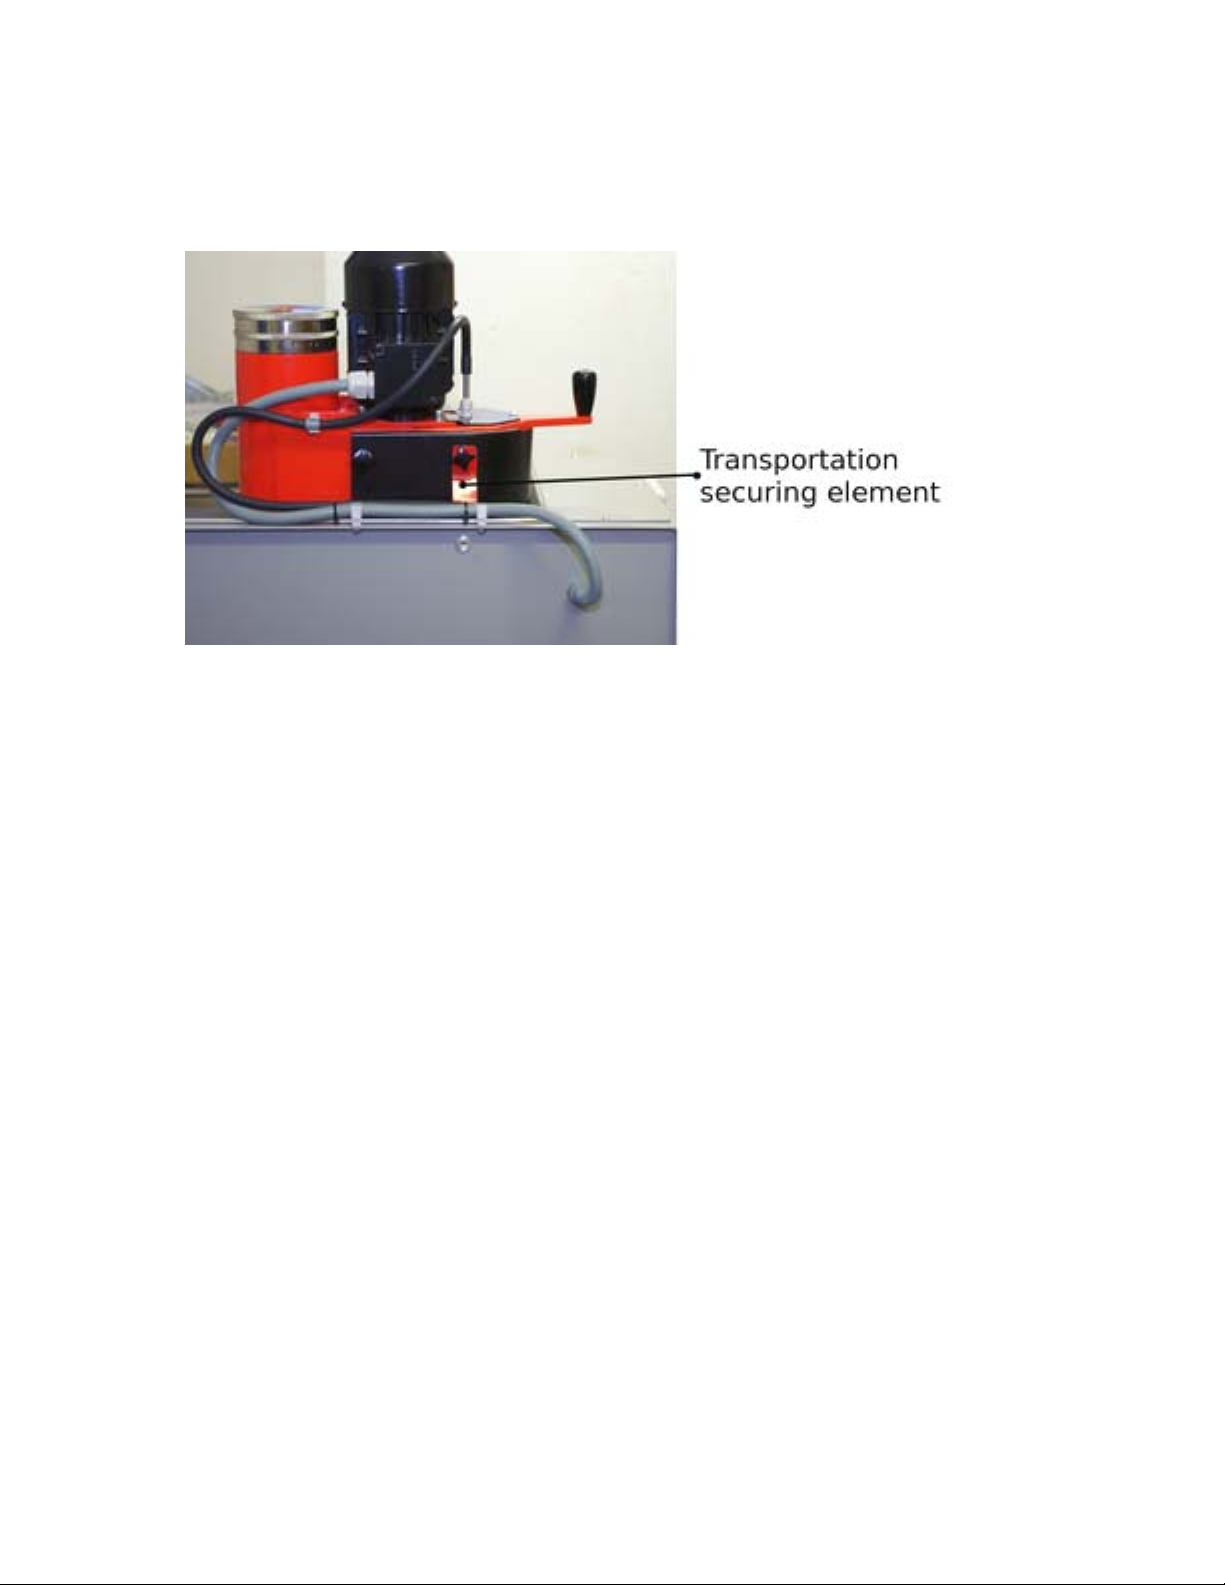
Loading or unloading of tooling, adjustments of the cooling liquid nozzle, and of the grinding wheel cover
may only be carried out when the machine is turned off.
CAUTION: All the adjustment or maintenance operations may only be carried out with the
machine disconnected from the supply mains.
The user is obligated to operate the machine solely in the perfect state. In the case of a repair, only
original spare parts and accessories may be used.
Apart from these instructions, safeguards to prevent injuries and generally accepted safety rules must be
observed!
Following is an Outline of Possible Risks which may arise as a consequence of improper
machine use or an operator not acquainted with the operating instructions.
Type of danger Dangerous point Risk
Danger to parts of the body arising from the
pressure of mechanical parts
Space between the motor and the knob used to
control the travel, operational range of the
rotating arm
Danger of injury
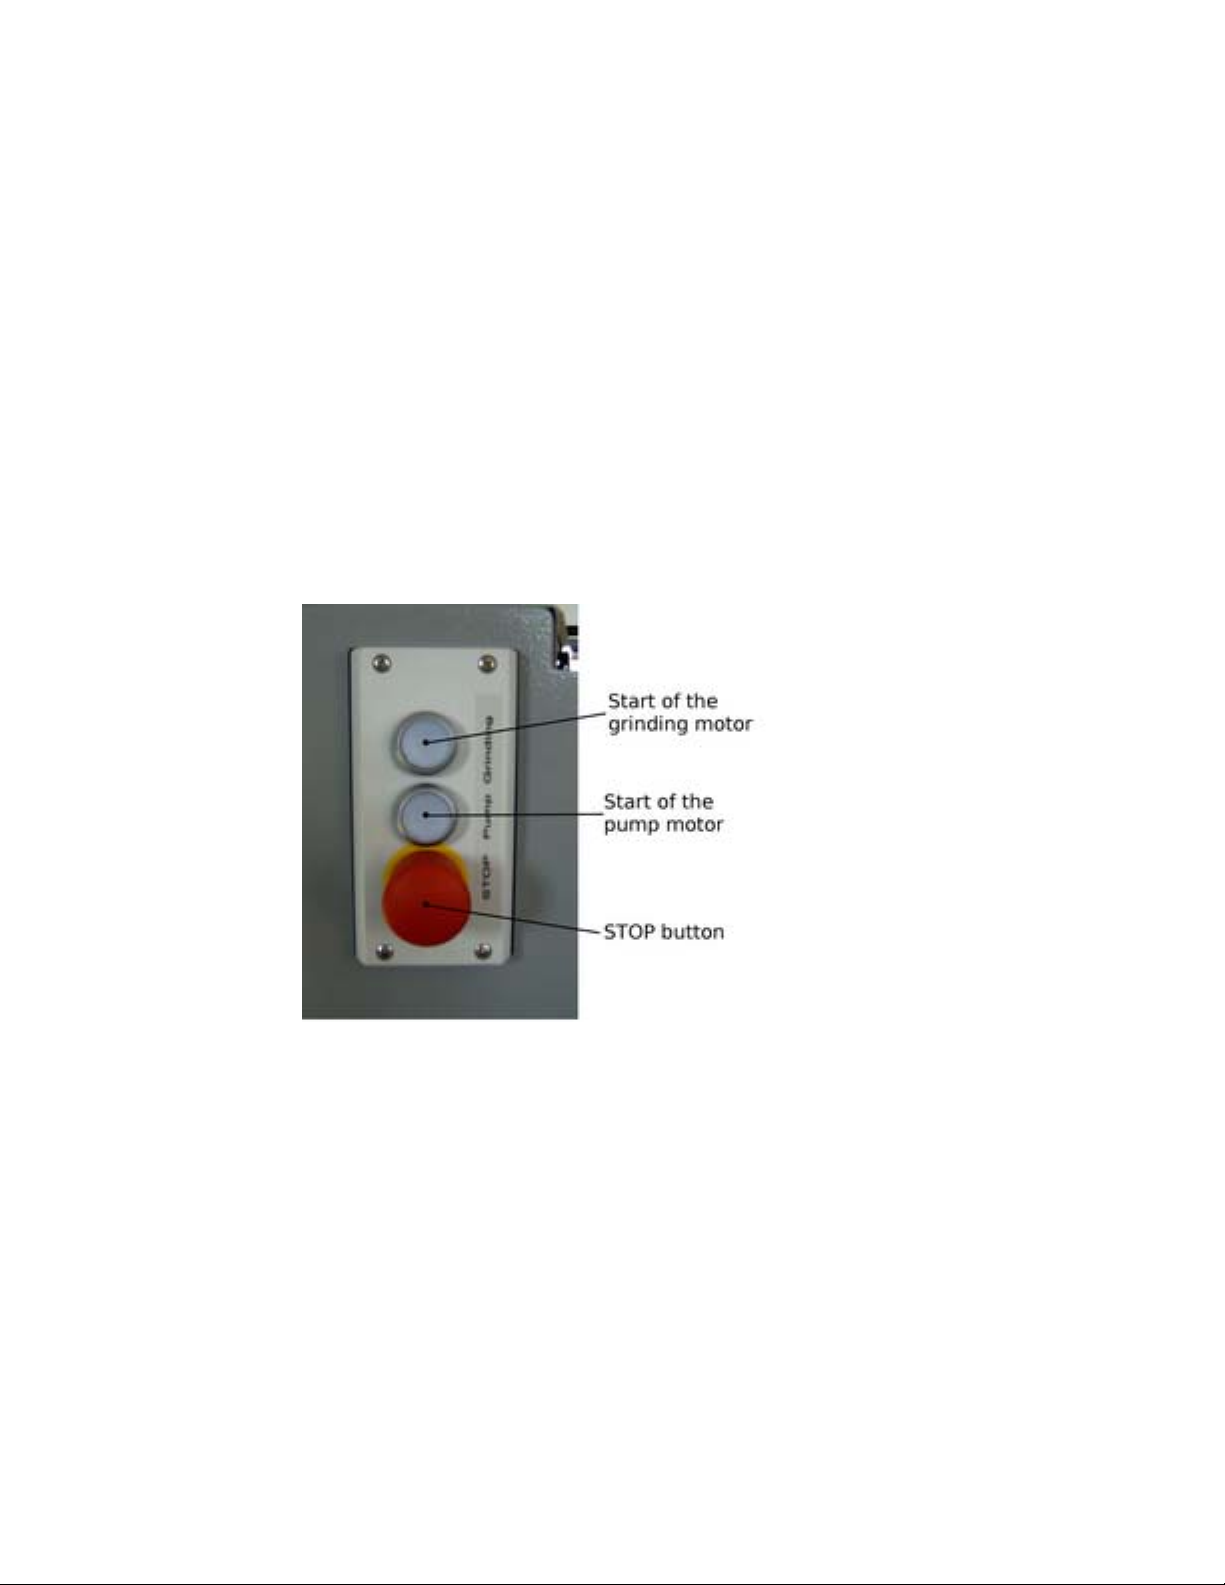
Danger arising from the grinding wheel Rotating grinding wheel Danger of injury
Danger arising from flying objects Grinding wheel, fixtures not properly clamped Danger of injury
Danger of cutting oneself with the ground
tool
Removing and installing tooling Danger of injury
Danger arising from electric current Directly - parts which are normally live
Indirectly - parts which are live in the event of a
failure
Danger to life
Danger to life
Danger arising from sparks and filings Working area of the grinding machine Danger of injury
Danger arising from the sprayed out liquid Hose, Nozzle Danger of injury
Danger arising from the inhalation of vapours
and dusts
Working area of the grinding machine Danger to health

©2011 Mate Precision Tooling Dimensions in Inches(millimeters) Page 4
2. Machine Maintenance
Regular servicing is a prerequisite for maintaining the machine’s high quality. Regular servicing of the
machine consists of visual inspections and keeping it in a clean state.
All the elements used for clamping tools must be kept perfectly clean. Furthermore, it is necessary to
clean the filter element as follows: Remove the strainer with the filter element (Figure 3, position 14),
flush with a stream, possibly blow it out. If necessary clean the nozzle, remove the water-hose from valve
and blow-over with a stream of air. Correctly connect the water hose back to the valve.
Depending on the frequency of use of the machine, it is necessary to remove the waste material
produced by grinding from the entire working area. For cleaning, use only non-frayed rags. The
impurities can also be removed with a vacuum.
Before every start of the machine, always carry out a visual inspection to check that the power cable is
undamaged. Check the level of the cooling liquid and the state of the grinding wheel for wear
continuously. Refill the cooling liquid if the liquid level disappears from the level gauge on the left-hand
side of the tank.
Furthermore, check the V-belt tension. To access the belt drive space, remove the belt pulley cover in
the front part of the rotating arm (Figure 1).
Procedure for belt tensioning:
1. Loosen the four screws of the motor plate.
2. Tension the belt by pushing the motor body in the direction of the grinding machine column.
3. Tighten the screws of the motor plate.
Fig. 1
Check tightness of electrical connections at regular electrical inspections.

©2011 Mate Precision Tooling Dimensions in Inches(millimeters) Page 5
Wheel Cleaning Procedure
Diamond grinding wheel cleaning needs will vary based on the amount of use as well as the hardness of
the material being ground. More use and softer materials will require more frequent cleaning. Follow one
of the procedures below when the ValuGrind Tool Grinding System does not seem to be cutting as freely
as it has in the past.
Wheel cleaning procedure A (Preferred):
1. Adjust the grinding wheel guard so that it will not interfere with the cleaning process.
2. Turn off the coolant valve.
3. Place the cleaning stick flat on the magnetic base.
4. Adjust the height of the grinding wheel so that it is approximately ¼”(6,35mm) above the cleaning
stick.
5. Hold the cleaning stick steady while making sure that your fingers will not come into contact with the
grinding wheel.
6. Start the grinding motor (leaving the coolant pump off) and let it come up to speed.
7. Hit the shut off switch and slowly lower the grinding wheel into the cleaning stick until the wheel
stops.
8. Raise the grinding wheel.
9. Repeat steps 3 through 8 four more times at different locations on the cleaning stick.
10. Re-adjust the grinding wheel guard back to factory recommendations.
11. Turn the coolant valve on.
Your wheel has now been cleaned and is ready for use.
Wheel cleaning procedure B (Optional):
1. Turn off the coolant valve.
2. Hold the flat side of the cleaning stick approximately ½”(12,70mm) below the grinding wheel. Make
sure that your fingers will not come into contact with the wheel.
3. Start the grinding motor (leaving the coolant pump off) and let it come up to speed.
4. Hit the shut off switch and slowly raise the cleaning stick into the grinding wheel until the wheel stops.
Note: Do not move the cleaning stick forward, backward, left, or right as you may damage the
grinding wheel.
5. Repeat steps 2 through 4 four more times at different locations on the cleaning stick.
6. Turn the coolant valve on.
Your wheel has now been cleaned and is ready for use.

©2011 Mate Precision Tooling Dimensions in Inches(millimeters) Page 6
Lubrication
All the lubricated points (bearings, the traverse screw and traverse nut, gliding surfaces on the rotating
arm) have been filled with lubricating grease for the entire operating life of the machine. Possible
additional lubrication of the traverse screw and of the column bearings can be carried out by means of
the lubrication hole after removing the M8 screw (Figure 2). Recommended lubricant: PENNZOIL
GREASE 3203M (MOBILGREASE MP, CASTROL GREASE).
Fig. 2
Outline of Maintenance Work
Maintenance cycle/service hours Activity
Before every start of the machine Visual inspection of the leading-in cable
After every utilization of the machine Cleaning of grinding grit and swarf from the fixtures
Depending on the frequency of the machine’s
utilization
Refilling of the cooling emulsion
4 hours Flushing of the filter element
4 to 8 hours Clean the grinding wheel using a cleaning stick.
8 hours Cleaning the working area of the machine
100 hours Checking of the V-belt tension
Within the framework of electrical inspections Checking tightness of electrical connections
Before putting the machine into storage, drain the coolant, and clean the machine and wipe dry.
Lubricate all the friction areas. Also treat the magnetic chuck and the clamping table to protect them from
corrosion. The machine may only be stored in a dry and clean room with an ambient temperature
between 41°F and 104°F (+5o C and +40oC).
3
3.
.
I
In
nt
te
en
nd
de
ed
d
U
Us
se
e
o
of
f
M
Ma
ac
ch
hi
in
ne
e
The machine is intended for sharpening dies, straight punches and oblique punches. Other utilization is
not permitted. The recommended grinding wheel with cubic boron nitride (diamond) is intended for
machining of hardened tool steels. The machine is fitted with a cooling system that prevents the ground
tool from warming while simultaneously removing mechanical particles which are produced during
grinding, thus improving quality of the ground surface.

©2011 Mate Precision Tooling Dimensions in Inches(millimeters) Page 7
4
4.
.
S
Sp
pe
ec
ci
if
fi
ic
ca
at
ti
io
on
ns
s
Length 32.28(820.0)
Width 20.47(520.0)
Dimensions:
Inches(millimeters)
Height 26.57(675.0)
Weight 330.69 lb (150 kg)
Nominal voltage 3/N/PE AC 400/230V
Nominal frequency 50 Hz
Nominal current max. 2,8 A
Power output 940 W
Degree of protection min. IP 54
Spindle revolutions 2700 / min
Working travel of the spindle 2.20(56.0)
Working travel scale division 0.078(0.02)
Angular displacement of the arm 180°
Identification 12-160-3/6-50Grinding wheel
Quality B-IIIA; B 151; K 75
Diameter of the ground die max. 6.29(160.0)
Maximum height of the die 1.57(40.0)
Maximum length of the punches “A” and “B” 8.18(208.0)
Maximum length of the punches “C”, “D” and “E” 3.81(97.0)
Adjustable draught 0°-8°
Type P3 Multan 41-30
Dilution 1:30
Recommended
emulsion:
Volume About 6 litres
Level of the sound pressure acting on the
standing operator (measured in accordance with
EN 11204)
75 dB
Weighted effective value of vibration
acceleration
(in accordance with ISO 5349 at grinding)
2,5 m/s2
The machine is intended for operation at temperatures from 41°F to 104°F (+5oC to +40oC) and at the
relative humidity of up to 50 % at the highest temperature. A higher relative humidity is permitted at a
lower temperature e. g. 90% at 68°F (90% at 20oC). The machine is designed to operate properly at
elevations of up to 3280 ft. (1000 m).

©2011 Mate Precision Tooling Dimensions in Inches(millimeters) Page 8
5. Technical Description
The basis of the machine is formed by a tank (1) welded of sheets with the thickness of 0.118(3.0)
(Figure 3). The welds are leak-proof, which allows the use of a cooling emulsion during grinding. The
tank is mounted on four rubber supports.
The wiring is fitted on the left-hand upper part of the tank. Behind the wiring is the cooling liquid pump
(11). These accessories are completely covered.
On the right hand side, a triangular-shaped bottom plate (2) is fastened to reinforce the bottom of the
tank. The column (4) is fastened at the rear part of the bottom plate, on which the tube (5) moves in the
range of the working travel. On this tube, the rotating arm (3) is mounted. The range of the arms angular
movement is limited by rubber stops, which are bolted to the rear wall of the tank. The arm’s travel is
limited by means of the screw and nut inside the tube, and it is controlled by a knob with numbered
increments (6), mounted at the end of the column. The Vernier scale increments represent 0.078(2.0)
mm of travel.
The arm is formed by a body tube, an upper and bottom plate and by side sheets that enclose the space
of the belt drive. To the bottom plate, a hub is fastened, which carries, in rolling-contact bearings, the
spindle with the grinding wheel (7). To the upper plate, a tension plate is fastened with the driving electric
motor (10). Torsional movement is transmitted from the motor to the shaft of the wheel by means of a
toothed V-belt. In the front part of the arm, the handle (13) is positioned, which is used to control the
traverse of the wheel.
On the left-hand front part of the bottom plate is the tilting plate (9) for clamping punches. The magnetic
chuck (8) for clamping dies is mounted on the right-hand part.
The coolant is supplied by means of a hollow shaft to the pot-shaped grinding wheel. The amount of
coolant supplied is adjusted by means of the valve (17), which is positioned by the pump outlet on the
left-hand rear part of the tank.
Fig.3 1 Tank
2 Bottom Plate
3 Arm
4 Column
5 Tube
6 Knob
7 Grinding Wheel
8 Magnetic Chuck
9 Tilting Plate
10 Electric Motor
11 Pump
12 Wiring
13 Handle
14 Strainer
15 Cover
16 Control Panel
17 Closing Valve
18 Emulsifying
Strainer

©2011 Mate Precision Tooling Dimensions in Inches(millimeters) Page 9
The collection of emulsion in the sump is covered with a strainer (14) and filter element.
The rear and side walls of the tanks operating space are covered with strainers (18), which are designed
to collect the splashing coolant.
The cover (15) is made of polycarbonate and is fastened by the slot at the front of the tank.
6
6.
.
D
De
es
sc
cr
ri
ip
pt
ti
io
on
n
o
of
f
w
wi
ir
ri
in
ng
g
Operation of the machine is controlled by means of the three buttons on the panel positioned on the left-
hand part of the tank (Figure 4). The upper button is used to start the grinding motor, the bottom button is
used to control the coolant pump. The red button is used to turn-off both functions of the machine. The
machine is ready for grinding when the second button lights blue. When the grinding motor starts, the
first button lights green.
The grinding motor can only be started after the red STOP button has been pulled out. Direction of
rotation of this motor is controlled by an appliance monitoring the phase sequence. The motor is
protected against overload by a thermal protector fitted along with a fuse in the wiring box at the left-hand
side of the machine. The wiring box is marked with a warning sign.
Fig. 4
The thermal protectors are set to the nominal value of the motor current. Their setting can not be
changed without the risk of incurring damage to the motor. The thermal protectors are set to automatic
mode, which means that after they have been tripped, they will automatically reset into the operating
position as soon as the operating parameters have been reached again. If the thermal protection trips
repeatedly, the defect must be detected and repaired by a qualified technician.
The power cable is fitted with a plug that allows the phase terminals to be swapped. The electrical
equipment of the machine has to be checked and inspected regularly in compliance with EN 60 204-1.

©2011 Mate Precision Tooling Dimensions in Inches(millimeters) Page 10
7. Transportation
The machine may only be lifted by means of lifting belts. Transportation is only permitted with the
machine standing on four rubber supports and sufficiently secured against movement or overturning. The
arm must be secured against rotation by means of a sheet-metal securing element for transportation
(Figure 5).
Fig. 5
The shipping container has to be marked with the sign “This Side Up!” The transportation may only be
carried out at temperatures ranging between 5°F to 131°F (-15oC to +55oC). Simultaneously, appropriate
measures have to be carried out so that damages incurred by humidity, vibrations and shocks are
prevented.
8
8.
.
P
Pu
ut
tt
ti
in
ng
g
t
th
he
e
m
ma
ac
ch
hi
in
ne
e
i
in
nt
to
o
o
op
pe
er
ra
at
ti
io
on
n
After unpacking, position the machine horizontally on an even, firm table. When positioning the machine,
take into consideration that sufficient area for the operator is provided. Once the machine has been
positioned, remove the transport lock, which prevents the arm from turning during transport.
First, check the state and tightening of the grinding wheel. Set the height of the grinding wheel cover so
that the bottom edge of the cover is about 0.04-0.08 inches (1-2 mm) above the bottom edge of the
grinding wheel. (Figure 6)

©2011 Mate Precision Tooling Dimensions in Inches(millimeters) Page 11
Fig. 6
Then, connect the machine to the supply mains 3/N/PE AC 400/230V, 50Hz (60Hz) with a current
protection of 16 A. The machine’s ready state is signalled by the blue button. If the green button does not
light up, it is necessary to proceed according to point 9.6. The process of grinding is signaled by the
green light on the button that starts the grinding motor.
After activating of the machine, fill the coolant tank with the required volume of the recommended coolant
(the level must fill about two thirds of the level gauge on the left hand side of the tank). Check the drain
plugs (Figure 7) for any leakage, if necessary tighten them. Check the function of the coolant pump and
of the closing valve.
Fig. 7
0.04-0.08 inches

©2011 Mate Precision Tooling Dimensions in Inches(millimeters) Page 12
9
9.
.
M
Ma
ac
ch
hi
in
ne
e
O
Op
pe
er
ra
at
ti
io
on
n
9.1 Clamping Thick Turret Punches
Punches are clamped in the special clamp. Punches Thick Turret sizes D and E are fixed on tilting plate
(Figure 8a). Other punches and are first fixed in a special fixture, which is fasten on the tilting plate
(Figure 8b).
Fig. 8a Fig. 8b
For oblong, oval and “banana”-shaped punches, make sure the longer side of the punch is positioned
perpendicular to the line connecting the center point of the punch with the axis of rotation of the arm.
To ensure the correct positioning of the tool, a fixture for setting the grinding angle can be used in such a
manner that the angle setting of the side edge of the fixture head corresponds to the angle of the side
edge of the tool (Figure 9).
Fig. 9

©2011 Mate Precision Tooling Dimensions in Inches(millimeters) Page 13
9.2 Clamping Trumpf Punches
Punches are first fixed in a special fixture, which is fastened on tilting plate (Figure 10)
Fig. 10
9.3 Clamping Multi Tools – Thick Turret and Trumpf
Trumpf style multi tool punches and dies, and Thick Turret multi tool dies are first fixed in special plate
which is clamped to magnetic chuck (Figure 11 a and b). MT™ and MTG™ multi tool punches are
clamped the same way as other Thick Turret punches (Figure 12).
Fig. 11a Fig. 11b

©2011 Mate Precision Tooling Dimensions in Inches(millimeters) Page 14
Fig. 12
9.4 Clamping Whisper/Roof Top Punches
The tilting plate has been set by the manufacturer into a horizontal position. For grinding shears, it can
be set in an angle between 0°to 8°. Again, to set the required angle, use the built-in fixture. Lift the tilted
fixture into a position where the edge of the blade touches the skewed surface of the tool (Figure 13a).
Then, by means of the two positioning screws (A), adjust the angle of the plate until the edge of the
blade fits closely to the ground surface (Figure 13b). When the required shear angle has been set, the
position must be secured by means of the fastening nuts (B). Do not forget to return the fixture back to
the standard 0°position!
Fig. 13

©2011 Mate Precision Tooling Dimensions in Inches(millimeters) Page 15
To set the zero position, turn the two adjusting screws (C) on the right-hand side of the tilting plate until
they stop on the bottom plate.
9.5 Clamping a Die
Dies are clamped to a magnetic chuck. Place Thick Turret A Station and B Station dies on the magnetic
chuck first; then place the thick turret die fixture OVER the dies with the top slot facing up (Figure 14).
Prior to clamping, clean the magnetic chuck and the die from mechanical dirt. Place the fixture (or Thick
Turret C through E Station die) in the middle of the chuck. Turn the handle at the right side of the chuck
outwards by 270° to the very end. For a rectangular (hole) die, the longer side of the hole is situated
across the connecting line of the die center point with the turning axis of the shoulder (Figure 15).
Fig. 14 Fig. 15
9.6 Adjustment of Coolant
The coolant nozzle is adjusted so that the flow of the coolant is directed closely under the bottom edge of
the grinding wheel (Figure 16). The jet of coolant must be directed to the point of engagement. The
nozzle is fitted with two apposing nozzle openings at an angle of 180°so that cooling will be optimal
when running in both directions.
Fig. 16
To adjust the nozzle (adjustment of height and direction), loosen the cap nut of the nozzle holder on the
pulley cover in the front part of the arm. Regular inspection and cleaning of the coolant nozzle is
recommended.

©2011 Mate Precision Tooling Dimensions in Inches(millimeters) Page 16
The amount of the coolant can be adjusted by means of the valve at the pump outlet on the left-hand
rear side of the tank. The valve is to be adjusted so that a high grinding quality is maintained, and
excessive spraying of the coolant does not occur.
9.7 Grinding
Position the grinding wheel about 1 mm above the work piece. Start the grinding motor. Then, with
caution, by means of the adjusting knob, move the grinding wheel to the first contact. Start the coolant
spray. Move the wheel slowly back and forth across the whole tool surface. The traverse speed of the
wheel must not exceed 0.39 inches (10 mm) per second.
Fig.17
Subsequently, set the first engagement. The maximum grinding depth increment is 0.0008(0.02)
(Figure 17). When the grinding depth has been set, move the grinding wheel back and forth across the
entire surface. Repeat this operation until the required sharpness of the shearing edge is achieved.
Switch the machine off by means of the red STOP button. Lift the arm and move it to the out most
position on the right, release the sharpened tool and remove it from the clamp. To start the grinding
machine again, reset the STOP button by pulling it out.
9.8 Replacement of grinding wheel
Use the adjusting knob to move the grinding wheel to the uppermost position. Rotate the arm so the
wheel is over the tilting plate. Lock the wheel by putting a metal rod through the holes in the wheel and
cover. Use a 27mm socket to loosen the nut and remove the wheel. Install the new wheel and tighten the
nut. Be careful not to break the wheel with the shear gage. (Figure 18)
Increments mm Inch
1 0.02 0.0008
2 0.04 0.0016
3 0.06 0.0024
4 0.08 0.0031
5 0.10 0.0039
6 0.12 0.0047
7 0.14 0.0055
8 0.16 0.0063
9 0.18 0.0071
10 0.20 0.0079

©2011 Mate Precision Tooling Dimensions in Inches(millimeters) Page 17
Fig. 18
Manufacturer’s recommendations
•Replace the grinding wheel only after the grinding wheel cover has been removed.
•To ensure maximum service life of the tools, remove less material, but sharpen more frequently.
•After the last grinding depth increment has been set, move the grinding wheel across the entire
surface three or four times to achieve a high quality ground surface.
•Before grinding short punches, close the hole by sliding the sheet metal stop in on the tilting plate
(Figure 18) to prevent punches falling below the clamp.
NOTE: Use of magnetic chuck may add magnetism to the parts being sharpened and they may
need to be demagnetized after sharpening.
Fig. 19

©2011 Mate Precision Tooling Dimensions in Inches(millimeters) Page 18
9.9 Warning
If good cutting conditions are not maintained, tripping of the thermal protection may occur, which will
result in stopping the grinding motor. In this case, wait for the green button of the grinding motor to light
up again before restarting the device.
Never sharpen shearing tools without the use of coolant. Due to thermal deformation, especially with dies
that have larger openings, taper of up to 0.0016(0.04) may arise after grinding.
The recommended grinding wheel is intended for sharpening of tools from hardened tool steels. Grinding
materials with other parameters may cause excessive wear of the grinding wheel.
9.10 Possible defects and their repair
Defect
Cause Repair
Faulty phase sequence
Carry out exchange of the phase
terminals (Article 6)
The button of the cooling
motor button does not light up
Stop button is switched on
Reset the STOP button (Article 6)
Tripping of the grinding motor Thermal protection has tripped Wait till the thermal protection becomes
activated (Article 9.5)
Cooling is not functional Check the cooling system (refill the
coolant, clean the filter)
Blue spots appear on the
ground surface
Excessive engagement or
grinding speed
Observe the rules of grinding device
operation (Article 9.4)

©2011 Mate Precision Tooling Dimensions in Inches(millimeters) Page 19

©2011 Mate Precision Tooling Dimensions in Inches(millimeters) Page 20
Table of contents
Popular Grinder manuals by other brands

SUHNER ABRASIVE
SUHNER ABRASIVE UBC 10-R Technical document

SUHNER ABRASIVE
SUHNER ABRASIVE LSB 44-DH Technical document

SUHNER
SUHNER ABRASIVE LSA 81 Technical document

Bosch
Bosch GSS18V-40 Operating/safety instructions

Sealey
Sealey SA44.V3 instructions

Hyundai power products
Hyundai power products HYAG2000E instruction manual