Max Burton 18XL User manual

OPERATING INSTRUCTIONS
Digital Induction
Cooktop 18XL
Featuring the latest in induction cooking technology.
• Precise temperature control using the included wireless
Temperature Probe - ideal for sous vide, maintaining oil
temperature, beer brewing and much more.
• Extra large 9” induction system accomadates larger cookware.
• Bright LCD display, touchpad and push-to set control knob.

2
IMPORTANT WARNINGS & SAFEGUARDS
Read all instructions thoroughly before operating this unit to avoid injury to self or property and avoid
damage to the unit. Keep instructions handy for reference during use.
Caution: This unit emits an electromagnetic field. Persons with cardiac implanted pacemakers or
other implantable heart devices should consult with their physician before using.
Electrical Hazards
• Do Not disassemble. There are no user serviceable parts. Contact Aervoe Industries, Inc. at 800-
227-0196 for assistance.
• Do Not submerge unit or electrical cord in liquid, touch with wet hands, or use in a wet
environment
• Do Not use if cooktop is cracked
• Do Not operate if the cord has frayed and wires are exposed
• Do Not let cord hang over the edge of a table or counter
• Never move the unit by pulling on the power cord
Personal Safety
• Do Not touch the hot cooktop surface or cookware. It may remain hot for several minutes after use.
• Do Not move the unit during cooking or with hot cookware on top
• Do Not place metal objects on the cooktop other than metal cookware or our Max Burton
Induction Interface Disk.
• Do Not heat unopened cans of food. The container could explode.
• Do Not use in or around flammable or explosive environments
• Administer close supervision when operating around children
• Electric shock hazard. Only a qualified expert may perform repair and maintenance work on this
unit. Never attempt to repair yourself.
Product & Property Damage
• Do Not place cookware with contents heavier than 60 pounds on the glass plate
• Do Not block the air inlet or exhaust fan. Keep the rear and sides of the unit at least 4” from walls
for proper ventilation
• Do Not clean in a dishwasher
• Do Not use the unit for other than its intended use
• Do Not place objects with a magnetic strip near the unit while in operation
• Use a dedicated 120V, 15A electrical outlet that is not shared with other appliances to avoid
overheating or shutdown
FCC REQUIREMENTS
NOTE: This equipment has been tested and found to comply with the limits for a Class B digital device,
pursuant to Part 15 of the FCC Rules. These limits are designed to provide reasonable protection
against harmful interference in a residential installation.
Operation is subject to the following two conditions:
1. This device may not cause harmful interference
2. This device must accept any interference received, including interference that may cause
undesired operation.
This equipment generates uses and can radiate radio frequency energy and, if not installed and used in
accordance with the instructions, may cause harmful interference to radio communications. However,
there is no guarantee that interference will not occur in a particular installation. If this equipment does
W A R N I N G
RISK OF FIRE OR ELECTRICAL SHOCK
DO NOT OPEN

3
ON/OFF Button
Power LED
Cookware
Clip
Temperature Probe
cause harmful interference to radio or television reception, which can be determined by turning the
equipment off and on, the user is encouraged to try to correct the interference by one or more of the
following measures:
• Reorient or relocate the receiving antenna
• Increase the separation between the equipment and receiver
• Connect the equipment into an outlet on a circuit different from that to which the receiver is
connected
• Consult the dealer or an experienced radio/TV technician for help.
FCC ID#
PARTS IDENTIFICATION Cookware Placement Guides
Push To Set
Control Knob
Function Lock
One Touch
Simmer & Boil
ON/OFF Button
Power Indicator LED
Glass Cooktop
Function Buttons
LCD Display
Power Cord
WIRELESS TEMPERATURE PROBE

4
SELECTING THE PROPER COOKWARE
Your induction cooktop will not operate without the proper cookware. Size, shape, and construction
are all factors for suitable cookware.
1. Suitable Cookware: the base of the cookware must be made of ferrous magnetic materials
including cast iron, carbon steel, magnetic stainless steel or cast aluminum with an induction
rated base.
2. Unsuitable Cookware: will cause an E0 error and the cooktop will not operate.
3. In general, if a magnet will stick to the bottom of the cookware, it will work on your induction
cooktop. A magnet is included for you to use to test your cookware.
4. If proper cookware is not available we offer an Induction Interface Disk (#6010) that will provide
the necessary connectivity between the induction cooktop and your non-suitable cookware. It is
normal for reduced efficiency when using the Interface Disk.
NOTE: Different types of cookware and sizes will result in varying wattage/heat efficiency. For maximum
efficiency, do not use cookware with a base larger than 14” or a combined weight over 60 lbs.
OPERATING INSTRUCTIONS
If the unit doesn’t operate as intended, please see the Troubleshooting Guide.
Start-Up
1. Select cookware according to the instructions above.
2. Place the unit on a dry, level surface at least 4 inches away from other objects to allow proper
ventilation.
3. Plug the power cord into a dedicated 120V/15A electrical socket. For optimum performance,
use only one appliance per outlet. A red LED above ON/OFF will appear indicating the cooktop is
ready to use.
4. Before turning the unit on, make sure the ingredients are in the cookware and place it on the
glass plate centered over the COOKWARE PLACEMENT GUIDES.
5. Touch the ON/OFF symbol to turn the unit on. The LCD DISPLAY will illuminate and the default
PL1 will show in the window. The cooling fan will turn on.
NOTE: It is normal for the cooling fan to operate for up to 2 minutes after the unit has powered off.
SUITABLE COOKWARE
Cast Iron Pot Magnetic Magnetic
Stainless Steel Pot Stainless Steel/Enamel
Iron/Steel Frying Pan Iron Tray/Grille Iron Enamelware
Size and Form
Diameter 4.5” minimum
Cookware should have
a flat surface.
Unsuitable Size and Form
Cookware of which the
height from induction
plate is over 1.5” and
the bottom diameter is
less than 4.5”.
Material: Glass, Ceramic, Copper, Aluminum, Non Magnetic Stainless Steel
UNSUITABLE COOKWARE
1.5” 4.5”1.5” 4.5”

5
Controls
All operations are easily controlled using the touchpad and PUSH TO SET CONTROL KNOB. The
control knob will increase or decrease your selection by turning the knob. Once a desired setting is
reached, push the knob to select it.
POWER LEVEL/TIMER MODE (10-watt settings)
This is the default mode. Use this mode for quick heat-up and where close temperature control is not
a requirement. The higher the Power Level, the more wattage applied to the cookware and increased
heating rate. Cookware will respond differently depending on type and size.
1. Touch the POWER LEVEL/TIMER symbol to select this mode. The default PL-1 will flash in the
LCD window. Use the CONTROL KNOB to increase (clockwise) or decrease (counter-clockwise)
the power as needed. Push the KNOB to lock in the setting.
2. Next the TIMER symbol will flash in the LCD window. You will then be able to set the timer from
1-180 minutes. For safety only 180-minutes is available. If 0 is selected or nothing is selected
within a few seconds, the timer function will not be used.
3. Your cooktop will follow the power level and time settings you selected and turn off when
finished. You can change the settings at any time by pressing the CONTROL KNOB and repeat
these steps.
POWER LEVEL SETTINGS MEDIUM PL6, PL7
LOW PL1, PL2, PL3 MED/HIGH PL8, PL9
MED/LOW PL4, PL5 HIGH PL10
ONE-TOUCH & LOCK FUNCTIONS
1. One-touch BOIL function will instantly select the PL-10 setting.
2. One-Touch SIMMER function will instantly select 100°F.
3. Touch the LOCK symbol at any time to lock in your desired setting. To unlock, touch and hold the
LOCK symbol for 2 seconds or power the unit off and restart.
TEMP LEVEL/TIMER MODE (21 settings)
This mode is best when more accurate cooking temperature control is needed. It is important to
realize that the following settings measure the temperature of the base of your cookware and not the
temperature of the food you are cooking.
NOTE: For more precise temperature control, go to the TEMPERATURE PROBE section below.
1. Touch the TEMP LEVEL/TIMER symbol to select this mode. The default 100° temperature will
flash in the LCD window. Use the CONTROL KNOB to increase (clockwise) or decrease (counter-
clockwise) the temperature as needed. Push the KNOB to lock in the setting.
Temperature settings will increase by 10° from 100° to 200°F and by 25° from 225° to 450°F.

6
2. Next the TIMER symbol will flash in the LCD window. You will then be able to set the timer from
0-180 minutes. For safety only 180-minutes is available. If 0 is selected or nothing is selected
within a few a few seconds, the timer function will not be used.
3. Your cooktop will follow the temperature level and time settings you selected and turn off when
finished. You can change the settings at any time by pressing the CONTROL KNOB and repeat
these steps.
SIMMER 100º - 120º MEDIUM 225º-275º
LOW 130º-160º MED/HIGH 300º-375º
MED/LOW 170º-200º HIGH 400º-450º
TEMPERATURE PROBE MODE FOR PRECISE TEMPERATURE CONTROL
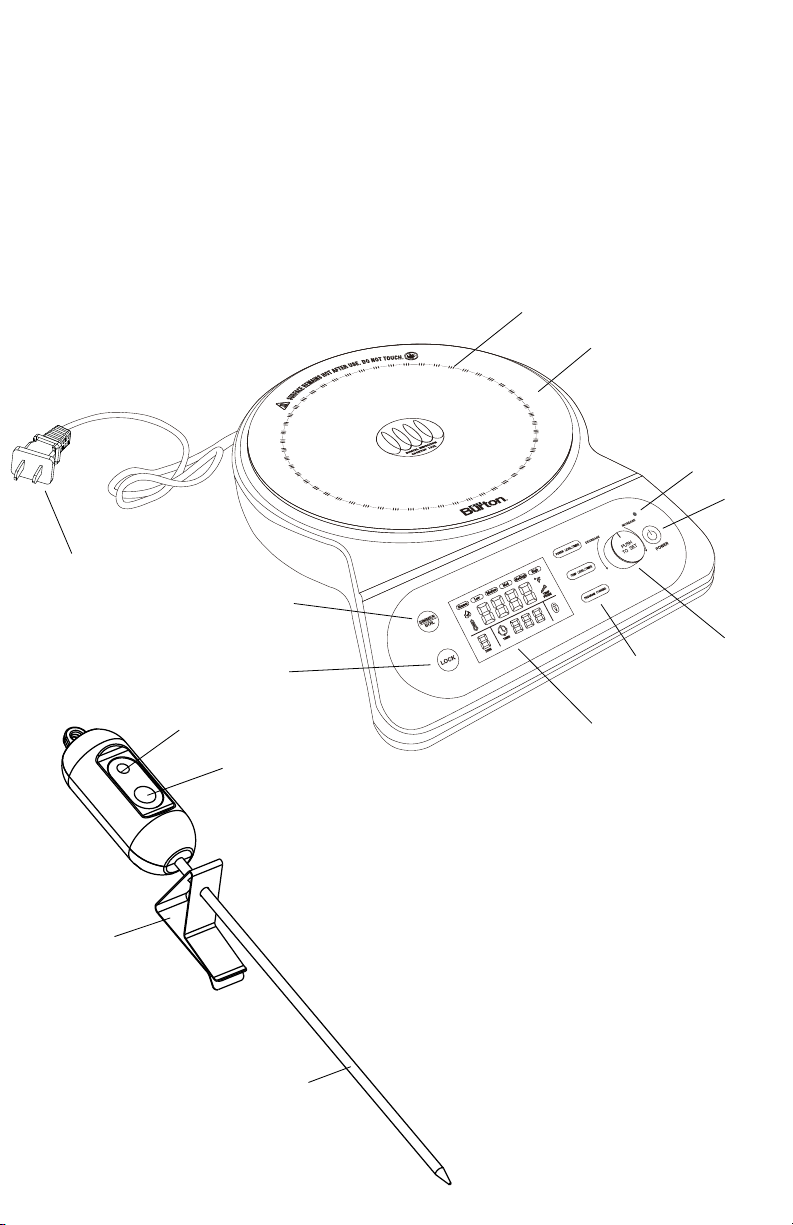
When precise temperature control is needed, use the wireless TEMPERATURE PROBE. This feature
may be used with the TEMP LEVEL or PROGRAM COOKING modes only. Selected temperature will be
closely maintained.
1. Clip the PROBE to the inside of the pan so that it is submerged in the pan contents or insert it
into the meat you are cooking. It should not touch the bottom of the pan.
2. Press the ON/OFF button on the PROBE. A red LED on the probe will light up periodically to show
it is active and a temperature probe icon will show in the LCD display during operation.
3. The current temperature of the food you are cooking (shown on the right side of LCD display)
and the temperature you set it to reach (shown on the left side of LCD display) will alternately
flash in the LCD display.
4. Clean the probe after use and store.
5. If the red LED does not come on when the probe is turned on, replace the battery with a standard
A23/12V alkaline battery. The probe will automatically shut down if the induction is turned off or
no change in temperature is detected after 30 minutes. Reset power as noted above.
6. Time can be set from 1-360 minutes below 200ºF and from 1-180 minutes above 225ºF.
PROGRAM COOKING MODE
This mode allows you to program up to 3 cooking time and temperature zones to create different
stages of cooking. You can program all 3 zones or just one. It may be used in slow cooking, sous vide,
beer brewing and much more; and can be used with or without the temperature probe.
Example: Zone #1 set at 300°F for 60 minutes; Zone #2 set at 225°F for 75 minutes; Zone #3 set at
100°F for 60 minutes.
1. Touch the PROGRAMMABLE COOKING symbol once to program Zone 1.
2. Zone 1 Temperature Setting:
• 100ºF will flash in the display
• Set your desired temperature by turning the CONTROL KNOB
• Push the KNOB to lock in the temperature. It will then advance to the timer setting.
3. Zone 1 Timer Setting:
• The timer icon will flash in the display
• Set your desired time by turning the CONTROL KNOB
• Push the KNOB to lock in the time and advance to Zone #2
Note: Time can be set from 1-360 minutes below 200ºF and from 1-180 minutes above 225ºF.
4. Zone 2 and Zone 3 Settings:
• Repeat the above instructions for Zone 2 and Zone 3
• Each zone must be programed quickly, or the previous setting will be locked in
• If either Zone 2 or Zone 3 are not needed, simply set the temperature and time the same
as Zone 1.

7
5. After all 3 programs have been set, the LCD display will cycle through all of the settings and lock
in.
6. If changes are needed after they are set, touch and hold the LOCK icon for 2 seconds and restart
from the beginning.
CARE AND MAINTENANCE
• Do Not clean with metal scouring pads, abrasives, or solvents
• Do Not immerse cord or unit in water or other liquids
• Unplug when not in use and before cleaning
• Allow unit to cool before storing
• Do Not use if glass cooktop or power cord is damaged
• Keep away from other sources of heat
• Unplug and let cool before cleaning. Use a mild liquid detergent with a moist cloth to wipe off
grease and stains. Let dry. Cover the unit to protect it from dust when being stored.
• Clean the TEMPERATURE PROBE after use.
TROUBLESHOOTING GUIDE & CUSTOMER SERVICE
If after reviewing the troubleshooting guide the problem is not resolved, do not attempt to repair.
Contact your dealer or call our Customer Service Department at 1-800-227-0196 for additional
information.
1. The Power Indicator light does not illuminate and/or the exhaust fan is not running.
• The power plug may be loose in the electrical outlet or there might be a 120V power
supply fault. Reset the circuit breaker and retry.
• E3 error code means the 120V input power supply is receiving voltage that is too high or
too low and shuts down after one minute. Unplug from the power receptacle and use a
voltage sensor to verify that the voltage is at least 110V AC and not more than 120V AC. If
not, switch electrical outlets or correct before operating the unit.
• The fuse or circuit breaker has malfunctioned or the unit is unplugged.
2. The fan is not running and the cookware is not heating up. E0 or E2 error code may be displayed.
• The cookware may be unsuitable and it is preventing operation (see Selecting the Proper
Cookware). If no cookware is present an E0 code will show.
• The cookware needs to be centered on the glass plate
• The glass plate may be cracked
3. The induction cooktop suddenly stops heating during operation and shuts down. E1 or E2 error
code may be displayed.
• The overheating sensor detected an excessive high glass top temperature and caused it to
automatically shut down. Heating empty cookware may cause this. Remove cookware and
let everything cool down and retry.
• The air inlet or exhaust fan is blocked or failed and caused it to overheat. Make sure the
unit is at least 4” from walls and other objects and all vents are clear.
4. The TEMPERATURE PROBE is not accurately keeping to the set temperature.
• Verify the Temperature Mode is selected.
• Follow the instructions in the Temperature Probe Section above to turn it back on.
FRANÇAIS

8
SPECIFICATIONS
INDUCTION TYPE Household rated
POWER SOURCE 120V/15A, 60Hz
WATTAGE RANGE 500 - 1800 watts (PL1-PL10)
TEMPERATURE RANGE 100ºF - 450ºF (21 settings)
WEIGHT 8 lbs. (3.6 kg)
DIMENSIONS 16.25” x 13.25” x 3.5” (41.28 x 33.65 x 8.9 cm)
CORD LENGTH 5 ft. (1.52m)
GLASS COOKTOP DIMENSIONS 11.5” round (29.2 cm)
MAXIMUM WEIGHT LOAD 60 lbs. (cookware & contents)
TEMPERATURE PROBE 10” Stainless steel probe
Replaceable A23 12-volt alkaline battery
SAFETY FEATURES Non-suitable cookware detection
Overheat protection
Improper voltage supply detection
APPROVALS ETL US (conforms to UL 1026 household rated)
FCC ID# YT9-6600P
PRODUCT WARRANTY (see warranty card included)
Aervoe Industries, Inc. warrants that this product shall be free from all defects in material and
workmanship for 1 year from date of purchase. All merchandise must be returned to the original place
of purchase to be processed according to the retailer return policy. A warranty card must be on file
with Aervoe Industries, Inc. within 30-days of purchase and proof of purchase is required to obtain
warranty performance.
Other manuals for 18XL
1
Table of contents
Other Max Burton Cooktop manuals
Popular Cooktop manuals by other brands

Miele
Miele KM 6366-1 Operating and installation instructions

KitchenAid
KitchenAid KGCP463KSS - 36" Sealed Burner Commercial-Style Gas... Dimension Guide

Bosch
Bosch NGMP677UC installation manual

Jenn-Air
Jenn-Air JEC8430BDB10 parts list

Electrolux
Electrolux EI30EC45KB Wiring diagram

Miele
Miele KM 400 operating instructions