Maxxhaul 50039 Instruction Manual

3-Point
Hitch Adapter
Model 50039
Read and understand this entire manual before assembling,
installing, operating, or servicing this product.
SAVE THIS MANUAL
Copyrightc2019 by Maxx Group LLC. All rights reserved. No portion of this manual or any artwork
contained herein may be reproduced in any shape or form without the express written consent of Maxx
Group LLC. Due to continuing improvements, actual product may dier slightly from the product de-
scribed herein. Tools required for assembly and maintenance may not be included.
Instruction Manual
&
Parts Catalog

IMPORTANT SAFETY
INFORMATION
This is a SAFETY ALERT symbol.
It is used to alert you to
potential personal
injury hazards. Obey all
safety messages that follow
this symbol to avoid possible injury or death.
DANGER indicates a
hazardous situation which, if not avoided,
will result in death or serious injury.
WARNING indicates a
hazardous situation which, if not avoided,
could result in death or serious injury.
CAUTION indicates a
hazardous situation which, if not avoided,
could result in minor or moderate injury.
NOTICE indicates
important information which, if not followed,
may cause damage to equipment.
SAVE THIS MANUAL
Keep this manual for the safety warnings
-
tant information on how to assemble, use
and maintain this product.
Write the product’s model number and pur-
chase date on the cover page of this man-
ual. Keep this manual (and your purchase
receipt) in a safe place.
UNPACKING
The shipment should be thoroughly inspected as
soon as it is received. The signed “bill of lad-
ing” is acknowledgement by the carrier of receipt
in good condition of shipment covered by our
invoice. For your own protection, if any of the
goods called for on the bill of lading are shorted
or damaged, do not accept them until the carrier
makes a notation on the freight bill of the shorted
or damaged goods.
Notify MAXXHAUL immediately if any
hidden loss or damage is discovered after
receipt.
DANGER
WARNING
CAUTION
NOTICE
INSTRUCTION
MANUAL
WARNING concerning Risk of Eye
Injury. Wear ANSI approved eye
protection.
WARNING concerning Risk of
Hearing Loss. Wear hearing pro-
tection.
IMPORTANT SAFETY
INSTRUCTIONS
1. Read and understand all
safety warnings and in-
structions. Failure to follow the warnings
and instructions may result in serious injury
or death. Save all warnings and instructions
for future reference.
2. Personal and Work Area Safety
A. Always wear ANSI approved
safety goggles.
B. Always wear hearing protec-
tection when working in
noisy environments. Prolonged exposure
to high intensity noise can cause hearing
loss.
C. Use safety equipment. Safe-
ty shoes, hard hat and work
gloves must be used for applicable condi-
tions.
Model 50039 Page 2
D. Dress appropriately. Never wear loose
Contain long hair, and keep hair, clothing
and gloves away from moving parts.
E. Use common sense when working.
Stay alert and concentrate when setting up
and using the 3-Point Hitch Adapter. Never
drugs or medications.

Model 50039 Page 3
Personal and Work Area Safety (continued)
When setting up and using the 3-Point
Hitch Adapter, keep work area clean and
well lighted. Keep spectators and chil-
dren out of the work area.
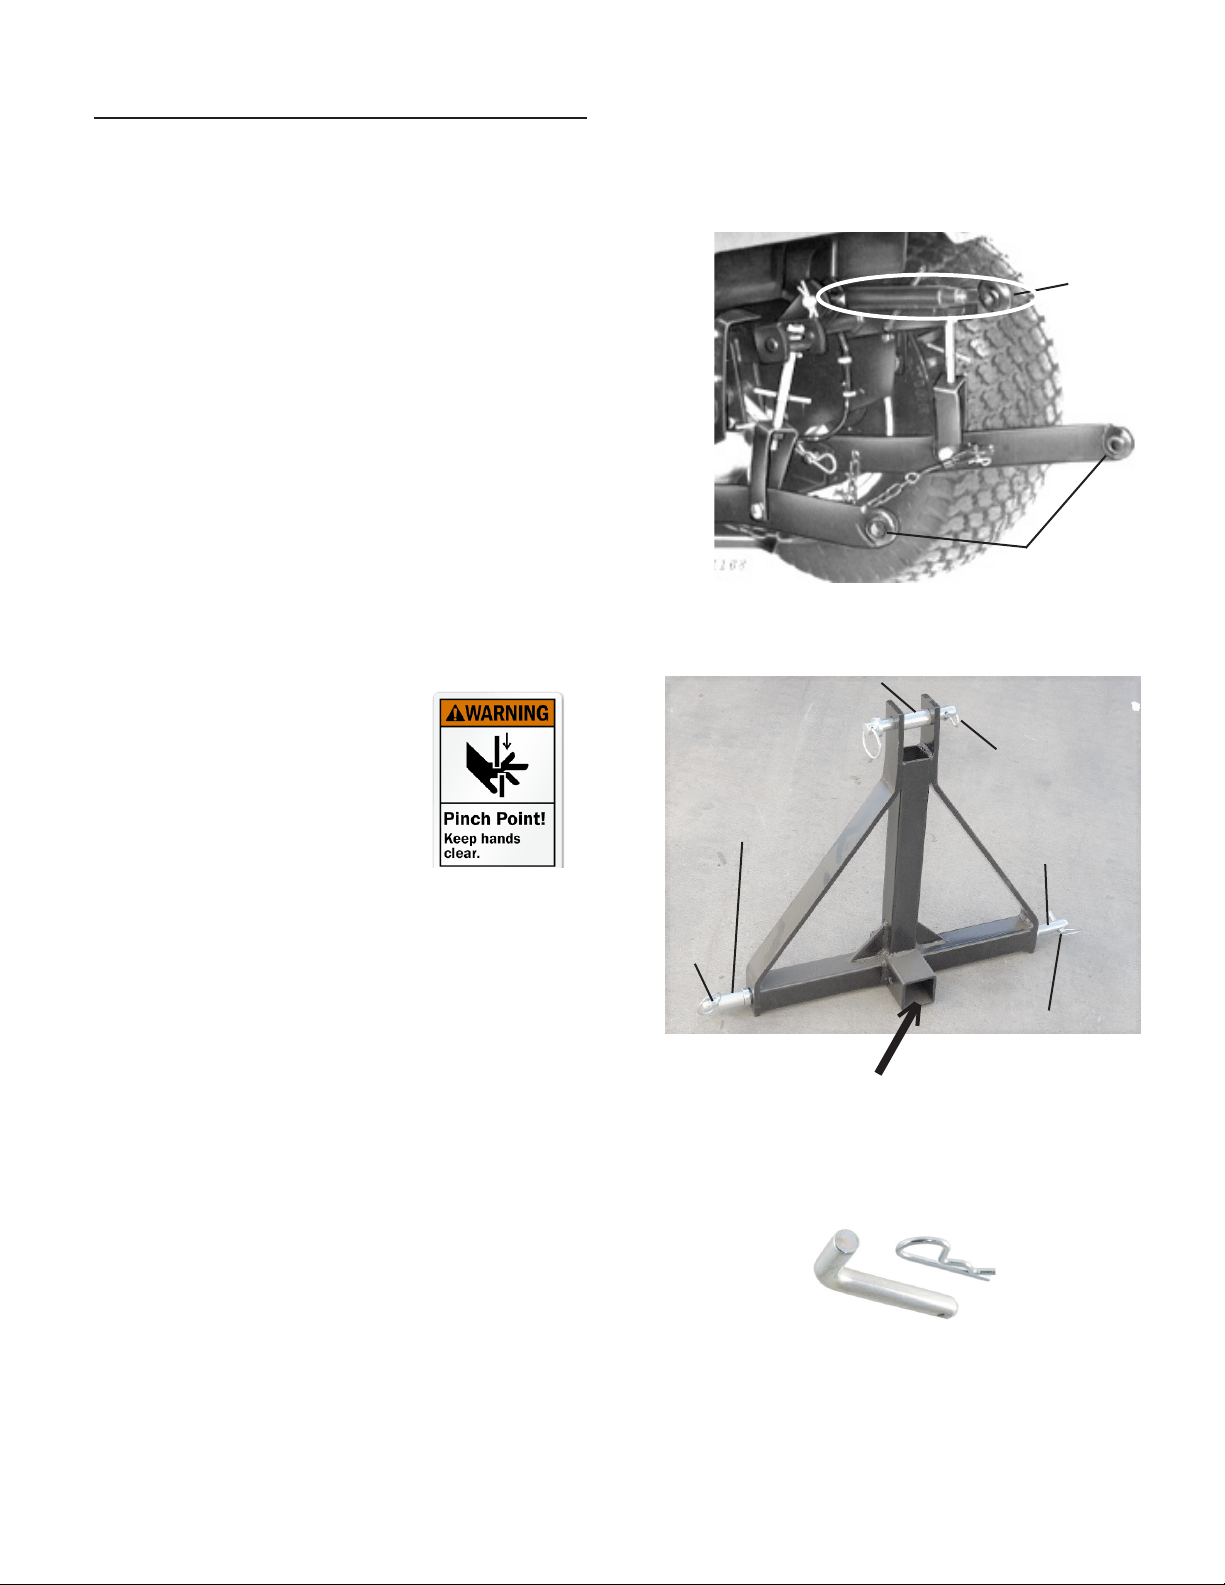
3. Use of the 3-Point Hitch Adapter
A. The 3-Point Hitch Adapter is designed
to be attached to a tractor’s 3-point hitch.
The receiver portion of the 3-Point hitch
Adapter can then be connected to the
hitch of a small trailer, or other type of
cargo carrier, for easy trailer/cargo carrier
mobility.
B. Understanding a tractor’s 3-point
hitch system: Read and understand all
warnings and instruction provided by the
tractor manufacturer on how to properly
adjust and use the tractor’s 3-point hitch
to connect hitch adapters and farm imple-
ments.
C. Before attaching
a small trailer or cargo carrier to a tractor,
one must consider whether tractor front
end weight must be added to insure tractor
and trailer/cargo carrier stability. Factors
such as weight of the load, and the tractor’s
recommended towing capacity need to be
factored-in.
Driving a tractor with insucient front end
counterweight could result in front end tip-
ping, resulting in personal injury and prop-
erty damage.
It is suggested that this issue be reviewed
with the manufacturer of the tractor before
attempting to attach a small trailer/cargo car-
rier to the tractor.
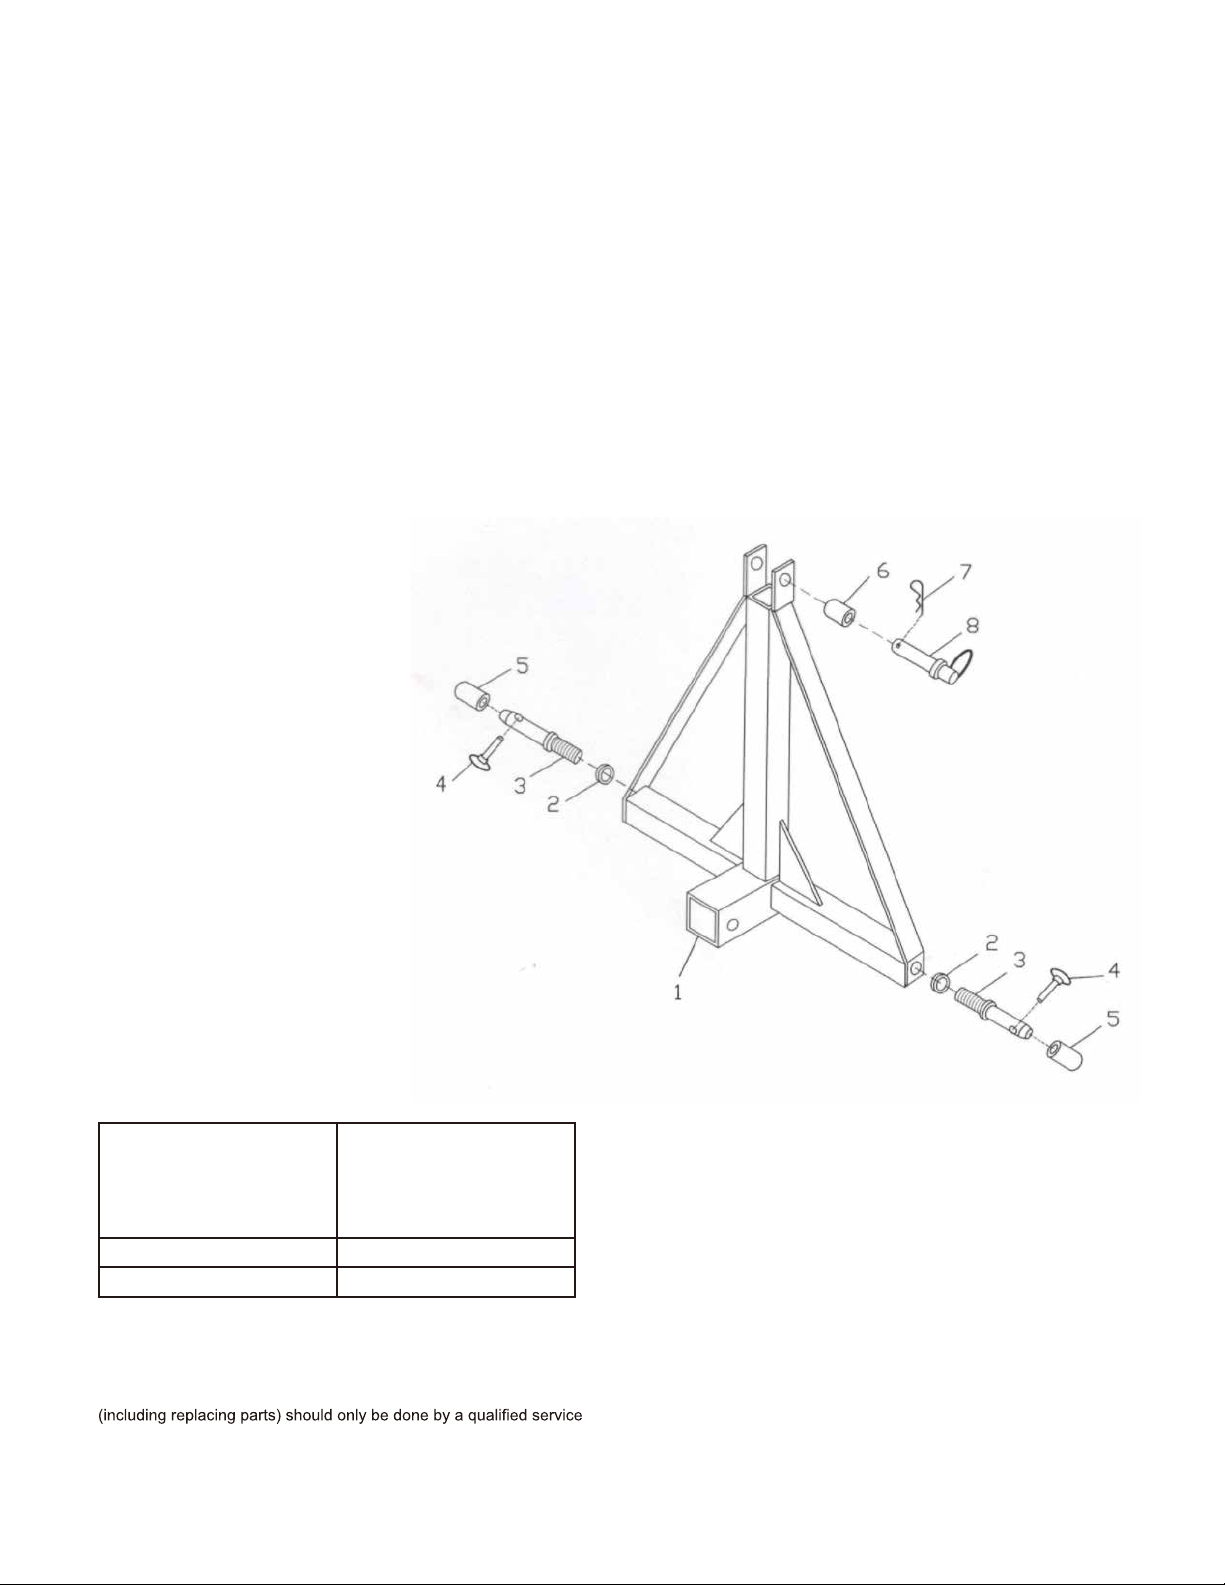
D. The trailer/cargo hitch must be com-
patible with a 2” x 2” Class III or Class
IV receiver. This trailer/cargo carrier hitch
must be properly installed by a qualied
service technician and be certied to sup-
port the weight of trailer/cargo carrier and its
load.
E. Do not modify the 3-Point Hitch Adapt-
er and do not use this product for pur-
poses that it was not designed for.
F. Never exceed the tractor’s maximum
towing capacity. For OFF-ROAD use
only.
G. Be aware of the danger of “dynamic
loading”. This situation arises when a load
is dropped onto the 3-Point Hitch Adapter
and it’s attached trailer/cargo carrier, result-
ing in a short term excessive load. Dynamic
loading can result in damage and failure of
the 3-Point Hitch Adapter, the trailer/cargo
carrier, the tractor, and personal injury to the
person(s) in the immediate area.
H. Keep children and spectators well clear
when setting up, attaching trailers, and ad-
justing or dismantleing this product.
I. Adhere to all Department of Transpor-
tation (D.O.T.) requirements when using
this product.
Industrial or commercial applications
must follow Occupational Safety and
Health Administration (OSHA) require-
ments.
J. Make sure the tractor’s engine is OFF,
with key removed, and parking brake
set, before connecting the 3-Point Hitch
Adapter to the tractor’s 3-point hitch.
K. The towed trailer, or cargo carrier, should
be disconnected from the tractor before
leaving the tractor unattended. Wheels of
trailer or cargo carrier should be chocked to
prevent unintentional movement.
L. Do not allow the 3-Point Hitch Adapter
to come in contact with an electrical source.
This product is not insulated and contact will
cause electrical shock.
Be aware of all power lines, electrical cir-
cuits, water pipes, and other mechanical
hazards, Some hazards may be hidden and
WARNING

Setting Up
the 3-Point Hitch Adapter
Model 50039 Page 4
will cause personal injury and/or property
damage, if contacted.
M. Always wear personal protective gear
when working. Wear ANSI approved safety
goggles with side shields. In dusty condi-
tions wear a dust mask. Wear hearing
protection, a hard hat, and heavy-duty work
gloves. All persons in the work area should
be protected with personal protective gear.
N. Never stand between the tractor and the
small trailer/cargo carrier that is to be at-
tached.
O. The 3-Point Hitch Adapter is bulky to
handle and is heavy. An assistant should
help set-up and attach this adapter to the
tractor.
If you do not have the experience or physi-
cal ability to do this type of work, setting up
the 3-Point Hitch Adapter should be done by
qualied service technicians.
P. When attaching hitch
of the small trailer/cargo
carrier to the 3-Point Hitch
Adapter, NEVER insert
nger into hitch pin hole
in an attempt to align this
accessory to the
trailer/carrier; serious
injury to ngers/hands
could occur.
Always use caution to protect ngers,
hands and other body parts from being
crushed or pinched when working with
the tractor, this adapter and attached
trailer/carrier.
Q. Note the position of the tractor’s ex-
haust pipes before attaching small trailer/
cargo carrier. Make sure exhaust pipes are
not in close proximity to the contents in the
trailer/carrier. Trailer/carrier contents could
catch on re due to heat from exhaust. If
this risk exists, do not attach trailer/carrier to
the tractor.
R. When not in use, the 3-Point Hitch
Adapter should be stored in a secure, dry
location that is out of reach of children.
Personal and Work Area Safety (continued)
Back end of tractor: 3-Point Link Arms
Top Link
Lower Links
3-Point Hitch Adapter
Hitch of Small Trailer/Cargo Carrier
connects to this 2”x 2” Receiver
using 5/8” diameter Steel Hitch Pin
and Safety R-Pin (both not included)
Joint Pin (8)
Retaining Ring
(7)
Joint Pin
(Threaded)
(3) Joint Pin
(Threaded)
(3)
Lynch Pin (4)
Lynch
Pin
(4)
Steel Hitch Pin and Safety R-Pin
(both not included)

Model 50039 Page 5
1. Refer to photos on previous page and
to the Assembly Diagram at end of this
manual.
2. Refer to all safety warnings and instruc-
tions previously mentioned on Pages 1
through 4 of this manual.
3. Always wear ANSI
approved safety goggles with side
shields when setting up, using, and
loading the 3-Point Hitch Adapter.
Always wear personal protective gear.
This product is bulky to handle and is
heavy. It is suggested that a qualied
assistant help in the set-up and loading
of the 3-Point Hitch Adapter.
4. Position the Lower Link Arms of the
Tractor in the lowest position.
Use lower threaded Joint Pins (3) of
3-Point Hitch Adapter to connect to Low-
er Link Arms of Tractor. Pull out Lynch
Pin (4) and slide Joint Pin through the ball
of Lower Link. Lock Joint Pin in place by
inserting Lynch Pin. Repeat this step with
the other Joint Pin (3).
5. Connect top end of 3-Point Hitch
Adapter to top link arm of tractor. Re-
move Retaining Ring (7) and pull out Joint
Pin (8). Carefully position top end of Hitch
Adapter in position around ball of Tractor’s
top link. Insert Joint Pin (8) through ball
and lock in place with Retaining Ring (7).
6. With the 3-Point Hitch Adapter now in
place, check that all pins and the retaining
ring are in place.
7. Check operation of the tractor’s 3 arm
link design. Make sure that the tractor’s
arm links move freely so that the 2”x 2”
receiver on the 3-Point Hitch Adapter can be
safely and easily manuvered into position to
connect with a small trailer/cargo carrier.
8. Connecting the small trailer/cargo car-
rier: Both the tractor and the small trailer/
cargo carrier must be on a at, level and
solid surface that is capable of supporting
the weight of the tractor, the small trailer/
cargo carrier and the load.
Slowly maneuver the tractor so that the 2” x
2” receiver meets the trailer’s/cargo carrier’s
hitch. Adjust the tractor’s Link Arms to posi-
tion the 2” x 2” receiver at the right height.
Connect the hitch to the 2” x 2” receiver us-
ing steel hitch pin (see photo Page 4). Se-
cure hitch pin with safety R-Pin.
NEVER insert nger
into hitch pin holes
in an attempt to align
the hitch to the receiver;
serious injury to
ngers/hands could
occur.
Make sure Safety R-Pin is always fully en-
gaged.
9. With set-up complete, before each use,
inspect the 3-Point Hitch Adapter’s connec-
tion to the tractor and also the small trailer/
cargo carrier; make sure that all hardware
is secure and all components are in good
working order.
Maintaining the 3-Point Hitch Adapter
Frequently check the condition of the 3-Point
Hitch Adapter, the Joint Pins (3, 8), the
Lynch Pins (4), and the Retaining Ring (7).
Check the condition of the Steel Hitch Pin
and the Safety R-Pin. Check the condition
of the small trailer/cargo carrier’s hitch.
Make sure that all components are in good
WARNING
Setting Up
the 3-Point Hitch Adapter
(continued)

Model 50039 Page 6
Parts List
SPECIFICATIONS
Maximum Load
Capacity
Do not exceed tractor’s
maximum towing capac-
ity; do not exceed small
trailer/cargo carrier maxi-
mum load capacity
Construction Heavy Duty, All Steel
Application For OFF-ROAD use only
Part # Description Qty
1 Hitch Frame 1
2 Spring Washer 2
3 Joint Pin with
thread end 2
4 Lynch Pin 2
5 Bushing 2
6 Bushing 1
7 Retaining Ring 1
8 Joint Pin 1
Assembly
Diagram
Limited Warranty
MAXXHAUL warrants to the original retail
purchaser that the product is free of defects in
material and workmanship at the time of ship-
ment. This 3-Point Hitch Adapter is warranteed
for 90 days from the date of purchase. This
warranty is expressly in lieu of all other warran-
ties, express or implied.
Proof of purchase is required for warranty trans-
actions; a copy of the original invoice or sales
receipt is required.
Maintaining the 3-Point
Hitch Adapter (continued)
condition. If the 3-Point Hitch Adapter or the
hitch becomes damaged through accident,
or if any weld damage is noted, the product
should be replaced.
Manufactured and Distributed by:
Maxx Group LLC
Camarillo, CA 93012 USA
www.maxxhaul.com
Note: The Parts List and Assembly Diagram is provided as a reference
tool only. Some parts are listed and shown for illustration purposes
only, and are not available as replacement parts. All repairs to this tool
technician.
Keep in mind that the warnings previously dis-
cussed cannot cover all possible conditions or
situations that could occur. It is important that
the person setting up and using this product
understand that common sense and caution are
factors which cannot be built into this product,
and must be supplied by the person(s) using
this product.
MAXXHAUL is not re-
sponsible for the attach-
ment or the installation of
this product or the small
trailer/cargo carrier’s
hitch. The attachment
of this product is critical
and beyond the control
of MAXXHAUL. It neither
guarantees, nor will it be
liable for any damage
resulting from the attach-
ment or improper use of
the 3-Point Hitch Adapter.
Table of contents
Popular Adapter manuals by other brands

iSystem
iSystem Infineon TC397XE user manual

StarTech.com
StarTech.com ICUSB2328 instruction manual

Rohde & Schwarz
Rohde & Schwarz R&S RT-Z1M manual

ZyXEL Communications
ZyXEL Communications PLA4215 quick start guide

Monacor
Monacor img Stage Line MC-31 manual

Adaptec
Adaptec APA-1480 SlimSCSI installation guide