Mazi CA-101 User manual

0
CA-101 KEYBOARD USER MANUAL

1
CA-101 Keyboard User Manual
V1.0
Thanks a lot for purchasing our product. If there is any question, please feel free to contact us.
This manual may have something inaccurate in technology, unsuited with the product’s functions and operations or the
misprints. The manual’s content will change with the enhanced functions of the product, as well as give the regular advance or
renew the product and procedure in this manual. The renewed content will be added in the new edition of this manual and no
separate notice will be given.
NOTES
LCD display can be easily damaged. Please do not press or exposure in sunshine for a long time;
The joystick can be easily damaged. If it needs to be repaired, please wrap and ship it by using original or
safety packaging;
This keyboard should be used in certain range of temperature and humidity, referring the technical index.
Please connect the keyboard correctly as this manual requires.

2
Conteúdo
Main Features...................................................................................................................................................................3
Control ..........................................................................................................................................................................3
Control protocol ...........................................................................................................................................................3
Divided control by host and auxiliary keyboard...........................................................................................................3
Features and functions .................................................................................................................................................3
Install Introduction ...........................................................................................................................................................3

3
Main Features
CA-101 keyboard is compatible with all of our company’s full series embedded DVRs. These keyboards can control
speed dome and PTZ either directly, or through the DVRs. Also they can control DVRs as well.
Control
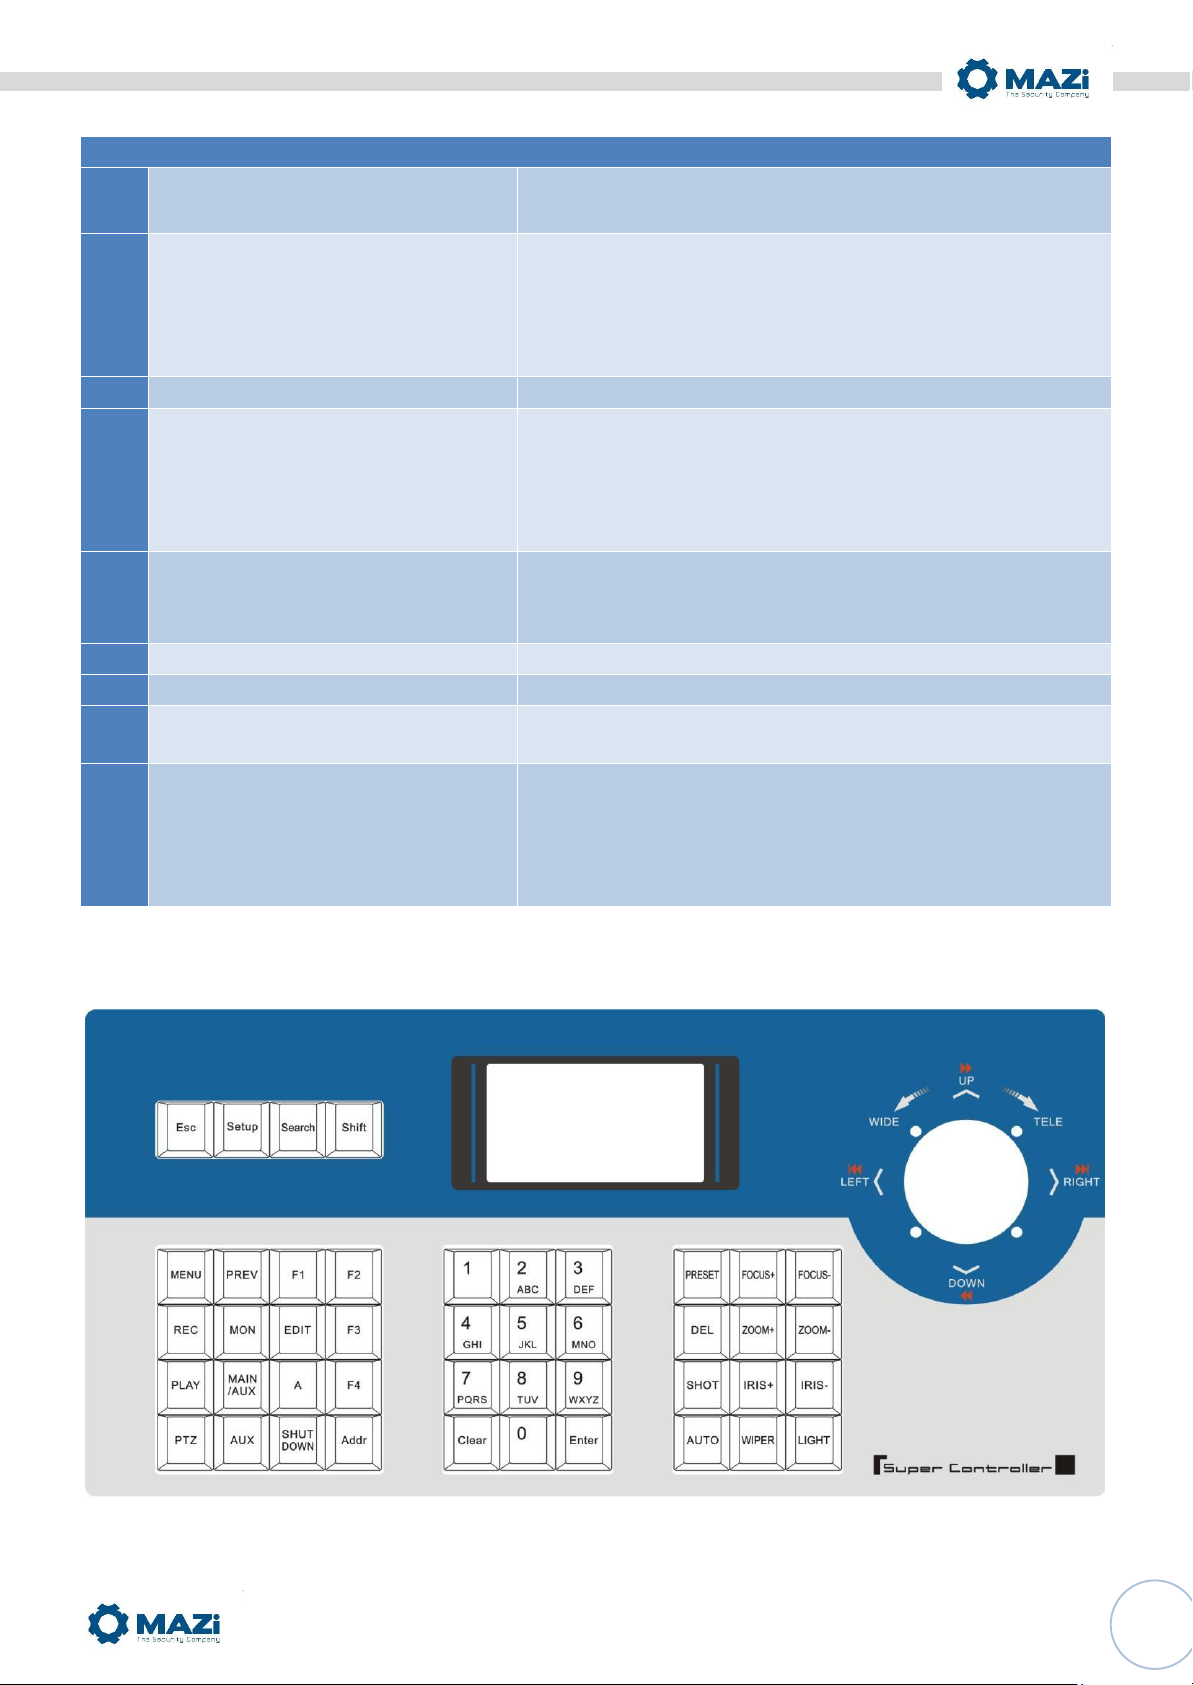
Completely replace the all functions of DVR front panel. Any operation is indicated in LCD display.
One keyboard can manage 31 DVRs maximum.
Control speed dome and PTZ: The speed dome and PTZ address is among 0~254.
Control protocol
Contain 9 kinds of speed dome and PTZ protocol. Users can require installing other specific protocol if the keyboard
has not contained. We will send the modified procedure to you to update keyboard procedure via RS-485
communication port, as it does not need to change hardware in advance.
Divided control by host and auxiliary keyboard
Classifying control can be supported in controlling embedded DRV, and 15 auxiliary keyboard can be connected, and
the ID ranging from 0 to 15
Classifying control can be supported in controlling quick DOME and decoder, and 15 auxiliary keyboard can be
connected, and the ID ranging from 0 to 15.
Features and functions
The flexibility of system is improved wisely as any equipments connect with RS485 can be set in different protocols
and baud rates. Due to all the configuration can be done on the LCD display, it is not needed to look for how to
change the protocol.
Install Introduction
Back panel interface introduction
R
S
485
EXP
O
R
T
P
TZ
-
C
O
N
P
TZ
-
A
U
X
G
r
ound
D
V
R
-
A
U
X
D
V
R
-
C
O
N
10 9 8 7 6 5 4 3 2 1
Ta Tb
Ra Rb G
G Ra Rb
Ta Tb
10 1
R
S
485
-
EXP
O
R
T
PTZ DVR
P
W
DC
-
12
V
1 2 3 4 5 6 7 8 9

4
No
Physical interface
1
Output of control PTZ
PTZ-CON
Host keyboard connects PTZ RS485 port. Ta is for RS485+,
and Tb is for RS485-
2
Input of auxiliary keyboard for PTZ
control
PTZ-AUX
Host keyboard connects auxiliary keyboard for PTZ control.
Host keyboard pin8 (Ra) connects auxiliary keyboard pin10
(Ta), and host keyboard pin7 (Rb) connects auxiliary keyboard
pin9 (Tb). Then auxiliary keyboard can control PTZ.
3
Ground
Ground control signal line terminal
4
Input of auxiliary control keyboard
for DVR control DVR-AUX
Host keyboard connects auxiliary keyboard for DVR control.
Host keyboard pin4 (Ra) connects auxiliary keyboard pin2 (Ta),
and host keyboard pin3 (Rb) connects auxiliary keyboard pin1
(Tb). Then auxiliary keyboard can control DVR.
5
Output of control DVR
DVR-CON
Connect host keyboard pin2 (Ta) with DVR KB port D+, and
connect host
keyboard pin1 (Tb) with DVR KB port D-
6
PTZ control indicator light
In PTZ control mode, the led is green lighted and twinkling.
7
DVR control indicator light
In DVR control mode, it is green and twinkling.
8
Power light PW
Host keyboard connects PTZ RS485 port. Ta is for RS485+,
and Tb is for RS485-
9
Power input DC-12V
Host keyboard connects auxiliary keyboard for PTZ control.
Host keyboard pin8 (Ra) connects auxiliary keyboard pin10
(Ta), and host keyboard pin7 (Rb) connects auxiliary
keyboard pin9 (Tb). Then auxiliary keyboard can Control PTZ.
CA-101 front panel introduction

5
Key button functions introduction
Button name
Function introduction
ESC
back to up-level menu
Setup
hold for 3 seconds, enter into keyboard configuration state (default password: 8888)
Search
press 1 second, check keyboard configuration: PTZ protocol
Shift
switch the control mode of embedded DVR or speed dome
MENU
show the main menu
PREV
switch the previews of single, four, nine, twelve, sixteen screens
F1
Quick key-press of setup speed dome, it is related to used protocol, refer to LCD explanation.
F2
Quick key-press of setup speed dome, it is related to used protocol, refer to LCD explanation.
REC
Enter into DVR manual record menu.
MON
specially control the four auxiliary display output ports of DS-8016HSI (hold for 2 seconds )
EDIT
Enter into DVR edit mode.
F3
Quick key-press of setup speed dome, it is related to used protocol, refer to LCD explanation.
PLAY
Enter into DVR playback menu.
MAIN/AUX
switch the main/aux output port (hold for 2 seconds)
A
switch input ways
F4
Quick key-press of setup speed dome, it is related to used protocol, refer to LCD explanation.
PTZ
Enter into DVR PTZ control menu.
AUX
In DVR control mode, this button is reserved.
Shut Down
power off DVR
Addr
choose addresses of PTZ or the device ID of embedded DVRs
Clear
clean currently input content
ENTER
confirm currently input content
0-9
A –Z
Number.: 0, 1, 2, 3, 4, 5, 6, 7, 8, 9
A-Z (26 letters)
PRESET
Setup the speed dome preset position
FOCUS+
set the lens focus near
FOCUS-
set the lens focus far
DEL
Delete the speed dome preset position
ZOOM+
zoom in the lens
ZOOM-
zoom out the lens
SHOT
Call the speed dome preset position
IRIS+
open the lens iris
IRIS-
close the lens iris
Auto
Set the speed dome to auto rotate depend on speed dome itself, please reference the speed
dome’s manual
WIPER
on/off the wiper relay

6
Joystick control introduction
fig
operation
function introduction
up
In PTZ control mode: control the movement of pan/tilt
In DVR control mode: play record file fast
down
In PTZ control mode: control the pan/tilt to move upon
In DVR control mode: play record file slowly
left
In PTZ control mode: control pan/tilt to move left
In DVR control mode: control record file backward
right
In PTZ control mode: control pan/tilt to move right
In DVR control mode: control record file forward
rotate left
zoom in the lens
rotate right
zoom out the lens
LCD display indication introduction
Any operation is indicated and corresponding in LCD display. The LCD will turn into electricity-save mode (minimum the
lightness) in 30 seconds without any operation.
Keyboard configuration and query
All the operation of keyboard configuration and query can be done via joystick and certain key buttons.
Keyboard menu tree
Configuration menu tree:
PTZ setup PTZ address corresponding protocol
Baud Rate
keyboard parameter password setup
Restore default setup
Sound setup
Keyboard ID setup
Inquire Keyboard parameter:
SYSTEM SEARCH model name
Keyboard serial number

7
Configuration illustration
Here is a example to illustrate how to set dome: change the communication protocol of dome 002 to PELCO-D, and
change the baud rate to 4800.
1. In the mode of standby (fig a), hold the “Setup”button for 3 seconds, login the main menu (fig b);
2. Enter the password (fig c, default password: 8888);
3. Press [Enter], enter into setup menu, operate the Joystick up and down to choose [PTZ SETUP] or [SYS SETUP] (fig
d);
4. Choose [PTZ SETUP], press [Enter] to enter in [PTZ SETUP];
5. Operate the Joystick left and right to choose the address of speed dome, e.g. 002 fig e, f , then press [Enter] to
enter the next level menu (fig g);
6. Operate the Joystick up and down to choose communication protocol, e.g. PELCO-D (fig h);
7. Operate the Joystick right to change the baud rate (fig i), and then choose the baud rate up and down (fig j);
8. Press [Enter], then press “ESC”until back to the standby mode (fig a);
9. Configuration is done
DVR

8
Typical wiring
diagram
Control speed dome

9
Control DVR

0
Technical Specification
Supported DVR number
31
Supported PTZ number
255
Control mode
RS-485 half-duplex mode
Baud rate: 1200 ~ 19200bps
Communication interface
RS-485 port
LCD screen
128mm*64mm
Joystick
3D
Maximum cable length
1200m
Power supply
DC 12V
Working temperature
-10℃-- +55℃
Working humidity
10%--90%
Size
360mm*200mm*108mm
Weight
3.2Kg
Table of contents
Popular Keyboard manuals by other brands

A4Tech
A4Tech RFKB-21 quick start guide

Accuratus
Accuratus Aurora 1 specification

Ecomani
Ecomani MINI user guide

Linkworld Electronic
Linkworld Electronic LK1100 Quick installation guide

Jing Mold Electronic Technology
Jing Mold Electronic Technology JME-8282R user guide

Cherry
Cherry MultiBoard G81-7000 Specifications