MB QUART WRC-P Specification sheet

Operation
and Installation
Manual
WRC-P
Watertight Marine
Radio Controller

Introduction
2
Index
Safety Information
DO NOT OPEN COVERS AND DO NOT REPAIR
YOURSELF. PLEASE REFER SERVICING TO A
QUALIFIED TECHNICIAN.
CHANGES OR MODIFICATIONS TO THIS PRODUCT
NOT APPROVED BY THE MANUFACTURER WILL
VOID THE WARRANTY AND WILL VIOLATE FCC
APPROVAL.
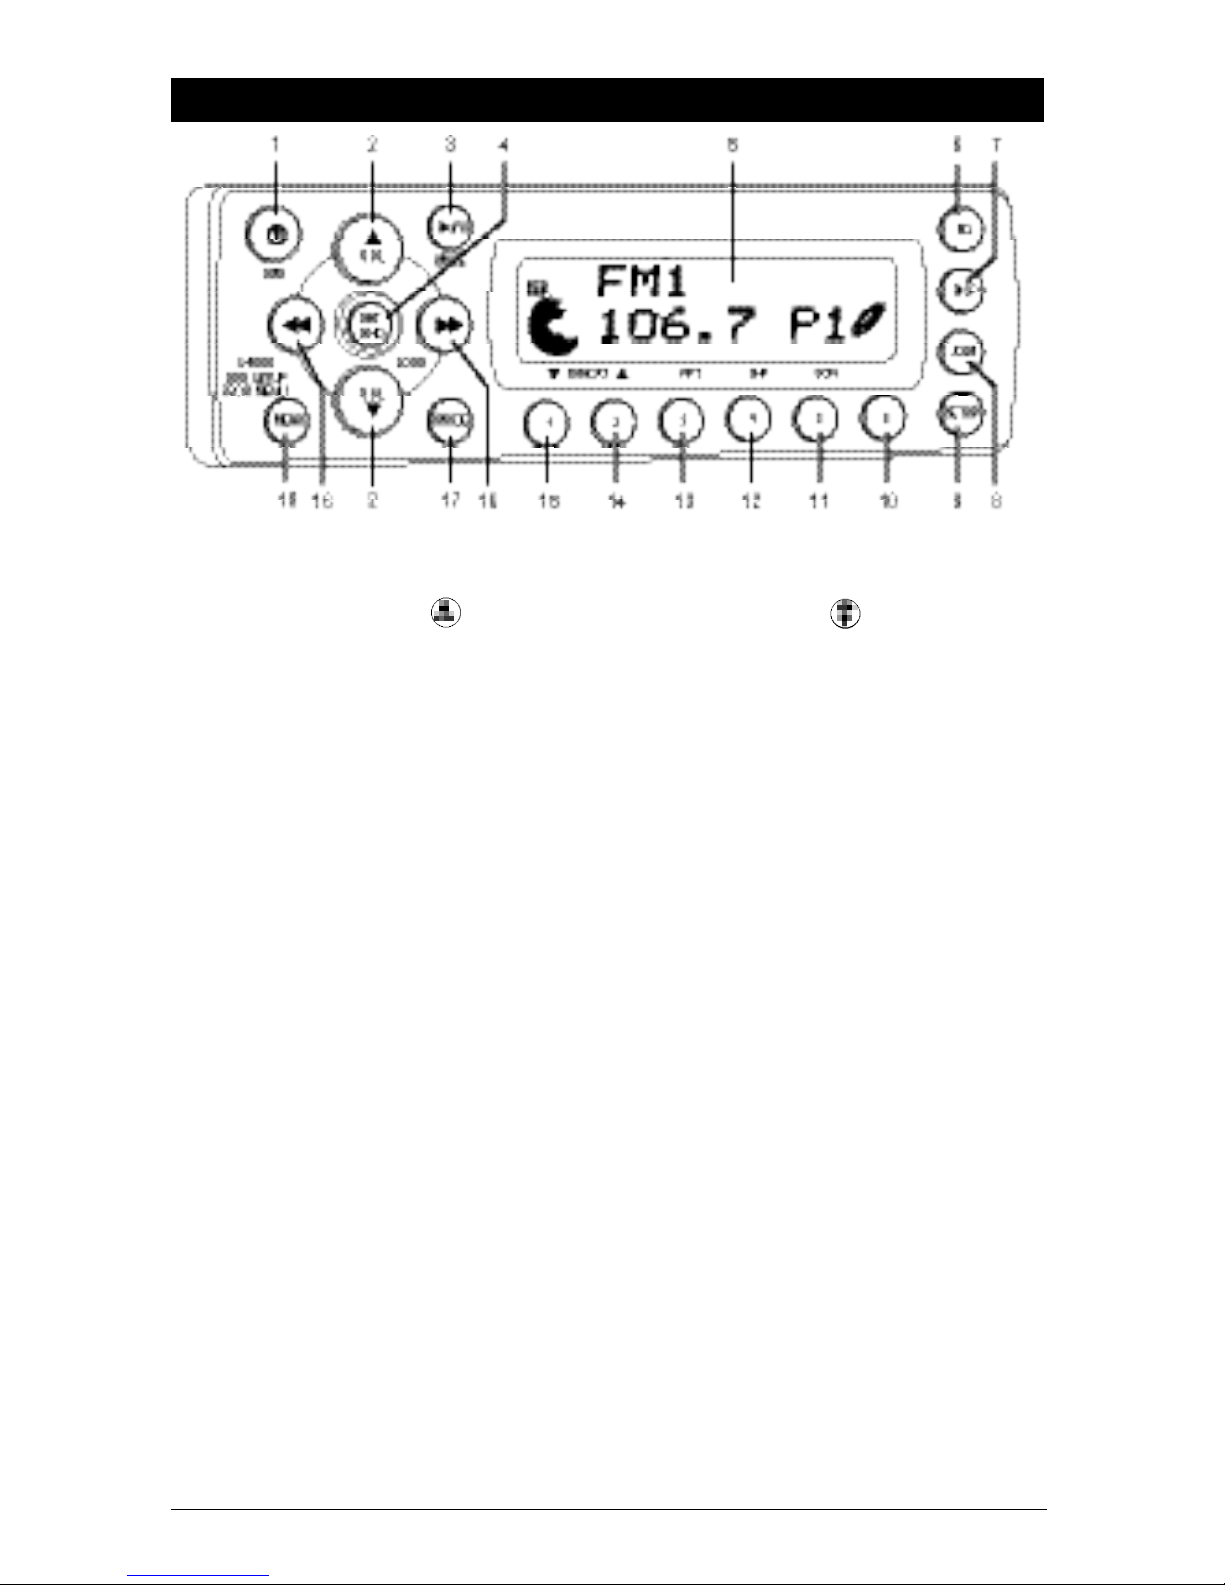
Button Locations and Functions . . . . . . . . . . . . . . . . . . . . . . . . . . . . . . . . . . . . . . . . . . . . . . . . . . . . . 3-4
System with DVD Player (Model: WM1-DVD)
General Operation . . . . . . . . . . . . . . . . . . . . . . . . . . . . . . . . . . . . . . . . . . . . . . . . . . . . . . . . . . 5
AM/FM Radio Operations . . . . . . . . . . . . . . . . . . . . . . . . . . . . . . . . . . . . . . . . . . . . . . . . . . . . 5-7
Sound Controls . . . . . . . . . . . . . . . . . . . . . . . . . . . . . . . . . . . . . . . . . . . . . . . . . . . . . . . . . . . . 7-9
Disc Warnings . . . . . . . . . . . . . . . . . . . . . . . . . . . . . . . . . . . . . . . . . . . . . . . . . . . . . . . . . . . . . 10
CD Operation. . . . . . . . . . . . . . . . . . . . . . . . . . . . . . . . . . . . . . . . . . . . . . . . . . . . . . . . . . . . . . 10-11
DVD Operation . . . . . . . . . . . . . . . . . . . . . . . . . . . . . . . . . . . . . . . . . . . . . . . . . . . . . . . . . . . . 12-14
MP3 Disc Operation . . . . . . . . . . . . . . . . . . . . . . . . . . . . . . . . . . . . . . . . . . . . . . . . . . . . . . . . 15
CD Changer Operation. . . . . . . . . . . . . . . . . . . . . . . . . . . . . . . . . . . . . . . . . . . . . . . . . . . . . . . 16-17
Sirius Satellite Radio Operation. . . . . . . . . . . . . . . . . . . . . . . . . . . . . . . . . . . . . . . . . . . . . . . . 18-19
IPOD Operation . . . . . . . . . . . . . . . . . . . . . . . . . . . . . . . . . . . . . . . . . . . . . . . . . . . . . . . . . . . . 20-21
USB Operation. . . . . . . . . . . . . . . . . . . . . . . . . . . . . . . . . . . . . . . . . . . . . . . . . . . . . . . . . . . . . 22
Auxiliary Audio/Video Input Operation . . . . . . . . . . . . . . . . . . . . . . . . . . . . . . . . . . . . . . . . . . 23
System with CD Player (Models: WM1-CD and WR1-CD)
General Operation . . . . . . . . . . . . . . . . . . . . . . . . . . . . . . . . . . . . . . . . . . . . . . . . . . . . . . . . . . 24
AM/FM Radio Operations . . . . . . . . . . . . . . . . . . . . . . . . . . . . . . . . . . . . . . . . . . . . . . . . . . . . 24-26
Sound Controls . . . . . . . . . . . . . . . . . . . . . . . . . . . . . . . . . . . . . . . . . . . . . . . . . . . . . . . . . . . . 26-28
CD Operation. . . . . . . . . . . . . . . . . . . . . . . . . . . . . . . . . . . . . . . . . . . . . . . . . . . . . . . . . . . . . . 29
MP3 Disc Operation . . . . . . . . . . . . . . . . . . . . . . . . . . . . . . . . . . . . . . . . . . . . . . . . . . . . . . . . 30
CD Changer Operation. . . . . . . . . . . . . . . . . . . . . . . . . . . . . . . . . . . . . . . . . . . . . . . . . . . . . . . 30-31
Sirius Satellite Radio Operation. . . . . . . . . . . . . . . . . . . . . . . . . . . . . . . . . . . . . . . . . . . . . . . . 32-34
IPOD Operation . . . . . . . . . . . . . . . . . . . . . . . . . . . . . . . . . . . . . . . . . . . . . . . . . . . . . . . . . . . . 35-36
Auxiliary Audio Input Operation . . . . . . . . . . . . . . . . . . . . . . . . . . . . . . . . . . . . . . . . . . . . . . . 36
USB Operation. . . . . . . . . . . . . . . . . . . . . . . . . . . . . . . . . . . . . . . . . . . . . . . . . . . . . . . . . . . . . 37
Installation . . . . . . . . . . . . . . . . . . . . . . . . . . . . . . . . . . . . . . . . . . . . . . . . . . . . . . . . . . . . . . . . . . . . . . 38
Warranty . . . . . . . . . . . . . . . . . . . . . . . . . . . . . . . . . . . . . . . . . . . . . . . . . . . . . . . . . . . . . . . . . . . . . . . 39
DVD
CD
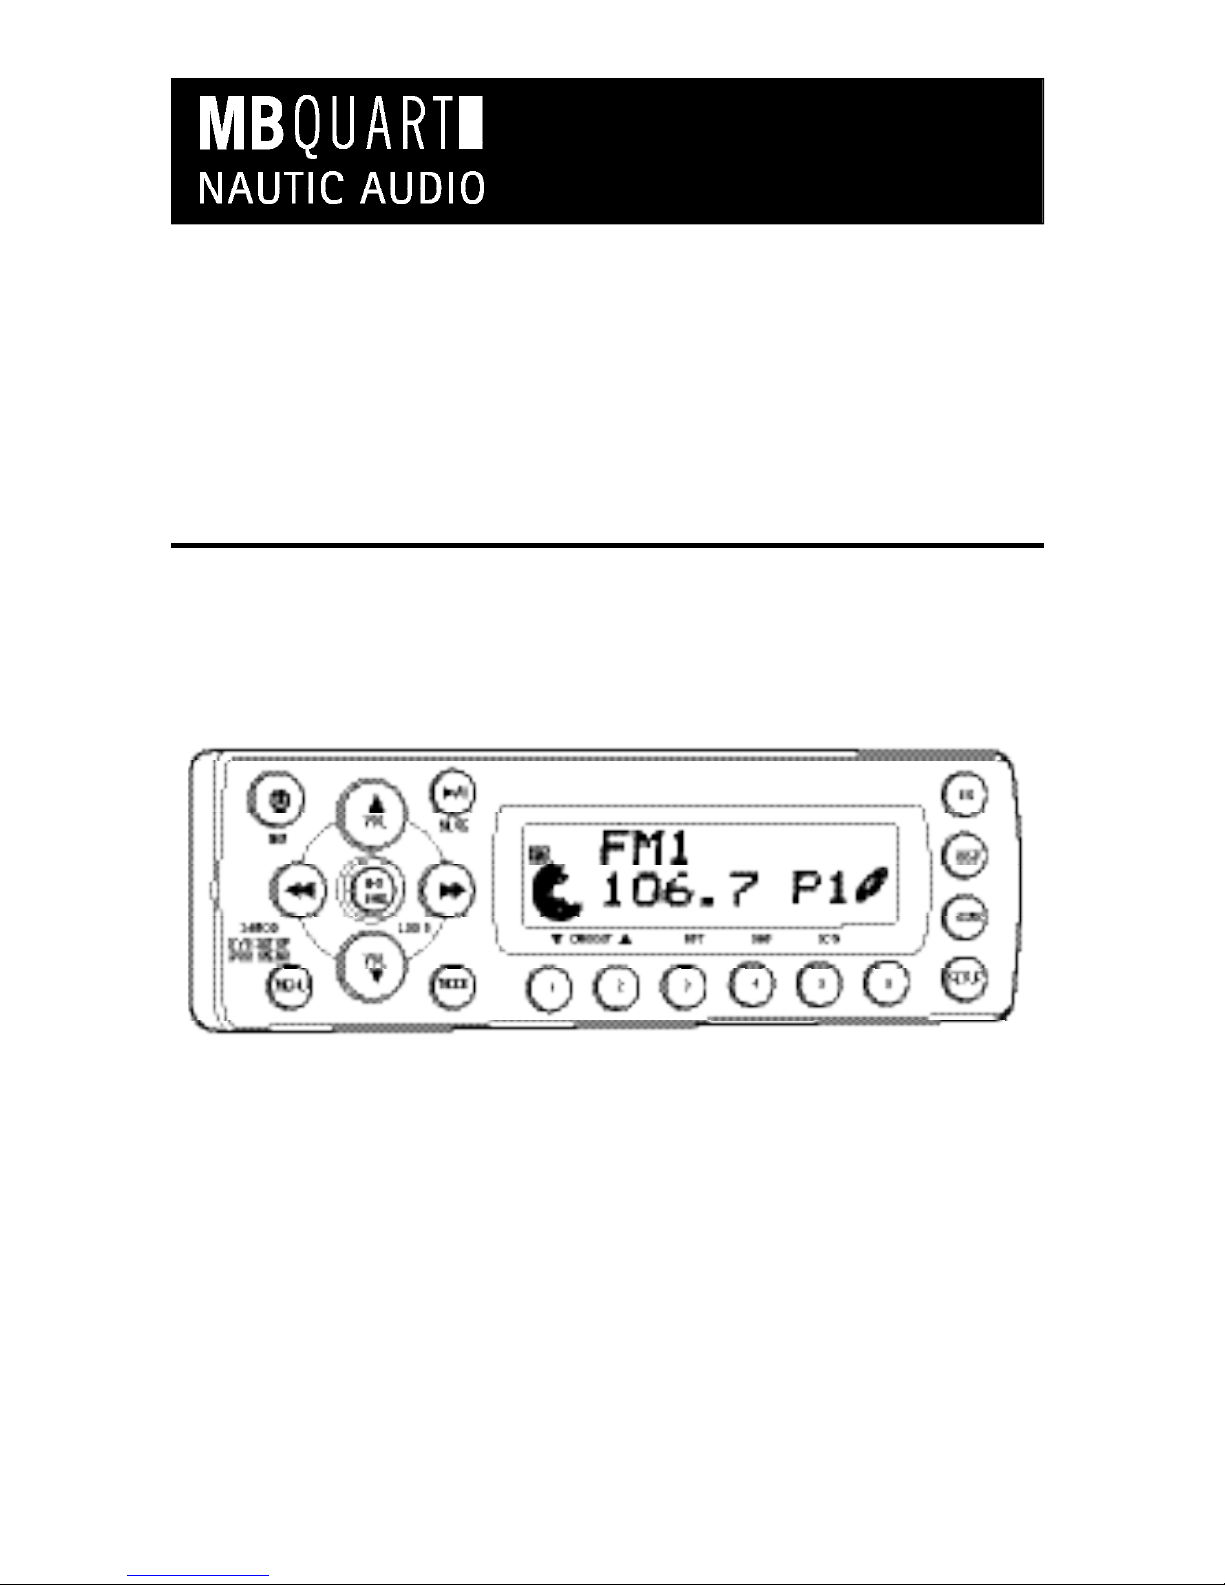
Please take the time to read all of the information in this manual.
The WRC-P controls 2 different types of MB Quart systems:
• System with DVD player (Model: WM1-DVD).
• System with CD player (Models: WM1-CD and WR1-CD).
Therefore this manual has 2 separate sections: DVD and CD. Consult your dealer to determine your type of
system.
Familiarity with operation will help you obtain the best possible performance from your new Marine Radio
Controller.

Button Locations and Functions
3
1.
Power On/Off and Display Dimmer: Press to turn the unit on or off. Press and hold to dim the display.
Press and hold again to restore display’s illumination.
2. Volume Control: Press the button to increase the volume and press the button to decrease
the volume.
3. Disc Play/Pause and Mute Button:
CD, DVD and CD Changer Mode: Press to pause disc play, press again to resume play.
Radio, Sirius Satellite Radio and AUX/AV Input Modes: Press to mute volume level. Press again to restore.
4. Enter/Band and Loud Button:
Radio: Press to select AM1, AM2, FM1, FM2 and FM3 radio bands.
Loudness: Press and hold button until “LOUD ON” appears in the display to boost high and low tones
at low volume levels. To deactivate press and hold again until “LOUD OFF” appears in the display.
IPOD Mode: See IPOD Operation Section for more information.
5. Display Area: This area displays all function information for the radio, disc player, auxiliary and IPOD
modes.
6. Equalizer Button: Press to choose between preset sound equalization settings.
7. Display Button (DISP): Press to display information if available.
CD, DVD and CD Changer Mode: Press to display track/chapter information.
8. ASM Button (Automatic Station Memory):
Radio Mode: Press and hold for automatic station memory storing. Press and release for scanning
memorized stations.
9. Setup Button: Press to access Bass, Treble, Balance, Fader and Subwoofer controls. Press and hold
for 10 seconds to access Beep Confirmation, Default Volume and AM/FM Tuning System.
10. Multi-Function Button #6:
Radio Mode: Press and hold until a beep is heard to store a radio station into memory #6 (CH6).
Press and release when recalling preset radio station #6
11. Multi-Function Button #5:
Radio Mode: Press and hold until a beep is heard to store a radio station into memory #5 (CH5).
Press and release when recalling preset radio station #5.
CD Mode (WM1-CD and WR1-CD only): Press to preview each track on the CD for 10 seconds. Press
again to cancel.
CD Changer Mode: Press to preview each track on the CD for 10 seconds. Press and hold to preview
each track on every CD for 10 seconds. Press again to cancel.

4
Button Locations and Functions
12. Multi-Function Button #4:
Radio Mode: Press and hold until a beep is heard to store a radio station into memory #4 (CH4).
Press and release when recalling preset radio station #4.
CD Mode: Press to play all the tracks on the CD in random order. Press again to cancel.
CD Changer Mode: Press to play all the tracks on the CD in random order. Press and hold to play all
the CDs in random order. Press again to cancel.
13. Multi-Function Button #3:
Radio Mode: Press and hold until a beep is heard to store a radio station into memory #3 (CH3).
Press and release when recalling preset radio station #3.
CD Mode: Press to repeat a CD track. Press again to cancel.
CD Changer Mode: Press to repeat a CD track. Press and hold to repeat the entire disc. Press again
to cancel.
14. Multi-Function Button #2:
Radio Mode: Press and hold until a beep is heard to store a radio station into memory #2 (CH2).
Press and release when recalling preset radio station #2.
CD Changer Mode: Push to change to a higher number disc in the CD changer.
15. Multi-Function Button #1:
Radio Mode: Press and hold until a beep is heard to store a radio station into memory #1 (CH1).
Press and release when recalling preset radio station #1.
CD Changer Mode: Push to change to a lower number disc in the CD changer.
16. Tune/Track Buttons:
Radio Mode: Press either button and the tuner will scan to the next strong station and stop. Then
press and hold either button until “MANUAL” appears in the display then release. Again press either
button until the desired radio station appears in the display.
CD and CD Changer Mode: Press to change the track to a lower or higher track.
17. Mode Button:
Press to change the play source: Radio, CD/DVD and AUX/AV. Depending on what other input sources
are connected (IPOD, Sirius and CD Changer) these play sources will also appear in the display.
18. Menu Button:
Sirius Mode: See Sirius Satellite Radio Operation section for more information.
IPOD Mode: See IPOD Operation section for more information.

5
Selecting the AM or FM Band:
Press the ENT BND button repeatedly and select
from FM1, FM2, FM3, AM1 or AM2.
Note: Radio station call letters may be displayed
instead of the radio band.
General Operations
Power On/Off:
Press the button to turn the unit on and off.
Selecting a Play Source:
To select a play source, press the MODE button
until the desired source appears in the display:
AM1, AM2, FM1, FM2 or FM3 or Radio
Station Call Letters (AM and FM Radio),
SIRIUS (Satellite Radio Input, if connected),
DVD PLAY(Built-in DVD/CD Player),
CD-CH (CD Changer, if connected),
AV IN (Auxiliary Audio/Video Input),
USB (MP3 Player, if connected) and
IPOD (IPOD Input, if connected).
Dimming the Display:
Press and hold the button to dim the bright-
ness of the display. Press and hold again to
restore the brightness of display.
Display Selection:
Press the DISP button to display the information
according to the mode selected.
Example: Press the DISP button in the Sirius
Radio mode to display “SONG-TITLE _
>
ARTIST_
> CATEGORY _
> SONG TITLE” . . .
AM/FM Radio Operations
Power On/Off:
Press the button to turn the unit on.
Selecting the Play Source:
Press the MODE button until “AM1, AM2, FM1,
FM2 or FM3 or radio station call letters” appears
in the display.
DVD
DVD

6
AM/FM Radio Operation (Continued)
Manually Tuning in a Radio Station:
Press and hold either the or button until
“MANUAL” appears in the display then release.
Then press the or until the desired radio
station appears in the display.
Tuning in a Radio Station Using Seek:
Press and release either the or button
and the tuner will scan to the next strong station,
stop seeking and start playing.
Memorizing Radio Stations:
1. Press the ENT BND button to select either the
FM1, FM2, FM3, AM1 or AM2 radio band.
2. Tune-in the desired radio station.
3. To memorize the station press and hold any-
one of the six radio station recall buttons until
you hear a beep.
Recalling Memorizing Radio Stations:
1. Press the ENT BND button to select either the
FM1, FM2, FM3, AM1 or AM2 radio band.
2. Press and release one of the six radio station
recall buttons to select the memorized radio
station.
Automatically Store Radio Stations:
1. Press the ENT BND button to select either the
FM1, FM2, FM3, AM1 or AM2 radio band.
2. Press and hold the ASM button and
“SEARCH” will appear in the display. The
tuner will search for the strongest stations
and store them into memory. The new sta-
tions will replace stations that were previously
stored in the current band.
Note: After the new stations are stored into
memory the tuner will start scanning the
newly memorized stations.
3. Press the ASM button to stop scanning when
a desired station is reached.
Hold
DVD

7
Sound Controls
Bass:
1. Select the Bass mode (BAS) by pressing the
SETUP button.
2. Increase the Bass by pressing the button.
Decrease the Bass by pressing the button.
3. Control reverts back to volume control after 5
seconds.
Volume:
Increase the volume by pressing the button.
Decrease the volume by pressing the button.
Bass, Treble, Balance, Fader and
Subwoofer Controls
Select the desired sound mode by pressing the
SETUP button. The modes will be displayed in
the following order: Bass, Treble, Balance, Fader,
Subwoofer Line Level Output and Subwoofer
Cutoff Frequency.
AM/FM Radio Operation (Continued)
Scanning Stored Radio Stations:
1. Press the ENT BND button to select either the
FM1, FM2, FM3, AM1 or AM2 radio band.
2. Press the ASM button and the tuner scans for
preset stations stored in the current band and
pauses for 5 seconds at each station. When a
desired station is reached, press the ASM but-
ton again to stop scanning.
Scanning for FM Radio Stations According
to Program Type (PTY):
1. Press the ENT BND button to select either the
FM1, FM2 or FM3 radio band.
2.
Press the MENU button to display the program
type.
3. Press the or to select the desired pro-
gram type (PTY).
(Example: News, Information,
Sports, etc.)
4. Press the or button to search a station
with the selected program type (PTY).
DVD
DVD

8
Treble:
1. Select the Treble mode (TRB) by pressing the
SETUP button.
2. Increase the Treble by pressing the button.
Decrease the Treble by pressing the button.
3. Control reverts back to volume control after 5
seconds.
Balance:
1. Select the Balance mode (BAL) by pressing the
SETUP button.
2. To adjust the amount of sound output to the
Right speakers press the button.
To adjust the amount of sound output to the
Left speakers press the button.
BAL L=R = Equal sound right and left speakers.
BAL 10R = Right speakers only.
BAL 10L = Left speakers only.
3. Control reverts back to volume control after 5
seconds.
Sound Controls (Continued)
Fader:
1. Select the Fader mode (FAD) by pressing the
SETUP button.
2. To adjust the amount of sound output to the
Rear speakers press the button.
To adjust the amount of sound output to the
Front speakers press the button.
FAD F=R = Equal sound front and rear speakers.
FAD R10 = Rear speakers only.
FAD F10 = Front speaker only.
3. Control reverts back to volume control after 5
seconds.
Subwoofer Line Level Output (SWG):
1. Select the Subwoofer Line Level Output mode
(SWG) by pressing the SETUP button.
2. To adjust the Subwoofer Line Level Output
higher press the button.
To adjust the Subwoofer Line Level Output
lower press the button.
SWG 00 = No gain.
SWG -12 = Minimum level.
SWG 12 = Maximum level.
3. After 5 seconds control reverts back to volume
control.
Note: If subwoofer output is turned Off, Subwoofer
Line Level Output mode is not accessi
ble. See
Subwoofer Output (page 9) for more information.
DVD

9
Subwoofer Output:
Press and hold the EQ button to turn subwoofer
output On and Off. “SW” appears in the display
when the subwoofer is On and “SW” does not
appear when the subwoofer output is Off.
Loudness:
To boost high and low tones at low volume lev-
els, press and hold the ENT BND button until
“LOUD ON” appears in the display. To deselect,
press and hold the ENT BND button again until
“LOUD OFF” appears in the display.
Mute:
Press and release the MUTE button to mute the
volume level. If a disc is playing the MUTE but-
ton will pause the disc. Press the MUTE button
again to restore the volume or resume playing
the disc.
Equalizer (EQ):
Press the EQ button to choose between the pre-
set equalizer settings: FLAT, CLASSICS, POP M,
ROCK M, JAZZ and DSP OFF as indicated in the
display area.
Subwoofer Cutoff Frequency (SWF):
1. Select the Subwoofer Cutoff Frequency mode
(SWF) by pressing the SETUP button.
2. To adjust the Subwoofer Cutoff Frequency
press the or button.
SWF 160 = Low Pass 160Hz
SWF 120 = Low Pass 120Hz
SWF 80 = Low Pass 80Hz
3. After 5 seconds control reverts back to volume
control.
Note: If subwoofer output is turned off, Subwoofer
Cutoff Frequency mode is not accessi
ble. See
Subwoofer Output (below) for more information.
Sound Controls (Continued)
DVD

10
Disc Warnings
Disc Formats Supported by this Player:
Disc Cleaning:
Use a dry soft cloth to wipe disc the surface. If the
disc is quite dirty, use a soft cloth slightly moist with
isopropyl (rubbing) alcohol. Never use solvents
such as benzine, thinner or conventional record
cleaners as they may mar the surface of the disc.
Note: A disc may become somewhat scratched
(although not enough to make it unusable) depend-
ing on handling and conditions in the usage envi-
ronment.
Handling:
• Dirt, dust, scratches and warping disc will cause
non operation.
• Do not place stickers on disc or scratch disc.
• Do not place discs in the following places: Direct
sunlight, Dirty, dusty and damp areas, Near car
heaters, Car seats or dashboard.
CD Operation
General Operations:
1. Press the button to turn the unit On.
2. Press the OPEN button on the WM1-DVD to
fold down the front panel to access the disc
player slot.
3. Gently insert the disc into the slot with the
label side up. The unit will automatically load
the disc.
Note: If a disc does not auto-load, DO NOT
FORCE it into the slot, as you may already have
a disc loaded as indicated by the inserted disc
icon.
DVD
DVD

11
Ejecting a CD:
1. Press the OPEN button to fold down the front
panel to access the disc slot.
2. Press the button to eject a disc.
CD Track Selection:
Press the button to select a lower track.
Press the button to select a higher track.
The track number will appear in the display.
CD Operation (Continued)
Pausing a CD:
Press the button to pause the disc, press it
again to resume play.
Random CD Track Play Order:
Press the SHF button until “SHF” appears in the
display. The tracks on the disc will play in a ran-
dom order. To cancel this feature press the SHF
button again.
Repeating a CD Track:
The WM1-DVD’s default setting is to repeat the
disc. So when the CD mode is selected, “RPTA”
appears in the display, the disc will play the
entire disc and then continually repeat the disc.
To repeat a CD track press the RPT button until
“RPT” appears in the display. The CD track will
now play repeatedly.
The repeat feature operates in the following
sequence: Disc Repeat (RPTA) _
> Repeat Off_
>
Track Repeat (RPT) _
> Disc Repeat (RPTA) . . .
DVD

12
Stopping a DVD:
Press the button to stop the disc. To resume
play, press the button.
Pressing the button 2 times. Then pressing
the button and the disc will start playing
from the beginning.
DVD Operation
General Operations:
1. Press the button to turn the unit On.
2. Press the OPEN button on the WM1-DVD to
fold down the front panel to access the disc
player slot.
3. Gently insert the disc into the slot with the
label side up. The unit will automatically load
the disc.
Note: If a disc does not auto-load, DO NOT
FORCE it into the slot, as you may already have
a disc loaded as indicated by the inserted disc
icon.
Pausing a DVD:
Press the button to pause the disc, press it
again to resume play.
Playing a DVD:
Press the button to play the disc.
DVD

13
Ejecting a DVD:
1. Press the OPEN button to fold down the front
panel to access the disc slot.
2. Press the button to eject a disc.
DVD Operation
Fast Forward / Fast Reverse Disc Play:
Press and hold the (fast forward) or
(fast reverse) button during play. Each time the
button is pressed and held, the speed of fast for-
ward/fast reverse changes in the following order:
2X, 4X, 8X, 20X
To resume normal play, press the button.
Menu Function:
Press the DVD MENU button during disc play
and the main menu will be displayed. Scroll
through the menu with the NAVIGATION BUT-
TONS. Select a feature by pressing the OK but-
ton.
DVD Chapter Selection:
Press the button to select a lower chapter.
Press the button to select a higher chapter.
The chapter number will appear in the display.
Chapter selection can also be selected by using
the remote control. Press the chapter selection
number button that corresponds to the chapter
you want to play.
For example: If you want to play chapter 8, press
button 8button.
If you want to play chapter 28, press the 2but-
ton followed immediately by the 8button.
Chapter 28 will start playing and “28” will appear
in the display.
DVD

14
DVD Operation (Continued)
Audio Language Menu:
Press the AUDIO button during playback to select
the desired audio/language setup.
Subtitle Language Menu:
Press the SUB-T button during playback. Each
time the button is pressed, the subtitle language
changes in sequential order.
• Some discs may only contain one subtitle lan-
guage.
• Depending on the disc, the number of subtitle
languages may be different.
Press the DVD SETUP button on the remote con-
trol to display the Setup Menu:
System Setup Page:
Use the navigation buttons to scroll between the
menu items. Make a selection by pressing the
OK button.
• TV System: NTSC, PAL, Auto
• Screen Saver: On, Off.
• TV Type: 4:3PS, 4:3LB, 16:9
• Password: _ _ _ _
• Rating: 1 Kid Safe
2 G
3 PG
4 PG13
5 PG-R
6 R
7 NC-17
8 Adult
• Default: Restore
• Exit Setup
Language Setup Page:
Use the navigation buttons to scroll between the
menu items. Make a selection by pressing the OK
button. Language Setup Options:
• OSD Language: English, German, Spanish,
French, Portuguese, Italian, Russian
• Audio Lang: English, German, Spanish,
French, Portuguese, Italian, Russian
• Subtitle Lang: English, German, Spanish,
French, Portuguese, Italian, Russian, Off
• Menu Lang: English, German, Spanish,
French, Portuguese, Italian, Russian, Off
• Exit Setup
Audio Setup Page:
Use the navigation buttons to scroll between the
menu items. Make a selection by pressing the OK
button. Audio Setup Options:
• Key: #, +3, +2, 0, -2, -4, b
• Exit Setup
DVD
Note: To access the DVD Setup Menu a DVD disc has to be inserted.

15
MP3 Disc Operation
General Operations:
1. Press the button to turn the unit On.
2. Press the OPEN button to fold down the front
panel to access the disc player slot.
3. Gently insert the disc into the slot with the
label side up. The unit will automatically load
the disc.
Note: If a disc does not auto-load, DO NOT
FORCE into the slot, as you may already have a
disc loaded.
Disc Track Selection:
Press the button to select a lower track.
Press the button to select a higher track.
The track number will appear in the display.
Display Selection:
Press the DISP button to display the elapse time.
Pausing a Disc:
Press the button to pause the disc, press it
again to resume play.
Repeating a Track/
Random Track Play Order/Preview Tracks:
(See CD Operation for details)
DVD

16
Load CD’s into Changer:
Insert the CD magazine into the external CD changer.
Power On/Off:
Press the button to turn the unit on.
Selecting the Play Source:
Press the MODE button until “CD-CH” appears in
the display.
CD Changer Operation (Option)
CD Track Selection:
Press the button to select a lower track.
Press the button to select a higher track.
The track number will appear in the display.
CD Disc Selection:
Press the 1button to select a lower disc in the
CD changer. Press the 2button to select a higher
disc in the CD changer. The disc number will
appear in the display.
Pausing a CD:
Press the button to pause the disc, press it
again to resume play.
DVD
Display Selection:
Press the DISP button to display the elapse time.
After 5 seconds the display will revert back to
track display.

17
CD Changer Operation (Option)
DVD
Repeating a CD Track or Disc:
Select the desired track to be repeated. Then pre s s
the R P T button and “RPT” will appear in the dis-
play. This track will play re p e a t e d l y.
P ress and hold the R P T button. “DRPT” will
appear in the display. The disc will now play
re p e a t e d l y.
To cancel either function, press the R P T b u t t o n
again.
Preview CD Tracks or Disc:
P ress the S C N button and “SCN” will appear in
the display. Each track on the current disc will
play for 10 seconds.
P ress and hold the S C N button and “DSCN” will
appear in the display. The first track on every
loaded disc will play for 10 seconds.
To cancel either function, press the S C N bu t t o n
again.
Random CD Track or Disc Play Order:
P ress the S H F button and “SHF” will appear in
the display. The tracks on the current disc will
play in random ord e r.
P ress and hold the S H F button and “DSHF” will
appear in the display. The tracks on every loaded
disc will play in random ord e r.
To cancel either function, press the S H F b u t t o n
again.

18
Sirius Satellite Radio Operation (Option)
Manual Tuning:
Press the or button until the desired
channel appears in the display.
Category Tuning:
1. Press the MENU button until “CATEGORY”
appears in the display.
Direct Tuning:
1. Press the MENU button until “Direct-T”
appears in the display.
2. Press the or button to select the first
number of the desired channel.
3. Press the button to choose the next
number. Press the or button to
select the second number of the desired
channel. Repeat this procedure for the third
number.
4. Press the ENT BND button and the channel
will start playing.
DVD

19
Sirius Satellite Radio Operation (Option) (Continued)
Switching the Display:
Press the DISP button to cycle through the fol-
lowing display modes.
SONG TITLE _
> ARTIST _
> CATEGORY _
> SONG
TITLE…
2. Press the 1or 2button to select the
desired category.
4. Press the ENT BND button and the channel
will start playing.
Memorizing a Preset Channel:
1. Press the ENT BND button to select either the
SIR1, SIR2 or SIR3 Sirius band. Each band
can memorize 6 channels for a total of 18
channels that can be memorized.
2. Tune in the desired Sirius channel.
3. To store the channel press and hold anyone of
the six channel recall buttons until you hear a
beep.
Recalling Memorizing Sirius Channel:
1. Press the ENT BND button to select either the
SIR1, SIR2 or SIR3 band.
2. Press and release the Sirius channel recall
button 1,2,3,4,5, or 6to select the memo-
rized channel.
3. Press the or button to select the
desired channel inside the category.
DVD

20
IPOD Operation
General Operations:
1. Connect an IPOD to the cable attached to the
radio.
2. The unit will automatically switch to the IPOD
mode and start playing.
Note: The IPOD controls will become inoperable
and the WRC-P will now control the IPOD.
1. Menu Button: Same operation as the MENU
button on an IPOD.
2. Next and Previous Button: Press these but-
tons to scroll through the menu items, same
operation as the IPOD’s Click Wheel.
3. Play/Pause Button: Same operation as the
button on an IPOD.
4. ENT BND Button: Same operation as the
Center Select button on an IPOD.
IPOD Button Location and Functions:
Browse for a Song:
1. Press the MENU button and appearing in the
display will be either “PLAYLIST, ARTIST,
ALBUM GENRE, SONG or COMPOSER”.
2. Press the or button to select the
“SONG” menu.
3. Press the ENT BND button to activate the
“SONG” menu.
DVD
4. Press the button to select the desired
song from the menu. Once the button has
been used to scrolled into the song list the
button can be used to scroll backwards.
Table of contents
Other MB QUART Marine Radio manuals