Mecanusa MBPmi-S1SB User manual
Bio-Pyramid-Mini / STYLUS 1s
MBPmi-S1SB – User’s Manual
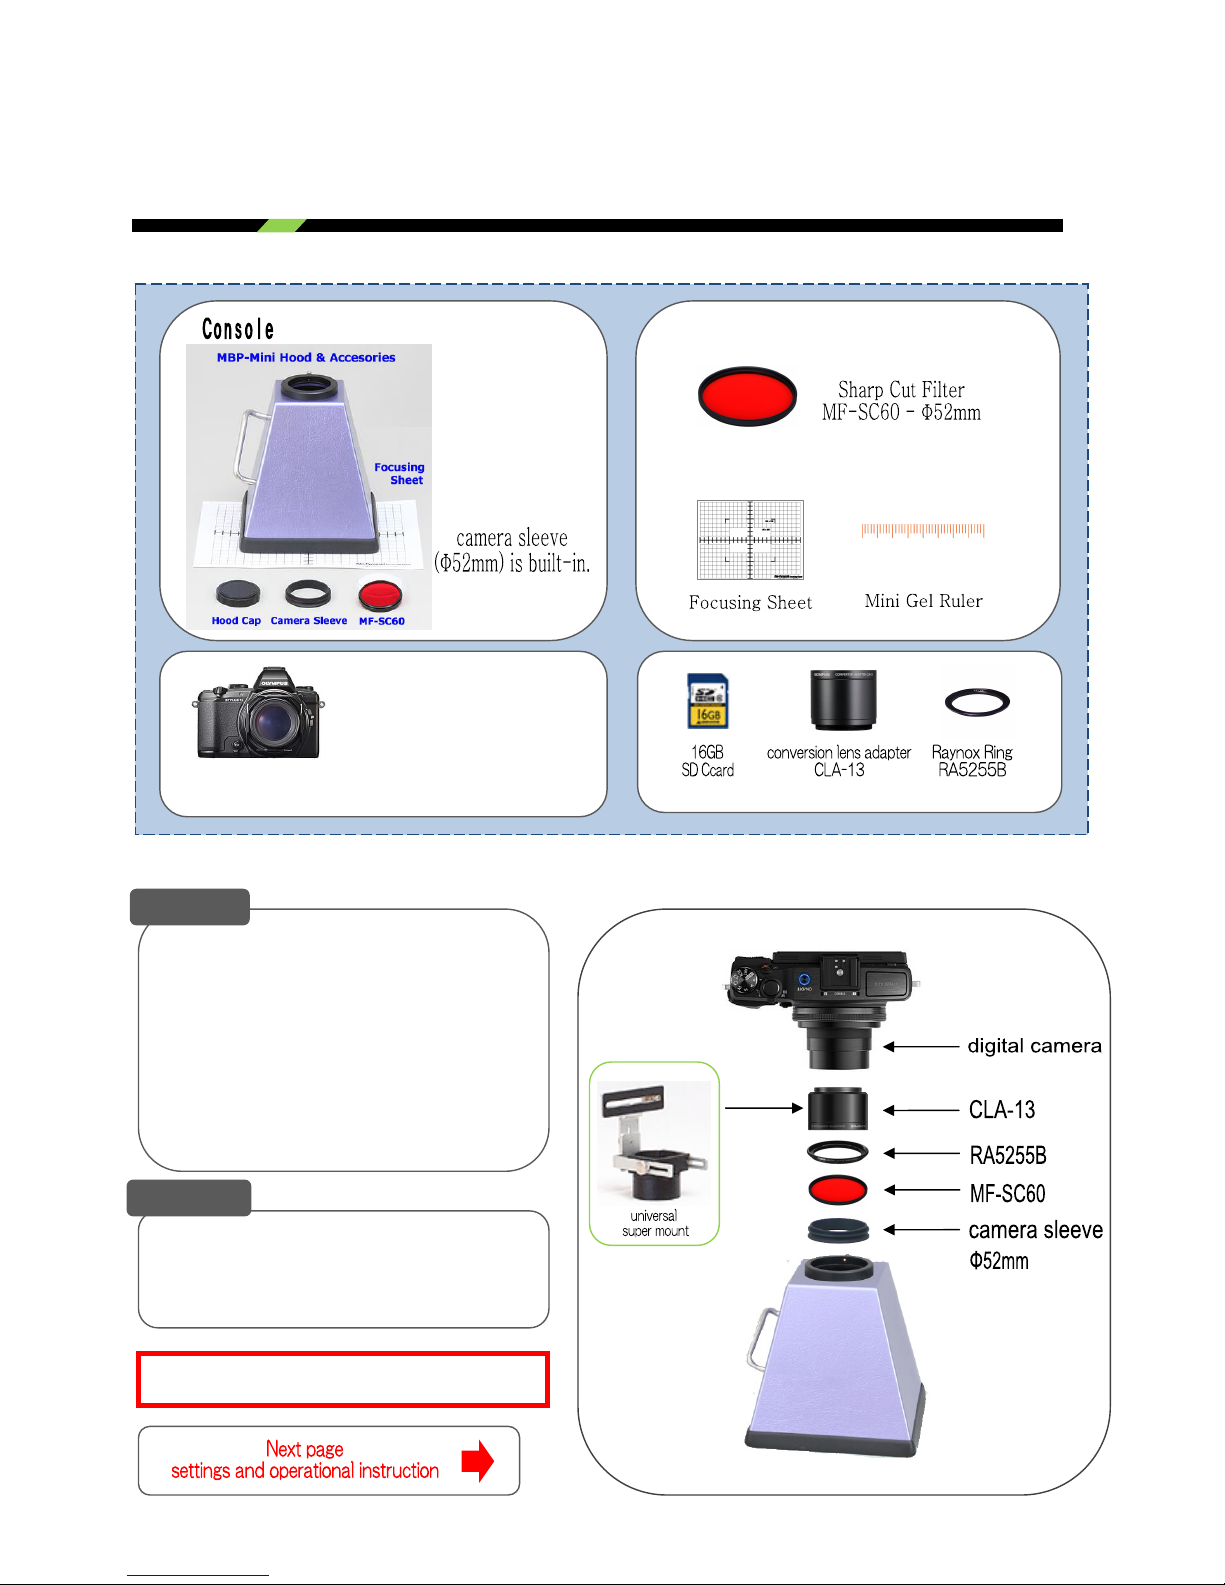
○ Standard Accessories
Pleaseinstallwithfollowingorder.
1.Removelenscapfromthecamerabody
1.AttachCLA‐13toStylus1slenspart
2.AttachRA5255BtoCLA‐13
3.AttachMF‐SC60AtoRA5255B
4.AttachΦ52mmsleevetoMF‐SC60
5.Attachallofabovetohoodbody
Whenreplacingglassfilter,pleaseuse
MF‐SC58A(soldseparately)
*Φ52mmfiltercanbeused.
Camera
Filter
1) Olympus STYLUS 1s
2) Lithium ion battery (BLS-50)
3) Lithium ion charger (BCS-5)
4) Lithium ion charger cable
5) USB Cable (CB-USB6)
6) Lens Cap
7) PC Software (CD-ROM)
8) Instruction Manual
9) Warranty
Pleasestartwithfullychargedbattery
○ CameraInstallation
○Instruction・・・ ★mark is important
⑤FlashOff
Keepstrobeinsidethecameraandflashwon’tgooff
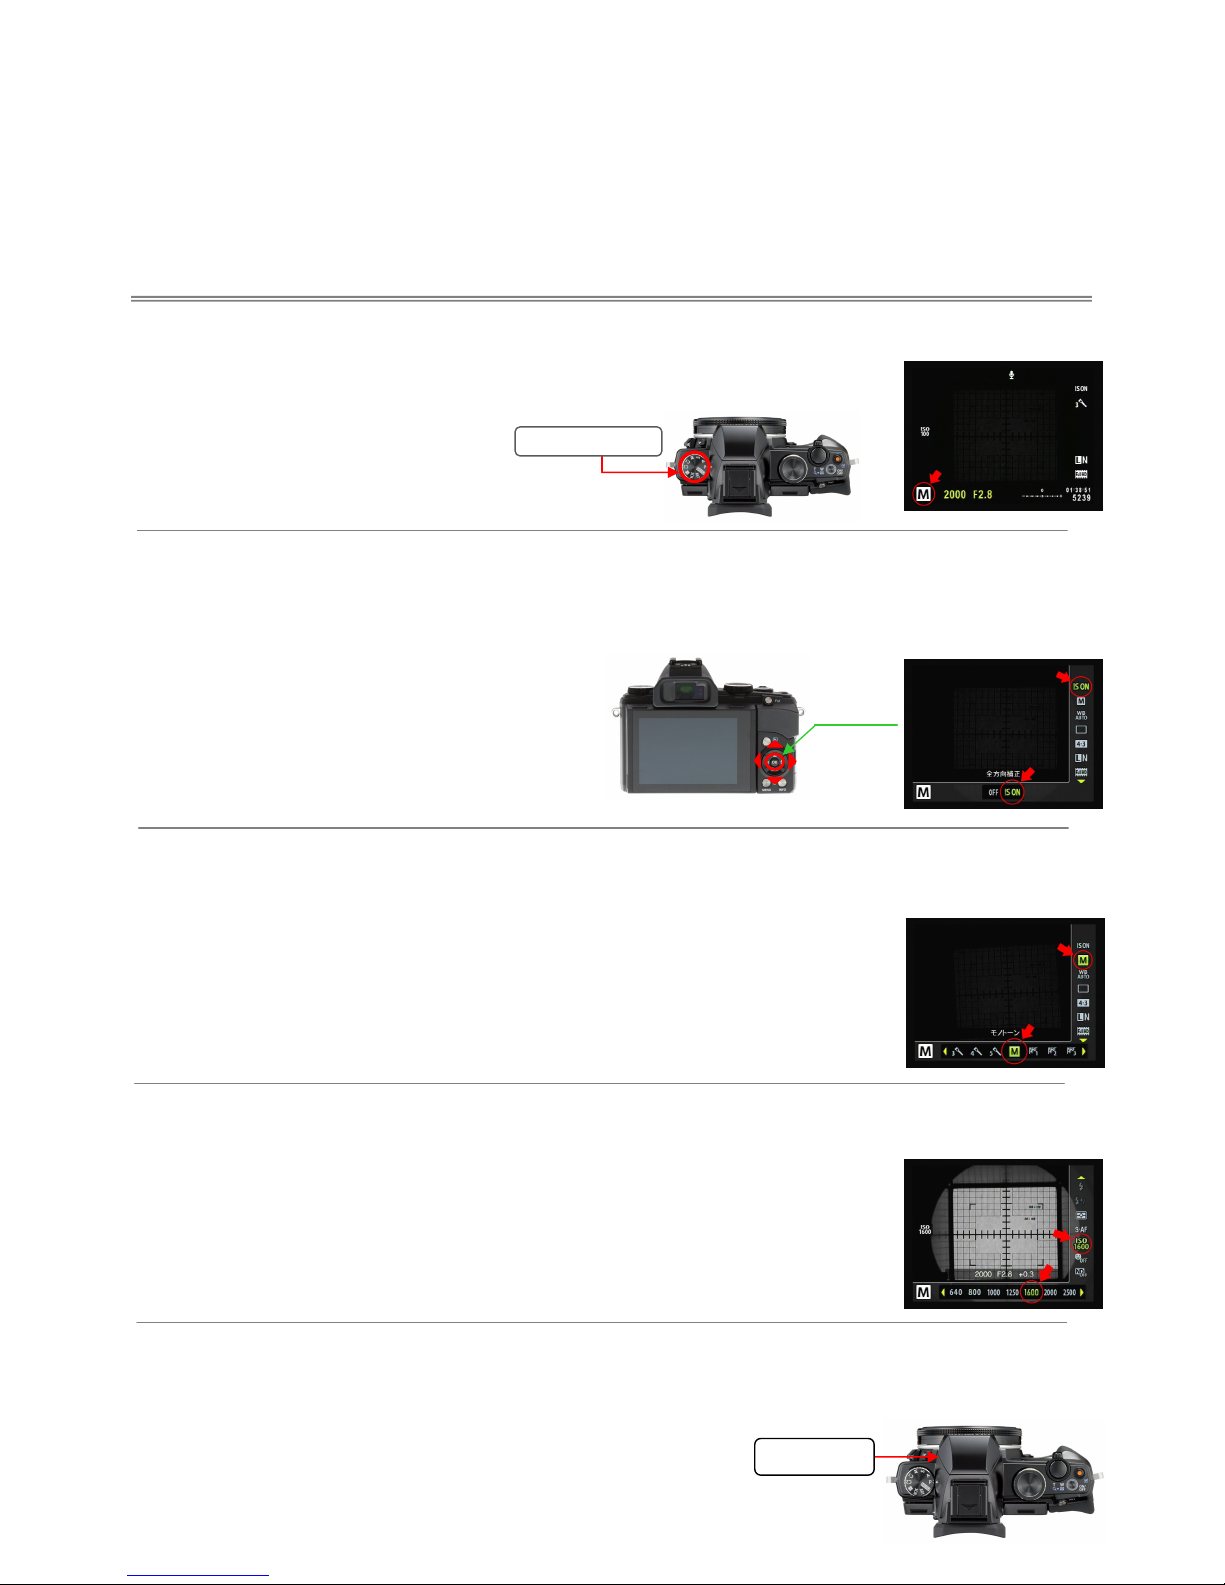
1. CameraSetting(1)(Thiscolorindicatecorrespondingpageincameramanual)
①SelectM(manual)modebyusingModeDial
**ManualP16
②ImageStabilizer
PressOKbuttonanddisplaylivecontrol.Selecttheimagestabilizeritemusing▲▼.
Selectan“ISON”with◄►andpressOKbutton.
**ManualP33
**PleasealsorefertoSTYLUS1SCameramanualforsettingupfollowings.
Geldocumentationtakesplaceinadarkroomenvironmentandsoisdifficulttocapturequality
imageswithfullautomaticmode.Therefore,pleasesetthecameratoM(manual)mode.
FollowingsaresettinginstructionforM(manual)mode.
③Monotone(blackandwhite)
PressOKbuttonanddisplaylivecontrol.Selectthepicturemodeitemusing▲▼.
Selectan“Monotone”with◄►andpressOKbutton.
**ManualP33
④ISOSensitivity★
PressOKbuttonanddisplaylivecontrol.SelecttheISOsensitivityitemusing▲▼.
Selectan“1600”with◄►andpressOKbutton.
**ManualP40
ModeDial
OK
Button
Strobe

2.CameraSetting(2)adjustingapertureandshutterspeed★
①Settingaperture
Press▲onsubdialanddisplay◄►markonscreen.Selectan“F8.0”Fvaluewithsubdial◄►.
**ManualP20
②Settingshutterspeed
Press▲onsubdialanddisplay▲▼mark.Selectanshutterspeed“2(1/2)sec”withsubdial
◄►.Theshutterspeedcanbesettominimum1/2 0 0 0 secwithmaximum16minutes[BULB].
**ManualP20
3.CameraSetting(3) **ManualP46
①LongExposureNoiseReduction
PressMENUbuttonandselecta“CustomMenu“withsubdial▼andpressOKbutton.
Selectan“Exp/Metering/ISO“withsubdial▼andpressOKbutton.
Selecta“NoiseReduct“withsubdial▼, and setitONandpressOKbutton.
**ManualP69,73
②HighISONoiseReduction
PressMENUbuttonandselecta“CustomMenu“withsubdial▼andpressOKbutton.
Selectan“Exp/Metering/ISO“withsubdial▼andpressOKbutton.
Selecta“NoiseFilter“withsubdial▼, and setitStandardandpressOKbutton.
**ManualP69,73
③SleepSetting
PressMENUbuttonandselecta“CustomMenu“withsubdial▼andpressOKbutton.
Selectan“Display“withsubdial▼andpressOKbutton.
Selecta“Sleep“withsubdial▼, and setitOFFandpressOKbutton.
**ManualP69,72
1)Press▲
2)Adjustwith◄►
Fn2lever
Fn2lever
Fast‐clockwise
Slow‐counterCW
ControlRing

④CustommodeSettings(Restoreabovepreselectedsettings)
PressMENUbuttonandselecta“ShootingMenu1“withsubdial►andpressOKbutton.
Selectan“Reset/CModeSetup“withsubdial▼andpressOKbutton.
Fromthemenu,selecta“CustomMode1“withsubdial▼, and pressOKbutton.
SettingsareregisteredtoModedial“C1“
**ManualP26
Pleasefullychargethebatterybeforestartshooting.
4.SettingUpTransilluminator
①PlacefocusingsheetontheTransilluminator.
②PlaceHoodonthe①
⇒PlaceHoodontheTransilluminatorafterinstallingcamera.
⇒placeHoodinawaythatitcoversentireemissionsurface.
③FocusingsheetwillbecomeluminousonceTransilluminatoristurnedon.
**imageisMBP‐UVCR
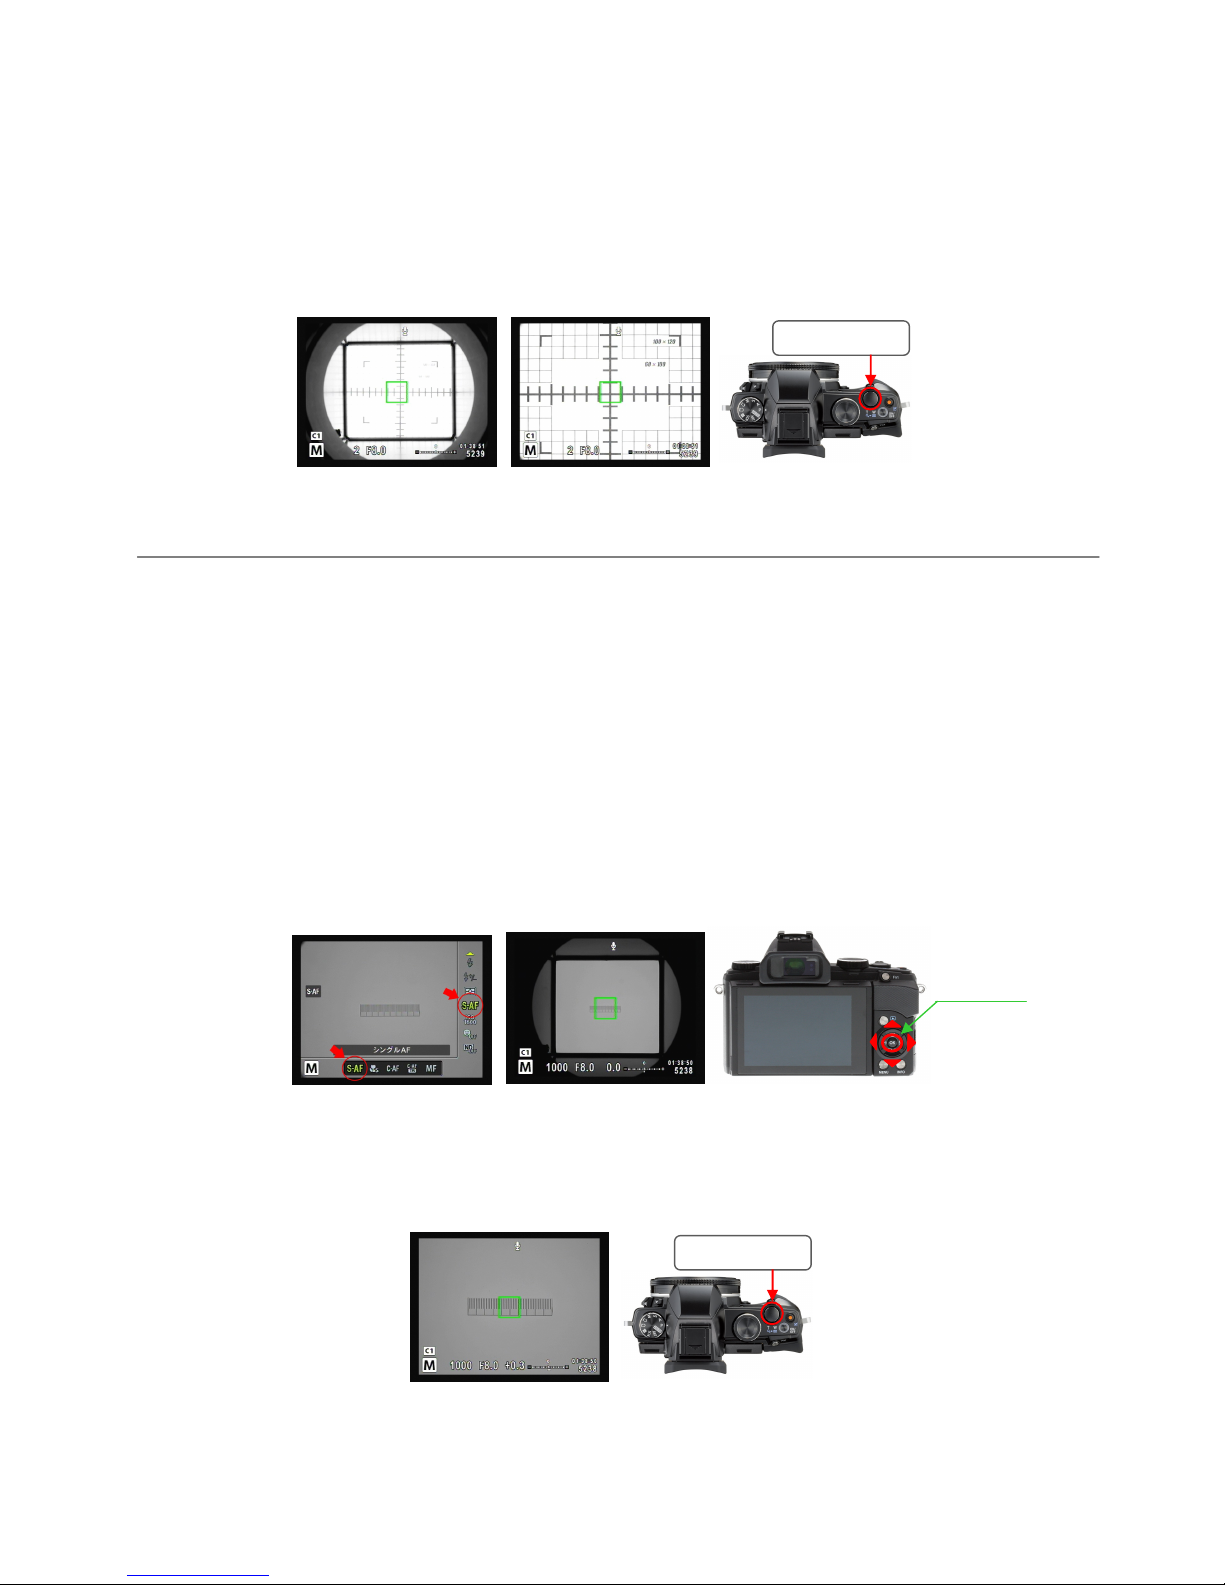
5.CameraFocusingandZoomingSetting★
①Focusing
⇒FocusLocksetting.
PressOKbuttonandsetfocusingwithsubdial▲▼.
Select“S‐AF“withsubdial►, and pressOKbutton.
**ManualP. 3 9
⇒Selectfocustarget
Presssubdial◄anddisplaytheAFtarget.
Withsubdial,selecttheAFtargettowhichyouwanttofocusonandpressOKbutton.
**ManualP30
Onceregistered,justset
modedialtoC1from
secondtime
OKButton
⇒Keepingtheshutterbuttonpressedhalfway,andmakesureAFtargetposition.
⇒AdjustzoomwithZoomLeverasitrequires.
Note:7.1x(shootingrange36.8x28.2mm)isMaxzoomingrangewhichcanbeinfocused.
:ItisconvenienttoregistertheAFtargetsettingtoC2onceitisfixed.
:Insteadofusingfocusingsheet,minigel‐rulercanalsobeused.
②FocusingwithminiGelRuler
⇒Positionminigelrulertoanareawhichdoesnotaffectelectrophoresisunitandletitfluorescence.
⇒FocusLocksetting.
PressOKbuttonandsetfocusingwithsubdial▲▼.
Select“S‐AF“withsubdial►, andpressOKbutton.
**ManualP. 3 9
⇒Keepingtheshutterbuttonpressedhalfway,andmaketAFtargettargetedtominigelruler.
ZoomLever
OKButton
⇒AdjustzoomwithZoomLeverasitrequires.
ZoomLever
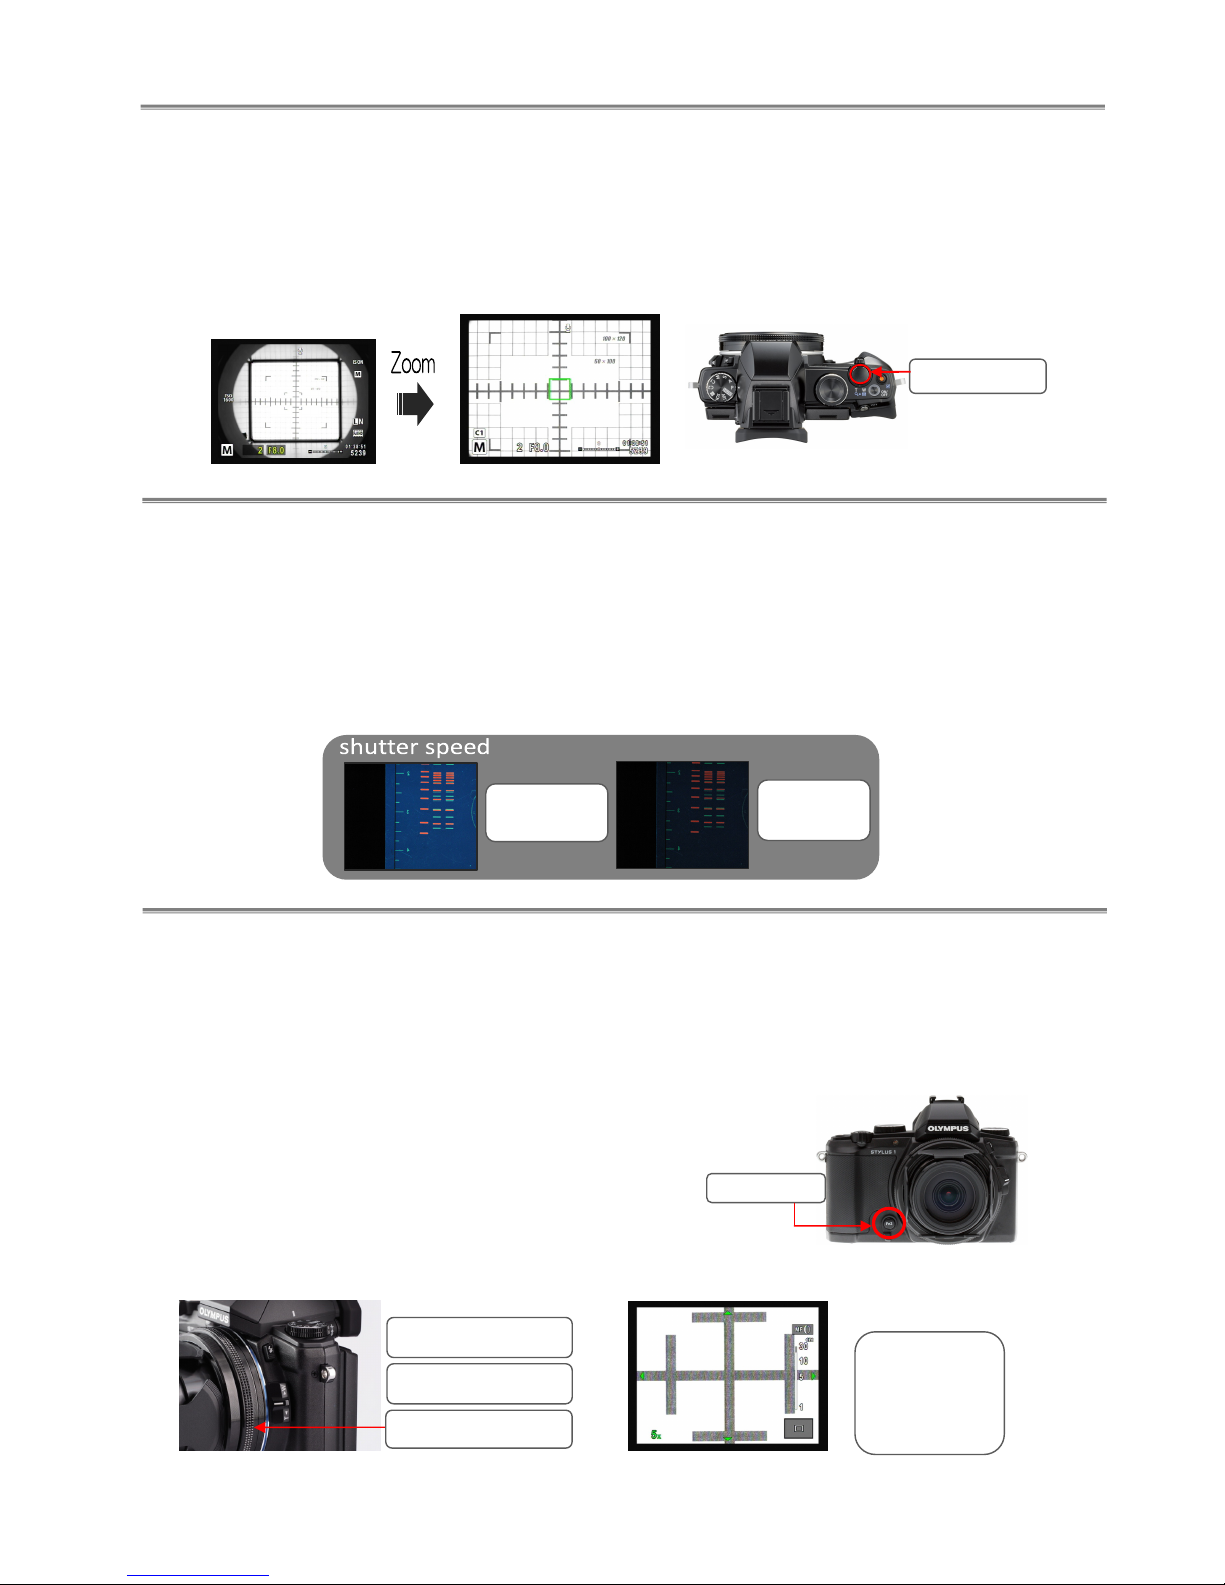
6.GelDocumentation
TurnontheCamera
⇒PlacethegelrightonthecenterandturnontheTransilluminator.
⇒Turningthezoomlevertotherightandadjusttoappropriateshootingrange.
**ManualP10
7.AdjustingBrightness★
Adjustingbrightnesswith“ShutterSpeed”
⇒Shutterspeedmeansexposuretime.Slowshutterspeedsletmoreamountsoflightreaches
theimagesensorandthusareusedtobrightenimages.Pleaseadjustaccordingly.
(Tip:startwithroughestimatesandnarrowatargetdownforpreciseadjustment)
**
Manual P
20
Longer
Brighter
Shorter
Darker
8.ManualFocus
WhenitisdifficulttofocuswithAF(e.g.gelistoothick,orunabletousefocusingsheet),
usemanualfocusinstead.
①PullupFn2leverwhichisequippedonthefrontsideofcamera.
②RotatetheControlRingandadjustfocusingposition.
**
Manual P
3
1
ZoomLever
Fn2lever
LCDviewwill
beswitchedto
focusingarea
whenfocusing
Fast‐clockwise
Slow‐counterCW
ControlRing

9.TransferPicturedatatoPC.
Youcantransferimagestoacomputerbyconnectingthecameratothecomputerwith
providedUSBcableandsoftware(CD‐ROM).,
**ManualP86
11.SavingImage/Viewing/Erasing/Printing
①CapturedimageswillbesaveinSDcard **ManualP100
②Toseecapturedimages,pleaseselectpicturefrom[playbackmode]**ManualP11
③Tofindimagesfromthelist(Indexdisplay) **ManualP11
④Toenlargeimages(Close‐upplayback) **ManualP12
⑤ErasingImages **ManualP12
⑥Printin
g
Ima
g
es **ManualP82
Othersettings…PleasereferStylus1sInstructionmanualfordetail.
Theguideisoneofthestandardsettingsfordocumentationandforreferencepurposeonly.
Pleaseadjustdetailsinaccordancewithyourparticularobservingenvironment.
WhiteBalance–Whenyoushootwithcolor,pleaseadjustwhitebalanceinaccordancewithcolortoneof
lightsource.Youwillbeabletocaptureimagewithoutanycolorbias. **ManualP34
ImageSize–Settingimage(pixel)size.Smallerdata(pixel)sizeiseasytohandle.
Largedata(pixel)sizeispreferableforprintingandenlarging. **ManualP37
Date–Abletoverifycaptureddate. **ManualP8,92
10.ZoomingMagnificationandShootingRange
Upto7.1x(shootingrange36.8x28.2mm)isMaxzoomingrangewhichcanbeinfocused.
FormoreZoomingpower,pleaseusecloseuplensCU‐3(optionalitem)
Bio‐PyramidMini:Specification
◆Maximumshootingarea167×147mm (=interiordimension)
*Mayvary,dependsonthecamera.
◆Shootingrange
Includeφ52mmsleeve
Withsupermount
203mm
235mm
★Pleaseselectthecamerathatcanbefocusedto
shootingareawithintheseranges.
◆Filter|SharpCutfilterUseφ52mmfilter
◆ SizeW187×D167mm(=HoodExternalDimensions)
xH203mm(includecameramountingpart)
◆WeightBody/Super‐mount500g/184g
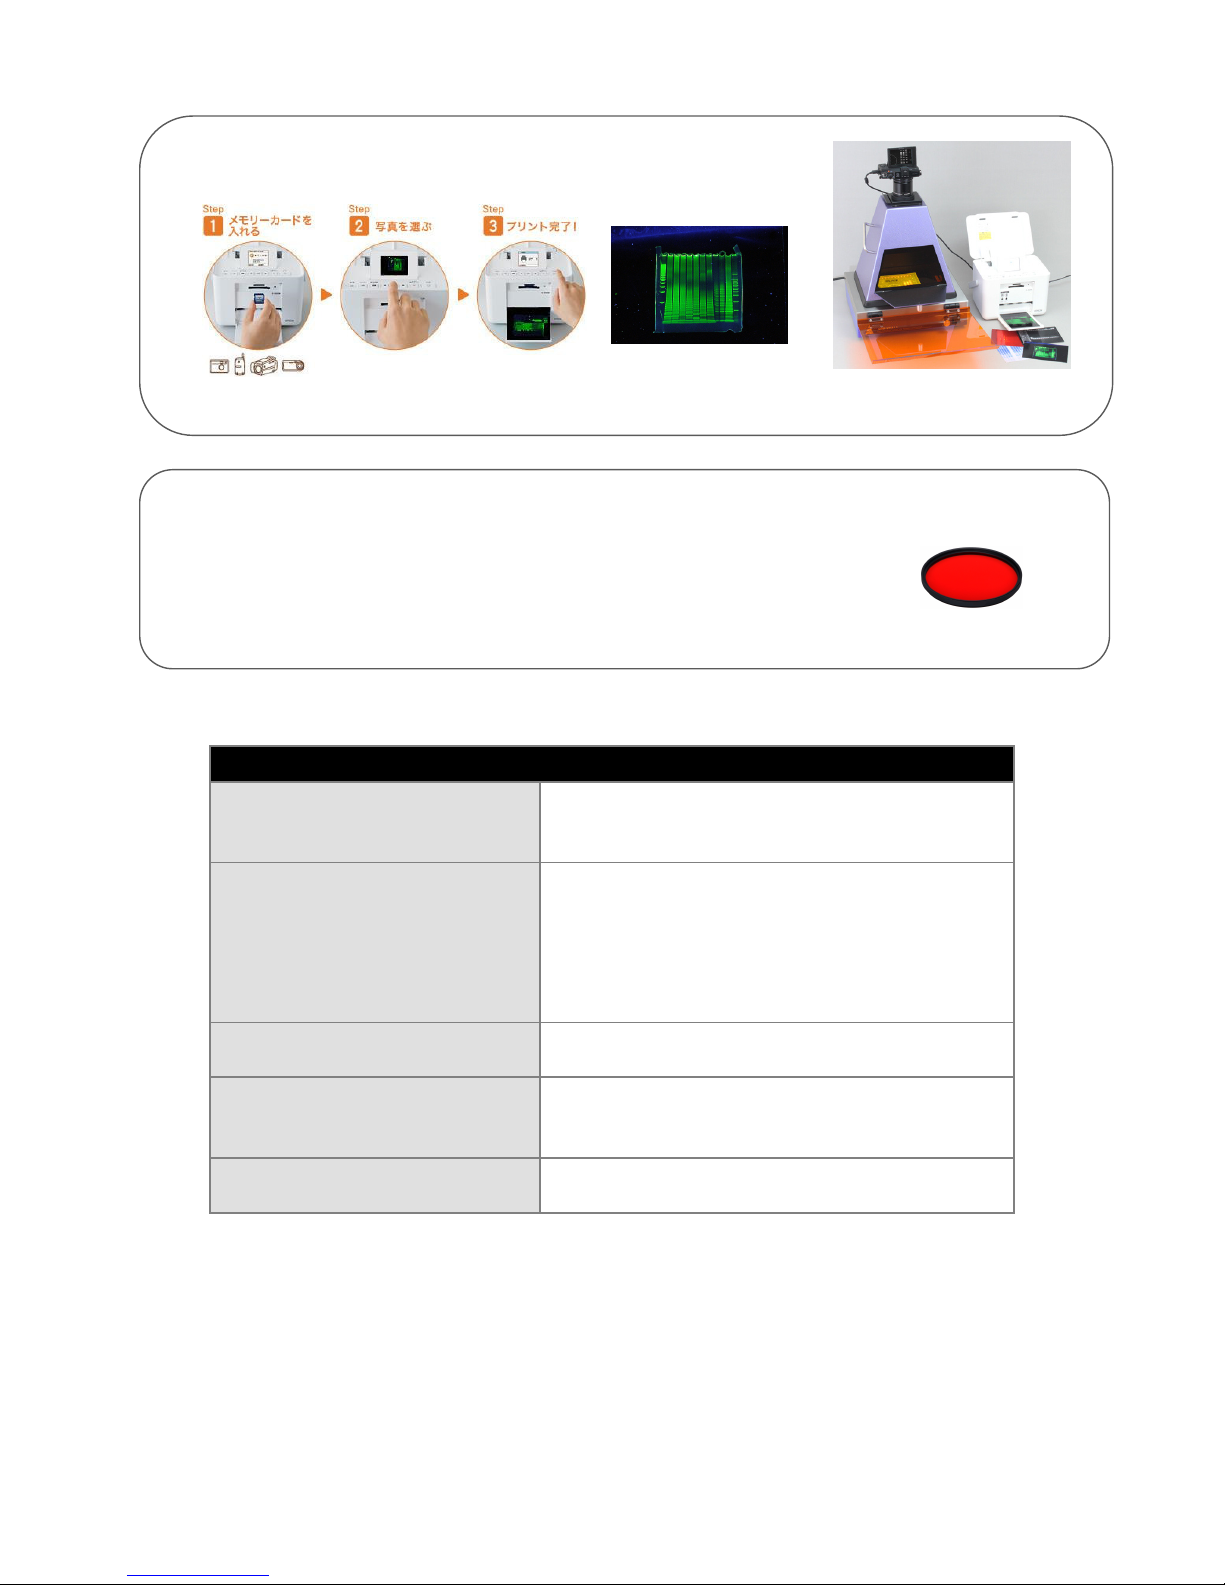
PhotoPrinter*soldseparately‐EpsonPictureMatePM225etc.
Abletoprintimagesinjust3easysteps.**manualP82
*operationmayvarydependingonthemodel.Pleaserefertomanualofyourprintermodel
**ImageontherightisBP‐UVOR.
Filters:
Sharp‐cutfilterscutexcitationlightandtransmitonlyemissionlight.
MF‐SC60(RED)cutswavelengthbelow600nm.PleaseuseMF‐SC60for
EtBr,andpleaseuseMF‐SC56A(soldseparately)forsuchregentasSYBR
Green.
Table of contents
Popular Camera Accessories manuals by other brands


Trojan
Trojan GC2 48V quick start guide

Calumet
Calumet 7100 Series CK7114 operating instructions

Ropox
Ropox 4Single Series User manual and installation instructions

Cambo
Cambo Wide DS Digital Series Main operating instructions

Samsung
Samsung SHG-120 Specification sheet

Ryobi
Ryobi BPL-1820 Owner's operating manual