mediplay mp4100A User manual

Follow the steps in this
guide to successfully install
your new media player.
(Windows 10)
4/29/21
PO BOX 949 • Murphy, NC 28906 • 800.565.1920 • www.mediplay.com
Media Player:
mp4100A

media player back panel
PO BOX 949 • Murphy, NC 28906 • 800.565.1920 • www.mediplay.com
2 32
1.1 Choose a location for your media player. It should be easy to access, yet out of
the reach of children. In most cases, the media player can be attached to the back
of the TV using the included Velcro.
TIP: We recommend connecting all cables before installing the media player.
This helps to confirm the cables will be able to reach the TV / power outlet.
1.2 Connect the provided HDMI cable from the HDMI port on the back of the
media player to an available HDMI port on your TV.
1.3 If using a wireless network connection (WiFi), skip to Step 1.4.
If using a wired network connection, connect an ethernet cable (included) from an
active ethernet jack on the wall, to the ethernet port on the media player.
Equipment provided
• Media player with power supply
• Ethernet cable
• HDMI cable
• Velcro strip
• (VESA compatible wall mount sold
separately)
What you need
• HDTV or monitor with HDMI input*
• USB Keyboard and USB Mouse
• Wired or wireless internet access
* Compatible resolutions:
1920x1080, 1366x768, 1360x768, 1280x768,
1280x720.
Welcome
We’re happy that you’ve chosen to join one of the fastest growing subscriber
networks in patient education and marketing. Our goal is to make the setup pro-
cess as simple as possible. That’s why we’ve created this handy guide to get your
Mediplay system up and running right out of the box.
3
1.4 Connect the media player’s power supply to an electrical outlet, turn on the TV,
and then select the correct HDMI input using your TV’s remote control.
1.5 Secure the media player using the provided Velcro. (A VESA wall mount is avail-
able for purchase.)
TIP: We recommend leaving the media player and TV powered on at all times
and connecting both to a quality surge protector or battery backup.
STEP 2: Configure
Connect USB Keyboard and USB Mouse (not included)
2.1 Connect a USB Keyboard and Mouse to any of the available USB ports.
Connect / Verify your Network Connection
2.2 If using a wired network, click “ “ in the bottom right tool bar. If connected,
the name of your network should be displayed, with “Connected” underneath.
2.3 If using a wireless network, click “ “ in the bottom right tool bar and select
your preferred wireless network from the list of available connections. Then, click
Connect. If prompted, enter the network password.
Select your Resolution
2.4 Right-click on the desktop and select Display Settings.
If using a 4K TV, change the Display Resolution setting to 1920x1080. Once done, or
if 1920x1080 was already selected, skip to Step 2.6. Otherwise, continue below.
2.5 Select the highest Mediplay approved resolution that is supported by your TV
(see list below). Once you have selected, make note of it on the back of this guide
and continue.
Mediplay Approved Screen Resolutions
Good Better BEST
1280x720 / 1280x768 1360x768 / 1366x768 1920x1080
TIP: If you receive a message that says “No Signal” or “Mode Not Supported”,
simply wait for the desktop to reappear, then try another resolution.
STEP 1: Connect
power
ethernet HDMI
PO BOX 949 • Murphy, NC 28906 • 800.565.1920 • www.mediplay.com
4
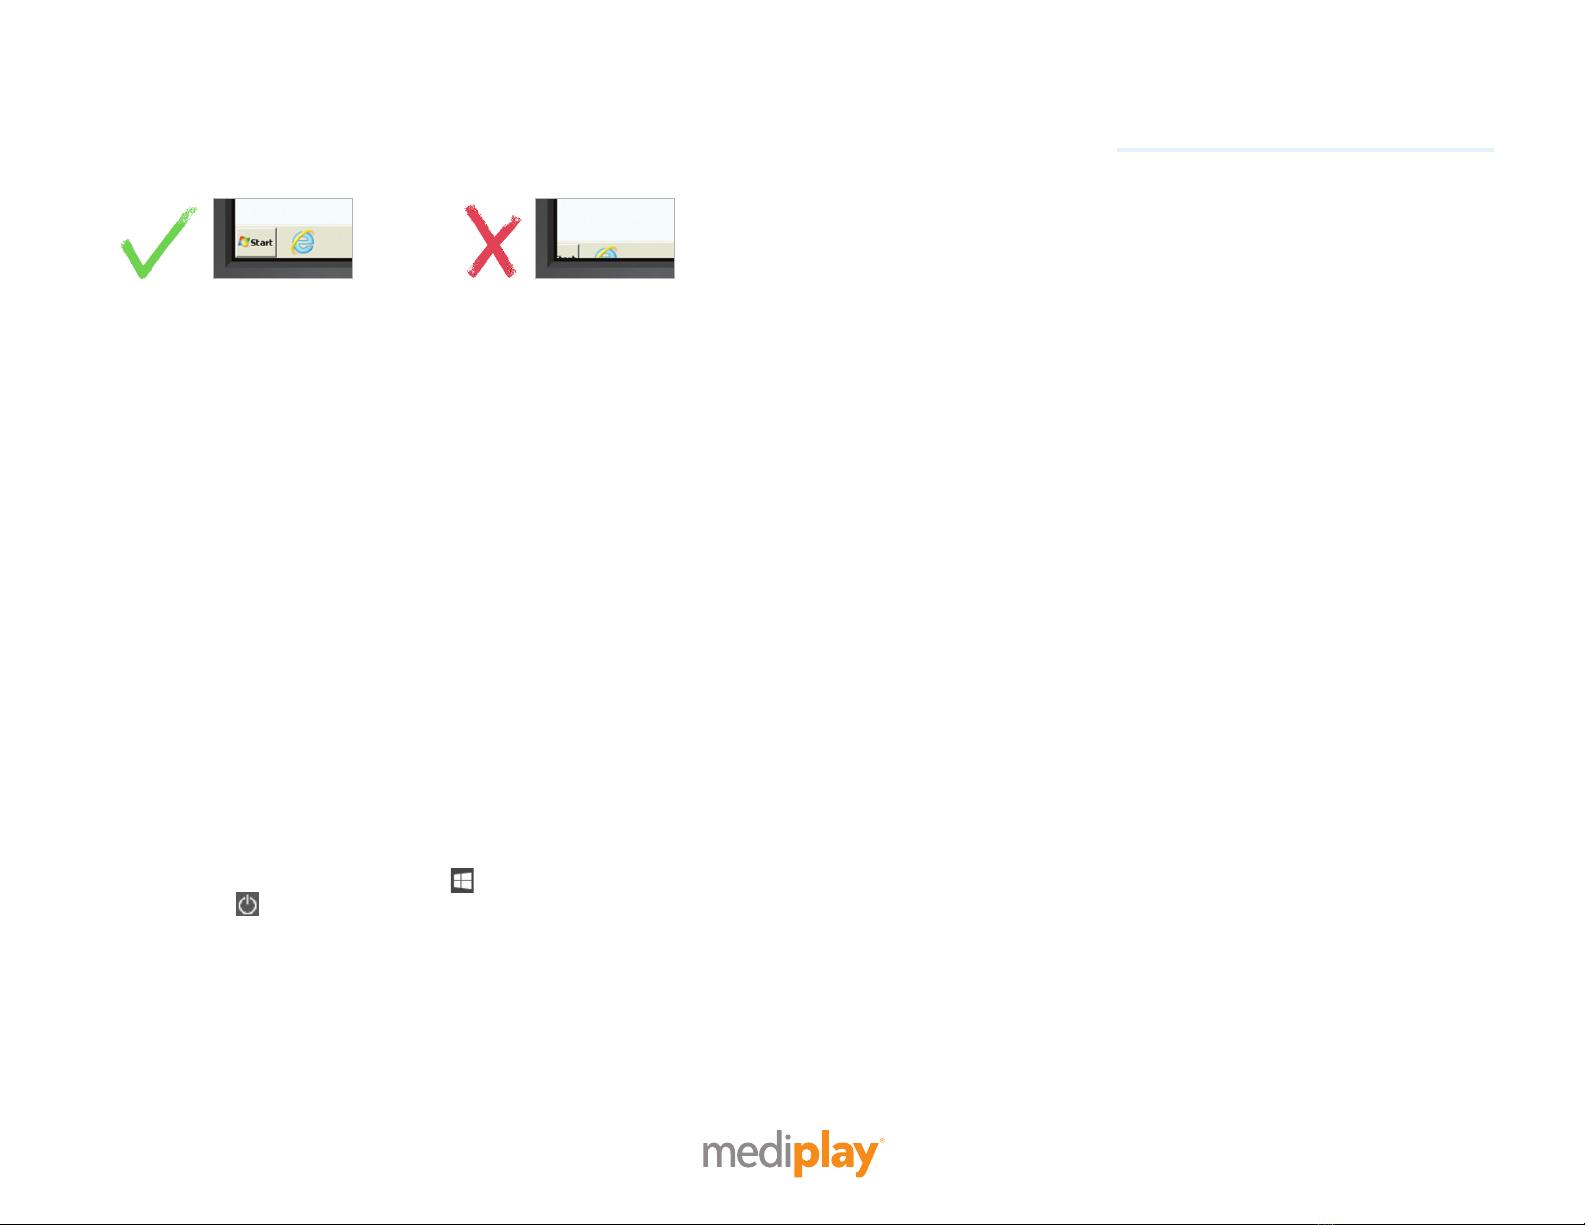
2.6 Verify the Start Button and Date are both visible.
If the Start Button and date are cuto, adjust the Picture Size setting within the TV’s
on-screen menu. The desired setting varies by brand (ex. Screen Fit, Fill, Natural).
If you are unable to correct the issue, test alternate Mediplay approved resolutions
until you find one that fits the screen properly. Need Help? Call 800.565.1920.
Running a Diagnostic Report
(This report is intended to verify that the media player is properly configured.)
2.7 Double-click the Launch Mediplay icon on the desktop.
2.8 Once the player window has launched full screen, press ESC. This will
minimize the player window.
2.9 In the top toolbar, click Help, then Diagnostic Report.
2.10 If all tests pass, close the Diagnostic Report window. Then, close the player
window, by clicking the “X”.
2.11 If one or more tests fail, see the description(s) at the bottom of the diagnostic
Completing the Installation
2.12 Double-click the Dedicate Mediplay icon on the desktop.
2.13 Once prompted, click OK.
2.14 Reboot the media player, by clicking the “ “ button in the bottom-left
corner, then click “ “, followed by Restart.
NOTE: If necessary, Windows Updates will run after clicking Restart. If you see “Get-
ting Windows Ready. Don’t turn o your computer” please leave the media player
powered on, allowing all updates to install. Once complete, the player will restart.
5
STEP 3: Customize
(The steps below are to be performed by the Primary or Admin User)
With the media player installed and connected to the network, the initial content
download has begun. The download time will vary depending on your network
bandwidth and the amount of content assigned. While that happens, let’s finalize
the setup and get your player ready for “prime-time”.
Welcome to Mediplay Connect
Mediplay Connect is your home base for the entire system. To finish setting your
media player, please log in to your account.
• Go to “app.mediplay.com” and enter your username and password
(username and password were emailed to the primary user at the time of shipment)
Name your Media Player (ex. Waiting Room, Lobby, Exam Room 2)
Administration > Players and Locations > click “Change Name”
Apply your Resolution (as determined during Step 2.4 and noted on back of guide)
Administration > Players and Locations > click “Change Resolution”
Select your Theme / Background
Administration > Players and Locations > click “Change Theme”
Set Operating Hours (set per location)
Administration > Players and Locations > click “Change Operating Hours”
Personalizing your Content
Whether your want to upload your logo, introduce a new physician, create a before
and after, or simply select from our library of medical content, the choice is yours!
For more information, including how-to videos, please visit our Support Wiki:
support.mediplay.com

PO BOX 949 • Murphy, NC 28906 • 800.565.1920 • www.mediplay.com
6 77
7. Content is not updating.
• If the media player has lost its network connection, it will not receive any updates until
the connection is restored. To identify an oine media player, look at the Weather Icon
and Ticker message. If both are missing, the media player is most likely oine. Please
verify the network connection.
• If the media player is properly connected, and the network settings have not changed,
reboot the media player. If issue persists, contact Mediplay Support.
8. Verifying or updating network settings.
• Connect a USB Keyboard and USB Mouse to the media player, and then press ESC. Once
the player window has been minimized, close the window by clicking the “X”. Click on
the Mediplay icon to access the desktop. Once all changes have been made, simply
reboot the media player.
Frequently Asked Questions
Q. How do I update my content?
A. Login to Mediplay Connect, by visiting: app.mediplay.com
Q. How often can I update my content?
A. You are free to update your content as often as you like.
Q. How quickly do changes take aect?
A. Ticker messages are updated every 30 seconds while all other content is updated
every 20 minutes. Download times may vary based on connection.
Q. Do I need to turn the media player on/o every day?
A. No, the media player is designed to be left on 24/7. Set the operating hours for
each location in Mediplay Connect (Administration > Players and Locations).
Q. Is there audio?
A. Although the medical topic videos and custom templates do not contain audio,
audio is present on most videos in the vendor, entertainment and PSA libraries.
Background music can also be applied for an additional $10/month and will play dur-
ing an content without audio. To preview and apply, go to Content > Music.
Q. Can we manage screens across multiple locations?
A. Yes, very easily. For more information, email: [email protected]
6
Troubleshooting Tips
1. Content not playing / TV is black
• Verify that your TV is powered on and set to the correct input / source.
• Verify that your media player is powered on, by looking for the blue power light. If the
power light is not illuminated, press the power button to power on.
• Verify that the video cable is properly connected to the TV and media player.
• Within Mediplay Connect, verify your location’s operating hours. Go to Administration
> Players and Locations, then click Operating Hours next to the corresponding location.
Content will not display outside of operating hours.
2. Content not fitting the TV correctly or displaying at a very low resolution
.
• Using your TV’s remote control, access the menu and adjust the Picture Size setting to
one of the following (if available):
16:9 / Screen to Fit / Fill / Natural / Just Scan
• Verify that your media player is set to the correct resolution, as established during instal-
lation and assigned in the Online Subscriber Portal.
3. Content is “frozen”
• Press the power button on the media player. If the player does not turn o after 15
seconds, please press and hold the power button until the media player turns o. Once
powered o, wait 10 seconds, then press the power button again to turn the media
player on.
4. Ticker and weather bug are not being displayed.
• In most cases, this means that your media player has lost its network connection. Verify
network connection (see “Running a Diagnostic Report” on pg.4).
• If the media player is properly connected and the network settings have not changed,
reboot media player.
5. Content errors during playback.
• If possible, attempt to identify the content file in question, as well as the area of the
6. Wrong date being displayed.

System Notes:
TV manufacturer / model #:
TV resolution:
TV input / source (ex. HDMI 1):
Name of media player:
Location of media player:
Date installed:
PO BOX 949 • Murphy, NC 28906 • 800.565.1920 • www.mediplay.com
Additional information can be found in our Support Wiki:
support.mediplay.com
For assistance, please contact Mediplay Support:
or scan the QR Code below
Table of contents


